Leaderboard


Popular Content
Showing content with the highest reputation on 04/21/11 in all areas
-
Seems almost like you're connected with the router of someone else and he's using the "upside-down-ternet" script for playing a prank on not registered MAC adresses... check this out, it's a fun idea imo Upside-Down-Ternet4 points
-
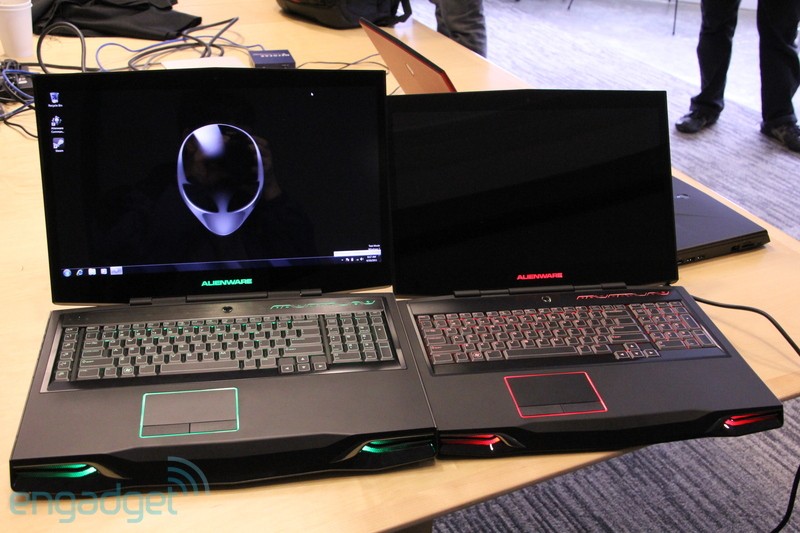
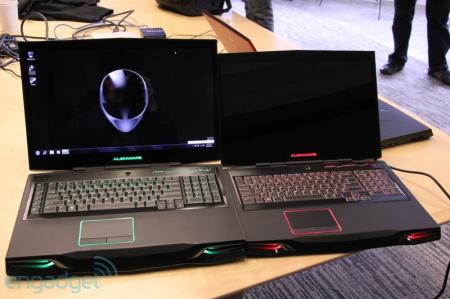
Holy hell that thing is big, I figured it would be big but not that much bigger than the R3. That's not even a laptop, can't be classified as a DTR, it's a hybrid all-in-one desktop lol. Kinda like the Ford Taurus X it's not a car it's not an suv or truck it's a cruck. I guess we can call the M18x a Desk-book lol.2 points
-
time to start moving furniture in here and get rid of the cobwebs . Is michael staying with his m17x-R3? seems like it. I have to say after seen this picture I leaned towards the m17x-R3 the m18x is to massive to carry around. On the other hand Brian is gonna be bragging about this for years to come, so be prepare.
 2 points
 -
I've decided that it's time to open my beast after i've noticed that one of my 4870's memory climbed above 93 degrees while playing Mass Effect. The idea behind photographing the process is to allow a better perspective than what the service manual gives. What was done? Cleaning the fins on both video cards heatsinks with compressed air Replacing thermal paste on both GPUs and the CPU to Shin Etsu G751 Replacing memory thermal pads on both GPUs from crappy stock ones to those Modding the retention clip as described here. All Credit goes to Ashtefere please rep him for that, he deserves it! Tools used small Phillips screwdriver - it matches all the screws inside your Alienware can of compressed air a small plastic prying tool that Dell once sent me, i used it to pry open the center control cover. Materials used Shin Etsu G751 thermal paste - i bought mine on eBay, but there are a lot of places that sell it. The reason i used it is because according to a lot of reviews this is one of the best performing pastes, only problem is that it's a pain to apply (there are guides for that too ) Thermal pads Step by step (More or less) Ok, here we go. Try to remember the sizes of the screws you are pulling out, and store them somewhere so they don't get lost (i use a vodka shot glass ) Removing the Center control cover i started with placing a towel on my working area to make sure i do not scratch the laptop while i work on it and removed the charger and battery. Unscrew two screws as shown to remove the compartment door. Unscrew the two screws located on both sides of CPU Fan, they are marked as M2.5XL17. Now turn the laptop around and open the screen as far as possible. using the pry tool, or a flat screwdriver, gently pry the control cover up. I found that in my case it's best to start from the right side. Be careful as there's a cable you need to disconnect before you pull it out. EDIT: For those of you who struggle a lot with taking the cover out, make sure you read this mod by Aikimox. Keyboard Unscrew the 5 little screws holding the keyboard and then gently pull it up. lift the keyboard up,disconnect those two cables and remove the it. Video cards. Since both video cards are going to get the same treatment, i'll describe just the master. We are going to pull it out, remove the heatsink, clean it and perform Ashtefere's retention clip mod Keep in mind that it will void your warranty! Remove the bracket. unscrew both screws that hold the video card. Disconnect the CF cable from the card, i used my nails to do it. Note that the location of the CF connector on the second card is under the heatsink and you'll need to remove the heatsink before disconnecting the CF cable there. Now pull the card up from it's outer side to remove it and expose the fan. blow compressed air to clean the heatsink and the fan. Unscrew the 4 screws that hold the heatsink down, following the numeration next to those screws. Now, after unscrewing those screws, the heatsink will probably be still attached to the video card pretty hard. Pry it up gently using the pry tool but make sure to do so where there's no electronic stuff under the tool. This is what you'll see. Next, clean the old thermal paste using alcohol pads, and remove the old thermal pads from the memory. Reapply thermal paste on the video card. I replaced the old thermal pads with with new ones, Ashtefere suggests applying a thick thermal paste on the memory (Shin Etsu would work since it's very thick).. Next, Ash's retention clip mod. I will not repeat him, he explained it beautifully in his guide. This is just to demonstrate how the screw looks like with the washer on it. Follow his guide to reassemble the heatsink on top of the card and return the card to it's place. (Don't forget the crossfire cable). Repeat with the slave card. CPU To access the heatsink of the CPU we will be removing the palmrest and the magnesium cover. With both video cards back in place and screwed in, turn the laptop, and unscrew three screws inside the battery compartment that are marked M2.5XL5 to release the palmrest. With the pry tool pry the palmrest down and then lift it up to remove the little cable that connects the touchpad. Ok, here i forgot to take a number of pictures so I will explain everything on this one. Basically what we're going to do is remove the magnesium cover. before we do that we will need to: disconnect LCD/Wifi/BT cables. They are marked with yellow. Next we will need to open the 10 screws that hold the cover down, those screws are marked with red and with a P letter on the cover itself. Disconnect the Crossfire cable from the master video card so you can pull it out. Finally, after the cover is removed, we'll unscrew those four screws that hold the heatsink down. They are marked with blue Clean the CPU and the heatsink from the old thermal paste with alcohol pads. Next i reapplied Shin Etsu G751 thermal paste on the CPU and replaced the thermal pad on the heatsink with a new one. That's it. Next, reversing the steps i reassembled the whole thing. I had a hard time putting the LCD cable back in place, took me maybe 3 tries before i got it right. Results Those are readings before and after, both after about 30 minutes of playing mass effect 2 so to me this comparison looks valid. Thanks to Ashtefere's mod,replacement of thermal paste and pads to better ones and cleaning the dust I can see about 5-7 degrees temperature drop on the CPU, and i have reason to believe that it'll keep dropping as Shin Etsu has about 3 days settle in time 11-19 degrees GPU temperature drop (!!!) 11-18 degrees GPU DISP/IO temps drop 19-24 degrees GPU /IO temps drop 15-20 degrees Shader temps drop 5 Minutes Furmark run No game warms the GPUs as furmark does, so after running it for 5 minutes and seeing the temperatures stabilize where they did i am very happy overall. EDIT: Additional Resources M17x Service Manual1 point
-
This is the CPU thread, and will become the thread for the CPU mod when me or someone else gets around to it. From the looks of things, its a single thick heatpipe with less fin surface area than the GPU's. This means it should not really perform all that well... The hardware heaven review seems to confirm this, with 83 degrees celcius for an entry level CPU (tj max is 99) so it doesnt have very much room at all. Factory overclocked 4ghz will probably throttle during prime/etc. So we will most probably need to mod that sucker to set it right. The only thing I can think of doing to help it is to salvage some more heatpipes from something else and solder them on for more heat transfer. -Ash1 point
-
Yesterday cousin, friends and I chilled to watch the lakers game with a couple pizzas, blunts and drinks. 420 day was nice and relaxing..how bout the rest of you? Inap??1 point
-
The laptop has a butt! What gives Asus.1 point
-
my lungs are still recovering from yesterday, hehehe just chilled out most of the day, ate a bunch of medicated brownies and special spaghetti, smoked a few blunts, took a bunch on bong hits spent most of the night smoking and playing poker. so all in all just like every other day. hahahahaha1 point
-
What the... with this forum.... first the speculation threads, then hot chicks thread, then coupon codes thread.... nothing locked.... I must be in heaven.1 point
-
Here's the link the OP is referring to: Farmers Value Program ~ Farmers® Get 21% OFF Dell Products April 14-28 To help kick off the Farmers Value Program located on our business site, Dell has offered to extend their employee discount Farmers! Call 1-800-695-8133 between April 14-28 and tell Dell you're with Farmers (ID#PS112919618) to receive 21% OFF all consumer desktops and notebooks. Please feel free to let your clients know about the Farmers Value Program which is located on the business section of Farmers.com. Terms & Conditions: ALL ORDERS ARE SUBJECT TO APPROVAL AND ACCEPTANCE BY DELL. Offers subject to change, not combinable with all other offers. Taxes, shipping, handling and other fees apply. Valid for the continental U.S. Dell Member Purchase Program new purchases only. Dell reserves right to cancel orders arising from pricing or other errors1 point
-
Hehe, that's funny, I just checked the page and it's normal but if it persists on yours you can always use a mirror to read it...1 point
-
Just to let you guys know, i am really glad i ordered the laptop in my sig. The agony of R3 vs Avenger is finally over for me and i am super happy with my decision. I hope that the nebula red looks good on the R3. Also, just ordered 8GB of 1600MHz Kingston HyperX RAM (KHX1600C9S3K2/8GX), seems like the best option for the R3. Anyone here tried it ?1 point
-
If you see the pic, there is some space between the CPU and the right GPU, if an extra fan could fit in there, possibly a smaller thinner one.... ( I am not sure about the depth though, I can't tell from that pic). Another thought, some soldering could add a few extra thin layers of copper on the right side of the heatsink in case a fan doesn't fit...1 point
-
HAHAHAHAH1 point