Search the Community
Showing results for tags 'y400'.
Found 9 results
-
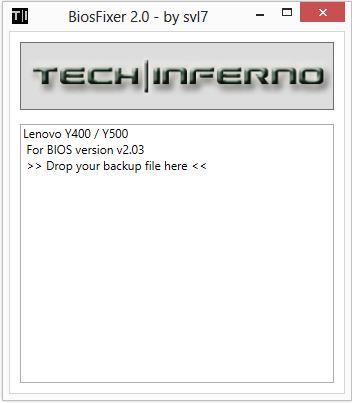
This is continuation of this thread (http://forum.techinferno.com/lenovo-ibm/2690-lenovo-y500-unlocked-bios.html) with all the necessary information in the first post in order to make it easier to find all the stuff. Lenovo Y400 / Y500 - 'unlocked' BIOS / wwan-wlan whitelist removal + modified VBIOS for higher overclocking The Lenovo Y500 comes with a pretty locked down BIOS, and in addition to this with a whitelist which prevents the user from getting 3rd-party wwan/wlan cards to work properly. The modified BIOS versions here will take care of this. Keep in mind that not necessarily all options available in the modified bios will work. Some might not do anything at all, others could possibly leave your system in a state which will prevent it from booting. Use care when changing stuff in the modified bios, don't touch things you're not familiar with. Use all the mods and software posted here on your own risk. Read the instructions carefully. NOTE: This will only flash the bios region. It won't reset the nvars set in the bios. *************** ONLY FLASH A MOD OF THE SAME VERSION AS YOUR CURRENT BIOS VERSION!!! If you're on 2.02 or 2.03 you can safely use the 2.04 update, *************** Attached you'll find modified versions of the Y400 / Y500 BIOS v1.03 and v1.05. Removed as they're outdated. Better updated to v2.02. The bios contains your Windows 8 license, therefore you can't just flash any file, else you'll have issue with your Windows activation. Furthermore the serial numbers, service tags etc. are stored there as well. You don't want to loose them. I wrote a little program that will take care of this issue and personalize the modified bios for you, so that you won't end up with an invalid Windows or no service tags. *************** Preparation to get to BIOS v2.02 (coming from any earlier version): Generally it's a good idea to keep the BIOS up to date. We're luck to have an official BIOS update to v2.02 apparently thanks to a leak on the net. (Lenovo is really bad when it comes to providing firmware updates and fixing issues). The leaked version must be genuine, else it wouldn't flash by using the regular method. If you want to update your system to v2.02 then grab the update here, extract it and flash the bios by executing the included InsydeFlash utility. Once the update is completed you can continue with the instructions below to get a modified version on your system. *************** Instructions for flashing a modified version: As a reminder - the modified BIOS needs to be the same version as you have on your system (2.02 to 2.04 is ok). Prepare an USB stick which can boot DOS. If you don't know how to do this, follow this short guide: Download the flash tool, for flashing you'll need the DOS version, but for creating the backup of your current BIOS the Win64 version will do as well, and it is faster. Get the prr tool as well. Grab the modified BIOS you want to flash, it comes as a tool which will patch the bios for you. Make sure you grab the version that corresponds with your BIOS version. Create a backup of your current BIOS using the flash tool you downloaded (first step) by runing the included backup.bat, or by using the Win or Dos version flash tool with this command: If the .bat doesn't work then open an administrator command prompt in your working directory and run the .bat per command line or type the command written above. In case you get an 'error 104' replace the parts file with the one that can be found in the 'error 104 fix' attachment at the end of the post. And if you still have issues after doing all of the steps above then please leave a reply in the thread and describe your problem. Open the downloaded tool and execute it. Drag and drop your BIOS backup file on it, it will create the mod for you. It will look like this: Put the modified BIOS, the prr.exe tool and the fpt.exe (along with the fparts.txt file) on the root of your prepared DOS bootable USB drive, restart your system and boot from that drive. Execute the prr.exe, if you don't get an error message continue by pressing enter. Then flash the bios by using this command (filename.bin obviously needs to be replaced with the name of the file you want to flash). If you can't remember the name of your file, use the command dir to display all the files on your drive. Flash with this: fpt.exe -f filename.bin -bios NOTE: The name of the BIOS file mustn't exceed eight characters (not counting the extension)! That's a DOS limit, so make sure the name of your file isn't too long. Wait until the process is done. After flashing it will verify the data, in case there's something wrong with the flashed data it will tell you. In that case don't reboot, just flash again. *************** Flashing the ultra bay 650m - only for SLI users with BIOS v2.02: The modified BIOS v2.02 also contains a vbios which will allow you to overclock your 650m past the 135MHz limit. As the ultra bay GPU has it's own vbios module you need to flash it separately. You'll need an USB drive which can boot DOS (just as the one you used for flashing the BIOS). *************** It might look a bit complicated at first, but that's the easiest way I could think of. Let me know if anything is unclear. >> Here's the 'buy me a beer' link in case you like this << Use at your own risk, you are responsible for your system and the changes you make on it. My programs come with absolutely no warranty to the extent permitted by applicable law. Grab file archive here:

- 2586 replies
-
- 243
-

-
I followed the youtube video Lenovo Y400 Y500 Full Disassembly - YouTube. However, the video was probably created with a prototype y500 because some of the layout of the laptop did not match mine. Most noticeably is that there are *three* screws holding the keyboard down not *two*, I almost ripped the keyboard trying to pull it off with one screw still in there. Also, a few of the ribbons are located in different places which I think is an improvement over the y500 in the video. Finally, the hardest part of the entire process was to remove the back cover because it is held on by plastic tabs facing in different directions so the best way is to wiggle it left and right while lifting and not lift directly up. That is just regular white thermal paste on the heatsinks. The OEM thermal paste resembled AS5 in color and thickness and I recommend that it be left alone if the temperatures are good. I have since replaced the cheap stuff I put on there with AS5 and still have not seen the temperatures I saw when it was stock (still 3-5C higher). Here is what I did to stop the twitchy touchpad (issue is well documented in the Lenovo support forum) and the random extra characters the keyboard would add while typing (less known issue).
- 191 replies
-
- 17
-
-
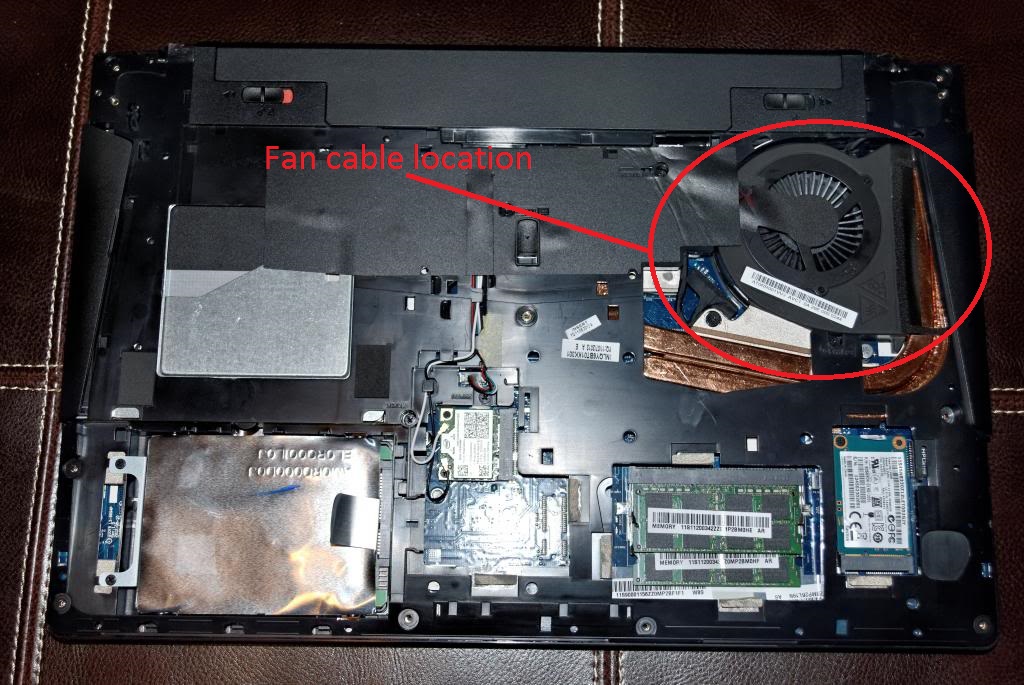
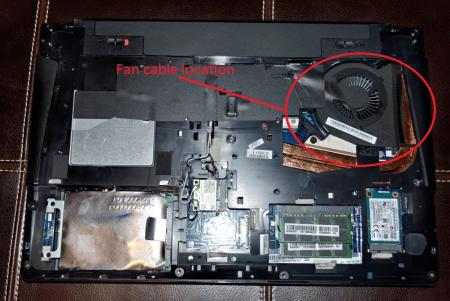
My Y400 ran into some trouble a while back and still isn't fixed but I won't tell what happened to it here as I will post it on a new thread. Simply put, I had to mod the laptop fan so that it would run at 100% speed no matter what. It made the fan run louder but made my temps considerably lower. This is a post to show you how I did the mod. 1. Open up the bottom cover of your Y400 or Y500 2. Locate the cables for the fan. 3. There should be four cables there. One red, one black, one yellow and one brown. 4. Cut the brown wire. The brown wire is for the motherboard to control the fan speed. Once you cut it your laptop fan will run as fast as the dust cleaning process lets it in lenovo's energy management tool. This is the fan's normal speed. It was made to run slower by lenovo to make less noise. I got the image above from this thread: http://forum.techinferno.com/lenovo-ibm/2773-y500-disassembled-pictures.html It shows roughly where the cables should be for the Y400 and Y500.
- 17 replies
-
- 1
-
-
- cooling mod
- fan
- (and 3 more)
-
I was wondering if theres any software that would be able to manually control the fan speeds on Y series notebooks speedfan and other software doesnt detect the fan. BIOS, no luck Is there any driversavailable to do this
-

Version 1.0.0
1340 downloads
Files contained in this archive: 'Error 104' Fix - v01.zip Lenovo Y500 - Y400 - BIOS [v2.02] - stock .zip Lenovo_Y500-Y400_-_Mod_[v2.04] (including update for 2.02 & 2.03 users).zip Lenovo-y500-y400-bios-[v2.02]-stock-.zip Y500 -Y400 - SLI 650m - 80.07.27.00.33 - OC.rom.zip Y500 - Y400 - SLI 750m - 80.07.9D.00.11 - OC.zip For instructions on how to use these files, see this thread: Donation Link: Here's the 'buy me a beer' link in case you like this << -
 Did a quick search and didn't notice anyone here using a solid state drive... So, I was wondering if anyone is. If so, share your experiencesǃ I'm using a Crucial M4 SSD which is 512 GB. The first thing I noticed was a great boot time. I can boot from off to my desktop in 35 seconds and all the background apps are loaded within the 40-45 second mark. Now, I'm sure there are faster...but this is the best experience I've had from anything I've ever owned personally before. I haven't tried shaking my computer to the point of disrupting the hard drive...nor do I plan to do it intentionally. However, I was running a transfer the other day and had to walk to the office with my computer running, lest I have to redo two previous hours of work and then wait again. No problems whatsoever. General speeds in running applications have been either faster compared to my last computer, although, I have no specific benchmarking comparisons there. But here are a couple things that I ran on the current Y400 with CrystalDiskMark and SiSoftware Sandra 2013 SP3. CrystalDiskMark (based on 5 tests) Read (MB/s) Sequentialː 518.1 Random 512KBː 438.6 Random 4KBː& 21.81 Random 4KB (QD 32)ː 198.8 Write (MB/s) Sequentialː 261.6 Random 512KBː 263.6 Random 4KBː 71.78 Random 4KB (QD 32)ː 212.3 SiSoftware Sandra 2013 SP3 File System Bandwidth Analysing... Aggregated Score : 430.823MB/s Result ID : Crucial M4-CT512M4SSD2 (512.1GB, SATA600, 2.5", SSD) Capacity : 512.11GB Finished Successfully : Yes File System I/O Analysing... Aggregated Score : 12330.4IOPS Result ID : Crucial M4-CT512M4SSD2 (512.1GB, SATA600, 2.5", SSD) Speed : 6000Mbps Capacity : 512110MB Finished Successfully : Yes Overall Score Aggregated Score : 7.07kPT Results Interpretation : Higher Scores mean Better Performance. Decimal Numeral System (base 10) : 1GPT = 1000MPT, 1MPT = 1000kPT, 1kPT = 1000PT, etc. Result ID : Lenovo 20192 IDEAPAD (Lenovo INVALID) (Intel Core i7-3630QM CPU @ 2.40GHz; Intel Core Mobile DRAM Controller; 2x 4GB Ramaxel RMT3160ED58E; Crucial M4-CT512M4SSD2; NVIDIA GeForce GT 650M) Finished Successfully : Yes
 -
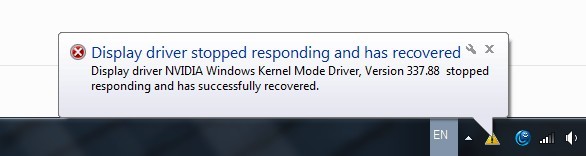
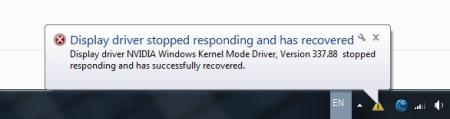
Does anyone here using lenovo y400/y500 kept getting "Display driver stopped responding and has recovered" error message often? The screen goes to black for 2-3sec and then recovered back. This is so irritating as I am trying to play games while it occur like once every few minutes, making the gaming experience bad.. Is this hardware faulty or is it my display driver is not stable and is there a setting in bios could help me fix it? I am currently using 337.88 on the display driver, tried newest drivers but the issue still occur so I decided to rollback to older version and still the issue is not gone yet. I am waiting for my 5th post to be approved and looking forward to unlock my bios with svl7's guide. If anyone have a solution please share with me I really needed a help. Specs: Intel Core 3rd Gen i7-3630QM RAM DDR3 8gb 100gb ssd+500gb hd(ultrabay) Nvidia GT 750m 2gb memory If needed any further information, just reply here to me Appreciate everyone's attentions and helps
-
I have a Y400, a 3D printer and a plan. I want to get a desktop GPU roughly compatible with the 650m -- GTX 650? -- and wire it up to my GPU-less Ultrabay. Having looked at the teardown pictures, it looks like something sort of kinda similar to a normal PCI port. Is this at all possible?
-
Hi all, I'm having big troubles booting from the mSATA when a hard drive is inserted in the 2.5" hard drive bay. I'm attempting to boot Ubuntu off the mSATA and GRUB (bootloader) won't even load; it just reaches a black screen and enters a high-power state. If I unplug the 2.5" drive and leave it out OR insert it in the CD/DVD with a caddy, it boots mSATA fine. Can anyone please confirm that booting mSATA works with 2.5" inserted? Could this possibly be a manufacturing error? BIOS?