Search the Community
Showing results for tags '660m'.
Found 10 results
-
Version 1.0.0
41 downloads
The 'Kepler' GPUs from Nvidia perform really well, even at increased clocks speeds they stay quite cool - a perfect behavior when it comes to overclocking and improving the performance. Unfortunately the mobile GPUs suffer from an artificial +135MHz core overclocking limit, so you can't go higher by using tools like Nvidia Inspector and similar. The modified VBIOS files listed here have this limit unlocked, some have increased stock clocks or tweaked voltages. Instructions: I recommend flashing under DOS using nvflash Donation link In case you want to buy me a beer Thanks and cheers! -
 G46VW Modded Bios Modded - Unlocked - Overclocked - Updated After a year of research and testing, I modded a bios for the G46VW. This enables many features that allows tweaking and capabilities unavailable before. Thank you to those who helped with the mods! Doink, Dreamonic, Klem, Fernando & SonicX Disclaimer: I take no responsibility for damage to your laptop. Speed/heat/and power can reach levels beyond specification which could cause long and short term damage. ---> Download: G46VW Mod BIOS v4 Beta <--- G46VW Bios210 Base: UNLOCKED Chipset menu and hidden options. Overclock CPU Boost Multipliers 37xxQM series and higher - Upto 4 multipliers K series - Unlimited Memory Frequency & Timings adjustable GTX660m VBIOS: Disable SECURE BOOT & FAST BOOT, then enable CSM. Overclock Limit - raised +405 Overvolt- Adjustable upto 1.20V (PrecisionX, Nvidia Inspector or MSI Afterburner (Must edit .cfg file to show) Updated: Atheros Ethernet: 2.0.2.6/2.1.1.1 ---> 2.0.6.6/2.1.1.5 Intel Raid/SATA: 11.6.0.1702 ---> 14.8.2.2397 Intel VBIOS: 2137 ---> 2171 Intel GOP IvyBridge: 3.0.1023 ---> 3.0.1030 Intel CPU Microcode IvyBridge: 15 ---> 1C SandyBridge: 28 ---> 29 Intel ME: 8.1.10.1286 ---> 8.1.65.1586 (Run METool.exe to update) Miscellaneous New Static Boot Splash Images BIOS defaults changed for performance and compatibility Win8/8.1/10 (Choose 'Restore Defaults' in BIOS) Fix for keyboard backlights not working. (Read 'Read Me' in fixmykb folder) Possible Future Updates: GTX660m VBIOS bug fix - battery profile voltage stuck at 3D profile. Change Animated Boot Logo Procedure: Turn off antivirus, windows update, running software. If system crashes during flash, it will be bricked. If flash is interrupted and you're still in windows, re-run flash. Download and extract to an empty folder BIOS Mod files. Run flash.bat (flash will start immediately and Mouse and keyboard will be disabled until done.) Shutdown, wait several seconds, then power on while holding F2 to enter the new BIOS. WARNING: The BIOS reset jumper does not work nor does the flashback feature. Only change settings you know its affect. If new setting prevents system start you will need an external programmer or solder a new programmed BIOS chip.
 -
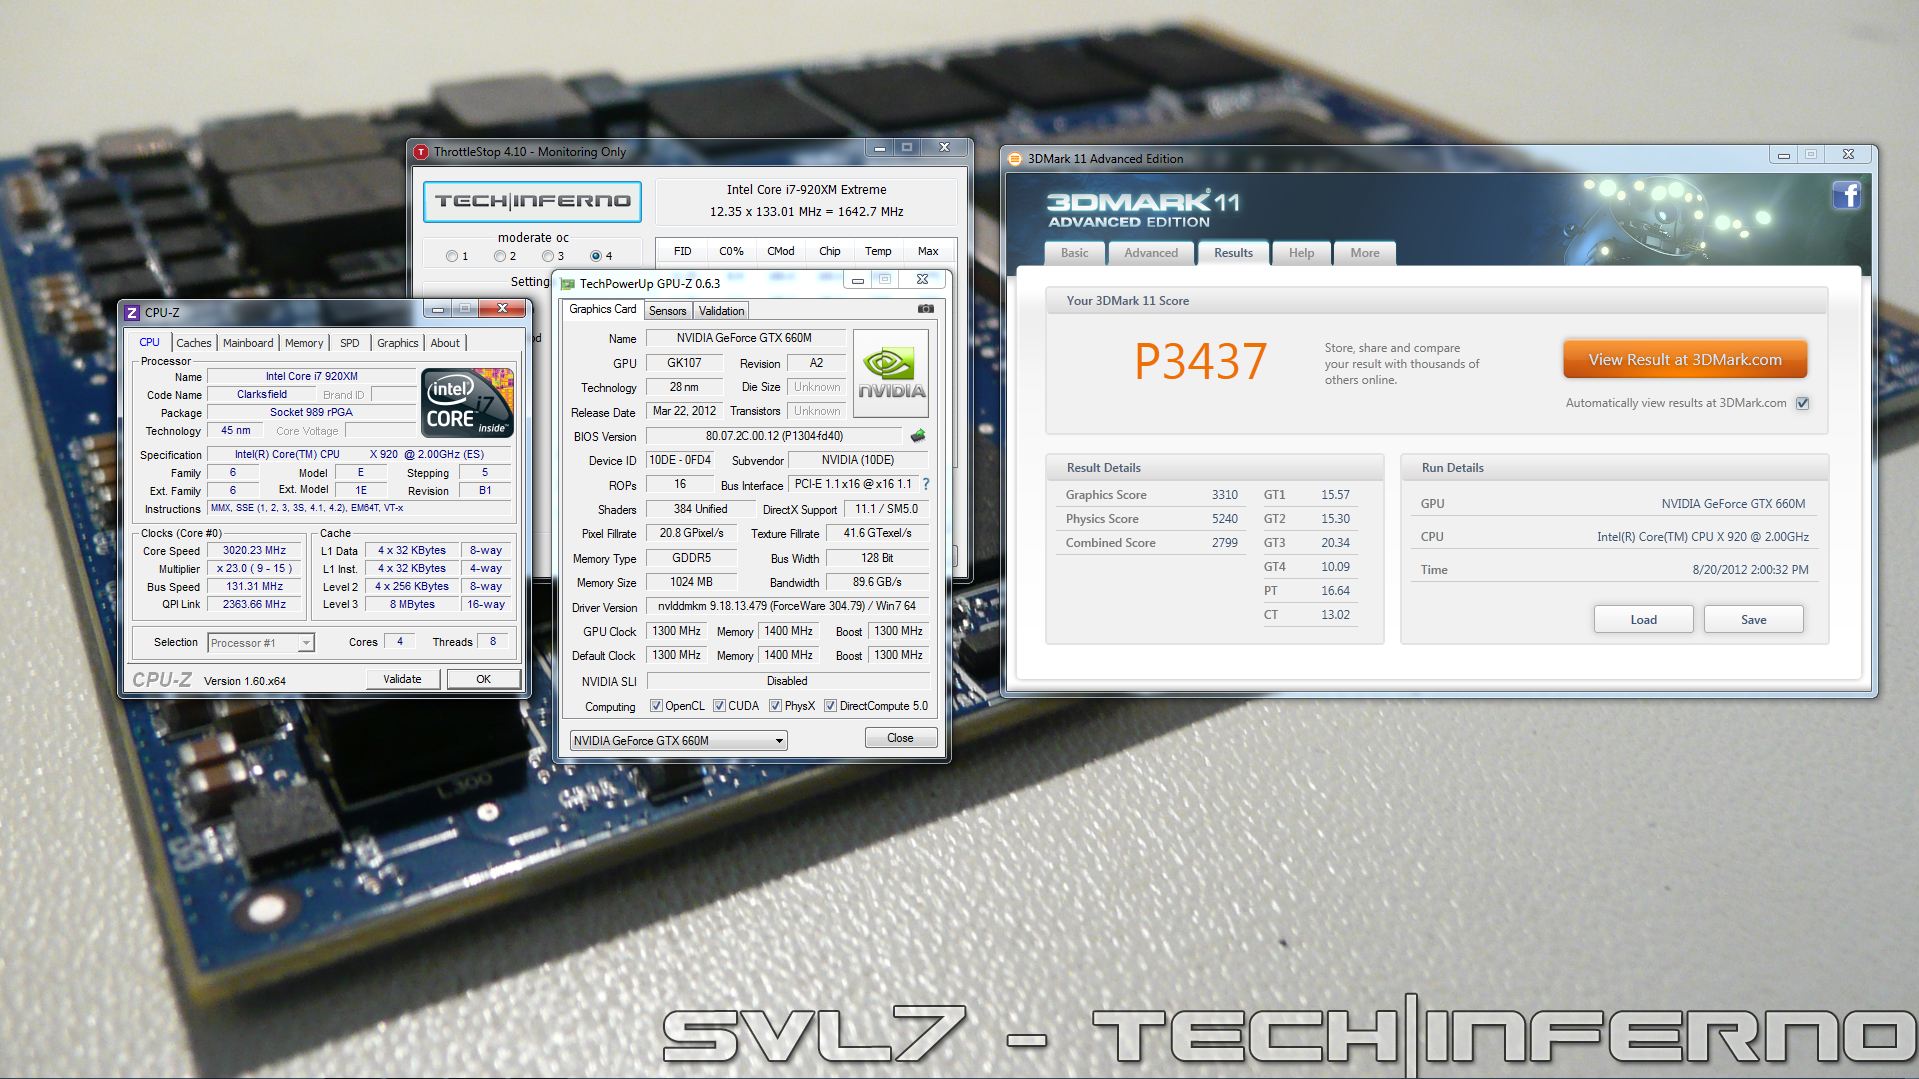
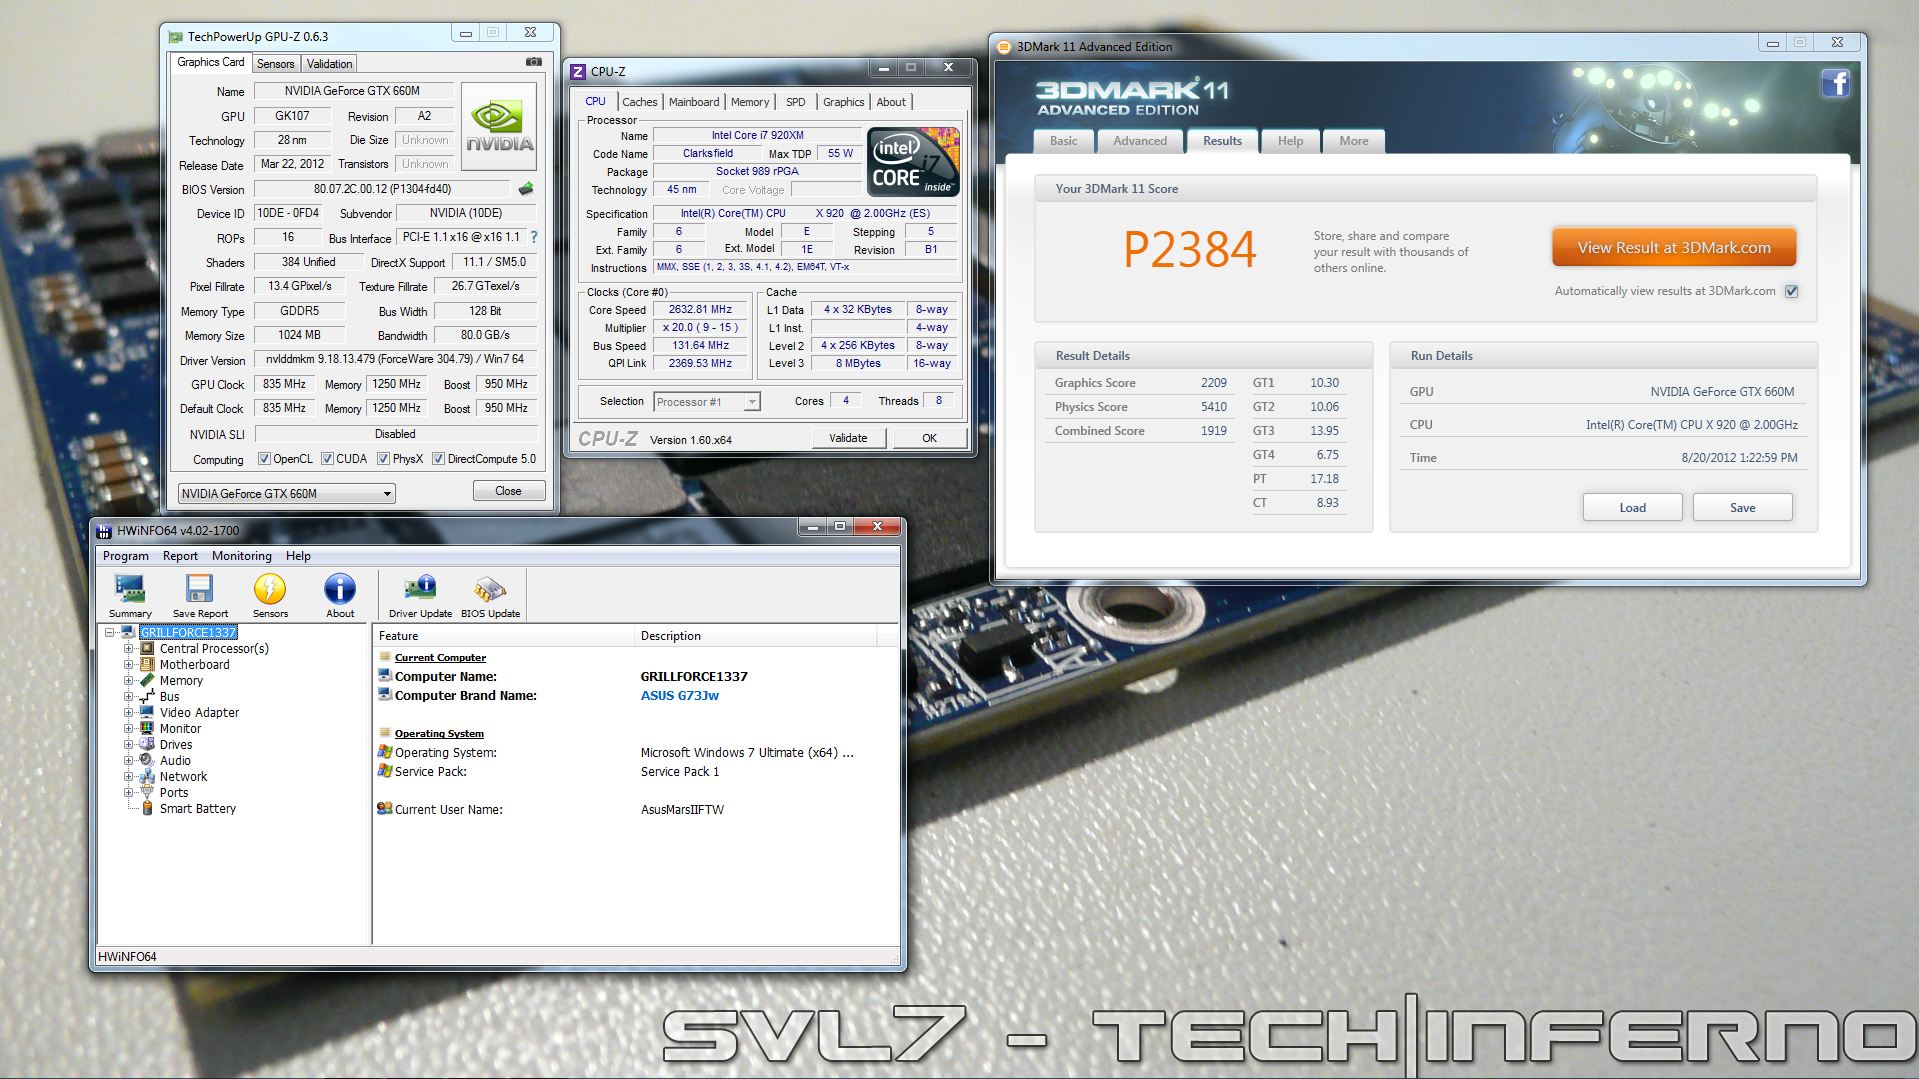
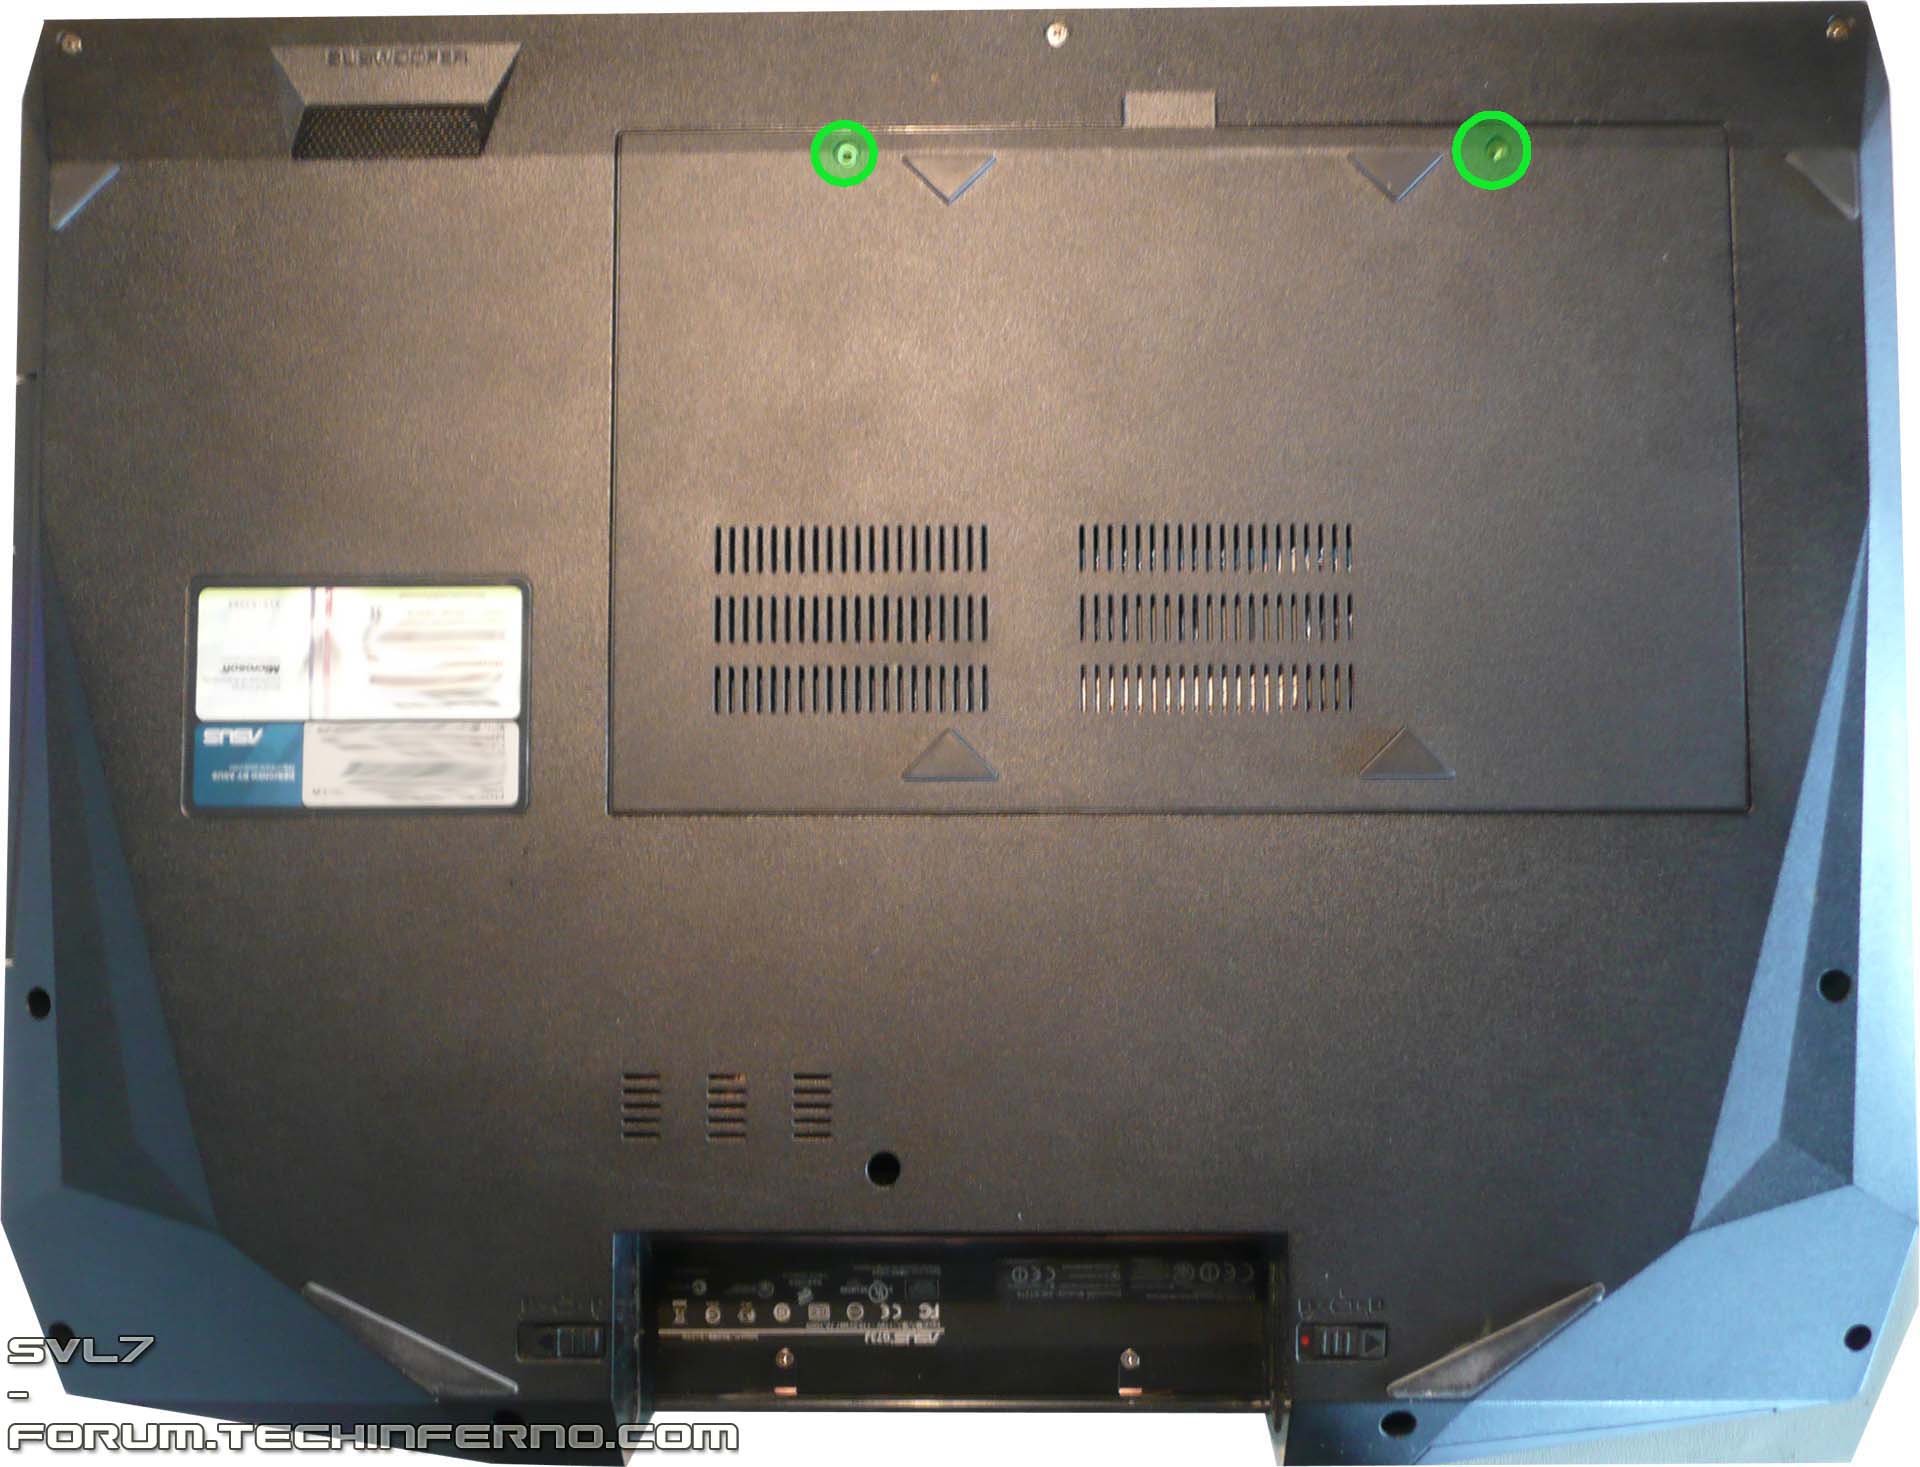
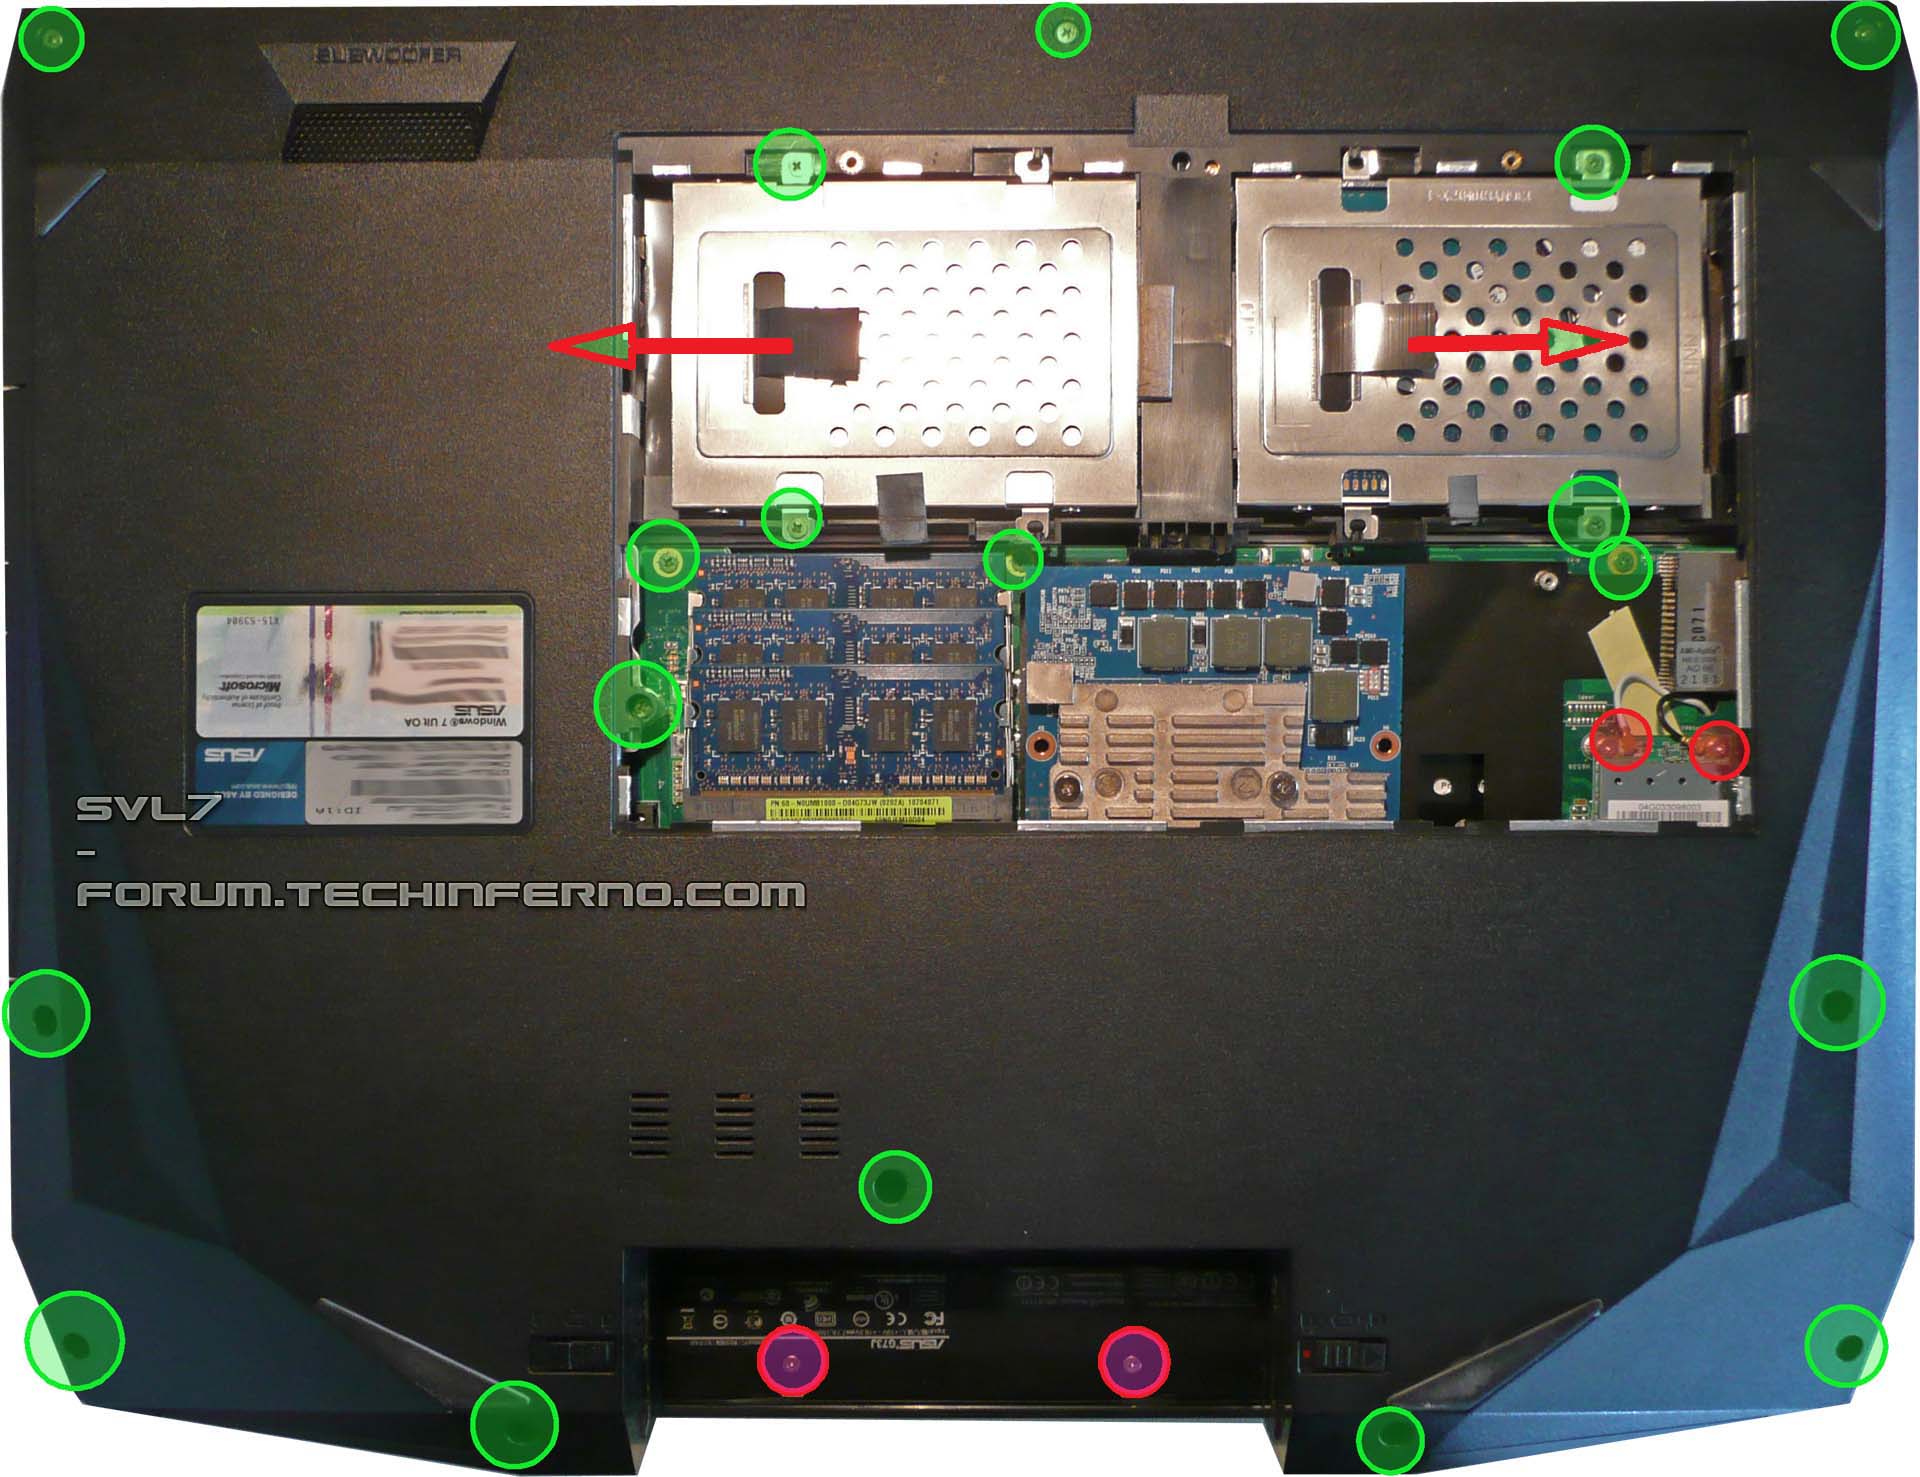
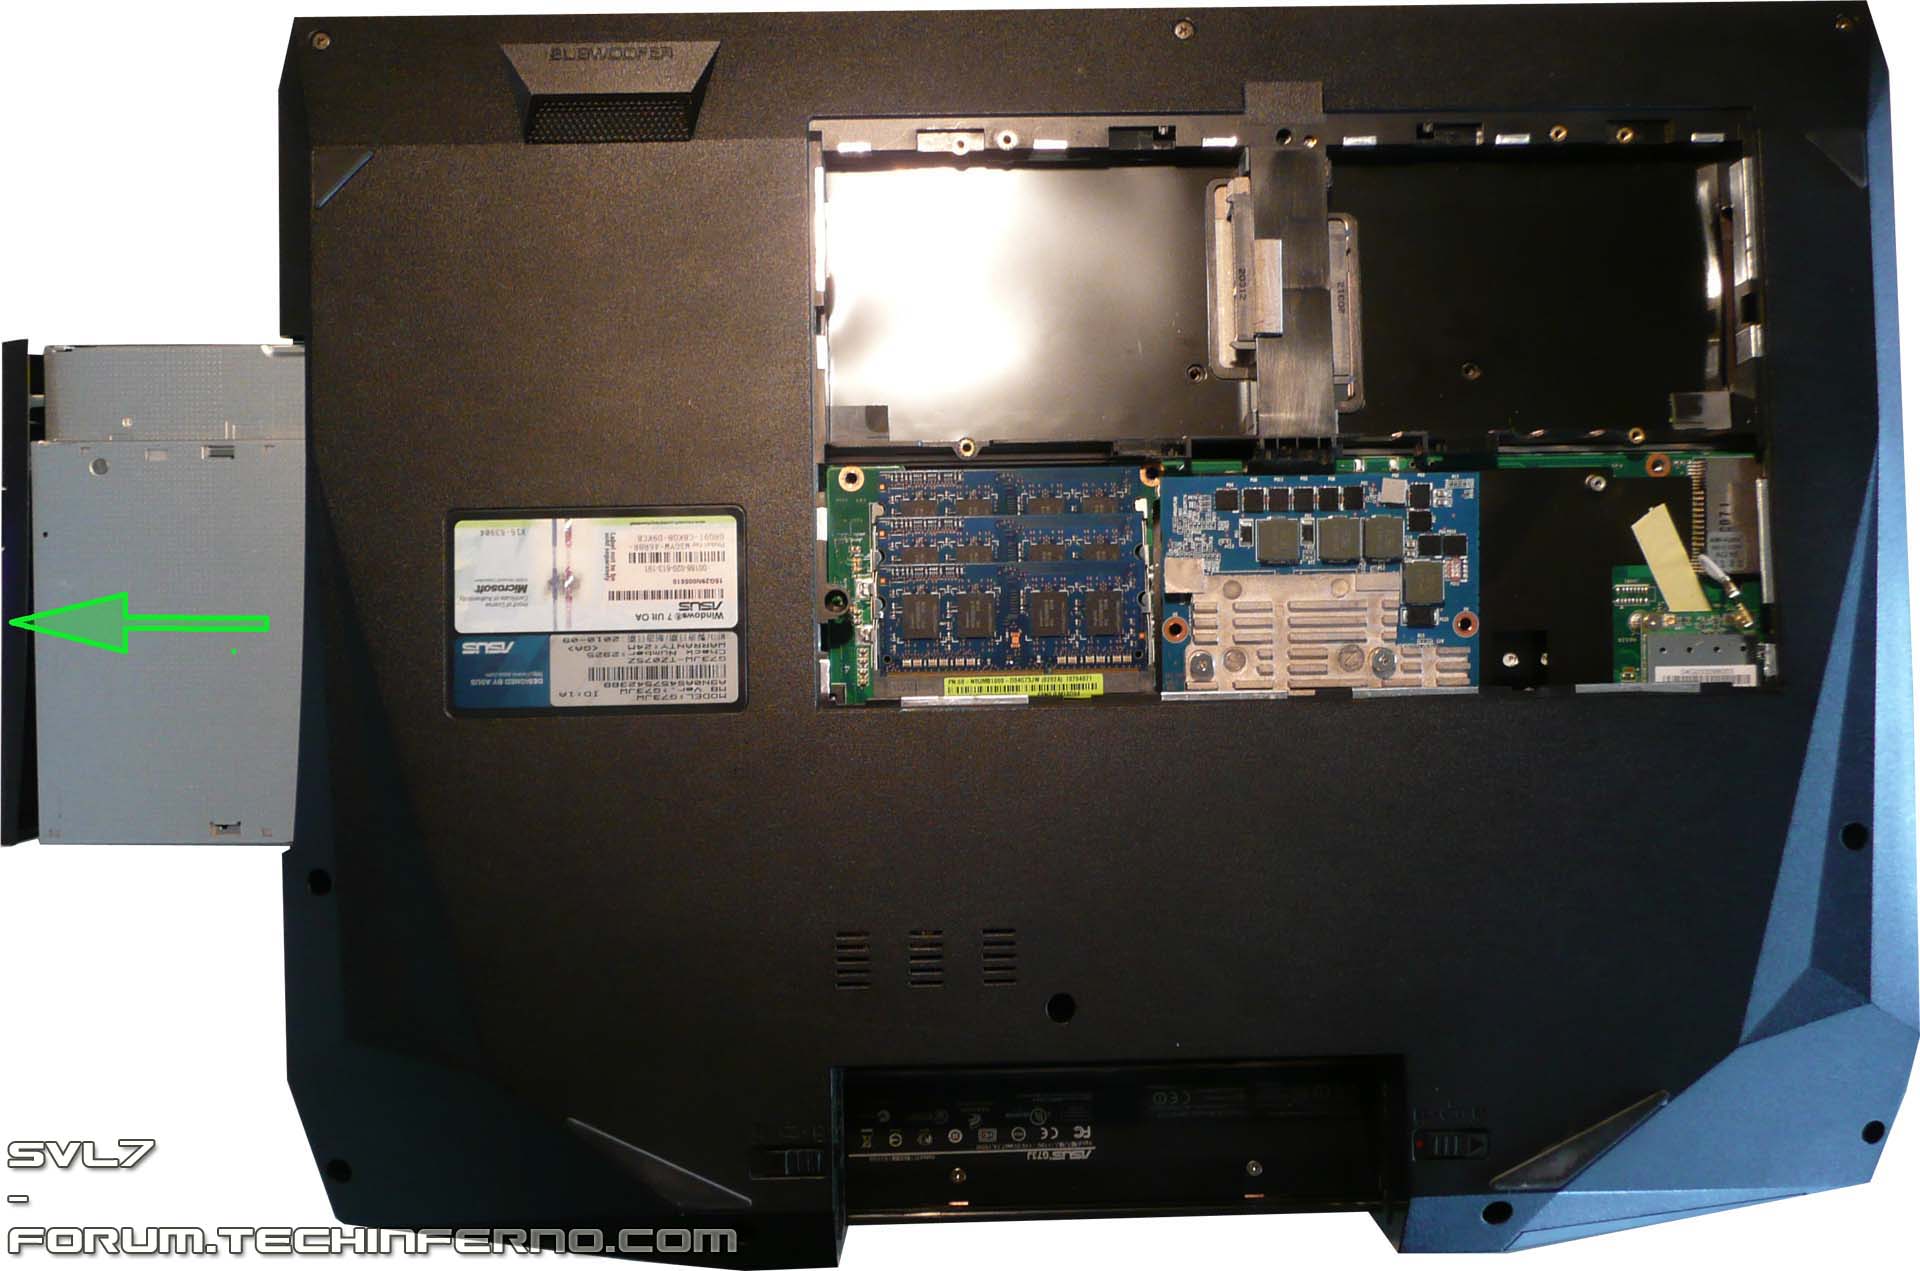
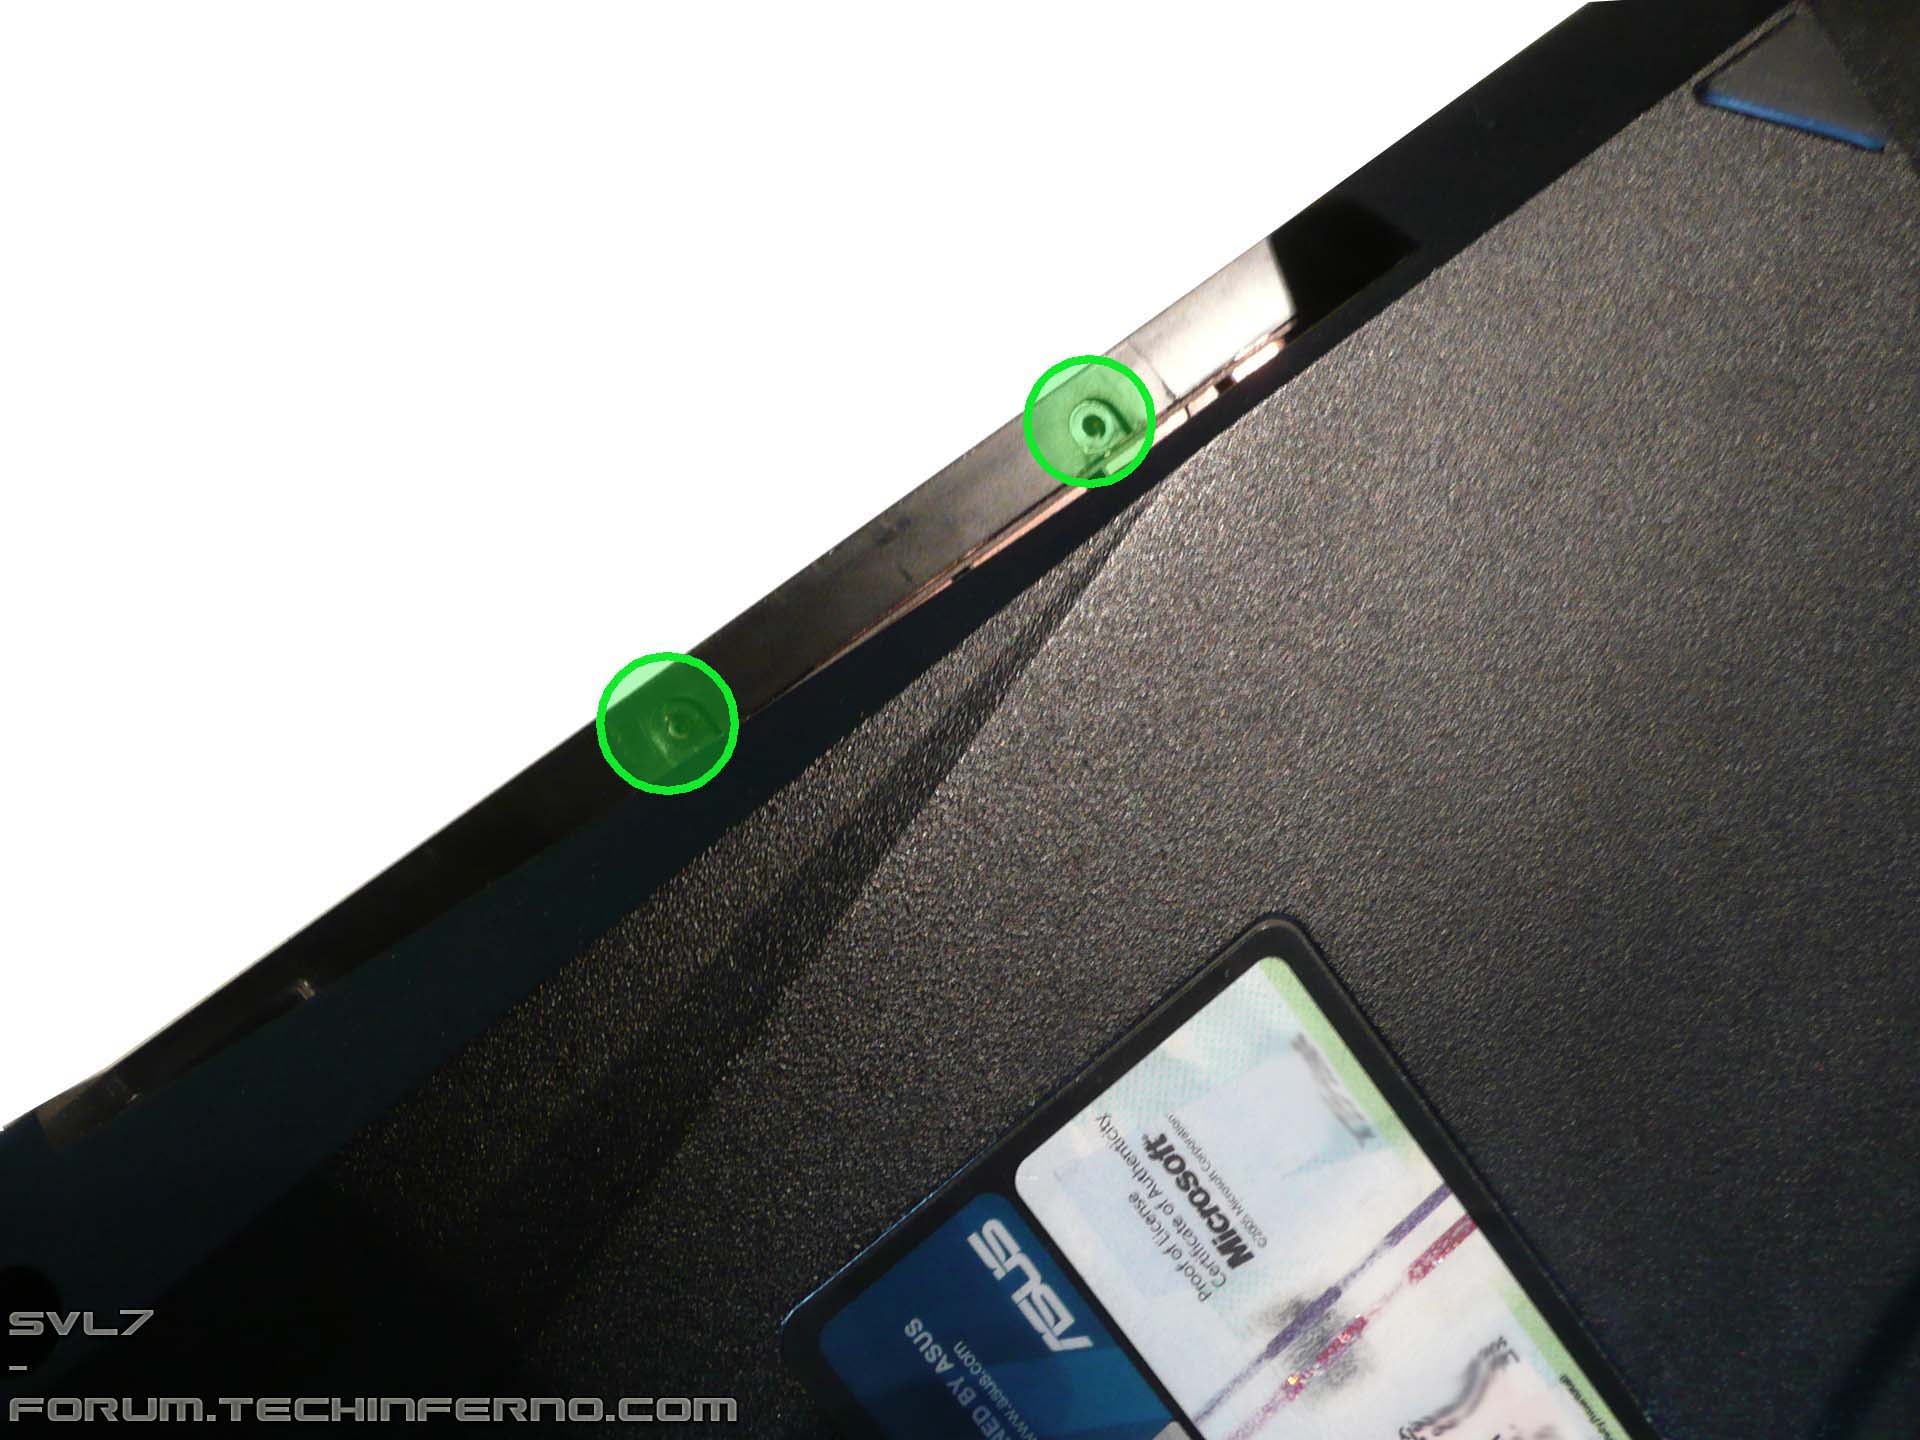
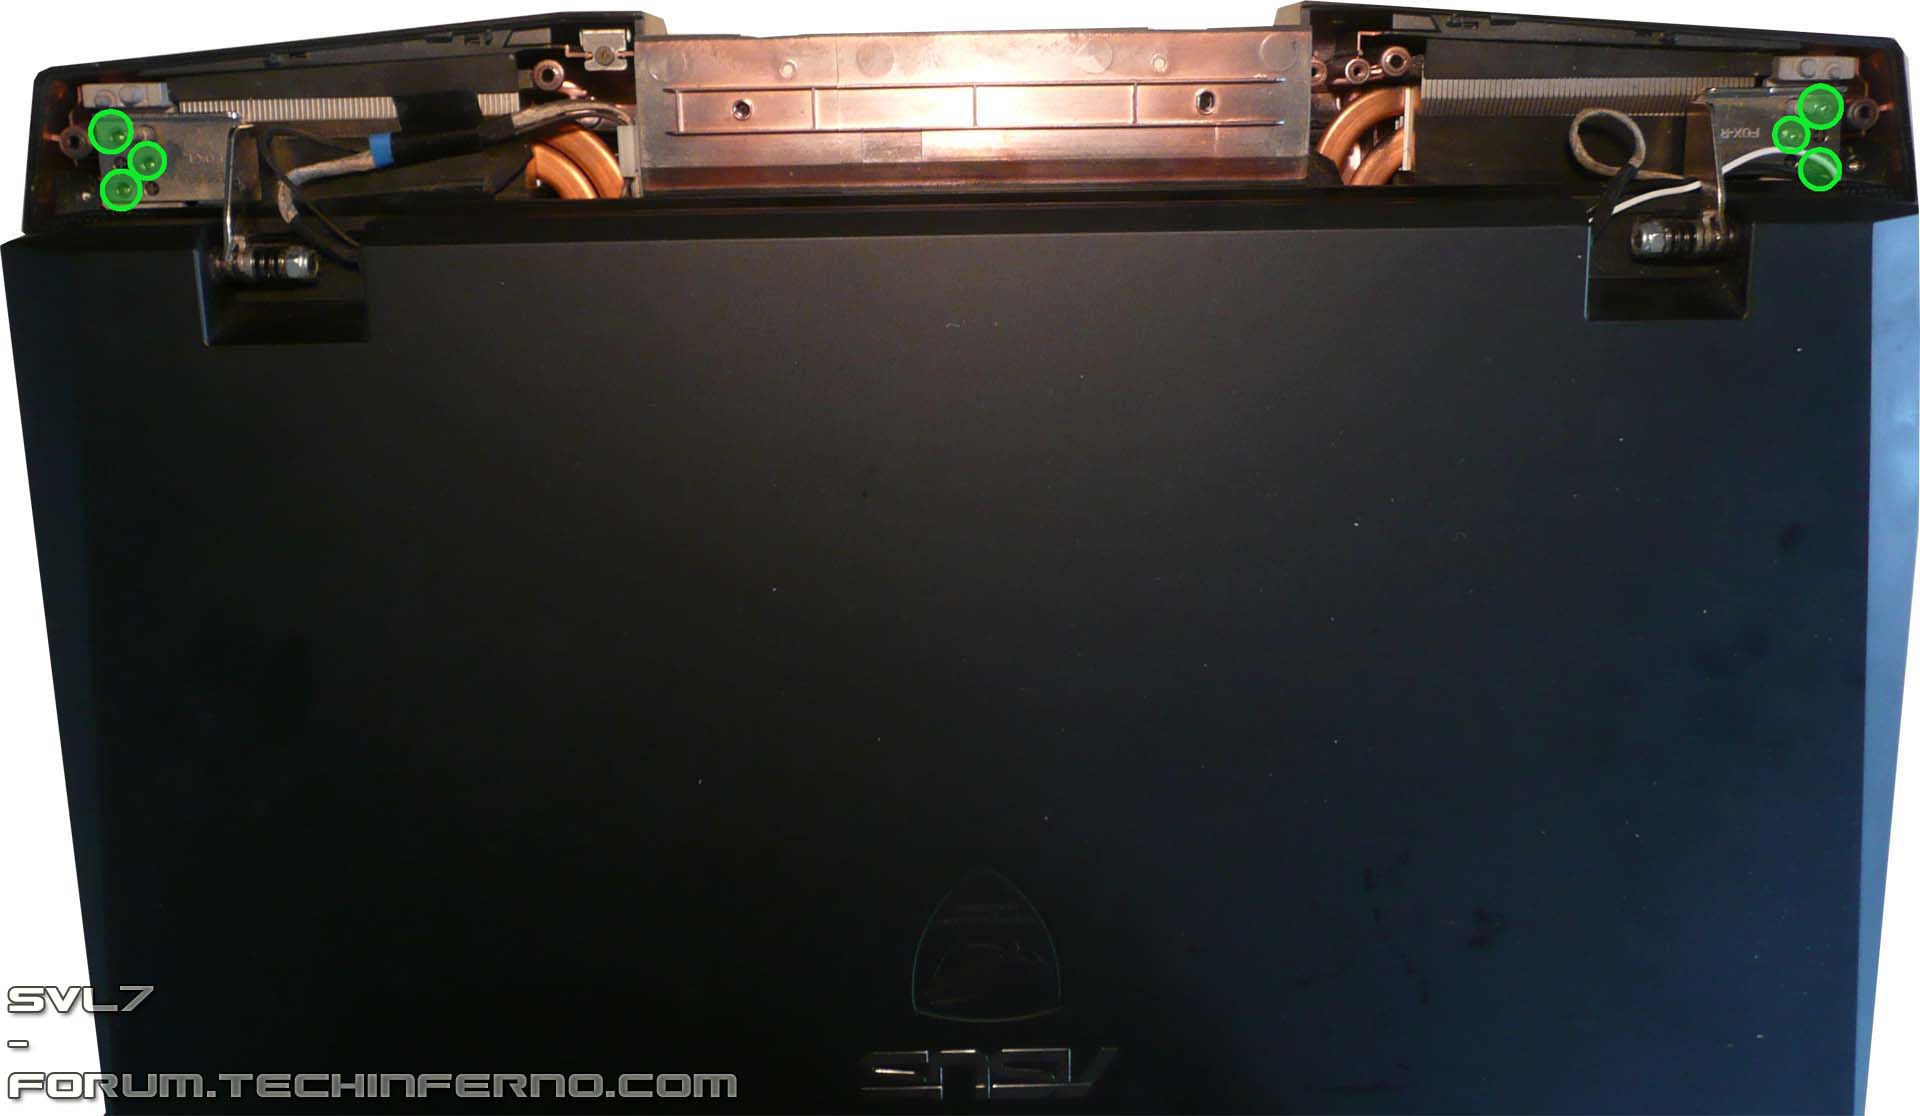
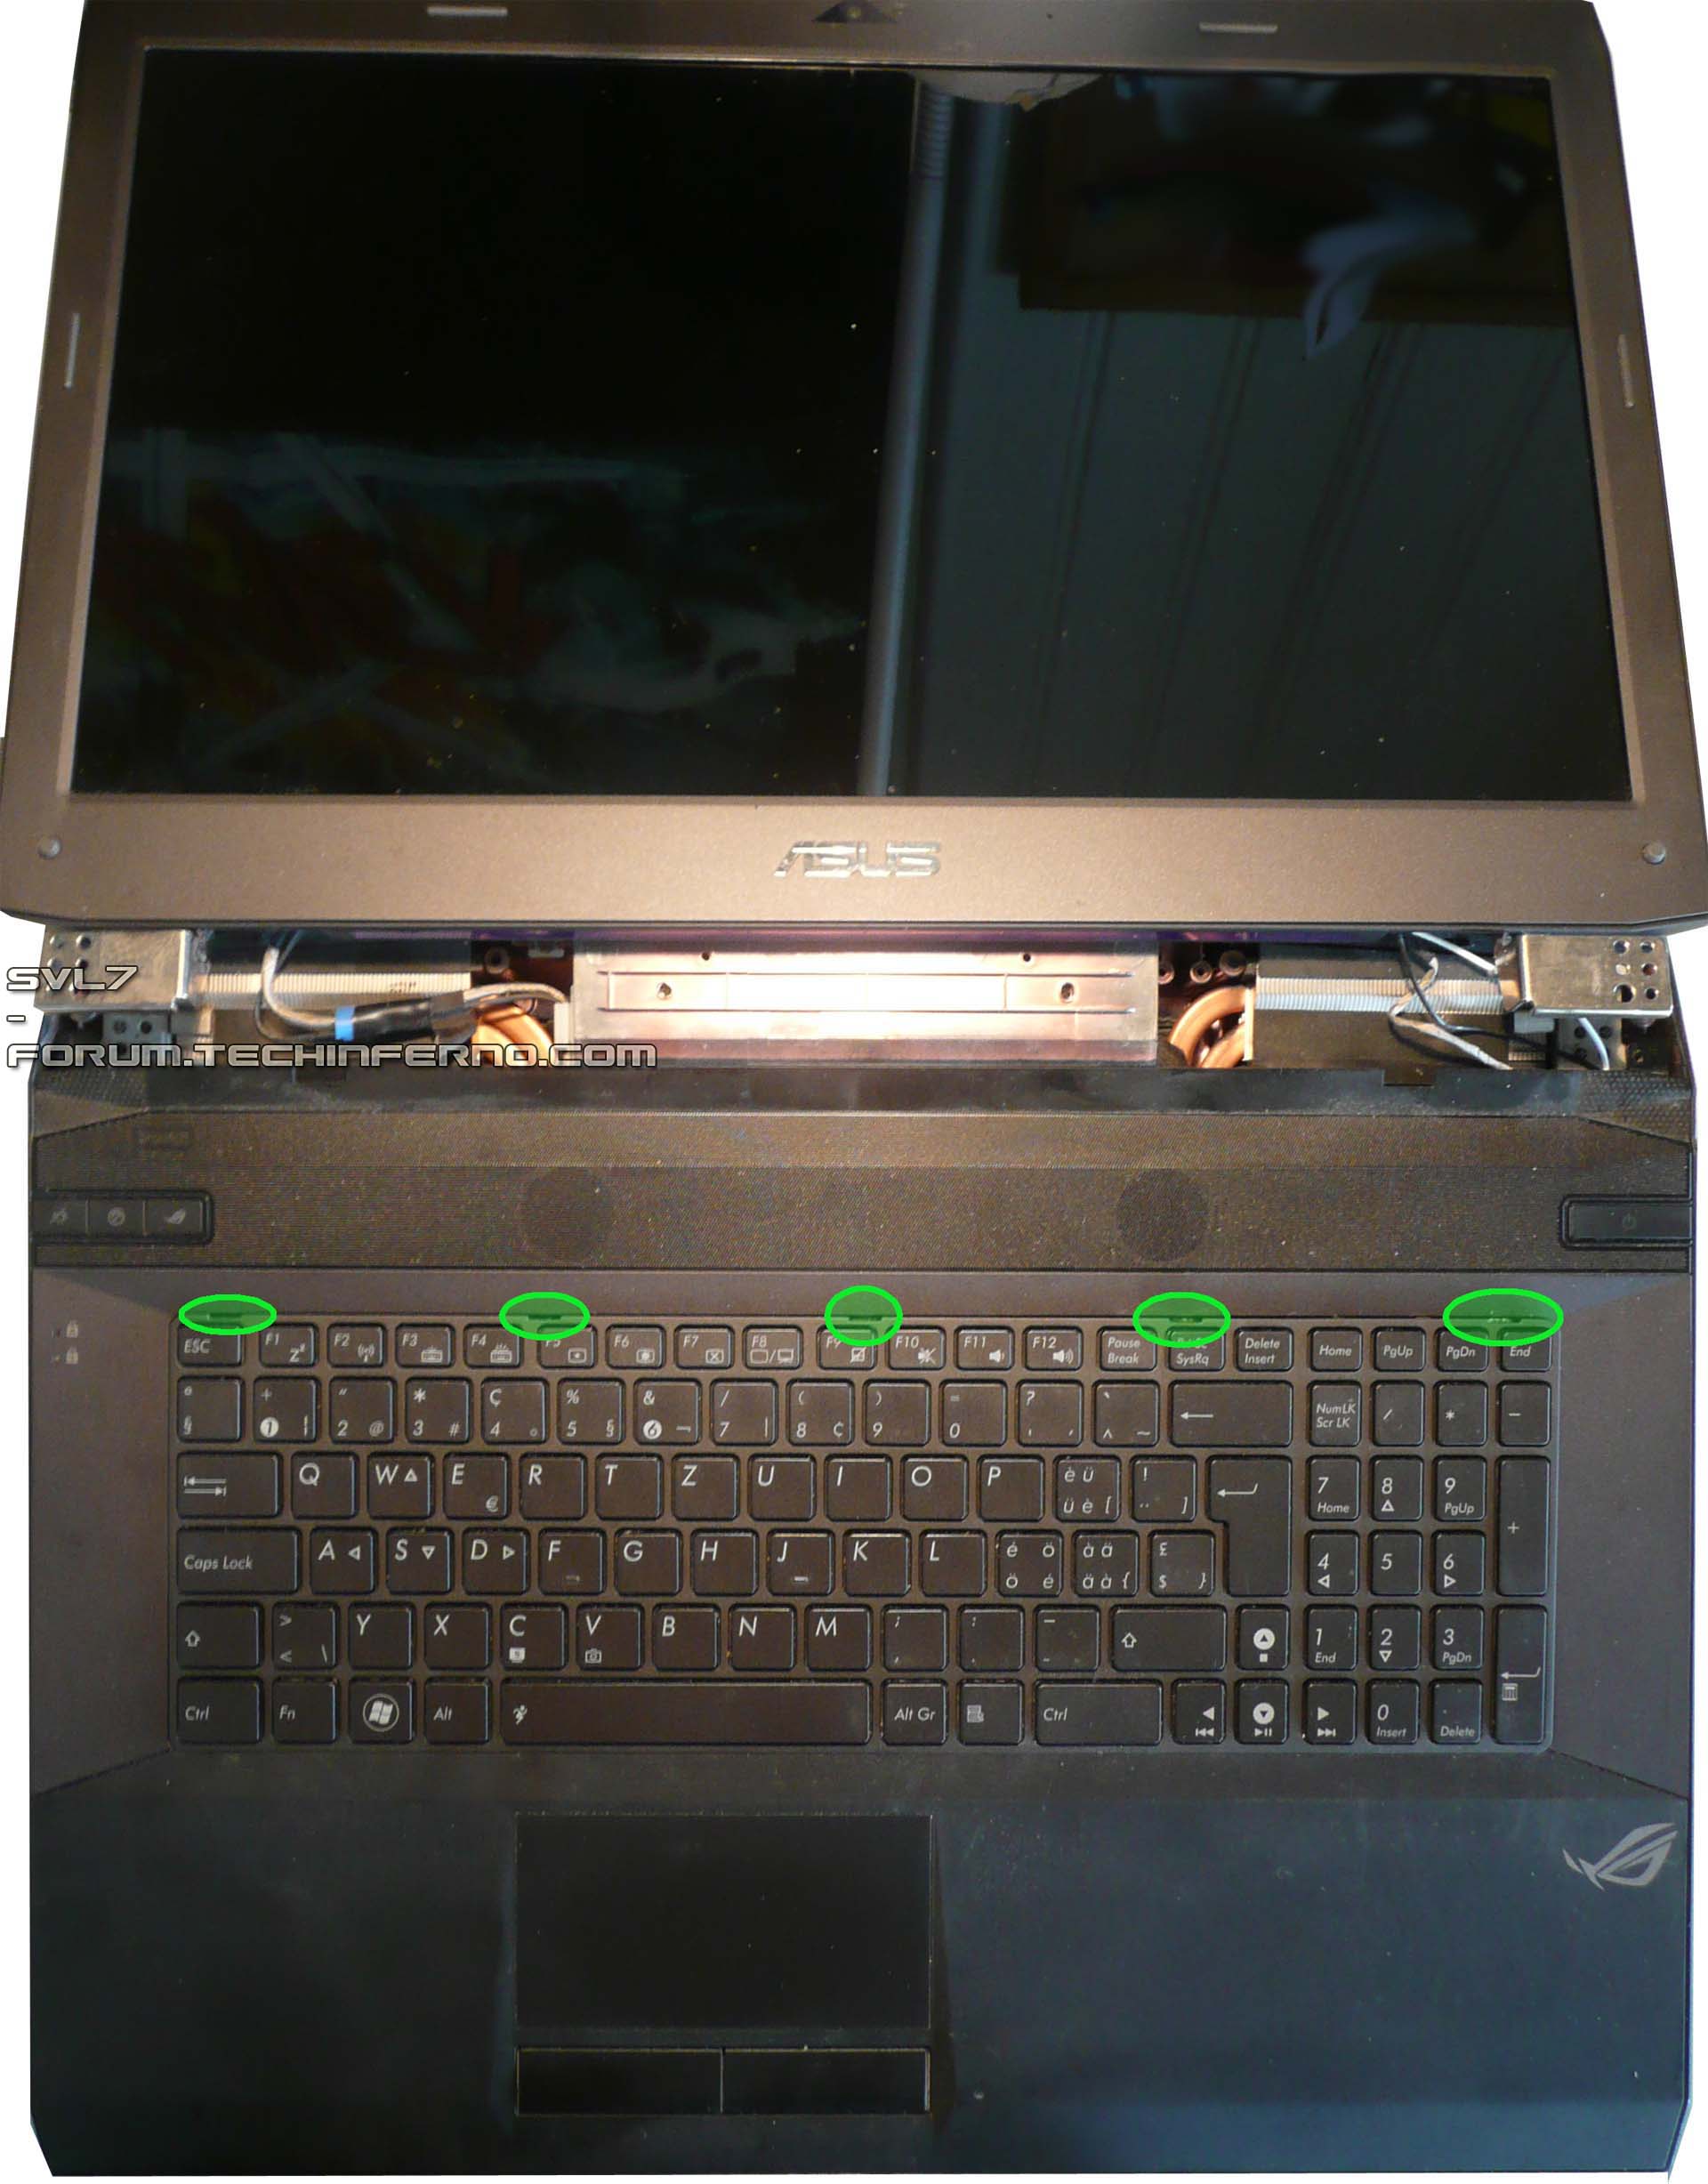
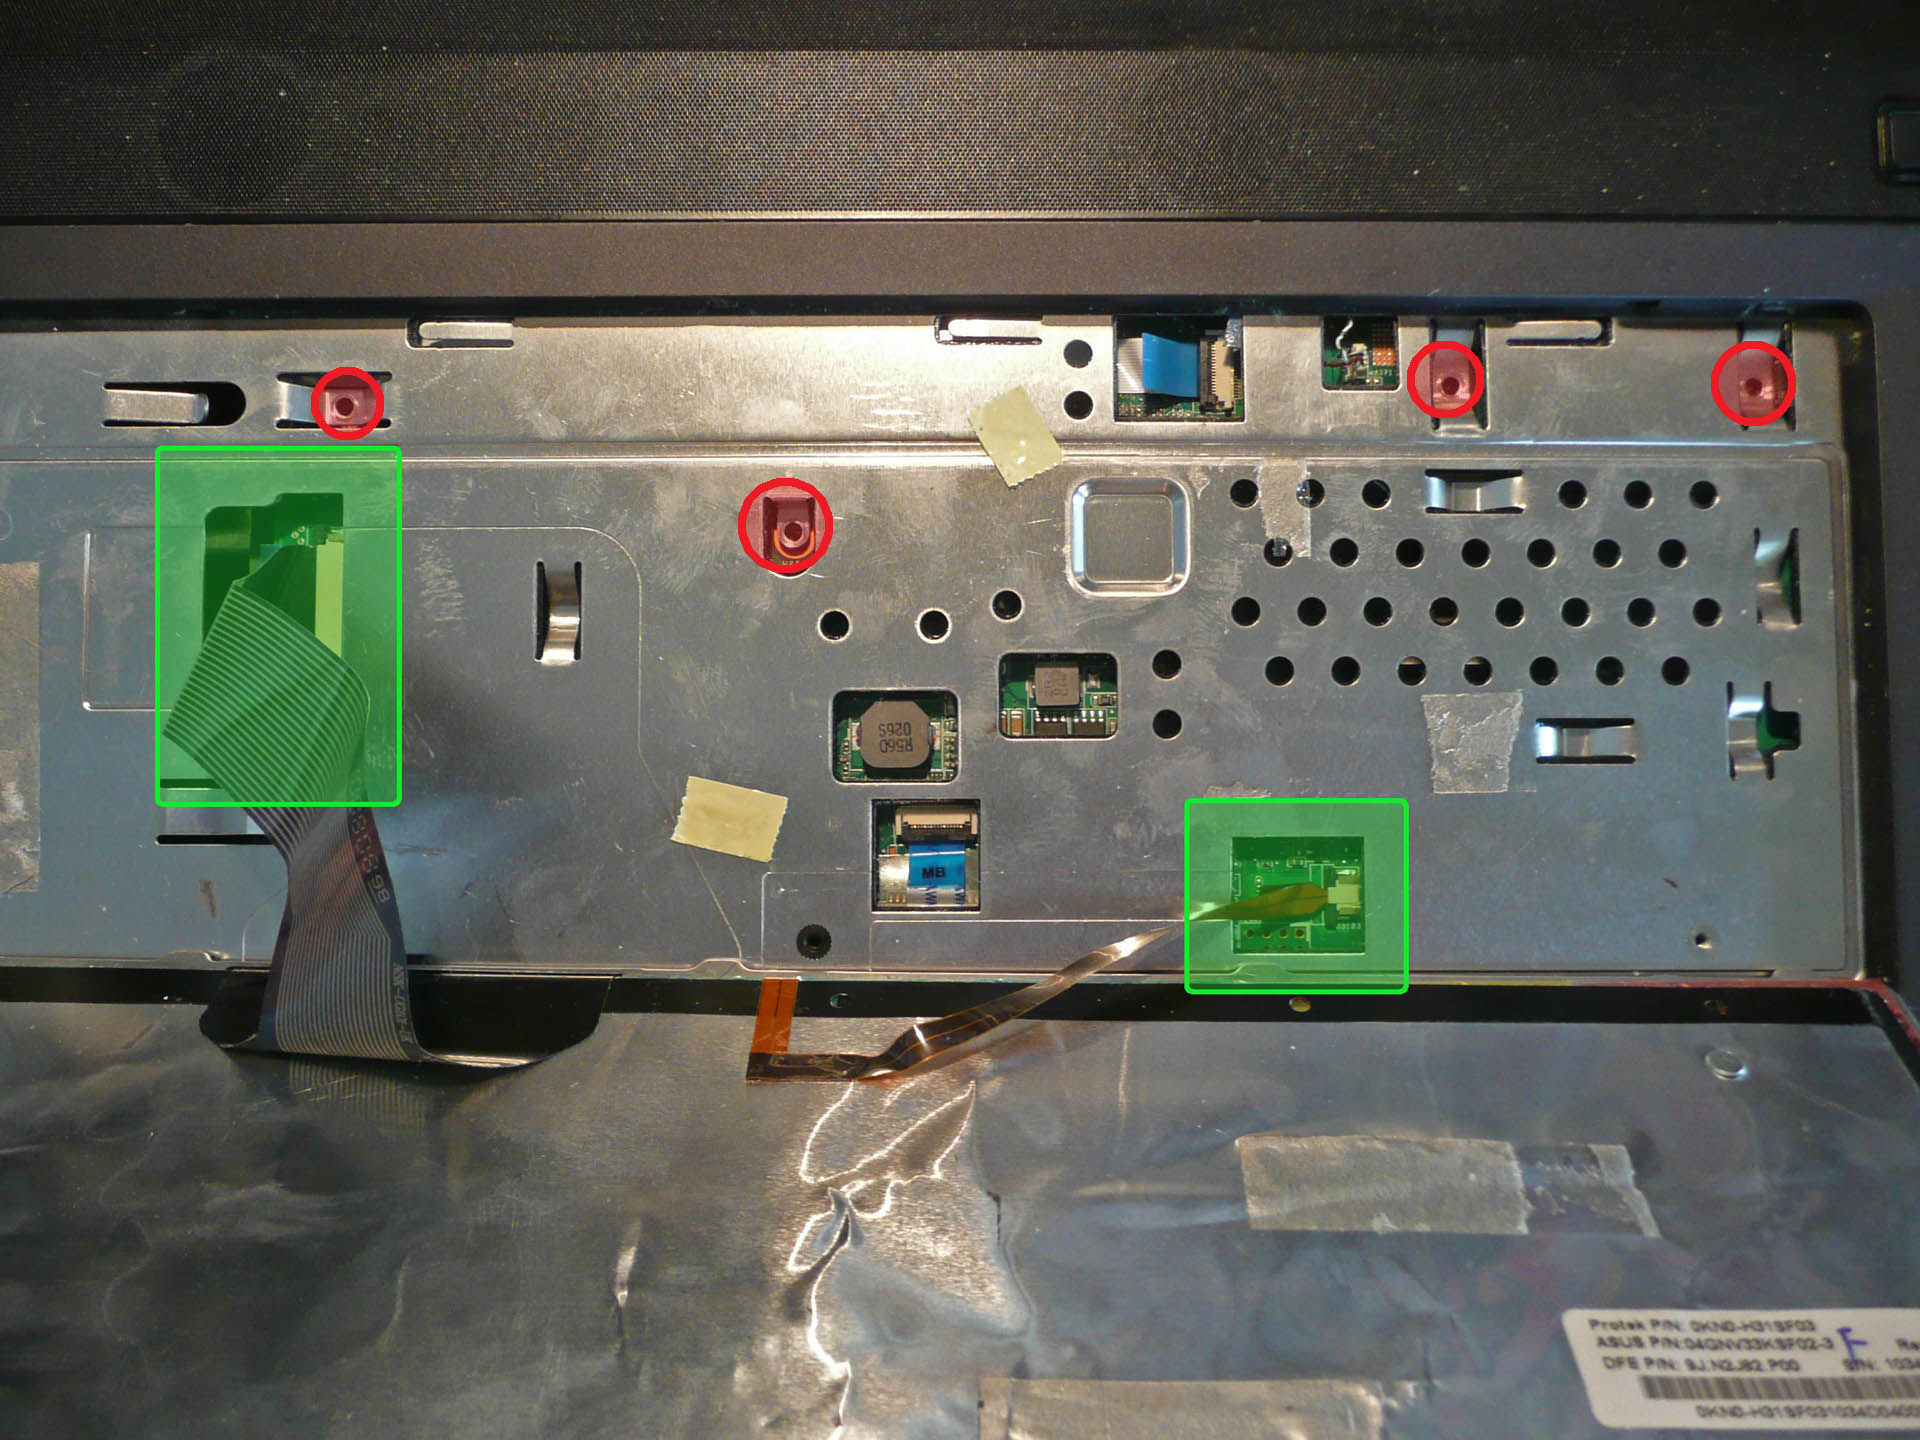
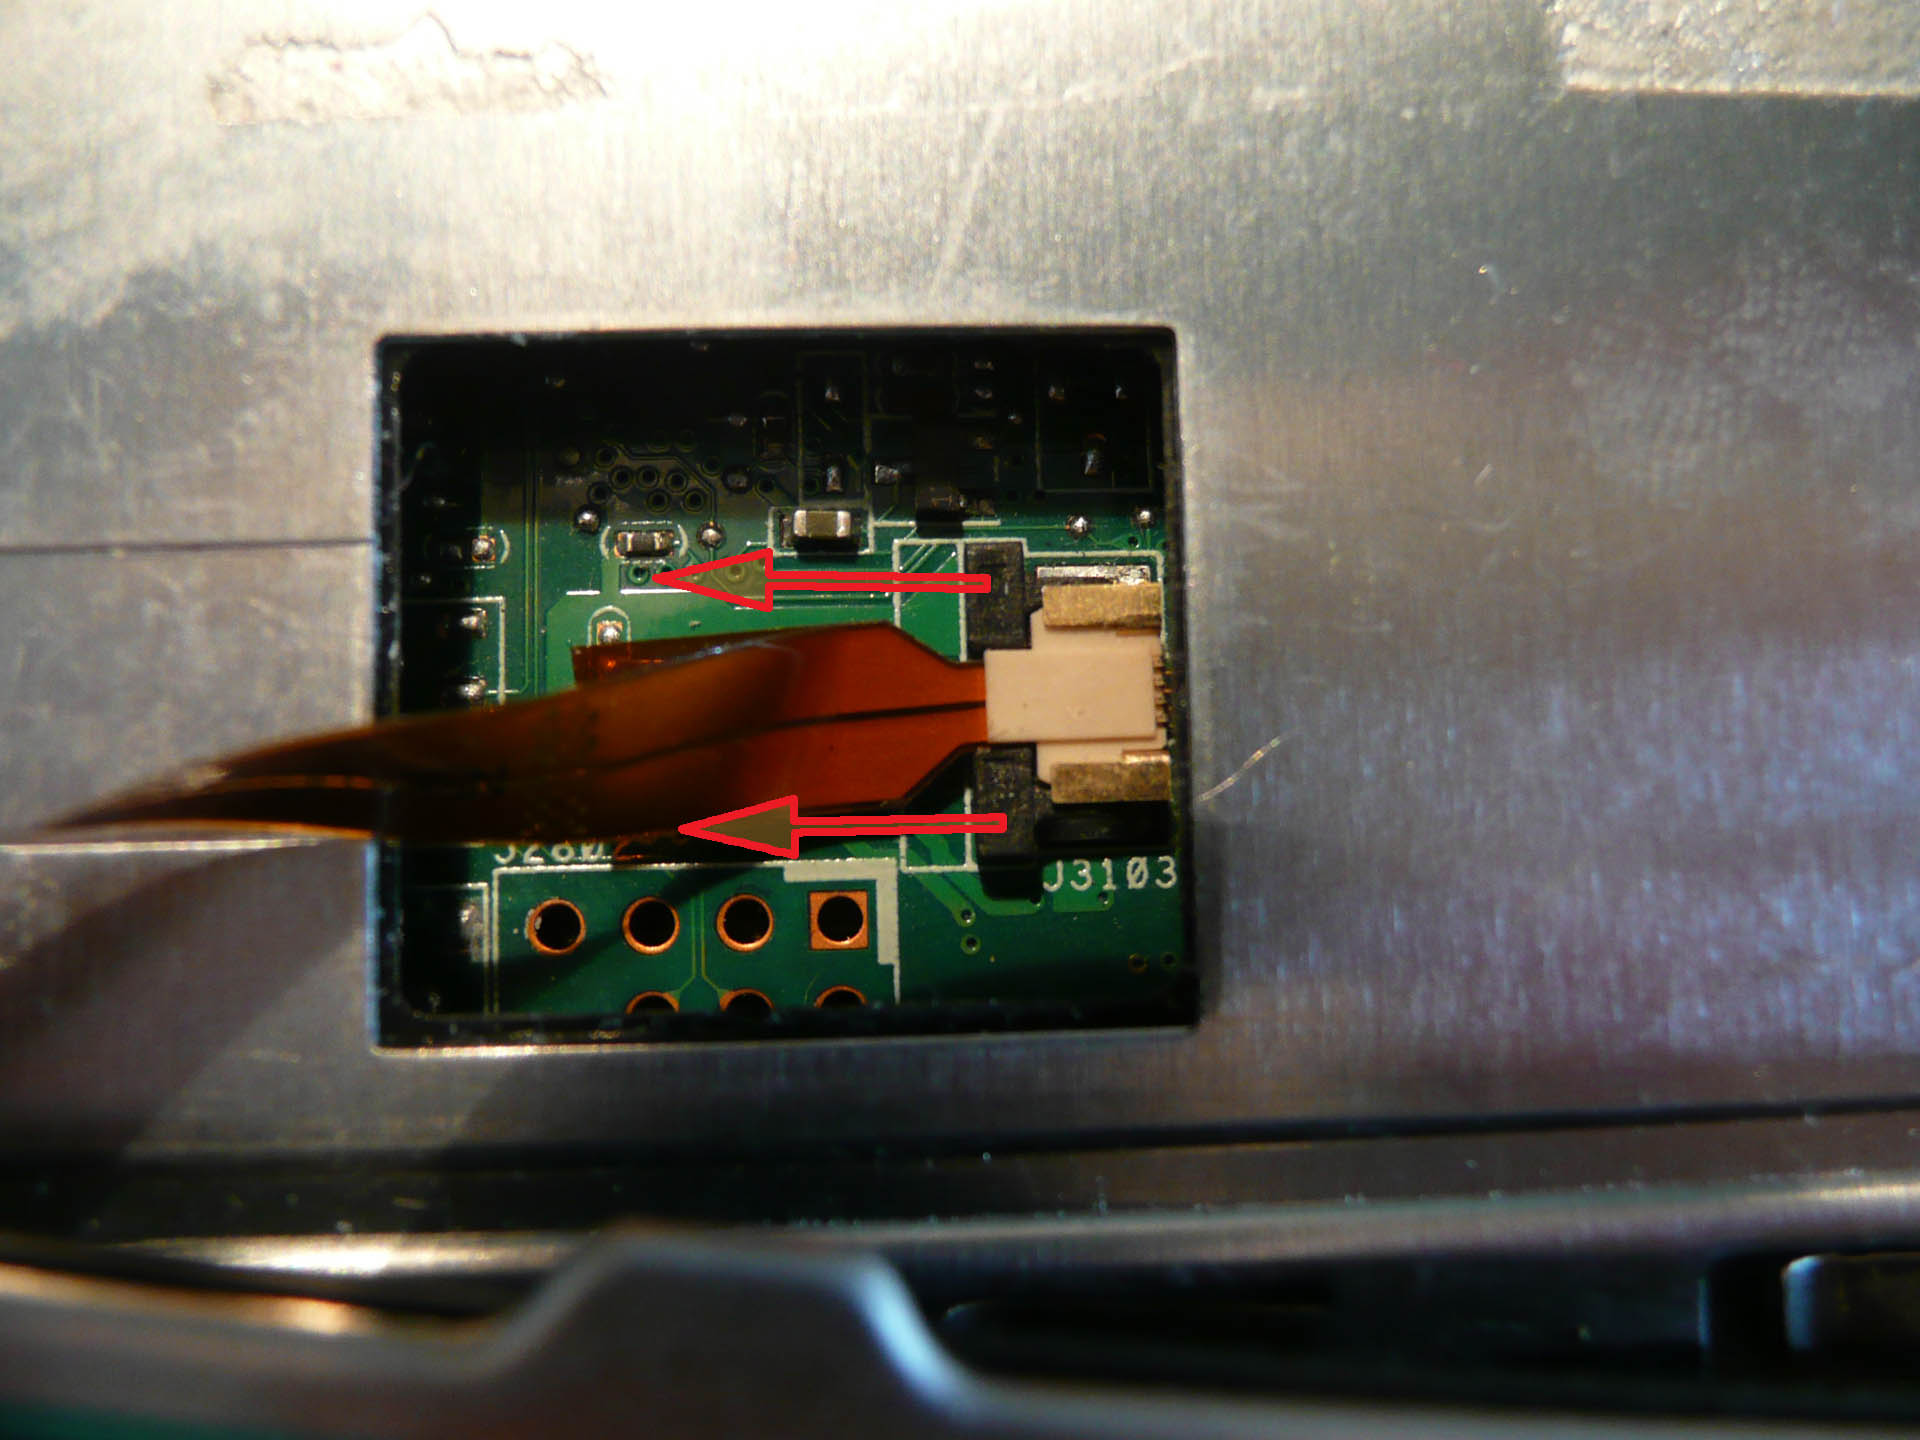
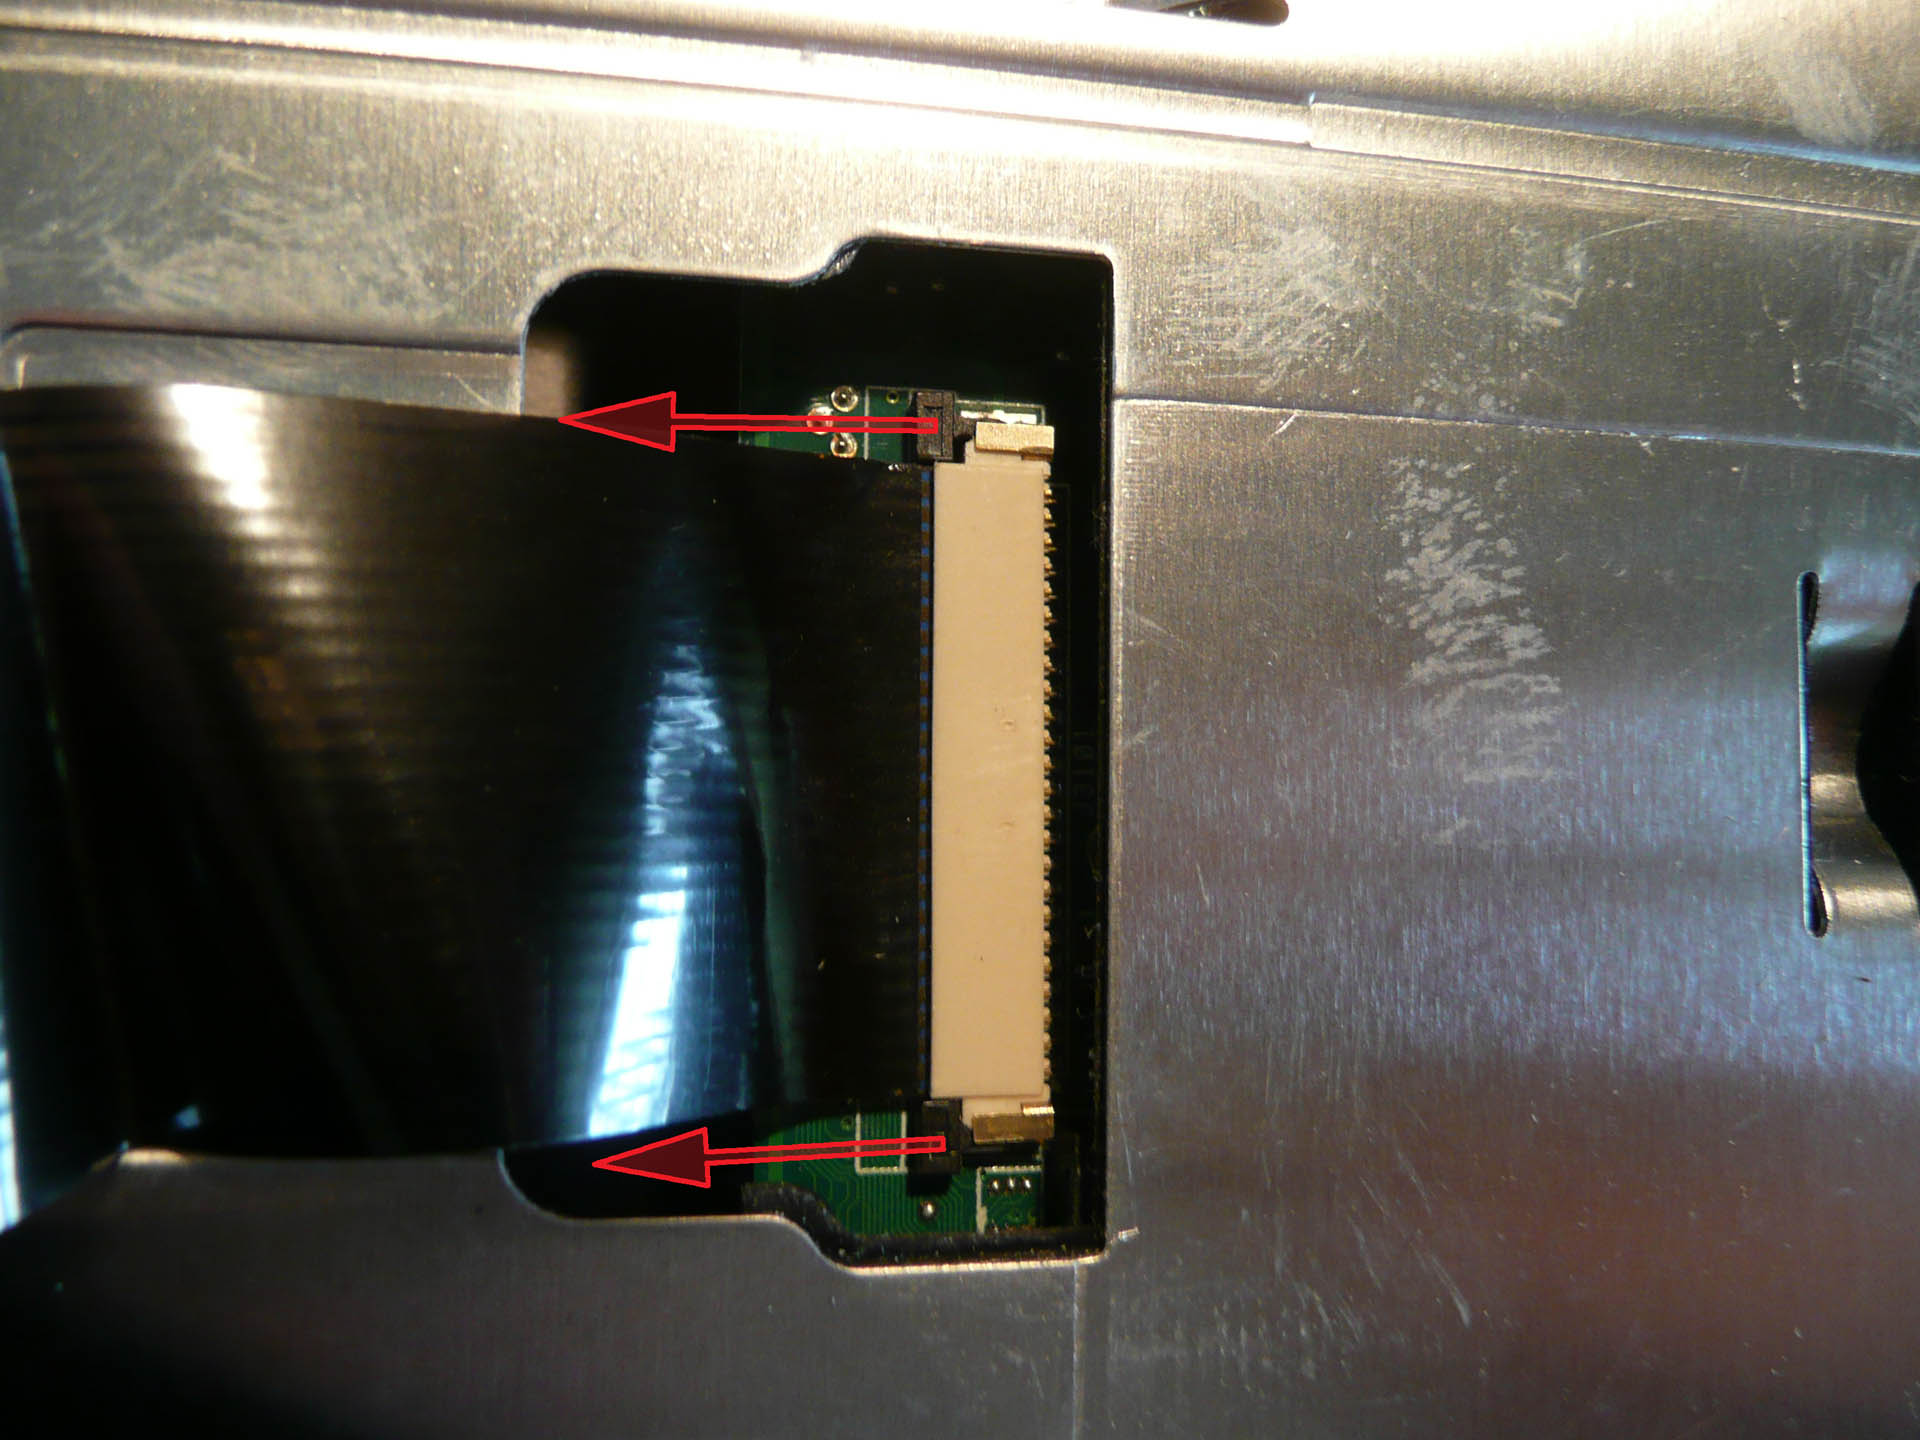
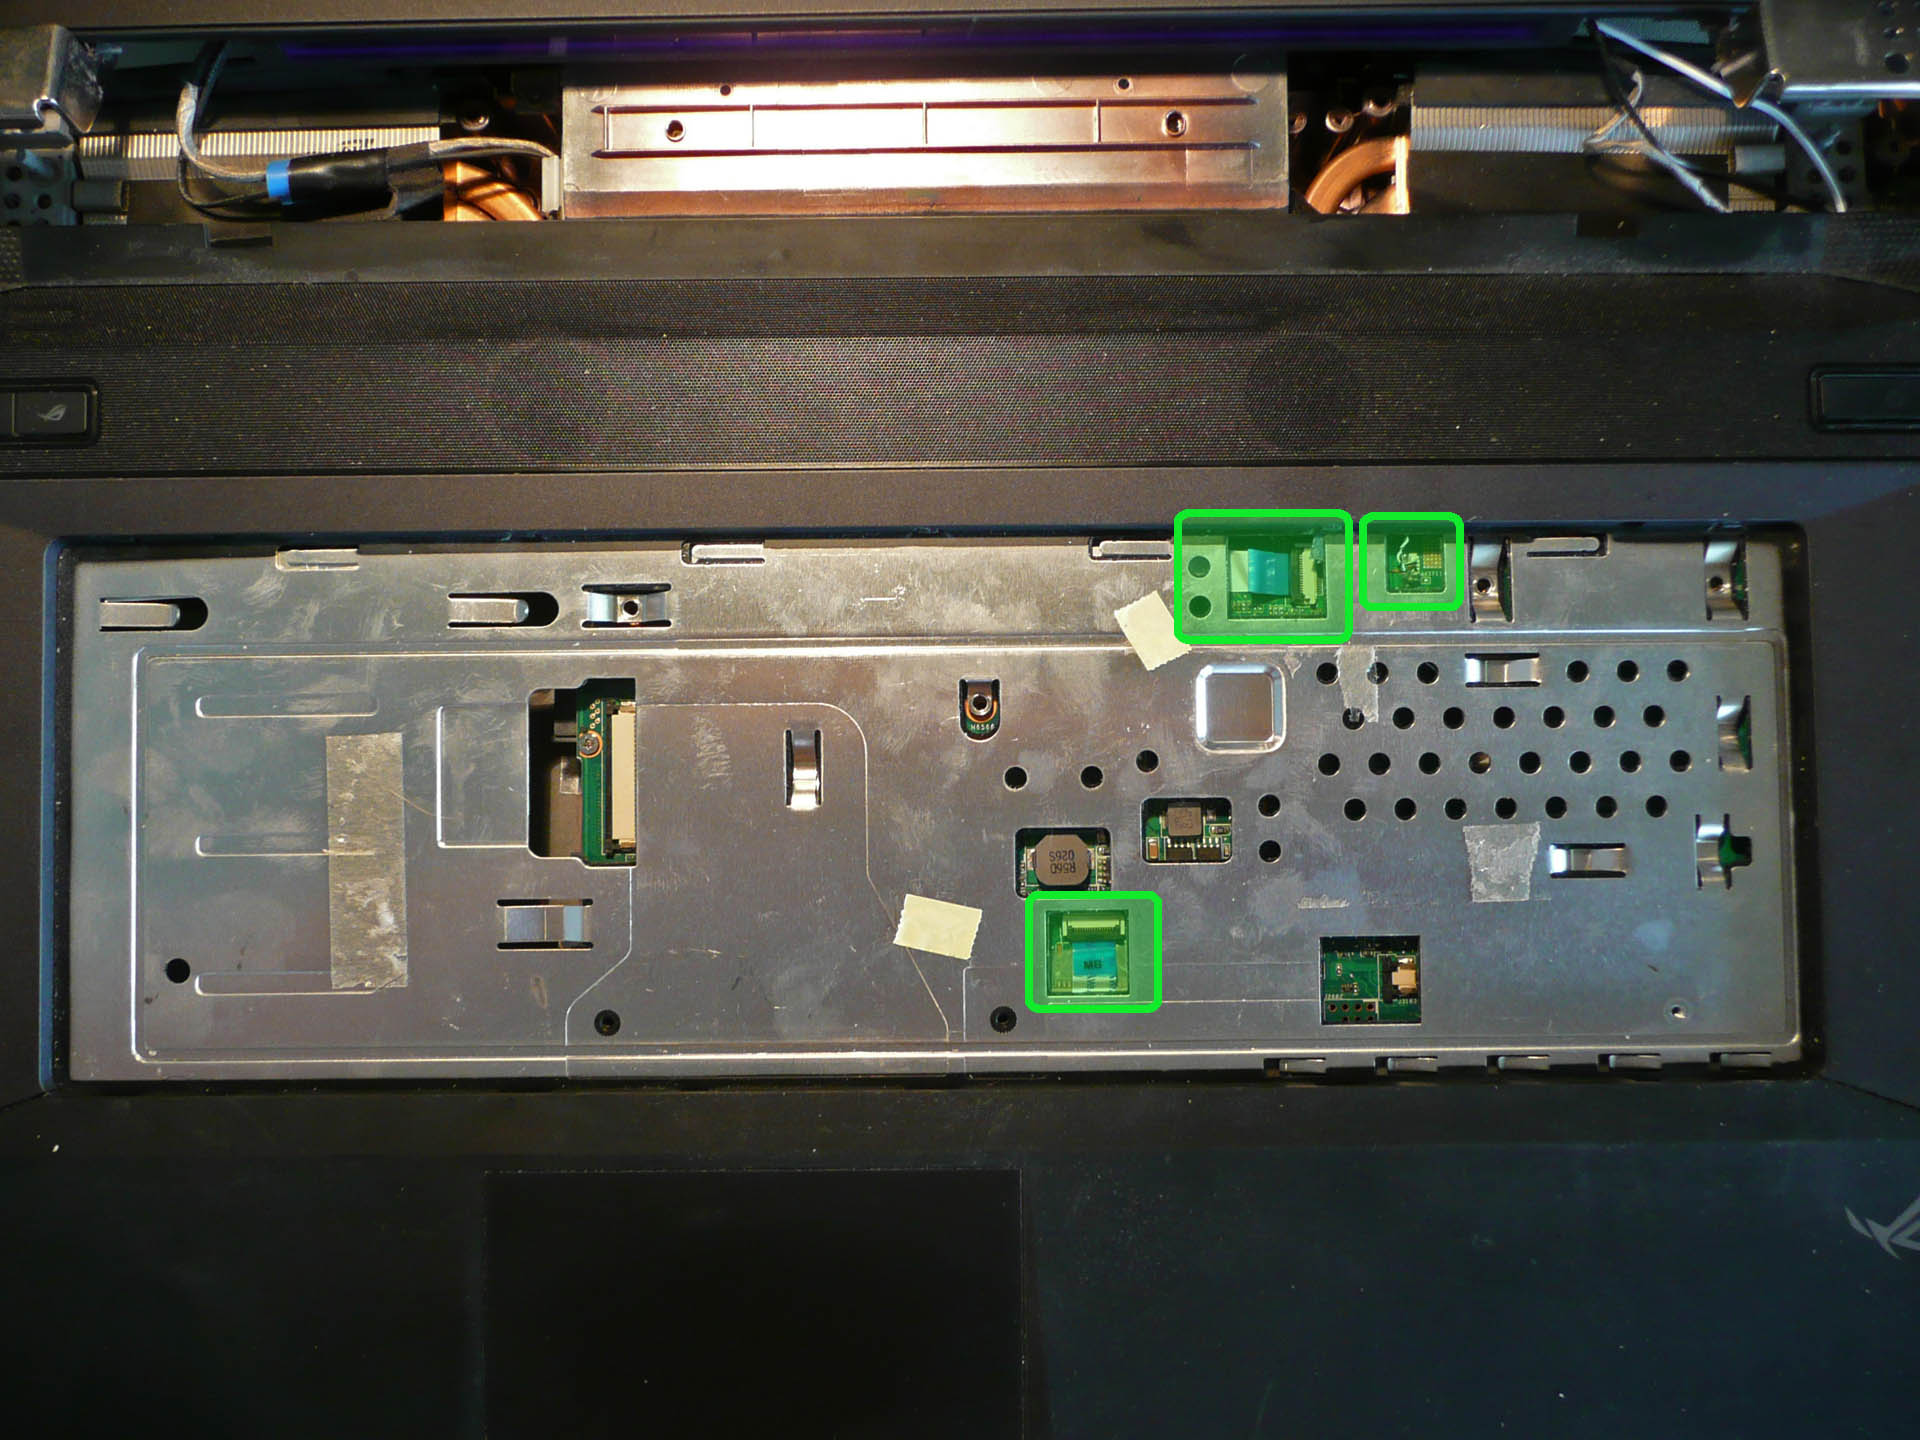
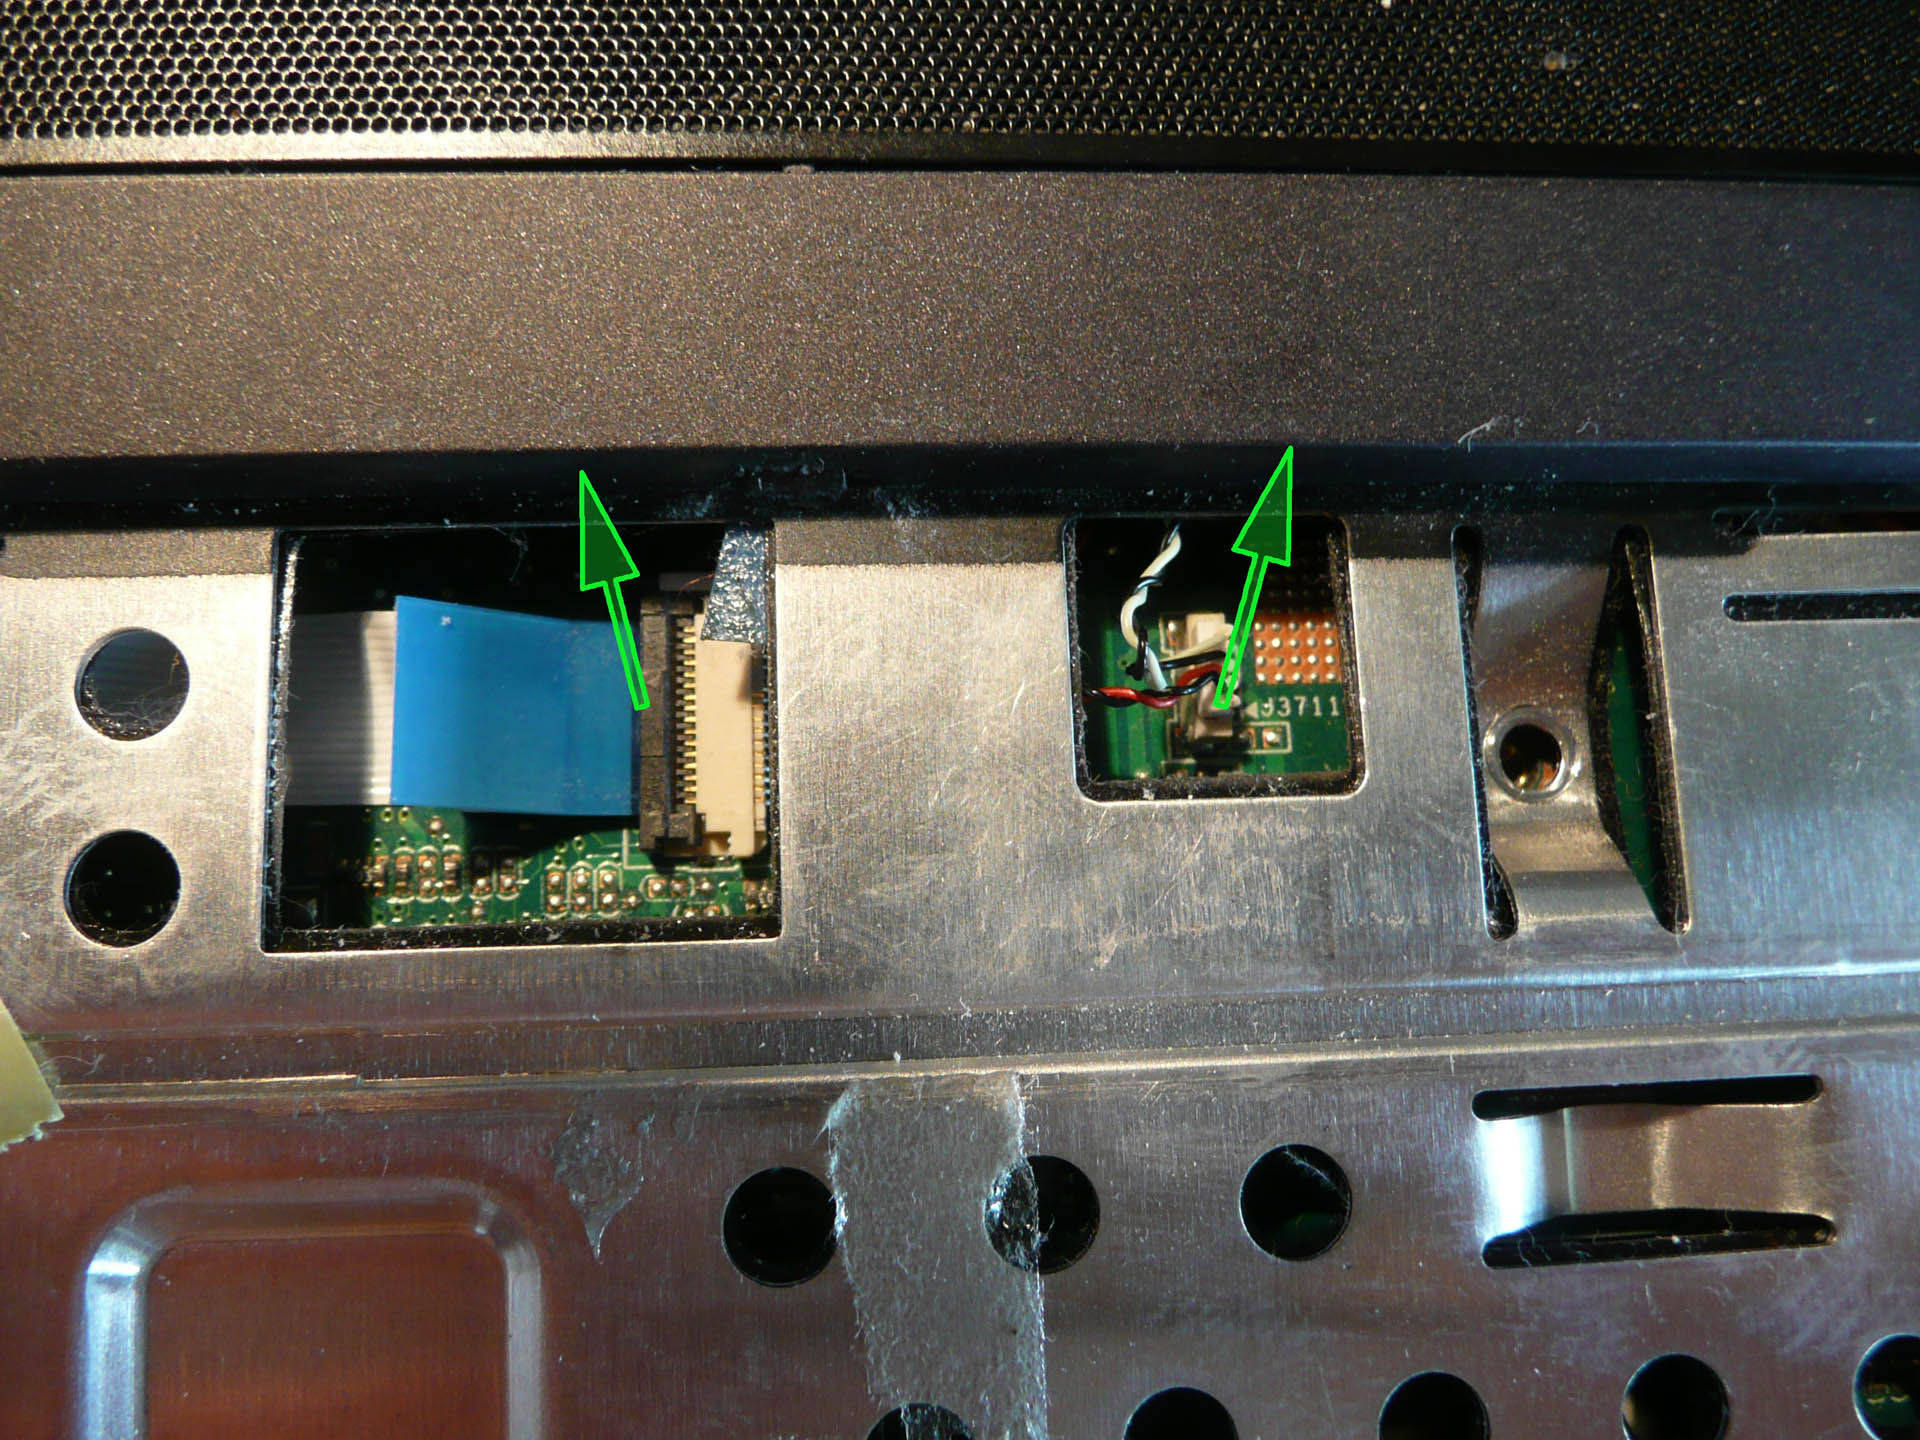
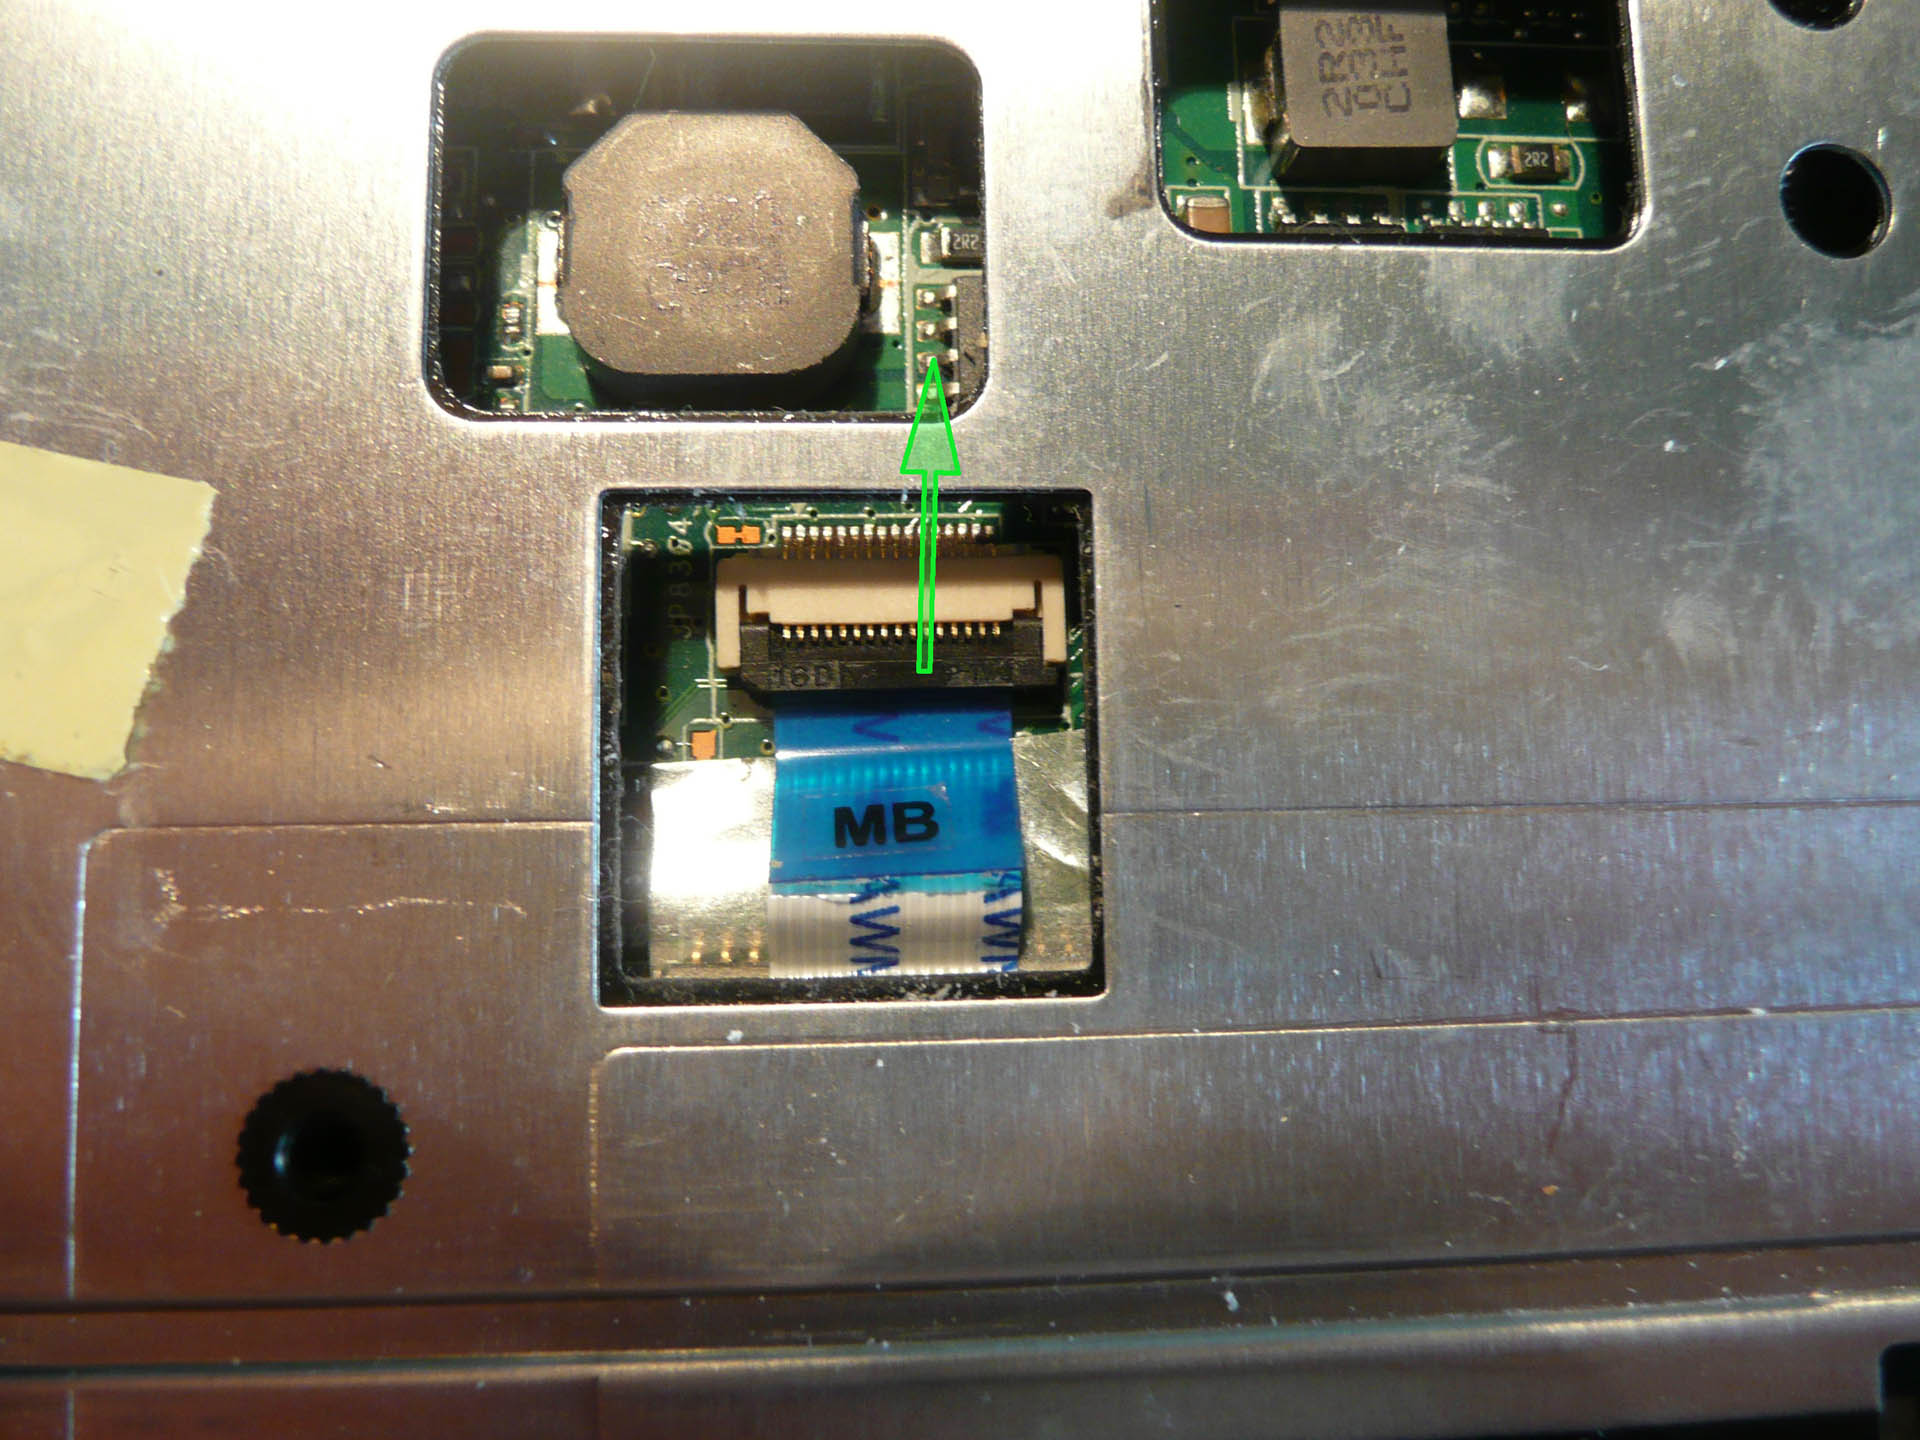
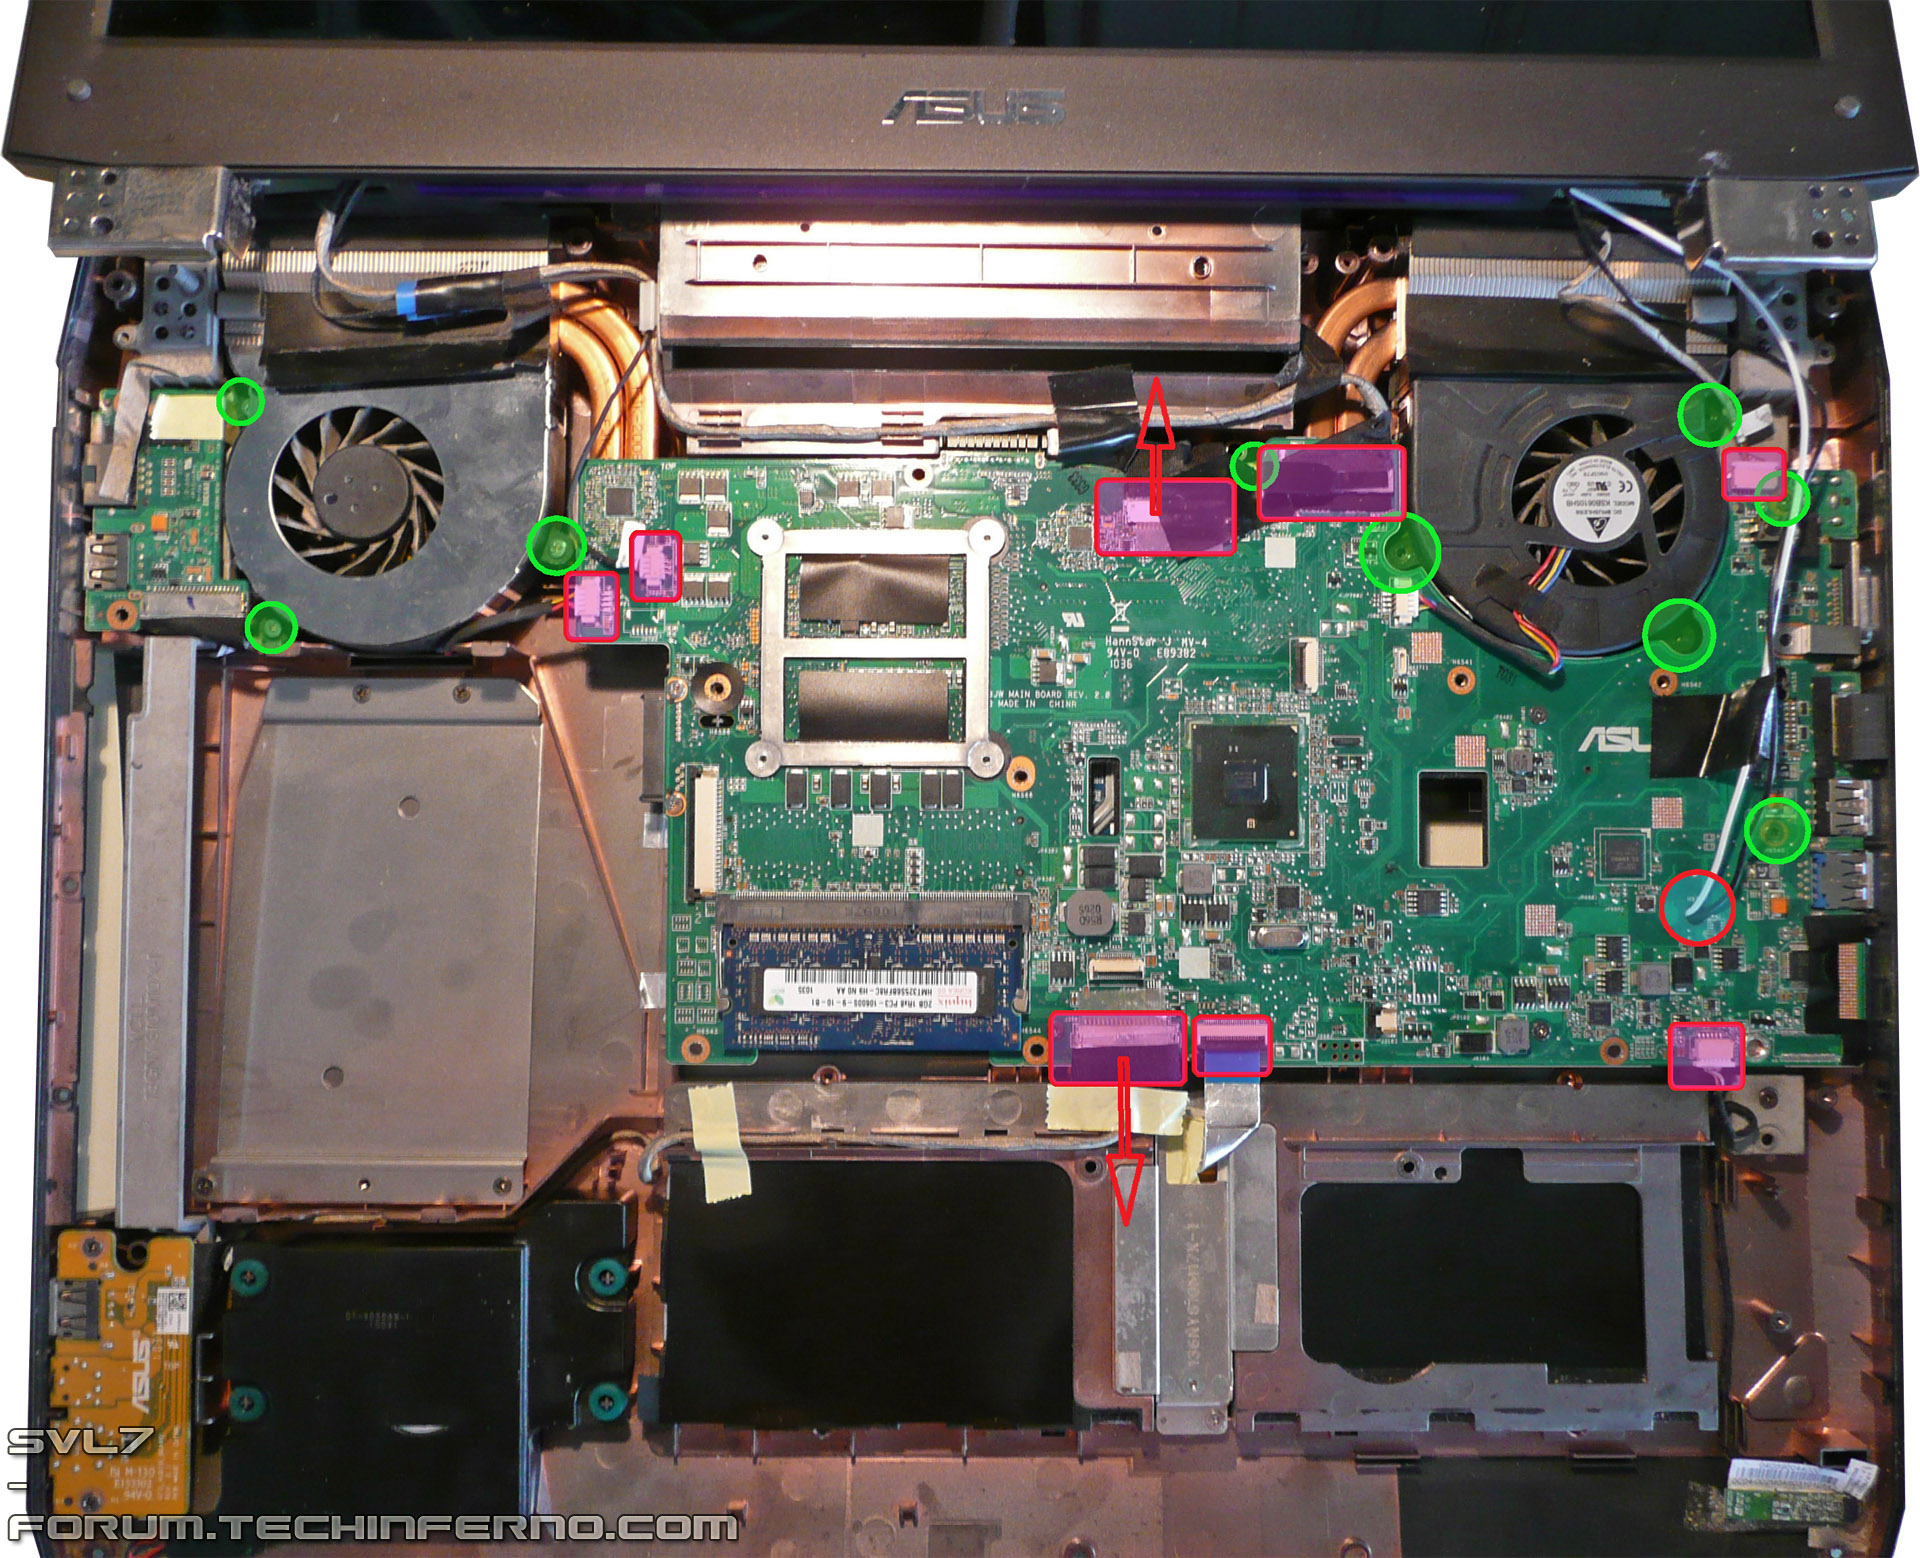
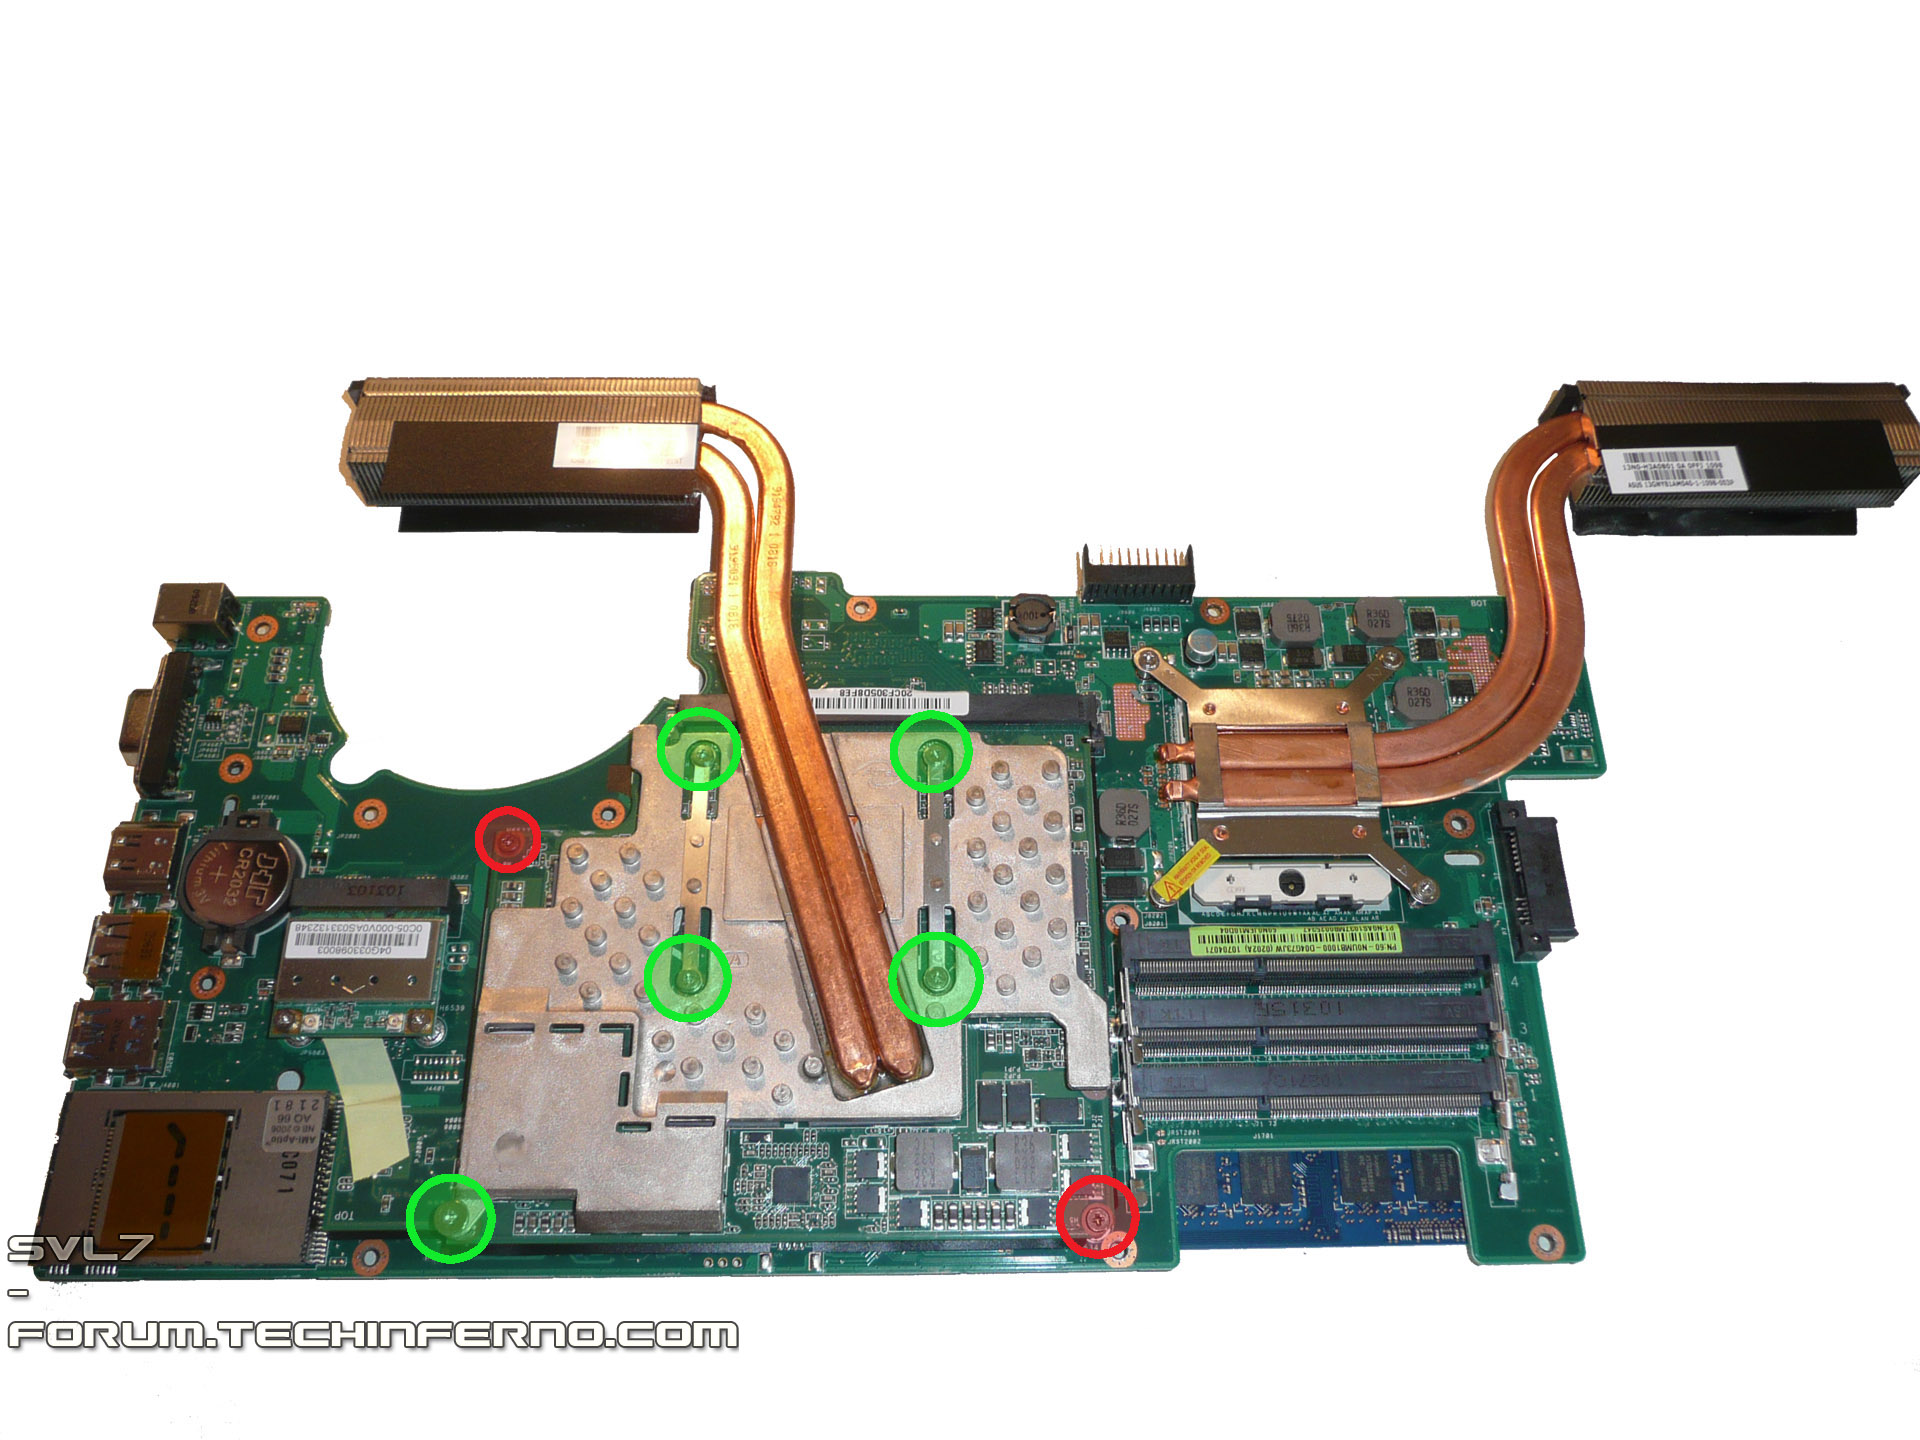
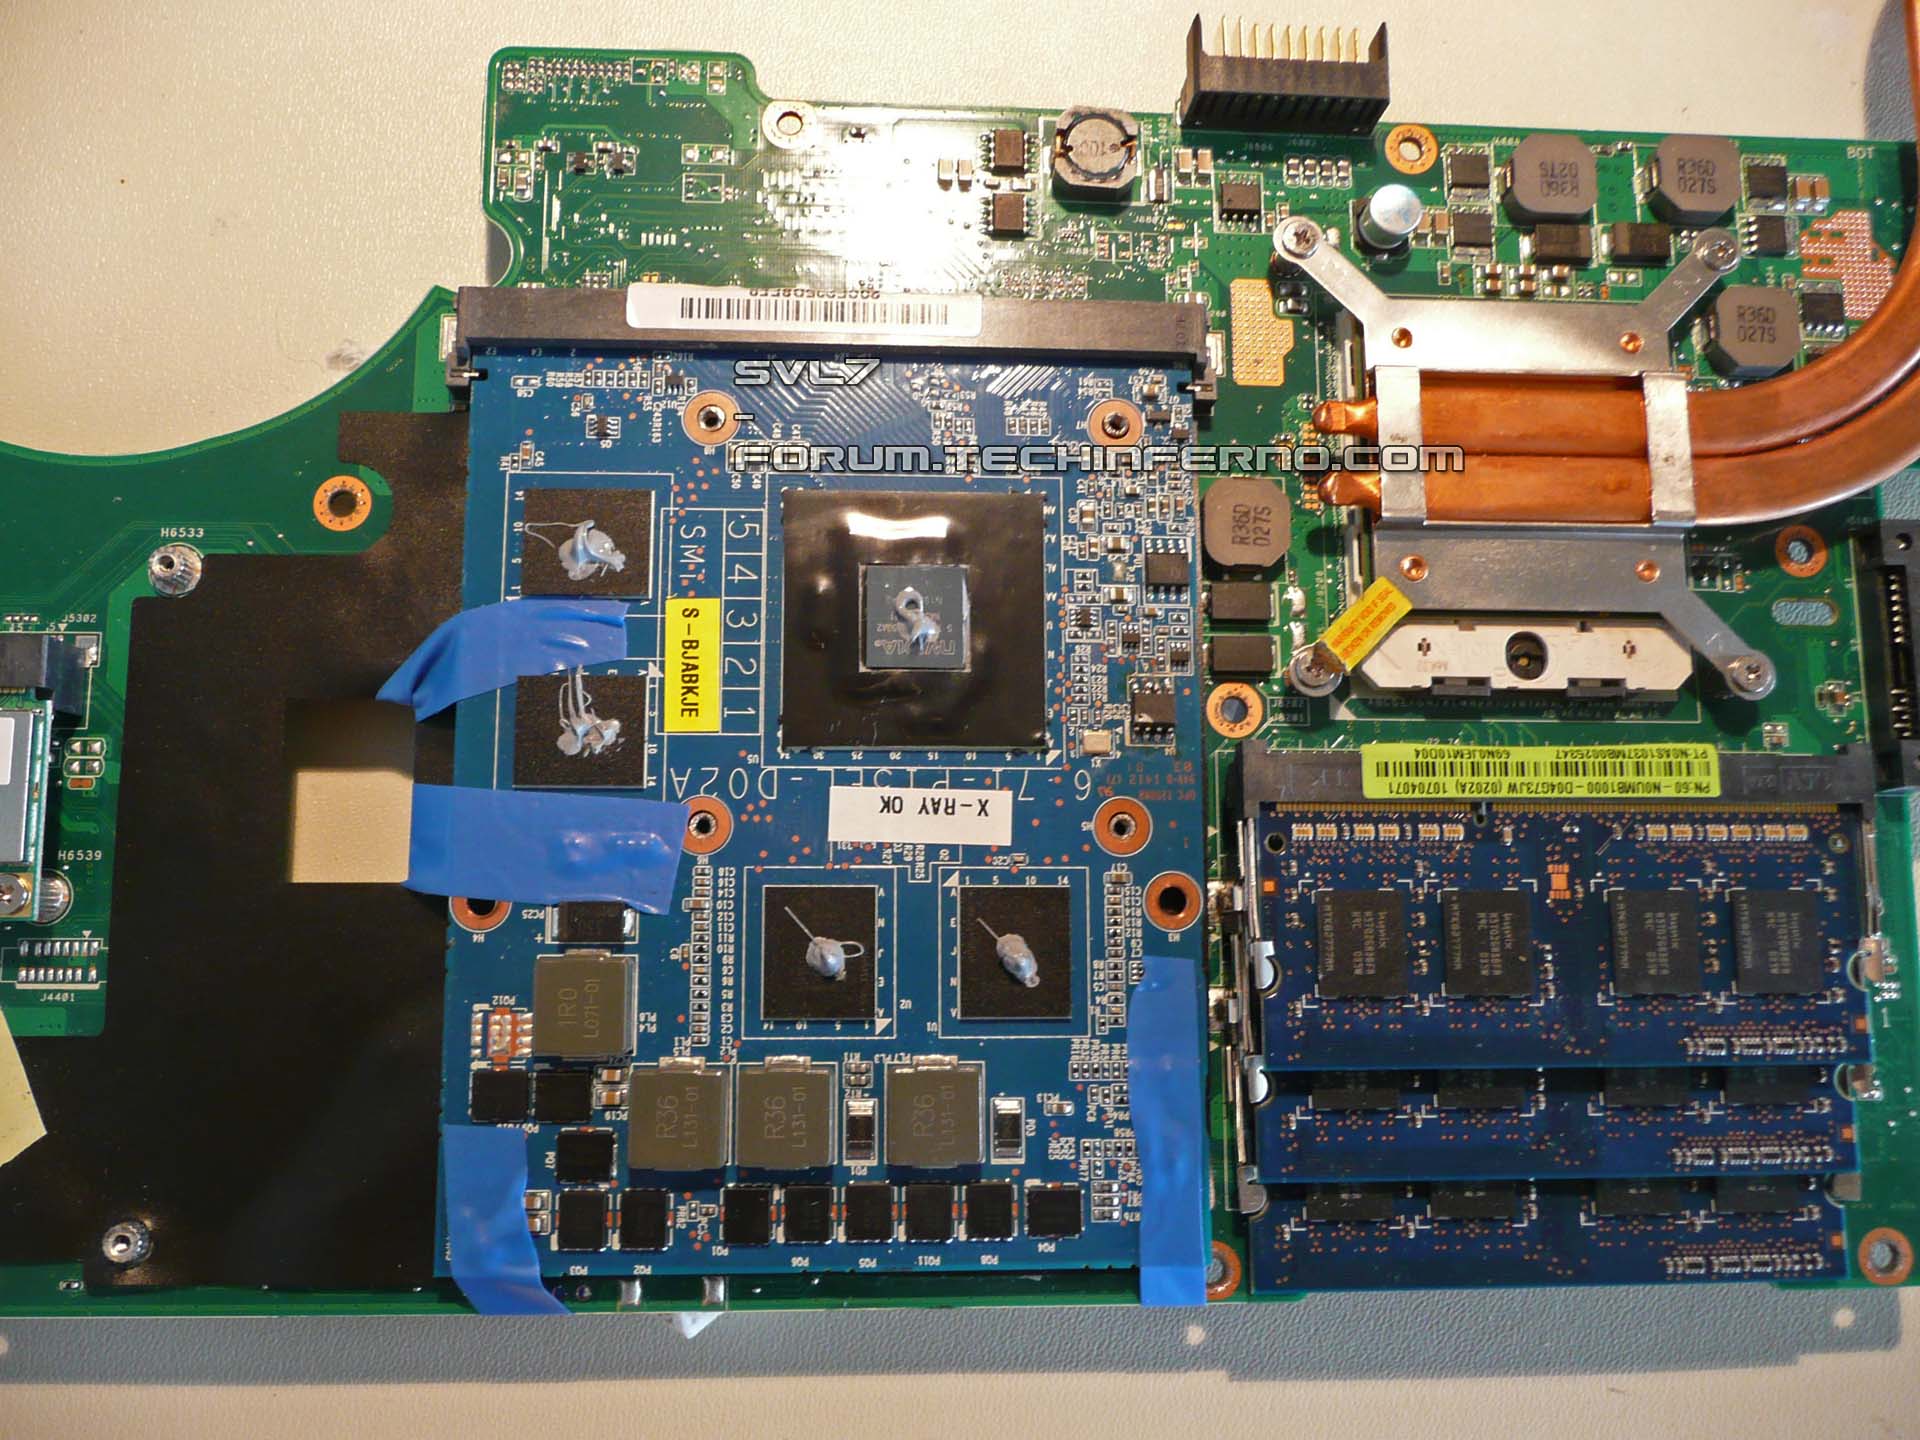
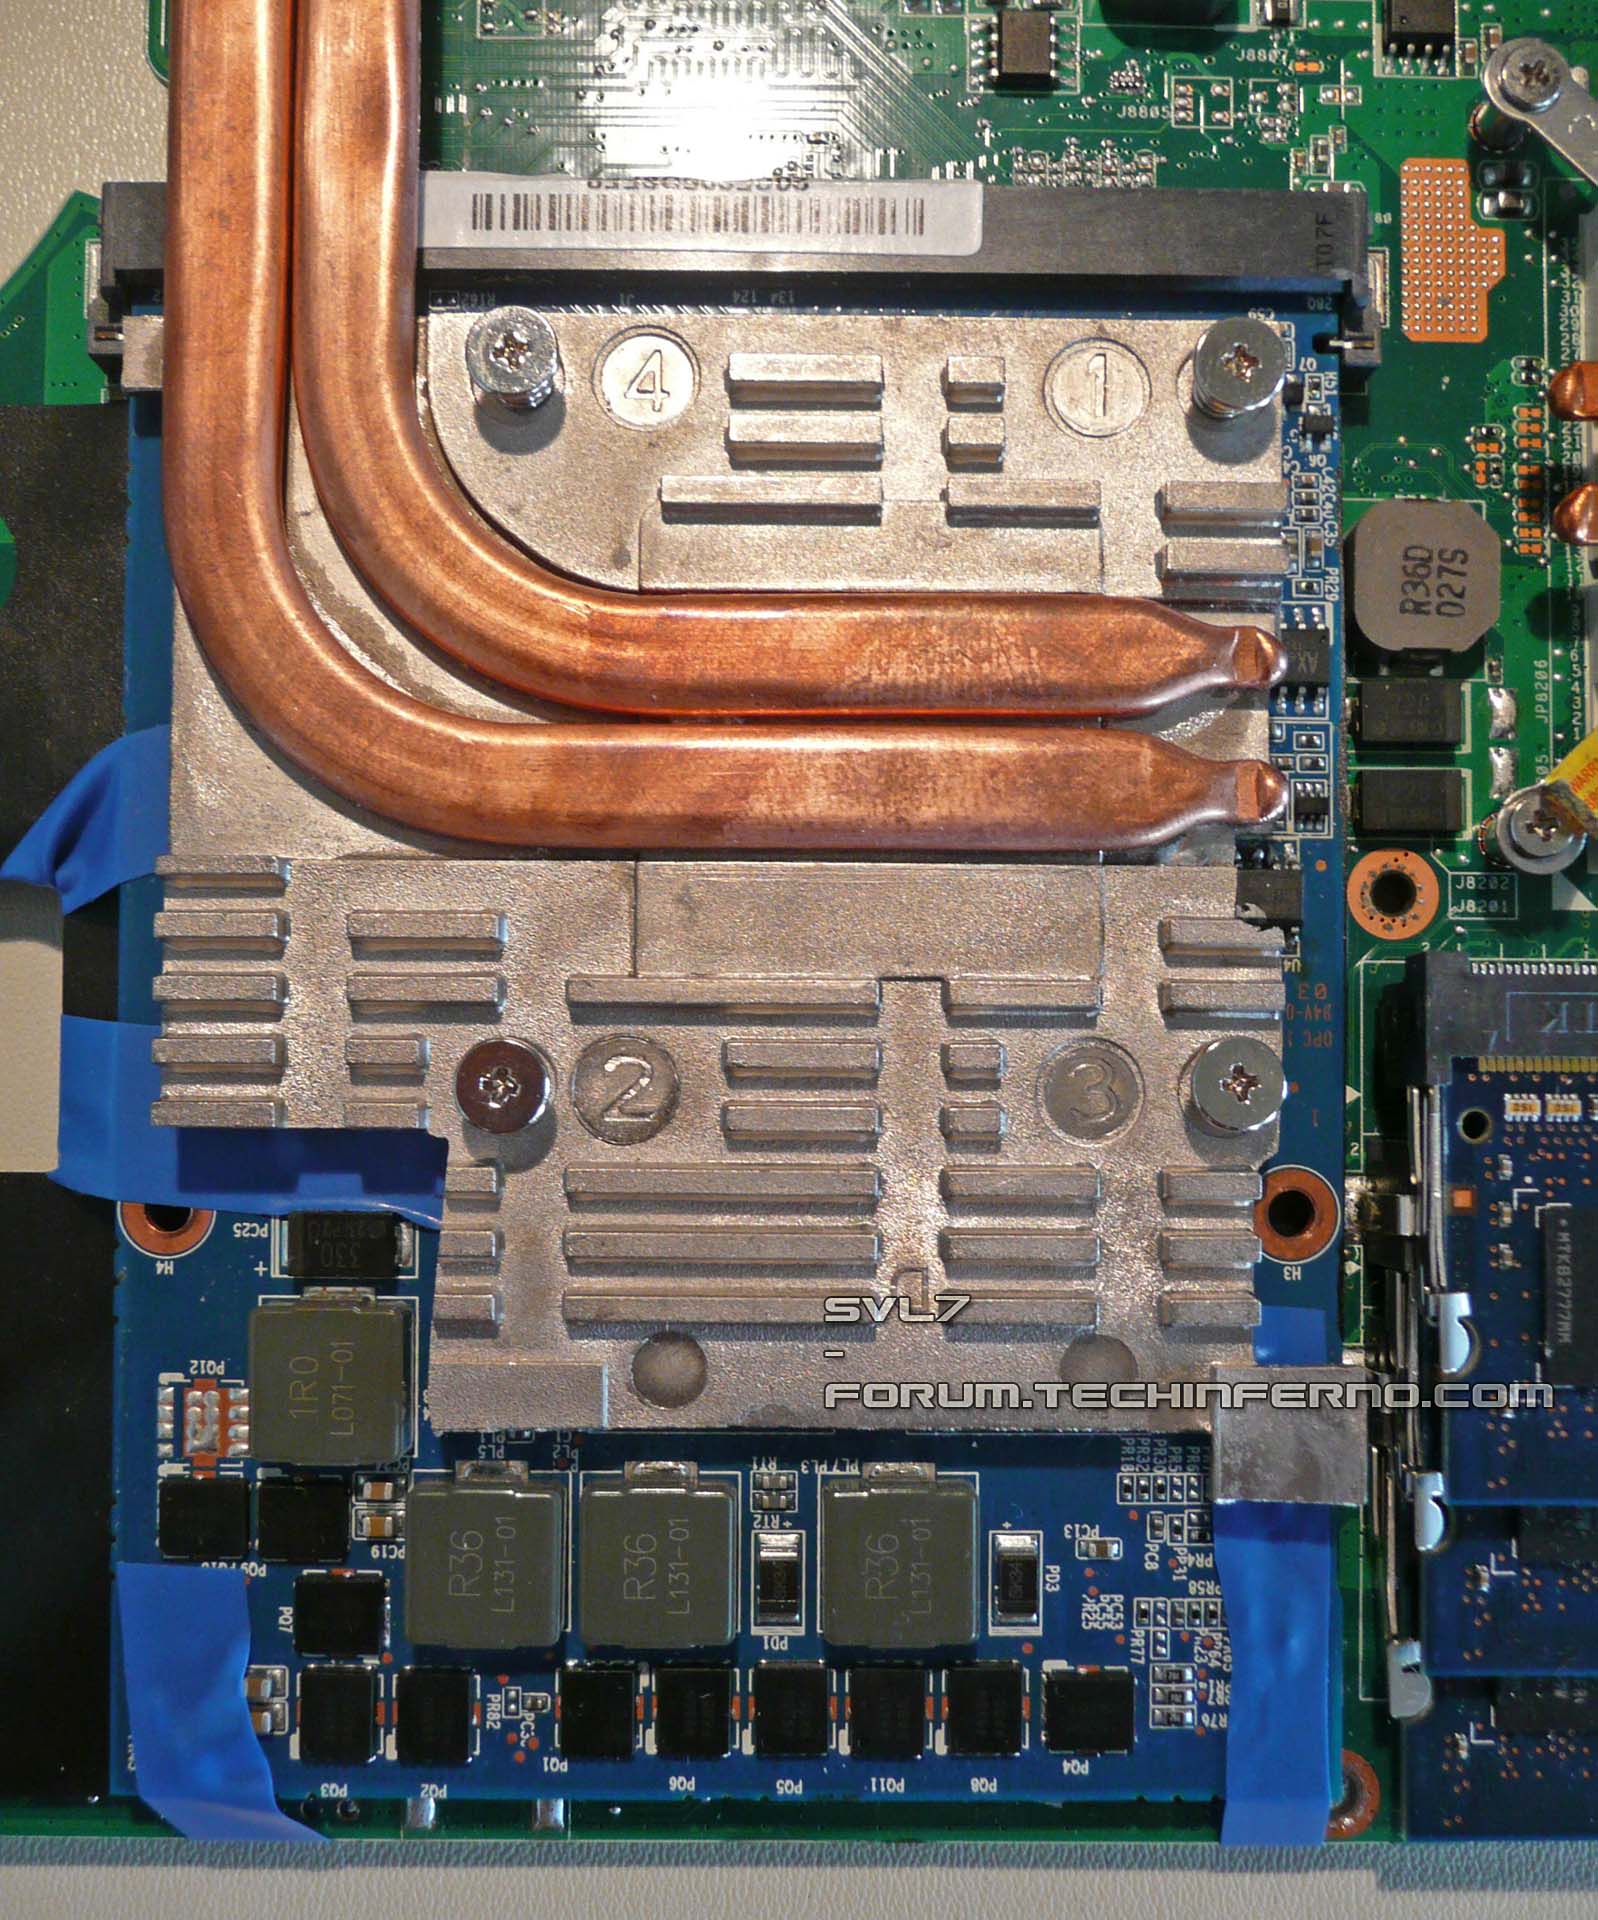
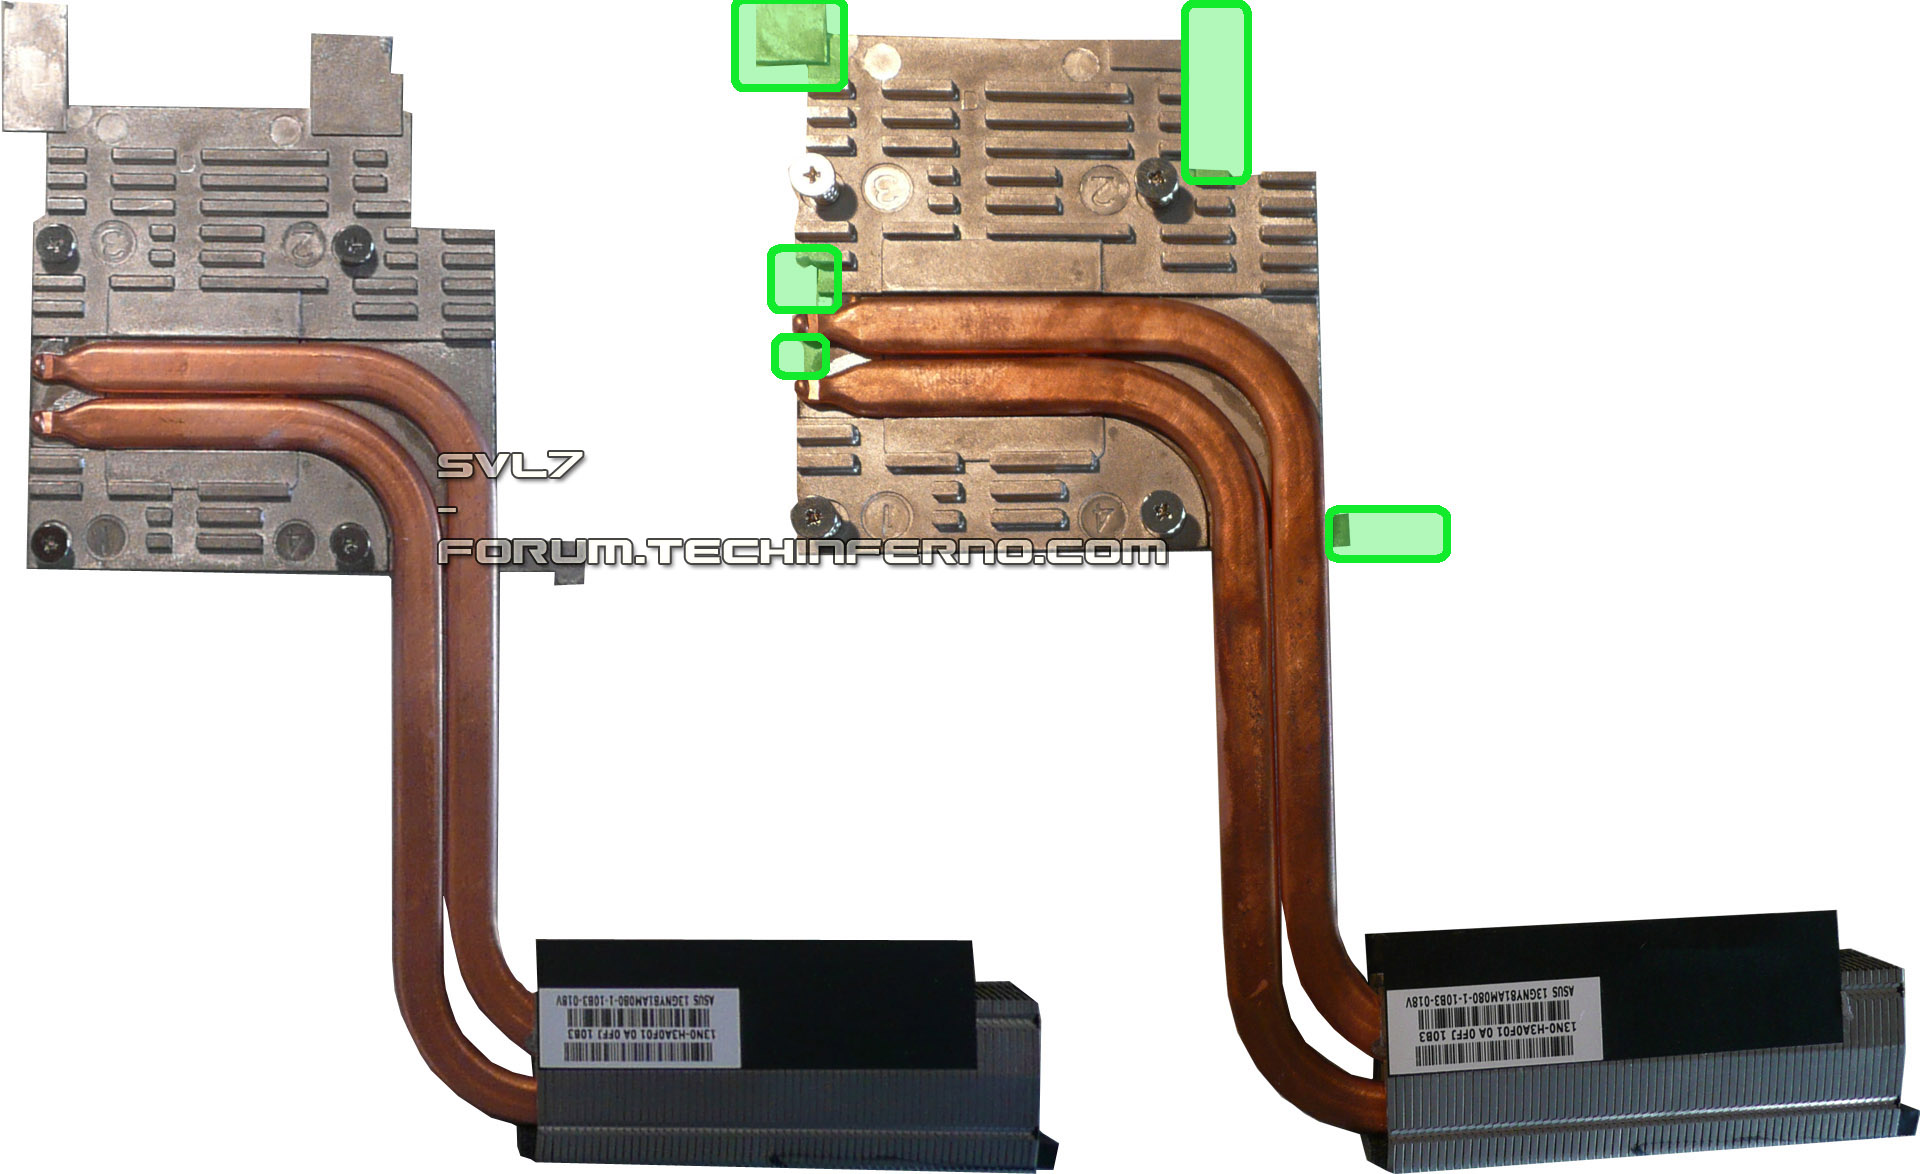
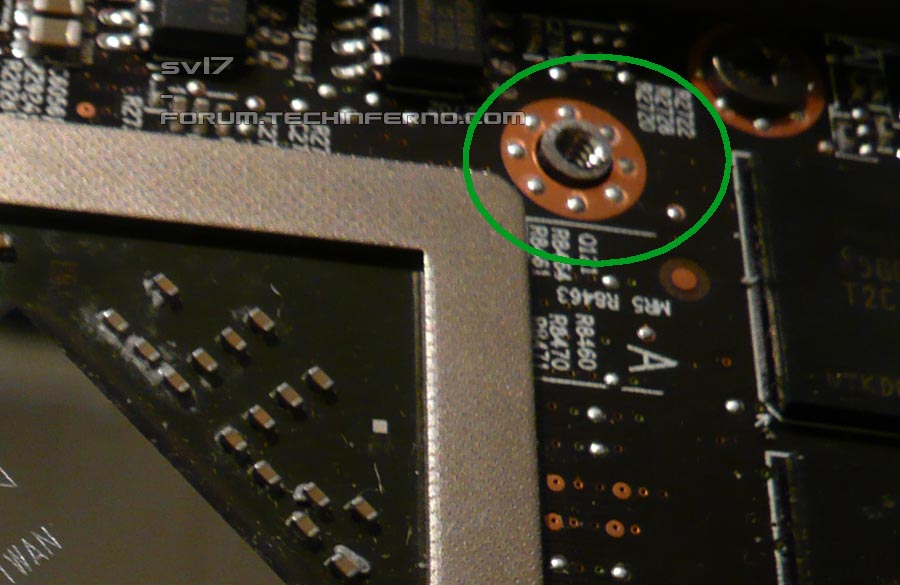
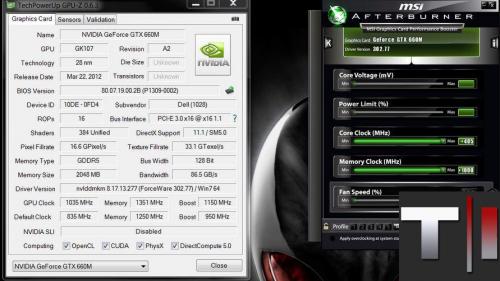
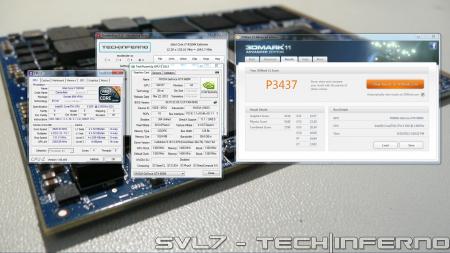
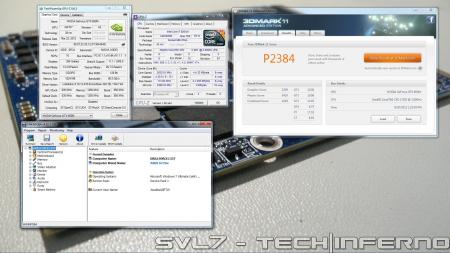
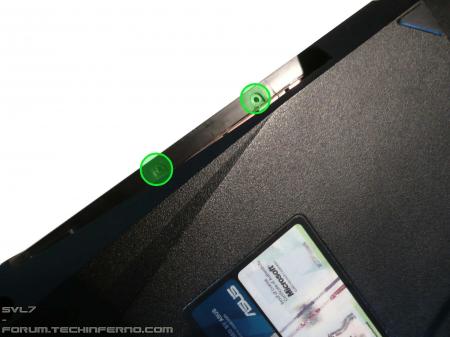
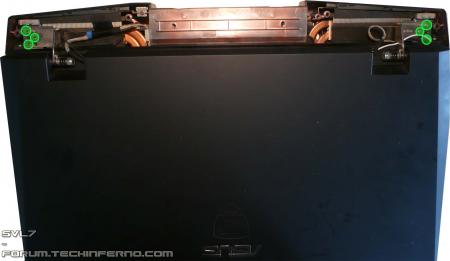
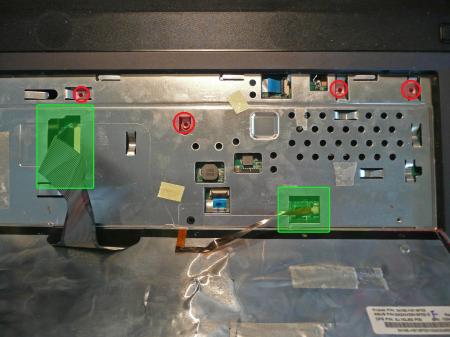
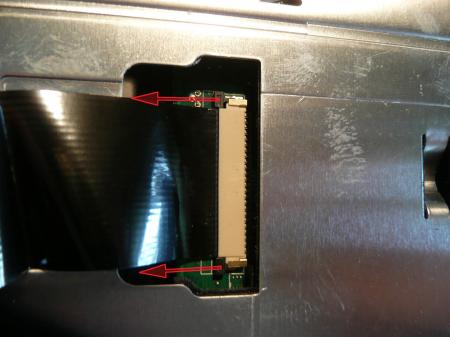
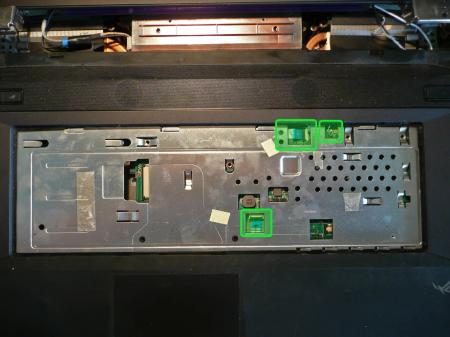
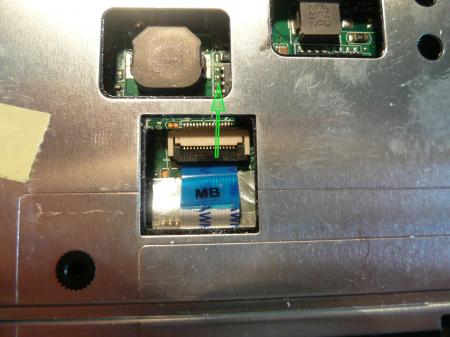
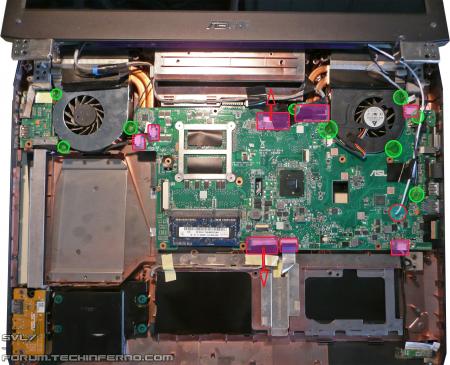
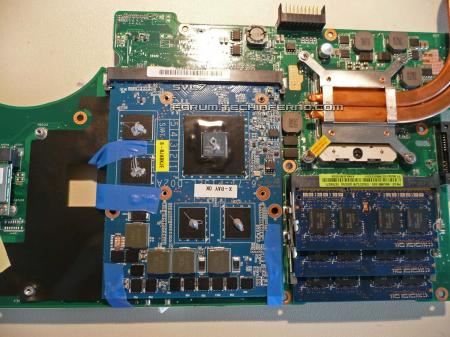
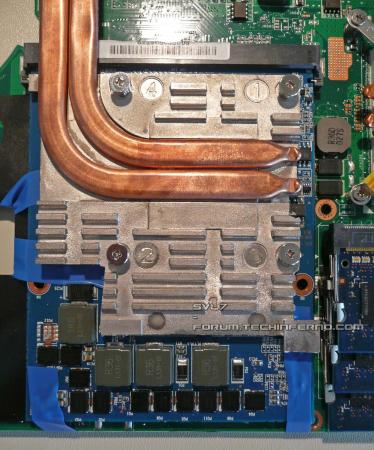
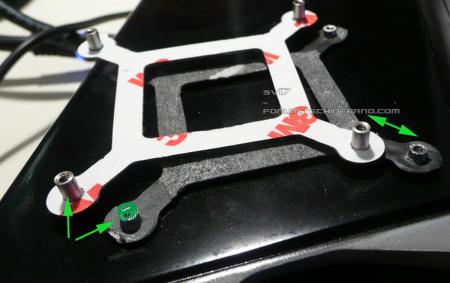
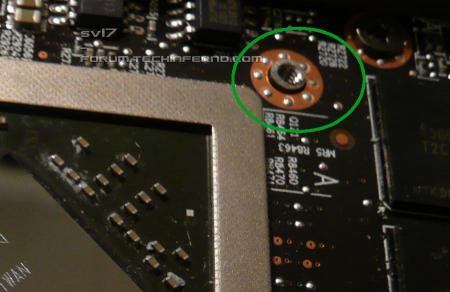
Yes, it works. The popular Asus G73JW can be upgraded with a Kepler card The G73JW isn't what I'd call "easy to disassemble", but it's doable. If you haven't disassembled this system before, follow the instructions very carefully. It's crucial not to rush anything, a lot of cables and plugs are really fragile. The upgrade is rather difficult, especially when you compare it with an Alienware / Clevo system, but it's really worth it. I want to thank MXM-upgrade for providing the test card, and @Conker for providing his G73JW for another experiment (we already disassembled this system several times... ). Check the end of the post to see some benchmarks. *** *** *** What you need for this upgrade: Nvidia GTX 660m, preferrably pre-flashed with the proper VBIOS. I assume MXM-upgrade.com will provide you the card ready for the upgrade, so you don't need to worry about the VBIOS and the involved procedures. In case you get your card somewhere else it's very likely you'll need to blind flash the card in order to get a picture on the screen. That's a relatively inconvenient procedure, especially since you can't be 100% sure whether it's your fault or possibly a defective card in case the blind flash doesn't work....I only tested the card from MXM-upgrade, other 660m may work as well, but I can't tell for sure. . . Asus G73JH GPU heatsink - The 460m which Asus put in the JW is a complete abomination when you compare it to an MXM card... it uses the same physical pin layout, but that's it. You won't be able to mount the JW heatsink on a proper MXM module, but it works with a (slightly modified) JH heatsink. You can grab one at asusparts.eu, ebay, other online notebook parts shops, etc., whatever you prefer. . . Screws which fit the backplate of the card you buy, or a Dell GPU backplate from a 6900m / 7900m series card (as those backplates have the proper thread size for the screws of the JH heatsink) . Screwdriver (make sure it really fits the screws) . Metal file or tool with similar effect to do some small modifications on the JH GPU heatsink . Thermal paste & some stuff to clean off the old paste (e.g. rubbing alcohol) . Some tape to keep the 660m in place . and I highly recommend: ESD-mat and wristband!! While it will also work without this equipment (you have to be really unlucky to damage your system by ESD), nevertheless, l won't recommend anyone to do so. Keep in mind that you're going to completely disassemble your system. Modifying the heatsink: No need for a lot of talk, it's pretty straight forward, look at the picture and you'll know what you need to do. When you're done with the modifications make sure it fits. Preparing the backplate: You need to slightly grind down the 'poles' of the backplate in order to get enough pressure on the die. Take a look at the pics and you'll see what I'm talking about. Without this mod the 'poles' are too high and won't allow you to properly mount the heatsink. Disassembling the system (step by step): - Uninstall your current Nvidia drivers. - In case your card doesn't already come with the required vbios: Set the first boot priority to USB (!!!) Else it will be rather difficult to blindly flash the card. - Shutdown your system, remove the battery and the AC adapter. - Press and hold down the power button for about 15 seconds. - Remove the quick-access panel of your G73: - Remove all the regular sized screws on the back (green), the two drives (red arrows), two small screws in the battery compartment (red) and unplug the WLan antennas (encircled red). Make sure you don't miss a screw. - Remove the optical disc drive. - Remove two small screws which previously have been hidden by the optical disc drive: - Now the display assembly, six screws. Then carefully lift the display and place it as shown in the next pic. - Once you have the display like this, remove the keyboard. You need a small flat tool for the five clips. Then lift it carefully. It gets hold in place with double sided tape, so you need to apply some force. Always use care, there are cables attached to it. - Four more screws. Then remove the cables which are connecting the motherboard with the keyboard. Carefully pull on the black part of the connector (see arrows) to unlock the cable, then you can remove it. - More cables: - Three screws on the mobo, 2x3 screws for the fans and a lot of cables to unplug. Also pull out the WLan antennas through the hole. Again, be careful with the cables. Once everything is detached, remove the fans and then the mainboard. - And finally... the heatsink(s). Remove the screws which are encircled with green first. Lift the heatsink and then you can unplug the card after removing the 'red' screws. - Put in the 660m and keep in in place with some tape. Unfortunately you can't use the screws as the holes on the motherboard aren't conform with the MXM standard. Put a small amount of thermal paste on the die of the GPU and as well on the VRAM modules. Using thermal pads for the memory isn't a good idea in this case since it would increase the distance between the die and the heatsink. Then mount the modified heatsink and reassemble the system. Make sure the heatsink really fits well and doesn't touch any component it shouldn't. After reassembling your G73, start it up. When your card already comes with the proper vbios it should boot just fine, else you messed up something during the dis- and reassembly. In that case check all the cables etc. If your card didn't come with the required vbios, then you need to blind flash your card now. That's why I stated earlier to set the first boot priority to USB in case the 660m doesn't already come with the proper vbios on it. The required vbios is attached to this post. Once your system is running and booted the OS it's time to install the GPU drivers. Download the desired drivers from Nvidia and unpack it, then put the modified .inf file (see post attachment) in the 'Display.Driver' folder, delete the old one with the same name in there. Then start the installation. That's it! Have fun with your upgraded machine!! And some benchmarks... 3dMark11 run at stock and overclocked... Gotta love the 660m, it's so much fun to overclock it, just look at the core clock Just ask if you have any question! As already mentioned, this upgrade procedure isn't easy for a beginner, but it's totally possible as long as you take your time, no need to hurry. 660m_G73JW.zip modified inf 660m G73JW.zip


- 146 replies
-
- 14
-

-
- 660m
- asus g series
- (and 8 more)
-
Hello fellow Aliens, My specs: Alienware M17xR4 got it back in Dec 2011 (Dell decided to upgrade my M17xR3 that crapped out on me) Intel Core i7 3940XM Upgraded from 660m to 780m 16GB Samsung 1600 RAM 2 500GB Samsung SSD in Raid 0 ( i know sue me) This will be a little guide with my journey of upgrading my dedicated GTX and CPU. Eagle vision activated and started the hunt on eBay for something that would not leave my bank with a massive dent. All i wanted to do is breathe more life into this monster that i have grown way too attached to. A quick search revealed people want way too much for their hard ware . How ever i started making offers and messaging people to negotiate a better price. I think it took me two days before i found a nice 3940XM listed for 350$. Messaged the dude and surely he replied with 200$ is a no go . But i can do 300$ . I had to come back with 280$ and to make the story short he accepted . Put my 3610QM after looking up on eBay they were going for 80$ give or take. So i listed it for 60$ with 4$ shipping . I got an E-mail from eBay; congrats on your listing...and your item sold . I did not want any negative feedback, so i removed the CPU wiped the thermal paste and decided to be with out my baby () until the 3940XM () arrived ( which took 3 days). That package was like a in my arms being delivered to its rightful owner. Reading all the replies on the offers i had made on 680m and 780m listings. From hell no to sorry you are crazy, there was a fellow that shared with me that the money is not a priority and his new 980m made him so happy he would sell his 780m for 300$ . Naturally i offered 280$ with paypal invoice = no eBay seller fees. What you know he accepted!!!! Listed my 660m for sale and till this day it is still there . I dont want to share my agony with you, waiting for a seven business day delivery by UPS ground , so lets fast forward to when i got the 780m and installing it. Seller advised i would need a 100W heat sink, which my poor 660m oddly had. So 780m is installed and a dual boot of Win10 and Win7 in order to see which Win the 780 preferred. Windows recognized the new hardware, so did the Bios, so i went to www.Nvidia.com and downloaded the latest drivers . The installer kept on saying no compatible hardware was found so that drove me . It was not until i googled " M17xR4 780m upgrade that i found out the 780m is not compatible the "Legal way" and a INF file modification was in place to get the drivers installed. Again googled M17xR4 780m upgrade drivers, and i found numerous of people crying for help as well. I thought to my self ( i will never see this work today, better try this in the morning, but before i went to sleep i needed some wisdom of a fellow Alien to come to my aid. A guy that goes by tanzmeister replied and guided me. Here is a copy paste for yas. These are the links you should check in order to install drivers properly:Flashing vBios:1- Guide:http://forum.techinferno.com/nvidia-video-cards/2166-[guide]-nvidia-vbios-flashing.html2 - vBios for the 780mhttps://www.techinferno.com/index.p...king-editions-modified-clocks-voltage-tweaks/Modded drivers:http://forum.notebookreview.com/thr...od-for-780m-880m-and-980m-mobile-gpus.767644/I am not actually sure these drivers are modded... They might just be "Enhanced". So check out this link as well to learn how to mod drivers yourself (really not that hard)https://www.techinferno.com/index.php?/forums/topic/4055-guide-modding-nvidia-oem-inf-files/To install a modded driver you need to restart Windows with DSE disabled (driver signature). Please google this to find how to do it. I personally haven't tried MrFox's drivers but I read they yield fantastic results on Kepler GPU's (780m included) so you can give these a try. Everything worked!!!! Red Alert 2 and Age of Empires 2 were running!!!! Joking aside i launched Gta v and The witcher 3 which ran at a decent 30+ FPS. Castlevania Lords of Shadow 1 and 2 i could play at Ultra. I was genuinely happy with my rig. Until today, for some reason i wanted to try an unlocked Bios. I was on A13, looked up Drivers on Dell's website and downloaded A12, A11, A10 and A05. Did you guess what i did next? I flashed them all one by one, A12 first which was a sucess, A11 which also yielded good results. A10 finished flashing and instead of restarting my Alienware decided to take a nap. Turn it on, and what i feared has happened. I HAD BRICKED MY BIOS!!!! Pulled my crappy Pentium laptop and googled M17xR4 bricked Bios. Thank the merciful lord of forgiveness, of light, of hope, of all that is great. I had stumbles on T|I: Following that i Blindly flashed A05 through recovery (which you really do not know what the hell is going on, Put the file on a flash drive, insert it in eSata. Shut down and remove both battery and AC adapter. Hold the END button on your keyboard and plug in your AC-adapter. Fans turn on 100% All the lights where showing, but then it started beeping and i had to go to work in 30 mins so i left it and proceeded to a warm shower. Finishing up and coming back to the room it was still beeping so i unplugged the AC-adapter reinserted the battery and AC-adapter. Pressed the and voila my tears were sucked back in. Thank you for reading, i know i am not much of a writer, but i just wanted to share my journey if someone was thinking of doing the 780m upgrade.
-
Hello I have a gtx 660m. I Put it in my m15x with a 1.5mm coper shim. It fit good, also added paste. I have windows 10 and have tried every driver none are working. the eurocam driver I got off from their site for the 660m upgrade starts downloading and 2 minutes into the install, it fails, and an error pops up, "install failed" and that's it. please help :\ NOTE: The 660m is showing up as unknown in the device manager but I can still manage to get the hardware ids.. Also I believe my bois is a08 I downloaded a09 from dell and it just gave me a folder with some files in it no download setup THANKS!!
-
Hi guys, I'm interested in increasing the voltage of my graphic card. I followed the tutorial to overclock my card with a custom vbios but i still cant modify the voltage in the nvidia inspector tool. How could i modify my vbios to increase the voltage ? Here is the tutorial im talking about : http://forum.techinferno.com/asus-gaming-notebook-forum/2538-%5Bg75vw%5D-modified-bios-vbios-higher-overclocking.html Thanks a lot
-
Version 1.0.0
30 downloads
The 'Kepler' GPUs from Nvidia perform really well, even at increased clocks speeds they stay quite cool - a perfect behavior when it comes to overclocking and improving the performance. Unfortunately the mobile GPUs suffer from an artificial +135MHz core overclocking limit, so you can't go higher by using tools like Nvidia Inspector and similar. The modified VBIOS files listed here have this limit unlocked, some have increased stock clocks or tweaked voltages. Instructions: I recommend flashing under DOS using nvflash Donation link In case you want to buy me a beer Thanks and cheers! -
Hey guys, It seems that the majority of posts I have seen so far pertain to the gt series in regards to modded BIOS', overclocking, unlocking etc. I was wondering whether anyone had any tips on undervolting the 660m on a GE60-257US laptop, and undervolting the i7-3630Qm. I have read that, in order to undervolt, or even adjust the voltage of the 660m in a GE60, one must use a modded BIOS, and I have seen nothing on undervolting the cpu. I was following a mod thread posted on the laptopreviews forum by Forge, found here: GE60 Optimization/Benchmark/Modding Thread but Forge has since put his GE60 up for sale ( which I would very much love to buy, but alas am an international user ) Thus, there is no new info on the matter. The reason for my interest in undervolting, other than being something techy and cool, is my desire to keep my laptop cool, which is notorious for running ludicrously hot (in the 90-94C range on both cpu and gpu) when gaming or anything resource intensive. The warranty for my laptop is limited and I can't get a better warranty (can't even open the back panel by the looks of things now), so adding copper blocks, sheets and re-pasting is out for the moment. I can't even find a registered serviceman in my area (Auckland, New Zealand) that will stick an mSATA SSD in the thing. If you have any tips, or possibly can link me to a person/company in NZ that could help with upgrades/ modding while keeping tghe warranty, it would be much appreciated. (also, Thank the heavens for the auto-save function! I timed out while writing this ) EDIT: Here is the link to the latest BIOS (hopefully it works): http://rapidshare.com/files/12120769/w8_E16GAIMS.513.zip I will post a screenshot of GPU-Z as soon as my USB drive is found (or when my new one gets here). Here is the screenshot of GPU-Z with the BIOS updated:
-
Hi there, I am currently looking at both models of the G75VW... the specs for both are almost the same, but one has 3D and the other doesn't, and the 3D version has the nvidia 670m with 3GB and the 660m has 2GB. My question is, is this difference that big for 500 extra dolars? Is the 670m actually that better with 3Gb than the 660m with to 2GB? PD: I'm very new to this and any technical errors should be ignored! [EDIT] Could a Mod or Admin move this thread to Asus Gaming Notebook Forum?
-
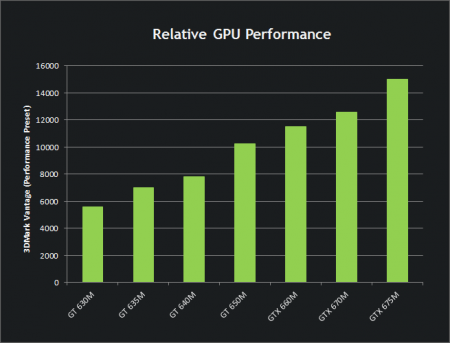
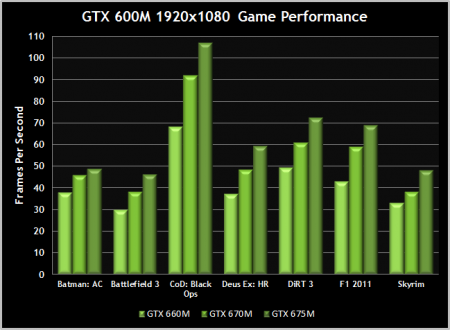
 So... after months of wild speculating and guessing we finally have some first official numbers regarding the new mobile GPUs of Nvidia. Here the specifications listed on the official Nvidia site: GTX 660M GTX 670M GTX 675M Graphics Clock 835MHz 598MHz 620MHz CUDA Cores 384 336 384 Texture Fill Rate (billion/sec) 30.4 33.5 39.7 Memory Interface DDR3/GDDR5 DDR3/GDDR5 DDR3/GDDR5 Memory Clock 2000MHz 1500MHz 1500MHz Memory Interface Width 128-bit 192-bit 256-bit Memory Bandwidth (GB/sec) 64 72 96 Max SLI Configuration 2-Way 2-Way 2-Way 610M GT 620M GT 630M GT 635M GT 640M LE GT 640M GT 650M Graphics Clock 900MHz 625MHz 800MHz 675MHz 500MHz 625MHz 850MHz CUDA Cores 48 96 96 144 384 384 384 Texture Fill Rate (billion/sec) 7.2 10 12.8 16.2 16 20 27.2 Memory Interface DDR3 DDR3 DDR3/GDDR5 DDR3 DDR3/GDDR5 DDR3/GDDR5 DDR3/GDDR5 Memory Interface Width 64-bit 128-bit 128-bit 192-bit 128-bit 128-bit 128-bit Memory Bandwidth (GB/sec) 14.4 28.8 32 43.2 28.8 64 64 There are seven 600m series GPUs which can be considered low- to middle-end and three which are high-end.No word on the Nvidia site about which manufacturing process is being used for these chips, but the statement telling one should assume that they really shifted to 28nm only, but I want to see this confirmed before I really believe this to be true.Anyway, looking at the specs of Nvidias new mobile flagship, the GTX 675m I can't help but to think that they just shrinked the fermi architecture... the specs and clocks are identical to the 580m. They might also have messed up the numbers they put on the site, it just seems unlikely that all GPUs from the 640m up to the 675m all have the same core count (except for the 670m).Well, I guess we will see more information in the near future, when the first systems with these GPUs are getting released. I'm definitely curious about how they perform and can't wait to see some benchmarks. Also the overclocking capability is going to be a very interesting point. So far there's no word about new features for this GPU series, so it's unclear whether the "clock boost" technology which can be found in the desktop GTX 680 will also make its way to the mobile GPUs. Here some performance graphs, also taken from Nvidias website:[ATTACH=CONFIG]3707[/ATTACH] [ATTACH=CONFIG]3708[/ATTACH] So far I'm really not that impressed, though we have yet to see the real world performance, and tbh I'm really curious about the AMD 7000m series :)