Onyoto
-
Posts
21 -
Joined
-
Last visited
Content Type
Profiles
Forums
Downloads
Everything posted by Onyoto
-
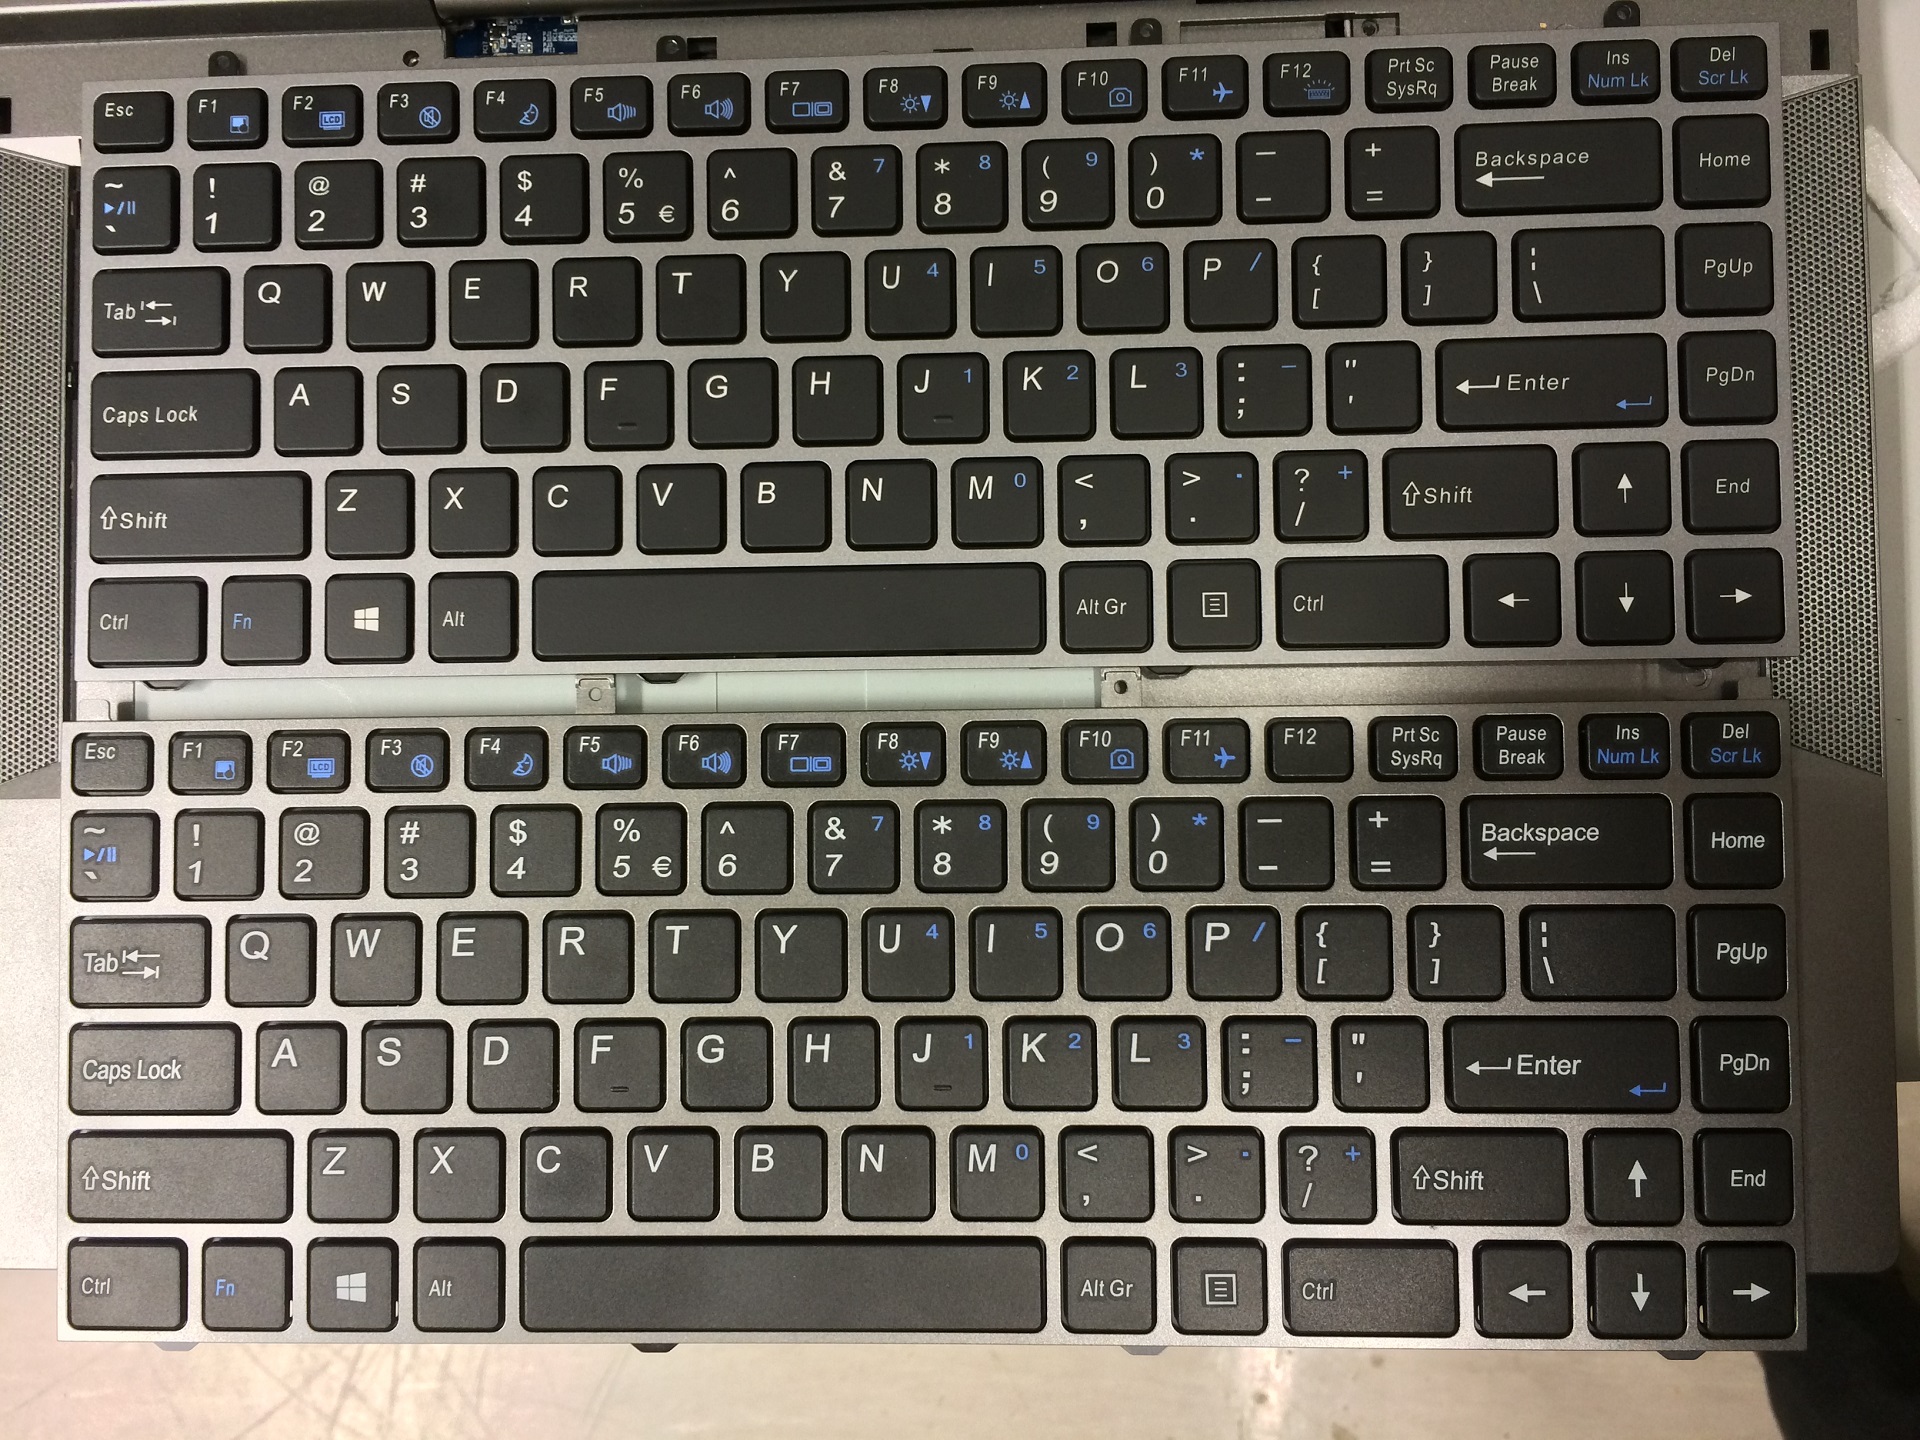
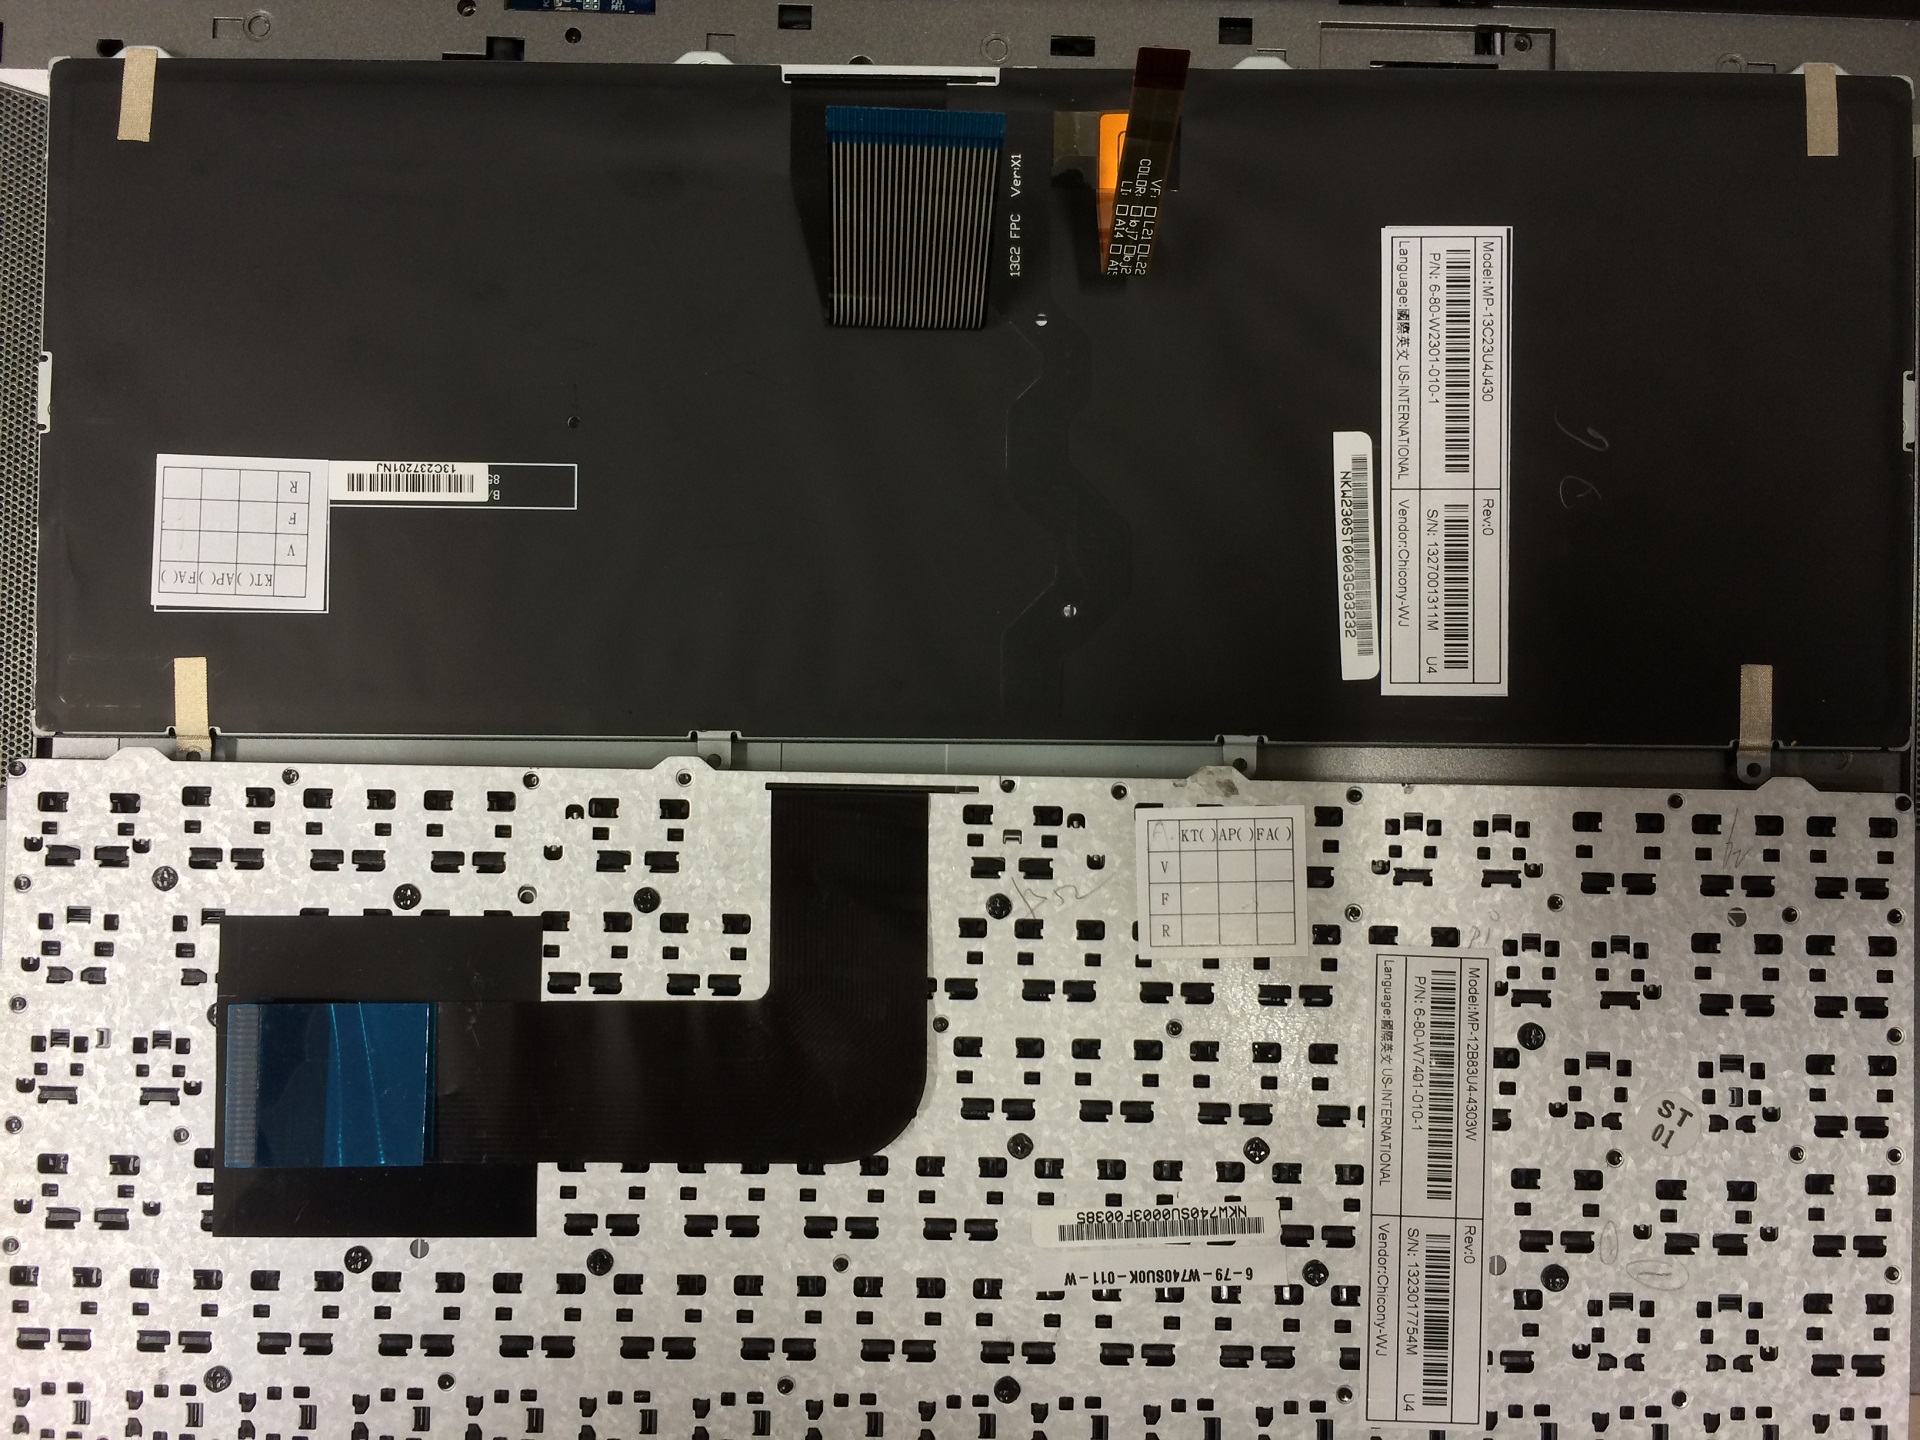
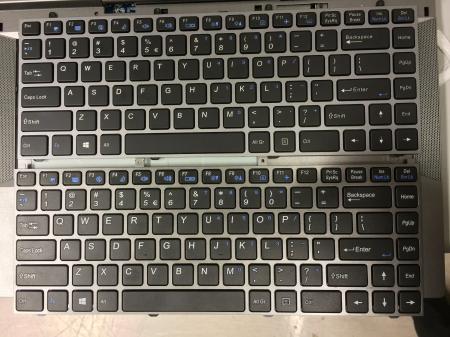
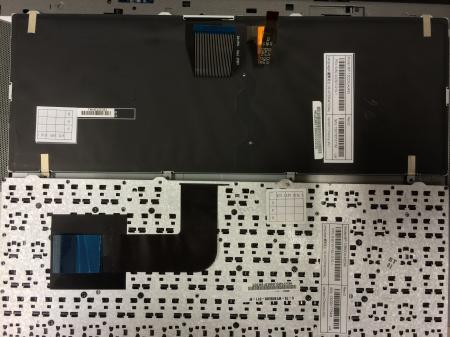
Sorry for the 6 month delay, not sure if you are still interested, but I did get the photos of the two keyboards side by side. In short they are not interchangable without a lot of modification, both mechanical and electrical... Also there is nowhere on the W740SU to plug in the illuminated keyboard, so you would lose that feature also.. Here are the two keyboards, they are positioned on a W740SU chassis. The top keyboard is from the W230ST and the bottom keyboard is from the W740SU. The keys line up and the keyboards are the same overall dimensions, however that is the end of the good news! This is the underside of the two keyboards, the black one is from the W230ST. See it has two ribbon cables one for the keys and the other for the illumination. Also the position of the keyboard connector is different, which will need modification to work in the W740SU. This is the W230ST keyboard in position on the W740SU chasis, notice neither the lugs on the bottom or screw holes along the top line up...
-
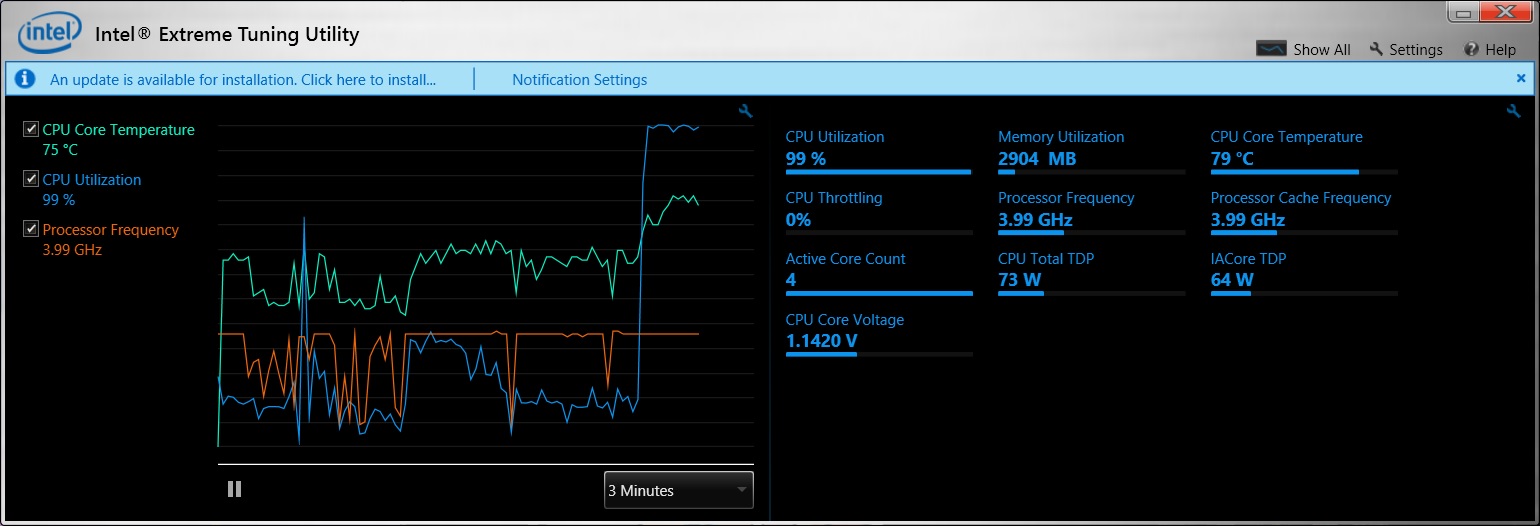
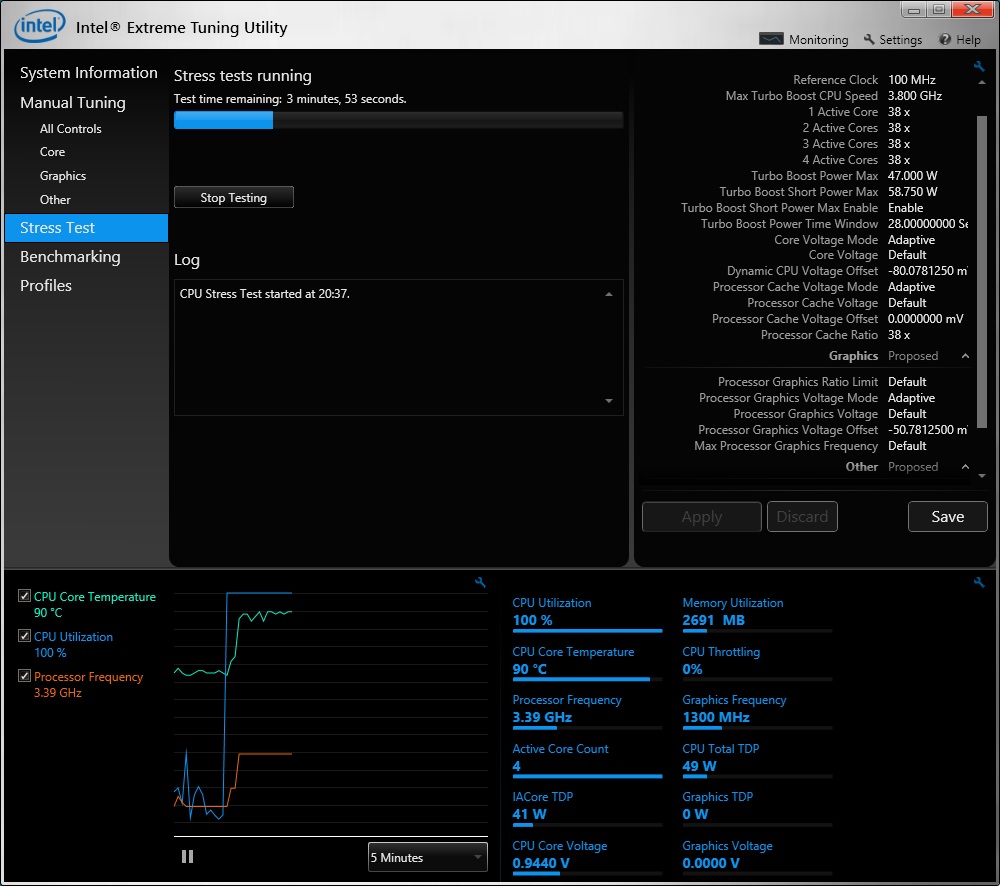
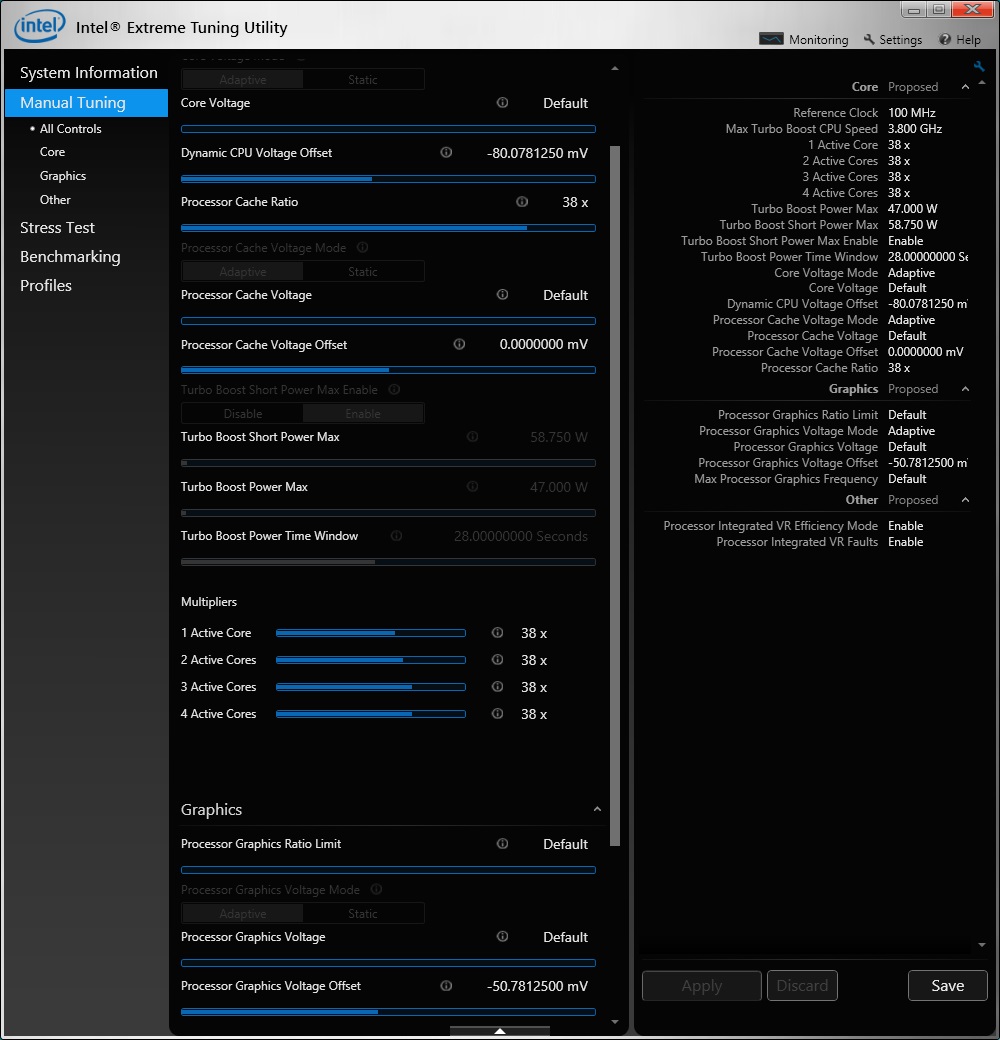
I tried my PC in NVIDIA mode last night and it runs the same as in Intel mode. The default max current for the CPU is now even correct in A06 (95A for the i7-4930MX). Of course I up this in XTU, the XTU settings are the same as my previous post. Here are the screenshots: Above: Running XTUs built in stress test (first 30s) Above: Prime 95 Large in place FFT. Within initial 30s (80W Short Term Turbo TDP) Above, ran Prime 95 for 40mins and took this screenshot.

-
Yes, bend the heatpipe a couple of centimetres from the socket, it ony needs the slightest of tweaking there as the fulcrum action will do the rest... I kept checking the contact points and visually they look OK, but the thermal interface didnt work when running the CPU under stress. I tried all sorts of exotic TIM, Coolaboratry Liquid Metal Pro for one, this is a PITA to fit and was no better than AS5. I eventually just used Arctic Silver 5 and this works just fine. As I said this was last done in October and it still is as good now as then...
-
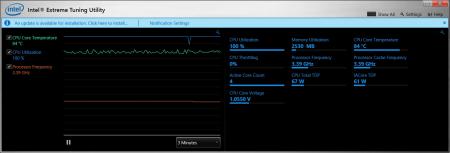
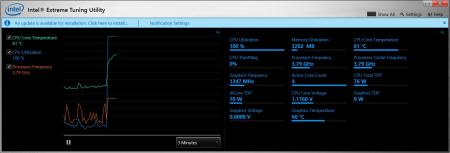
The problem seems to be mechnaical, not an issues that can be fixed by a BIOS update... I tried a shim and it made things worse! (copper plate, about 0.3 mm). I found most of the AW 18s thermal issues seem to stem from a machanical issue. The end of the heatsink (where the radiator is) touches the plastic top cover, the day to day use of the system causes the thermal interface between the CPU and heatsink to be disturbed. This crates a reseating of the heatsink and CPU without optimum thermal past coverage. I first saw this when I first re-applied thermal paste to the CPU. The first day it was great (generally under 85c @ 65W), by day 2 the CPU overheated within seconds and the PC shuts down! To fix it, I took the system apart (again) and bent the heatpipe very, very gently, enough to make the radiator sit 2-3mm lower (with reference to the keyboard being the top). I did this in October and have not reseated the CPU again, it is still fine. I use this sytem every day. Although this shouldnt affect you if the board is out of the chassis... I just applied A06, there seems to be a difference with all BIOS version I have tried between Intel GFX and NVIDIA GFX mode. The CPU seems to be correctly programmed if using its own GFX and then seems to be starved of current if in NVIDIA mode. All these results were obtained using A06 and the graphics in Intel Mode (Function + F5) Here are my results after applying A06, running Prime 95 (In Place Large FFT) for 30 seconds, using my XTU settings (80W, 120A peak) Here are my XTU settings: For most "high Stress" applications the CPU runs at 4GHZ, even with all the cores loaded, its just Prime 95 which settles back to 3.6GHz (when the short turbo is active, it runs about 4GHz for 30 seconds!) This is after 10 mins, the CPU is still under 85c. (85C is a magic temp for Intel processors, keep it under that and it will use less power (less leakage current) and therefore perform better per watt) This is runing XTUs built in stress test... straight after stopping Prime 95, notice the CPU has not cooled down yet, but the CPU still runs at 4GHz. When I get time, I will repeat the exercise in NVIDIA mode to see if there is a difference. Another interesting thing of A04, 5 and 6 is the battery life is longer (in Intel GFX mode), I wonder if Dell enabled C7s in the BIOS? I can get upto 5 hours now!
-
I know what you mean! I will have a look for you when I see those 2 models together later.
-
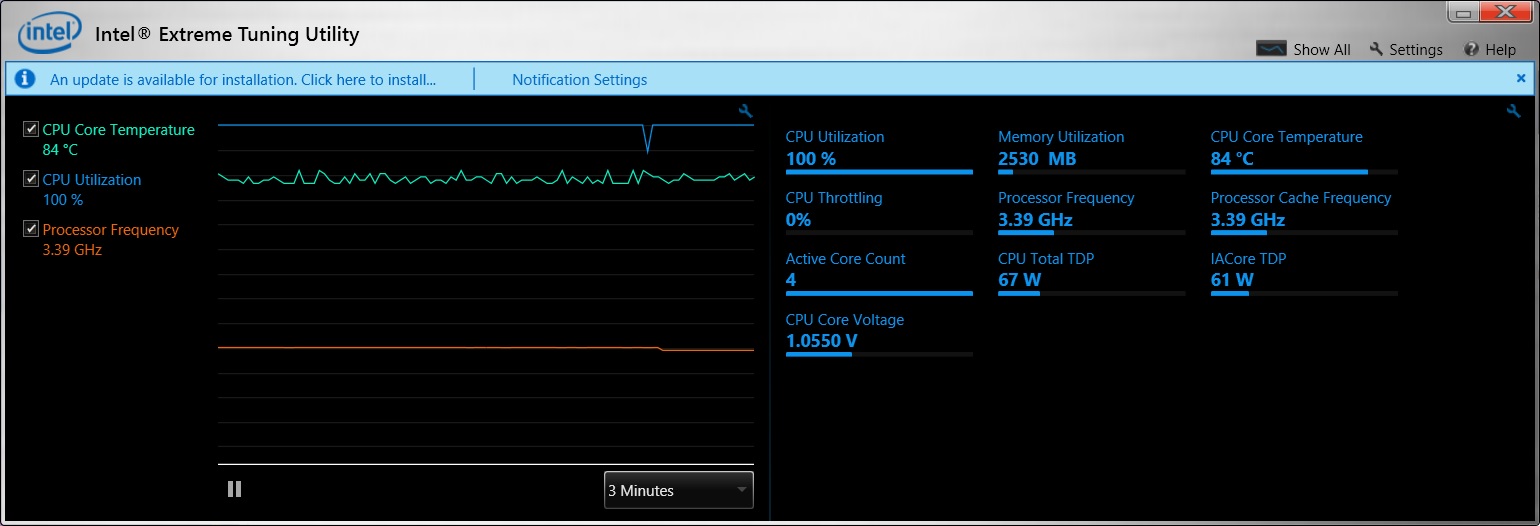
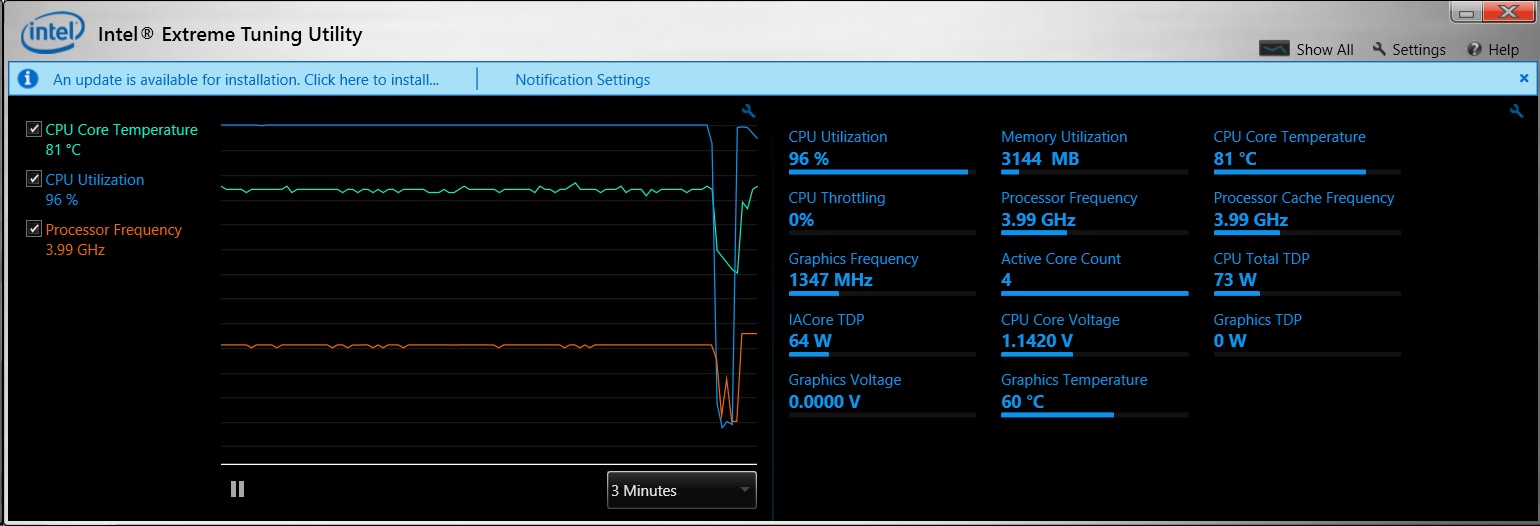
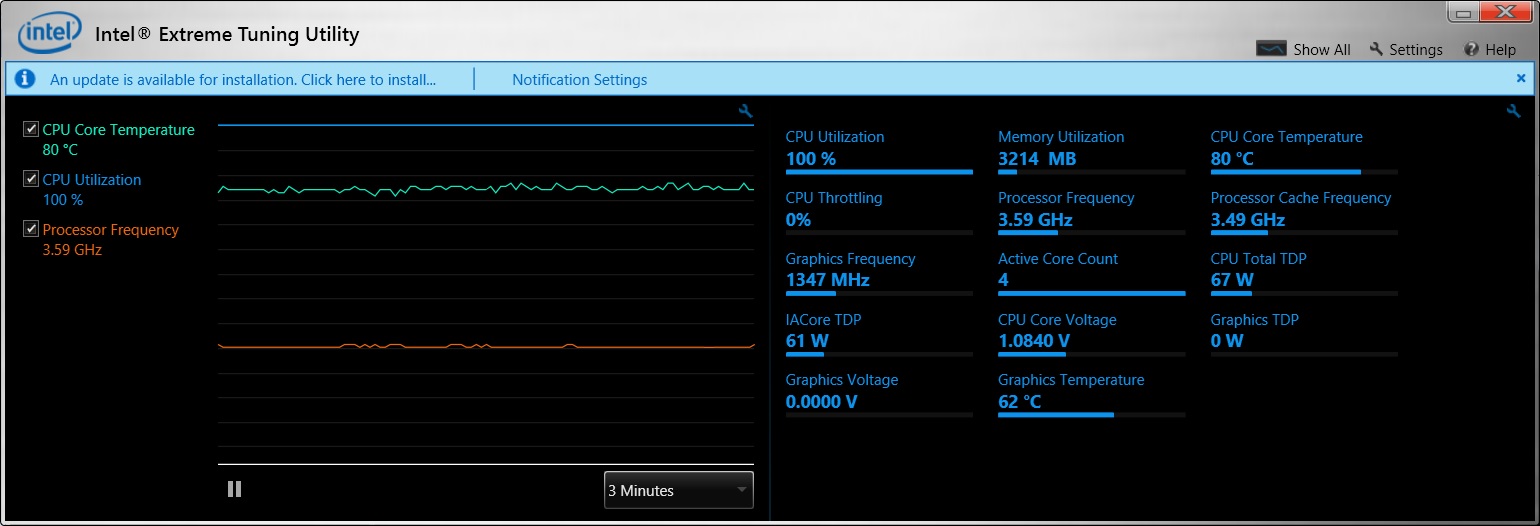
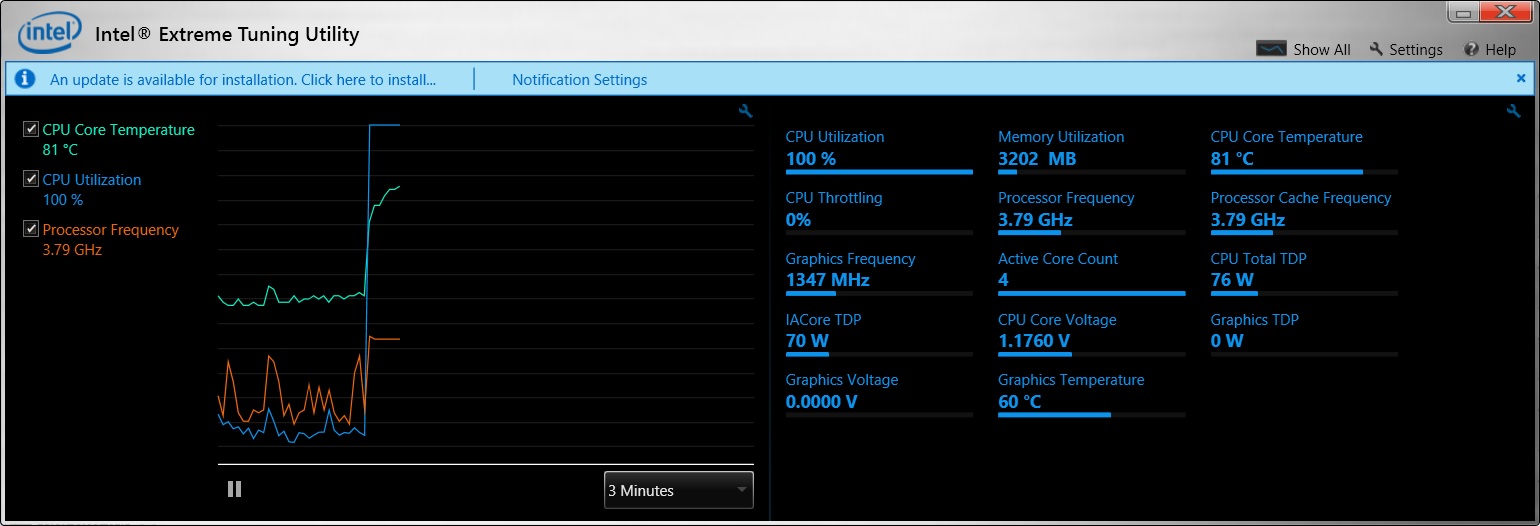
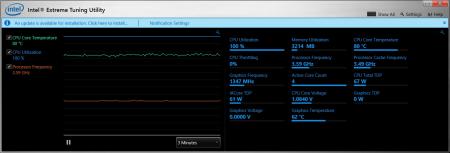
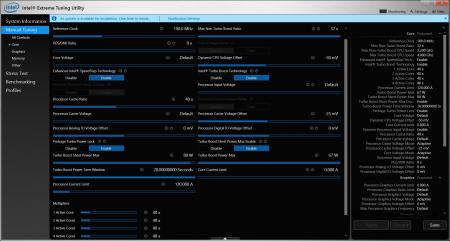
Another odd thing I have noticed, the CPU seems to be set for 95A if you use integrated GFX mode, it is set for 55A when you use the NVIDIA GFX. I think 95A is the correct current for the CPU as defined by Intel. Using XTU you can set the max overall current in both modes and the CPU behaves consistently in both cases. Here are a couple of screenshots of my system running Prime 95. (8 thread, blended) First is running at 4GHz, this is with the short turbo set to 83W, as you can see the CPU is still using less than this. The max CPU current is set to 135A. (After some experimentation, it took 135A for the CPU to run Prime 95 @ 4GHz, most other tasks would take far less current, hence my inital post of 120A) The per core limit is set to 0A, which seems to be unlimited. [ATTACH=CONFIG]9433[/ATTACH] Once the long term turbo kicks in (67W) it reduces the clock speed to 3.7GHz on average. There is some variation between 3.6GHz and 3.8GHz. [ATTACH=CONFIG]9434[/ATTACH] Both these screenshots have been taken in Intel GFX mode, I keep the system in this mode most of the time as it is a lot quieter and uses less power! Only when gaming do I go into NVIDIA GFX mode. 67W and 83W are the limits set in the BIOS in the way I set this up. There is a way to make these unlimited, however I dont think the thermal solution would cope with a prolonged CPU power usage much above 67W, so I kept to these limits. I did have to closely look at the thermal interface though, I noticed that the CPU would be relatively cool for 24hrs or so after refitting the heatsink (about 85c MAX) and then it would heat up rapidly and power off (due to thermal shutdown at 100+C) the following day. When taking the system apart, I noticed that the top of the screen hinge and keyboard assembly touched the top of the CPU radiator, this caused some mechnical problems between the top of the CPU and the heatspreader base of the heatsink. By bending the heatpipe very gradually, the radiator no longer touches the hinges or top assembly of the case. I also used coolaboratory Liquid Metal Pro, both these factors mean the CPU is running as cool today as it was when I first re-applied the thermal paste 2 weeks ago. (Both the attached screenshots were taken today, the thermal paste was reapplied 2 weeks ago and I have been travelling with the machine in the mean time using it every day.) I changed the CPU as soon as I got the machine, so don't know if the factory applied thermal interface works OK or if others are seeing the same issues.
- 6 replies
-
- 1
-

-
- a03
- alienware 18
- (and 4 more)
-
A03 has certainly made my machine quietier. I have also updated the thermal interface material which helped too! As for the CPU throttling issue, it seems that the CPU is limited to 55 Amps by the BIOS, which seems to limit the TDP to about 38W. Using intel XTU (not the BIOS because this seems to brick the machine everytime I change the OC settings). I can increase the CPU current to whatever I like. 120A seems to be a good number and the heatsink is good for 70watts or so continuously. The peak TDP is set to 83W. I have also set all the multipliers to 40, meaning 4 GHz is the max turbo speed. This means the CPU turbos to about 3.6Ghz running a blended 8 thread stress test under latest build of prime 95. CPU temps stable about 85 Celsius. At the start of the test, the system peaks to 4GHz under 100% load at 83W until settling to its long term TDP of 67W. The XTU settings seem to auto load with Windows, until the system crashes and on next boot you go back to BIOS defaults. Agree, its not ideal, but it is a good work around for now. As a result of the bricking issue, I have discovered the best way to take the AW 18 apart, the results (sorry it's a wall of text) are posted here: http://forum.techinferno.com/alienware-m18x-aw-18/4922-alienware-18-teardown.html
- 6 replies
-
- 2
-
-
- a03
- alienware 18
- (and 4 more)
-
Need help AW 18 bricked due to disabling Samsung EVO RAPID
Onyoto replied to kh90123's topic in Alienware M18x / AW 18
Just out of interest, what CPU do you have and have you overclocked it in BIOS? Have you changed the RAM from the stuff already supplied in the system? The reason I ask is on my AW18 and AW17 both will show the same behaviour with either a i7-4930MX or i7-4900MQ plugged in if I select one of the overclocking options. I believe this is because it is trying to set the memory to XMP mode. The same thing happens on A00, A02 and A03 BIOS. Even if I put "normal" memory in it wont boot. (I have upgraded the system with Crucial Ballistix DDR3-1866) The fix is to put in an i7-4700MQ and this will make the system beep continuously, it can then be powered off and then powered on. After 30 seconds the backlight will come on and then the system will boot as normal. If you already have one of the CPUs, this fix probably wont work for you. (I'm not sure if it will work for the i7-4800MQ either) I have to go into BIOS, reset to defaults (F9), save (F10) and then reboot again. Go into BIOS a second time (F2) and then you can disable overclocking support in the performance option (under advanced) You can replace the CPU with one of the faster ones that support OC options, this means you need, once again go into the BIOS and make sure overclocking options are switched off. (The BIOS auto detects the CPU and normally the OC options come back on) For overclocking I use Intel XTU, even when the BIOS is set to no OC, it can still change the CPU parameters to allow overclocking. I put some teardown instructions here: http://forum.techinferno.com/alienware-m18x-aw-18/4922-alienware-18-teardown.html -
Apologies for the wall of text, next time I take this machine apart I will take some photos! Teardown Instructions: ---- WARNING! THIS WILL MOST LIKELY INVALIDATE YOUR WARRANTY WITH DELL ---- ---- This is a guide only, no warranties or guarantees are implied, damage is at your own risk --- ---- You will need: T9 TORX screwdriver (to remove CPU only), Decent Thermal Paste, Philips Screwdriver, Thin flatblade screwdriver, Isoproponal electronics cleaner (Meths will probably work too), paper towels, plastic pry tool (or very strong fingers!) ---- If trying to "recover" the BIOS from an overclock, you will also need a non overclockable processor such as the i7-4700MQ or i7-4702MQ. It may work with the i7-4800MQ but I have not tried it. Steps: Turn system upside down, with the back / cooling fans towards you. Undo the 3 screws on the base. Carefully lift the plate that covers the front of the system (furthest from you) it is clipped in at the sides Carefully push the back plate with the fan grilles away from you about 5mm, this unclips it which means it is free to be lifted off. Remove the 2.5" HDD bay (4 rubber grommeted screws) and SATA connector from the motherboard Remove the DVD drive plate (4 screws) and SATA connector from the motherboard. Remove the battery (2 screws) and battery connector. Carefully remove 5 ribbon connectors. 2 are on the right near the 2.5" bay area, these are vertical. To remove, lift the plastic collar of the motherboard connector with a flat blade screwdriver. pull the ribbon cables up using the attached tab (not the wire) They should lift with no force, if they are still stuck, the collar needs to come up more. Remove the 3 horizontal cables under the DVD drive. You one need to undo one side of each. Undo the connector closest to the back in this area, then undo the SD card reader at the side closest to the edge, lift the white locking collar to do this and slide the ribbon cable out using the tab. repeat this for the connector underneath, this is the long one and will need gentle prizing (if you use too much force at once, you will break the locking collar). Remove the SD Card or SD card spacer / blanking plate (IMPORTANT!) Remove all the screws with a P in a circle next to them. take note of the size information. It tells you the width and length of the screw. This is very important when putting the system back together, it you put a long screw in a short hole it may damage the system or ruin the aesthetics. likewise a short scew in a long hole may not grip enough causing other problems. The next part will use the pry tools and is not for the feint hearted! Getting the AW18 apart is a pain, even when all the screws are out there are clips holding the palm rest on these are so tight, most will break when you separate the palm rest from the base of the system. It seems to be easier starting the separation at the point above the power connector and working towards the front. At that point, open the lid / screen as far as it goes, then unclip the back clips around the hinge. Then pull the palmrest away from the other side and these clips will stay intact. Finally lift it from the back and pull towards the screen, this will save the clips to the front of the palmrest. With the palmrest off you can change the second bank of DIMMS, Wireless card, CPU and graphics card. To get the CPU out, you will need to undo the lid hinge screws from the top, there are 3 in total. (2 on the left and one on the right). You will also need to remove the plastic guide for the wireless antennae leads. This has one screw on the right side. Remove the display cable from the motherboard and the logo led cable (use a small flatblade screwdriver to lever the white connector, don't pull the lead). If you have 2 video cards, you will need to remove the SLI cable. Disconnect the right side first, the cable is only wedged between the heatpipe and hinge, then carefully remove the tape from the CPU heatpipe. Then lift the lid away from the base slowly, you don't need to disconnect the antennae leads, you just need a small amount of clearance to get the CPU heatsink out. Undo the CPU heatsink screws, follow the order they show. (before you do this, make sure you have some good thermal paste, something like Arctic Silver 5 or Coolaboratory Pro). ---- FOR BIOS RESET STEP ONLY --- Install the i7-4700MQ and give it a reasonable thermal connection (you can probably re-use the existing thermal paste). Boot it up with a USB mouse and keyboard plugged in (this way you can keep the palm rest off). There is a power switch soldered onto the motherboard, just in front of the "bottom" DIMM, roughly centered between right and left. Follow the steps about the BIOS resetting below: I have to go into BIOS, reset to defaults (F9), save (F10) and then reboot again. Go into BIOS a second time (F2) and then you can disable overclocking support in the performance option (under advanced) Replace the CPU with the original that supports overclocking (i7-4930MX or i7-4900MQ for sure, not sure about i7-4800MQ). This time clean it up with the isoproponal cleaner fluid, make sure all traces of the old thermal paste have been cleaned from the copper heatsink pad and the top of the CPU / capacitors. Be careful not to break bits off the CPU die (the long grey rectangle) as this is actually the CPU and you will start to remove transistors from it! Its fairly tough, a bit like glass, but can be scratched, crushed or shattered if mis treated. Make sure you don't get cleaner and paste on the pins or in the socket. pour a small amount onto a paper cloth and use this to wipe the paste away. Don't pour directly onto the CPU, motherboard, socket or heatsink. Follow heatsink paste manufacturers instructions of how to apply the paste (I have used both Arctic Silver 5 and Coolaboratory Liquid Metal pad, the pad is much easier to apply and seems to have great results! Coollaboratory*Liquid MetalPad - the innovation of cooling for High-End sytems) Be careful not to get these metal based thermal interface pastes onto the capacitors on the CPU. Fire up the system with the palm rest off to make sure it boots (it may reset a few times or beep continuously on the first boot, this is normal. if you get the beeps, just switch it off and on again, the next time it should eventually boot (may take a minute or so to get through the BIOS screen, or even to get the AW logo). When you get the opportunity to enter BIOS setup, once again go into the BIOS and make sure overclocking options are switched off. (The BIOS auto detects the CPU and normally the OC options come back on) ---- END OF BIOS OC RESET ---- ---- GPU THERMAL PASTE CHANGE ---- If you are feeling super brave you can repeat the process on the GPU too. Personally, I found a 10 Celsius improvement in replacing the stock paste with the coolaboratory pad. The system fans stay off longer while in Windows too. ---- END OF GPU THERMAL PASTE CHANGE ---- ---- RECONSTRUCTION --- Make sure the SLI cable is reconnected.. I have done this in the past after putting it all back together to find it was not re connected, no cable, no SLI!! Hopefully it worked and booted to Windows (Check SLI is enabled, if the options are non existent then the cable is not reconnected properly (or you have 1 card!)) If no NVDIA options are enabled, the system is probably in Intel GFX mode, press FN + F5 to reboot in NVIDIA GFX mode. If everything is OK, repeat the teardown in reverse to reconstruct your machine. When the system is rebuilt but the power button, touchpad, LEDs, backlight or SD card reader don't work, this is because the ribbon cables were not connected back or locked down properly. Make sure the ribbon cables are square to their sockets (there is a guide line on the cable to indicate the final position) and the locks are clamping the cables. The next time I need to take the system apart again I will include some photos! Good luck!
-
SkylineLVR is correct, the R1 (and all laptops built with the HM6x chipset) are only compatible with Sandy Bridge CPUs. On the desktop, however, many H/Z/P6x boards were able to be updated to support Ivy Bridge CPUs (this maybe the source of confusion). In theory, the R2 can support both Ivy and Sandy Bridge, although I have not tested it, I do know other models on the same generation were offered with sandy bridge dual core at launch because intially Ivy Bridge was only available in quad core (if you are wondering!)
-
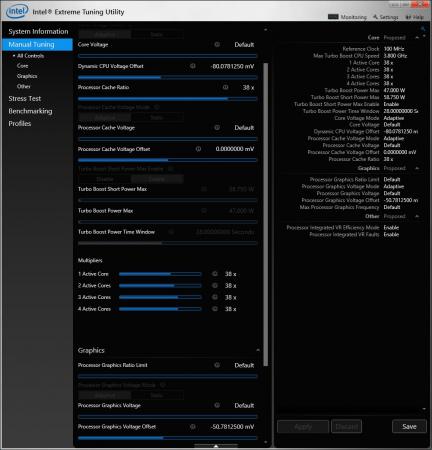
Yes, if you click on the XTU screenshots you can see the settings which Clevo leave unlocked. This only works in Windows however, there is no OC support in BIOS. You can only adjust the max ratios of the CPU and GPU parts, the 4900MQ allows upto 800MHz to be added to the stock turbo speed. As you pointed out, you can't adjust the max power or current on this system, you are limited in power budget. To get around this slightly, you can reduce the maximum dynamic voltage (turbo voltage) and depending on teh CPU it will vary. On this CPU it was reduced by 80mv. I also had to reduce the top single core clock speed to keep the system stable under light loads. Although clipping the max speed for light loads, the increase in 4 core load speeds was dramatic (from 3.2GHz to 3.6GHz sustained). I also reduced the GPU voltage by 50mv and have since been experimenting reducing the cache voltage. Somewhere between -33mv to -50mv seems to maintain reliability and reduce a bit of power.
-
Thanks svl7, I gave it a go and here are my initial results! - http://forum.techinferno.com/hwinfo32-64-discussion/65-alienware-fan-control-95.html#post60155 I think many more hours tuning and tweaking are needed here!
-
I posted a review here: http://forum.techinferno.com/clevo-sager-reviews-owners-lounges/4268-clevo-w230st-first-look.html#post59982 if you look at post #2 I undervolted the CPU by 80mv, this gave me +300Mhz under heavy load (8 threads, 100% utilisation) and was stable for lighter loads. I also undervolted the GPU part, so when this ramps up it doesn't take too much power away from the CPU. Obviously, while playing games, you would use the GTX765M, but for other tasks in Windows, you would be using the Intel graphics. If you undervolt furher, you may want to look at reducing the single and two core turbo frequencies to bring them in line with the quad core if you find the CPU crashes while under light or peaky tasks. I was using a 4900MQ here, the 4700MQ has lower clocks so you may see less problems with single core turbo speeds...
-
I just updated to BIOS A02, and noticed the CPU fan is now always running. with the A00 BIOS it would switch off when the CPU was idle and had a low temp. Has anyone else found this? Also is there an application that can contol the fan speed on these systems?
-
Thanks for the thanks! One thing I have noticed, with all the mobile Haswell CPU sockets, the latch is no longer operated by a flat blade screwdriver. You will need to arm yourself with a Torx screwdriver, T-9 seems to be the best fit. T-10 does fit, but you need to provide a lot of pressure for the teeth to grip the head of the screw.
-
Hi svl7, I just got hold of an AW18. it was built last week and shipped with BIOS A00, do you need this BIOS version? Also what is the precedure to dump the BIOS? I could not see any way to do this using various windows or DOS BIOS tools. The supplied flash utility just flashes your BIOS without giving you a backup option as far as I can see. To this point I have not tried to flash A02 on this system.
-
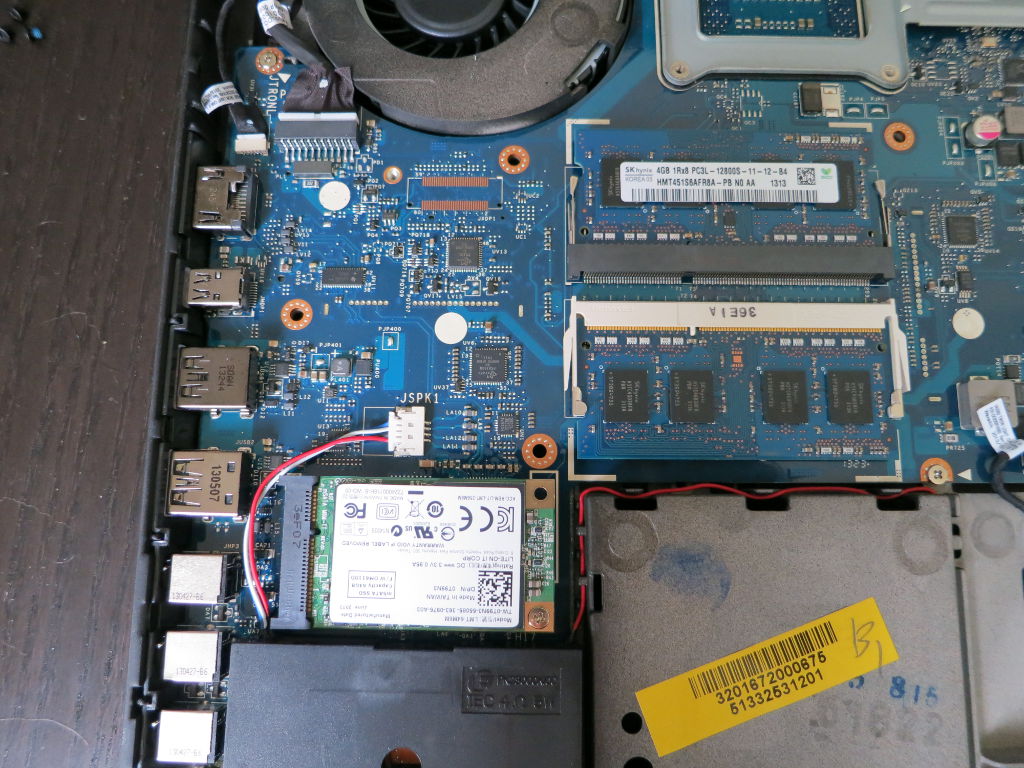
I eventually got around to tearing down my AW17.... for another reason than just curiosity! See the pics of the mSATA / PCIe location. Under the keyboard, it's pretty easy to get at, take off the bottom cover, 2x HDD caddies, 1x optical drive and 1x battery. This will leave all the screws exposed with an encircled P next to them. Unscrew all of these (there is a hidden one under the foam around the end of HDD2) and the palm res / keyboard will come unclipped with a little nudge! A detail shot of the mSATA drive and the second pair of DIMMs. If you do buy and Aliemware with the mSATA drive already installed from Dell, it will have been setup with the chipset caching, which means some of the OS is on this drive too. Before changing out for a larger drive, you need to go into Windows first, completing setup and launch the Intel Rapid Storage Technology manager utility. Under the performance or acceleration tab, you can uncache the HDD. Once you have done this (it may take a few mins) all of your data will only be on the HDD. You can then clone this with an app such as Acronis True Image or Clonezilla.

-
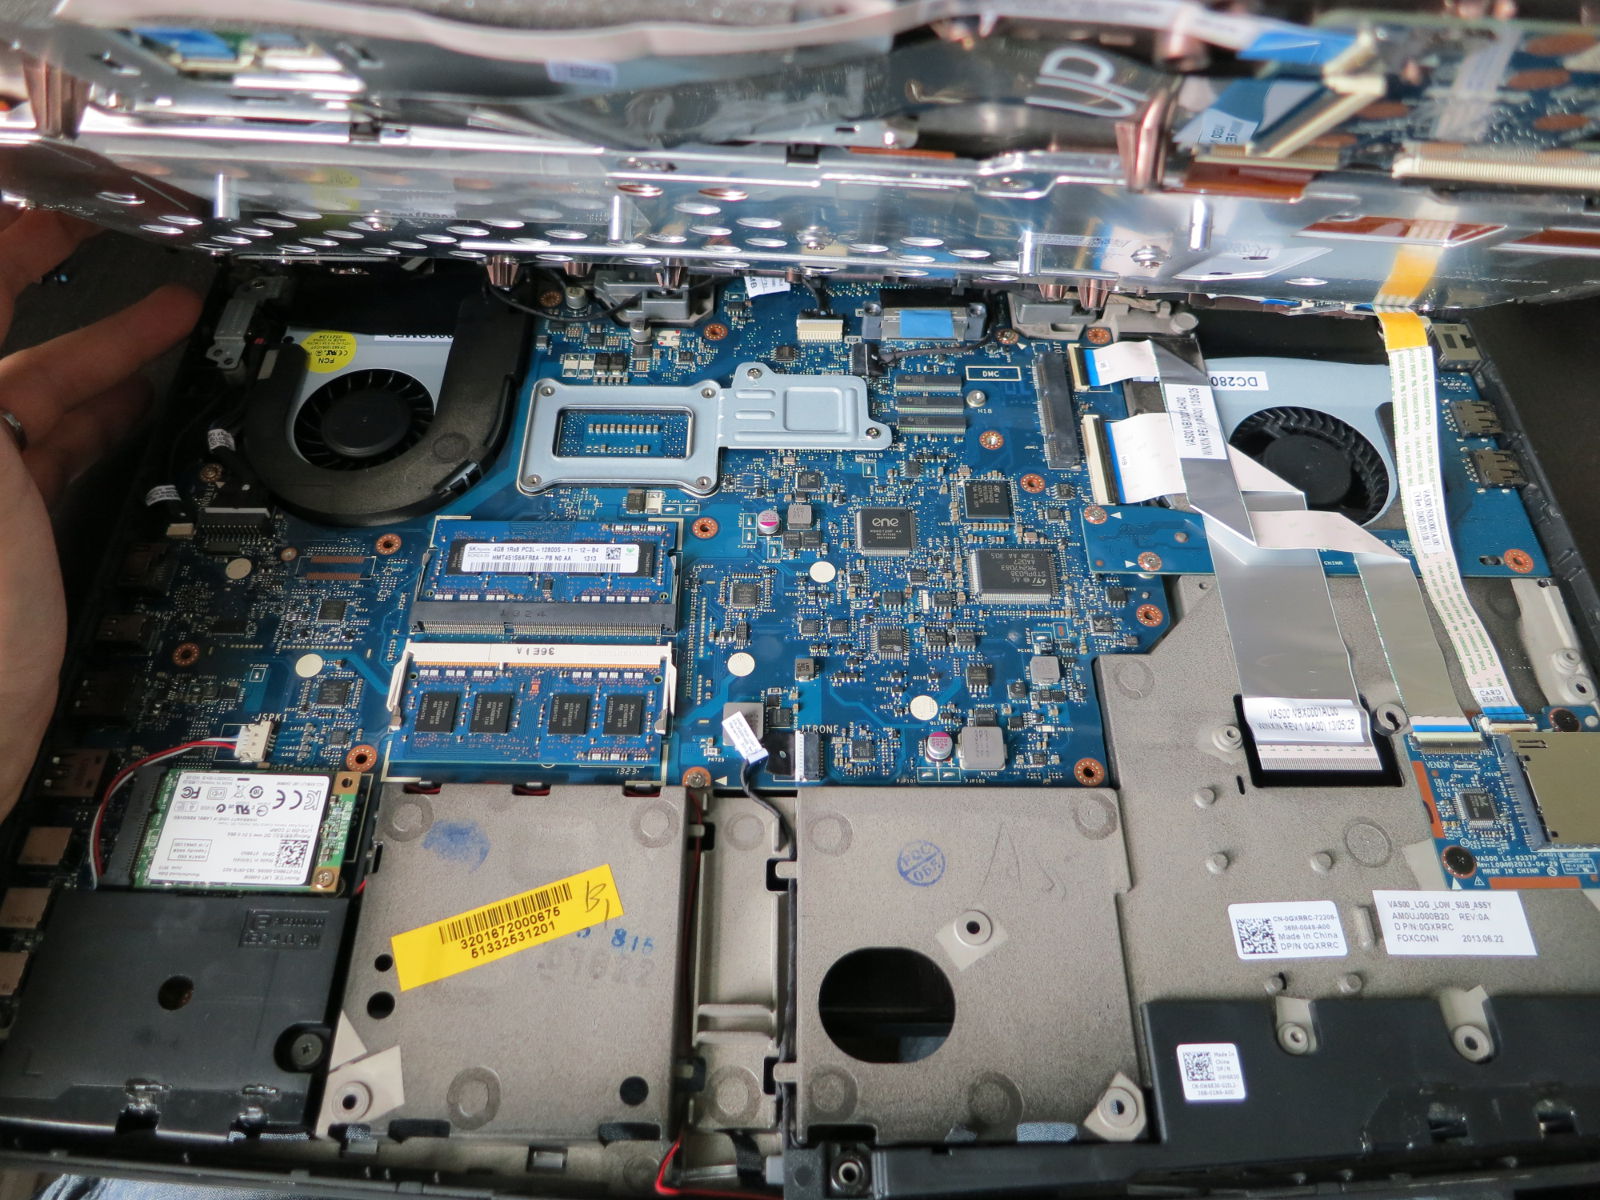
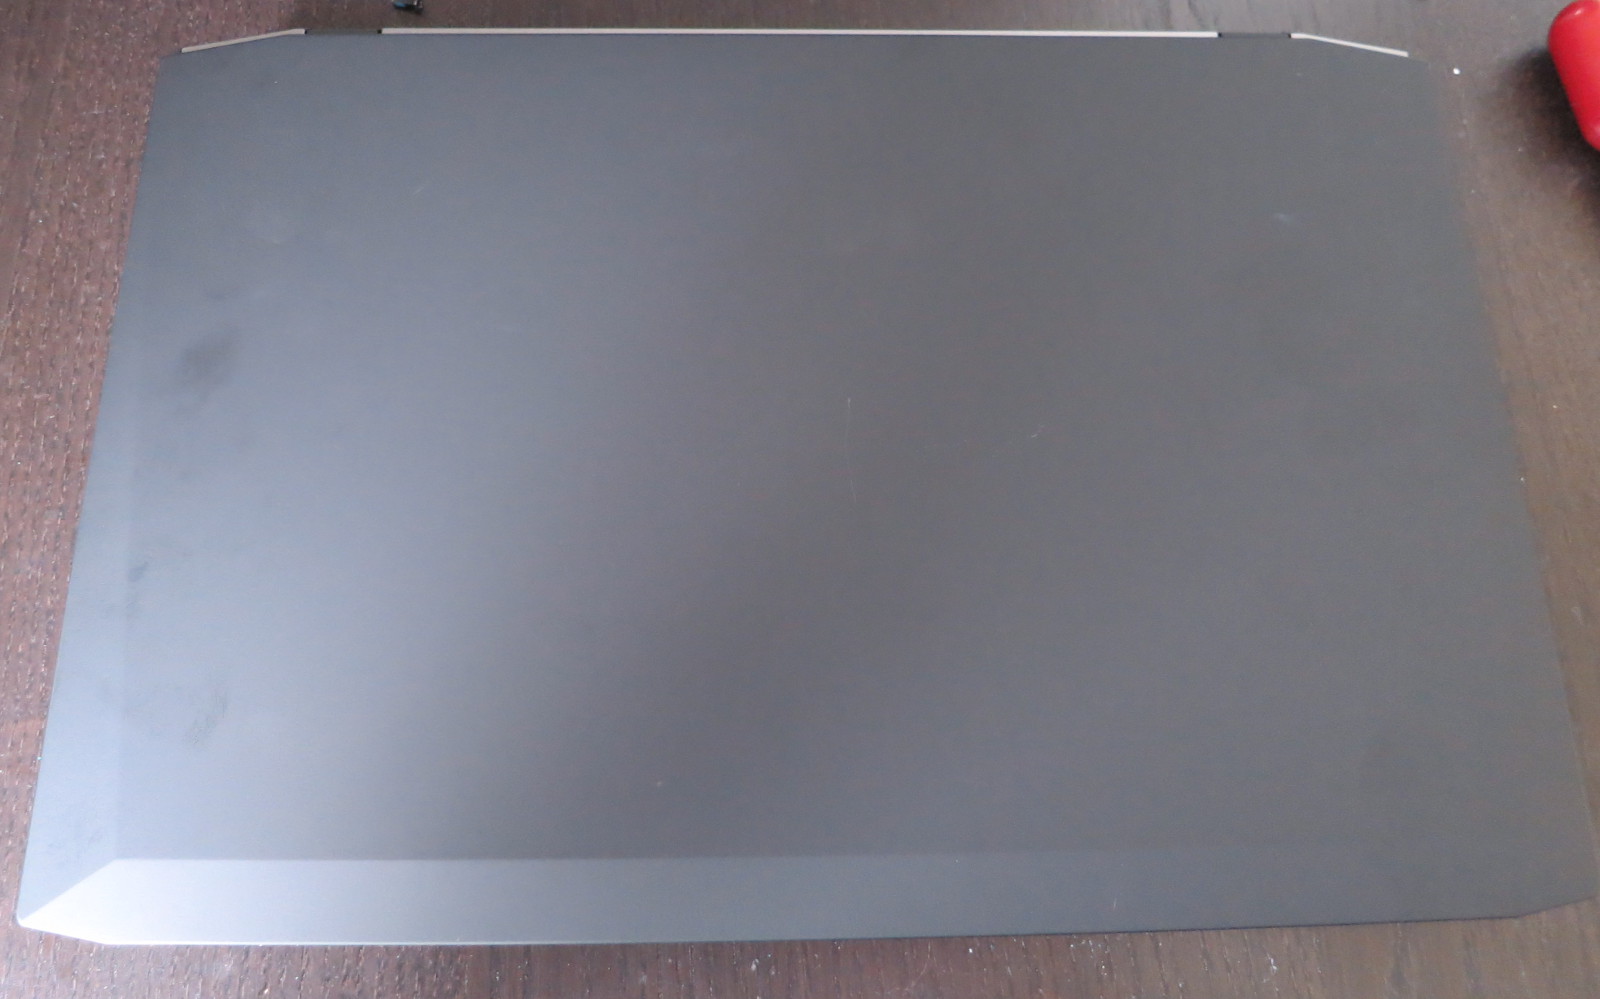
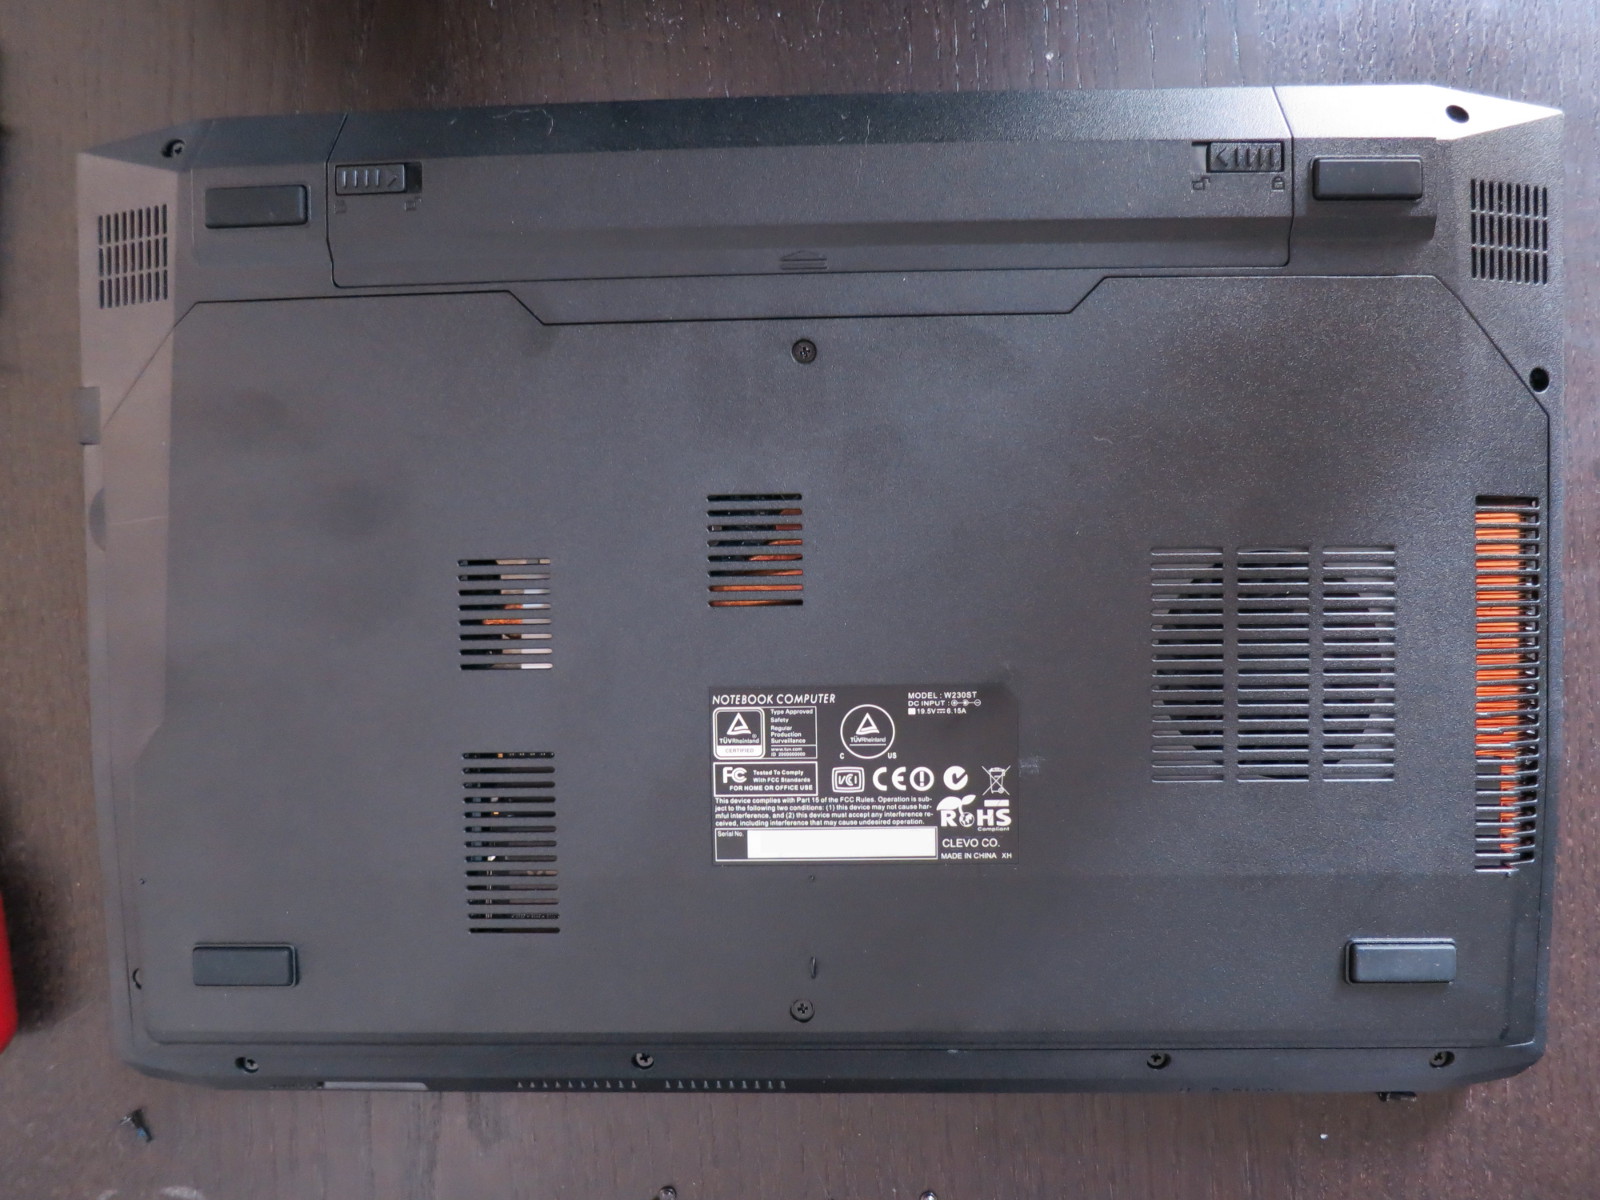
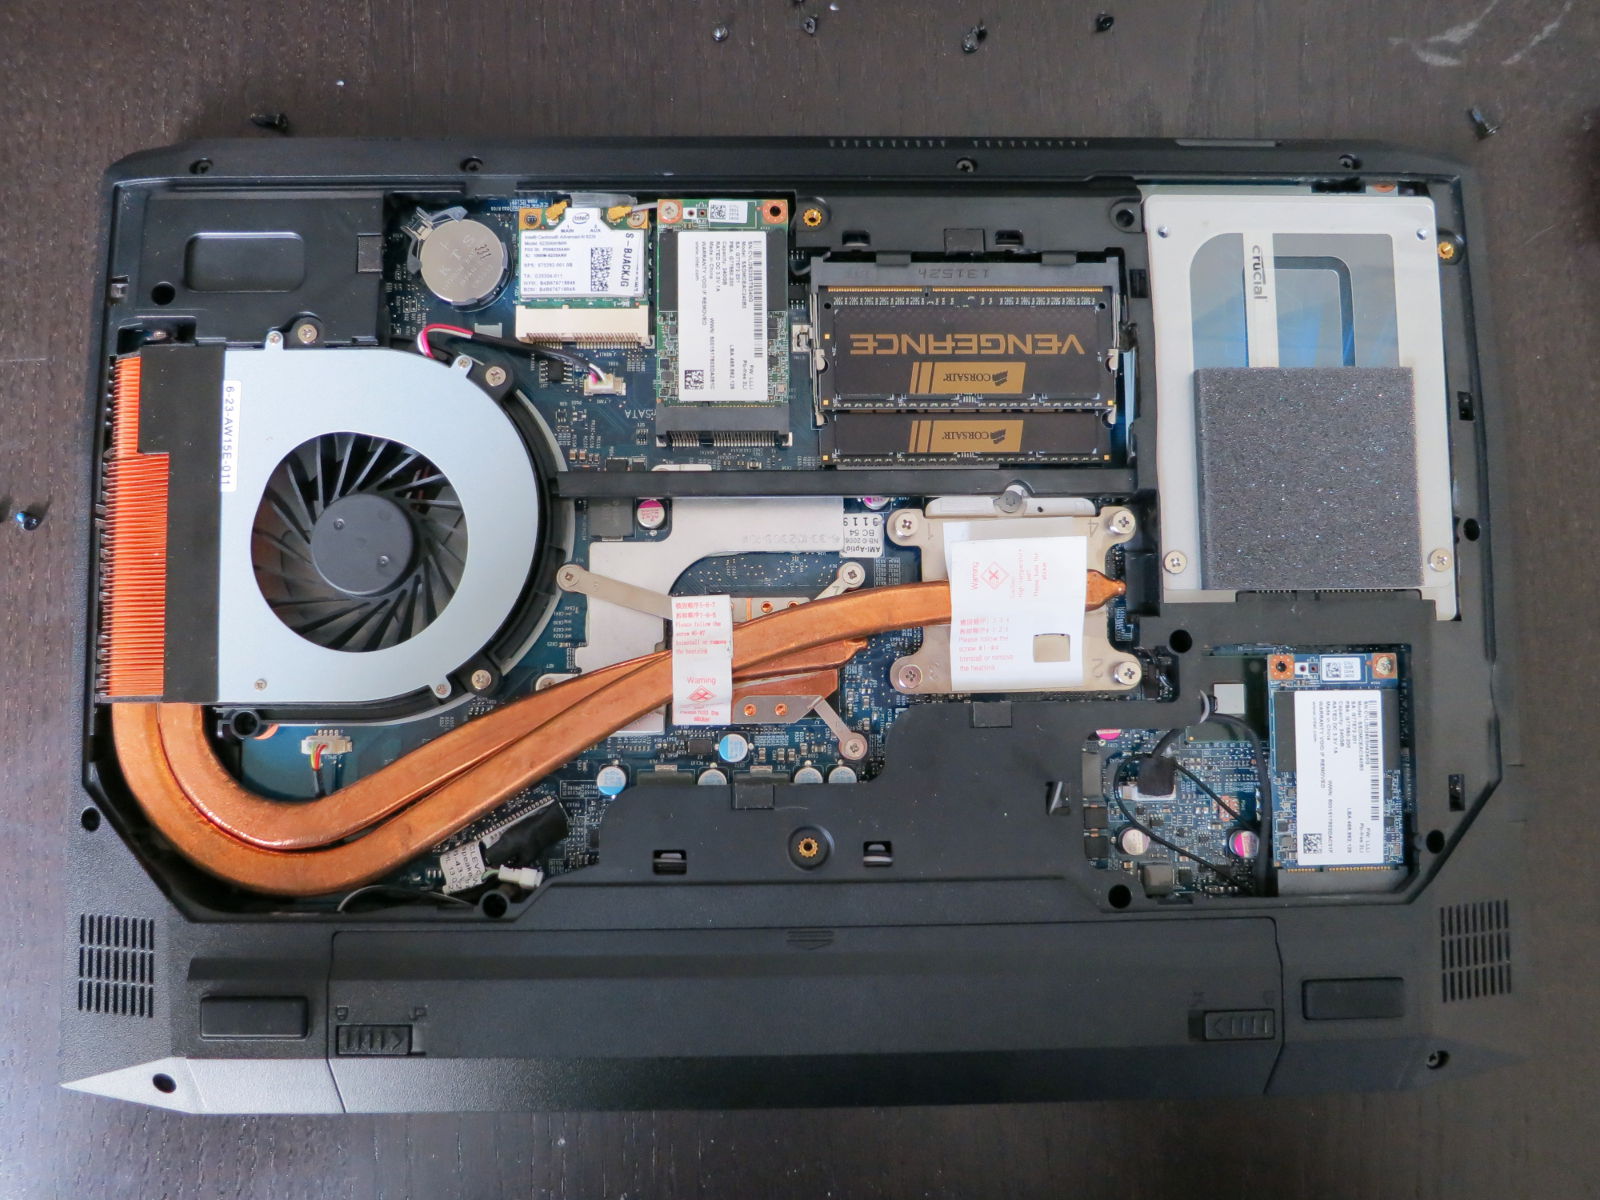
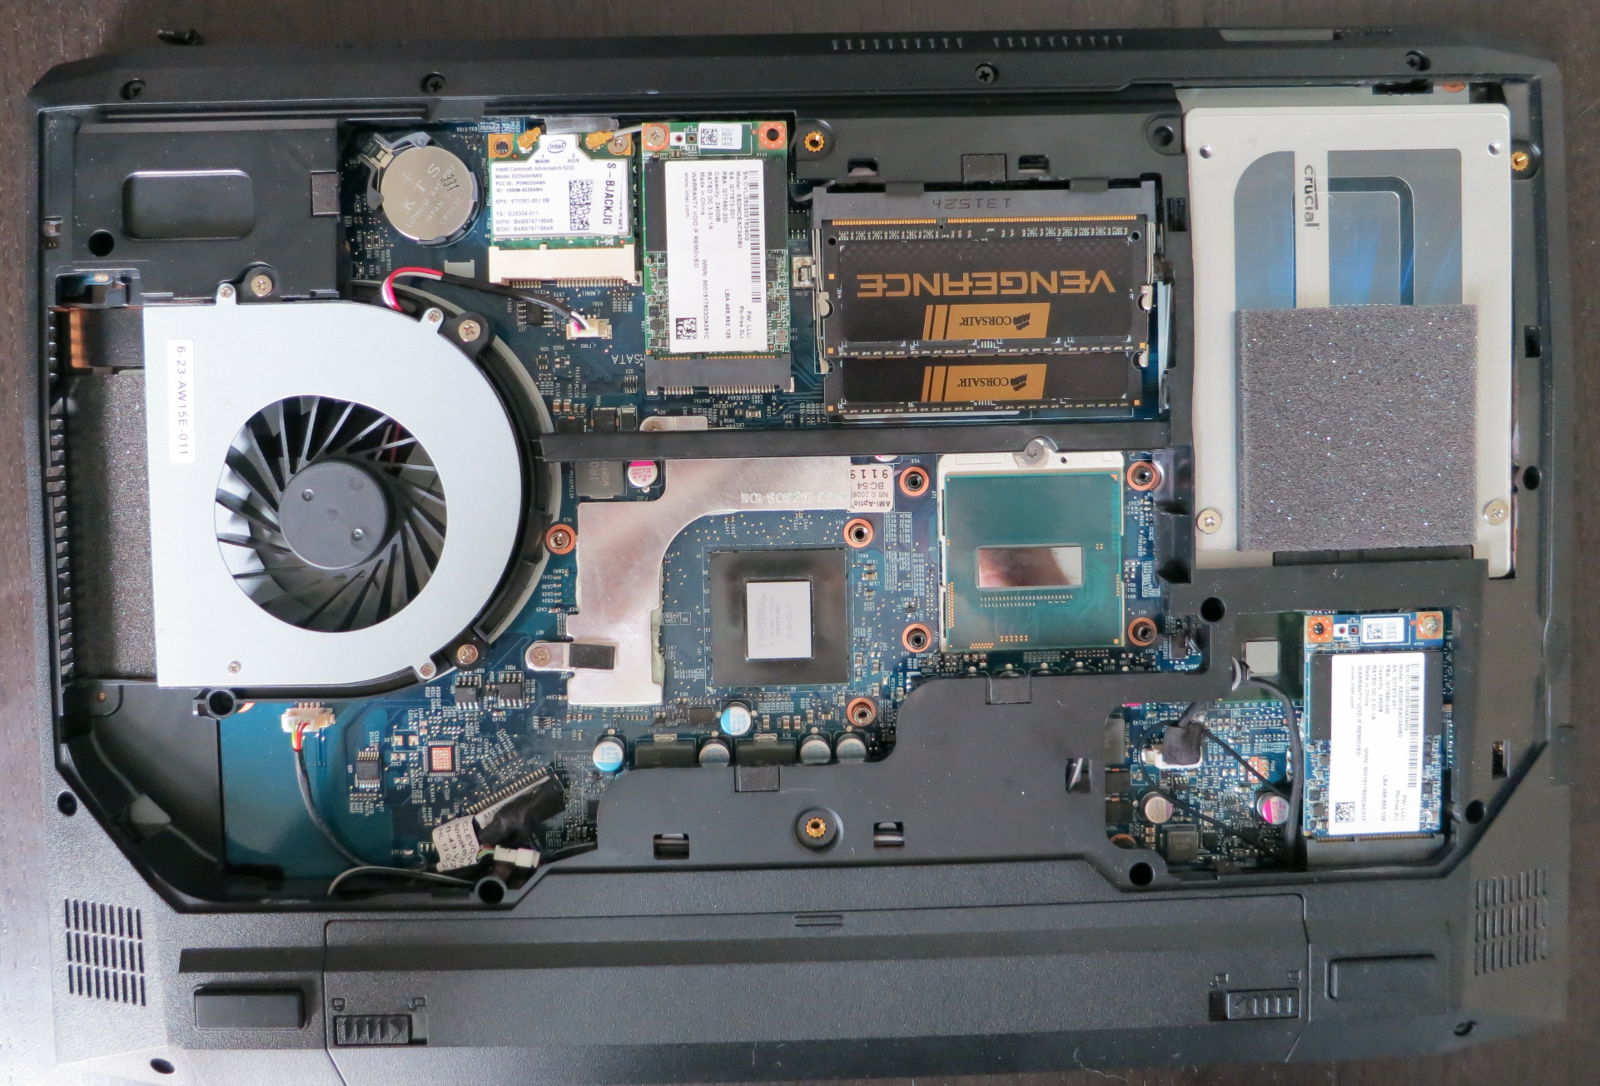
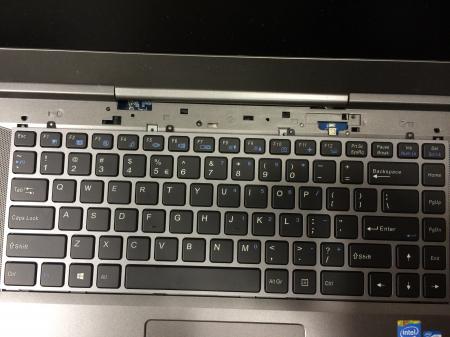
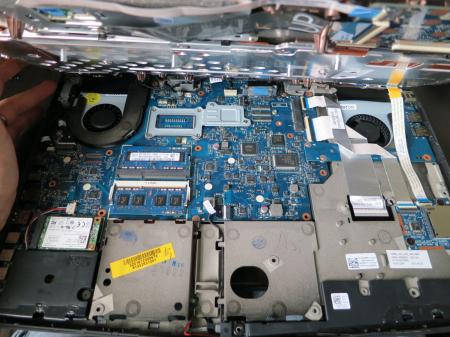
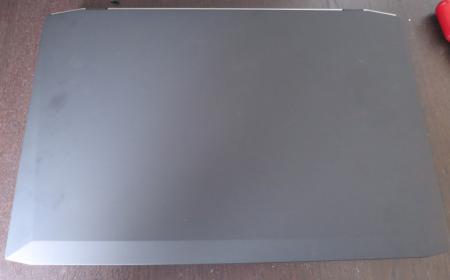
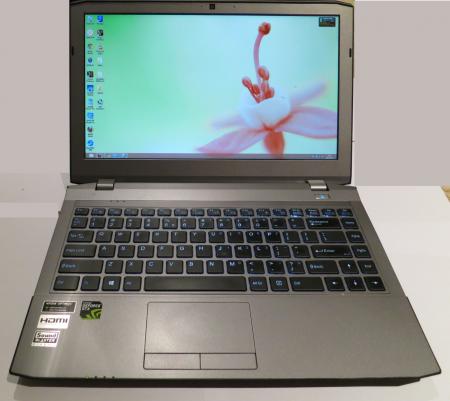
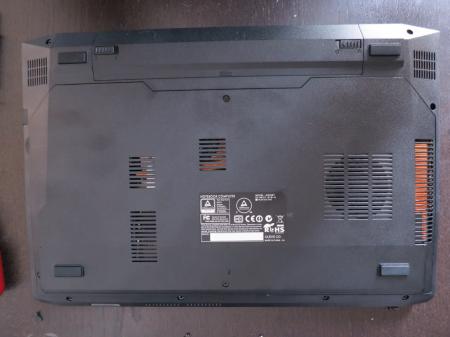
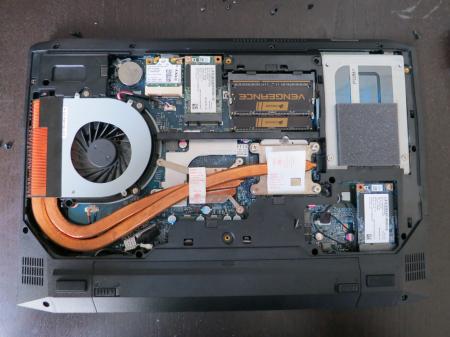
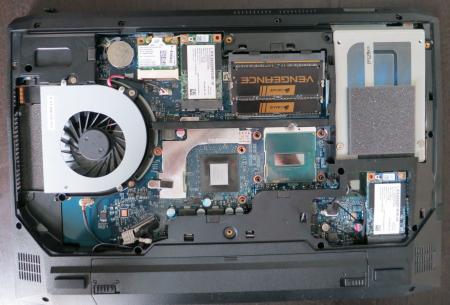
Here are some pics of the system itself, please excuse some of the dubious editing!: Left hand side Right Hand Side Underside with cover on Lid Closed, showing top of lid. Here are the money shots! Photos taken looking straight down at the underside of the system with the cover off. With the cover off - showing heatsink: With the heatsink removed, you can see the CPU and GPU side by side. They share the same heatsink with a heatpipe each. You can also see the position of the RAM, 2x mSATA Drives and 2.5" drive. This bay will take upto a 9.5mm drive although takes thinner ones too. Onyoto


-
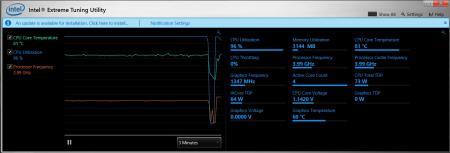
As promised in the post above here are some pics: Clevo Control Center: Excuse the pink, Win 8 automatically changes the window borders colour in sync with the background pic! XTU - CPU Stress Test Correction to the info on the previous post, the CPU gets to 90C under load. Here are the XTU options, see the TDP options are greyed out. Maybe Throttlestop and a custom BIOS can allow users to change this. In order to get a higher load turbo clock, I undervolted the CPU by 80mv in turbo. The GPU is undervolted by 50mv while in turbo. This helps the CPU meet its TDP target while increasing the core clock (it sustained 3.4GHz 4 core turbo). Onyoto

- 20 replies
-
- 2
-
-
- clevo gaming
- haswell
- (and 3 more)
-
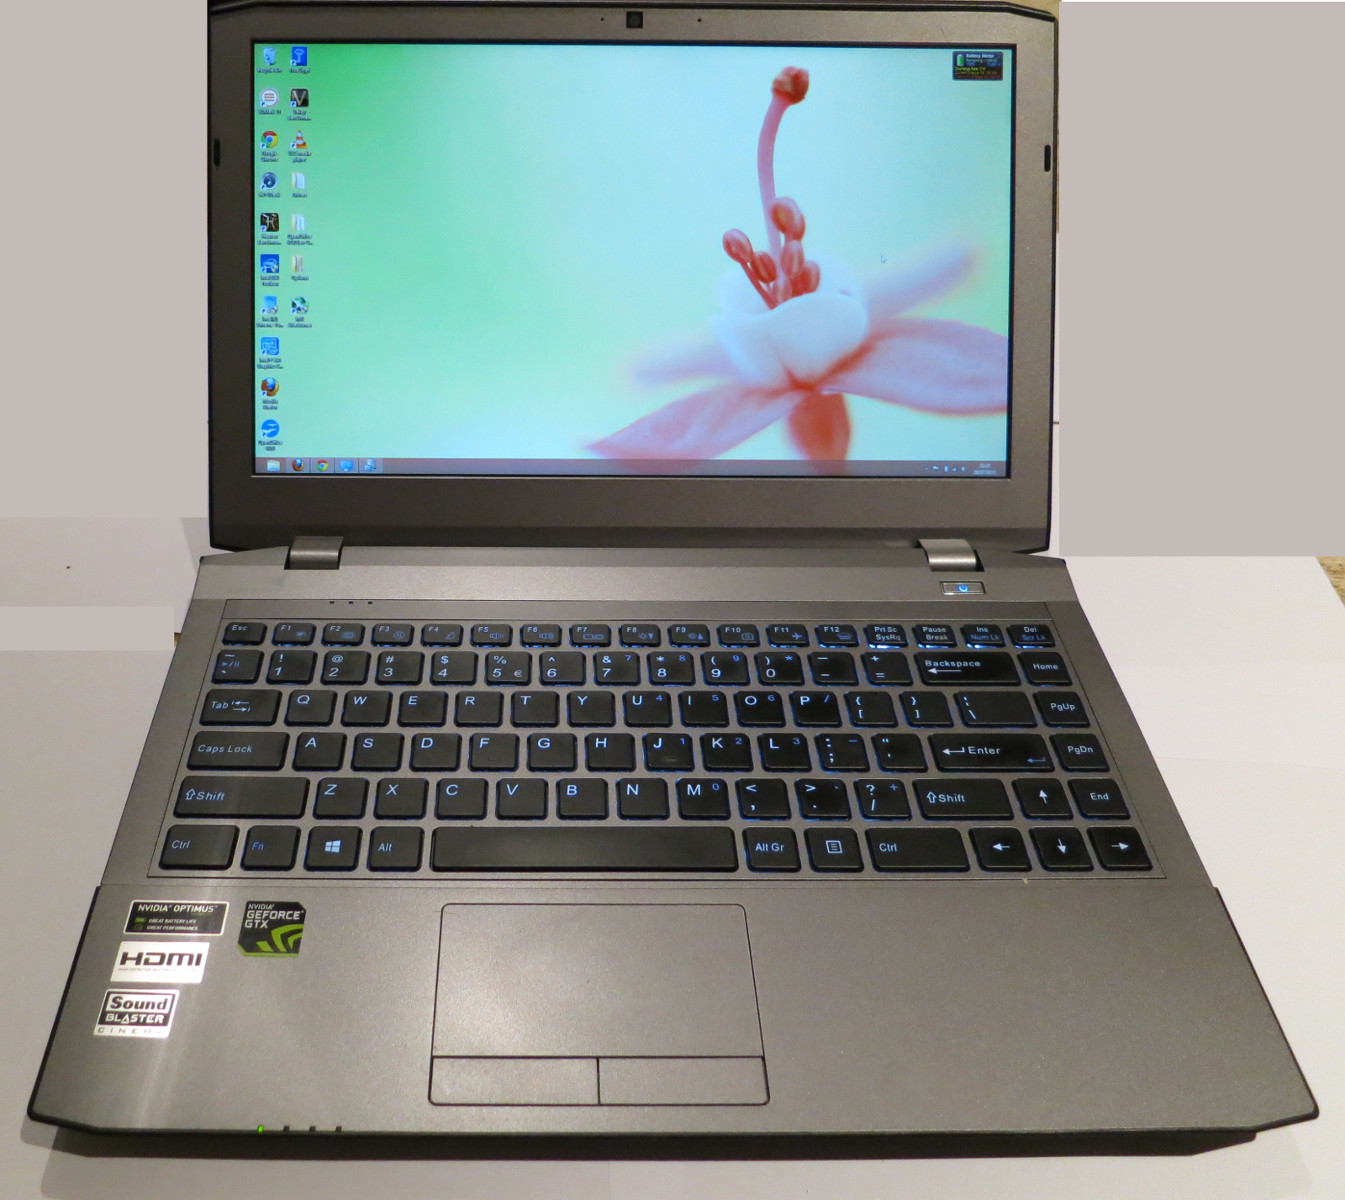
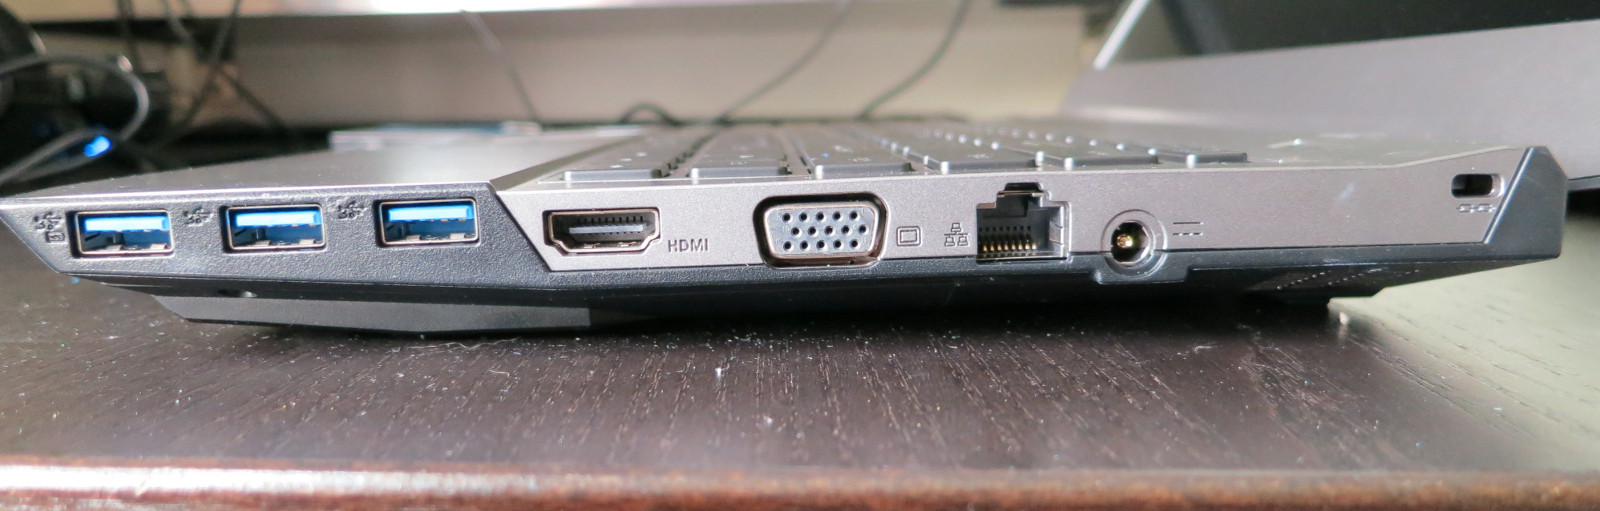
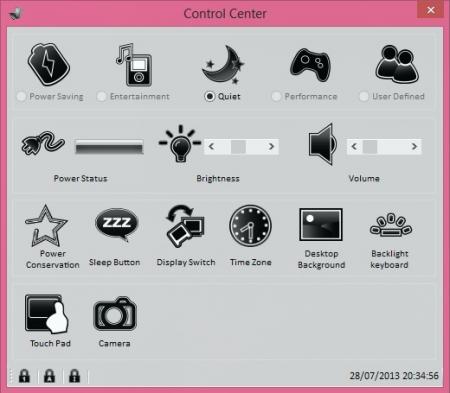
Hi All, I have got my hands on a few new 4th gen core (Haswell) machines recently... I have been lurking on TI for about 15 months, came here looking for Kepler video bioses after MKV tech went away, in that time I've not really posted any information. I found so much more than I was looking here over that time, I thought I would share something in return. As I have the W230ST right here (I'm typing this on it) I thought I would share my thoughts with you. I have a lot of experience with older Clevo and other laptops over the years and this one is continuing the improvements that have been present in more recent Clevo laptops. In my opinion this is a worthy successor to the M860TU and the W110ER (if you don't know what that M860TU is, click here: M860TU Clevo Specs) This one is configured with a 1080p IPS panel (with PSR to save power), i7-4900MQ, 16GB DDR3-1866 CAS10 (Corsair Vengeance), 2x 240GB Intel 525 Series mSATA SSD, 1x 960GB M500 Crucial SSD, Intel 6235 ABGN Wireless with Bluetooth. It also comes with the NVIDIA GTX765M with 2GB DDR5. Apart from the screen and wireless card, all the other bits were added by myself. I have installed Win 8 on the system, I'm a big Win 7 fan, but personally I have had no problem with the transition, even on a device with no touchscreen.It does provide super speedy boot times and seems to offer better compatibility with Clevo's power utilities. Plus Points: 1. The system size / weight for the spec. It's 35mm high (sat on a desk to to top of the screen) and weighs 2KG. Even the PSU is smaller than 120W bricks that have been shipped recently (it is the same as the one that ships with the W350ST) 2. Keyboard. This is a first! I'm not normally a fan of Clevo's keyboard setup, but they have made this one very rigid, so the laptop does not flex while typing! Also the keyboard has a subtle white back-light, combined with the chicklet style and semi-tactile covering on the keys, it is a nice experience.* * I have yet to test the keyboard for gaming, so not sure how it will cope with multi-key presses. 3. Its quiet! Yes the fan controller does seem to allow the fan to switch off, right now the fan is silent, occasionally it will kick in to its slowest settings. There are several power modes with the Clevo Control Center tool, one is silent which limits the CPU speed to 1.7GHz, Multimedia and Performance. There is also power saver too which seems to switch off most of the system including the wireless card! I'm running in performance mode right now and it is still silent. If the CPU is not working too hard it will still got to 800MHz. 4. The Screen - This 1080p IPS screen is superb, I’m running at 100% scaling and can see this text perfectly. This is a nice resolution for a 13.3" panel. The good news is that you can run games at a lower resolution to increase detail and framerate and they don't look fuzzy. 5. Performance - The performance is excellent for a small machine like this, I got just shy of P5000 on 3D mark 11 and 1000 points / 24fps on Unigine Valley (This was with a 120MHz Core / 600MHz Memory OC on the GFX). To give you some context, My AW M14XR2 with a GTX650M and the VGA unlocked BIOS from this site could get P3222 with a 340MHz Core OC (bringing the core to 1176MHz) and 1000MHz extra on the memory (Bringing memory to 3000MHz) 6. The lid is painted with that soft touch paint, personally I like this. 7. It looks nice! - You would not be embarrassed to be seen in public with it! 8. Good I/O , there are 3 USB 3.0 Ports and 1x USB 2 port. One of the USB 3 ports is always powered. There is also HDMI, VGA, LAN, 2x Audio (Mic and Headset) there is also a card reader in the front, and the card goes almost flush with the body when pushed in (this is nicer than some laptops with have the card sticking out). The card is on a push latch. Not so good points: - These may be particular to my machine, please don’t assume it is a general problem. 1. Its quiet when at idle / light use, however there is a bit of a ticking rattle that occasionally comes up (its like a PWM frequency harmonic is manifesting in the fan motor). Also the fan creates some vibration in the body of the laptop (ironically if I were using a mechanical HDD this would not be an issue as it would not be felt) 2. Loud when pushed - I think this is the same for all smaller laptops, although it is louder than the AW14 with the same components. Although when I'm playing games I have my headset on, so this becomes a non-issue. 3. Power to the USB ports. I tried to connect a USB optical drive to the machine to copy the drivers that Clevo supply, the drive would initialise and then as the motor spins up would disappear from the OS. I tried this drive / disk on an AW17 which worked perfectly (the AW17 also has an optical of course). The drive only had one USB connector, so would only take power from one port. 4. Position of the USB ports. All the USB ports are on the front quarter of the machine, with the 3x USB 3.0 on the right, this means if you have HDDs etc. plugged in, these can get in the way of your mouse movement. 5. No Display Port - Instead of the VGA (or as well as), it would have been nice to have a displayport connector, this would allow a higher than 1080p panel to be connected . 5. No NVIDIA Verde support for Clevo yet, or at least the SVID / SDID for this GTX 765 - I tried to hack the inf of the current Verde Beta Driver - but this caused a failure on boot. The supplied 311 drivers work fine but are old! 6. Although the screen is great, it does have a semi-gloss finish. It would be nicer if it was Matte. 7. Palm rest, this is another symptom of a smaller machine, the palm rest is very slightly too short, also it is painted glossy plastic, it would be nicer if it had the same soft touch surface as the lid. (The AW14 has a longer palm rest and is painted with soft touch paint) 8. TIM - The stock TIM is just about enough for stock speeds, if you a building yourself, or the person who built it for you didn’t change the TIM, this is an easy upgrade path. I'm using Arctic Silver 5 on this system. Even under load the CPU will not go over 85C and the GPU over 78C. 9. Cannot give the CPU more power. Or at least with XTU... The short and long term turbo power limits are greyed out. I can reduce turbo vcore however which means the CPU will turbo higher under load before it reaches its power limit. - Will Throttlestop be able to change this? As you can see the list of gripes are really minor issues day to day, and some will be fixed with drivers etc. I'm not sure what sort of price your favourite system builder will charge for this, probably less than an AW14 configured to the same spec! I will get some pics and screenshots for my next post. Any Q's feel free to ask! Onyoto
- 20 replies
-
- 2
-
-
- clevo gaming
- haswell
- (and 3 more)
-
It definately comes with one, I am typing this on an AW17 right now and it has a 64GB mSATA cache. The actual connector seems to be hidden though, you can get to both 2.5" HDDs from the base cover (as well as 2x DIMMs and the wireless card), my guess is the mSATA drive is under the keyboard with the other two DIMMs. Not sure how to get there though, I keep looking for a teardown review! At this rate I may have to make one!