svl7
-
Posts
4643 -
Joined
-
Last visited
-
Days Won
789
Content Type
Profiles
Forums
Downloads
Everything posted by svl7
-
I got it as a gift.. I guess about $300, it's a high quality solder station even though it's not a professional version... and a great variety of tips and spare parts are available for it. But I have no idea whether this one is available in the US. Shipping won't be worth the money imo, this thing is pretty heavy, maybe 3kg... I'm sure there are other manufacturers which sell similar solder stations in the US if this one isn't available. I recommend making sure that you can easily change the tip and that you'll be able to buy spare parts/tips for several years if you invest in such a tool. (That's usually the case with a quality brand... ERSA, the manufacturer of my solder station mainly produces professional stations, the one I have is the only "hobby" version they sell afaik... the great thing about this is that it's really easy to get new tips and accesoires since they have all the stuff for the professional tools anyway) If you regularly use a solder station it's great having a reliable tool which is easy and quickly adjustable and doesn't just heat up like a $20 solder and burns all the flux. But back to the topic, I hope this works out fine with this LED mod, it sounds really easy in theory, but in the end you need the time, the tools, etc... Unfortunately things often get more complicated when you think you're almost done.
-
You're sure? I thought only the optical drive was SATA I, not the port itself... if I remember correctly it's a SATA II port, at least that's the case in the M15x if I remember correctly, and they have similar chipsets, right? I've once seen some CDM benching of someone who had a SSD in the optical drive, and if I'm not mistaken it worked with SATA II speeds... I could be wrong though...
-

Intel Core i7 2920XM Fastest Mobile CPU Until Q4 2011
svl7 replied to Jimbo's topic in General Notebook Discussions
I totally agree with you Brian... and as the CPU is still pretty new there's not much competition on ebay, atm I can find only three 2920xm for sale, for $1120... they seem to be OEM, no word about ES (though I only looked really quickly). This will hopefully change during the following months. If I had to guess I'd say Intel will release a 2940xm somewhen in Q4... no change when compared with the 2920xm, but higher binned and multi raised (+1). That would be the most easy way for Intel, they did the same with the first gen already.- 5 replies
-
- 1
-

-
- 2920x
- cpu overclocking
- (and 6 more)
-
Yes, spread the word!! (We need M15x users as well )
-
[Guide] M15x with AMD 6970m / 6990m - everything you need to know
svl7 replied to svl7's topic in Alienware M15x/AW 15
Information for flashing the Dell vbios on a non-Dell card for making audio through DP/HDMI working: ATTENTION: This has only been tested for the card from MXM-upgrade. (Subvendor ID Sapphire/PCPartner (174B) ) It may work as well with a card from a different manufacturer (e.g. Clevo) but this hasn't been confirmed so far. In case you want to try this with an untested card make sure you know enough about the flashing procedure to blind flash the card in case something doesn't work as intended. Also let me know about your success so that I can update the list. WARNING: Flashing the vbios of your GPU always involves some risk and can brick your card in case something goes wrong. Make sure you know the exact procedure before doing this. I do not take any responsibility for damaged cards, systems or whatever. You'll need a DOS bootable USB drive with ATIflash on it. If you have already such an USB drive you can skip the next step and simply copy the Dell.bin file from the attached archive to your stick. If you first need to create such an USB drive open an read the Spoiler: Creating a bootable DOS USB drive (by Brian K) 3. Copy the extracted files from the flash files.zip[/b ]archive onto your usb key. Before you flash make a backup of your original vbios. You can use GPU-Z or ATIflash to do this. Then: -Plug in your prepared USB drive -Make sure your system is plugged in (AC adapter and to be safe battery as well) -Reboot -When you see the Alienhead press [F12] to get to the boot menu, choose "Boot from USB" A command prompt will appear. I recommend making sure the file you want to flash didn't get corrupted while downloading, extracting and copying to the stick. Validate the vbios by looking up the BIOS checksum with this command: atiflash -cb 0 The attached vbios has the checksum 0xBE00. As flashing the Dell vbios on a non-Dell card will change the hardware ID it will cause an error when trying to flash it regularly with ATIflash. You'll need to force the flash with the following command: atiflash -p -f 0 FILE Note: FILE stands for the filename. Valid extensions are .rom and .bin. The name must contain more than eight characters. An example: The file in the attached archive is called "Dell.bin", thus the command you have to use is: atiflash -p -f 0 Dell.bin Then restart your system and unplug the USB stick. You can use GPU-Z to verify the flash of the vbios. flash files.zip -
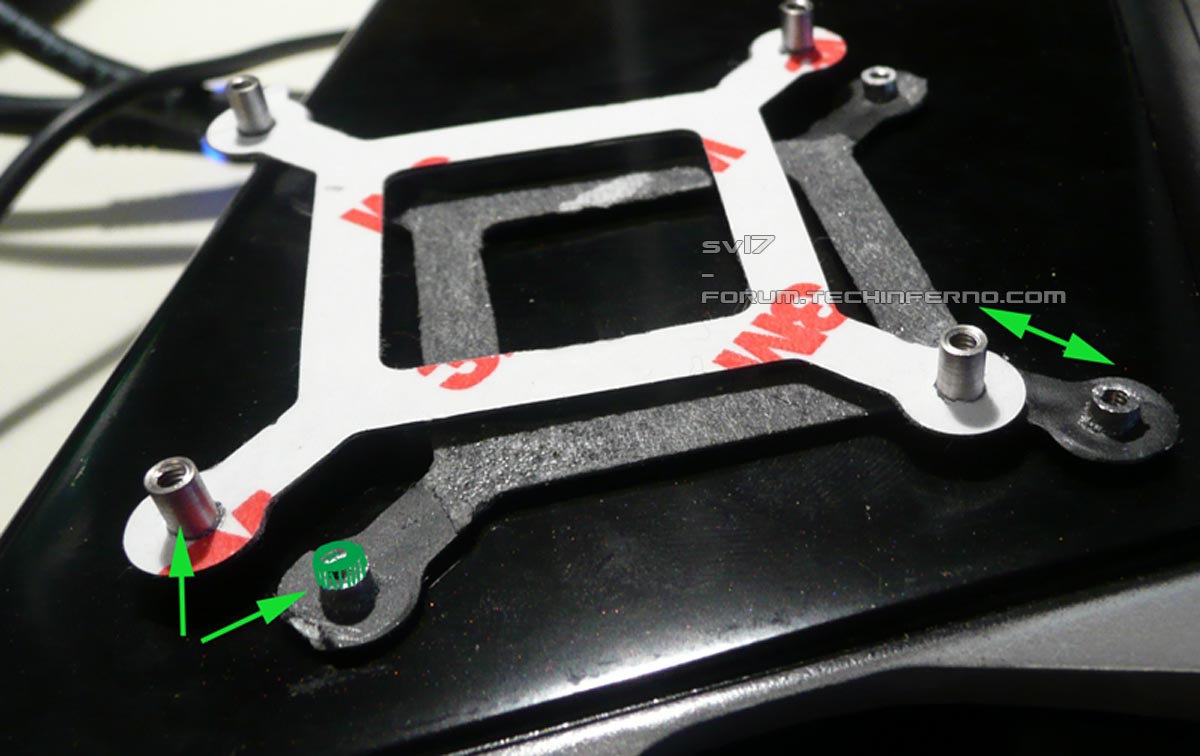
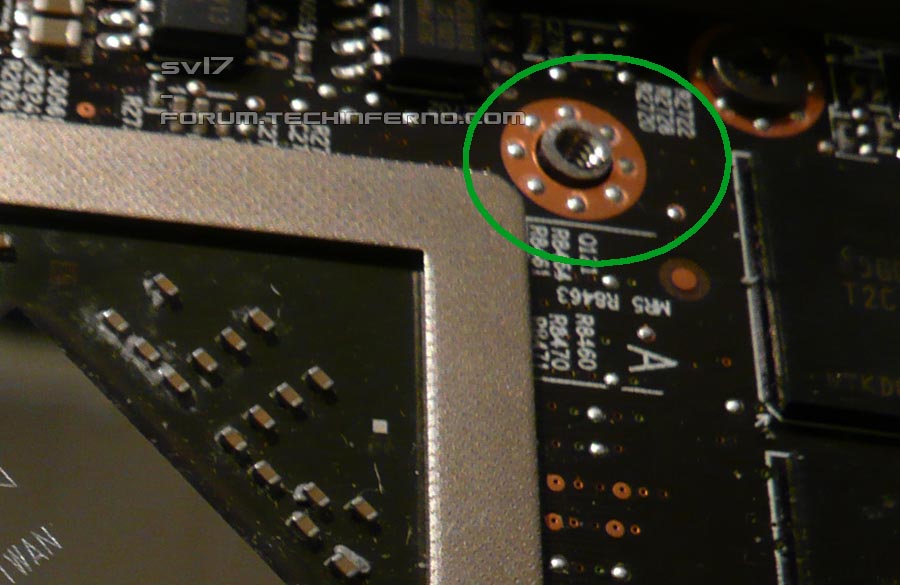
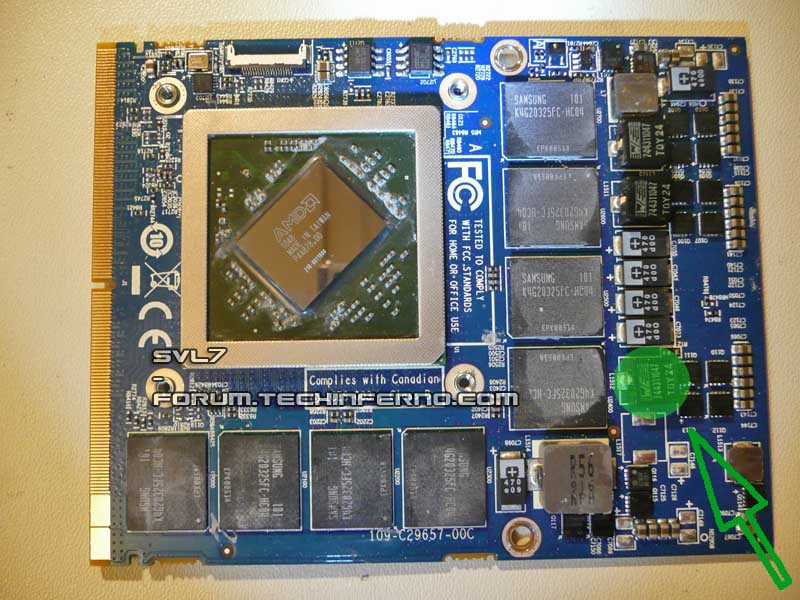
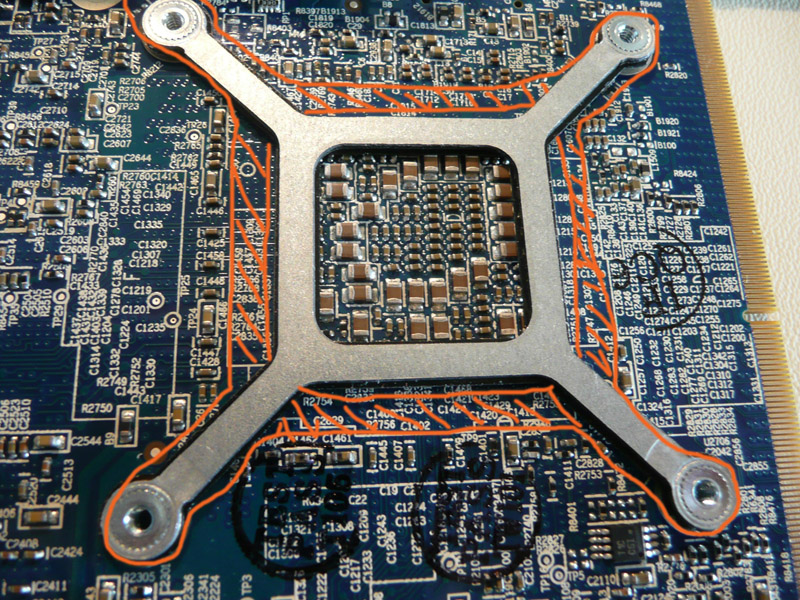
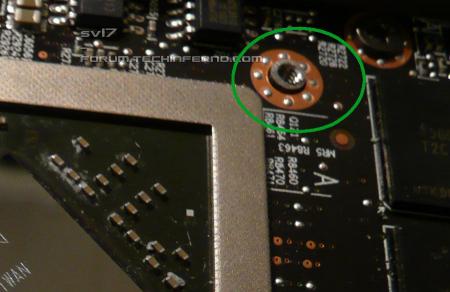
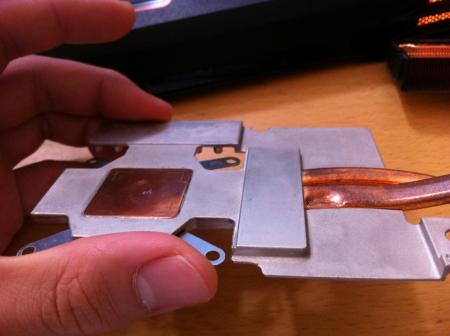
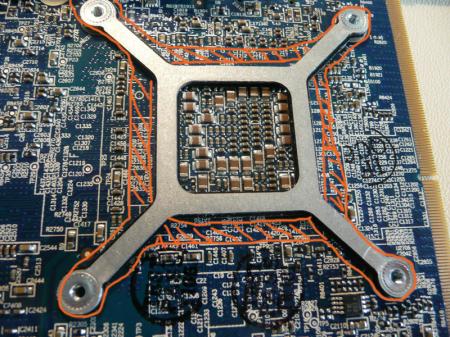
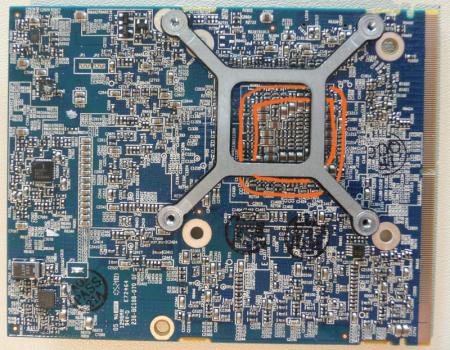
In case you have some additional info that should be included, or if I missed something important, let me know and I will include it. IMPORTANT: The 6970m is not officially supported by Dell. Upgrading to this card may void your warranty. The 6970m is a powerful card, it will draw more power and produce more heat. This card can significantly improve the performance of your system, however, the long-term effects of running this card in a M15x are currently unknown. But it works great so far Cards that are known to work: The card Dell uses in the M17x R3: This has only been tested for a short while so far, but it seems to work perfectly fine. Credits go to Rogue-OP and iloveb00bs. The first guys who tried to put a 6970m in a M15x. -DP/HDMI works, confirmed by Strigae, thanks!!. -Fan control works It seems you need to install the M17x R3 drivers first before you can get the official AMD drivers. I guess installing for example the modded 11.4 will work as well. Dell Part nr. is: V9XKH. Good luck when ordering one from Dell, depending on where you live and what kind of rep you get on the phone they might not want to sell you the card as it isn't officially available for your system. Call again in this case, or if you know someone with a M17x R3 let him order the card for you. 6970m from MXM-upgrade.com: Works great, but no fan control. The fans are constantly at a high speed, but not completely at full full speed. For now you'll need to manually control the fans with HWinfo32. -DP/HDMI works. Sound through HDMI works when you install the Dell 6970m vbios and the M17x R3 HDMI audio driver. -m15x-amd-6970m-everything-you-need-know.html#post3717"]Here are the instructions for this. Card can now be ordered for the M15x from mxm-upgrade. Clevo (and resellers) 6970m: The card from Clevo and resellers (Eurocom etc.) works as well, but make sure you get a version of the card which has holes for the back plate! Some of these cards have the screw holes for mounting the heatsink soldered on which makes it impossible to use the Dell backplate, and since Clevo uses slightly smaller screws than Dell you can’t simply put your heatsink on such a card. Contact your dealer in advance to make sure you get a card which doesn’t have the screw holes soldered to the PCB, otherwise you’ll have to remove it (which is difficult) or use some smaller screws on the heatsink. For all these cards the heatsink of the M15x fits perfectly. No modification needed. Cards from other vendors / manufacturers may work as well. If you got a different 6970m running in your M15x let me know and I'll upgrade the list. Things to do before exchanging the card: Download the drivers. This modded 11.5 should work, click on "MobilityMod Windows 7/Vista" in the linked thread. Also get GPU-Z for monitoring your video card and verifying it, Trixx, for under- and overclocking and in case you haven't got a Dell card also HWinfo32 (I recommend getting it anyway since it is a great system monitoring tool) Make sure you have thermal paste, maybe some new thermal pads as well as something to clean the heatsink (e.g. isoproply alcohol) and some cloths around. I also highly recommend using a grounded ESD-mat and a wristband. Know what you're doing. You need to partially disassemble your machine to get to the GPU. Prepare yourself thoroughly, check out the M15x service manual, as well as the if you don't know how to get to the GPU. It can be helpful to write down all the steps in advance when you're doing this for the first time. If something is still unclear about the disassembly procedure after looking at the video and checking out the service manual let me know, I can provide you some pictures if necessary. The upgrading procedure: Uninstall your GPU drivers. Make a power drain (Turn off your M15x, remove the power cord and the battery. Then press and hold down the power button (Alienhead) for about 10-20 sec. Remove your GPU - Here's a little guide with pics in case you need some help. Clean your heatsink, if necessary replace the thermal pads with new ones. Make sure the 6970m has a retention bracket on the back of the GPU. If not take the one from your old GPU and put it there. Also make sure you read the section about the "retention bracket problem". Properly insert your GPU, make sure that it sits properly. Apply the thermal paste, and attach the heatsink. Then (after reassembling your system), boot, install the drivers and reboot. Make sure the fans are running. Open GPU-Z and verify your card and the clocks. It should look more or less like this. Default 3D clocks are 680/900MHz (core/memory) and 150/100MHz when idling. Make sure PowerPlay is enabled in the Catalyst Control Center. Also make sure Stealth Mode is deactivated. Check your temperatures. Idle temps should be 40-50°C, depending on your ambient temp of course. While gaming or doing something similar GPU-intense the system will run significantly hotter, 70-80°C, maybe a bit higher. Note: By lifting the back of your system a bit (for example with a book) you can improve the airflow in the system. This can really help lowering the temps. The back plate problem: The retention bracket of the 6970m has a different size than the regular M15x cards (260m, 5850m etc.) When your card doesn't come with this x-plate you need to take the one you have on your old GPU, but this one won't fit properly. Nevertheless it works, even if it covers some resistors on the back of the card. Make sure you're not shorting anything. Usually the back plate has an insulating black plastic pad on it, this will work. However, if your x-plate doesn't have this pad on it, you must cover it with some thin, insulating tape. Here you can see the problem: In this picture I marked where the back plate should be: And in this one I highlighted the area which gets covered by the too small bracket of my 260m: The space beneath the card becomes pretty tight, but it works. My advice is contacting your dealer before buying the card and asking whether he can provide the correct x-plate. (In case he tells you that you should use the one from your old card tell him it has a different size.) The backplate problem part 2: In case you got your hands on a card with a proper backplate - cool! There's only one problem... the holes with the threads for fixing the screws are standing out just a bit too much. Compare it to the original backplate which came with your M15x, the difference is about 3 millimeters. Due to this, the heatsink applies almost no pressure on the die when you mount it on the card, resulting in high temps. A simple mod will solve this, just grind down the "screw holes" of the backplate a couple of millimeters, easy to do and very effective. This will highly increase the pressure which is applied on the die and bring down the temps. Just take it easy with fixing the screws, if you grind down the metal a bit to much and then fix the screws until you can't turn them anymore you might crack the die if you're unlucky. I recommend comparing the plate with your original M15x plate and just grind your 69xxm plate down until it has the same height. Here some pics which illustrate the problem. I cut of quite some material, you might want to leave a bit more to make sure you don't accidentally kill your card with the pressure. Heatpipe problem: It's possible that one of the coils on the cards is standing out just a little bit too much and thus touching the heatsink. This can lead to a small gap between the die and the heatsink which will lead to increased temps as well. To prevent this you can do a slightly crazy mod, as done by @widezu69... take a hammer and carefully flatten your heatpipe a tiny little bit at the problematic spot. If you work with enough care, it really works without killing the heatipe. Again, care is the keyword here. Here's a pic of the modded heatpipe as well as the problematic coil (marked with green): Power consumption: The power draw of the card is probably about 75-100W. I run this card together with an i7 920xm in my M15x and it works fine. Nevertheless you need to be careful, as the PSU of the M15x is only rated 150W. When doing some 3dM11 runs with both GPU and CPU overclocked I measured about 160-170W current draw from my system during the combined test. You really need to be careful when running this card, especially when you have an extreme processor (920/940xm). Pushing both GPU and CPU can (and will) bring the PSU to its limits (and above). Some numbers about the power draw when playing games, everything on stocks: Black Ops Zombies (everything on max): ~ 130-140W Portal 2 (everything on max): ~110-125W Medal of Honor (everything on max) ~140-150W Crysis 2 (set to "Hardcore) ~ 140-150W The device I use for measuring the power draw has an accuracy of about ± 10W. I'll update some more numbers later. Fan control: In case you have a card which makes your fans running at a high speed all the time you will need to use HWinfo32 to manually adjust the fan speed. To get to the fan control open HWinfo32 (sensor only) and press on the little fan next to the "Logging start" button. This will open the fan control window. Ignore the GPU2 fan, you only need to adjust the CPU fan and GPU1 fan value. The programm needs to override the fan setting of your system in short intervals all the time, the standard value is 100ms. (See the "respin period" box). But the fan needs some time to slow down again, even when the EC already reset the value of HWinfo32, that's called the respin time. If you set it to about 11000ms your fans should run all time at the value you set. If they start to slow down and then spin up again you need to decrease the respin period. For adjusting the fans set the slider to the desired value and click "Set Manual" You will need to do this for both fans. Update: It's now possible to create a fan control look-up table and let HWinfo32 automatically control the fan speed by temperature. 1. Click on the fan symbol 2. Click on "Custom Auto" 3. Choose the temperature sensor diode which you want to use as reference. 4. Set the desired speeds/temperatures according to your needs. Do this for both GPU and CPU, ignore GPU2 fan. I recommend using the hottest GPU diode (usually MemIO). A big thanks to Mumak, the developer of this fantastic tool. Here you can find the official Alienware fan control thread in case you find a bug or need to know more. ATTENTION: Adjusting the fan speed can be dangerous!! Always keep an eye on your temps and never forget to adjust the values before doing something CPU or GPU intense (in case you control them manually)! I'm still looking for a different solution. In case I'm successful I'll post the update here. Possible problems and solutions: Unable to install drivers. Solution: Try a different driver. Also contact your vendor, maybe he knows a specific one that works. Idle clocks are 250/900 instead of 100/150. Solution: Check your display settings and make sure only your internal notebook monitor is selected. 250/900 are the idle clocks when you're connected to an external monitor (or when your display settings are got messed up, probably driver related) Solved by iloveb00bs. The GPU temps are crazy high! Solution: Repaste. You probably did a bad job with the thermal paste. Also make sure your system is dust-free and that the heatsink sits properly and is making contact (also check the pads where the memory modules touch the heatsink). While idling the GPU clocks change from 2d to 3d clocks and back all couple of seconds. Solution: This behaviour can be caused by the M17x r3 6970m driver (A00). Get the latest AMD driver and you should be fine. If you have this problem with a different driver try another driver version. Feel free to ask questions! M15x GPU exchangement guide .pdf


- 162 replies
-
- 15
-
-
I'd say the M11x is easier to sell as there's no much competition in this category.. a pretty powerful and (imo) great looking 11 inch screen notebook is not very common, unlike the XPS, there are a lot of similar models from other vendors available. However, the Alienware look isn't liked by everyone, and it will definitely depend on where you try to sell it I guess.
-
Yeah, should definitely work imo. And yes, six connectors is normal, two for each diode.
-
Very nice!! Seems to be a pretty capable system. In case you're going to repaste please take some pics of the system opened.
-
Yeah, I agree... especially comparing fraps benches is difficult as the framerate will not only depend on the map, but also the way you're playing. In some games measuring the fps while playing online doesn't make any sense, e.g. Black Ops Zombies... if there's a player in your field of view with a huge ping it will drastically drop your fps, at least that's what I experience. Btw, does anybody know how huge (small) the impact of fraps on the performance is? (Benching, not recording)
-
You need a soldering station / soldering iron which allows you to exchange the tips. I'm soldering SMD parts from time to time and it works fine, but it needs a little practice and a steady hand. I'm using this soldering station... I have tips that are 0.4mm diameter, but that's really small, usually 1mm is sufficient, even for SMDs, but it reall depends on the size of the solder joint. When you have a soldering iron that can do the job I recommend getting some SMD resistors and wire and practice a bit first.
-
Well yeah... they charge about $2300 for the 32GB ram Edit: And more than $1300 for the SSD raid...
-
Dååth , From the Blind (without drums and vocals)
-
Japanese prices seem to be a bit more sane. I'm curious what Dell will charge for a nice M18x in Switzeland (once it will become available... ) Usually the prices are pretty insane...
-
Hi stevenX! Glad you got my mail, nice to see you. They are no more... they first merged a couple of threads then they simply disappeared, lol.
-
I guess you mean the page with all the service manuals... here's the one for the M17x R3: Alienware: Online Documentation But it won't really help as they only describe to exchange the whole lid assembly, I checked. And if someone's interested.. here you'll find all manuals and stuff.... for Alienware search for "alw": support.dell.com - /support/edocs/systems/
-
Here's a really, really nice unboxing video, lol. Maybe I should post this in the lmao section I'm curious about the capabilities of the 555m... hope we see someone with a M14x here soon.
-
Greetz from Switzerland, just next to Zurich
-
Hahaha, great wallpaper unreal25, do you have a link? Nice stuff here!
-
Too bad there's no 1080p screen for the M14x... that would've been a great pixel density. Anyway, does anybody happen to know the specs for the M15x 1080p screen?
-
Ok thanks, I'm gonna give this a try!
-
Yes, when running a VM on the RAMdisk it will be incredibly fast... I agree. But I'm wondering whether having the pagefile on the RAMdisk really makes a big difference.
-
Yeah, I only have 4GB myself, otherwise I would have tried it already a while ago. I'm really curious whether it works fine.
-
Have you already worked with a system which used this setup? I'm really curious about whether you can actually fell the difference or not. I heard about this idea a couple of times and I think it's really interesting. However there are also people saying it isn't really worth all the effort because you don't gain enough performance... I'd love to hear from someone who uses this whether it really (noticeably) boosts the system. BTW, did you check the prices of the 8GB RAM sticks?
-
Great to know!! Inap already confirmed the fan control, but it's good news that DP/HDMI audio works. I'm on the latest preview driver (11.4) and it doesn't work, I tried installing the Dell 5850 driver (only HDMI audio part of course) but it didn't make a difference... I'll try it again tomorrow or so, maybe I messed up something, but chances are that it doesn't work. When I connect my TV to the M15x I always get a notification which says that audio won't work for this connection... mybe it's even a thing with my TV. I never used HDMI/DP audio, I only wanted to try it to confirm whether it's working or not... usually I connect my sound system with the 3 stereo jacks (my Logitech z5500 doesn't have a HDMI in) Now I'm curious about how far you can push your card... show us some numbers!