Leaderboard


Popular Content
Showing content with the highest reputation on 05/13/17 in all areas
-
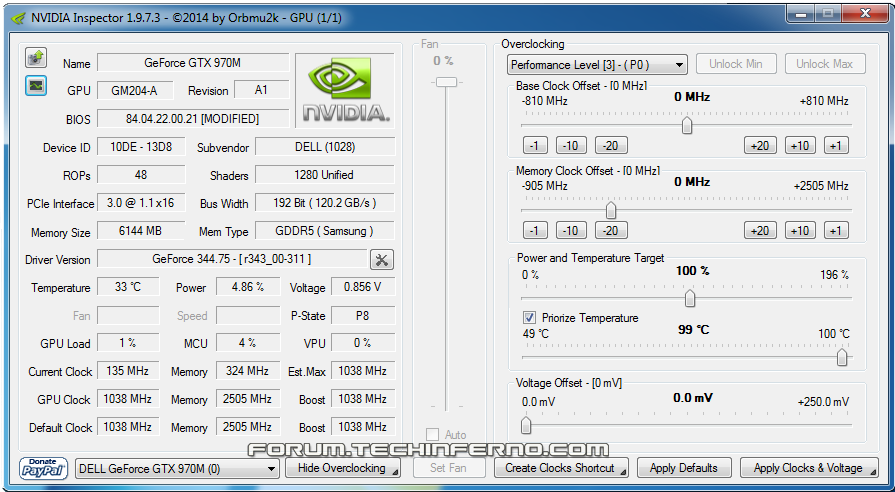
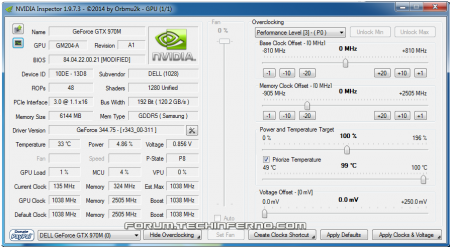
NVIDIA 'Maxwell' VBIOS mods Here you find modified VBIOS versions for the mobile parts of the Nvidia 'Maxwell' series. The VBIOS versions in this post are tweaked for performance and versatility. You'll get almost complete control over the performance parameters of your GPU. List of available VBIOS mods: Nvidia GTX 970m - 'OC edition' rev0 - >> 6 GB Version << - modified by @johnksss & svl7 -> see attachments Nvidia GTX 980m - 'OC edition' rev0 - >> 8 GB Version << - modified by @johnksss & svl7 -> see attachments Screenshot demonstrating the capabilities of the 970m versions: >> Read the instructions carefully before flashing! << If anything is unclear after reading or if you have additional remarks, please post in the thread. Flashing: - Go to the device manager -> 'Display Adapters' -> chooser your GPU, right click on it and choose disable - Flash the VBIOS with mnvflash, a modified version of nvflash (see attachments). Here are detailed instructions for nvflash in case you aren't familiar with it. - After the flashing is done: Enable the GPU once again in the device manager. - Reboot Do NOT use driver 347.09, it's broken and useless and won't allow you to overclock, even with the stock firmware. Don't distribute the files hosted here outside of Tech|Inferno. Don't modify the files you download here. mnvflash_windows_5.196.zip Nvidia GTX 980m - 'OC edition' rev0.zip Nvidia GTX 970m - 'OC edition' rev0.zip
 1 point
 -
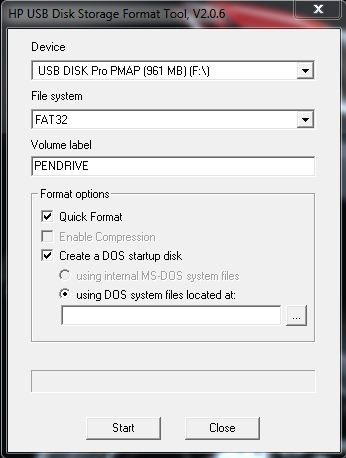
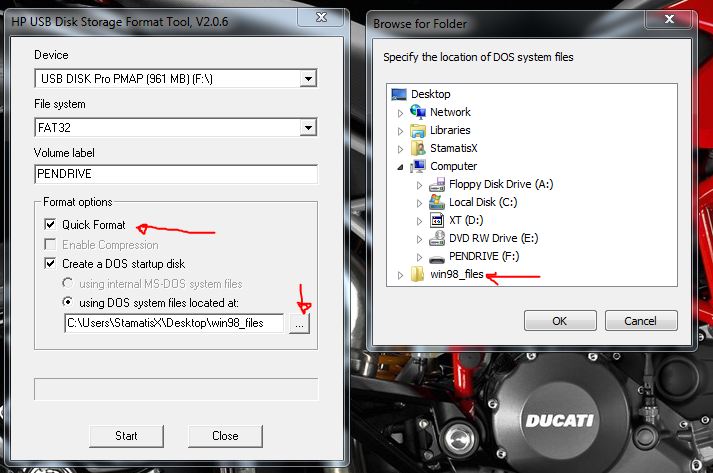
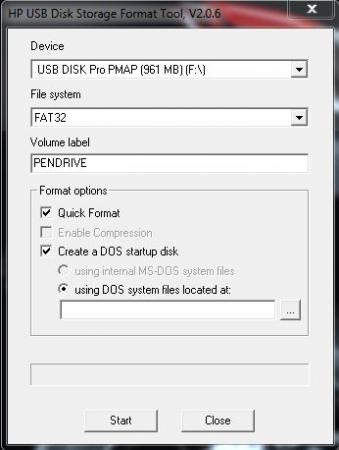
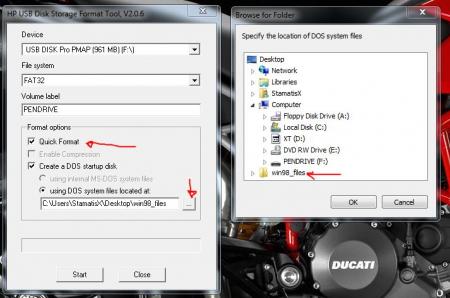
For those who don't like the restrictions Lenovo put on their system, here's a BIOS mod that will get you back at least some of the freedom you should have over your own hardware. Features: WLAN card whitelist removed, any (hardware-wise compatible) card should now work hidden BIOS menus unlocked VBIOS tweaked for more performance and better tuning possibilities Keep in mind that not necessarily all of the BIOS options available with this mod will be fully functional, so use the new available settings with care. If you're unsure about something don't change it and ask here, someone might be able to help. Available for v1.07 / v1.09 / v1.10 and v3.05. v2.04 and v2.07 added (only whitelist removal as for now) If you have a different BIOS (or more specific, a BIOS newer than 3.05) I will need a copy of it in order to make it work for your system. Instructions for flashing the modified BIOS v3.05: You need a USB stick prepared to run DOS, here is a guide you can follow in case you don't know how to do this: Guide by @StamatisX - thanks! >>> Before continuing make sure the AC adapter is connected to your laptop and your battery has at least 20% charge remaining. <<< (0) - NOTE: This step is Only necessary if your system isn't already using BIOS v3.05 Update to the official v3.05 BIOS provided by Lenovo . (1) - Create a backup of your own BIOS (now v3.05) by using Fptw64 tool. Extract the files and run the included .bat file from an admin command prompt. . (2) - Download Lenovo_Y510p-Y410p_[v3.05]_modified.zip and put the files of folder [1] to the root of your prepared USB DOS stick. Let the BiosFixer prepare your BIOS for flashing by drag and dropping your backup file on it. Put the created "v305mod.bin" file to the root of your USB DOS drive as well. . (3) - Now you need to downgrade the firmware back to v2.07 (Y510p-Y410p_v207_[stock].zip) in order to flash the mod. . (4) - Boot from your USB DOS drive, when you see the command prompt type BIOS and hit enter. Wait until the BIOS is flashed (you can safely ignore warnings about non-existing regions). . (5) - Once the BIOS flash completed with no errors, type EC and hit enter. Wait until the EC is flashed. Then reboot. . (6) - Go to the BIOS setup menu, load the default settings, apply and reboot. Done. In case you're using an ultra bay GPU follow the instructions in post #2 and flash the vbios.. NOTE: It's crucial that you flash both, BIOS and EC. Having different EC and BIOS versions can in certain situations lead to issues. IMPORTANT: If you want to go back to stock v3.05 you can do that easily by simply using the official update from Lenovo. That's it, nothing additional required in this case. Old instructions for users with v1.07 / v1.09 / v1.10 or v2.04 / v2.07 who for some reasons don't want to update to v3.05: Video walk-through of bios settings (thanks @allstone): My donation link in case you want to buy me a beer Download link for files referenced in this post:
 1 point
 -
Fan Control: 1. GT70 Fan Control V1.6.3 setup.zip SHA256: c2fcf7a35ffa7e313787b62cf6768626900821f315575b1b0e1d79f551c6843d File name: GT70 Fan Control V1.6.3 setup.zip Detection ratio: 0 / 54 Analysis date: 2015-10-26 11:47:11 UTC ( 1 month, 3 weeks ago ) 2. MSI fan control These are legacy utilities created by third parties and are not tested or warranted by Tech|Inferno. Use at your own risk.1 point
-
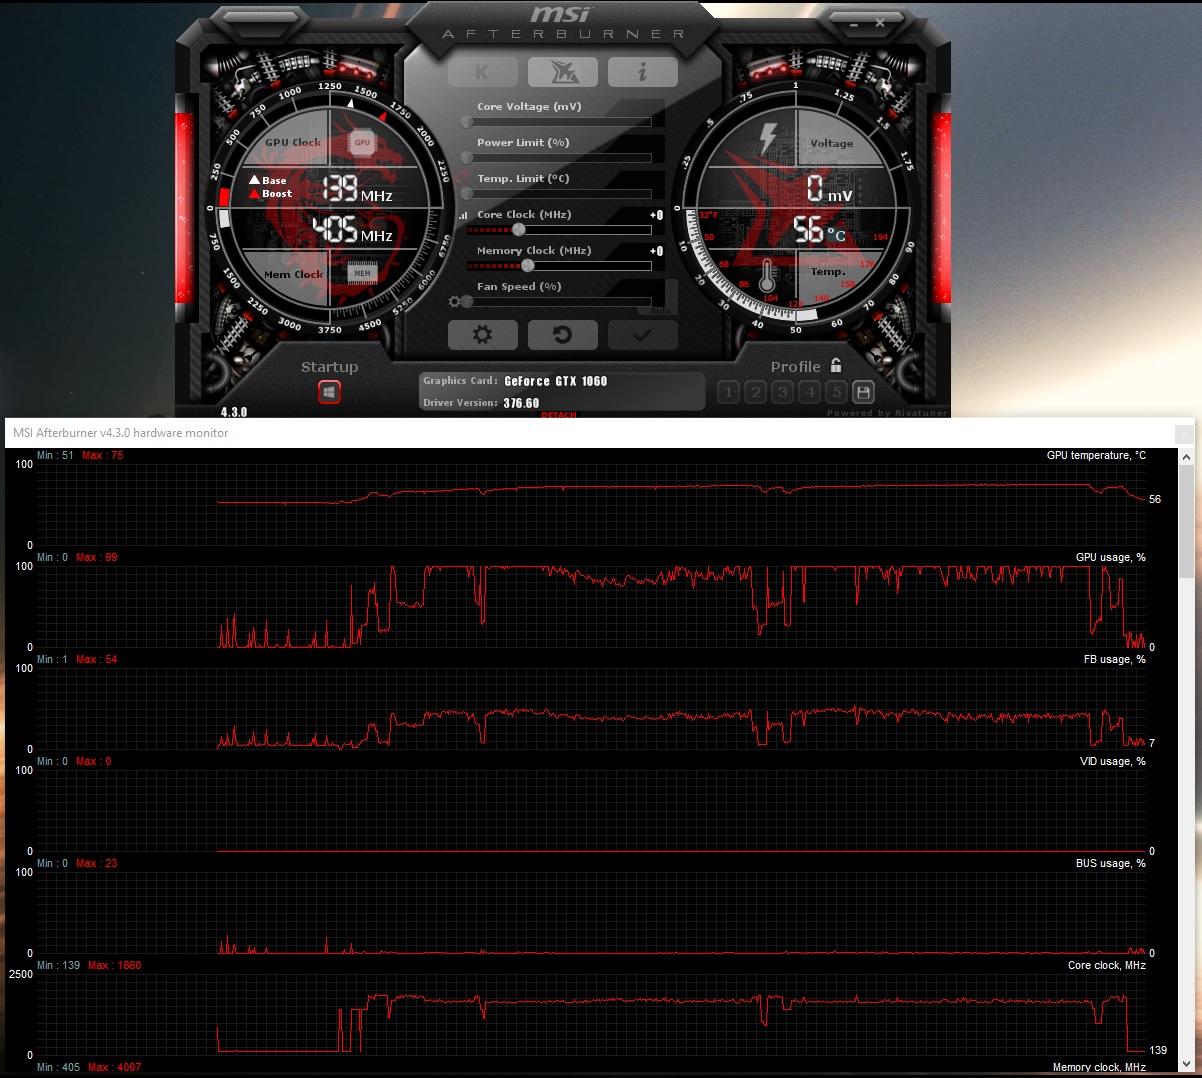
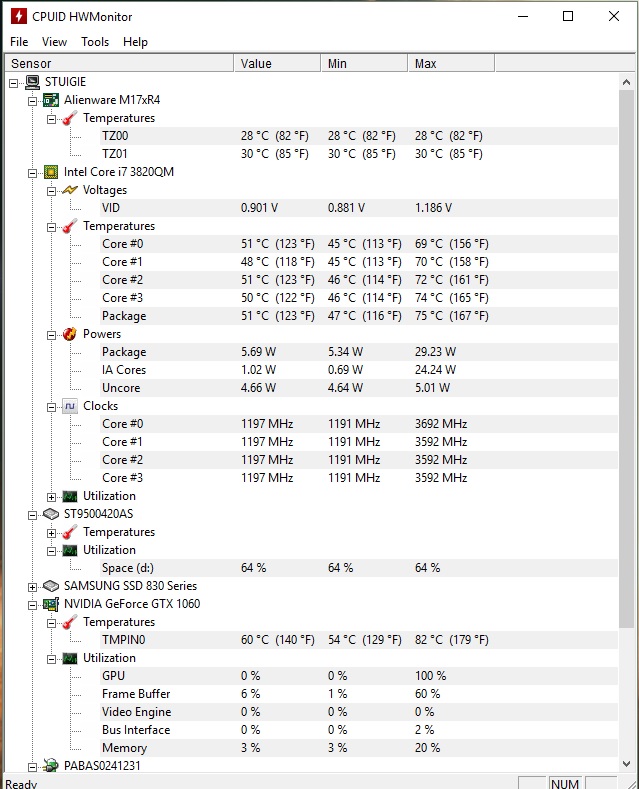
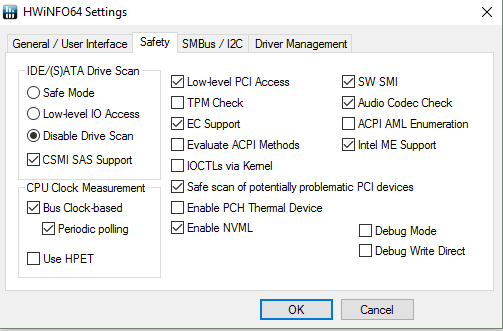
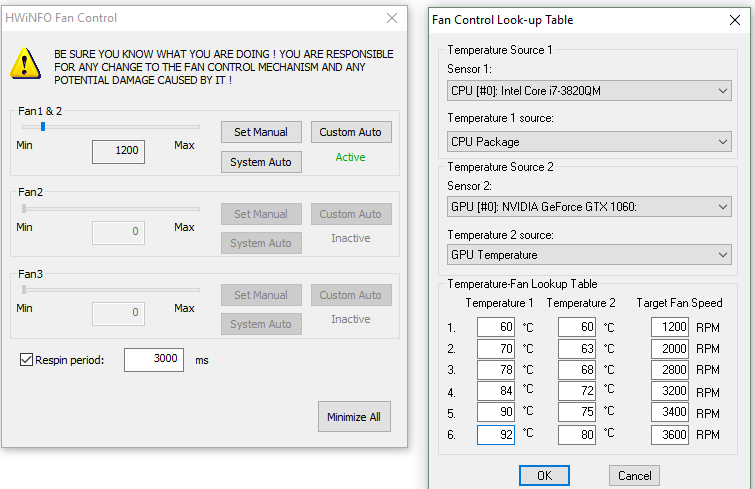
Hi all, This is just to report the success of installing a gtx 1060 on my M17X R4. Mine is the 3D version and as far as I'm aware, you need a screen in eDP mode (120Hz 3D model) for it to work (confirmed) on top of UEFI support to boot up. See here for the gtx 980m install which is the same for this card, but the 980m works on 2D models too: https://www.techinferno.com/index.php?/forums/topic/8103-installed-980m-in-m17x-r4120hz-3d/ HDMI in and out works but it does raise the question if the gtx 1060 will work on the 2D model via HDMI out. It should do as it's the eDP connector for the laptop screen is the issue here. Also 3D mode will no longer work (like anyone cares about 3D anymore ). The cards above the 8xxm series have no 3D support. Prerequisites A 120Hz screen is needed to pascal GPUS as only the 120hz connector in the laptop supports eDP mode. Keep your current card, in case you try modding your Bios or something like that, if settings become reset, UEFI is usually off by default. That means in this situation the GTX 1060 won't work without changing the Bios settings. Install your old card as it supports non-UEFI and UEFI modes. UEFI mode: This is must for the reason above. Windows needs to be installed on a GPT partition to use this feature. As this laptop origianlly came with windows 7, GPT and UEFI originally was not used. However Bios updates and windows 8+ could use it so UEFI was enabled. Install a fresh copy of windows on a GPT partition. The windows installation menu can help you with that. https://technet.microsoft.com/en-gb/library/dn336946.aspx Bios settings: In the boot options, set to UEFI mode, disable fastboot and legacy options. This ensures that your old card and the Pascal card both work when you swap them out. Installation It seems the laptop just about supports it. One Major thing to be aware of is the installation. For at least the MSI model of the GTX 1060, you need to use very thin heat pads as the core only just makes contact with the heat sink otherwise. I have found that on the core side are some new resistor blocks (Labelled R.22) that weren't in my old GTX 680m and thankfully they are the exact height of the core, so it isn't impossible to mount the heat sink. It's a very fine mark but provided you use thin pads (stock GTX 6xxm cards have nice thin ones) and a tightly screwed X bracket, you can get good cooling performance. The top R.22 blocks also do not need thermal pads (may benefit from thermal paste though) as you need as little height as possible. I'm aware of two types of heatsink used in the m17x r4. Both will work but there is a protrusion (in red) that can prevent proper contact with the core. If on a copper cornered heatsink (second image), you may not have to file this bit down. If you seriously have no tools to do this, you can very carefully bend this section VERY slightly to provide a little more clearance. To ensure good contact with other components in this case, use thicker pads or more paste on this section. (Top) Taken by Zoldago (Bottom) Taken by Decool Drivers Drivers are fine, just go to laptopvideo2go and get the latest drivers with the modded .inf files. Remember to use DDU before installing . Simple guide for drivers:) - uninstall any graphics drivers, including ones automatically downloaded by windows (disable windows update if need be). Using DDU ensure every trace is wiped clean to avoid any problems - Disable driver signature enforcement (Shift + restart button in the start menu -> troubleshoot -> Advanced options -> Startup settings) OR f8 at boot screen (windows 7) - Run official installer, quit once the driver files are extracted. - Place the modded .inf file into "display.driver" of the extracted files - run "setup.exe" from extracted folder. Done! Bios + screen Generally, a modded bios is not needed as all necessary options are already available. Some scenarios may need a display type change or the iGPU cannot be disabled the usual way. To convert from a 60hz to a 120hz screen, you need to ensure that when booting up on the 60hz screen to disable the iGPU (FN+ F7) (Check BIOS settings to ensure it stays off). Once in dGpu only mode, you can go ahead and install the 120hz screen. 120hz screens do not support optimus as the iGPU is incompatible. Performance wise it's pretty close to a desktop 1060, hitting a score of ~3600 in time spy and ~12,000 graphics score in Firestrike (desktop scored ~14,000). Temps settle at 75C as the card is limited to ~80W (so very limited OC for now ). First Screenshot below used the stock paste that came with the card. Highly recommend a different paste such as mx-4 paste which I used (second screenshot). I doubt it will work on a M17X r3 due to the lack of UEFI support. Fan control and monitoring I use MSI afterburner for monitoring temps. You can also use HWinfo to control the fans, seeing as the 1060 is an 80W GPU compared to the 100W that the laptop is capable of cooling. If you're interested in lowering the fan speed for the sake of noise, use HWinfo. I'm aware that a system lock up can occur when using the fan control feature. However, so far I may have a solution. - Remove the main battery. A fix for many users and easy to implement - Alternatively use the settings provided in my screenshot. I know that the ACPI features are likely to be the main cause of lockups, but to be sure copy my settings and only monitor the sensors needed for fan control (e.g. CPU package temp and GPU temp). the author of this program is aware that the battery monitoring is the cause for lock ups (which uses the ACPI in windows) Remember that you can only control both fans at the same time! Be sure to stress your CPU with a program prime95 to ensure your CPU does not overheat with your new fan settings. Also use both fan tables, one for the CPU and the other for the GPU so the fans spin up under loads from either. A final note. I would set a re-spin period on the fan control menu to reduce fan pulse. I found 2-3 seconds ideal. In my machine at least, the BIOS sets the fan speeds higher than needed before settling down to their target speed. E.g. at 4000 rpm, the fans spin up to 4600 rpm and in around 10 seconds slow down to 4000. Below is my preferences, although you may not want to run components quite as hot. Under max load, the CPU hits 90c and GPU 78c. Good luck and enjoy!

 1 point
 -
I recently tried this Lenovo IdeaPad Y500 bios mod by svl7. I was originally running official Insyde Bios v2.02 and the stock vbios for the first graphic card GDDR5 750M. I was reluctant to try this bios mod initially because I could not backup the vbios for the first 750m graphic card, but I finally decided it to try it because I was convinced that I needed access to other hidden bios options to accomplish what I was trying to do. I wasn't modding my bios so I could change the GPU clocks of my 750M graphic cards, and I did try to back up the vbios for each 750M first. If I tried to back up the vbios with GPU-Z, it would give me an error message saying bios reading is not supported, cause my computer screen to change colors, or freeze my computer completely. If I tried it to back up the vbios with NVFLASH, it would change my display resolution, disable my GPU, return an error message, and cause NVIDIA control panel to return a message which says a NVIDIA GPU must be attached to the display, etc. I could only backup the vbios for the second GPU. I followed the instructions on the guide posted on the TechInferno forums correctly and everything. I backed up my bios, modified it using the tool, and then I flashed the modded bios. The bios mod was successful, and I now had access to other hidden bios options. However, I noticed that the vbios version for the first 750M GDDR5 graphic card was now different as I had feared, and it was also clocked at 1059 mhz, almost 100 MHZ higher than it was before the mod (it was at originally at 967 MHZ). The original vbios version 80.07.95.00.17 was changed to version 80.07.9d.00.11. Here are some other GPU-Z validations for reference: vbios 80.07.95.00.17: https://www.techpowerup.com/gpuz/details/e7hcb https://www.techpowerup.com/gpuz/details/3yyyu vbios 80.07.9d.00.11: https://www.techpowerup.com/gpuz/details/4z7pe The GPU clock was higher (1059 mhz) for me with the 80.07.9d.00.11 version. I did a Futuremark benchmark in SLI, but I got the same/similar results as before. But the computer seemed to running fine with the SL7 bios mod, despite the change to the vbios for the first graphic card. I tried enabling and disabling various features and options in the bios, but none of them seemed to get what I wanted working. If the PC was stuck at the Lenovo logo after changing an option, or something else wasn't working right in Windows after making a change in the bios, I just undid the changes I had made previously in the bios. One thing I noticed after I installed the bios mod was a command prompt which opened up and installed some WiDi certificate while I was running Windows 10. I decided to press escape a few times while the Lenovo logo was displayed, and I noticed that it took me to some Grub4Dos boot menu, with gave me a list of options of booting Windows with or without SLIC, etc. I was never able to do this until I installed the modded bios v2.04, and I'm pretty sure I never actually installed Grub4Dos myself. I tried experimenting with various bios settings in the video configuration which was accessible in the advanced section of the boot menu, but changing these options didn't suffice. So, I decided to enable the Intel Smart Connect Technology and the Intel Dynamic Platform and Thermal Framework (DPTF) in the bios. A bunch of unknown devices showed up in Device Manager when I booted Windows, so I went ahead and installed the Lenovo Smart Connect software which was for a different Lenovo Laptop as well as the Intel Dynamic Platform and Thermal Framework drivers that were for a Lenovo Yoga. Both installations worked and installed drivers for the unknown devices. I took of some options for the CPU which stood out to me. I saw that the "Bi-Directional PROCHOT#" in the thermal configuration of the advanced section of the bios, was enabled, but I didn't disable it. If this is enabled, it kinda makes the Intel Turbo Boost feature useless because the CPU Turbo Boost clock to 3.4 ghz etc. will only last a couple of minutes and maybe longer if you are lucky since the CPU cores will reach temperature maximums by that time. If Intel Turbo Boost is enabled at the same time, the Bi-Directional PROCHOT setting can also cause CPU-demaning games to freeze and lag. But the BDPROCHOT setting in the bios isn't something that you cannot disable in Windows using an external overclocking program if you want the the extra benefit of the Intel Turbo Boost, so it wan't really necessary to disable it in the bios. I did see that there was an option to disable the hyper-threading for the CPU somewhere in the power section of the modded bios, so I gave it a spin. I once wanted to reduce extra CPU threads without actually disabling physical cores of the CPU by disabling hyper-threading, and I could not do this until I installed the modded bios. I was interested in the ACPI Table/ Features Control in the advanced section of the bios as well, and I enabled the TC0 Watchdog Support which was originally disabled. It changed some configuration in Windows and required a reboot of the operating system. Changing this setting in the bios didn't seem to cause any problems. I enabled Serial Port A in the Peripheral Configuration of the advanced section of the bios, and I'm not sure what this did. I also disabled some PCI clockrun setting as well. I believe it was the turn off unused PCIE/PCI clocks in extended ICC in the advanced section of the bios. Finally, I decided to change a setting in the PCI Express Graphic in the Video Configuration which was part of the advanced section. The setting was called "PCI Reset Delay". I changed the setting from "100 ms" to disabled. Now I cannot even access the bios of the laptop. The laptop powers on, but all I get is a black screen. I cannot get a video output using an external screen. I wanted to do a factory reset of the bios somehow, but I'm not sure how I can accomplish this. I tried calling Lenovo technical support, and they told me to try a remove the CMOS battery. I'm aware of the location of the CMOS battery on the motherboard, but it does not seem to be removable and might actually be soldered to the motherboard. The Y500 also seems hard to disassemble, and I was watching a video on how to disassemble it from this website: https://www.how-fixit.com/laptop-repairguideslenovo-laptop/lenovo-y500-y510p I tried to take the laptop apart, but I was having great difficulty doing this. I couldn't fully take it apart to expose the CMOS battery. I'm also afraid of breaking the connectors which connect the CMOS battery to the motherboard. I already broke a plastic piece of the second GPU because I had trouble removing it from the Ultrabay port of the laptop. I'm trying the bios reset by using the discharge laptop battery method that someone used on their Z400 laptop, but I'm not sure if it will work on my laptop or not. If anybody knows of a way I can fix this problem so I can use my laptop again and can explain it to me, I would be very thankful. I hope that a replacement of the entire motherboard is not necessary just to fix a bios or CMOS battery issue.1 point
-
This GPU has certain things that are not proper 3.0b MXM spec. Look at the chokes (grey squares), vrms in b/w and the positions of them w.r.to your machine's heatsink. Here, check this for AW17 HS comparison.1 point
-
GeForce Hotfix driver 382.19 •This hotfix resolves a stutter issue experienced on some configurations while playing Prey *Install drivers at your own risk* Windows 10 + GeForce Drivers are Killing Samsung and LG Notebook LCD Display Panels Uninstall PrecisionX, including screen overclocking tools. Instead, keep MSI Afterburner's RTSS for monitoring purposes. 900M Requirements: Flash latest @Prema's v2 980M & 970M (Please consider donating to Prema) Win10/8.1 'F8' Boot options 'Safe Mode' & 'Disable driver Signing' cmd (Admin) bcdedit /set {default} bootmenupolicy legacy -> reboot -> F8 -> select 'Disable Driver Signature Enforcement' -> Install drivers Run DDU "Clean & Shutdown (Safe Mode) Extract driver using 7-Zip Display.Driver folder, copy/overwrite the proper .inf file(s). Extracted driver package >> delete the folders as shown below (don't skip this step) -> run setup.exe >>> Keep these folders only <<< INF MOD v382.19 Alienware: nv_dispi.inf (including nvdmi.inf) PEG/Dedicated All Models: M15x, M17x, AW17 R1, M18x, AW18 R1 (including Optimus/M17xR4) excluding AW 2015 - GTX 980 , 980M , 970M , 965M , 880M , 870M , 860M , 780M , 770M , 765M , 680M , 675MX , 670MX , 660M. Clevo & MSI non-Optimus models: nv_dispi.inf (including nvcvi.inf & nvmii.inf ) nvcvi.inf: Optimus Alienware 17 / 05AA (only) GTX 980M - 970M - 965M nvcvi.inf: Clevo P170EM / P150EM *Optimus* 980M - 970M GeForce 382.19 Win10 Alienware nv_dispi.inf_v382.19_Win10_PEG_Dedicated_Alienware.zip nvcvi.inf_v382.19_Win10_Optimus_Alienware_17.zip Clevo & MSI Laptops (non-Optimus) nv_dispi.inf_v382.19_Win10_PEG_Dedicated_CLEVO_MSI.zip AW 900M Throttling workarounds: M18xR2 First, flash @Swick1981 [Bios Mod] M18xR2 - Legacy Support now Available M18xR2 980M workaround Hibernation method HERE and HERE Please use the SEARCH function to see if your question has been answered/posted already. https://www.techinferno.com/index.php?/announcement/4-user-account-promotion-rules-read-before-posting/1 point