Leaderboard


Popular Content
Showing content with the highest reputation on 03/05/15 in all areas
-
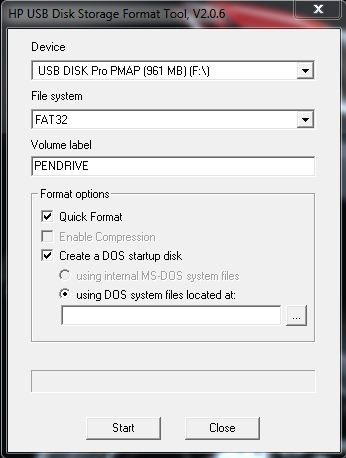
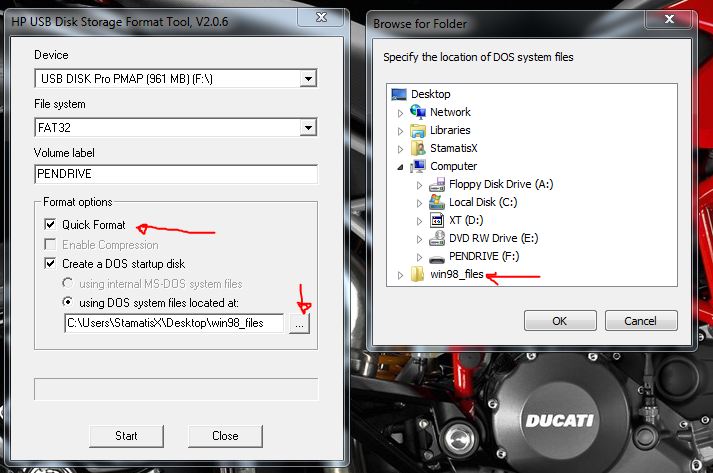
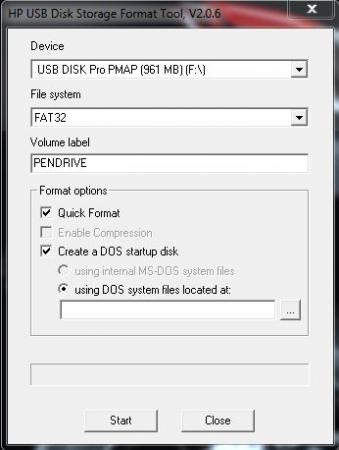
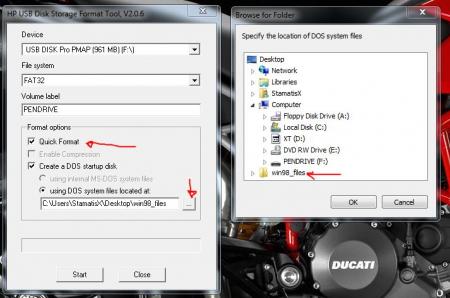
For those who don't like the restrictions Lenovo put on their system, here's a BIOS mod that will get you back at least some of the freedom you should have over your own hardware. Features: WLAN card whitelist removed, any (hardware-wise compatible) card should now work hidden BIOS menus unlocked VBIOS tweaked for more performance and better tuning possibilities Keep in mind that not necessarily all of the BIOS options available with this mod will be fully functional, so use the new available settings with care. If you're unsure about something don't change it and ask here, someone might be able to help. Available for v1.07 / v1.09 / v1.10 and v3.05. v2.04 and v2.07 added (only whitelist removal as for now) If you have a different BIOS (or more specific, a BIOS newer than 3.05) I will need a copy of it in order to make it work for your system. Instructions for flashing the modified BIOS v3.05: You need a USB stick prepared to run DOS, here is a guide you can follow in case you don't know how to do this: Guide by @StamatisX - thanks! >>> Before continuing make sure the AC adapter is connected to your laptop and your battery has at least 20% charge remaining. <<< (0) - NOTE: This step is Only necessary if your system isn't already using BIOS v3.05 Update to the official v3.05 BIOS provided by Lenovo . (1) - Create a backup of your own BIOS (now v3.05) by using Fptw64 tool. Extract the files and run the included .bat file from an admin command prompt. . (2) - Download Lenovo_Y510p-Y410p_[v3.05]_modified.zip and put the files of folder [1] to the root of your prepared USB DOS stick. Let the BiosFixer prepare your BIOS for flashing by drag and dropping your backup file on it. Put the created "v305mod.bin" file to the root of your USB DOS drive as well. . (3) - Now you need to downgrade the firmware back to v2.07 (Y510p-Y410p_v207_[stock].zip) in order to flash the mod. . (4) - Boot from your USB DOS drive, when you see the command prompt type BIOS and hit enter. Wait until the BIOS is flashed (you can safely ignore warnings about non-existing regions). . (5) - Once the BIOS flash completed with no errors, type EC and hit enter. Wait until the EC is flashed. Then reboot. . (6) - Go to the BIOS setup menu, load the default settings, apply and reboot. Done. In case you're using an ultra bay GPU follow the instructions in post #2 and flash the vbios.. NOTE: It's crucial that you flash both, BIOS and EC. Having different EC and BIOS versions can in certain situations lead to issues. IMPORTANT: If you want to go back to stock v3.05 you can do that easily by simply using the official update from Lenovo. That's it, nothing additional required in this case. Old instructions for users with v1.07 / v1.09 / v1.10 or v2.04 / v2.07 who for some reasons don't want to update to v3.05: Video walk-through of bios settings (thanks @allstone): My donation link in case you want to buy me a beer Download link for files referenced in this post:
 1 point
 -
Nando4>> Exclusive!! T|I user kryzaach modified a Sonnet III-D's internal PSU to supply up to 300W for eGPU use. The mod simply crimped and attached a dual 8 pin PCIe power lead to the ring terminals . A NVidia TITAN then being fully enclosed and powered in a plug'n'play eGPU implementation. This being a first since previously squink's Sonnet III-D eGPU implementation used supplementary external ATX PSU power to drive a GTX780Ti. While done simply and easily, the Sonnet III-D enclosure retails for a whopping US$979!! It would have been far more cost effective to modify a Thunderbolt2 capable US$200 AKiTiO Thunder2 enclosure instead. Note too the Sonnet III-D is 16Gbps Thunderbolt2 compatible. This solution ends up being 10Gbps Thunderbolt1 due to the attached Macbook Air (MBA) being only Thunderbolt1 capable. As as all MBAs to date. If kryzaach upgraded to a 2013 Macbook Pro with a Thunderbolt2 chip then he'd see a 60% PCIe bandwidth improvement (10Gbps->16Gbps) using the same Sonnet III-D Thunderbolt2 eGPU hardware. Desktop Replacement Ultrabook - Thunderbolt GPU Expansion posted by kryzaach at OCAU OK that's a pretty weird title, but bear with me. Ages ago, when eGPUs were brand new, I decided to try building an eGPU rig with my macbook air. This was just to see if it could work, more than anything, as no-one else was doing it with pure thunderbolt at the time. So, I ordered a Sonnet Echo Express SE enclosure and got chopping. Spoiler These things don't support Video Cards and definitely aren't designed for them. With that in mind, I ordered a very specific card, knowing I could cram it in to the limited space. This was a Palit Geforce 650GTX half length card, that for some reason came with a double slot cooler, but only a single slot bezel. As it only came with an 8x mechanical slot, I had to convince it to take a 16 lane card. It's still only electrically 2x, but that's not really a concern in the broad scheme of things. There are guys out there with 1x eGPU builds who are also running optimus, so they are effectively a fraction of that even.. No pins were harmed in the modding of this hardware(ok, so i bent a pin.. I did bend it back again though). The card fit the chassis perfectly ...sort of Then, as the SE version of Sonnet's boxes only pump out 60W, and only through the PCIE interface, I had to get some power to the card. I decided to use an external HDD power pack with a molex plug for this as the power requirements for the card aren't too high. Then, to keep things neat, I built a molex to molex cable that ran through the rear mesh of the unit. The end result, surprisingly, worked Anyway, fast forward 2 years and I'm getting sick of running multiple machines again. For study and work, the laptop is always used, but for gaming, I have to use the desktop rig. This means that I get no study or work done at all, as I'm always sitting in front of my gaming machine and I traditionally tried to keep it restricted to games and supporting software only. I start thinking about using the eGPU fulltime, so I resurrect it to try it out again, but I keep hitting issues with the grunt of the macbook air. CPU wise, it seems to keep up fine, but my VM workload has increased to the point that 4GB of ram just doesn't cut the mustard anymore. As it is baked into these things, I shelved the idea for a few months, but it started getting to me again and I decided, screw it. I bought a new 11" macbook air and took a pair of metal snips to the Sonnet enclosure. Oh, for those wondering why I keep buying chintzy little machines, it's because I walk to work and, without having to lug a backpack about, the macbook air is about as big as I'm happy to carry with me. Anyway. I stuck an old 680 GTX in my newly butchered thunderbolt box and gave it a test. It worked brilliantly, so I thought, why not try the Titan. It spun up without a hitch. Only, now I had a problem, and that was I'd tasted an ultrabook with a Titan strapped to it. The issue here was that the enclosure really couldn't keep up with the card, it wasn't delivering enough power through the lanes, and it was prone to overheating, so I went back to the 650 GTX. Up until now, GPUs aside(and I had those anyway, from various gaming rigs), I hadn't wasted too much money on this stupidity, as the enclosure was only a couple of hundred bucks and gave me something to do for a while. I started counting my pennies and began wondering if I should pull the pin on the big daddy Sonnet enclosure. Meanwhile I put up with the anaemic performance of the 650GTX. Not to say it was terrible, but it wasn't anything special. My mates and I started lanning again recently and I realised that lugging the desktop around was a major pain in the ring, however I no longer had a gaming laptop, so I was kind of locked in. That was the deal breaker though. I got back from a lan recently and ordered the Sonnet Echo Express III D. It arrived today, so here is the latest build of the retarded desktop replacement ultrabook. One last look at my old faithful SE sytem, goodnight, old girl. Spoiler The new enclosure has a lot more space, and a 300W power supply, although I'm not sure if that will be up to the Titan because I have not idea how the power is split between rails. The more I chop this open, the more I realise it is a modders dream. It is, after all, pretty simple. Also, Jackpot! 300W and only one power rail! Also, it's just crimped ring terminals held in place with screws, so adding additional feeds will be a piece of piss. Already comes with a 6 pin AUX, but that gets its feed from the top board and is only rated up to 75W, so I'm removing it. Here's my candidate, a spare modular dual 8 pin PCIE power feed for my corsair AX860i Better get the trusty workhorse out to make sure there's nothing funky going on with that Corsair cable.. Added the feed in! Looks like a bought one! Make sure that everything is secured and wasn't jostled when I replaced the shielding Slots in pretty cleanly!! Sitting on the old ones head! Purdy And finally, after all that, it booted with no magic smoke escaping... Just a quick test of Heaven 4.0 with extreme tessellation and everything else maxed under OS X. Pretty happy with the way it turned out. I'll test it out for windows, lanning, etc etc etc and report back. ack.1 point
-
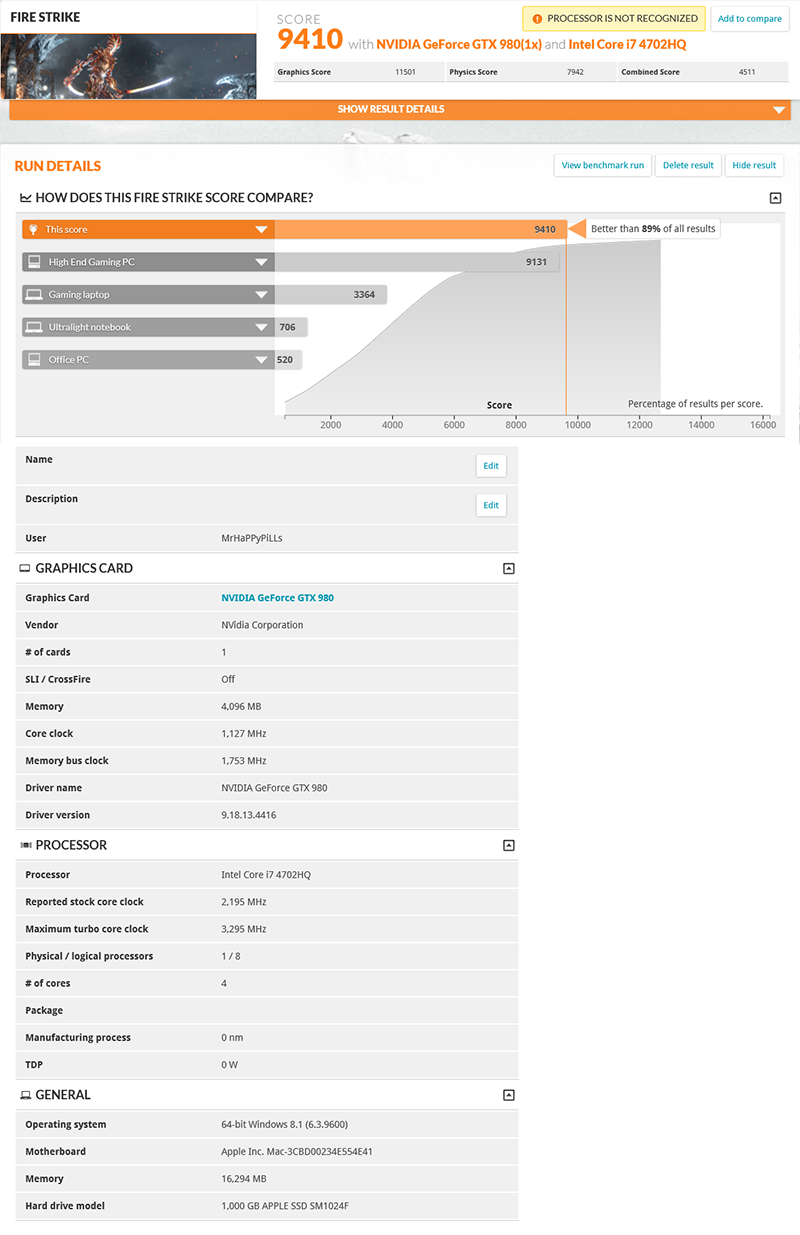
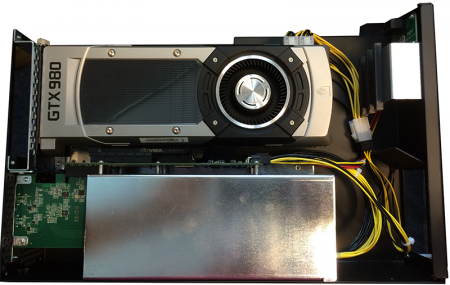
Having been happily running a late 2011 MacBook Pro with GTX 660Ti for the last 18 months, and waiting patiently for the Maxwell architecture NVidia cards to be released, I've splashed some cash (and managed to sweet talk Sonnet into providing an engineering sample of their new Echo Express IIID Thunderbolt II enclosure) to do a pretty sizable upgrade. For those who are more concerned with the hugely useful nature of eGPU's rather than working to a budget, what briefly follows is an illustration of just how simple and powerful this concept has now got (read: No faffing about with EFI bootloaders and injecting code to manually manage PCIe allocation during the startup)! Components: 15” rMBP – Base Model MGXA2B/A (16GB DDR3 1600MHz Ram, 256GB SSD – thanks to eBay: upgraded to 1TB version, Intel Core i7-4770HQ CPU, no discreet GPU). Sonnet Echo Express IIID – Thunderbolt 2 enclosure, 1 PCIe 2.0 x16 physical (x8 Electrical Ports) + 1 x8 port + 1 x4 port. 300W power supply. Zotac GTX 980 GPU – Maxwell architecture, reported max TDP 165W! So installation-wise – I just installed Windows 8.1 pro as I would on any normal PC. This is the first MBP that I’ve worked with where it all just worked (although I suspect that is partly due to improvements in Win8.1). No blue screens, no reboots, just plug and play. I then used DiskPart to shrink the windows partition, created a new one and installed OSX. Only slight hiccup was that OSX Disk Utility couldn’t format the partition to HFS – quick install of Paragon Partition manager solved that one. No picure but I swapped out the 80mm fans that Sonnet supplied with the enclosure (anyone who has ever used a Sonnet enclosure will I’m sure agree that they use the cheapest fans known to man!) for a pair of Noctua NF-R8 redux-1200. Simple swap of the connectors to 2pin and mounted them on the outside of the enclosure to avoid them touching the GPU. Quick picture of the enclosure – no external PSU required, all power is provided by the internal PSU using a y-splitter to provide 2 x 6pin connectors. Benchmarked using the Firestrike test in Futuremark – seems to be a slight issue with the CPU reporting, assuming because of the newish rMBP build not being fully supported by the software? EDIT: Added full benchmark links to each of the 3d Mark tests: 3d Mark 06: http://www.3dmark.com/3dm06/17663590 3d Mark 11: http://www.3dmark.com/3dm11/8783566 3d Mark 13: http://www.3dmark.com/3dm/4230159
 1 point
 -
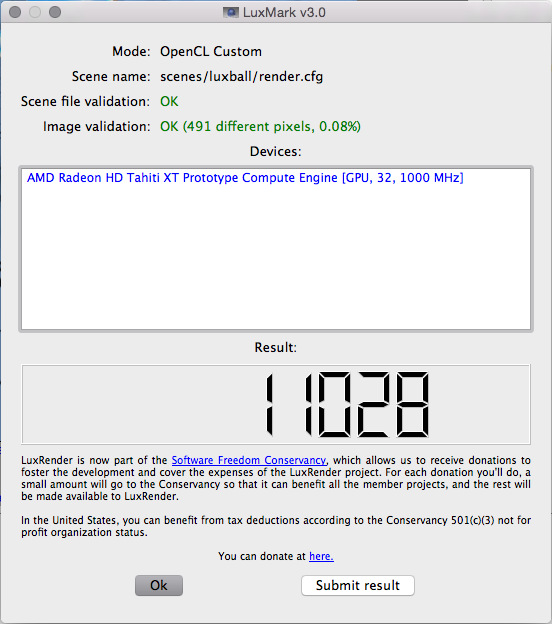
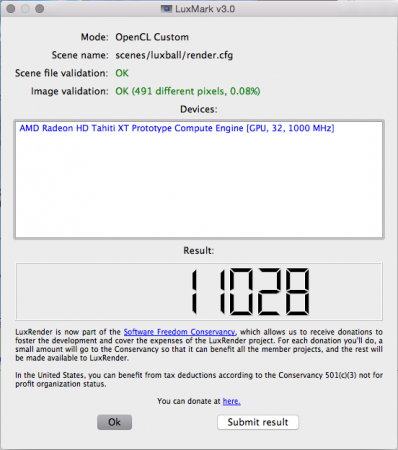
The GPU chewed through the polished ball LuxMark without any issues. Don't know how the score compares, other than that the 7970 got 10 times as many rays/second as my 6750m. Sweet.
 1 point
 -
The graphics card is mostly working fine now, I got a mean fps of 34,6 in Unigine Valley (in Mac OS X) with Ultra settings, 8xAA and 1600x900 resolution. Seems reasonable, though I don't have much to compare with except for goalque who seemed to get a similar score in his video. There's one big problem though - Indigo, the application I bought the graphics for, isn't stable. After a short period of rendering, it often slows down to a really slow speed, and the samples/second indicator makes small jumps every 10 seconds or so, with an audible little tick from the graphics card. Wait a little longer and everything often freezes and then the computer shots down. The way Indigo's GPU acceleration works right now, is that the CPU and GPU work together, so called hybrid rendering. That means the GPU will bottleneck the CPU if it's too weak, and the CPU will bottleneck the GPU if it's too slow. And I'm pretty sure it's the latter happening here, because the CPU is working at 100% when rendering. I'm wondering if there's a bug bogging down the CPU, causing the GPU to idle, and just putting out those tiny bursts of rendering power. I also wonder what exactly causes the system to crash, if it's a system error, or if it's the GPu's fluctuating power consumption (if my hypothesis is correct). Are there any special errors in the console to look for?1 point
-
You have to contact them by email and give them this code: 150131AW10EB. Then they will ask for your ebay id as it's a coupon code for ebay user.1 point
-
Flashing the ultra bay 750m / 755m - only for SLI users: Grab the latest version of nvflash for DOS, extract the files and put them on an USB stick that can boot DOS. Check here if you need a tutorial about getting the USB stick to boot DOS. .. v3.05 mod users download the attached file and put it on your USB drive as well (here is the modified vbios for 750m users with v1.0x (obsolete)). Rename the file so that the name has no more than eight characters (not counting the extension). It's a DOS limitation. Here's a nvflash tutorial which contains all necessary information: http://forum.techinferno.com/general-notebook-discussions/2166-%5Bguide%5D-nvidia-vbios-flashing.html . Flashing: nvflash -iX -r // X represents the index of your ultra bay GPU, you can figure it out by using nvflash -a nvflash -iX --save filename.rom // use this to save a copy of your original vbios nvflash -iX -6 filename.rom // once again, X represents the index, filename the name of the vbios Warnings regarding the SSID can be ignored. Ultra Bay VBIOS for [v3.05]_modified.zip1 point
-
Ok first of all thanks to svl7 for all his efforts. I own the 750m Sli model. I flashed the BIOS and now my EC and BIOS stand at 3.05 with everything unlocked. Next up I flash the ultrabay. I used the same USB disk used for the BIOS mod. The VBIOS I used was 750mOC from the file "Ultra Bay VBIOS for [v3.05]_modified". Flashed succesfully but in device manager, GPU#1 has an exclamation mark (GPU2 is fine) and with nvidia control panel throwing an error " No nvidia GPU attached to display...". I tried to flash again by changing the vbios' name to 8 characs and this time it worked. I undervolted and played Dead Rising 3 for 30-40mins until GPU1 reached 97C. It didn't crash like before it would within 15-20mins. I thought well the flashing process was done and dusted but I was wrong, I restart and again I get an exclamation mark to GPU1 with nvidia control panel throwing the same error. Am I doing something wrong? And why is my ultrabay GPU designated as GPU1 and internal as GPU2 (Hwinfo reports that too)?-1 points