Leaderboard


Popular Content
Showing content with the highest reputation on 12/20/13 in all areas
-
Right. I've sent someone some files but I never got any reply so far, but it should work anyway: Downgrade to bios v2.07 by using the attached file. It flashes from within Windows. Make sure AC and battery are connected. Before proceeding to the flash go to the bios and enable bios flashback and make sure you have secure boot disabled. Y510p-Y410p_v207_[stock].zip2 points
-
If you're using Chrome as your web browser you could also use the Referer-Control plugin. AMD's site checks who the referer is before downloading, if its not their site you're redirected to that download incomplete page. After installing the plugin go to Chrome's Settings -> Extensions and click on "options" for the Referer-Control plugin. Add the line below to the site filter http://www2.ati.com/DriverS/mobile/* Then click on "Custom" and then "Target host". Then set the Referer-Control status to Inactive and Active again and you should be able to download as per normal.2 points
-
I imagined that people would like a vbios similar to the one I released for the Titan, so here you go. As I don't have 780 myself I'll need your feedback in order to adjust the mod in case something doesn't work as it should. Thanks for the people who tested it so far, all seems to work fine. Features of the "OC edition": Boost 2.0 disabled - the card runs at the clocks you set it to . Voltage is adjustable up to 1.2125V . Default power target = 350W (so there should be no more need to adjust it manually per software, EVGA classified vbios is set higher) . Fan speed adjustable up to 100% . Clocks are stock, card idles normally at 2d voltage 'rev03' adds undervolting capabilities . To clarify some things - as boost is disabled clocks and voltage will be fixed in 3d mode. In all other performance profiles the card will behave just as the with the stock vbios. The main differences to the stock vbios is that there is no throttling. NOTE: If your 780m came with a 80.10.3A.00.xx or newer vbios from the factory, then please don't use an older version. People have reported issues when using an older vbios on 780s that came with 3A or newer. The reason for this might be a slight revision on the board or GPU. It won't harm if you flash an older vbios on such a card, but it can cause crashes and unstable behavior. ************* Download links 'OC edition': Nvidia_GTX_780_(EVGA)_80.10.3A.00.82_-_'OC_edition_v03'.zip EVGA 780 - SC ACX - 80.10.3A.00.81 - 'OC edition v03' (new fan profile).zip Nvidia_GTX_780_-_80.10.36.00.01_-_'OC_edition_v00'.zip 80.80.30.00.01_-_GTX_780Ti_'OC_edition'_v04.zip ************* MD5 sums for the paranoid guys: EVGA 780 Classified - 80.10.3A.0x.80 - 'OC edition v03'.zip EVGA 780 - SC ACX - 80.10.3A.00.81 - 'OC edition v03' (new fan profile).zip1 point
-
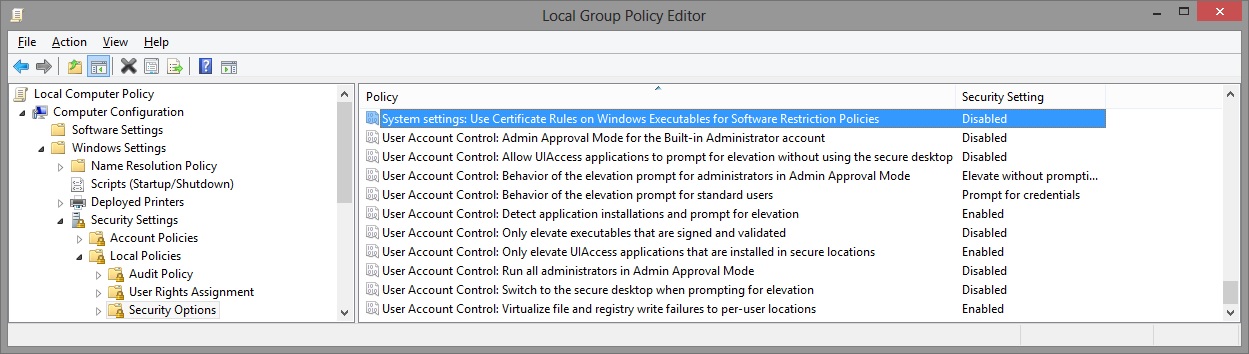
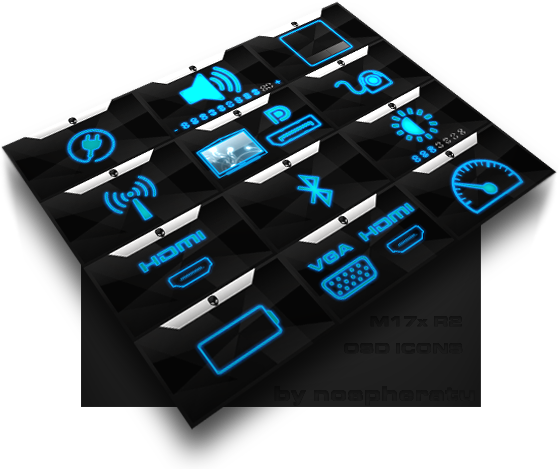
I've recreated the OSD Icons for the R1/R2/R3/R4 and R5 aka 17 as the standard ones are a bit dated. It should also work with the M15x though as my old M15x had the same setup for the OSD app. Regarding the R3 OSD, it seems its the same install for the M18x as well so it should work for you M18x owners too. I've also added the AW 17 OSD to the list. This exe is also compatible with the 14 and 18 as Dell uses the same OSD for all the new machines. There's also a set for you Area-51 m17 R1 owners. I've tried to give it a simular feel to the Invader Icon pack by Alienware. Hope you guys like it Install Instructions for R1 1. You need to end the OSD process in Task Manager since it may be using some of these icon files. Ctrl+Shift+Esc then find the OSD process and end it. 2. Backup your current icons if you want to revert to the originals (You can also uninstall and re-install the OSD application if you want to go back to the original icons) 3. Extract the attached "M17X R1-R2 & M15X.zip" contents to C:\Program Files (x86)\OSD\picture\. Overwrite if prompted. 4. Restart the OSD application. It is located in C:\Program Files (x86)\OSD\Launch.exe 5. Done! Install Instructions for R2 /M15x 1. You need to end the OSD.exe process in Task Manager since it may be using some of these icon files. Ctrl+Shift+Esc then find "OSD.exe" and end the process. 2. Backup your current icons if you want to revert to the originals (You can also uninstall and re-install the OSD application if you want to go back to the original icons) 3. Extract the attached "M17X R1-R2 & M15X.zip" contents to C:\Program Files (x86)\OSD\ICONs\. Overwrite if prompted. 4. Restart the OSD application. It is located in C:\Program Files (x86)\OSD\Launch_OSD.exe 5. Done! Install instructions for R3 / R4 / M18x 1. You need to end the OSD process in Task Manager since it may be using some of these icon files. Ctrl+Shift+Esc then find the AlienwareOn-ScreenDisplay.exe process and end it. 2. Backup the existing AlienwareOn-ScreenDisplay.exe by renaming it to "AlienwareOn-ScreenDisplay.exe.BAK" for example. Its in C:\Program Files (x86)\Alienware On-Screen Display\ 3. Extract the AlienwareOn-ScreenDisplay.exe from the appropriately named file depending on your OS and model to the C:\Program Files (x86)\Alienware On-Screen Display\ folder. 4. Restart the OSD application by double-clicking the file. 5. Done! Install instructions for 14 / 17 / 18 ** 1. You need to end the OSD process in Task Manager since it may be using some of these icon files. Ctrl+Shift+Esc then find the AlienwareOn-ScreenDisplay.exe process and end it. 2. Backup the existing AlienwareOn-ScreenDisplay.exe by renaming it to "AlienwareOn-ScreenDisplay.exe.BAK" for example. Its in C:\Program Files (x86)\Alienware On-Screen Display\ 3. Extract the AlienwareOn-ScreenDisplay.exe from the "AW 14-17-18 (Windows 8).zip" file to the C:\Program Files (x86)\Alienware On-Screen Display\ folder. 4. Restart the OSD application by double-clicking the file. 5. Done! The Area-51 m17-R1 install should be similar to the steps for the other laptop revisions above. They all basically follow the same process anyway, apart from filenames/paths. @robby_hd was kind enough to make a red version of these icons for the M17x R3 / M18x R1 which can be downloaded from his post here. **There seems to be a security issue with Windows 8/8.1 at this point in time since it doesn't allow modified exe's. I will update this post with a solution once it has been found. Also a few Alienware owners are having an issue with the unmodified OSD and Windows 8. Only the default Windows 8 OSD displays and not the Alienware version. Try the solution posted by Dell here and then attempt installing the mod. The below screenprint is a workaround by editing the security policies to allow the unsigned exe to run in Windows 8. If you are not aware of what these settings do and the repercussions of changing them, please do not attempt it. - Open the Group Policy Editor by typing "gpedit.msc" in the search or run text box. - Duplicate the settings below. Area-51 m17-R1.zip M17X R1-R2 & M15X.zip M17X R3-R4 & M18X R1-R2 (Windows 7).zip M17x R4 & M18X R2 (Windows 8).zip AW 14-17-18 (Windows 8).zip M17X R4 & M18X R2 (Windows 8.1).zip

 1 point
 -
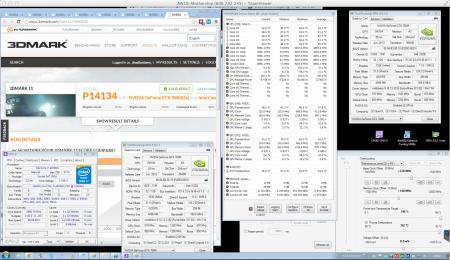
did a little bit of playing and came up with this i know it's not the max, but it's ok since i have to play with the settings over teamviewer (me @ work - AW18 @ home), then start 3dmark11 and quickly close the teamviewer connection in order for the bench to run without interruption ;-) and of course, i have to be carefull, since if the system locks up, i can wait until i get home to reboot haha ^^ NVIDIA GeForce GTX 780M video card benchmark result - Intel Core i7-4930MX,Alienware 01W2J2 EDIT: crap, sorrryyy for the image size -.- ..... O.o
 1 point
 -
GPU-Z should show a "x16 @2.0", either way you'll need a setup 1.x to enable Gen2 link speed if you can't do it through the BIOS. Also in Nvidia control panel make sure to change the Physx to your GFX card (I think it's in "3D managing settings").1 point
-
Np! I will say this now before you jump on the wagon, many times 'setup 1.x' (pre-boot software for eGPU) is necessary in order for the eGPU to be detected correctly. You get the setup 1.x by donating to @Tech Inferno Fan (and it costs $25 if I'm correct?). I'm just saying this since it sounds like you might be short on money and this might be the case later. The PE4L 2.1b-EC is 34mm and fits in both 34mm/54mm slots. There is no performance improvements between the two, only the physical size differs.1 point
-
Maybe you'll have to enable the Gen2 link speed for the port. Since you don't have it in your bios you'll need setup 1.x. But just to make sure what's your CPU? Is it an intel 6 series or after? @coolioboy23 I don't think there's any improvements between a 34/54 EC I guess. It would be a known workaround.1 point
-
Yes it works, download manager run FreeDownloadManagerPortable.exe -> ✚ bar button -> URL: "http://www2.ati.com/DriverS/mobile/13-12_mobility_win7_win8_64_dd_ccc_whql.exe" (without quotes) done.1 point
-
Has anyone else here have attempted to fit the Arctic Cooling Accelero Xtreme III on 780 or 780Ti Classified or am I the lone wolf here? The stock ACX cooling on my card kept weird noises since from the day I installed the card. I removed the cooler and examined it. I noticed that some of the fins on the cooler were very loose which I think was the main reason why the card kept that awful rattling noise everytime fan speed started to increase or decrease. And the cooler also had the weird humming noise especially when the fan speed changed. Instead of RMA'ing the card I decided to upgrade to more efficient and quieter solution, the Arctic Cooling Accelero Xtreme III. Installation was really easy, I didn't even had to use the aluminium heatsinks that came with the cooler. Instead I've kept the card's original black aluminium cooling plate (part of the original ACX cooler) which takes care of cooling the memory and VRM. The cooling plate is attached to the PCB with a bunch of small screws, there's at least a dozen of them. Best thing about the original cooling plate is that it covers the whole PCB and it keeps the PCB not getting bent (Accelero weights over 600g). I had to completely remove the cooling plate first from the card and modify it a bit so that the mounting plate of Accelero could fit in the GPU area (didn't had enough clearance for Accelero's mounting plate in GPU area). It was very simple to modify, all I did was the cut off the excessive aluminium surrounding the GPU area (I cutted it so that the GPU area on cooling plate is completely square) to make sure there's enough clearance for the Accelero to fit on top of the GPU. I used pliers for cutting the cooling plate, the aluminium is a soft material to work with so no need for proper cutting tools. Although the Dremel would be the easiest solution for cutting. Without this modification the copper bottom of the Accelero wouldn't have made any contact at all to the GPU so this modification was definitely a needed operation. Another option would have been just to remove the original cooling plate completely and glue on the aluminium heatsinks that came with the cooler. But I came to an conclusion that modding the original cooling plate to fit with the Accelero is much simplier and easier than glueing the heatsinks and is more efficient solution too. Only real problem with the Accelero Xtreme III and GTX 780 is that controlling the fan directly from the video card drivers doesn't work properly. Several people have reported that fan controller on the GTX 780 is not compatible with the fans on Accelero Xtreme III, even though it runs the fans on ACX cooler just fine. It has something to do with the different specs between the stock ACX cooler fans and Accelero Xtreme III fans or another explanation is that the fan wiring on Accelero is somehow different from the stock ACX cooler. Luckily I had a existing solution for this issue: Scythe Kaze Master fan controller mounted on the front panel on my case. However, I had trouble connecting the fans of Accelero to my fan controller. First, I tried to use the Molex adapter that came with the Accelero that lets you connect the fans directly to PSU instead of the GPU. With this adapter you can choose from two different options, 7v and 12v. Unfortunetaly the adapter didn't do anything when I tried to find a way to connect it to my fan controller, the fans were completely dead on the Accelero when I managed to plug it in to my fan controller (my fan controller has a 3-pin female fan plug with yellow-red-black wiring). I couldn't find an suitable adapter, no matter how hard I searched through the internet. So I decided to make the appropriate wiring myself. First, I took the old Fractal Design 120mm case fan from the closet and cut the wire off from the suitable point so I could have the 3-pin male fan connector and some wiring with it to make the connection. Then I removed the small 3-pin VGA fan connector from the fan wire of the Accelero. Then I just simply stripped the wires (red, yellow and black) I have just cut from the case fan and from the wiring of Accelero fans and wrapped them together so that the colors of the wiring matches. I used electric tape to insulate the bare wires I did just wrapped together to avoid any shorting. And bam, the fan controller recognised the Accelero fans instantly and as a result I have now full control of the fans on the Accelero. I keep the fans of the Accelero at 1700-1800rpm at all times and I can't seperate the sound of the Accelero fans from my case because they get covered to the sound of the all other case fans I have on my case. The difference in cooling efficiency between 780 Classified stock cooler and Accelero Xtreme III is huge. For example, when running 3DMark Vantage in factory clocks and voltage, GPU max temperature was 73C with the stock cooler with default fan profile. Now with Accelero, max temps were only 56C. Ambient temperature was 23C at that time. So you can expect at least 15 to 20 degree improvement on max temperatures if you upgrade to Accelero Xtreme III over 780 Classified's stock ACX cooler. For me it was definitely worth the upgrade. I'm very satisfied to the end result. I took a few photos of my card inside the case with Accelero fitted, please use the direct links below to view them. https://dl.dropboxusercontent.com/s/5vnahjkf79zowtl/IMG_0996.JPG https://dl.dropboxusercontent.com/s/15zrtrxy4gsl2m7/IMG_0997.JPG https://dl.dropboxusercontent.com/s/ch65m9rngfrnv53/IMG_0998.JPG1 point
-
Do this the engineer way: "It works? Don't touch it". If you don't have any problems with temperatures then don't bother. You might shave off few degrees at the risk of braking something. If you still want to do it, then few tips from me: - assemble and disassemble it slowly and carefully - group the screws so that you can remember which one goes where - the tapes connecting keyboard, touchpad, and other things on top cover are rather short, and I found it rather tricky to put them back with my hands. I recommend using narrow pliers, tongs, or something like that - clean the fan assembly of dust. That's the best moment to do it, and the only way to do it thoroughly.-1 points