Leaderboard


Popular Content
Showing content with the highest reputation on 12/11/13 in all areas
-
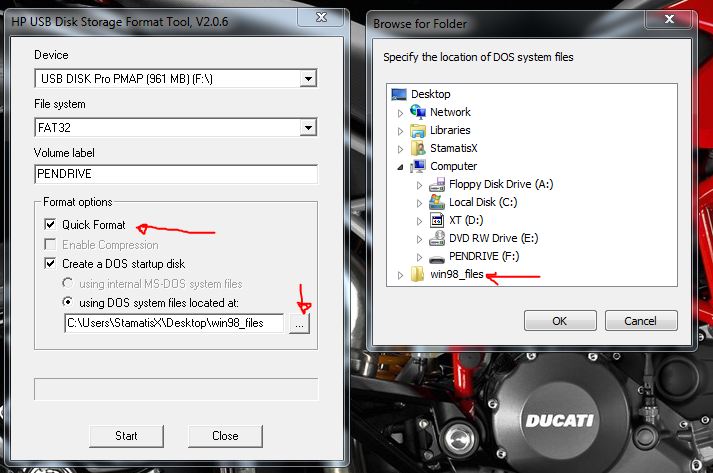
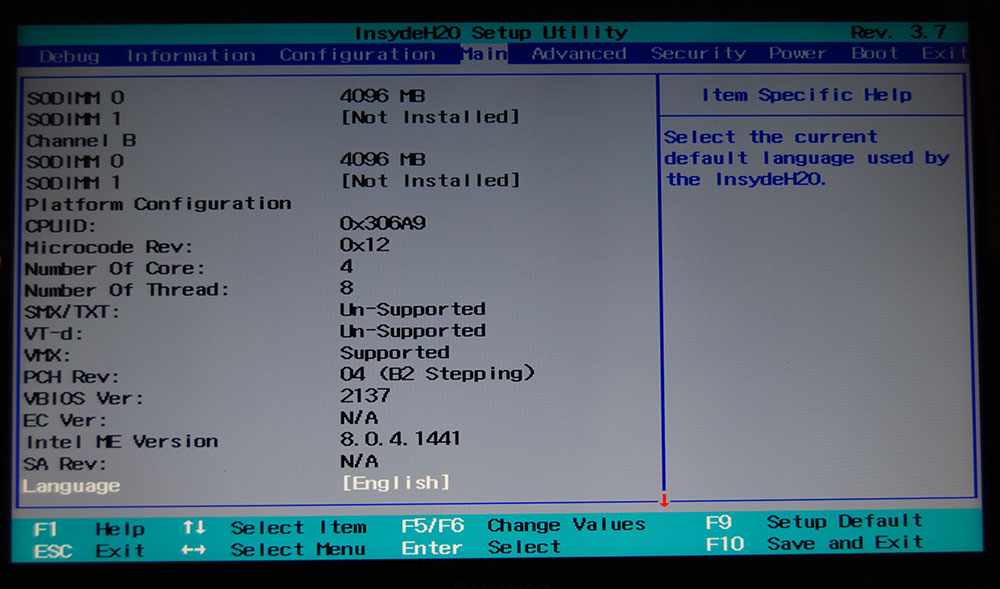
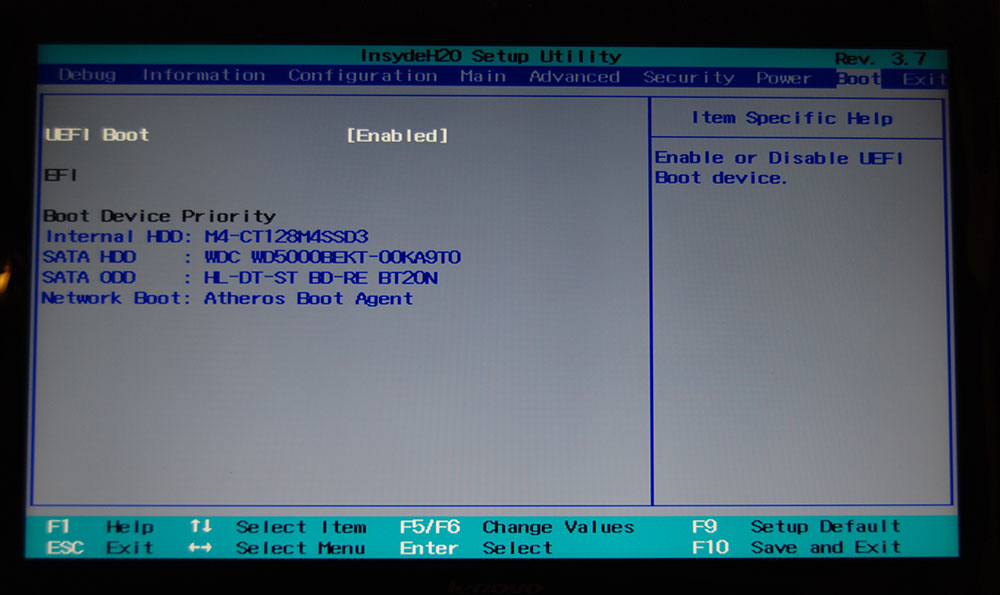
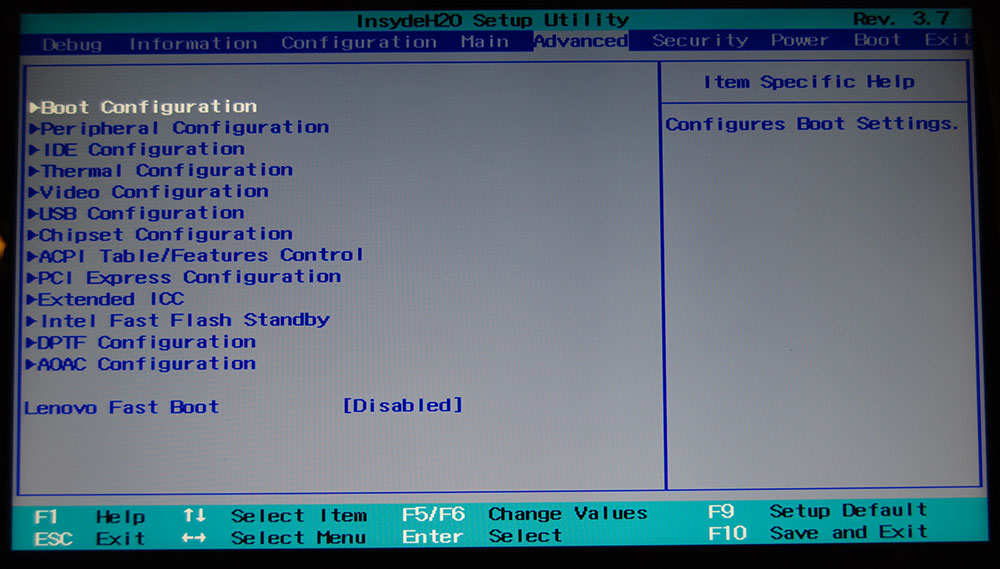
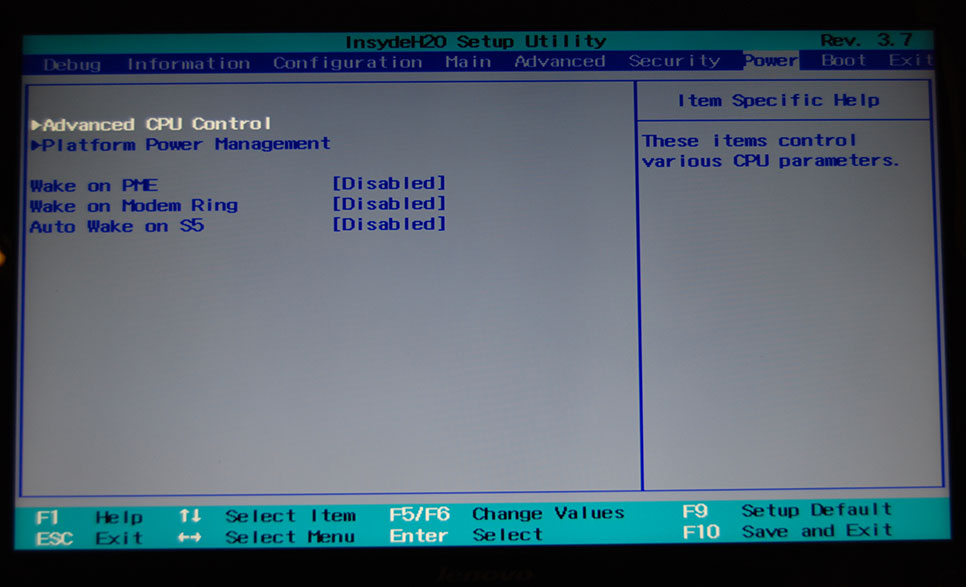
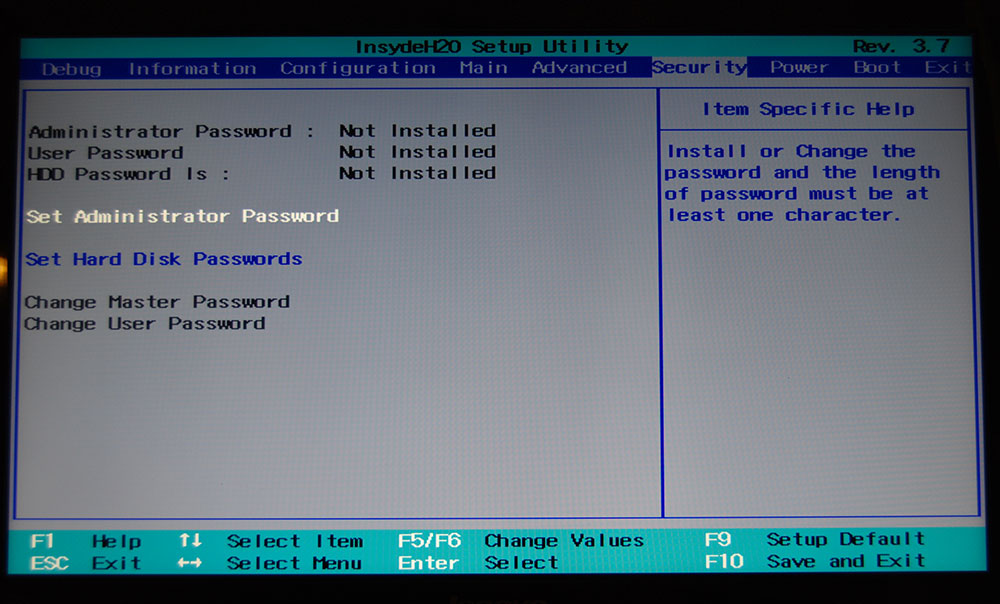
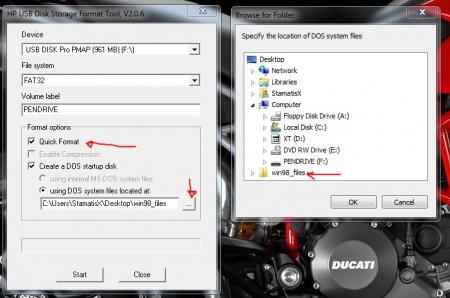
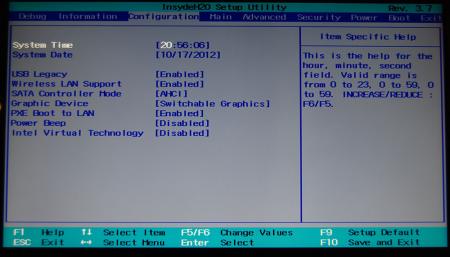
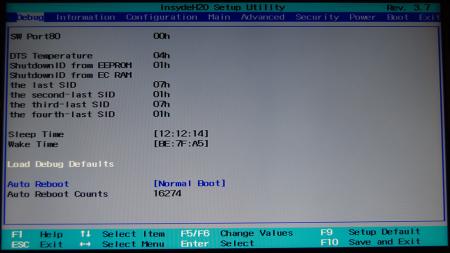
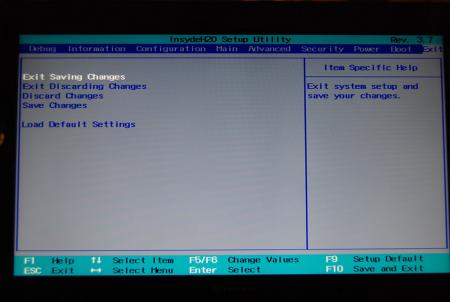
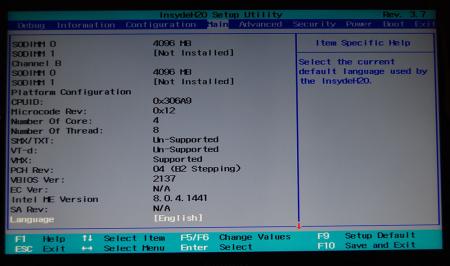
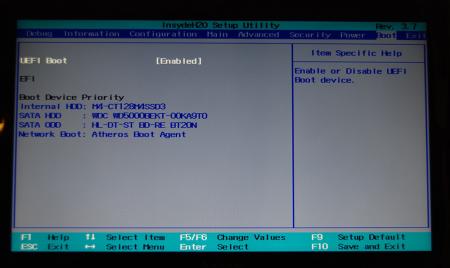
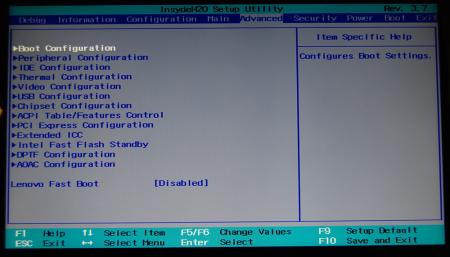
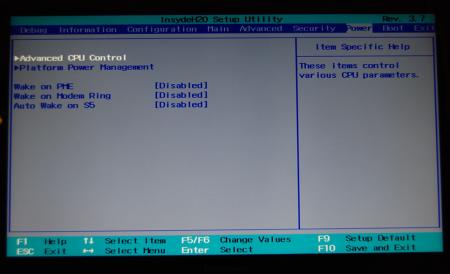
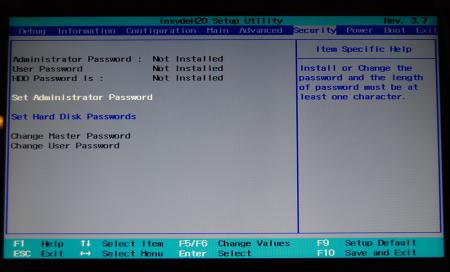
Lenovo Y500 - 'unlocked' BIOS / wwan-wlan whitelist removal The Lenovo Y580 / Y480 comes with a pretty locked down BIOS, and in addition to this with a whitelist which prevents the user from getting 3rd-party wwan/wlan cards to work properly. The modified BIOS versions here will take care of this. Keep in mind that not necessarily all options available in the modified bios will work. Some might not do anything at all, others could possibly leave your system in a state which will prevent it from booting. Use care when changing stuff in the modified bios, don't touch things you're not familiar with. Use all the mods and software posted here on your own risk. NOTE: This will only flash the bios region. It won't reset the nvars set in the bios. While it is technically possible to update from v2.0x to v8.01 by using the method described below, I can't really recommend it since the EC of your system won't get updated. While it might work (possibly even without any issues) I can't recommend it. Therefore if you're on v2.0x and want to update, the better option is to wait until Lenovo provides an official 8.xx firmware update with EC and BIOS. You can then still flash the modified version as described below, once you're on a proper v8.xx firmware. Attached you'll find a modified version of the Y580 / Y480 BIOS v8.01 (5DCN90WW). ----------------------------------------- >> For users with a v2.0x BIOS: << Download links Old version: Current 2.0x version: Lenovo Y580 / Y480 BIOS v2.07 (5DCN40WW) -> unlocked, whitelist removed, Nvidia 660m @ 1GHz default 3d clocks Flash with the included InsydeFlash utility. ----------------------------------------- >> Instructions for v8.0x BIOS users: << The attached BIOS ("Lenovo Y580 - Y480 BIOS v8.01 (5DCN90WW) - Mod") is unlocked, whitelist stuff removed and the 660m is tweaked to 1GHz default 3d core clock. The only way I know of which allows you to flash the modified BIOS for v8.01 users does unfortunately also describe certain information which you don't want to loose (serials, Windows licencse etc.). Don't worry, I got it all sorted out, but due to this the flashing procedure is a bit more complicated than usual. Make sure you follow the instructions carefully. Download the flash tool, for flashing you'll need the DOS version, but for creating the backup of your current BIOS the Win64 version will do as well, and it is faster. Get the prr tool as well. Grab the modified BIOS you want to flash and the Y580-Y480_BiosFix tool. Create a backup of your current BIOS using the flash tool you downloaded (first step) by runing the included backup.bat, or by using the Win or Dos version flash tool with this command: -d BackupBiosY500.bin -bios If you get and 'Error 104', grab 'Error 104' fix and replace the original fparts file with it. . Make sure you have the modified bios which you want to flash, the bios backup you just created and the "Y580-Y480_BiosFix" tool in the same folder. Run the Y580-Y480_BiosFix tool, follow the instructions on the screen. Enter the name of the files correctly, else you'll get an error. It will create a new file for you and will be named after the modified bios file you specified, with 'Fix' appended to it. Here's a screenshot of the tool in use (Y580 version looks the same). In the case shown here it will create a file called "modifiedBiosFix.bin" which you can find in the folder where you run the tool. Use that one for flashing. Put the fixed BIOS, the prr.exe tool and the fpt.exe (along with the fparts.txt file) on the root of your prepared DOS bootable USB drive, restart your system and boot from that drive. Execut the prr.exe, if you don't get an error message continue by pressing enter. Then flash the bios by using this command (filename.bin obviously needs to be replaced with the name of the file you want to flash). If you can't remember the name of your file, use the command dir to display all the files on your drive. Flash with this: fpt.exe -f filename.bin -bios NOTE: The name of the BIOS file mustn't exceed eight characters (not counting the extension)! That's a DOS limit, so make sure the name of your file isn't too long. Wait until the process is done. After flashing it will verify the data, in case there's something wrong with the flashed data it will tell you. In that case don't reboot, just flash again. It might look a bit complicated at first, but that's the easiest way I could think of. Let me know if anything is unclear. The attached v8.0x modified versions include: - unlocked menus - whitelist removed (wwan / wlan) - Nvidia 660m 'GHz edition' - 1000MHz default 3d clocks >> Here's the 'buy me a beer' link in case you like this. Modding makes me thirsty << Use at your own risk, you are responsible for your system and the changes you make on it. My programs come with absolutely no warranty to the extend permitted by applicable law. Thanks @X0pas1 for testing, and for some pics - see below: I'd appreciate it if someone could also post some pictures of the more interesting sub-menus, e.g. advanced CPU control, video settings and similar. UPDATE 1/17/16 DOWNLOAD LINK FOR FILES REFERENCED IN THIS POST:
 1 point
 -
Here are the M14x BIOS revisions A07 and A08 with all the menus unlocked, just as previously with A05. This has not been tested so far, as I don't own an M14x, if you want to test it flash it with the tool in the attached archive and please report back! Thanks in advance! After flashing I highly recommend to go to the BIOS menu and load the default settings! *************** If you like these BIOS releases, please consider a donation to Tech|Inferno. *************** As always with such mods... you're responsible for your machine and what you do with it. Edit: A08 confirmed to work, A07 as well. Thanks a lot for testing @alroar ! M14x [unlocked] BIOS A07.zip M14x [unlocked] BIOS A08.zip1 point
-
I've had a couple people ask me how I overvolted my 680m's memory, so here's a guide for 4GB Clevo cards: The memory has its own VRM separate from the larger core VRM. The memory has a hardwired voltage based on a voltage divider. Default voltage is 1.35V for all 680m models. 680mx and 780m have 1.5V on their memory. The middle of the voltage divider is always .7V. What you do is lower the resistance of the resistor between the .7V point and GND causing more current flow, making the voltage drop between Vout and .7V increase, thus raising Vout. Annoyingly the resistor to modify is on the backside of the 680m, so you need to take the card out. General area: http://i.imgur.com/0zHaOVH.jpg (the glue is to try to keep the graphite on the resistor over time. more on that later) Exact resistor: http://i.imgur.com/E3ZSXBr.jpg Now doesn't everything sound nice and easy? That's what I thought at the time. It turns out that when the 680m is off that lots of stuff looks shorted together even though it really isn't. Even better is that measuring resistance one way or the other will produce different results. The only explanation I have for that is that the memory FETs are not symmetric and have enough subthreshold conduction to change what the multimeter sees. And what looks shorted with the system off? Vout to GND! This means that you will measure the same value across Vout and .7V as .7V to GND, so you can't tell what the output voltage is. I did some math though to determine what the resistance values likely are. I measured a resistance of 11.73k one way, and 11.50k the other. Assuming that these are the only 2 resistors in parallel, that means that the .7V to GND resistor (the one we want to mod) is really 25.4k, and the other resistor is 21.79k. (the Vout to .7V resistor is immediately to the left of the cap above the .7V GND resistor). You could desolder them and measure them, but I never bothered to since I figured it'd be a great way for things to get messed up. You can measure the memory voltage with the card running from the pair of 330u caps on the front side of the card, but that requires running the card with the memory cooler off. It should be safe with the card idle. I never did it though. I ended up pencil modding the resistor down to where I measured 10.63k. If I did my math right this means that I raised the voltage to 1.48V. I found measuring the resistance between pin 4 on the VRM to GND, which can be found on one end of most caps, to be an easier way to measure the resistance that trying to touch the ends of the tiny resistor. Back to why I had glue on the resistor. I had issues with the pencil graphite settling and changing the resistance value over time. Twice it went up. Once it went down. The alarming time was when it went down. I closed up the laptop measuring 10.59k. The next day my GPU started crashing constantly. Measured the resistance again and it had dropped to 9.37k, which is well over 1.5V. To do this mod a proper and non-lazy way unlike me, you should probably buy small SMD resistors and piggy back one on the existing resistor. That way you know that the voltage will remain constant over time. You could also just touch a known resistor to the existing one to help figure out what the resistance and thus output voltage really is. The glue actually took the graphite off the resistor, so don't try it. I did this mod to a 4GB clevo card. I do not know if the dell and MSI cards have the same memory voltage circuit. Maybe they do though and cards like the 675mx do too. I don't know. Before the mod I was running memory at 4700. After this I run it around 5100. I also replaced the cooling pads with copper shims. Before that my memory only ran in the low 4600s. A problem is though the shims are thicker than the pads, and I overtightened the screws and warped the card... don't do that. It looks like I might be getting a 780m because I did that. I can't guarantee that you won't blow up your card doing this. Don't blame me or make Dell or whoever pay for it if you do.1 point
-
I say stay with titans and compare highly detailed pictures of resistor pull-ups/pull-downs on titan and 780 ti cards to see which combo is responsible for the 15th smx being off. Rumor has it laser cuts are not used anymore I did the same for my 680m vs 780m, but unfortunately the card was dead at the time anyway due to other reasons so I could not test it. I did find only 3 sets of differences though. All pads that had a resistor on the 680m but lacked one on the 780m were present on the 780m, and vice verse, so I really think I did find the core config pull-ups and just needed to swap 2-3 resistors.1 point
-
Yess! Just when I felt running out of ideas I managed to get it work somehow. So my rig is a 2560p@i7-2760qm and 8GB rams - I am not sure its important or not... I use an oem Sapphire 7970 with pe4l 2.1b. I hade to make dsdt override. Got the table loaded like kizwan showed, so no need to bothering with that more. Needed to have an egpu clean W7 64bit (I just deleted my previous driver tries, so no reinstall needed). Adapter in x2/x4... and in 6,9sec delay switch. (I am not sure I need to plug and power it first, may be a hot plug in setup1x takes it too. I will edit it, if can make more simple.) So let past bios and arrive into setup1x. I tried several forms, but it seems the 32-bitA compression on egpu worked me. When W7 stands up it says no more error on my 7970, and AB says it has a 13.9 catalyst. Its almost the latest. So I don't do anything with that. Run a couple tests, later will add some more: 13.9 Catalyst, 925/1375 : AMD Radeon HD 7970 video card benchmark result - Intel Core i7-2760QM Processor,Hewlett-Packard 162B 13.9 Catalyst, 1100/1450 : AMD Radeon HD 7970 video card benchmark result - Intel Core i7-2760QM Processor,Hewlett-Packard 162B Sadly AB lets me only push it until 1125 MHz core. It is also voltlocked. But it takes it too. It took me about a half day to make it work, but I was curious about this override stuff. I try to help a lot of people with this egpu stuff in my home country, but could not really say anything personally when it came to this point. Round2: The sapphire vga was bought used, freezed 2 times within a day during normal web surfing, so I decided to give it back. The new candidate - an asus DCII 280X (very serious one, I had same DCII 660Ti, but that looks only a toy compared to this) - has already bought too. First kind surprise, that I did not have to do anything special. Just plug-n-play, the same startup method worked it too. It's core can be clocked up to 1,5GHz in AB, so I might try to sneak to the top of the list. Quick run at 1200/1600: 9909 GPU Score More benches coming soon!1 point
-
Stay with the Titans, Ti is not a real upgrade...1 point
-
Hey, your image isn't working for me so I can't see which errors you get. This is what I followed to fix the errors you probably are getting: DIY eGPU experiences - Page 1003 Do you have the address from the dsdt substitution guide? You can post me the dsdt file you created and I can modify it the proper way then send it to you to compile. I'm not sure if you can use mine and if its at the same address, but I don't think it will cause harm as its only temporary till the next restart, So here is mine(I don't have the source with me). to try with my address, if you have a different address change it I'm not sure mine will work on yours: Zippyshare.com - dsdt.zip Now lets say you have the dsdt.aml file (yours or mine) do the following: Put the file at <diyegpuimg_drive>\config\dsdt.aml And modify the <diyegpuimg_drive>\config\startup.bat file to the following: call vidwait 30 call pt MEM writefromfile 1 0xBCFD1000 dsdt call chainload mbr Start the pc and egpu at about the same time, go to menu based setup 1.x and choose startup.bat -> test. This will cause it to run the 1st and 2nd command (because its just a test it won't chainload), so now the override is in place. Now you test the different compactions that you couldn't before, for example mine works with 56BIT only on eGPU while choosing to ignore iGPU and force none to 32bit. If the compaction worked, you will get all_alloc = yes and you proceed to chainload -> test (Change from mbr first if necessary). Now setup 1.x managed to compact the ram it will add the command: call pci to the startup.bat file, so if you still get errors in windows after chainloading (43,12), or can't boot and want to try a different compaction, you will need to edit the startup file again, or else it will compact twice (when you run startup.bat to write dsdt again). You can edit it in setup 1.x you don't have to do it in windows... </diyegpuimg_drive></diyegpuimg_drive>1 point
-
Well. i'm not Prema, but I'm sure I could give you the answers you need. You can "undervolt" your processor - It wouldn't create so much heat, and therefor it wouldn't be so loud. As always - depending on yout geological environment. If you're a sahara-habitant, you'll get some problems As for Windows 7 / 8 - My experience tells me that Winows 8 (8.1) has a better management, and has a little bit more performance (concerning loading times and little things). It does sae some battery. It's marginally as It'd be about 10 Minutes more (also depending on what you'Re doing), but overall, I'd suggest you to give it a try. It won't bite you1 point
-
Voltage mod for the Nvidia GT 555m of the M14x This is an Alienware M14x BIOS containing a modified VBIOS which has a slightly increased GPU core voltage at 3d clocks. The increased voltage will allow you to overclock the GPU core a bit more. So far people got it up to 850MHz, but each chip is different. The system will draw a bit more power and run warmer than before. If you want to see some results, -voltage-increase-nvidia-gt-555m-8.html#post12013"]P1900 and -voltage-increase-nvidia-gt-555m-8.html#post12027"]even more is possible in 3dMark11, thanks to this mod. Since the VBIOS of this system is part of the BIOS, modifying it isn't as easy as playing with a vbios of a dedicated GPU. I had find and extract the VBIOS file from the BIOS. Since I don't have a lot of practice with modifying Nvidia bios files I needed some help there, so thanks to Saltius from MVKtech for identifying the voltage strings and modifying the VBIOS. Also thanks @n3ocort3x for starting this project and @Ninjahunter for testing it, and thanks to everyone else involved! INSTRUCTIONS: Attached is the repacked BIOS which contains the modified VBIOS. Extract it and simply execute InsydeFlash.exe and it the flashing procedure will start. Remember to close all applications in the background before doing this and make sure your system doesn't accidentally shutdown during the process. After flashing, I highly recommend going to the BIOS, load the default settings, apply and reboot. This will cause the system to reinitialize the hardware and can save you from some issues in certain cases. As already mentioned, overvolting always comes with raised temperatures. Make sure your system can handle the additional amount of heat. Check the airflow, a dust-free system is important and reapplying the thermal paste can lower your temperature by several degrees.And keep in mind that this only changes the core voltage of the GPU, not the memory voltage. So this will only affect the maximum overclock on the core. Update: Repacked the unlocked BIOS A03 with the modified VBIOS, check the attachements. Update 2: Repacked BIOS A05 with the modded VBIOS. Update 3: Repacked the unlocked BIOS A05 with the modded VBIOS. Update 4: Repacked BIOS A07 & A08 with the modded VBIOS, attached below. Update 5: Unlocked A07 & A08 with modded VBIOS added. Update 6: New version of A08 uploaded, volt mod now works for GF116 as well. Users with the newer 555m revision (GF116 - check GPU-Z) seem to have issues with the original mod. So please use the updated A08 version attached at the end of the post ("GF116 fix"). It will also work for GF106 systems. I will upload a fix for the unlocked version of A08 as well, as soon as I get around to do so. UPDATE: Two new versions of A08 added which bring back the SATA behavior of A05, so GF116 users can enjoy more SATA speed as well. Or for all GF106 users which want to use the latest BIOS but keep the SATA behavior from A05. Standard and unlocked versions added. *************** If you like these BIOS releases, please consider a donation to Tech|Inferno. *************** _____________________________ #As always with such mods: You are responsible for all the changes at your system and do this at your own risk _____________________________ M14x A01 voltmod flash package.zip M14x unlocked A03 with GT555m volt mod.zip M14x A05 incl VBIOS volt mod.zip M14x unlocked A05 incl VBIOS volt mod.zip M14x [unlocked] A08 with voltmod.zip M14x A07 - voltmod.zip M14x A08 - voltmod.zip M14x A08 - voltmod - GF116 fix.zip M14xR1_A08_voltmod_incl_GF116_support_&_SATA_fix.zip M14xR1_A08_[unlocked]_voltmod_incl_GF116_&_SATA_fix.zip1 point