Leaderboard


Popular Content
Showing content with the highest reputation on 04/05/13 in all areas
-
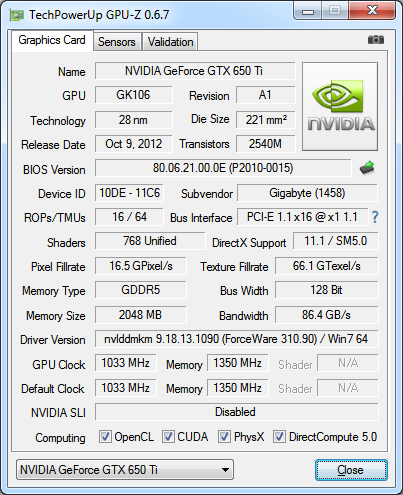
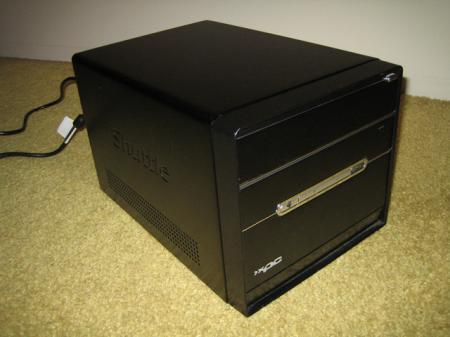
UPDATES: Feb 3, 2013: Added 3DMark06 and 3DMark11 benchmarks for dGPU GT 540M as comparative values between dGPU and eGPU Feb 17, 2013: Added pictures for mPCI-e slot underneath my laptop, and eGPU enclosure May 14, 2013: Selling my PE4H to upgrade to PE4L! First and foremost I want to thank Nando for all his troubleshooting and support as I worked to get my eGPU working. Without his help I wouldn't be up and running, especially with some of the interesting troubles I ran into. I hope this thread will help anybody else with a Dell XPS 15 L502x, or a similar machine, who wants to get an eGPU going. Please note that the following instructions are what got my eGPU working; it's entirely possible that following my steps may not work for you as well. You may have to make your own adjustments based on your own configuration. It should also be noted that I am only running 1.1Opt, as the GPU-z screenshot will confirm. I am working with HIT to exchange my current PM3N for the newer Gen2 capable mPCIe board. The PE4H is indeed PCI-e 2.0 capable, but the mPCI-e card itself is not. When I have the new mPCI-e card and cable, I'll run the benchmarks again for comparison. Benchmark scores and photos to follow. In this Post: Requirements Installing eGPU Using Setup 1.x Things you will need: Free mini PCI-e slot (not half size!) PCIe -> mPCIe adapter (e.g. PE4H / PE4L + the mPCIe adapter board and cable) GPU of your choosing (at this time of writing, Nvidia card is required if you want to get internal LCD support) PSU that meets the minimum power requirements of the GPU (something that can provide >150W on 12V1 rail should be enough) My current configuration is as follows: Dell XPS 15 L502x: Intel i7-2760qm 8GB 1333MHz Intel HD 3000 Nvidia GT 540M Windows 7 Ultimate 64-bit Setup 1.x (v1.10 and above) eGPU components: PE4H 2.4 (from HIT) PM3N (from HIT) mini HDMI , 60cm (from HIT) Setup 1.x (v1.10b5) (from HIT) Gigabyte GTX 650 Ti 2GB Coolermaster Extreme 2 Power Plus 625W PSU A shoebox (of all things!)A re-purposed Shuttle XPC case to hold the PSU + eGPU 1. Preparing the machine for eGPU Installing Setup 1.x Either purchase/donate for Setup 1.x from HIT, or follow the link they send you in an email after purchasing your eGPU kit Extract the installer's content to anywhere on your machine (default is C:\eGPU), and run the "eGPU-Setup-mount.bat" batch file to install Setup 1.x. This will add an item to your machine's bootable OS Uninstall mobile Nvidia drivers Uninstall all Nvidia driver items. It's easiest if you uninstall "NVidia Graphics Driver $drivernumber$" first, as it automatically uninstalls other items with it Navigate to your "C:\Program Files" folder (and if on 64-bit OS, "C:\Program Files (x86)") and delete the "Nvidia Corporation" folder 2. Installing and setting up eGPU components Installing the eGPU Shut down your computer Plug mPCIe adapter board into laptop; make sure you screw it in to secure it in place plug GPU into PE4H/PE4L board; the PCI port on the board is a little "loose", this is normal so don't worry if the GPU wobbles a bit Plug the mini HDMI cable into the PE4H board and the mPCIe adapter Plug the 6-pin PCI power cable from the PSU into the GPU Plug the 24-pin ATX power cable fro mthe PSU into the SWEX board Plug the 4-pin floppy connector into the port on the PE4H/PE4L board. If you do not have a 4-pin floppy adapter, then use the molex-to-floppy adapter cable that is provided with the PE4H kit. Connect your eGPU to an external monitor Switch on the PSU, leave it in the ON position Switch on the SWEX, you should see green LEDs appear on the PE4H board indicating that it is on. The GPU's fan(s) and PSU fan should also turn on Checking that Windows sees the eGPU Boot up Windows Open up Device Manager Expand the "Display adapters" branch You should see your eGPU, with a yellow exclamation mark beside it Open the eGPU's properties, you should see the Device status = Error 12. At this stage, this is a good sign, it means that Windows detects your eGPU assembly If Windows tries to install drivers automatically for your eGPU, let it, don't interupt it. We will replace this driver later on anyways 3. Running Setup 1.x Booting up Setup 1.x Turn on your laptop Select Setup 1.x from the Windows Boot manager menu Select Option 2, Start Setup 1.x in menu mode Running PCI compaction and disabling dGPU. Creating startup.bat script as we go along. If any of these steps fail at any time, see the section "Troubleshooting My Setup 1.x startup.bat". Failure can include the system locking up after performing an action such as PCI compaction or disabling dGPU. Select "Video Card > Hybrid GFX > dGPU [off]" to disable dGPU. Hit F3 to add to startup.bat script. If you have PE4H+PM3N, then select "PCIe Port > Link Speed > G1". F3 to add to startup.bat Select "Video Card > Initialize". F3 to add to startup.bat Select "PCI compaction > method 32-bit / 32-bitA" so that the "pci_alloc_valid=yes". F3 to add to startup.bat Select "Chainloader > win7". F3 to add to startup.bat Select "startup.bat > !Speedup". F3 to add to startup.bat Select "Run startup.bat". This will run all the commands you have added to your startup.bat script. It should run successfully, and prompt you to hit "[Enter]" when it's done. Select "Chainload win7" to chainload to Windows 7 and automatically reboot When at the Windows boot manager, select Windows 7. The previous startup.bat script you just ran has been chainloaded to the Windows startup event. So your dGPU should be disabled, and your eGPU ready to go 4. Getting the eGPU working in Windows The first thing you should notice is that your Windows will still show the boot sequence on your internal laptop screen. However, once you reach the login screen the eGPU should automatically kick in and display to your external monitor. If it doesn't do this automatically, don't fret, it might just be Windows deciding to leave your internal laptop LCD as the primary display device. Run setup 1.x and automatically run startup.bat, chainload to Windows Log into Windows Check Device Manager; your eGPU should now show up without the Error 12. If you see Error 12 still, see the section "Troubleshooting My Setup 1.x startup.bat". If not already outputing to external monitor, right-click on your desktop and open Screen Resolution. Set your external display as your primary screen. Download Nvidia drivers for your eGPU, install the new drivers Reboot, run startup.bat and chainload again And that's it. You should now have a working eGPU. It's not too difficult, but it's time consuming. The payoff is huge, however, as we can now use the desktop Nvidia driver on the mobile GT 540M as well. So if you need to pack up your laptop and travel, you still have full use of the dGPU! You'll likely have a lot of wires hanging about. It would be wise to collect these stray cables and try to keep them organised with cable ties or using some sort of box. I've found that a shoe box holds the PSU and GPU very well, and helps keep the cables out of the way.1 point
-
Prior to flashing your BIOS, follow the instructions on this page to recover your BIOS in case any mistakes or accidents were to happen. It will save you allot of time and trouble. Recovering From A Bad Insyde Bios Flash After naming your backup BIOS file correctly, include it on your flash drive as you normally would. The instructions also tell you the proper keys to press in order to recover your BIOS if your computer will not POST.1 point
-
I really liked the concept of the Dell Latitude Z600. My ideal yet realistic notebook would be similar to the Z600 but in a 15.4" (16:10 aspect ratio) form factor that could turn into a tablet PC. Hardware wise, I'd want: - regular Intel quad core CPU with their small form factor chipset - 4 SODIMM slots (4x8GB) - 2 mSATA RAID0 SSDs (2x 512GB) - Thunderbolt connection to a switchable nVidia GTX Titan eGPU enclosure - 8-bit IPS panel with capacitive multitouch and adaptive transflective screen on a thin bezel - 2 slim removable batteries (similar to above, needs intelligent switch so that it alternates which battery drains) - slice battery for long trips, every battery should have a LED indicator with battery level - thin high wattage power brick1 point
-
Have fun. Clevo 470m - 70.04.25.00.06.zip1 point
-
I'm one of those people who only buys a new laptop every ten years and always go all-out with it. I treat them like how some people treat sports cars; always out in public with them and always have them out even when I'm not really using them. How they look is a big thing. I'd like to see "true flagship" laptops. I mean, let's face it, if you're paying $4,000 for a laptop, an extra $500-$1,000 to make it truly yours isn't going to deter you. If it were possible to put my own graphics on the case, select the location of some of the ports (I really need the ethernet port on the right side of the case. It drives me nuts when it's on the left.), choose the location of the touchpad (I like it slightly off-center to the left, but some people put it too far over), choose the font for the keyboard's keys (and replace that annoying windows flag with something OS-independent. Fun fact, the official name for the key is "meta".), decide which keys have bumps on them (I don't use homerow. My typing style's weird and it'd help a lot if the "w", "p", "s", "f", "j", "l" and "enter" keys all had bumps) and decide on what kind of keys it has (mechanical, "normal", "short iMac", etc), I'd easily pay an extra $500. I'd go higher if I could specify the color (exactly as I want it, not from a list of 4-16 different choices) or upload concept pictures. On the hardware side of things, it'd be nice if laptops had two battery bays that worked like dual PSU's. That way, you can take one battery out when it gets low and put a new one in without having to power the system down first, plus you could run faster without as much risk of exploding. (It's pretty dangerous to pull more than 100 watts or so from most laptop batteries; that's why your GPU underclocks its self (or even turns off) when you're not plugged in.). While on the topic of batteries, I'd love one that takes up the entire underside of a laptop even if that meant almost doubling its thickness and weight. Most of the time I don't have a laptop on my lap in the first place. Rather than just extending the lifetime, it could be split up multiple batteries (but in the same "battery case") to keep the laptop running at full speed as if it were plugged in. A battery level indicator somewhere easily visible so I don't have to minimize my full-screen programs to check on it would be great, too. Dual-screens would be nice. I wouldn't mind doubling the screen's thickness. My thoughts are to either have the second screen just stuck to the back of the first, and automatically switch the "normal" one to the "back" one when the screen is closed (and enable some touch features so it works like a tablet), or to have the second screen "pull out" of the side of the normal screen, then slide the entire assembly over so you're still centered (but the laptop still closes and fits into a reasonably-sized space like they do today). Heck, why not make the entire thing detachable? Have the display "dock" to the laptop. When docked, it communicates via regular HDMI plus anything else it needs (charging, fancy lights, etc). When you pull it out, the laptop automatically switches over to transmitting to it wirelessely. Suddenly you have a tablet with the power and compatibility of a gaming rig.. Plus, laptops just look awesome with their screens off. Seriously, try to visualize yours without it. Ambient lighting is a big thing for me. I once played a game that changed my keyboard's color to match the action on-screen and it made the experience a /lot/ more immersive. If there was a way to change the bezel's color to match the screen edge's content (like some TV's do with the walls behind them) it'd help me get deeper into my games. GPIO's (general purpose input/output) would be great to have too. I have a few motherboards with GPIO headers that are easy to reach. I work with embedded electronics as a hobby and it's fun using these headers for some novelty projects. It'd be great if I could stick them on a laptop too. Perhaps an entire PCIe slot on the side of the case would be fun. There's some people who don't care about an optical drive and most of the other "holes" on the side of their laptops, so they could be replaced by a desktop GPU. Just stick it in like normal and attach a second PSU to run it. Considering how thick some laptops are, it might end up looking like the laptop was just build with it already attached! A larger camera would be great, too. Why do we have big laptops, some with gigantic bezel areas, and we still use this tiny pinhole-sized webcam? On my laptop (M17x) there's easily enough room for a decently sized lens like you'd find in a point-and-shoot camera. Oddly, a CD changer-type thing might be good for some people too. Think about it for a minute; there are people out there who prefer older games to newer ones, and some older games only work if the CD is in the drive. There's programs meant to copy an .ISO to your hard drive and emulate it, but they don't always work. Plus, the whir of the CD is part of the experience. It brings back nostalgic memories for me. It'd be nice if I could insert multiple discs like some a car stereo and switch between them without having to take them out. On most larger laptops, there's this big awkward area on the bottom right that's just empty. Put something there; a screen that appears to the OS as a second display, a second trackpad (I have actually used two mice at once before. There's times it helps.), macro keys, something. Heck, why not just put a touchscreen there and do something like the Razer Blade does? Maybe have a switch nearby that changes it from acting as a screen (and thus relying on the OS to carry out requests) and emulating a second keyboard directly or something. If it could be built to detect when non-conductive objects are placed on it (such as plastic cups), it could display fancy animations when I set a drink down on it. It might be a useless gimmick to some people, but it'd probably run about $200. Compared to $4,000+ that's pretty much nothing. Fans that run both directions so they can clean themselves. Seriously, why doesn't anyone do this? It seems like common sense! Every day or so the fans should stop spinning and change direction for a few seconds to knock off some dust that's built up. There should be some safety lock to prevent them from doing this if the system's under high load so it doesn't overheat in the time it takes to stop them and reverse their direction. Windspeed or pressure detectors at the exit of the vents. There's been times I sat my laptop down on a table over paper, didn't realize it, and when the fan kicked on high it just sucked the paper up against its self and couldn't breathe anymore. Some indication this is happening besides my computer overheating would be nice. Bring infrared ports back and mount them on the back of the screen. Use it to control your TV. Think about it. You want this. You /need/ this. Lights that are angled down and mounted above each connector port. Sometimes I move the laptop and start pulling wires out part way without realizing it. It'd be nice if the added strain could be detected somehow and a warning light could flash and make the table change color. Second headphone jack, with the ability to choose the audio source (independent left/right outputs, cloned outputs, specific program goes to each output (combines well with the dual-screen thing), etc). Vibration. Provided the laptop has SSD's in it, this is relatively safe. It doesn't have to be very strong; if you've played with vibration long enough it's mostly the sound that makes it register with your brain anyway. It does more than people give it credit for.1 point
-
R01f Done. Try. This is the modified version of the BIOS for your GTX660M graphics card. The whole procedure of the flashing BIOS firmware is the same as in the first post of this topic. In any case, put directly on drive C stock bios G75VWAS.223, first renaming it to G75VW.bin1 point
-
@TimeLord84: Hi, cool to see somebody else with two GTX Titans on T|I I do not own Borderlands or Borderlands 2, but Metro2033, which also makes heavy demands on PhysX, I have in my Steam games library. There I can find no problems, even under high load graphics and PhysX.1 point
-
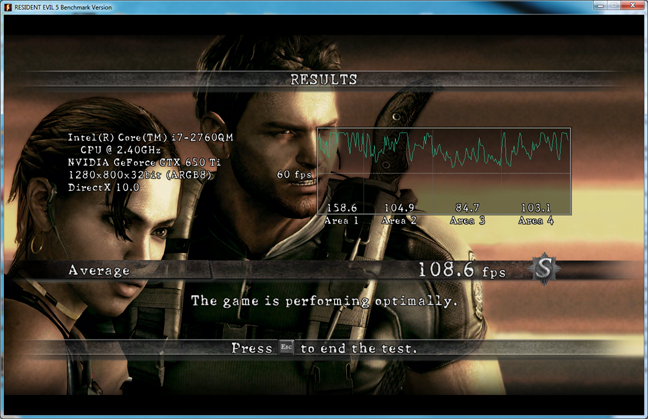
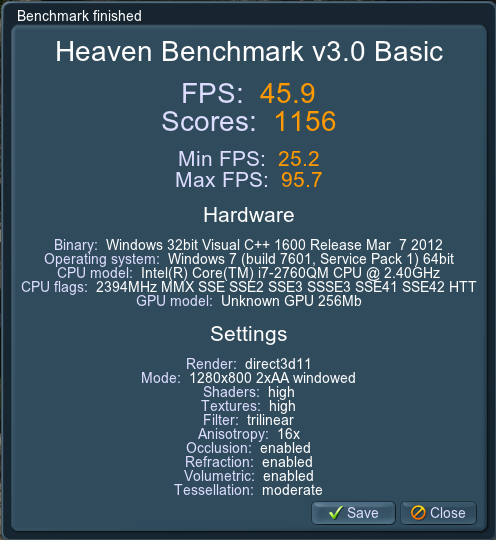
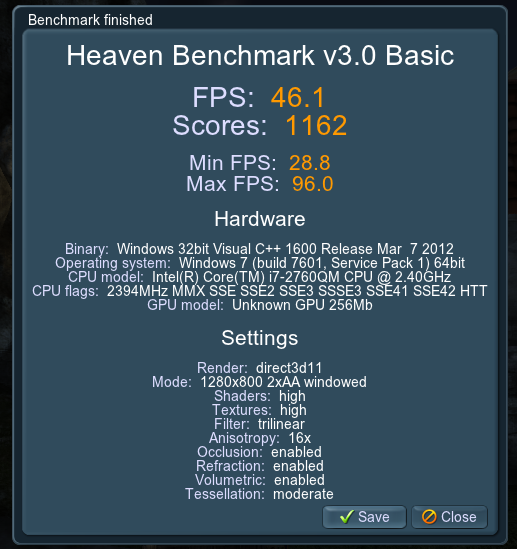
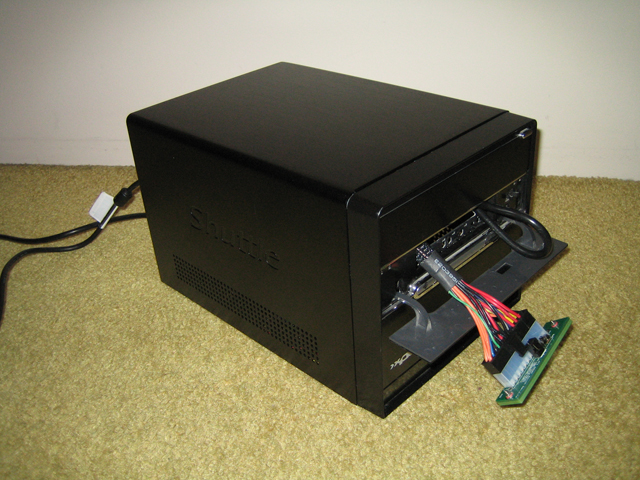
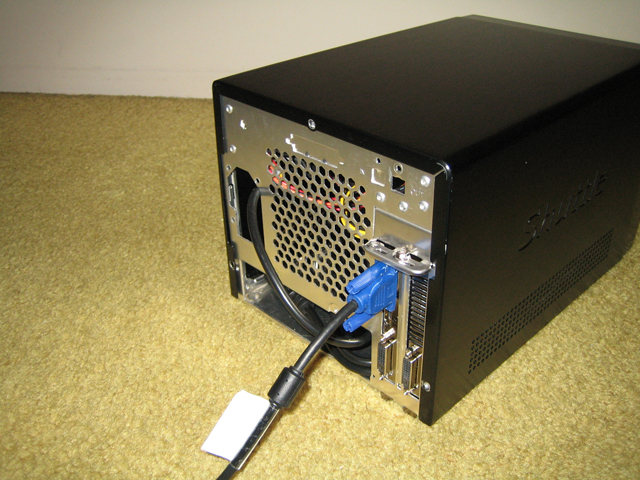
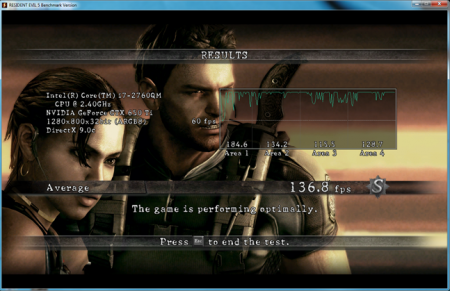
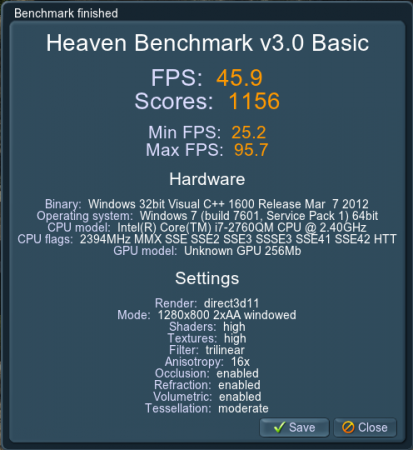
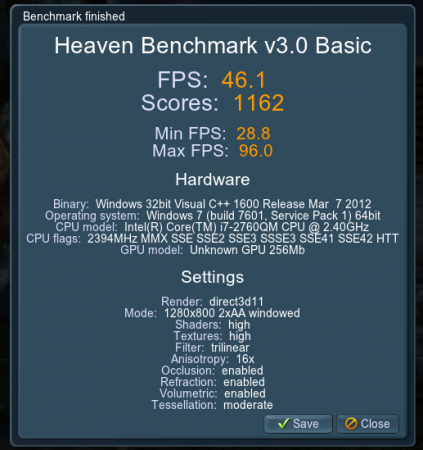
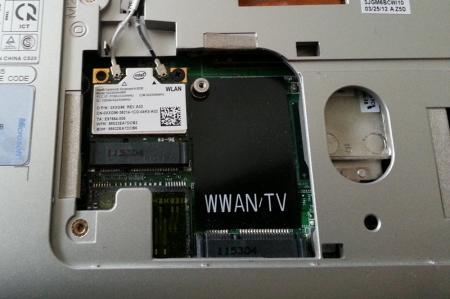
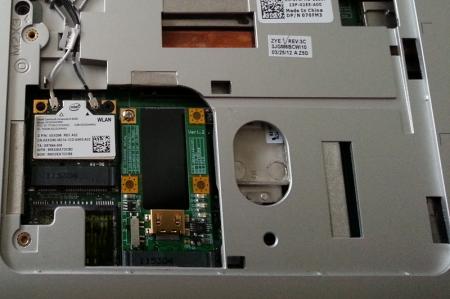
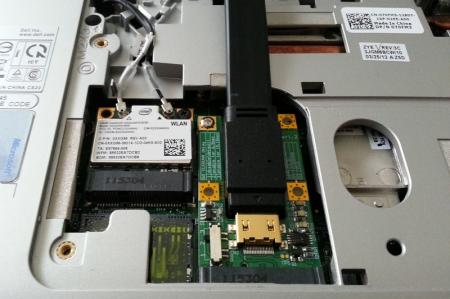
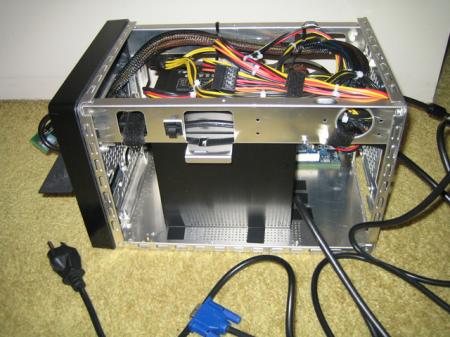
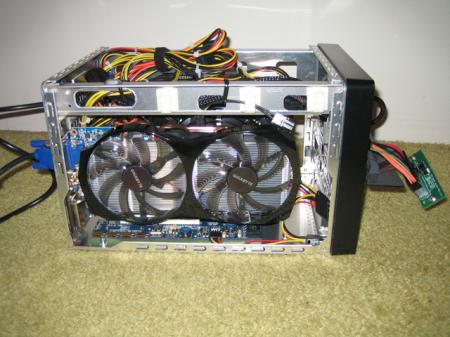
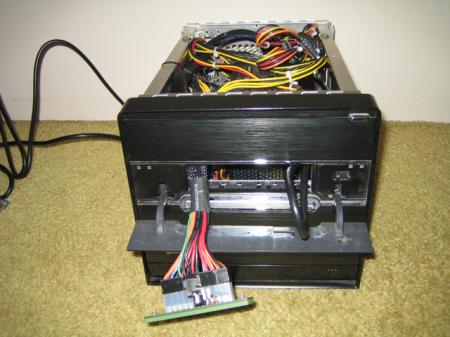
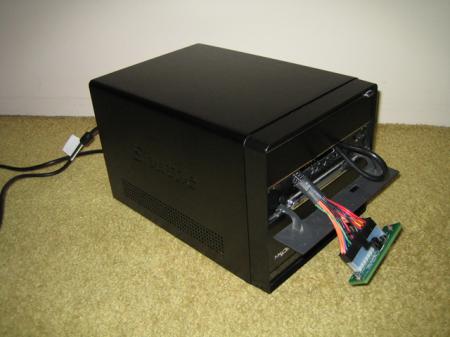
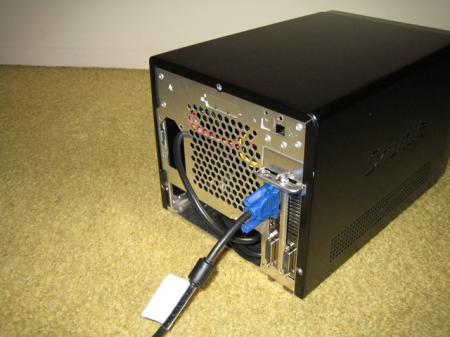
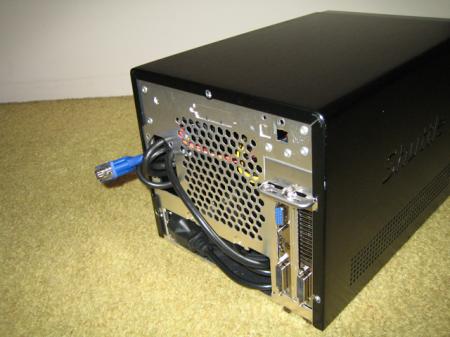
In this post: Troubleshooting my Setup 1.x problems Benchmarks Pictures Troubleshooting My Setup 1.x startup.bat I had a *lot* of trouble with Setup 1.x. The first problem to arise was the "dGPU[off]" command stopped working. While the script would run, it would immediately freeze when Setup 1.x attempted to return to the main menu. This happened consistently. In order to resolve this, Nando helped me cherry pick certain troubleshooting steps. Normally a startup.bat script would look something similar to call iport dGPU off call iport g1 1 call vidwait 60 10de:11c6 call vidinit -d 10de:11c6 call pci call chainload mbr However, as disabling my dGPU was causing trouble, we needed to work around it. So with Nando's help, here is my new startup.bat: Note that "call iport dGPU off" has been replaced by the "setpci -s ..." and "call iportbus force". These two lines effectively do the same what "call iport dGPU off" would do. These values were determined by Nando for me (cannot thank him enough). Also, with Nando's assistance, I used another version of Setup 1.x to help troubleshooting my problems. I am still uncertain if the different versions of Setup 1.x have helped my situation, but both versions I've used seem to work now. There were some other changes made to my DIYEGPUIMG:\core\pci.bat script as well, to test and try alternatives to the "call iport dGPU off" problem, but the updated startup.bat is essentially what fixed my issue. Benchmarks (Below are all results running on 1.1Opt) GPU-Z 3DMark06 3DMark06 DX9 (Highest of 5): 19935 (click link for 3DMark06 score) 3DMark06 DX9 (Lowest of 5): 19600 (click link for 3DMark06 score) versus 3DMark06 DX9 on the dGPU Nvidia GT 540M: 8430 (avg of 1st run and 2nd run). 3DMark11 3DMark11 DX9 (Highest of 3): P4204 (click link for 3DMark11 score) 3DMark11 DX9 (Lowest of 3): P4175 (click link for 3DMark11 score) versus 3DMark11 DX9 on the dGPU Nvidia GT 540M: P1149 (avg of 1st run and 2nd run) 3DMark Vantage 3DMark Vantage DX10 (Highest of 3): P13925 (click link for 3DMark Vantage score) 3DMark Vantage DX10 (Lowest of 3): P13895 (click link for 3DMark Vantage score) Unigine Heaven Unigine Heaven DX11 (Highest of 3): 1162 Unigine Heaven DX11 (Lowest of 3): 1156 Resident Evil 5 Benchmark Resident Evil 5 DX 9.0, Variable (1280x800, Shadow = High, Texture = High, Overall quality = High, AA x2, Motion blur On): 136.8 (other benchmarks with higher and lower settings fell between 90 - 150) versus only 46.7 on the dGPU Nvidia GT 540M: Resident Evil 5 DX 10, Variable (1280x800, Shadow = High, Texture = High, Overall quality = High, AA x2, Motion blur On): 108.6 (other benchmarks with higher and lower settings fell between 80 - 110) versus only 59.6 on the dGPU Nvidia GT 540M: Pictures PM3N mini PCI-e card installed, and with mHDMI cable eGPU enclosure - Shuttle XPC case - used VGA cable for demonstration purposes only Internal PSU side view: Notice the empty space around the PSU. Lots of room for arranging cables, etc (but I'm too lazy to get into that) Internal GPU side view: just the GPU and the 4-pin floppy connector powering the PE4H board. Note the placement of the mHDMI power in the far bottom left corner: this poses a problem with the XPC's enclosure sleeve. I will have to cut out part of the sleeve to make a hole large enough to safely allow the mHDMI cable to be plugged in at all times. Assuming I get a PE4L, this hole should accommodate the board as well Internal top view: bit of a mess, but it's mostly just extra cable sitting on top of the PSU. The PSU power cable has been fed through a couple of cable cable cinches along the inside of the top frame (closest to camera, out of view) Front view: the SWEX board, and a bit of the power cable poking out (to reduce stress on the PSU's input port) Front panel: that's the slot where the 3.5-inch floppy drive would normally go. It's perfectly sized to allow easy movement of the SWEX board and PSU 24-pin cable, and just large enough that I can tuck in/pull out the SWEX board for quick packing. For storage, I can unplug the power cable, and place it as well as the SWEX board inside the case. Makes it extremely easy to pack up and move around, or just pack away altogether Rear view. Note that I can very easily tuck away the power cable into the larger horizontal hole at the bottom. Makes it extremely easy to pack up. (Power cable exits the enclosure through the 1.5x3 inch hole on the left of the back panel) When cinched up, the video cable (DVI or VGA, but not both) can be tucked away into the enclosure, through the hole that the power cable comes out of. Plenty of room inside, beside the PSU.


 1 point
 -
More stuff exclusive for T|I users, voltage mods: All the vbios listed here are attached at the end of the post. ******************************** Nvidia 800m series: Nvidia GTX 880m (8GB version only): 'OC edition' -> unlocked overclocking limits, voltage adjustable, power target adjustable, optimized performance at higher clocks Can be used for all current 880m (Clevo, MSI and Dell). Nvidia GTX 870m: 'OC edition' -> see above Nvidia GTX 860m (GK104 variant): 'OC edition' -> see above. Refer to the file name to know which version is suited for your system. NOTE: Only for the Kepler version of the 860m. Silly Nvidia started giving different GPUs the same name. ******************************** Nvidia 700m series: Nvidia GTX 780m: 'OC edition' -> unlocked overclocking limits, voltage adjustable, power target adjustable, optimized performance at higher clocks Can be used for all current 780m (Clevo, MSI and Dell). Nvidia GTX 770m: 'OC edition' -> see above Nvidia GTX 765m: 'OC edition' -> see above. Refer to the file name to know which version is suited for your system. ********************************* Nvidia 600m series: MSI GTX 680m (4GB version): 'OC edition' revised -> higher limits for software overclocking, stock default clocks ----------------------- Dell GTX 680m (2GB version) vbios: 'OCedition' revised -> higher limits for software overclocking, stock default clocks same with increased 3d voltage ('OV') -> refer to the file name ----------------------- Clevo GTX 680m (4GB version) vbios: 'OCedition' revised -> higher limits for software overclocking, stock default clocks. For P1xxHM based systems I recommend only using version 80.04.29.00.01 !! Some users reported issue with other vbios versions (stock or modified, doesn't matter). EM users make sure you're on the latest BIOS / EC same with increased 3d voltage ('OV') -> refer to the file name (Same warning as above applies to P1xxHM users). ----------------------- K3000m: (Nvidia) K3000m - 80.04.3A.00.07 'OCedition' -> higher software overclocking limit Should work on all K3000m, unless you got a board ID mismatch. (HP) K3000m - 80.04.33.00.2E - 'OC edition' - > same as above, but probably the better choice if you use a HP machine ----------------------- K5000m: (Dell) K5000m - 80.04.33.00.35 - 'OCedition' -> higher software overclocking limit, stock 3d clocks 758MHz It's Dell but should work on all K5000m, unless you get a board ID mismatch. ----------------------- GTX 670mx: MSI 670mx (1.5GB) - 80.04.5B.00.A5_'OCedition'_rev00 -> higher software overclocking limits, tweaked performance at high clocks. Same board as the Clevo card. Clevo 670mx (3GB) - 80.04.58.00.03_'OC edition'_rev02 -> same as above, plus voltage is adjustable per software. ---------------------- MSI GTX 675mx: MSI 675mx (2GB) - 80.04.58.00.14_'OCedition'_rev00 -> higher software overclocking limits, tweaked performance at high clocks. MSI 675mx (4GB) - 80.04.58.00.0E_'OCedition'_rev00 -> same as above, vbios for 4GB card (!) ----------------------- Clevo GTX 675mx: Clevo 675mx (4GB) - 80.04.58.00.05_'OCedition'_rev00 -> higher software overclocking limits, tweaked performance at high clocks. ----------------------- ASUS G75VW BIOS: - 660m at 1000MHz core / 1400MHz memory - additional BIOS menus http://forum.techinferno.com/asus-gaming-notebook-forum/2538-%5Bg75vw%5D-modified-bios-vbios-higher-overclocking.html ------- Donation link in case you want to buy me a beer Thanks and cheers! *** FILE DOWNLOAD LOCATION:1 point