Leaderboard


Popular Content
Showing content with the highest reputation on 03/05/13 in all areas
-
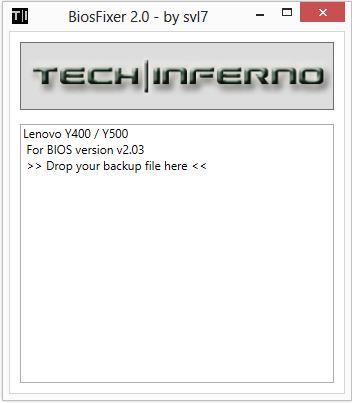
This is continuation of this thread (http://forum.techinferno.com/lenovo-ibm/2690-lenovo-y500-unlocked-bios.html) with all the necessary information in the first post in order to make it easier to find all the stuff. Lenovo Y400 / Y500 - 'unlocked' BIOS / wwan-wlan whitelist removal + modified VBIOS for higher overclocking The Lenovo Y500 comes with a pretty locked down BIOS, and in addition to this with a whitelist which prevents the user from getting 3rd-party wwan/wlan cards to work properly. The modified BIOS versions here will take care of this. Keep in mind that not necessarily all options available in the modified bios will work. Some might not do anything at all, others could possibly leave your system in a state which will prevent it from booting. Use care when changing stuff in the modified bios, don't touch things you're not familiar with. Use all the mods and software posted here on your own risk. Read the instructions carefully. NOTE: This will only flash the bios region. It won't reset the nvars set in the bios. *************** ONLY FLASH A MOD OF THE SAME VERSION AS YOUR CURRENT BIOS VERSION!!! If you're on 2.02 or 2.03 you can safely use the 2.04 update, *************** Attached you'll find modified versions of the Y400 / Y500 BIOS v1.03 and v1.05. Removed as they're outdated. Better updated to v2.02. The bios contains your Windows 8 license, therefore you can't just flash any file, else you'll have issue with your Windows activation. Furthermore the serial numbers, service tags etc. are stored there as well. You don't want to loose them. I wrote a little program that will take care of this issue and personalize the modified bios for you, so that you won't end up with an invalid Windows or no service tags. *************** Preparation to get to BIOS v2.02 (coming from any earlier version): Generally it's a good idea to keep the BIOS up to date. We're luck to have an official BIOS update to v2.02 apparently thanks to a leak on the net. (Lenovo is really bad when it comes to providing firmware updates and fixing issues). The leaked version must be genuine, else it wouldn't flash by using the regular method. If you want to update your system to v2.02 then grab the update here, extract it and flash the bios by executing the included InsydeFlash utility. Once the update is completed you can continue with the instructions below to get a modified version on your system. *************** Instructions for flashing a modified version: As a reminder - the modified BIOS needs to be the same version as you have on your system (2.02 to 2.04 is ok). Prepare an USB stick which can boot DOS. If you don't know how to do this, follow this short guide: Download the flash tool, for flashing you'll need the DOS version, but for creating the backup of your current BIOS the Win64 version will do as well, and it is faster. Get the prr tool as well. Grab the modified BIOS you want to flash, it comes as a tool which will patch the bios for you. Make sure you grab the version that corresponds with your BIOS version. Create a backup of your current BIOS using the flash tool you downloaded (first step) by runing the included backup.bat, or by using the Win or Dos version flash tool with this command: If the .bat doesn't work then open an administrator command prompt in your working directory and run the .bat per command line or type the command written above. In case you get an 'error 104' replace the parts file with the one that can be found in the 'error 104 fix' attachment at the end of the post. And if you still have issues after doing all of the steps above then please leave a reply in the thread and describe your problem. Open the downloaded tool and execute it. Drag and drop your BIOS backup file on it, it will create the mod for you. It will look like this: Put the modified BIOS, the prr.exe tool and the fpt.exe (along with the fparts.txt file) on the root of your prepared DOS bootable USB drive, restart your system and boot from that drive. Execute the prr.exe, if you don't get an error message continue by pressing enter. Then flash the bios by using this command (filename.bin obviously needs to be replaced with the name of the file you want to flash). If you can't remember the name of your file, use the command dir to display all the files on your drive. Flash with this: fpt.exe -f filename.bin -bios NOTE: The name of the BIOS file mustn't exceed eight characters (not counting the extension)! That's a DOS limit, so make sure the name of your file isn't too long. Wait until the process is done. After flashing it will verify the data, in case there's something wrong with the flashed data it will tell you. In that case don't reboot, just flash again. *************** Flashing the ultra bay 650m - only for SLI users with BIOS v2.02: The modified BIOS v2.02 also contains a vbios which will allow you to overclock your 650m past the 135MHz limit. As the ultra bay GPU has it's own vbios module you need to flash it separately. You'll need an USB drive which can boot DOS (just as the one you used for flashing the BIOS). *************** It might look a bit complicated at first, but that's the easiest way I could think of. Let me know if anything is unclear. >> Here's the 'buy me a beer' link in case you like this << Use at your own risk, you are responsible for your system and the changes you make on it. My programs come with absolutely no warranty to the extent permitted by applicable law. Grab file archive here:
 2 points
 -
To any who want to try and beat my score... and I hope you do! Don't brick your new computer, please. I take no responsibility. Been working with this stuff all my adult life... if you aren't super-comfortable with this, re-think. Theoretically, your Y500 should be just as capable of reaching that score as mine. My P3239 is the highest of three consecutive runs. The score will vary by a few points each time. Use a cooler or place the laptop on a fan. Watch your temps on a second monitor, if you can. I haven't noticed any impact on the score when running dual external monitors. You must stop the CPU from throttling completely and set it to run at 3.2ghz. To do this, set C-States, BDPROCHOT and Turbo Short PWR Duration to "disabled" in the svl7 modded bios. Use ThrottleStop to lock your multiplier to 32x, 33x or "Turbo". 32x should put you at 3198.8ghz. 33x and Turbo do the same thing. It tops out at 3.2 ghz. I'm not interested in unlocking that limit at the moment, but I did see a 3DMark score from what looked like a Y500 that reported CPU at 3.3ghz. It was probably throttling. The physics and mixed portions of the test are CPU-intensive, so steady CPU is better than bursting in this case. Also, any bump in CPU speed will yield a higher score. As a side note, disabling hyper-threading yielded much lower scores across the board. The decrease in heat generation was not worth the performance hit for me. I had best results on the 310.70 Nvidia driver. I would NEVER recommend what I'm about to say if I hadn't experienced it myself, but... let windows upgrade the driver for you. (gasp) I was on the Lenovo 306.00 driver and had tried 310, 314, etc Nvidia installers, with varied results. In a moment of insanity I went into devmgr and clicked on the GT 650m, then upgrade driver, then search automatically. Windows found the 310.7 driver and replaced the 306.00 driver without much fanfare. After a restart I was surprised to find that my Windows driver update was working beautifully... that's when I achieved the posted score. My previous experience with Windows updating video drivers has been overwhelmingly poor... so poor that I disable those updates on my client's computers. This time it worked nicely... dunno. I'll take it though. I used the latest Nvidia Inspector (1.9.7.0) to set clocks at 1150core and 2700 mem. Anything higher and there is simply not enough voltage to get it done. Hoping to be able to bump up the juice a bit eventually, but to be honest these gains are impressive as they stand. Crysis 3 runs on maxed out settings without issue. Planetside 2 with the "ultra" settings mod runs excellently and never drops below 25FPS. Pretty good for Planetside. Those battles get busy! Please be careful and feel free to ask any questions. I check in here once a day at least. PM is ok too, but your question might benefit the group, so consider posting in the thread -bearfight2 points
-
First 3dm11 run, complete stock.
 2 points
 -
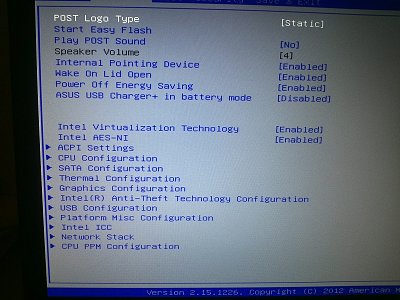
Asus G75VW - modified BIOS / VBIOS Here's a modified BIOS for the Asus G75VW. It enables some more options and settings in the BIOS setup. It also contains a tweaked VBIOS for the 660m. Detailed version information: mod02 'GHZ edition' - 660m 3d clocks at 1000MHz core - 670m @ 715/1650 (only in 'overclock edition') additional BIOS menus Pics of the most interesting BIOS settings (thanks @bobby7): Instructions: Download the BIOS you want to flash, as well as the flash tool (Win64). Put the modified BIOS (and included files) in the same folder as the flash tool . Make sure that your current BIOS version is the same as the one you want to flash. Then create a backup of your BIOS by executing the backup.bat file. . Download the 'G75VW-BiosFixer.zip, put it in the same folder as the flash too and run it. Follow the instructions on the screen, it will ask you for the BIOS backup you just created, as well as the modified BIOS file which you already downloaded. . If the tool doesn't come up with an error message, go ahead and flash the created file by executing the included flash.bat file. . Wait until the flashing is done, in case everything's okay you can reboot. NOTE: It's a good idea to go to load the default BIOS settings after flashing. Also I really recommend flashing the official version before applying the modified BIOS, as mentioned in the instructions. >>> Here's my donation link, if you like my mods feel free to buy me a beer <<< As always with such mods, use at your own risk. The program I provide here (BiosFixer) comes with absolutely no warranty to the extent permitted by applicable law. *** Asus G75VW - BIOS v223 - [unlocked] [overclock edition].zip G75VW-BiosFixer.zip Asus G75VW - BIOS v223 - [unlocked].zip
 1 point
 -
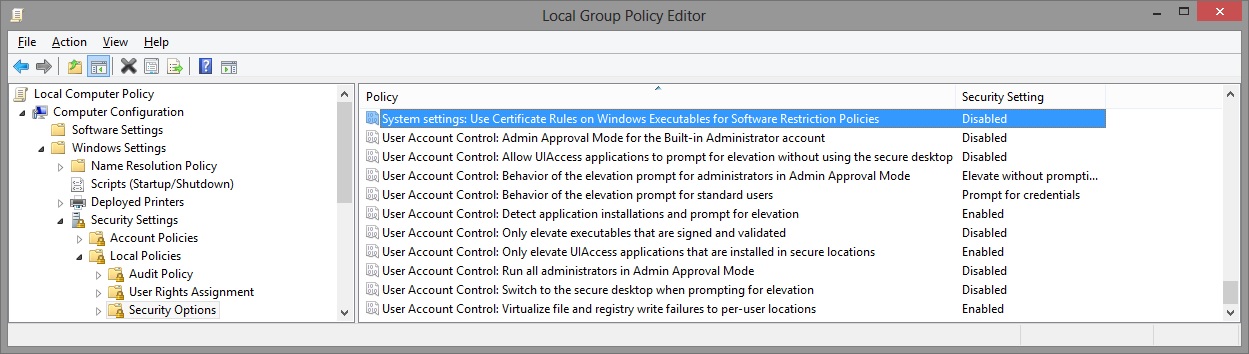
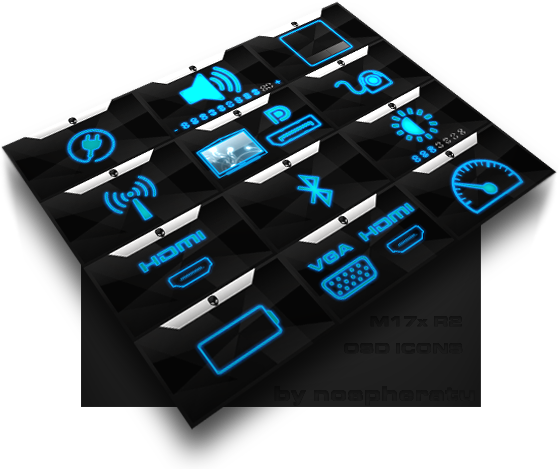
I've recreated the OSD Icons for the R1/R2/R3/R4 and R5 aka 17 as the standard ones are a bit dated. It should also work with the M15x though as my old M15x had the same setup for the OSD app. Regarding the R3 OSD, it seems its the same install for the M18x as well so it should work for you M18x owners too. I've also added the AW 17 OSD to the list. This exe is also compatible with the 14 and 18 as Dell uses the same OSD for all the new machines. There's also a set for you Area-51 m17 R1 owners. I've tried to give it a simular feel to the Invader Icon pack by Alienware. Hope you guys like it Install Instructions for R1 1. You need to end the OSD process in Task Manager since it may be using some of these icon files. Ctrl+Shift+Esc then find the OSD process and end it. 2. Backup your current icons if you want to revert to the originals (You can also uninstall and re-install the OSD application if you want to go back to the original icons) 3. Extract the attached "M17X R1-R2 & M15X.zip" contents to C:\Program Files (x86)\OSD\picture\. Overwrite if prompted. 4. Restart the OSD application. It is located in C:\Program Files (x86)\OSD\Launch.exe 5. Done! Install Instructions for R2 /M15x 1. You need to end the OSD.exe process in Task Manager since it may be using some of these icon files. Ctrl+Shift+Esc then find "OSD.exe" and end the process. 2. Backup your current icons if you want to revert to the originals (You can also uninstall and re-install the OSD application if you want to go back to the original icons) 3. Extract the attached "M17X R1-R2 & M15X.zip" contents to C:\Program Files (x86)\OSD\ICONs\. Overwrite if prompted. 4. Restart the OSD application. It is located in C:\Program Files (x86)\OSD\Launch_OSD.exe 5. Done! Install instructions for R3 / R4 / M18x 1. You need to end the OSD process in Task Manager since it may be using some of these icon files. Ctrl+Shift+Esc then find the AlienwareOn-ScreenDisplay.exe process and end it. 2. Backup the existing AlienwareOn-ScreenDisplay.exe by renaming it to "AlienwareOn-ScreenDisplay.exe.BAK" for example. Its in C:\Program Files (x86)\Alienware On-Screen Display\ 3. Extract the AlienwareOn-ScreenDisplay.exe from the appropriately named file depending on your OS and model to the C:\Program Files (x86)\Alienware On-Screen Display\ folder. 4. Restart the OSD application by double-clicking the file. 5. Done! Install instructions for 14 / 17 / 18 ** 1. You need to end the OSD process in Task Manager since it may be using some of these icon files. Ctrl+Shift+Esc then find the AlienwareOn-ScreenDisplay.exe process and end it. 2. Backup the existing AlienwareOn-ScreenDisplay.exe by renaming it to "AlienwareOn-ScreenDisplay.exe.BAK" for example. Its in C:\Program Files (x86)\Alienware On-Screen Display\ 3. Extract the AlienwareOn-ScreenDisplay.exe from the "AW 14-17-18 (Windows 8).zip" file to the C:\Program Files (x86)\Alienware On-Screen Display\ folder. 4. Restart the OSD application by double-clicking the file. 5. Done! The Area-51 m17-R1 install should be similar to the steps for the other laptop revisions above. They all basically follow the same process anyway, apart from filenames/paths. @robby_hd was kind enough to make a red version of these icons for the M17x R3 / M18x R1 which can be downloaded from his post here. **There seems to be a security issue with Windows 8/8.1 at this point in time since it doesn't allow modified exe's. I will update this post with a solution once it has been found. Also a few Alienware owners are having an issue with the unmodified OSD and Windows 8. Only the default Windows 8 OSD displays and not the Alienware version. Try the solution posted by Dell here and then attempt installing the mod. The below screenprint is a workaround by editing the security policies to allow the unsigned exe to run in Windows 8. If you are not aware of what these settings do and the repercussions of changing them, please do not attempt it. - Open the Group Policy Editor by typing "gpedit.msc" in the search or run text box. - Duplicate the settings below. Area-51 m17-R1.zip M17X R1-R2 & M15X.zip M17X R3-R4 & M18X R1-R2 (Windows 7).zip M17x R4 & M18X R2 (Windows 8).zip AW 14-17-18 (Windows 8).zip M17X R4 & M18X R2 (Windows 8.1).zip

 1 point
 -
Hello, As now the gaming system Steam is available for Linux, I though that would be a good idea to open a new discussion about Linux on Alienware for gaming. I think Steam will port more and more games on this OS and it is interresting to try it. I would post my reviews about it in this thread. For the moment I successfully installed Linux Mint (a nice version of ubuntu) I need to try Steam and a few games with differents graphical cards drivers. here are the steps I followed : Choose a good Linux Distribution : Mint is a good choice as it comes from Ubuntu with a few improvments. (ubuntu is supported by Steam and has a huge community) Download Mint : http://www.linuxmint.com Use LiLi USB creator to make a bootable USB Key Install the OS (very easy graphical installer) Reboot Install better Nvidia drivers for your laptop (on command line) sudo add-apt-repository ppa:xorg-edgers/ppa apt-get dist-upgrade apt-get install nvidia-313 nvidia-settings Install Steam Did anybody tried to play on Linux with this Laptop ?1 point
-
Modded Nvidia nvdmn.inf Alienware M17XR3/R2+M18X GTX 680M Dell/Clevo NVIDIA DRIVERS 314.14BETA Windows 8 - Disable driver signing. 1) Open command prompt (Admin). 2) Type "bcdedit /set {current} testsigning yes" (without quotes)enter>reboot. 3) Install Driver>reboot 4) Exit test mode type "bcdedit /set {current} testsigning no" reboot. nvdmn.inf_M17XR3_GTX680M_v314.14.zip nvdmn.inf_M17XR2_GTX680M_v314.14.zip nvdmn.inf_M18X_GTX680M_v314.14.zip1 point
-
Hey there, I got a 25 Euro voucher for Clevo Notebooks. Its for the german retailer Schenker at mysn.de. First one, first served. But please write if you claimed it. 502012MI100769735502012MI1007697351 point
-
I have successfully ran LMDE (Mint Debian Edition) on my m11x, installation was a breeze and everything worked out of the box. Sent from my GT-N7100 using Tapatalk 21 point
-
It might work if you can get Win7 to allocate the eGPU and you hotplug in to overcome mPCIe whitelisting issues. However, the gt540M would be assigned the Optimus features, so the gtx660 would run in x1-only mode. There you'd miss out on Optimus internal LCD screen mode AND pci-e x1 compression which *greatly* accelerates DX9 and somewhat DX10. To get the greatly desired performance boost requires the gt540m to be disabled. From my PM discussion with daver160 we found the neither the stock nor modified bios could disable the dPGU. The modified one does give a PEG option which didn't do anything. So daver160 resorted to using Setup 1.x to successfully disable the dGPU. Setup 1.x, when automated, presents as a Win7 bootmenu item so when you want the eGPU you just hit that item, it does it's thing and chainloads back to the Win7 bootmenu where you select Win7. It adds like 1.5s to the whole bootup time.1 point
-
More stuff exclusive for T|I users, voltage mods: All the vbios listed here are attached at the end of the post. ******************************** Nvidia 800m series: Nvidia GTX 880m (8GB version only): 'OC edition' -> unlocked overclocking limits, voltage adjustable, power target adjustable, optimized performance at higher clocks Can be used for all current 880m (Clevo, MSI and Dell). Nvidia GTX 870m: 'OC edition' -> see above Nvidia GTX 860m (GK104 variant): 'OC edition' -> see above. Refer to the file name to know which version is suited for your system. NOTE: Only for the Kepler version of the 860m. Silly Nvidia started giving different GPUs the same name. ******************************** Nvidia 700m series: Nvidia GTX 780m: 'OC edition' -> unlocked overclocking limits, voltage adjustable, power target adjustable, optimized performance at higher clocks Can be used for all current 780m (Clevo, MSI and Dell). Nvidia GTX 770m: 'OC edition' -> see above Nvidia GTX 765m: 'OC edition' -> see above. Refer to the file name to know which version is suited for your system. ********************************* Nvidia 600m series: MSI GTX 680m (4GB version): 'OC edition' revised -> higher limits for software overclocking, stock default clocks ----------------------- Dell GTX 680m (2GB version) vbios: 'OCedition' revised -> higher limits for software overclocking, stock default clocks same with increased 3d voltage ('OV') -> refer to the file name ----------------------- Clevo GTX 680m (4GB version) vbios: 'OCedition' revised -> higher limits for software overclocking, stock default clocks. For P1xxHM based systems I recommend only using version 80.04.29.00.01 !! Some users reported issue with other vbios versions (stock or modified, doesn't matter). EM users make sure you're on the latest BIOS / EC same with increased 3d voltage ('OV') -> refer to the file name (Same warning as above applies to P1xxHM users). ----------------------- K3000m: (Nvidia) K3000m - 80.04.3A.00.07 'OCedition' -> higher software overclocking limit Should work on all K3000m, unless you got a board ID mismatch. (HP) K3000m - 80.04.33.00.2E - 'OC edition' - > same as above, but probably the better choice if you use a HP machine ----------------------- K5000m: (Dell) K5000m - 80.04.33.00.35 - 'OCedition' -> higher software overclocking limit, stock 3d clocks 758MHz It's Dell but should work on all K5000m, unless you get a board ID mismatch. ----------------------- GTX 670mx: MSI 670mx (1.5GB) - 80.04.5B.00.A5_'OCedition'_rev00 -> higher software overclocking limits, tweaked performance at high clocks. Same board as the Clevo card. Clevo 670mx (3GB) - 80.04.58.00.03_'OC edition'_rev02 -> same as above, plus voltage is adjustable per software. ---------------------- MSI GTX 675mx: MSI 675mx (2GB) - 80.04.58.00.14_'OCedition'_rev00 -> higher software overclocking limits, tweaked performance at high clocks. MSI 675mx (4GB) - 80.04.58.00.0E_'OCedition'_rev00 -> same as above, vbios for 4GB card (!) ----------------------- Clevo GTX 675mx: Clevo 675mx (4GB) - 80.04.58.00.05_'OCedition'_rev00 -> higher software overclocking limits, tweaked performance at high clocks. ----------------------- ASUS G75VW BIOS: - 660m at 1000MHz core / 1400MHz memory - additional BIOS menus http://forum.techinferno.com/asus-gaming-notebook-forum/2538-%5Bg75vw%5D-modified-bios-vbios-higher-overclocking.html ------- Donation link in case you want to buy me a beer Thanks and cheers! *** FILE DOWNLOAD LOCATION:1 point
-
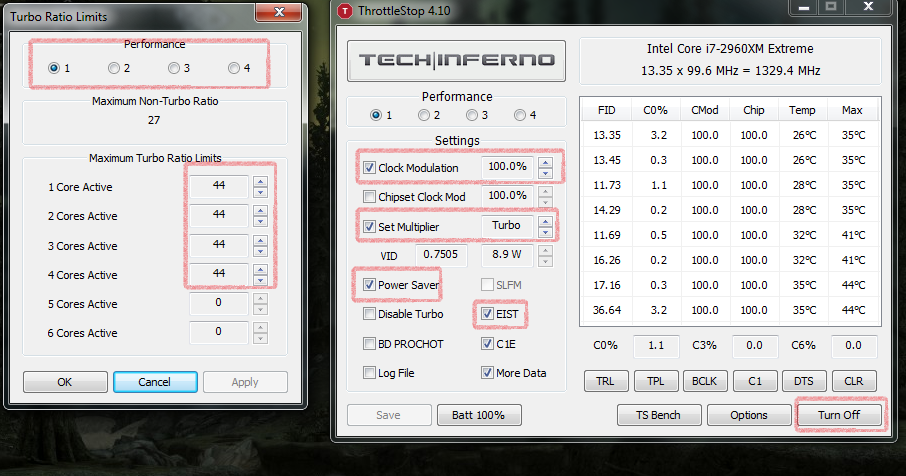
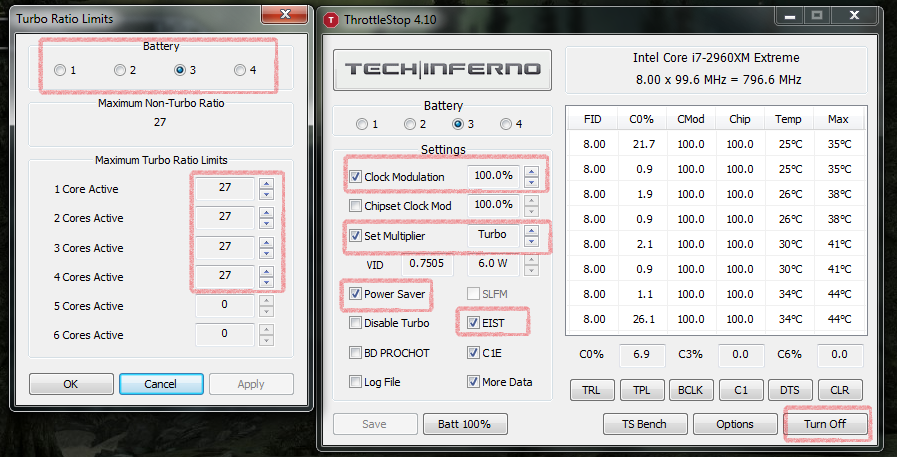
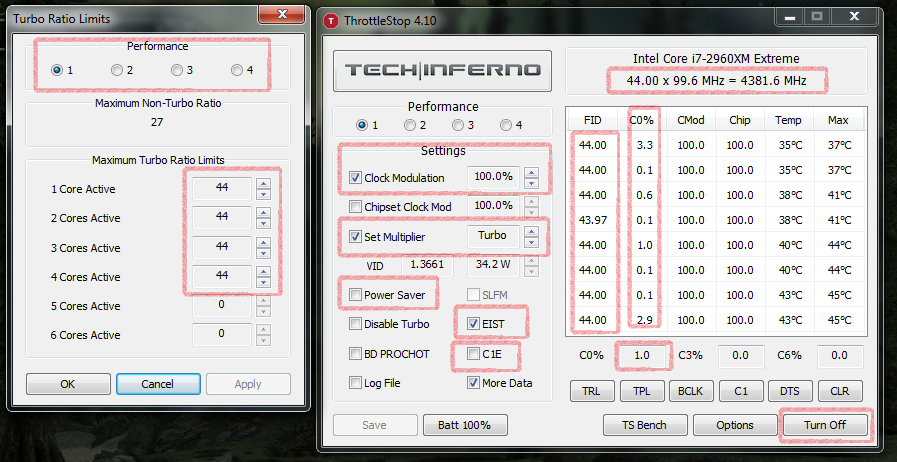
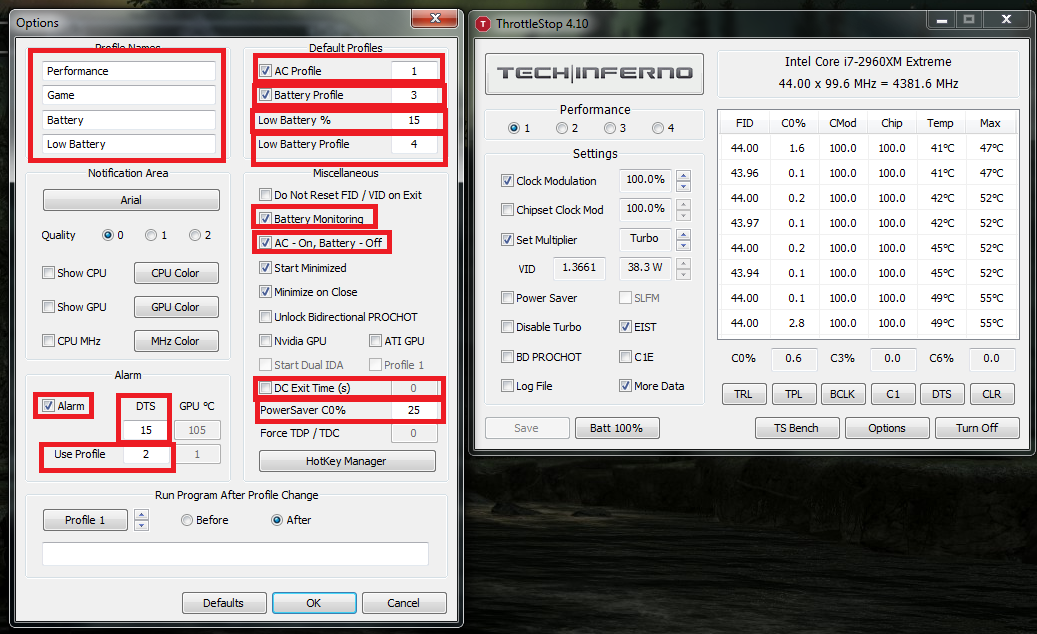
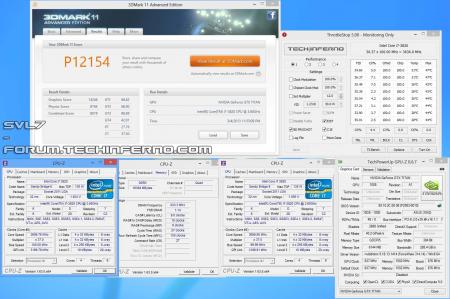
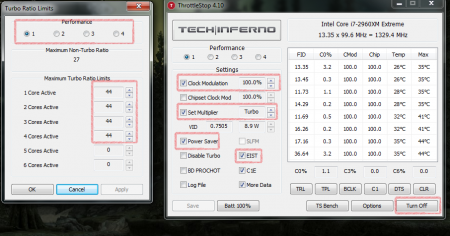
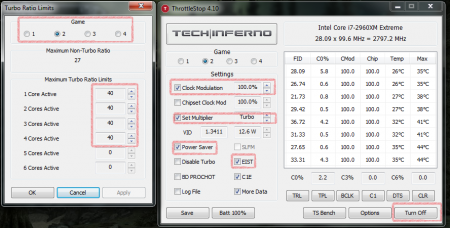
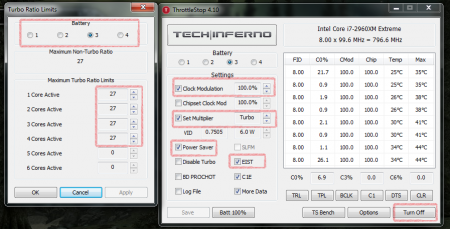
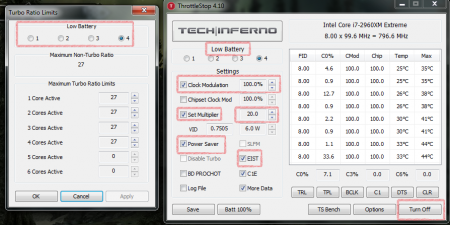
been running 4.3ghz core states disabled with 1024amp set and 122watt... when that ran fine for a month i upped it to 1024 watt also. Using 0flex on 43/43/43/43 and under only gaming i didnt see to far over 80c... recently i upped it to 44x so 44/44/44/44 core states disabled that i used 3flex for as I recorded in the above chart and still been gaming for awhile over various games and 88c i saw max so far... everything is very zippy. I'm thinking of setting 45x or 46x and setting Throttle Stops "Alarm function to switch to 43 or 44x if it reaches 10DTS so 90c maybe ill be more preventative and set 15 DTS or 85c suprisingly idle is around 40c-50c max idle... but performance is zippy no c-states. I may for benefit of lower temps enable cstates again and even set cpu power options to Balanced mode so cpu speed is tied to load and unless high load is detected turbo wll not kick in then. test games have been Mass Effect 3 Demo, Skyrim, BF3, The Witcher 2 and will also be trying Dirst 3 and Rage too. since for me 43x (0flex) and 44x (3flex) have ran so cool in most apps I use (i know real rendering or transcoding etc would produce more heat than most apps i use) so i'll try the 45/46x theory at 85c/90c and under and 43/44x when above... would be great if Asetek's prototype is released. Given their claims of their liquid cooling setup in my opinion and observation it can be done on stock cooling as they only ran benchmarks and at ranges possible on stock heatsinks... had they claimed 4.4ghz for longer than simply each of the short common 3d benchmarks they would have claim to a feat not possible on stock M18x cooling... looking forward to see actual comparison data but in mean time i hope those of you on M18x with XM realize that given the same 44x overclock your system can survive vantage and 3dmark just the same. I've been gaming and can say that in actual games the temps seem fairly in check at 43x as i had been using it at that for months at 0flex... those worried about overheating can use Throttle Stop to make your own safety speed drop. Example: -set two profiles up in Throttle Stop -Set one to your everyday high overclock... example 44x @ 3 turbo flex in bios on main AC profile with cstates and anything else up to you. Go to TRL set all 4 active core multiplier options to the same value and make sure eist is checked and set multiplier is checked. press down on the arrows under to the right of set multiplier until you see some number below the number you set in TRL and now press back up until you see turbo. leave it like that... i do this because if you were using a multiplier higher before and it said turbo to start its still set to the old multi and once you press down you see the number one multi down from where you were and by pressing up and showing turbo it shows the number that is 1 less that what is set in trl and the next press up it shows turbo thats how you know its set to the number in TRL for 4active cores. I had to do this so its running the correct multiplier in Throttle Stop. -set other profile the same way to a cpu speed all 4 cores can handle even under extreme load and estimated summer temps (overestimate to be safe) so this Multiplier might be 4ghz-3.5ghz 40x-35x (better than system throttling to 2.5-2.7ghz... unnecessary and causes games and apps sometimes to stutter from the sudden drop...) -Go into Throttle Stop options and check "Alarm". Set use profile to the second profile number you made for downclocking. Set "DTS" to for a example ill say 80c so DTS would be 20 meaning or 20 degree units away from max temp before thermal shutdown (100c for i7 2900XM series). Since stock throttle temp of M18x is 85c you would then see further drop in mhz at 85c to base speed of xm series (2920xm 2.5ghz and 2960xm 2.7ghz). If on unlocked bios you could set Throttle Temp to via unlocked menus under "thermal management" to 90c (max menu limitation). Then maybe set DTS alarm to 85c or 15 is the value you would enter in Throttle stop options. If an advanced user you can use a bios with a modified value in the unlocked bios higher than max throttle temp value based on menu limitations so it can be set over 90c as long as you dont re-enter that thermal management menu and save bios as doing so will reset it to default 85c :| So one example on that is set 95C using bios modding software (hex editor is example... or get a modified version from a felow TI user) and then set Throttle stop alarm to 90c so 10 DTS and you will be on max overclock at under 90c and at max safe overclock while overheating at under 95c and at 95c + the system 2.7-2.5ghz throttle would kick in You need to check "ac on battery off" and "battery monitoring" also you should check Default "AC profile" to the profile number for the max overclock you set first in Throttle stop options. Additionally if you can setup a Battery Profile and set a reasonable cpu multi (base clock i would highly recomend) and since Throttle Stop is so amazing it wont throttle as long as you check "Clock Modulation" and set it to 100% in the battery profile. If you chose to do so in Throttle stop options check under Default "Battery Profile" and set the number to the profile you made for battery speeds. now on main window of Throttle Stop hit "Turn ON" and you system will run at your max overclock as long as its under your alarm temp value you had set if its not it runs at your second profile made for long hauls processing or overheating moments and if it gets hotter still will throttle at the systems bios set throttle temp when reached and hopefully not but if temps kept rising your system would then shut off due to thermal protections in bios set to default of 100C. *if using powersaver and or cstates at high frequencies and cpu drops and rises from 800mhz to extreme speeds can cause a voltage related bsod in rare cases if turbo overvoltage or turbo flex is too low as even cstates itself causes extreme overclocks to be instable due to the cpu no applying the higher needed voltage fast enough before the frequency went from 800mhz to the extreme value... not an issue with the above described settings. *DC exit time in the Throttle stop options can help if system hangs upon plugging AC power in going from battery and your AC profile loads automatically increasing the delay from zero will allow more time to pass once plugged in before the AC profile you set is loaded. great feature Unclewebb *You can enable "power saver" on main screen by checking it on a per profile basis and by setting the load percent in Throttle stop options called "power saver c0%" to whatever you want cpu to have as max load over all threads (physical and virtual cores) when under this value system will run at 800mhz on all cores which is SandyBridges minimum speed. when cpu load is over the C0% that is set (remember that even means the cpu load when its dropped to 800mhz times 4cores... so C0% may be inflated when cpu is sitting at 800mhz vs C0% observed running at normal speeds keep that in mind setting power saver c0% so cpu doesnt bounce between states as much us a higher value if its bouncing up and down from 800mhz rapidly unless desired), it will run at the normal programmed speed for the profile its currently running under in Throttle Stop... or dynamically if thats what the profile is set up as (core states enabled). Default is 35% I have heard 13% is a good hair trigger for it if you want minimal power saving but likely you will see cpu flipping from normal to 800mhz a lot set like that. So i suggest 25%-default 35% if you choose to use the feature (which can be combined iwth no core states so cpu runs max 4active speed unless under powersavers C0%) I show 25% in my example. Like i say above though "if using powersaver and or no cstates at high frequencies and cpu drops and rises from 800mhz to extreme speeds can cause a voltage related bsod in rare cases"... not common for these ranges and suggested power saver C0%. *side note* in the testing in the OP i needed 4flex for 44x at those temps and on IBT on that chip sample this is my first 2960XM so it hasnt been as thoroughly tested but been fine at 3flex for 44x ( i try to use enough volts just in case jumps in load occur hence the IBT table above... more to come eventually)

 1 point