Leaderboard


Popular Content
Showing content with the highest reputation on 02/08/13 in all areas
-
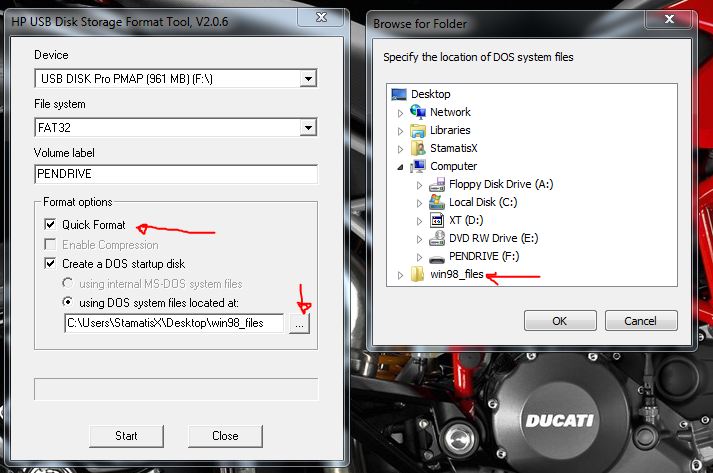
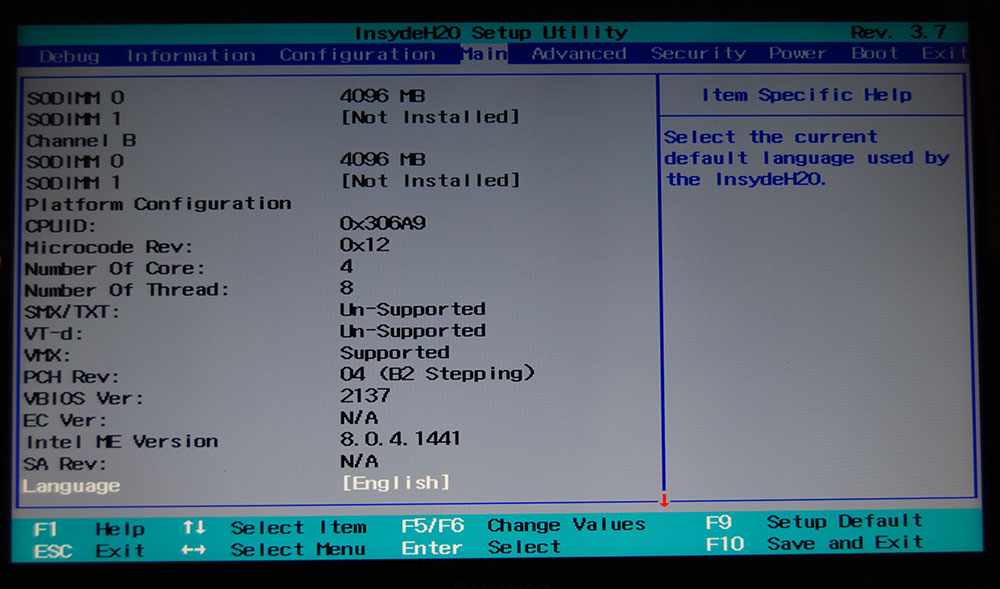
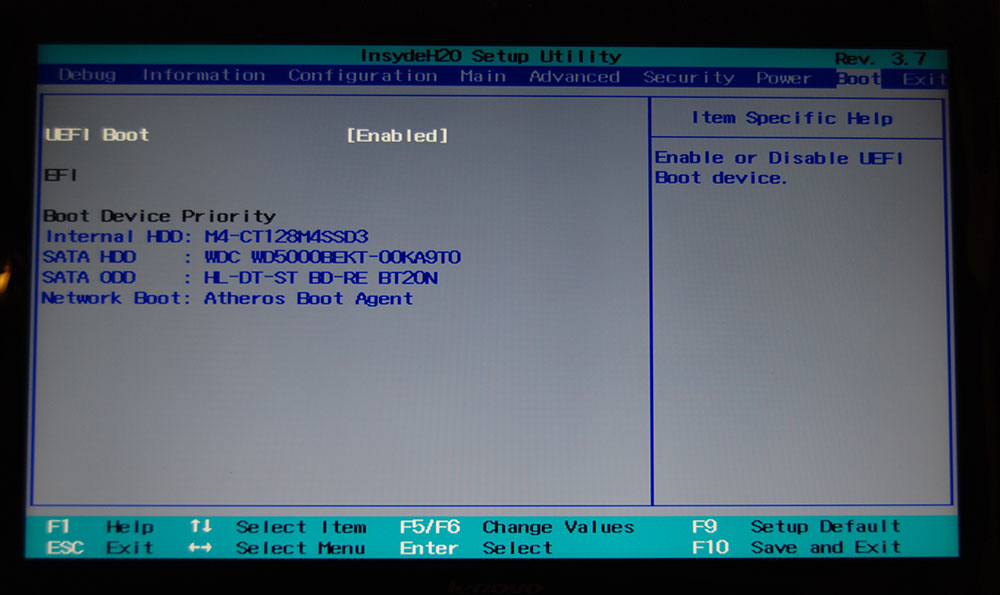
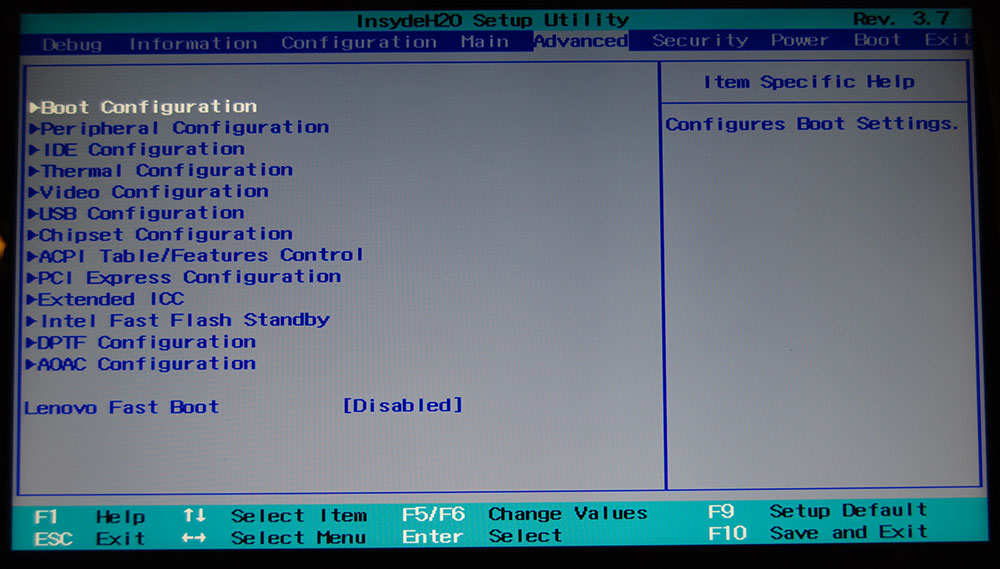
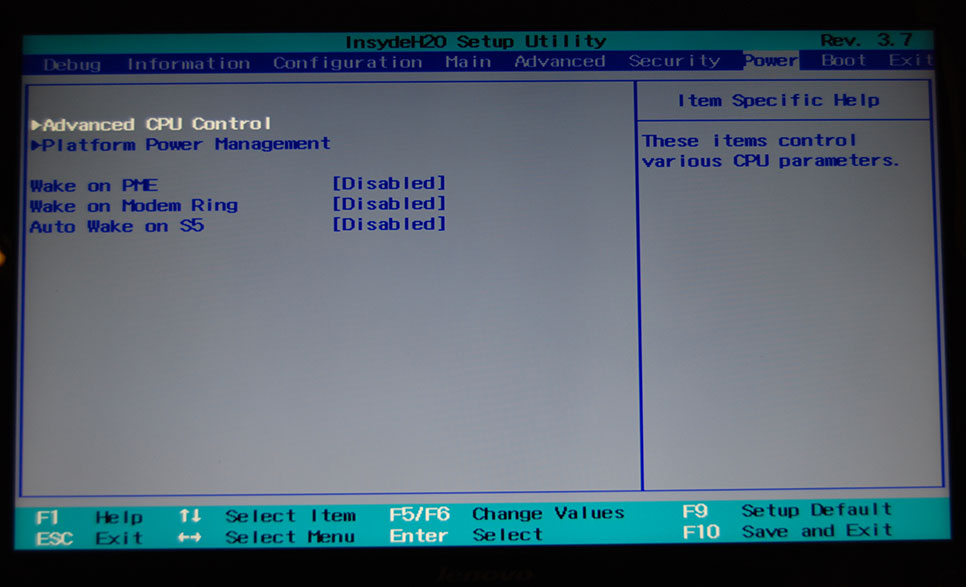
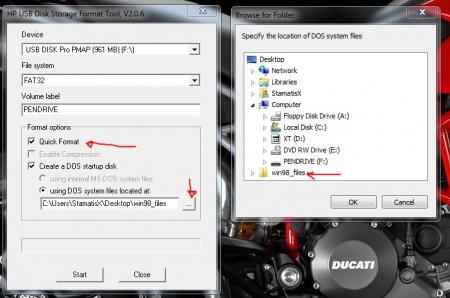
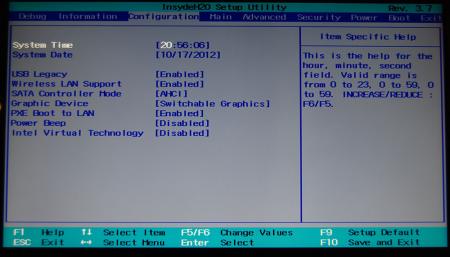
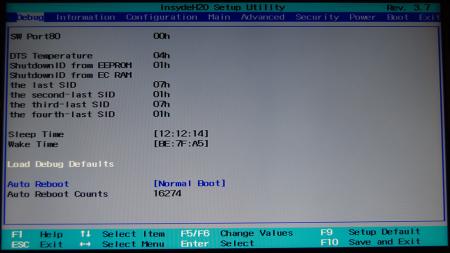
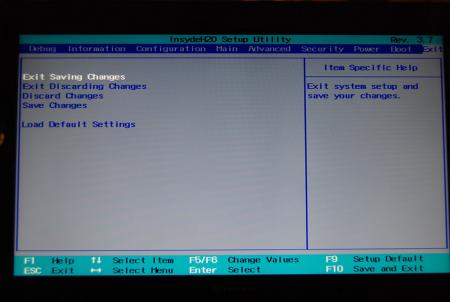
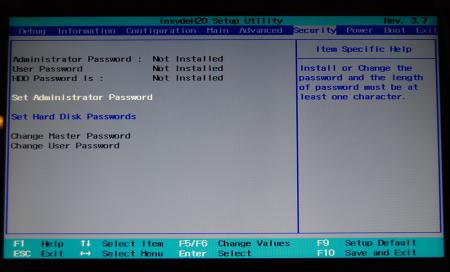
Lenovo Y500 - 'unlocked' BIOS / wwan-wlan whitelist removal The Lenovo Y580 / Y480 comes with a pretty locked down BIOS, and in addition to this with a whitelist which prevents the user from getting 3rd-party wwan/wlan cards to work properly. The modified BIOS versions here will take care of this. Keep in mind that not necessarily all options available in the modified bios will work. Some might not do anything at all, others could possibly leave your system in a state which will prevent it from booting. Use care when changing stuff in the modified bios, don't touch things you're not familiar with. Use all the mods and software posted here on your own risk. NOTE: This will only flash the bios region. It won't reset the nvars set in the bios. While it is technically possible to update from v2.0x to v8.01 by using the method described below, I can't really recommend it since the EC of your system won't get updated. While it might work (possibly even without any issues) I can't recommend it. Therefore if you're on v2.0x and want to update, the better option is to wait until Lenovo provides an official 8.xx firmware update with EC and BIOS. You can then still flash the modified version as described below, once you're on a proper v8.xx firmware. Attached you'll find a modified version of the Y580 / Y480 BIOS v8.01 (5DCN90WW). ----------------------------------------- >> For users with a v2.0x BIOS: << Download links Old version: Current 2.0x version: Lenovo Y580 / Y480 BIOS v2.07 (5DCN40WW) -> unlocked, whitelist removed, Nvidia 660m @ 1GHz default 3d clocks Flash with the included InsydeFlash utility. ----------------------------------------- >> Instructions for v8.0x BIOS users: << The attached BIOS ("Lenovo Y580 - Y480 BIOS v8.01 (5DCN90WW) - Mod") is unlocked, whitelist stuff removed and the 660m is tweaked to 1GHz default 3d core clock. The only way I know of which allows you to flash the modified BIOS for v8.01 users does unfortunately also describe certain information which you don't want to loose (serials, Windows licencse etc.). Don't worry, I got it all sorted out, but due to this the flashing procedure is a bit more complicated than usual. Make sure you follow the instructions carefully. Download the flash tool, for flashing you'll need the DOS version, but for creating the backup of your current BIOS the Win64 version will do as well, and it is faster. Get the prr tool as well. Grab the modified BIOS you want to flash and the Y580-Y480_BiosFix tool. Create a backup of your current BIOS using the flash tool you downloaded (first step) by runing the included backup.bat, or by using the Win or Dos version flash tool with this command: -d BackupBiosY500.bin -bios If you get and 'Error 104', grab 'Error 104' fix and replace the original fparts file with it. . Make sure you have the modified bios which you want to flash, the bios backup you just created and the "Y580-Y480_BiosFix" tool in the same folder. Run the Y580-Y480_BiosFix tool, follow the instructions on the screen. Enter the name of the files correctly, else you'll get an error. It will create a new file for you and will be named after the modified bios file you specified, with 'Fix' appended to it. Here's a screenshot of the tool in use (Y580 version looks the same). In the case shown here it will create a file called "modifiedBiosFix.bin" which you can find in the folder where you run the tool. Use that one for flashing. Put the fixed BIOS, the prr.exe tool and the fpt.exe (along with the fparts.txt file) on the root of your prepared DOS bootable USB drive, restart your system and boot from that drive. Execut the prr.exe, if you don't get an error message continue by pressing enter. Then flash the bios by using this command (filename.bin obviously needs to be replaced with the name of the file you want to flash). If you can't remember the name of your file, use the command dir to display all the files on your drive. Flash with this: fpt.exe -f filename.bin -bios NOTE: The name of the BIOS file mustn't exceed eight characters (not counting the extension)! That's a DOS limit, so make sure the name of your file isn't too long. Wait until the process is done. After flashing it will verify the data, in case there's something wrong with the flashed data it will tell you. In that case don't reboot, just flash again. It might look a bit complicated at first, but that's the easiest way I could think of. Let me know if anything is unclear. The attached v8.0x modified versions include: - unlocked menus - whitelist removed (wwan / wlan) - Nvidia 660m 'GHz edition' - 1000MHz default 3d clocks >> Here's the 'buy me a beer' link in case you like this. Modding makes me thirsty << Use at your own risk, you are responsible for your system and the changes you make on it. My programs come with absolutely no warranty to the extend permitted by applicable law. Thanks @X0pas1 for testing, and for some pics - see below: I'd appreciate it if someone could also post some pictures of the more interesting sub-menus, e.g. advanced CPU control, video settings and similar. UPDATE 1/17/16 DOWNLOAD LINK FOR FILES REFERENCED IN THIS POST:
 3 points
 -
SystemModel: Samsung RF511-SD1BR (brazilian, but similar to US versions)Processor: Intel Core i7 2630QM 2.00 GHzChipset: HM65Screen: 15.6’’ LED HD (1366 x 768)iGPU: Intel HD 3000dGPU: NVIDIA GeForce GT 540M 1 GB DDR3RAM: Corsair Vengeance 8 GB DDR3 1600 MHz (upgrade)SDD: Samsung 840 Pro 256 GB (upgrade)Has EC slot or Thunderbolt: NoHas mPCIe slot: Yes, internally, in which was a Broadcom WiFi cardExternaleGPU: Gigabyte Radeon HD 7970 OC 3GB GDDR5 – Core 1000 MHz, memory 1375 MHzAdapter: PE4L-PM060A 2.1bPSU: Corsair CX 600WMonitor: ASUS 23’’ Full HD IPSSetup• Did fresh install of Windows 7 x64.• Did all the power connections: notebook DC adapter, PSU floppy connector on the PE4L adapter, PSU 6-pin and 8-pin connectors on the eGPU. Also plugged the PSU 24-pin connector on the SWEX.• Connected the high-speed HDMI cable between the external monitor and the eGPU.• Put the switches on the PE4L to x1 (SW2 position 1-2) and 6.9s delay (SW1 position 3). Jumper J1 in place (default).• Opened the notebook and put it upside down, supported by the screen, for easy access of the mPCIe slot, which is only accessible by removing the bottom frame of the notebook. Using wireless keyboard and mouse now.• Turned on the notebook and booted Nando’s Setup 1.10b5 + updates, via USB flash drive.• Turned on the eGPU + PE4L via SWEX.• Plugged carefully the PE4L on the mPCIe slot.• Pressed F5. eGPU detected on port 1!• Did 32-bitA PCI compaction on iGPU + eGPU ignoring the dGPU.• Changed the speed of port 1 to 2.0.• I needed to ensure pci_alloc_valid was 256 MB. I only achieved this by removing 8 GB RAM (there was 16 GB initially). Oddly, pci_alloc_valid at 128 MB gave me low Vantage benchmark results, although no Error 12 was displayed.• Chainloaded Windows 7 and installed the latest AMD drivers (13.2 beta 5). Rebooted, doing the same steps to detect again the eGPU.• I don’t know why some benchmarks resulted so low, particularly 3DMark06. I tried exchanging drivers, disabling ULPS, changing settings in CCC, overclocking… Does anyone have an idea?Benchmarks 3DMark06 (DX9) 3DMark Vantage GPU (DX10) 3DMark11 GPU (DX11) RE5 (DX9) DMC4 (DX10, scene 4) Heaven (DX11) Battlefield 3 MP (1080p) Borderlands 2 (1080p) Portal 2 (1080p) iGPU 4563 1790 --- 34.5 27.07 230 --- --- --- dGPU 8588 4857 1120 63.1 61.33 609 20 FPS on Low 30 FPS on Low 30 FPS on Medium eGPU 11983 11925 11221 26796 26763 26456 8951 8950 8943 122.0 149.84 2618 2468 2303 50+ FPS on Max 40+ FPS on Max 200+ FPS on Max2 points
-
Ok, thanks for the help guys, I've looked at some datasheets and I'm pretty sure I found the cause of 'Error 104'. For those who experience this, grab this file, and use the included fparts file instead of the original one. This should do the trick. I already added the instructions to the first post, but I would appreciated if someone can confirm that it really works as expected. I modified the vbios, if you have a 660m you should have a new default clock and higher overclocking limits. If you have a different card please post a GPU-Z screenshot. Rufus is great, freeDos as well, but I'm not sure whether the fpt works with freeDos... does it? The only problem with rufus is that it requires an image in order to create a bootable drive, the HP utility can handle a folder with all the necessary files in it.2 points
-
More stuff exclusive for T|I users, voltage mods: All the vbios listed here are attached at the end of the post. ******************************** Nvidia 800m series: Nvidia GTX 880m (8GB version only): 'OC edition' -> unlocked overclocking limits, voltage adjustable, power target adjustable, optimized performance at higher clocks Can be used for all current 880m (Clevo, MSI and Dell). Nvidia GTX 870m: 'OC edition' -> see above Nvidia GTX 860m (GK104 variant): 'OC edition' -> see above. Refer to the file name to know which version is suited for your system. NOTE: Only for the Kepler version of the 860m. Silly Nvidia started giving different GPUs the same name. ******************************** Nvidia 700m series: Nvidia GTX 780m: 'OC edition' -> unlocked overclocking limits, voltage adjustable, power target adjustable, optimized performance at higher clocks Can be used for all current 780m (Clevo, MSI and Dell). Nvidia GTX 770m: 'OC edition' -> see above Nvidia GTX 765m: 'OC edition' -> see above. Refer to the file name to know which version is suited for your system. ********************************* Nvidia 600m series: MSI GTX 680m (4GB version): 'OC edition' revised -> higher limits for software overclocking, stock default clocks ----------------------- Dell GTX 680m (2GB version) vbios: 'OCedition' revised -> higher limits for software overclocking, stock default clocks same with increased 3d voltage ('OV') -> refer to the file name ----------------------- Clevo GTX 680m (4GB version) vbios: 'OCedition' revised -> higher limits for software overclocking, stock default clocks. For P1xxHM based systems I recommend only using version 80.04.29.00.01 !! Some users reported issue with other vbios versions (stock or modified, doesn't matter). EM users make sure you're on the latest BIOS / EC same with increased 3d voltage ('OV') -> refer to the file name (Same warning as above applies to P1xxHM users). ----------------------- K3000m: (Nvidia) K3000m - 80.04.3A.00.07 'OCedition' -> higher software overclocking limit Should work on all K3000m, unless you got a board ID mismatch. (HP) K3000m - 80.04.33.00.2E - 'OC edition' - > same as above, but probably the better choice if you use a HP machine ----------------------- K5000m: (Dell) K5000m - 80.04.33.00.35 - 'OCedition' -> higher software overclocking limit, stock 3d clocks 758MHz It's Dell but should work on all K5000m, unless you get a board ID mismatch. ----------------------- GTX 670mx: MSI 670mx (1.5GB) - 80.04.5B.00.A5_'OCedition'_rev00 -> higher software overclocking limits, tweaked performance at high clocks. Same board as the Clevo card. Clevo 670mx (3GB) - 80.04.58.00.03_'OC edition'_rev02 -> same as above, plus voltage is adjustable per software. ---------------------- MSI GTX 675mx: MSI 675mx (2GB) - 80.04.58.00.14_'OCedition'_rev00 -> higher software overclocking limits, tweaked performance at high clocks. MSI 675mx (4GB) - 80.04.58.00.0E_'OCedition'_rev00 -> same as above, vbios for 4GB card (!) ----------------------- Clevo GTX 675mx: Clevo 675mx (4GB) - 80.04.58.00.05_'OCedition'_rev00 -> higher software overclocking limits, tweaked performance at high clocks. ----------------------- ASUS G75VW BIOS: - 660m at 1000MHz core / 1400MHz memory - additional BIOS menus http://forum.techinferno.com/asus-gaming-notebook-forum/2538-%5Bg75vw%5D-modified-bios-vbios-higher-overclocking.html ------- Donation link in case you want to buy me a beer Thanks and cheers! *** FILE DOWNLOAD LOCATION:2 points
-
Alienware M14x R2 - Modified BIOS versions containing tweaked VBIOS files Similar to the original M14x (aka R1 nowadays), the GPU of the M14x R2 is astonishingly powerful and has much more power than it reveals at stock settings. The relatively low default clock and base boost as well as the apparent +135MHz core overclock limit holds back a lot of GPU power. These BIOS versions here will unlock this software overclocking limit and / or increase the clocks of your GPU and allow you to get much more power from your system. Mods based on M14x R2 BIOS A03: - A03 @ stock clocks, unlocked overclocking limits - more to come Instructions are included, refer to the READ ME file. Please provide feedback and leave a comment. I'm also still looking for some versions to be tested once in a while, if you're interested please take a look at this thread: http://forum.techinferno.com/alienware-m14x/1787-%5Bm14x-r2%5D-vbios-mod-higher-boost-clocks-test-versions-only-5.html *************************************************************** F.A.Q.: Why do I need to flash the BIOS in order to get higher clocks? Isn't the VBIOS responsible for the GPU settings? Answer: How can I revert to the original Dell BIOS? Answer: What exactly got changed compared to the original BIOS? Answer: *************************************************************** Credits: I want to thank all the testers, especially @Stevenxowens792 and @deadbydawn, also @lh6kean, @thanats007 and all the guys I forgot to mention. And remember, you are responsible for the changes you make on your system, flash at your own risk. M14x_R2_BIOS_A03_-_[unlocked].zip
 1 point
 -
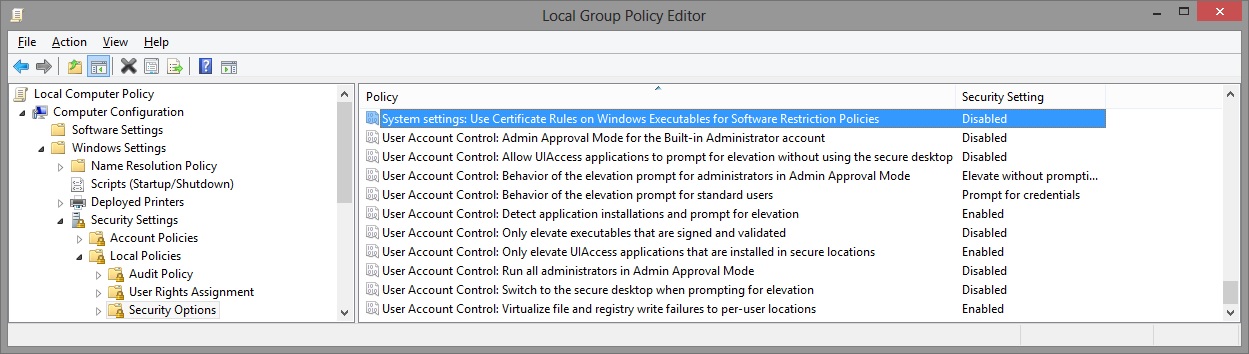
I've recreated the OSD Icons for the R1/R2/R3/R4 and R5 aka 17 as the standard ones are a bit dated. It should also work with the M15x though as my old M15x had the same setup for the OSD app. Regarding the R3 OSD, it seems its the same install for the M18x as well so it should work for you M18x owners too. I've also added the AW 17 OSD to the list. This exe is also compatible with the 14 and 18 as Dell uses the same OSD for all the new machines. There's also a set for you Area-51 m17 R1 owners. I've tried to give it a simular feel to the Invader Icon pack by Alienware. Hope you guys like it Install Instructions for R1 1. You need to end the OSD process in Task Manager since it may be using some of these icon files. Ctrl+Shift+Esc then find the OSD process and end it. 2. Backup your current icons if you want to revert to the originals (You can also uninstall and re-install the OSD application if you want to go back to the original icons) 3. Extract the attached "M17X R1-R2 & M15X.zip" contents to C:\Program Files (x86)\OSD\picture\. Overwrite if prompted. 4. Restart the OSD application. It is located in C:\Program Files (x86)\OSD\Launch.exe 5. Done! Install Instructions for R2 /M15x 1. You need to end the OSD.exe process in Task Manager since it may be using some of these icon files. Ctrl+Shift+Esc then find "OSD.exe" and end the process. 2. Backup your current icons if you want to revert to the originals (You can also uninstall and re-install the OSD application if you want to go back to the original icons) 3. Extract the attached "M17X R1-R2 & M15X.zip" contents to C:\Program Files (x86)\OSD\ICONs\. Overwrite if prompted. 4. Restart the OSD application. It is located in C:\Program Files (x86)\OSD\Launch_OSD.exe 5. Done! Install instructions for R3 / R4 / M18x 1. You need to end the OSD process in Task Manager since it may be using some of these icon files. Ctrl+Shift+Esc then find the AlienwareOn-ScreenDisplay.exe process and end it. 2. Backup the existing AlienwareOn-ScreenDisplay.exe by renaming it to "AlienwareOn-ScreenDisplay.exe.BAK" for example. Its in C:\Program Files (x86)\Alienware On-Screen Display\ 3. Extract the AlienwareOn-ScreenDisplay.exe from the appropriately named file depending on your OS and model to the C:\Program Files (x86)\Alienware On-Screen Display\ folder. 4. Restart the OSD application by double-clicking the file. 5. Done! Install instructions for 14 / 17 / 18 ** 1. You need to end the OSD process in Task Manager since it may be using some of these icon files. Ctrl+Shift+Esc then find the AlienwareOn-ScreenDisplay.exe process and end it. 2. Backup the existing AlienwareOn-ScreenDisplay.exe by renaming it to "AlienwareOn-ScreenDisplay.exe.BAK" for example. Its in C:\Program Files (x86)\Alienware On-Screen Display\ 3. Extract the AlienwareOn-ScreenDisplay.exe from the "AW 14-17-18 (Windows 8).zip" file to the C:\Program Files (x86)\Alienware On-Screen Display\ folder. 4. Restart the OSD application by double-clicking the file. 5. Done! The Area-51 m17-R1 install should be similar to the steps for the other laptop revisions above. They all basically follow the same process anyway, apart from filenames/paths. @robby_hd was kind enough to make a red version of these icons for the M17x R3 / M18x R1 which can be downloaded from his post here. **There seems to be a security issue with Windows 8/8.1 at this point in time since it doesn't allow modified exe's. I will update this post with a solution once it has been found. Also a few Alienware owners are having an issue with the unmodified OSD and Windows 8. Only the default Windows 8 OSD displays and not the Alienware version. Try the solution posted by Dell here and then attempt installing the mod. The below screenprint is a workaround by editing the security policies to allow the unsigned exe to run in Windows 8. If you are not aware of what these settings do and the repercussions of changing them, please do not attempt it. - Open the Group Policy Editor by typing "gpedit.msc" in the search or run text box. - Duplicate the settings below. Area-51 m17-R1.zip M17X R1-R2 & M15X.zip M17X R3-R4 & M18X R1-R2 (Windows 7).zip M17x R4 & M18X R2 (Windows 8).zip AW 14-17-18 (Windows 8).zip M17X R4 & M18X R2 (Windows 8.1).zip

 1 point
 -
I have been researching mineral-oil cooling lately, and have concluded with the following : * The best cooling solution for mineral oil is probably using a Portable Air Conditioner, a free standing one, these generate from 5000 to 11000 BTU cooling power pr hour, typicaly a deep freezer generates only 200 BTU pr hour, while a hardcore desktop pc can produce 1500w heat pr hour, which equals aproximately 4500 BTU pr hour. * The airconditioner normaly has a max cooling temperature of -30c , but for the handy it can be modded to a whopping -80c, by a process called autocascading : Morphing Air Conditioner into Autocascade System. * low viscosity mineral oils are avaliable like: Drakeol 9 Light Mineral, a low viscosity White Mineral Oil at $16.75 per gallon from : Holland Applied Technologies | Chicago | Specialty Chemicals | White Oils | Petrolatum | Waxes | Acetals (its nonconductive, gives no problems for the fans, and does not harm the pc in any way -as long as HD CD and power supply are keept outside the oil bath.) * Using gpu's made for water cooling will work excelent with this setup, as they work fine in low viscosity oil, and augment the effect of the cooled oil. Normal gpu's will also work fine. * This setup is compatible with using Liquid Nitrogen and dry ice for the advantureous, so for those hard core overclocking experiments, just add it to the oil bath and stir, but keep in mind that the freezing point of mineral oil is around -30c. Mineral-oil cooling: Adventures in mineral oil cooling ? The Register1 point
-
Thank you very much svl7 for the Error 104 fix and the BIOS mod. I didn't flash my BIOS yet, but I was able to back it up with no problem (after disabling my anti-virus) with the fix. I will flash my BIOS after the week-end probably and will get you some beers for sure =) Good luck with your SSD, I hope Intel will replace it even though it will not bring your data back.1 point
-
Well, here we have the reason... I assume that v8.01 uses a different EC which apparently is necessary. Since we currently can't flash the EC without any hardware mods you can't get v8.01 until Lenovo posts an official update on their driver site. (I described all this somewhere at the beginning of the first post I think). I can unlock v8.00 if you send me your original backup. But it will take a while until I get to mod it, as explained previously.1 point
-
Well, it tells me 72.1%. I don't know if its good or not, but i will not get over 775mhz for gpu for daily use anyways. My card is only 1.5GB VRAM, this may explane why i can get higher frequencies than yours.1 point
-
@gokica : Thanks to your explanations, i made some testing on my side, the gpu works nicely up to 796mhz, so +181mhz. Not that bad. I didn't push it any further. Concerning vram, +1450mhz works pretty well, pushing it to 2850mhz (1400mhz stock). With roo7y82, we manage to get nearly P5K on 3DM11 with that. We only have nearly P3800 without o/c. (P4932 for me ; Gpu @ 796mhz and VRAM @ 2850mhz). The temps never exceeds 69° on my side, for the gpu.1 point
-
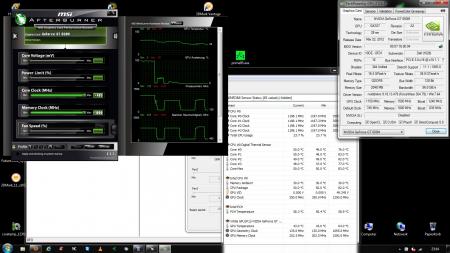
A brief tutorial on Nvidia Inspector's command line parameters (with Total Commander utility): 1. Download Total Commander. 2. Install and run (press key 1, 2 or 3 at startup as required by the shareware version of the software) The program will run and you will see a window which looks like this: Basically you see two windows for file management. In one of the windows above (left in the example) navigate with your keyboard or mouse to the folder where you have Nvidia Inspector installed. Once nvidiainspector.exe file is visible in the Total Commander window add the following parameters in the bottom line (marked with red square in the picture above): For 750MHz overclock on the GPU of GTX 670MX: nvidiaInspector.exe -setVoltageOffset:0,0,0 -setGpuClock:0,2,750 -setMemoryClock:0,2,1400 -forcepstate:0,0 and press enter. For 760MHz overclock on the GPU of GTX 670MX: nvidiaInspector.exe -setVoltageOffset:0,0,0 -setGpuClock:0,2,760 -setMemoryClock:0,2,1400 -forcepstate:0,0 press enter. For going back to default state of your graphic card: nvidiaInspector.exe -setVoltageOffset:0,0,0 -setGpuClock:0,2,135 -setMemoryClock:0,2,1400 -forcepstate:0,16 press enter. During the process open EVGA precision in a separate window on your desktop and in it follow the frequency and the temperature. Please note that the voltage will be fixed and maximum while you are overclocking. Play with the parameters as you wish but do not exceed the numbers. Please note that the above values are valid for GTX 670MX. If you have different card in your computer modify the frequency values upon need. Do not touch the voltage in the parameters. Leave the value at 0. So you do not need to run the Nvidia inspector by double clicking. Just enter the command parameters while Total commander has nvidiainspector.exe folder open. If you have more questions please let me know. For changing the memory frequency in the nvidia inspector just move both sliders equally: If you want to increase the memory limit just press "unlock max" in the upper right corner. Than move shader clock and memory clock sliders both to 3000 (or any other value) for example. After both are pointing at 3000 (i.e. both same value) press "Apply Clocks & Voltage" at the bottom right corner. (I am sorry for the Asian language example). As you can see the option for raising the GPU frequency in Nvidia inspector is dimmed in my case. I can only play with the GPU frequency via the command line parameters or via EVGA precision. I do not know why is like this. These options work with my GTX 670MX. In case you see a message popping up like "divider not 0" or similar once you run Nvidia inspector try and use version 1.91 instead of the latest build. Do not forget to monitor the changes in frequency and temperature in EVGA precision or MSI afterburner. I hope this helps.1 point
-
Hey, here is my dump: https://www.dropbox.com/s/voi64cgl3wtkyb5/dump.bin I make it with: fptw64 -d dump.bin -bios My Model: SVS1512C5E1 point
-
@gokica. I now understand why you were asking about power draw and loading. That's a nice laptop you have, just been reading the review on Notebookcheck.net. Towards the end of the review they state the peak load at 138 Watts, so your PSU has plenty of headroom to OC. I previously had an Alienware M15x with a GTX670M and a 45watt i7. I used to measure the power usage with a current meter and found that under full load I was averaging 133 Watts. I upgraded to an extreme i7 so a 55watt chip that could be OCd, and with a 40% OC on the i7 and a 10% OC on the 670M I averaged 154 - 168 watts. The only way to really know your power draw is to meter it, but I don't think you need to with a 180 Watt supply. Your GPU load temps are excellent, on the M15 with the old Fermi technology the 670 averaged 75C for me and rose to 80C with a 10% OC. I wish you all the best with flashing the vbios, you are brave with it being an Asus custom fitted GPU board. Have you removed the bottom cover to see if you can locate a vbios chip, just incase anything should go wrong and it needs reprogramming?1 point
-
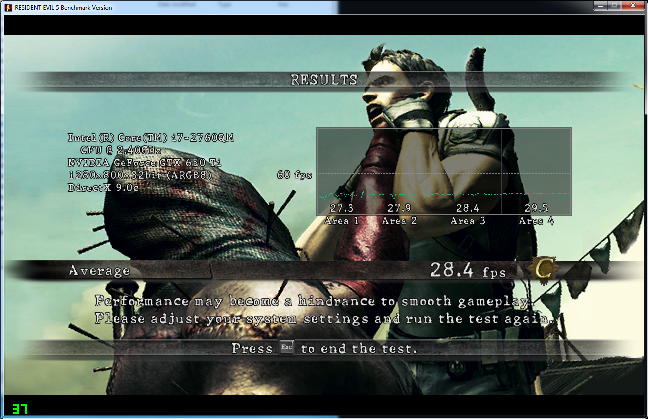
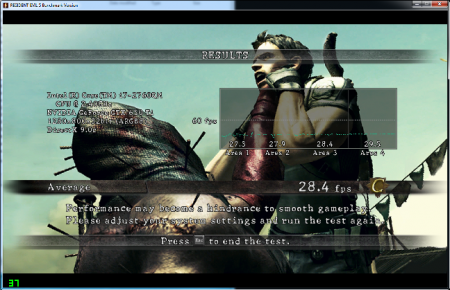
I actually haven't done any real comparisons between internal and external displays. It's well known that the internal display will have lower performance, but by how much? that is currently not well documented. I'll give it a try tonight, and see what I can get. Benchmarks are only half of the truth, but I'll run the RE5 benchmark in DX9 and let you know. As for the PE4L, currently it is the best option because it is Gen2 compatible (PCIe 2.0), which means 1.2Opt performance. This also translates into better internal display performance, but still lower than performance if using an external display. It is well documented that the PE4L is Gen2 capable, so that's the safest route to go. In terms of setting up the PE4L for your Dell L502, it should be "exactly the same" as what I've done - just keep in mind that I had some weird problems using Setup 1.x (still having some funky issues with it freezing on me). The work arounds I'm using still work, just that it's not as smooth for me as it has been for almost everybody else. UPDATE: I ran the DX9 Resident Evil 5 on my internal screen. See below for the results Basically I got less than 30 fps using the same benchmark settings as in my 2nd post. The performance decrease is immense (100 fps!), but I think it's because of the fact that I am on 1.1Opt instead of 1.2Opt. Hopefully someone else with 1.2Opt can run a benchmark on their internal screen as well.
 1 point
 -
K5000m added in the Kepler vbios mods thread, let me know how it performs.1 point