Leaderboard


Popular Content
Showing content with the highest reputation on 12/07/12 in all areas
-
Hi everyone ! I just joined I|T as this forum seems to have some great infos about alienware laptops, and as it's my laptop, this is really interesting for me ! Now about me, I'm a student, I'm french and living in France (lol !) and I love high tech and so on ! I'm also trying to o/c my gpu (ati 7970m) currently, but I'm afraid that the results ain't so good ... Thanks guys ! Thib'2 points
-
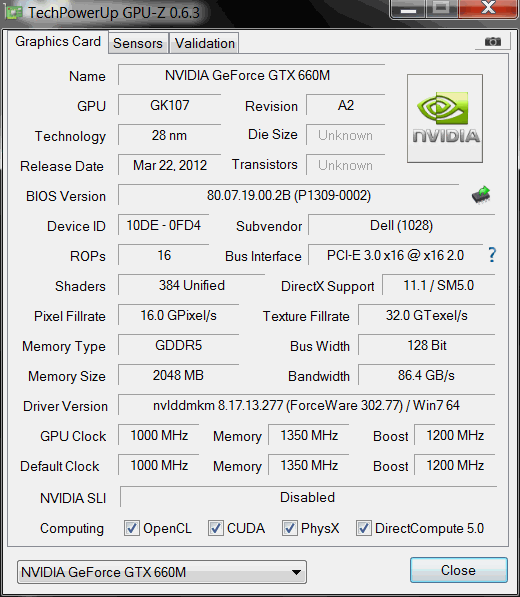
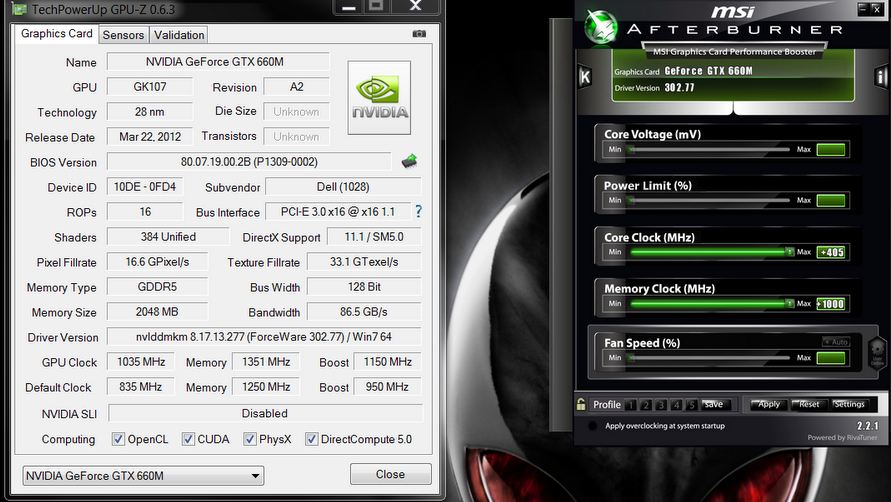
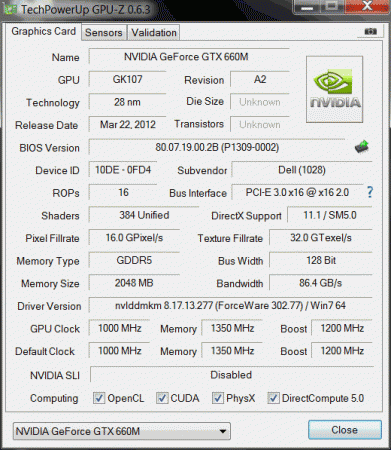
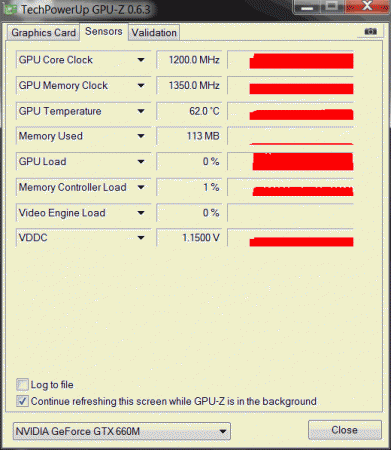
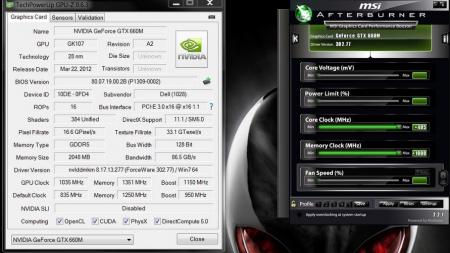
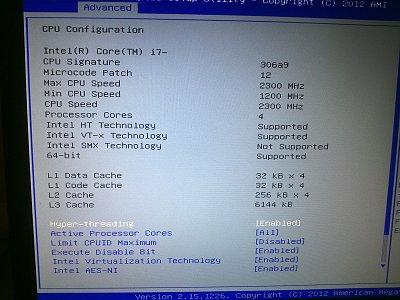
UPDATE: ALL DOWNLOADS LISTED IN THIS POST FOUND HERE. Nvidia 'Kepler' GPUs - modified VBIOS files >>> NOTE: More versions (including voltage mods) exclusive for T|I users can be found in the second post. <<< The 'Kepler' GPUs from Nvidia perform really well, even at increased clocks speeds they stay quite cool - a perfect behavior when it comes to overclocking and improving the performance. Unfortunately the mobile GPUs suffer from an artificial +135MHz core overclocking limit, so you can't go higher by using tools like Nvidia Inspector and similar. The modified VBIOS files listed here have this limit unlocked, some have increased stock clocks or tweaked voltages. Just refer to the description. All files have been modified by myself, if you like them feel free to buy me a drink, donation link can be found below GTX 660m: 660m_OC_edition__VBIOS_[DELL].zip- comes with unlocked software overclocking limits 660m_GHz-Edition_overvolted_VBIOS_[DELL].zip - default 3d clock 1000MHz, base boost 1200MHz,, memory (3d) 1350MHz, increased 3d voltage undervolted editions possible, depends on interest, tba Some screenshots: GTX 680m: Clevo_680m_-_80.04.33.00.10_'OCedition'_revised_01.zip Dell_680m_-_80.04.33.00.32_'OCedition'_revised_00.zip Increased software overclocking limits & optimized for no throttling. Read the included 'Read me' file before flashing. Instructions: I recommend flashing under DOS using nvflash . Donation link in case you want to buy me a beer Thanks and cheers! More to come. Testers: Thanks @eliteone (Dell 660m), @littleone562 (Dell 680m) For all mods: Use at your own risk.
 1 point
 -
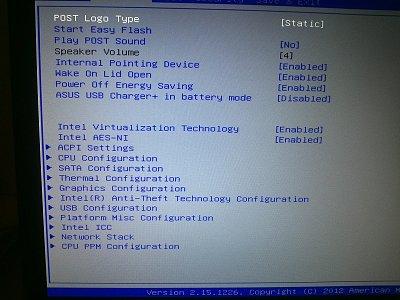
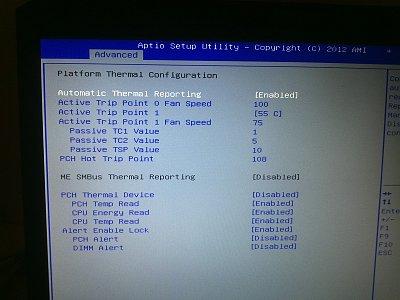
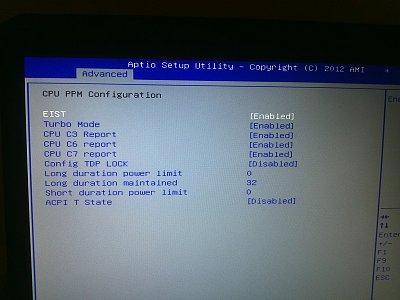
Asus G75VW - modified BIOS / VBIOS Here's a modified BIOS for the Asus G75VW. It enables some more options and settings in the BIOS setup. It also contains a tweaked VBIOS for the 660m. Detailed version information: mod02 'GHZ edition' - 660m 3d clocks at 1000MHz core - 670m @ 715/1650 (only in 'overclock edition') additional BIOS menus Pics of the most interesting BIOS settings (thanks @bobby7): Instructions: Download the BIOS you want to flash, as well as the flash tool (Win64). Put the modified BIOS (and included files) in the same folder as the flash tool . Make sure that your current BIOS version is the same as the one you want to flash. Then create a backup of your BIOS by executing the backup.bat file. . Download the 'G75VW-BiosFixer.zip, put it in the same folder as the flash too and run it. Follow the instructions on the screen, it will ask you for the BIOS backup you just created, as well as the modified BIOS file which you already downloaded. . If the tool doesn't come up with an error message, go ahead and flash the created file by executing the included flash.bat file. . Wait until the flashing is done, in case everything's okay you can reboot. NOTE: It's a good idea to go to load the default BIOS settings after flashing. Also I really recommend flashing the official version before applying the modified BIOS, as mentioned in the instructions. >>> Here's my donation link, if you like my mods feel free to buy me a beer <<< As always with such mods, use at your own risk. The program I provide here (BiosFixer) comes with absolutely no warranty to the extent permitted by applicable law. *** Asus G75VW - BIOS v223 - [unlocked] [overclock edition].zip G75VW-BiosFixer.zip Asus G75VW - BIOS v223 - [unlocked].zip
 1 point
 -
Instructions for flashing the VBIOS of a NVIDIA video card: You'll need: A VBIOS file you want to flash The latest version of NVflash, a DOS utility to flash the VBIOS of Nvidia cards. A USB drive, formatted to boot DOS, in order to use NVflash How to create a bootable USB flash drive: The flashing procedure: Put the NVflash files to the root of your prepared (DOS bootable) USB drive. Do the same with the Vbios you want to flash. NOTE: DOS has a limit of 8 characters per file name (not counting the extension). So make sure to rename your files appropriately before putting them on the USB drive. Make sure the USB drive is plugged into a port which is active at boot, reboot the system and go to the boot manager. Choose to boot from your prepared USB drive. As soon as you see the command line you're ready to go, write dir and hit enter to display all the files on the USB drive. Display all Nvidia adapters in the system: nvflash -a or alternatively the longer version of the command: nvflash --list This command will return you a list with all Nvidia adapters present in your system. Here's an example output of this command run on my M15x with a 680m in it: NVIDIA Firmware Update Utility (Version 5.117) NVIDIA display adapters present in system: <0> N13E-GTX (10DE,11A0,1028,02A2) H:--:NRM B:02,PCI,D:00,F:00 The number in the <> brackets is the index of the corresponding device. SLI users will have more than one entry and flash each card separately. Backup your current VBIOS: Never forget to keep a backup of your original VBIOS before you flash anything non-stock. Use this command to save a copy of the firmware to your USB drive: nvflash -b filename.rom or with nvflash --save filename.rom Flash the VBIOS to your card(s): For a single card it's really straight forward, you don't need to worry about the adapter indices. Just use this command: nvflash -6 vbiosname.rom -6 will allow you to override mismatches of the PCI subsystem ID. In case of a mismatch you'll need to confirm the flash with 'y'. NOTE: Users with a non-US keyboard might need to press 'z' or similar, because the 'y' isn't at the same location for all keyboard layouts. SLI users will need to flash each card separately. The concept stays the same, but you will need to use the corresponding adapter index to flash a card. How to figure out the adapter nr. is described above. Flashing goes like this: nvflash -i[index] -6 vbios.rom [index] represents a number, namely the index you found with the 'nvflash -a' command. So a command example to flash a card which has index 0 is: 'nvflash -i0 -6 vbios.rom' When the flashing starts, just wait until it says that it's done. Then reboot with Ctrl+Alt+Del and remove your USB drive. Pro tip: Let me know if I missed anything important or if you have questions.1 point
-
Hey all,So I decided to post over here instead of at other notebook forums (in support of Nando4). nuff said.specsprobook 4330si7-2820qm hd 3000 graphics16gb ramwd scorpio black hddintel 520 ssdI originally bought this machine for music production and wanted something fairly compact but upgradable to a quad core+16gb ram, dual hard drives, etc. This is the perfect machine, except for the loud fan. you can google and see what I mean. After months of searching and buying a new fan (did nothing), I stumbled upon this HPfancontrol (note: at that website, you need to scroll to bottom of page to get the hp version). this prog will allow you to adjust the fan steps based on temperature and works awesome for control over your fan but it cannot change the lowest rpm setting for your fan. This was a good temporary solution but I needed better.This is where my mod comes in (NOTE: MOD AT YOUR OWN RSIK, I AM NOT RESPONSIBLE IF YOU FRY YOUR LAPTOP):I bought a bunch of diodes for about 2$ on ebay (model # 1N4001) and I put 2 of them on the orange/red wire on the fan. this reduced the first fan step from 3000rpm to about 2150rpm and its pretty darn quiet.The effect of the 2 diodes is that it also reduced the top fan speed to 4237rpm (i didnt check what it was without the mod). During testing I also, accidentally found out that there are more fan control settings than those in the HpFancontrol.ini file. Pretty much any value between 0-128 changes the fan speed so I have been playing round to get the speeds that I want.How to do the mod:Take 2 of the diodes and solder them together. Make sure you note the polarity. Do not connect the stripe side of 1 to the stripe side of the other. it should be [blank-stripe]-[blank-stripe] NOT [stripe-blank]-[blank-stripe]. if you have a soldering iron, I would solder them together. Also tape or heatshrink the connection. Remember that if the wires touch anything inside your computer, its fried.Unplug and take out the battery, flip it over and press the power button to release the charge.Ground yourself by touching some metal.Open up the bottom cover and remove the fan (see hp removal guides1 point
-
There goes that 16k gpu score.1 point
-
Try this if it failed. M17x R4 BRICKED BIOS RECOVERY (not vbios)1 point
-
hey guys, thanks for having this great forum where you dont ban people. i was directed here due to the Tech Inferno Fan ban issue and am showing my support by making this my new home and i deleted my 2 threads that i started regarding upgrading an hp probook 4330s to an i7 quad. ill repost here. cheers! ryan1 point