Leaderboard


Popular Content
Showing content with the highest reputation on 10/24/12 in all areas
-
The motherboard doesnt regulate most of the power for the video cards. It comes almost straight off the line from the DC jack. It only regulates the 3.3 and 5 volt rails, where power consumption should be fairly similar for most cards. The card itself regulates the main power input to the core, which is the approximate 19.5 volts from the power supply.5 points
-
Looks like the 680M has something better than it coming out. I just accidently found out about this card while on the 675M nvidia page. Wonder if these cards will work with the M15X if they get out to sites like ebay. tech specs: GeForce GTX 680MX | Specifications | GeForce2 points
-
@imsolidstate that's correct, 15A and 19V so 285W (from the wall it must be higher, I estimate around 328W given the efficiency of the PSU is around 85%). Yeah I don't need a bridge and that's why I didn't use all the pins, just the 3 of them, but it was easier to use instead of finding and soldering separate diodes.2 points
-
Here's a test version which might help with 3d support for R3 users with the 120Hz screen and the 680m. The archive comes with a password, I'm sorry for the inconvenience, but I want to prevent people from just grabbing the file anonymously and then never providing feedback, it's a test version and I need to know whether this tweak makes any difference. It's as save to flash as a stock version, so don't worry about this. In the best case 3d will work, in the worst you won't notice a difference. If someone likes to test it, please let me know in this thread or PM me, and I'll send you the pw. Looking forward to hearing from you guys. M17x R3 - 680m - 3D [TEST].zip2 points
-
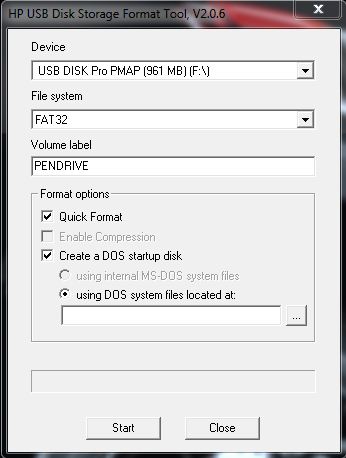
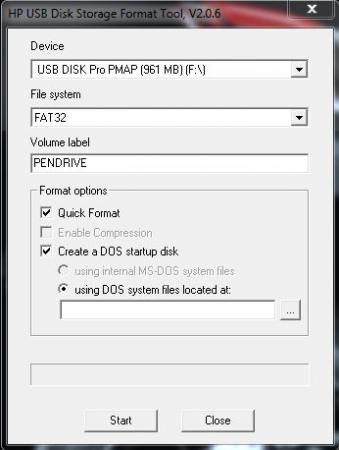
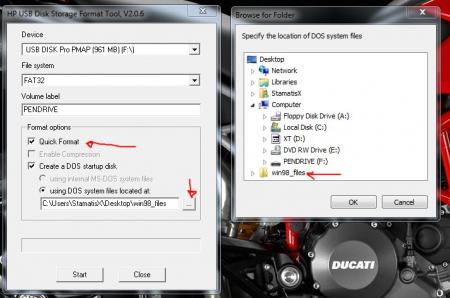
- work in progress - Instructions for flashing the VBIOS of an AMD / ATI video card: You'll need: A VBIOS file you want to flash The latest version of ATIflash, a DOS utility to flash the VBIOS A USB drive, formatted to boot DOS, in order to use ATIflash How to create a bootable USB flash drive: Flashing procedure: Once you've prepared your USB drive, put ATIflash to the root of the drive, same with the VBIOS file you want to flash. NOTE:DOS has a limit of 8 characters per file name (not counting the extension). So make sure to rename your files appropriately before putting them on the USB drive. Reboot your system, go to the boot manager and choose to boot from the USB drive. As soon as you see the command line you're ready to go, write dir and hit enter to display all the files on the USB drive. Display all adapters, ATIflash will enumerate them. Remember the numbers of the devices you want to flash. atiflash -i Save a copy of your original VBIOS to the USB drive, "i" is the number of the adapter you checked before, if you only have one GPU it's going to be "0". "Filename" is going to be the name of the file, don't forget to add an extension (.rom). Keep in mind that there's a limit of 8 characters for a file name in DOS. atiflash -s i filename.rom Verify the integrity of the VBIOS you want to flash by calculating its checksum. Of course you need to know the correct checksum in advance. If the checksums don't match -> don't flash. atiflash -cf vbiosfile For example if the file you want to flash is called "modVbios.rom" the command for displaying the checksum would be "atiflash -cf modVbios.rom". Flash your VBIOS to the desired adapter "i". atiflash -p i vbiosfile E.g. "atiflash -p 0 modVbios.rom" flashes the file modVbios.rom to adapter 0. DON'T do anything with the system during the flash procedure. Restart the system when asked to do so and remove your USB drive. Pro tip: Using ATIflash: This will display a list of all valid atiflash commands, the associated parameters and explanations about how to use them: atiflash -h
 1 point
 -
If AMD can pull a great driver suport from now on i think it's a great cheaper alternative. I don't take sides, i only choose the one that is the best at the current generation. I waited months for the release of the 680M before jumping to a new laptop with a 7970M, and then waited a couple of months to see if AMD would release a fix for enduro porblem's. Than i would compare the 2 cards. No fix came so i opted for the 680M like 0xsergy. The 680M worked great out of the box.1 point
-
Thanks @bigtonyman, blind-flashing from A08 fixed the issue.1 point
-
Nvidia needs a slap on their head for their naming scheme.1 point
-
I just got my 5 posts needed for downloading and this is the first thing I downloaded. Thanks Nospheratu! This is an awesome set of icons!1 point
-
i used my friend's m17x service tag. but they refuse at first and i told them i will bear the risk and damage if anything should happen. she thinks its for the m17x.1 point
-
I've had the same issue with my drive as well. According to the crucial site, and it fixed my drive, you just need to leave the computer in the bios for like 20 mins and it should be detected again. So far A12 has been working great for me. Sent from my Samsung Galaxy S2 running Resurrection Remix1 point
-
So fedit gives full edit capabilities without keys getting mangled? If so, I'll change pedit with fedit for the next version. Yes, please do try some other hotkeys in \bin\capture (snarfit screencapture utility) and advise if can get another good one to work. I avoid ones like ALT+S since they are editors to search or save, preferring ones like ALT+ or ALT+DEL. I am unaware of any other bootloader that allows direct image writes like grub4dos does. Other utils like grub2 use memdisk so read the image into memory and writes occur to memory too. The disk image being a way to avoid needing to repartition the harddisk to boot. A couple of workarounds to the failing disk image writes come to mind, listed in order of complexity below: 1. Just stick with a USB stick install. It allows writes without issue. 2. Create a USB Setup 1.1x stick and do all write activity. That is, generate the requires pci.bat via pci compaction and your required startup.bat file. Then create a disk image install and copy across the \config directory from the USB stick to the disk image. The disk image's benefit over a USB stick being much faster response time and more convenience. 3. [experimental] Move the Setup 1.1x disk image to the first 2GB of space on the boot HDD using one of the better defrag utilities. Seems grub4dos may use CHS access with writes working if the Macbook bios emulation lacks EBIOS write support (per tinybit comment, a grub4dos developer). 4. [experimental] Create a FAT32 DOS partition and move the Setup 1.1x disk image contents across. Boot the FAT32 partition using your favorite bootloader. Then can use the disk image to do all write activities. This is by far the most complex workaround. Checking x1.2Opt is working Check with GPU-Z. Does it report x1 2.0 as the link speed during the first few secs when it starts up? When you open the NVidia control panel, then 3D settings, is there a Program settings tab where you can choose whether to run a program using "Integrated graphics" or "High-performance NVidia processor". If yes to both, then x1.2Opt link speed is working. These are shown below:1 point