Leaderboard


Popular Content
Showing content with the highest reputation on 03/13/11 in all areas
-
Since we didn't have one yet, this is it. I'll update this post with the newest driver releases, bios mods and news for the R2. Please keep all M17x-R2 owner posts confined to this thread if possible. System Files (Dell OEM) Download Links System Bios Bios A10 Chipset Intel Ibex Peak PCH Chipset Audio IDT 92HD73C1 Audio - 6.10.0.6261, A03 Media Card Ricoh R5U230 - 2.07.01.00, A00 Infrared Receiver ITE IT8512 CIR Receiver - 5.1.0.1, A00 Touchpad Synaptics TouchPad - 15.0.15.0, A04 Bluetooth Dell Wireless 370 Bluetooth Minicard - 6.2.0.9603, A02-1 Dell Wireless 1520 Dell Wireless WLAN 1520 Half MiniCard - 5.60.48.35, A04 Intel Wireless 6300 Intel WiFi Link 6300 - 13.0, A00 Intel Gigabit Ethernet Intel 825xx Gigabit Platform LAN Network Device - 11.5.10.0, A01 Intel Rapid Storage (HDD) Intel Rapid Storage Technology - 9.6.0.1014, A00 Free Fall Sensor ST Microelectronics DE351DL Free Fall Sensor - 1.06.08.33, A01 AMD 5870M Display AMD Mobility Radeon HD5870 - 8.763-100810a-104118C-Dell, A01 AMD 5870M VBios AMD Mobility Radeon HD5870 - 13B96101.104, A01 Alienware OSD Alienware OSD Application - 1.13, A03 Alienware Command Center Alienware Command Center - 2.5.54.0, A07 Alienware Wallpapers Alienware Wallpapers - A01 Alienware GUISE custom theme Custom Desktop Themes - A-02 Alienguise Theme Combo-Win72 points
-
So here how the scores go on 3DMark Vantage ATI drivers 11.4 beta, CPU @ 3.579 GHz for all 3 runs so it won't affect the GPU scores Single 5870 stock clocks: 9909 ImageShack® - Online Photo and Video Hosting CFX 5870 stock clocks: 17106 ImageShack® - Online Photo and Video Hosting CFX 5870 @ 950/1220: 20437 (First Alienware M17x -R2 to hit 20K+ on vantage only here on Tech|Inferno) ImageShack® - Online Photo and Video Hosting2 points
-
Here are some Vantage benchmarks that could be of interest: M17x R2 with i7 920XM (Turbo boost to 3ghz) paired with a single Radeon 6970M using 11.4 Beta drivers: Result Same setup with the card overclocked to desktop 6850 speeds (775mhz Core, 1000mhz memory): Result I think these 11.4 drivers could make this card as fast or a bit faster than the GTX 485M based on the other games I've tested with them as well. Also, I ordered a new set of thermal paste and pads. When that arrives, gonna try Vantage @ 850 core / 1100 mem then 3dmark 11 with the same settings.2 points
-
Hey guys! Not sure if someone mentioned this but there was another leak somewhere (I'll look for the link) stating that the M18X will have a switchable graphics with a 15hrs of battery life. Now that would be some nice addition to the specs.2 points
-
You have the right to remain silent, any bench posted can and will be compared to others in the "All Powerful" Tech inferno forum. You will be given a fair trial with a jury of your Tech Inferno peers. Seriously though, posting stock benches to compare to is a great idea.2 points
-
Since we didn't have one yet, this is it. I'll update this post with the newest driver releases,and news for the R3. Please keep all M17x-R3 posts confined to this thread if possible. System Files Download Links System Bios Bios A03 Chipset Intel HM67 Cougar Point chipset, Intel Management Engine Interface Audio IDT 92HD73,A00. If the Dell IDT driver gives you problems, try this one. Card Reader Realtek RTS5209 Card Reader USB 3.0 NEC USB 3.0 Touchpad Synaptics TouchPad - 15.1.19, A00 Bluetooth Dell Wireless 375 Bluetooth Module - 6.3.0.6300, A00 Dell Wireless 1501 Half Mini-Card Dell Wireless WLAN 1501 Half MiniCard - 5.60.48.35, A00 Intel Wireless 6300 Intel WiFi Link 6300 - 13.3, A00 Intel WiMAX Link 6250 Intel WiMAX Link 6250 - tic TRFXW0115MUP, A06-1 Intel Wifi Link 6250 Intel Wifi Link 6250 - TRWFW1318D,A04 Atheros AR8151 Atheros AR8151 - 1.0.0.36,A00 Intel Rapid Storage (HDD) Intel Rapid Storage Technology - 10.0.0.1046,A00 Free Fall Sensor ST Microelectronics DE351DL Free Fall Sensor - 2.00.11.14, A00 AMD 6870M Display AMD Mobility Radeon HD6870 - 8.80.6-101202a-109902C-Dell.4, A00 Intel HD Graphics 3000 Intel HD Graphics 3000 - 2246, A00 nVidia Internal 3D Stereo Controller nVidia Internal 3D Stereo Controller - 266.08, A00 nVidia GeForce GTX 460M nVidia GeForce GTX 460M -266.08, A00 Alienware OSD Alienware OSD Application - 0.31.0.8C, A00 Alienware Command Center Alienware Command Center - 2.6.2.0, A00 Alienware Wallpapers Alienware Wallpapers - A01 Alienware GUISE custom theme Custom Desktop Themes - A-02 Alienguise Theme Combo-Win7 Intel Management Engine Interface1 point
-
Ok guys at the request of a few people I'm doing a guide with pics on how to repaste your R3 and the results I got from doing so. First off keep in mind a few things: -Repasting is risky, if you don't know what you're doing you could harm your components which invalidates your warranty. Now as long as you have some technical skill and go slow you should be fine but as always I take NO RESPONSIBILITY if you damage your hardware. If you have a question ask it before proceeding to prevent damage. -Some of the steps below may be slightly different depending on what GPU you have, all of the CPU's will be the same however. -The temps I was getting and that most have reported with the Nvidia GTX 460m are very good even with stock paste, if you're not going to be benchmarking or applying heavy overclocks you don't need to do this unless you have experience and want the lower temps. Now that that's out of the way let's get on to the fun stuff Here are the items you'll need: -Paste: I recommend MX-4, TX-4, or OCZ Freeze. I used MX-4 in this guide. -Pads: The pads I used are Fujipoly Premium 0.5mm pads that I purchased from frozencpu.com. Depending on if you want to replace all the pads or not you may also need 1.0mm and 2.0mm pads(see below). -Either Arctic Clean -OR- Alcohol(not the drinking kind lol): I used Arctic Clean here but honestly after using both the Arctic Clean is no better and is more expensive than good high purity rubbing alcohol. If you use alcohol get 90% or higher as it cleans better and leaves less residue. -Cotton Swabs and Lint Free Cloth: The cotton swabs need to be quality tightly wound swabs or they'll leave cotton residue, also a good quality lint free cloth that hasn't been used on anything else to prevent residue. -Precision Screwdrivers: I can't stress how important it is to have a good set of precision screwdrivers, a bad set of screwdrivers or using non-precision size screwdrivers can easily strip screws and/or cause damage. If you don't have any you can pick them up at Radio Shack, Home Depot, Lowes, etc. Temps with Stock Paste: Below you can see the temps are very good for stock paste, but good is never enough and the temps could always be better. After running Prime 95 and Furmark at the same time the max CPU temps were 84 degrees and the max GPU temp was 75 degrees. These were at stock clocks on the GPU and a 100.0 BCLK on the CPU. I didn't take idle temps as idle temps are nice to compare, but really they don't matter on a gaming rig. Battery and Bottom Panel: First remove your battery, under it there will be two small screws that need to be removed to slide the bottom panel off. Once the screws are removed slide the panel toward the back of the computer(toward the heatsinks). Now you'll have a view of the internals of the laptop, the CPU and it's heatsink/fan are in yellow, the GPU and it's heatsink/fan are in green. GPU: First remove the screws highlighted in yellow on the fan, also disconnect the fan cable highlighted in green. Once those are disconnected remove the fan by lifting it on the end where the purple arrow is pointing then sliding it out. Once the fan is out you can remove the heatsink, the screws for the heatsink are circled in red. By each screw there will be a number, it's important to remove the screws in this order 4 - 3 - 2 - 1 by backing them out in small increments(1/4-1/2 turn) then moving to the next until they are all the way out to prevent bending/warping the heatsink. Once you have done this lift the heatsink on the same end as the fan carefully and pull the heatsink out. Once you get the heatsink off you'll see a bunch of funky colored pads on the heatsink, and a whole ton of gray molasses looking junk that Dell calls thermal paste on the heatsink and GPU core You'll need to remove the "paste" by placing a few drops of either alcohol or step 1 of the Arctic Clean on the paste on the heatsink and gpu core, be careful to get it on only the old paste as making a huge mess of the paste or cleaner can cause problems also avoid getting any on the pads as well. Allow the cleaner to soak for a minute or two then use the cotton swabs to wipe it off carefully, you'll likely have to repeat this multiple times until the swabs no longer have any gray/black color to them. If you are using Arctic Clean once you have a clean surface apply step 2, let it soak and wipe it clean. Once cleaned your gpu core and heatsink should look something like this: Now you'll need to cut and replace the pads, I used only .5mm pads and all of them will go directly on the heatsink and are gray colored in the picture. The only pad I didn't remove from the heatsink is the purple one outlined in the picture because it's in the 2-3mm thick range and seems to work just fine based on the results. Now the one thing that threw me for a loop were the pads on the backside of the card, yes underneath it. The pads underneath work just fine as I reused them so unless you're more experienced you can skip to the next step. There is a large, approximately 2mm thick pad that has a rubbery texture between the mobo and one bank of the Vram, there is also pads between part of the backing plate and the other bank of Vram. I really have to wonder what on earth Dell was thinking here especially on the Vram under the backing plate. Feel free to replace them if you want, I just left them there not wanting to mess with the backing plate and not having 2mm pads. Now that everything is cleaned and in place you need to apply the thermal paste to the GPU core. I used slightly more than a half of a grain of rice worth of paste right in the center of the core, once the heatsink is reapplied give it a slight(a few degrees is all you need) rotation and screw the heatsink down in the reverse method as you used to remove it. Then install the fan again and the GPU is done! :D CPU: Again the first step is to remove the fan by removing the screws in yellow. Then pull the cable in green and lift the fan on the end near the purple arrow to slide it out. Once the fan is out loosen the screws in red in the 4 - 3 - 2 - 1 order(1/4-1/2 turn each at a time) and lift the heatsink on the end near the arrow to slide the heatsink up and out. The pictures of the heatsink and CPU show more of what kind of mess you're in for that our good friends Dell have left behind. Apply the thermal material cleaner, let it soak, and wipe it off with the swabs. Repeat if necessary until the swabs are no longer gray/black. Again if you're using Arctic Clean apply step 2 now, let it soak, then wipe it clean. Once you're finished it will look something like this: Now that it's all clean you'll need to apply your thermal paste to the CPU. I used a line slightly thinner than a grain of rice, in the center of the CPU about 1/3-1/2 the length of the CPU. Once your paste is applied put the heatsink back on, give it a very very slight turn(again a few degrees), and retighten the screws in the opposite direction as what you took them off. 1 - 2 - 3 - 4 in very small increments(1/4-1/2 turn each) until tightened again. With the CPU try to have it as level as possible as if it's not flush with the CPU you may have to try again to achieve improved temps. Once you're done with that re-install the CPU fan, bottom panel, and battery and you're done. Here are my temps after repasting with both Furmark and Prime95 running simultaneously for 33 mins. You'll see the max temp of the CPU dropped to 74 degrees, an improvement of 10 degrees. The max temps of the GPU dropped to 67 degrees, an improvement of 8 degrees. As always if you have any questions or want to see anything else like: guides, synthetic or game benchmarks, etc just shoot me a PM or post something and I'll get it up.1 point
-
20K Nice! Maes me wish I had two GPU's Nicely done sir.1 point
-
Congrats on the 20k stam!1 point
-
aha! So this is where all the action is...It sucks how they closed the M18x (and the M14x) thread. It seems as if NBR is being over-moderated/over-regulated as of late to the point where people are even scared to post stuff. As to the specs of the M18x, looks to be what is expected. Of course, not a big fan of 16:9 (though I didn't mind the screen on the Asus W90) and I hope that they give more headroom for the extreme CPUs. If the 15 hr battery life thing holds true, then that'll be huge. It's possible too if you think about it: since the M18x will be huge, there'll be enough space for a large battery. And if the M18x supports the integrated GPU in the intel chips with switchable graphics, then it starts to make sense.1 point
-
I'm quite surprised with the release of the m14x, I expected AW would first update their m15x (make it thinner and lighter like the m17x r-3). And tbh, after the revision of the m15x (which didn't happen) i'd expect a 13" model, not 14". It doesn't make any sense to me, unless AW is planning to replace the m15x with the m14x.1 point
-
Alternatives are always good as is healthy competition.1 point
-
Sounds good. Looking forward to much more participation in these forums. Thanks again!1 point
-
Dude. I'm 5'4" and made the tough decision of getting a DTR: the R3. To test my craziness (and anxiousness), I cut out a piece of cardboard at work to match the R3's dimensions (2-dimensional only, of course), and it came out to be as big as my torso. And guess what? I don't mind it. So you may want to do the same. If you can't stand the large size of YOUR piece of cardboard, you prolly may want to get a 14inch laptop Good luck!1 point
-
I'm going back and forth on what I want for a desktop replacement - I do quite a bit of traveling and I feel that m17x might be too large, but would m14x be large enough!! Oh The Insanity!1 point
-
14" is the best size for any type of laptop. Fits every backpack I can think of I sure hope this comes out. Hopefully with SB cpu and hopefully with a gaming-tier GPU (ATI 68xx or at least a Nvidia 460M). Don't care how much it weighs either. Oh yeah, shoutout to my boiz: Vikingrinn & Dane!1 point
-
Good to see you too Infernia, I see this machine is actually working for you Nope couldn't stay away now that there's one I can actually travel with. And yes it's the one and only Joker1 point
-
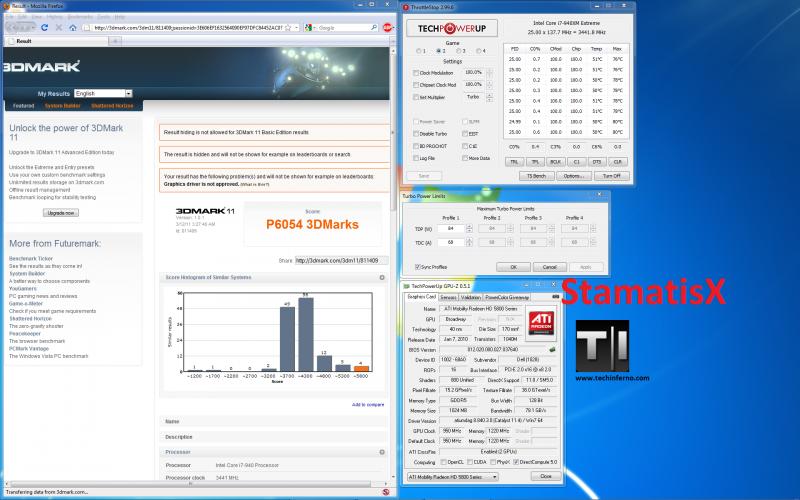
And.... we have a WINNER!!! 3DMark11: http://3dmark.com/3dm11/811409;jsessionid=3E606EF1632564090EF97DFC84452AC0?show_ads=true&page=%2F3dm11%2F811409%3Fkey%3DnDVuMWCkTxpk2TeJca7dpz4fkvYQKZ P6054 (keep in mind I had higher ambient temperature, lower clocks on my GPU than my last run and lower settings on ThrottleStop, ATI drivers 11.4 beta)
 1 point
 -
In here you don't have the right to remain silent1 point
-
I plead the 5th.1 point
-
yes he is the same person, I can confirm it1 point
-
As far as benches, here is what I have. A lot of them are going to need to be rerun as they can still be pushed further. Most we rerun with out any retention mods, so I'll be rerunning them now that the mods are done. If I ever manage to find time. I think my favorite benchmark of all of them is the PCMark Vantage benchmark as it is a system assesment of the entire notebook, and simulates a lot of real work senarios. I also need to run 3DMark11 when I get some time. Moving in to a new apartment in a month, and got a two bedroom, so I can have a computer room DR650SE's Alienware M17x R2 Benchmarks. GPU Benchmarks 5870M Dual GPU 3DMark Vantage: P19838 Marks 3DMark06: 23720 Marks 3DMark05: 31672 Marks 3DMark03: 80002 Marks 3DMark2001 SE: 50975 Marks Unigine Heaven DX9: 1459.12 Marks Unigine Heaven DX11: 927 Marks AquaMark: 168065 Marks ---- 5870M Single GPU 3DMark Vantage: P11163 Marks 3DMark06: 18040 Marks 3DMark05: 27381 Marks 3DMark03: 50893 Marks 3DMark2001 SE: 52426 Marks Unigine Heaven DX9: 1295.37 Marks Unigine Heaven DX11: 466.95 Marks AquaMark: 191609 Marks ---- CPU Benchmarks i7 940XM: CPU-Z: 4261.03MHz Pifast: 21.72sec SuperPi 1M: 10.311sec SuperPi 32M: 9Min 47.669sec wPrime1024: 4Min 59.305sec wPrime32: 6.958sec i7 920XM CPU-Z: 4248.15MHz Pifast: 21.33sec SuperPi 1M: 10.223sec SuperPi 32M: 9Min 40.636sec wPrime1024: 3Min 44.858sec wPrime32: 6.599sec i7 Q720M CPU-Z: 3406.38MHz Pifast: 26.16sec SuperPi 1M: 12.449sec SuperPi 32M: 11Min 17.821sec wPrime1024: 6Min 39.918sec wPrime32: 12.870sec i5 540M CPU-Z: 4102.03MHz Pifast: 23.03sec SuperPi 1M: 11.404sec SuperPi 32M: 10Min 36.138sec wPrime1024: 7Min 3.307sec wPrime32: 13.221sec i5 520M CPU-Z: 3850.45MHz Pifast: 24.98sec SuperPi 1M: 12.448sec SuperPi 32M: 11Min 26.697sec wPrime1024: 8Min 18.406sec wPrime32: 15.691sec --- Referance Clock Benchmark for M17x R2 178.35MHz on FSB of i5 540M Full System Benches PCMark04: 11364 Marks PCMark05: 18577 Marks PC Mark Vantage: 18181 Marks1 point
-
Is this enough to feed your M18x rumors guys? Actual screenshot with the link to go with it: Documentation1 point
-
It's the standard ram that Dell ships with the R2. Did you notice the high shipping price? If you're in Australia, you might be better off just buying something locally there. I am not really a proponent of low latency modules for the R2 either (e.g. Kingston HyperX) because I haven't seen any evidence that they provide added performance vs the standard stuff Dell ships. Furthermore, low latency modules require higher voltage in order to remain stable at higher bclk settings.1 point
-
the new alienware M14x, pictured side-by-side with an M17x for comparison, posted here...-1 points
-
LOL I don't even know of a 14" rig with a numpad. Do you know of any? I'm very excited for this rig, as long as it comes with good specs and can run at full speed(GPU/CPU) on battery I'll be picking one up to go along side the R3.-1 points
-
Welcome to T|I J. Crichton (btw that show rocked). It seems like they are trying to force you to get an R3 so IMO the best option to pursue is to ask for your money back. That way you can wait until the M18x is released in a few months and get a dual card system.-1 points