Search the Community
Showing results for tags 'mod'.
-
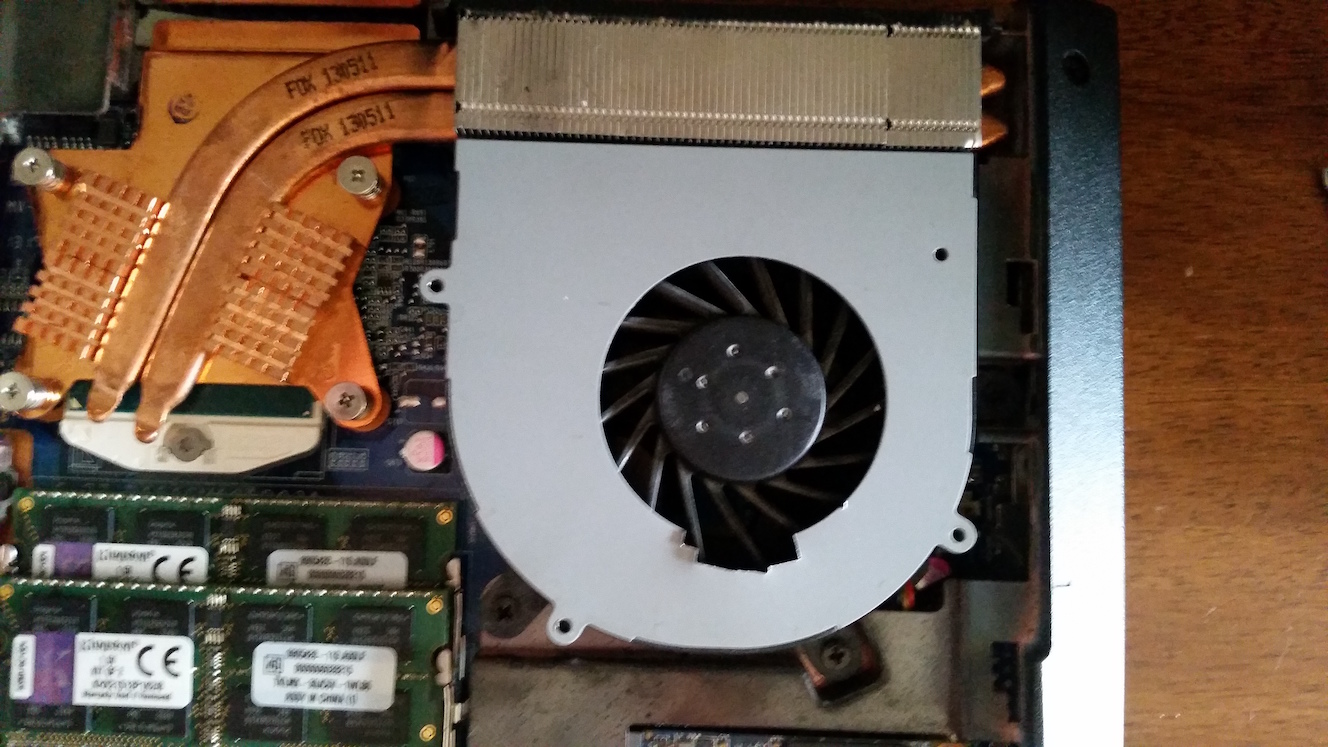
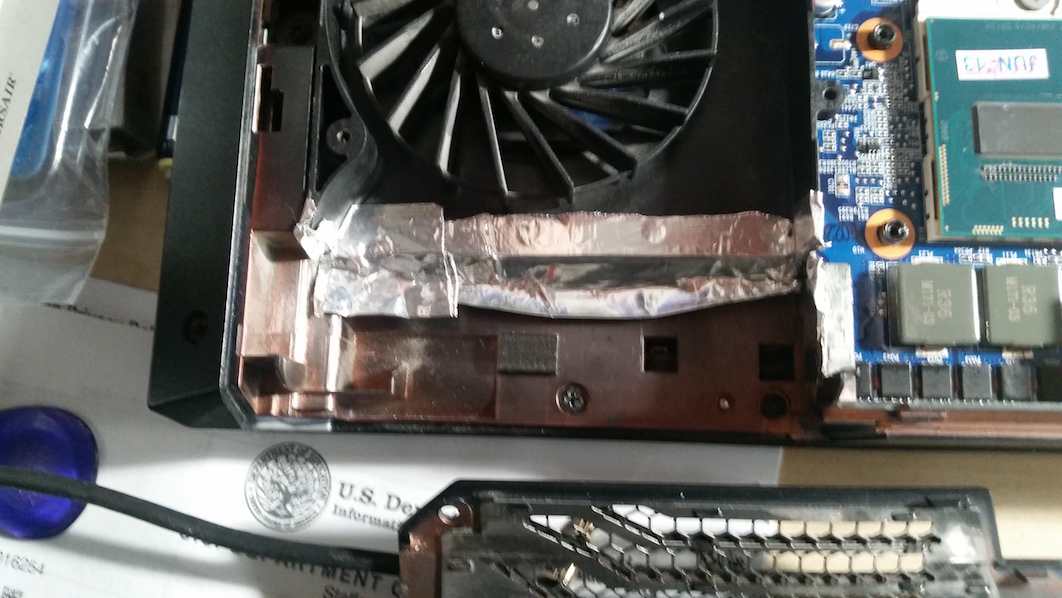
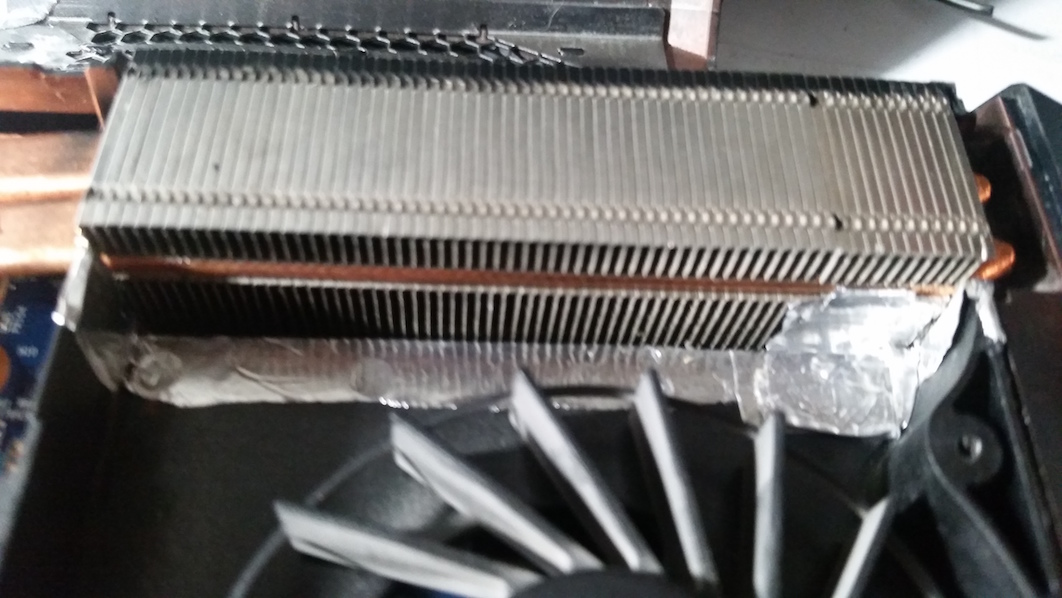
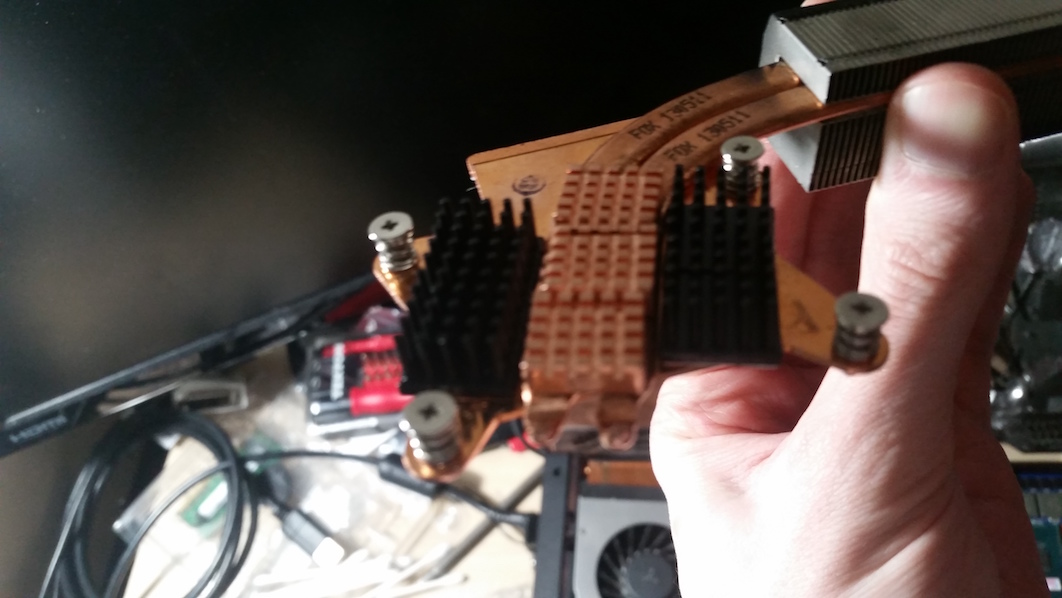
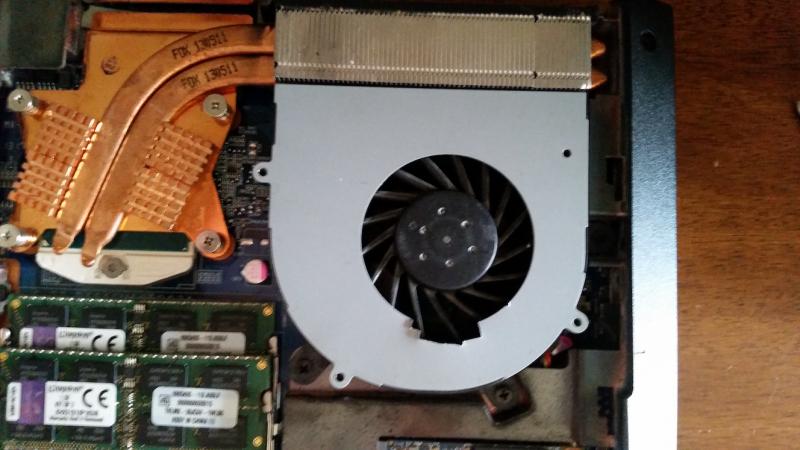
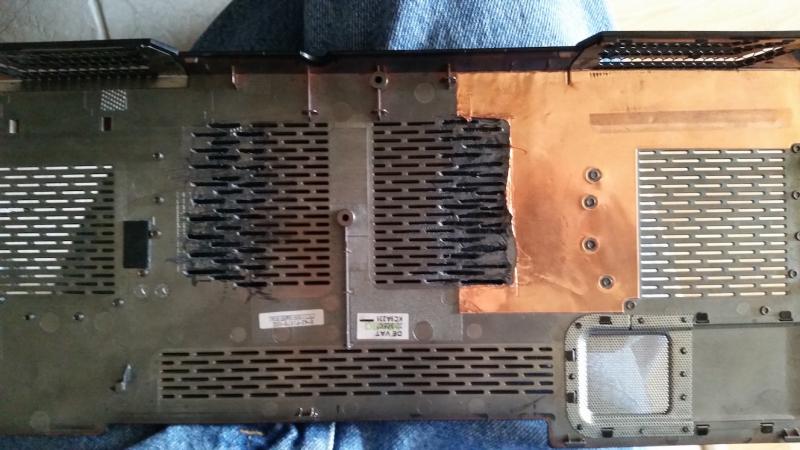
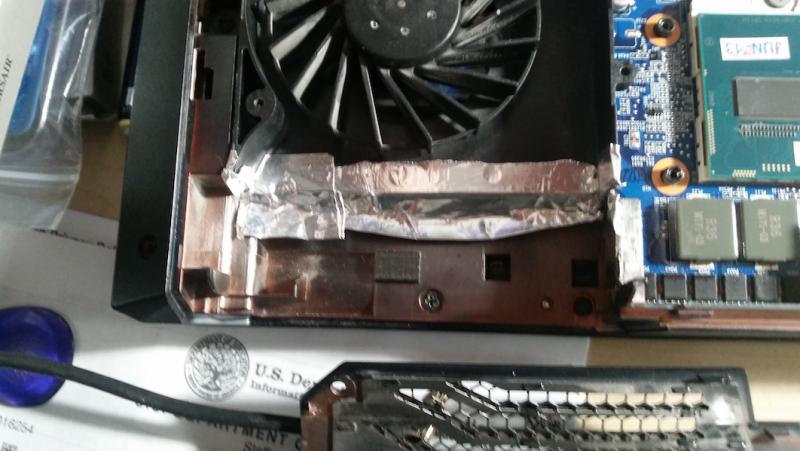
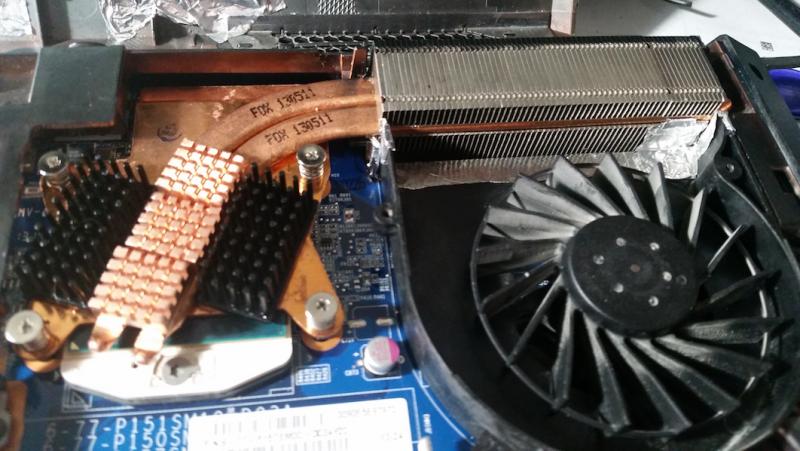
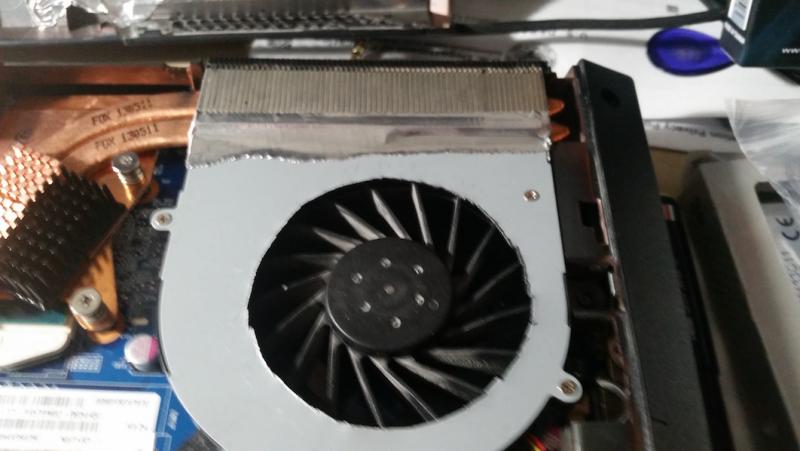
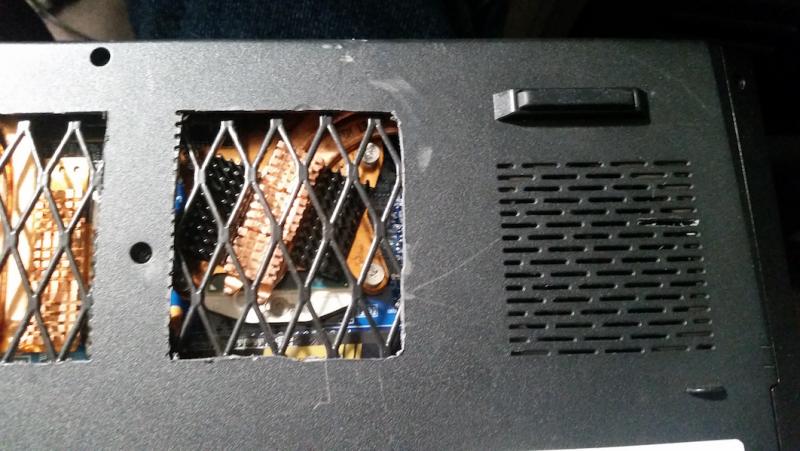
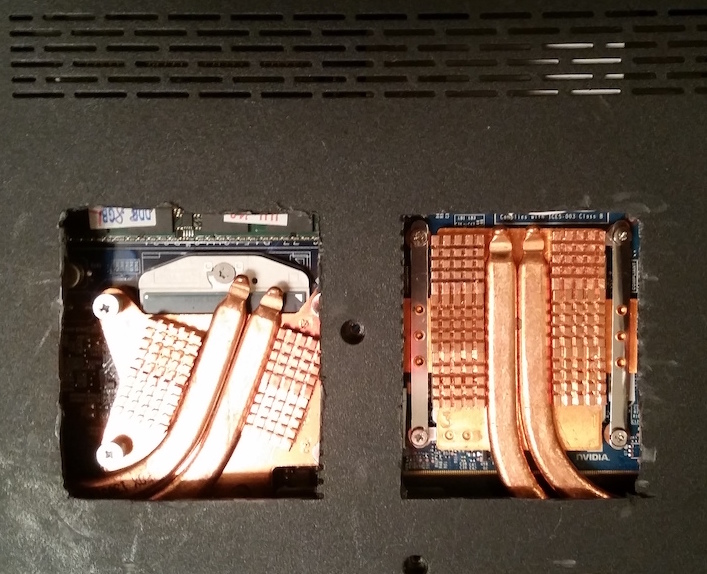
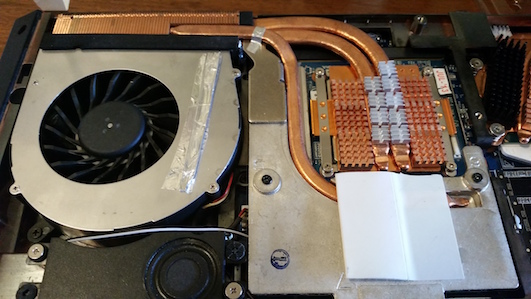
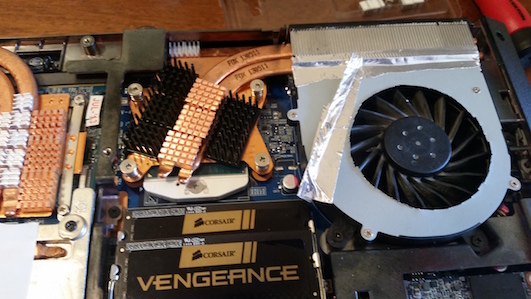
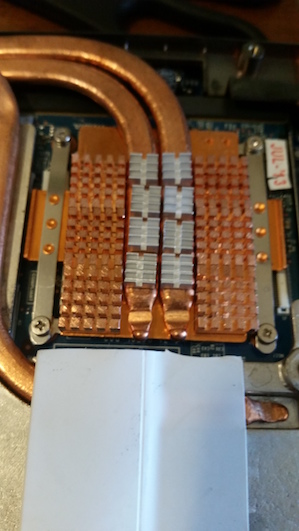
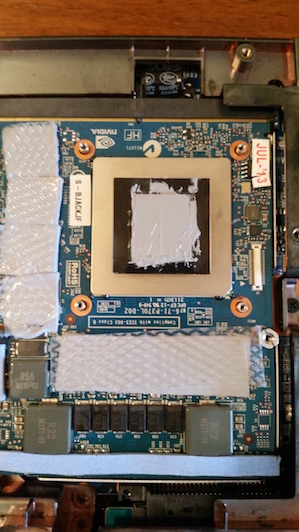
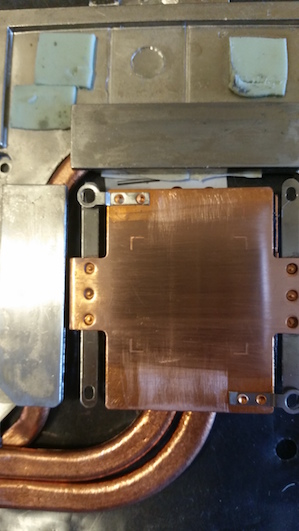
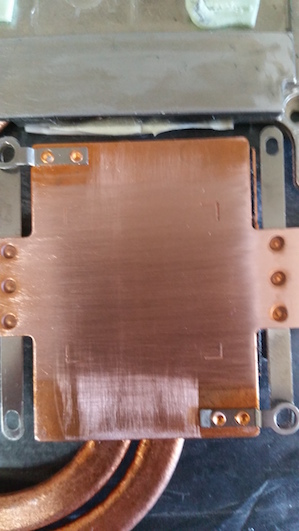
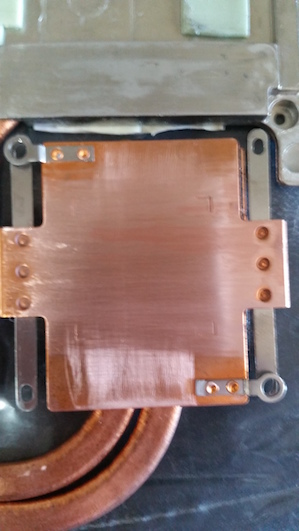
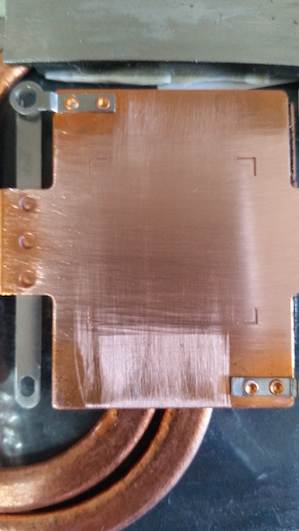
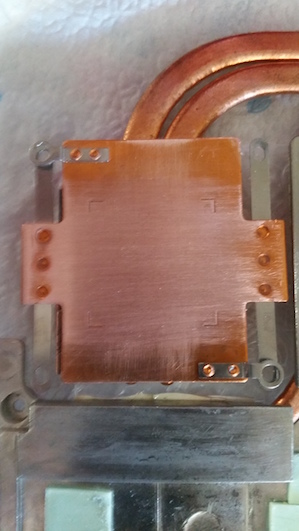
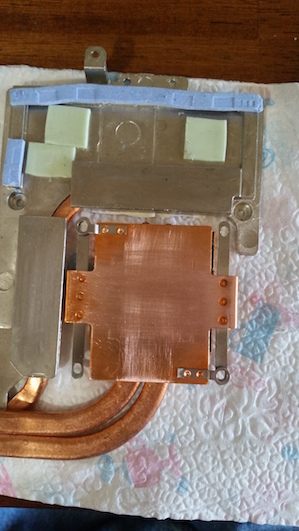
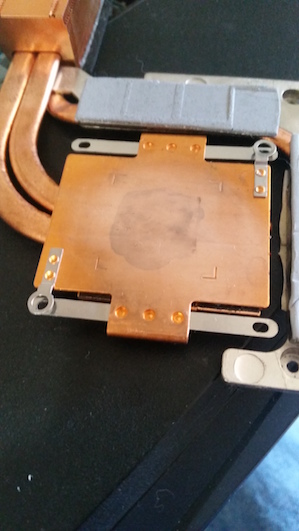
Over the last month or so, I've been planning on overhauling my (slightly dated) P157SM to give it better cooling, and possibly higher performance. There were a number of sources I used for inspiration, and I'll attempt to document all of them later on, but first, pictures! This is the first modification I made. I increased the opening of the CPU fan to allow more air to go into the fan. As I recall, it helped with idle temperatures but I don't remember by how much. This picture shows how much I increased the opening by, I didn't do just that bit and stop Next up, I increased the width of the intakes directly over the GPU and CPU to reduce ambient heat buildup in those areas. I ultimately decided that increasing the width was not the best route to go (and it was quite ugly) so I decided to simply remove the vents I used some diamond mesh to cover those areas, but I don't have any pictures of that at the moment. Next I used some HVAC tape to direct the air flow from the CPU fan into the heatsink and not out the tiny gaps in the area. Then I swapped out the heatsinks (originally I ordered this from XoticPC and went with their copper cooling upgrade (I was young(er)) for some bigger ones. Everything is all nice and snug And finally with the lid back on. With the changes made between cutting the vents, and the last picture, I was able to drop load CPU temps ~5C which I thought was pretty nice. My goal is to also get rid of the vent over the fan, but I haven't found time to do it. I'm also planning on lapping the GPU heatsink, which will, again, take time. I'll post more updates as I make them (and post the benchmarks I've already done). Update: GPU Work: So I have a 780M at the moment (I'm planning on going to a 980M, though I may just wait for the Pascal GPU's to come out) and I decided to lap the heatsink, since I'm planning on overclocking it. Fresh of the block 400 Grit (10 minutes) 600 Grit (10 minutes) 800 Grit (10 minutes) 1000 grit (7 Minutes) 1200 Grit (7 Minutes) 1500 grit (about 25 minutes for this stage) And I thought it looked pretty smooth. One of my references mentioned cutting off the little tabs on the block, since they're mostly there for adding additional pressure (since the plate is usually warped) and I wanted to just lap the area directly over the GPU die (plus I don't really have a good place for grinding copper with my rotary tool). For the paste I used http://www.coolermaster.com/cooling/thermal-compound/mastergel-maker/ which I went with based on the favorable review posted at http://www.play3r.net/reviews/cooling/cooler-master-master-gel-maker-nano-thermal-paste-performance/ and the pads are Fujipoly high end (didn't think I'd need to go ultra). I also added some little sinks on to the heatpipes, though they might be suspect (more on that in the results below). And I sealed up a gap in the fan to direct more airflow through the larger fins. I also used from more HVAC tape to try to prevent ambient air from being drawn in to the fans, but this too might be suspect (it might be needed to draw it away, since where else is the heat from all those fins supposed to go?) And the results are... interesting... pre upgrade post upgrade So the initial benchmark had a 5C drop in temperature, but the following results aren't as promising. In fact, the stress test results appears to be higher (I'm speculating that it'd be over 86C by 400 seconds). I'm thinking that either the added heatsinks on the heatpipes are dispersing the heat before it can get to the fins, my lapping job wasn't so great, or I added too much TIM. I may try the washer trick from the p150 cooling threat mentioned below, but I'm spent on energy for this weekend. June 3rd update I finally got back around to working on my clevo some more and after a third re-pasting my temps are down (taking into account that today is hotter than when I first tested) I suspect that my older paste jobs were either too thick, or I bent the heatpipe and kinda threw the plate out of alignment. Inspiration: Modding my clevo in general: http://null-bin.blogspot.com/2015/04/extensive-clevo-p150sm-cooling-and.html Sealing up the gaps in the fins: Additional cooling ideas:


-

Version v1
397 downloads
Prema Mod™ NVFLASH TOOLKIT One-click solution to backup & flash your NVIDIA GPUs with mod & stock versions in Windows! -------------------------------------------------------------------------------------------- Password for all files: premamod.com --------------------------------------------------------------------------------------------- All my mods are DONATIONWARE and for your personal use only! THX & ENJOY! -
 Hi there! I - by chance - got hold of an Gigabyte P34w V4. As this small notebook is really getting hot, I am looking for a vBios modification with the goal to undervolt the 970m. Thank you and best regards phila
 -
Hi Prema, here you can download the BIOS files for p65_p67sa motherboard. Let me know if you can mod it and how I can help you. EC http://repo.palkeo.com/clevo-mirror/P6xxSA/E0501.zip Bios http://repo.palkeo.com/clevo-mirror/P6xxSA/B0501.zip Thanks in advance!
-
I'm not sure what models this all applies to but: The alienhead on the back of the LCD is always white. It leeches of the LCD backlight and there is not remotely enough space to allow for a RGB system. Well, there might be, but it would be super tight tolerance and not for this particular system. I have some light gel sample thing for stage lighting. These allow an adequate amount of light through while changing the color of said light. One thing I love about this company is the overly cheesy names: Simply Mauvelous, Purplexed, Kablueie, Bluetylicious, Putting Green, Rust Assured, Just Peachy, Peach My Interest, Salmon"illa", Pink Pong, Pinkerbell. I personally used Bodacious Blueberry for this mod. Procedure:: 1. Rip off front plastic bezel. Start in an upper corner and work your way around. Pretty easy (Rider is watching you) 2. Pick your color samples: 3. I picked Bodacious Blueberry. Suigintou seems to like it as well. 4. Unscrew the LCD and make sure to pull away your webcam cable (it's stuck to the back of the LCD). Lay it down on your keyboard. You can test your colors now: Assortment of colors (Mauvelous, Neon Yellow, Diva Red, Bodacious Blueberry, Putting Green) 5. Determine how big to cut, I found out after my first cut, it's easier to just cram the light gel behind the silver reflective stuff, a dull xacto blade helps here: 6. Cut (this is too large to install in a easy manner, it ends up being about half this size - only need to stretch in the opening in one dimension either vertically too tall or horizontally too tall.): 7. Cram it in. The gel sticks a few mm over the top and bottom and is near flush on the left and right sides (in relation to the silver cut out): 8. Use a flashlight to test: 9. Slap it back together: 10. Enjoy. --- Pretty simple and quick mod. I did this spur of the moment while checking the pins on the LVDS cable to see if I could put a 1080p panel in here. It's a 40-pin 2ch 6bit LVDS connection. All 1080p panels that can fit in the m14x are 13.1" or smaller and 30pin LVDS. So a no go there.
-
Hi @all, I have the HP Split 13 x2 (now with 8gig of ram and the i5-4200y). Apart from SSD, RAM, WiFi, is there anything that I could tune/mod/change to make it run faster? For example new coolers, better fan and with that an unlocked BIOS (no unlocked Bios -> no more power possible out of the small i5 ;-) ) Or even better a incredible cheap i7y ^^ Or something I didn't even think of. (What comes to mind is a different dock with more connection options or a new metal backplate) Please leave your comments, even if it is just to get me some ideas, something you already did or things you could help me with. Kind regards, Hermelinmaster
-
 I'm an architecture student going into College and I've been informed by my professors that I need to purchase a Quadro graphics card in order to run the hardware acceleration in the drafting programs we use. To me, this doesn't make any sense; why would I downgrade my already powerful GTX 780ti's (in three way SLI: overkill? Yes, I'm aware. But why the hell not?) for something not nearly as powerful, the Quadro 5000, and spend over $1000 on one graphics card? I've been reading about ways to crack the 660 into working, or at least reading, like a Workstation card, but is there a way to do it on something as recent as the 780ti? I'd still like to be able to retain the gaming capabilities of my PC but also, you know, succeed in college and not spend a fortune on another graphics card when I have 3 perfectly good ones in my machine already?
 -
Hi guys! I just wanted to share my personal experience with the adhesive film. The equipment required is very simple: - Adhesive film (bought on ebay) - Hair dryer - Cutter - Felt wrapping squeege (bought on ebay) - So much patience (this unfortunately can not be bought anywhere ) The procedure is really simple and intuitive, the only difficulty is it does not create bubbles under the film, and be careful to trim the edges and corners. The end result is... Byee

-
 First off, i'd like to thank Nando for all his work helping bring eGPUs to the masses. On to the post: The short of it: Where I once had a DVD drive that I barely used, I now have 3 low power USB ports and a convenient eGPU port. I’ve designed a caddy of my own in order to manage the new components. Full photo set: https://www.facebook.com/media/set/?set=a.193840844073776.17933.193579380766589&type=1 The long of it: This began as a simple 2nd HDD/DVD caddy swap. The more I thought about it however the more the fact that the HDD was physically smaller than the DVD drive, which ultimately meant unused space started to bother me. Incidentally I was also working on getting an eGPU set up but didn’t like the idea of having to take off the 2nd battery and bottom plate off each time I wanted to use the eGPU. The eGPU hardware connects via the mini PCIe slot where the Wi-Fi card is. So I decided to try to permanently embed the eGPU connection alongside a 2nd HDD where the DVD drive used to be. This threw a new wrinkle into the equation, since a permanent eGPU connection would mean disconnecting my wlan permanently. My solution was to go with a USB dongle for my wireless connection. New problem, where to find the USB connection….and where to hide the dongle. The last thing I wanted was to have it sticking out the side of the computer all the time. So the dongle also had to go into the caddy space. As to the USB connection, well there’s a wwan slot I never use right next to the caddy. While most wwan cards are physically a mini PCIe format and connection, they really work via USB. I found a card which breaks out the USB connection to flying leads (mentioned in the parts list below) and planned on using that to get my USB connection for the Wi-Fi dongle. New problem, most wwan mPCIe ports carry USB signal but not power. The port on the SB works like this. So where do I get 5v from? I could run the port power in parallel from one of the USB ports on the right side of the computer, but those make for some long leads and are difficult to run back to the caddy area. The only easily available source of power on the left hand side is the SATA connection itself. And that was my "aha" moment. I tend to use my laptop as a laptop when on the road but when at home it’s really working as a desktop. I’ve got a few USB peripherals and a screen I connect it to, plus the aforementioned eGPU. Ultimately I decided that I wanted more USB ports and a convenient eGPU port on the left side of the machine more than I wanted a 2nd hard drive. So I replaced the hard drive in the mod with a USB hub, with enough power to run the wlan dongle, an Asus Xonar USB soundcard, thumbdrives, peripheral dongles (Logitech universal, and Microsoft keyboard, etc.) It won’t power a HDD in a caddy however. I was also having some trouble fitting the hard drive in the original mod, but that’s because I was afraid of taking a dremel to the bottom case of the laptop (I’ve since worked through my fear, though I like the mod as is.) Things that still need doing: I still need to shave off a 1mm from everything, and I ended up warping the top case with one of my earlier attempts. I’ve revised the design of my caddy so that I can fasten the 3 screws along the face of the DVD drive which I had to forego with the old design. I also have to model this and get it 3d printed so it’s one integral unit. Also, it looks like the new version of the eGPU hardware (PE4L-PM060A) might have the mPCIe card and the adapter directly soldered to the mini hdmi cord, so I’ll have to revise the mod slightly. Even without revising the design, I have to go in there and clean up some cables now that I’ve had it in for a few weeks and know that it works. Things to watch out for: I somehow shorted the speakers on this computer, no idea how I did it but I’ve made my peace with it. Also I killed a couple of usb wifi dongles due to bad solder joints and shorts. (Will update with parts list soon…) Photos: Initial Testing: First stab at a mockup: Progress: End Result: Pic of the three usb ports with the eGpu port. Its the hole at the end, closest to the screen.
 -
Not sure if you guys know of this app that ejohnson from the NBR forums found on some russian site. It changes the AlienFX lights colour to match whatever is on your screen. It calculates the average colour that is shown on your screen and sends that colour to the alienFX controller to display. I've tried it and it works on my M17x R2 except for the power button and alienhead on the lid. Very interesting especially if you have alternating wallpapers with different colours Its a bit too distracting if you're watching a movie or playing a game though. Although it will should work well with say a fullscreen visualisation on your fave music player theHelios also from NBR set it up for us Alienware users and can be downloaded from his private dropbox below. http://dl.dropbox.com/u/1089880/Lightpack AlienFX.zip To see it in action check it on youtube The original thread can be found here.
- 3 replies
-
- 1
-

-
- alienfx
- ambilighting
- (and 3 more)
-
 I modded my CM storm SF-19 to filter dust and to vibrate less. The result turned out to be excellent. Q&A Q: Will this block my airflow? A: Not much, further down in the guide I am showing you the famous paper test after modification. Q: Does the anti-vibration mod work well? A: There will still be vibrations, but much less. What do you need? -Rubber tape -Electical tape -Mosquito net The dustfilter mod Step 1: Cut your mosquito net to fit the underneath of your cooler Step 2: Tape it to the bottom of the cooler The anti-vibration mod Step 1: Cut your tape to the correct size. Step 2: Wrap the plastic knobs with the rubber tape. Step 3: Reattach the fans to the grill step 4: Tape the mosquito net over the grill. Airflow is still strong As you can see in this picture, the paper is lifted quite high into the air. I am holding down one corner of the paper with a rubber hammock feet. Just as a safety precaution I am not responsible if any damage occurs The End
- 13 replies
-
- 3
-
-
- cm storm sf-19
- cooler master
- (and 5 more)