Search the Community
Showing results for tags 'm15x'.
-
Hi All, I recently bought a Dell Alienware M15x laptop. I thought it would be a good idea to do a full re-install of the OS as the laptop was previously used. After the re-install the lights on my laptop stopped working. After a bit of research I found this is a common problem with the Alienware laptops and its not an easy or quick fix. I tried what the DELL website says to do by downloading the latest drivers and doing the re-install again but no joy! I then contacted DELL support who advised due to the wrong firmware being applied, my motherboard was now corrupted and will need replacing for which they wanted close to £400. My issue is I used the resource CD that comes with the laptop from DELL to do the re-install. The CD's only purpose is for that very reason, to provide all the drivers needed after a re-install. If this is a known problem, why is DELL providing these CD's with the laptops? surely there's a legal case to made somewhere in this?? I can't afford to spend another £400 on a new motherboard so I am hoping someone on these forums has come accross this issue before and managed to resolve it. If so I would be immensely grateful if you could post how it was fixed. If I cant fix this issue I will have to sell the laptop as spares or repairs and only get back a fraction of what I paid. I will also NEVER buy from DELL again!!! Looking forward to any response!!!! PLEASE HELP!!!!! Please see the error messages I am getting below: Error reads: Error 2: Error reads: AlienFX Test: PLEASE HELP!!!!!
-
I have a dell 6990m bought it off ebay, part number RDRGR, was tested in an m18x r1. Anyways the card is fine I'm assuming but I have a black screen the moment I start up the computer but I can hear the sound of windows starting up and everything. Please someone help. What do I do? Also My specs are i7-740qm 500gb hdd seagate 6gb ram Original card was radeon hd 5730m HD+ 1600x900 screen
-
Hi all I decided to upgrade my M15X. Current configuration: DDR3 SDRAM 4.096 MB @ 1.333 MHz 1GB NVIDIA® GeForce™ GTX260M 500GB (7,200rpm) Serial ATA Hard Drive Intel® Core™ i7 Processor 720QM Im looking for nVidia gtx 670M and gtx675M, but no idea what works better on my laptop, I was read some issues about power supply (75W or 100W), about throttling and about incompatibilities. Im reading your posts, and get more and more doubts, can somebody help me? Thank you so much!
-
 Hey everybody, I installed a gtx 660m in my M15x and after finally installing the drivers, it works! But there is something weird about it. Here is a picture of what I mean: Laptop Forums and Notebook Computer Discussion Can someone tell me what's going on!!! (note: I can only overclock the memory not the core clock)
 -
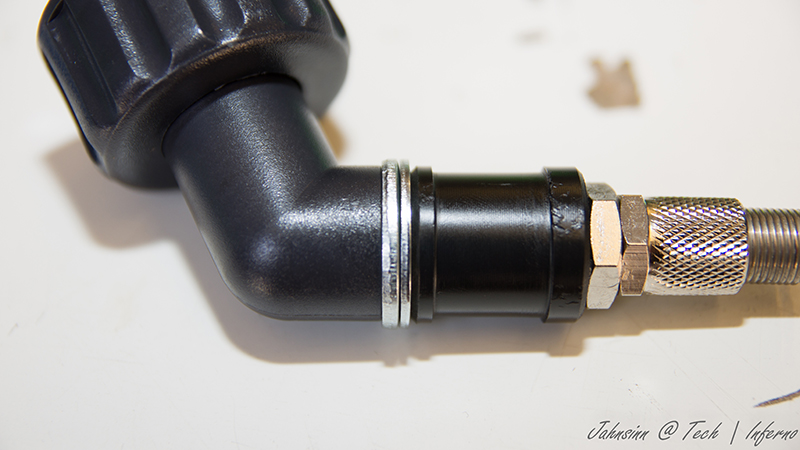
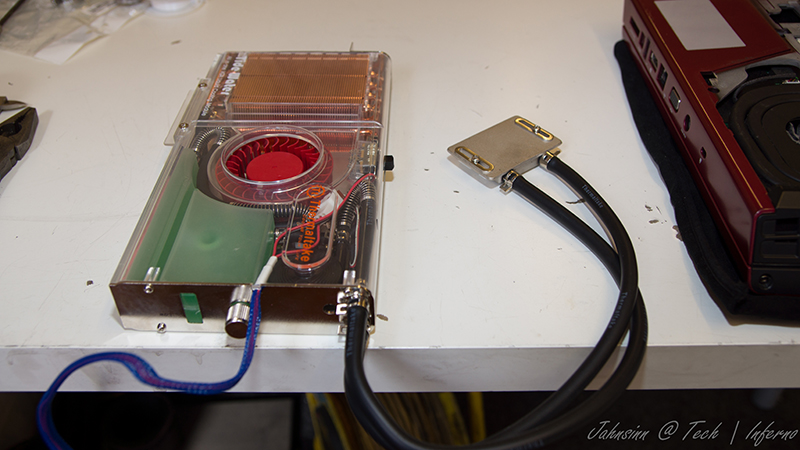
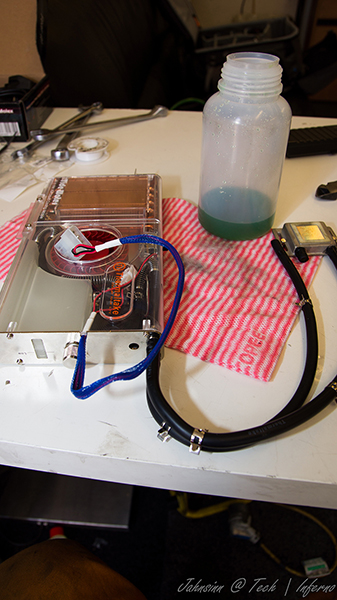
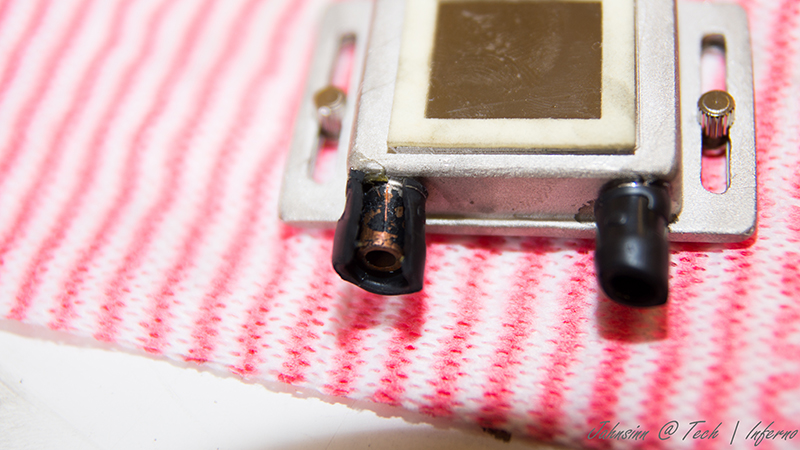
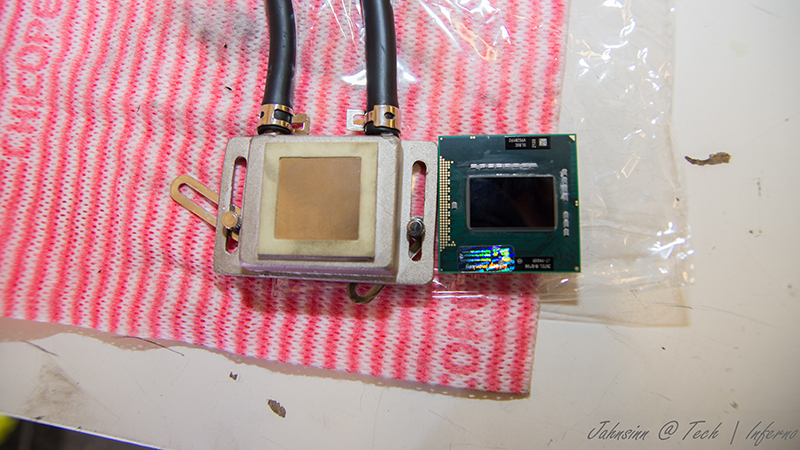
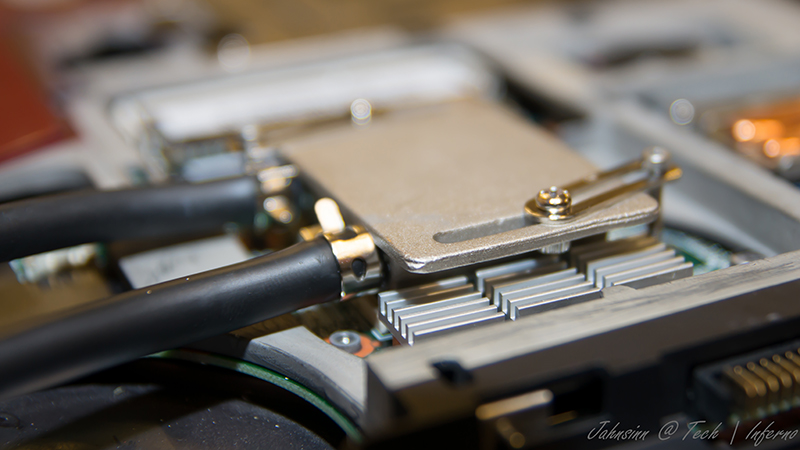
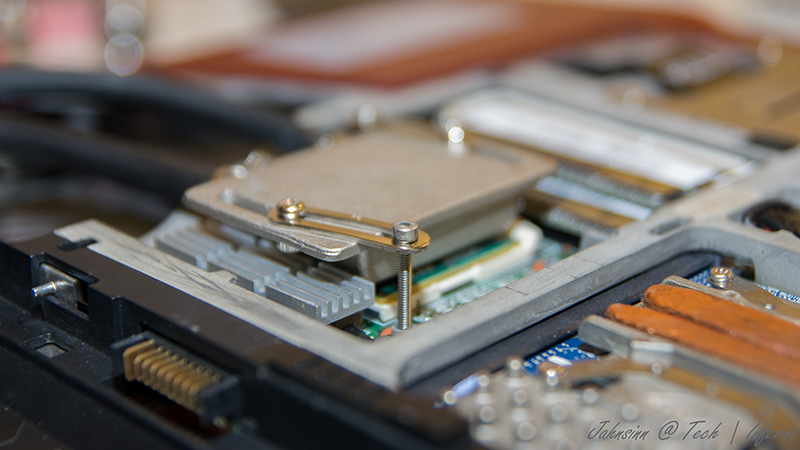
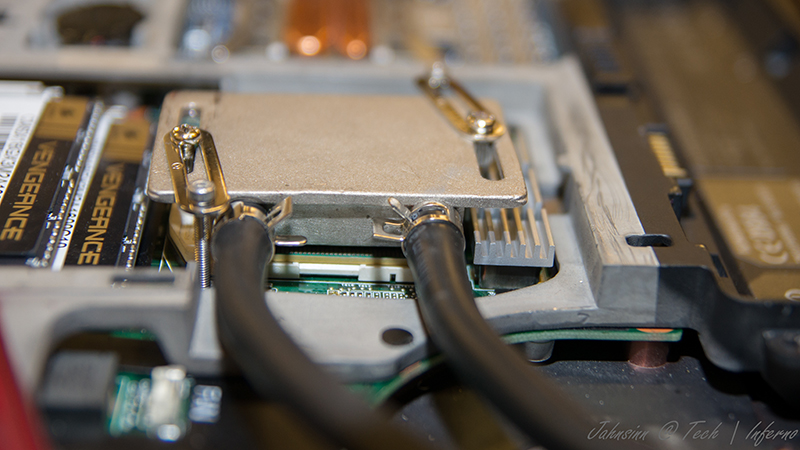
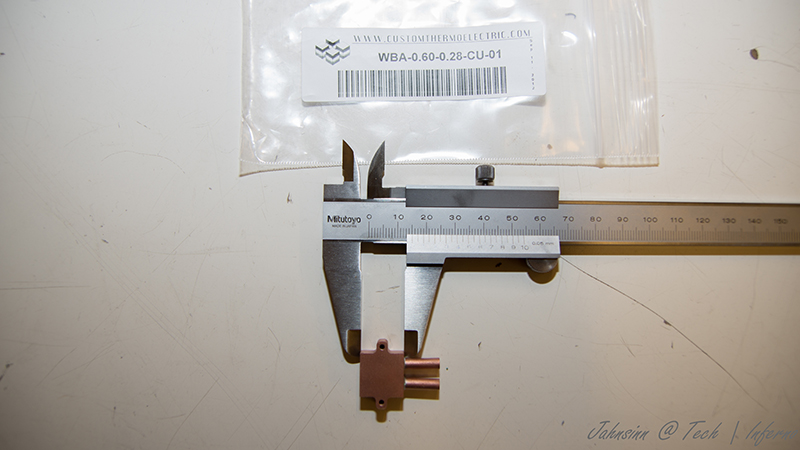
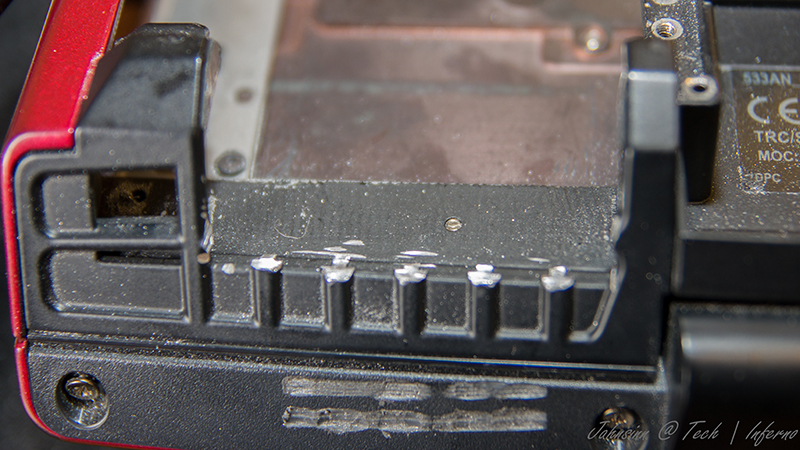
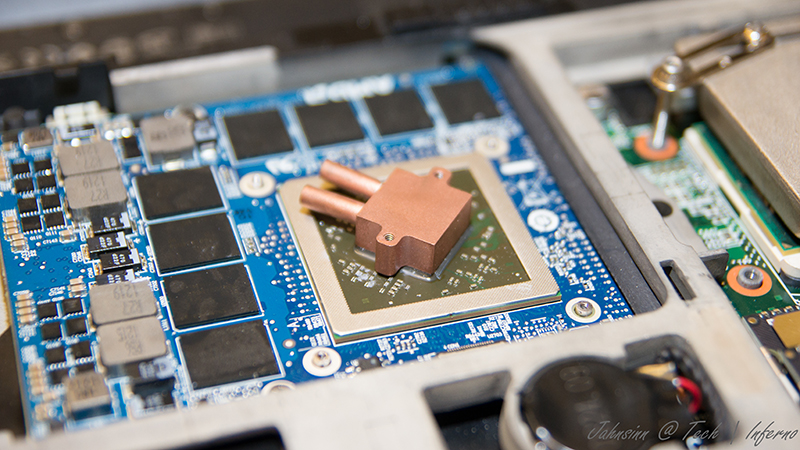
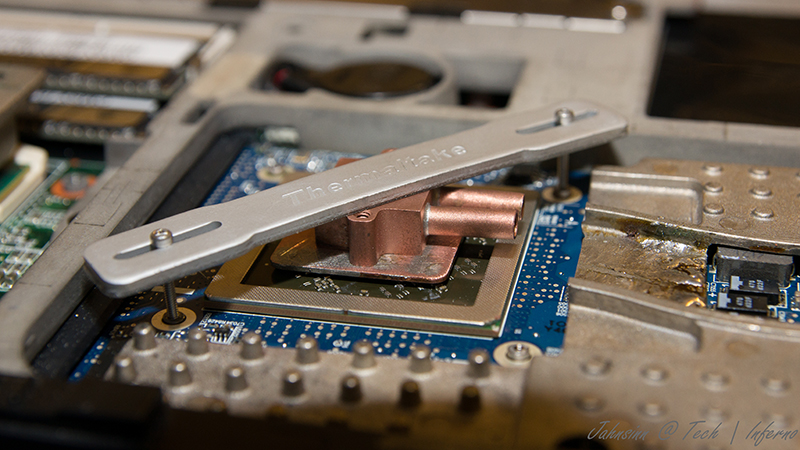
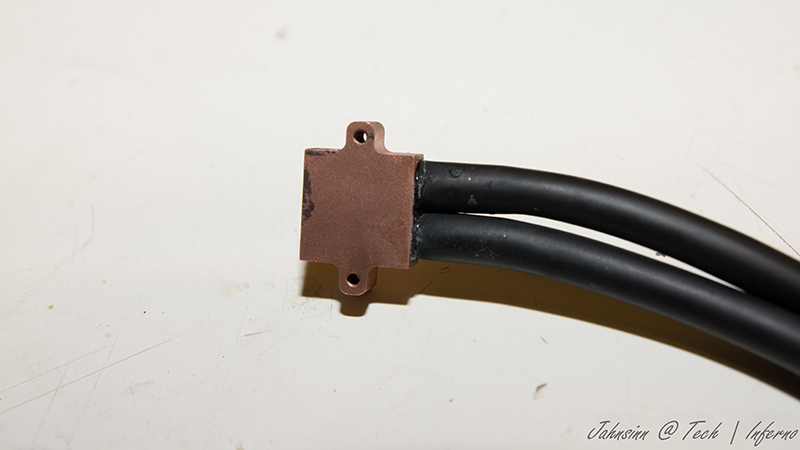
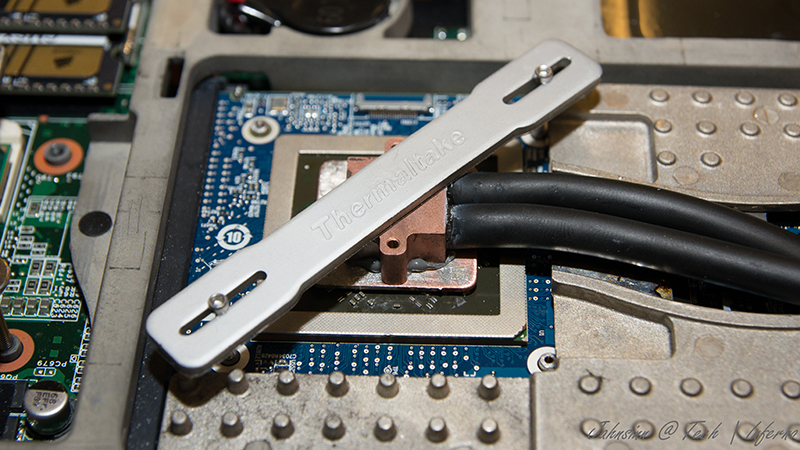
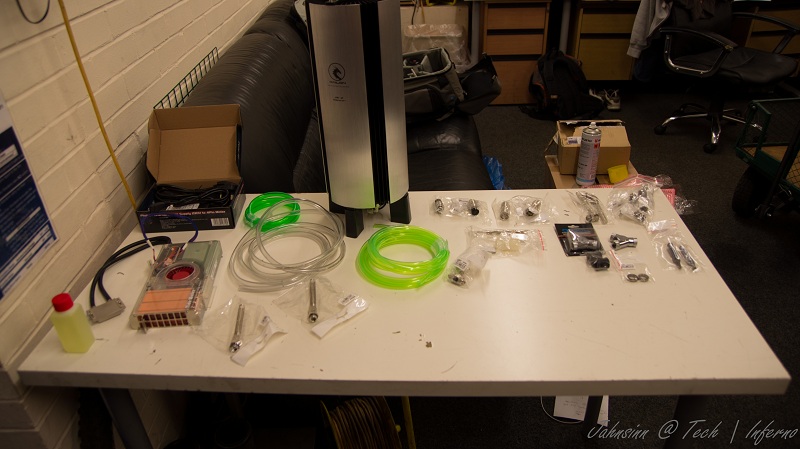
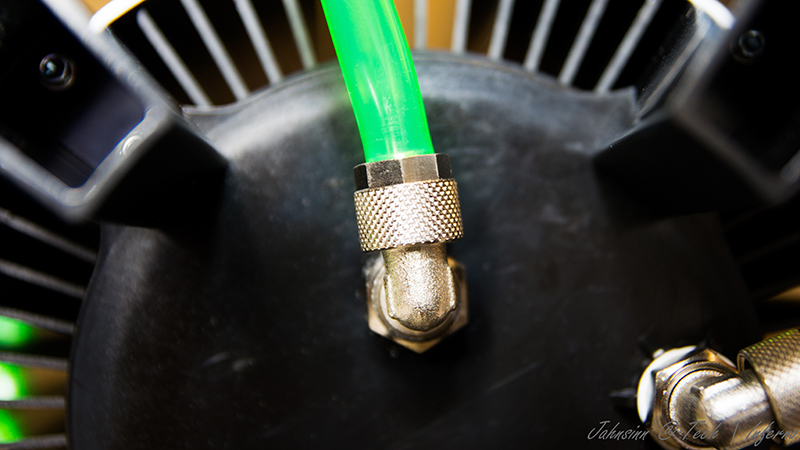
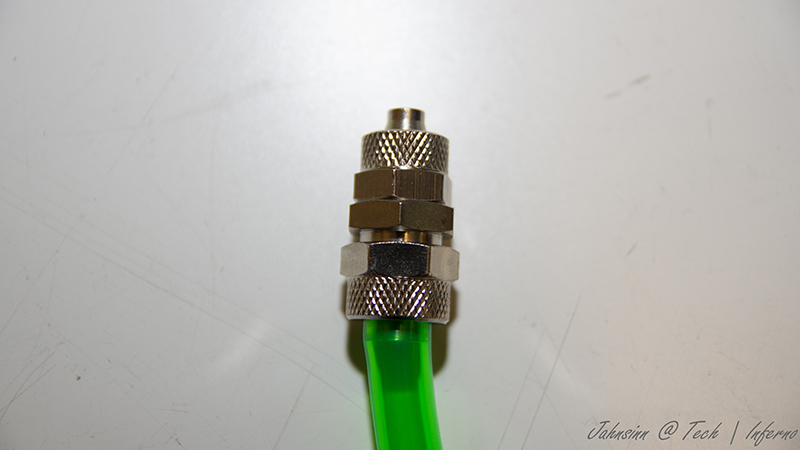
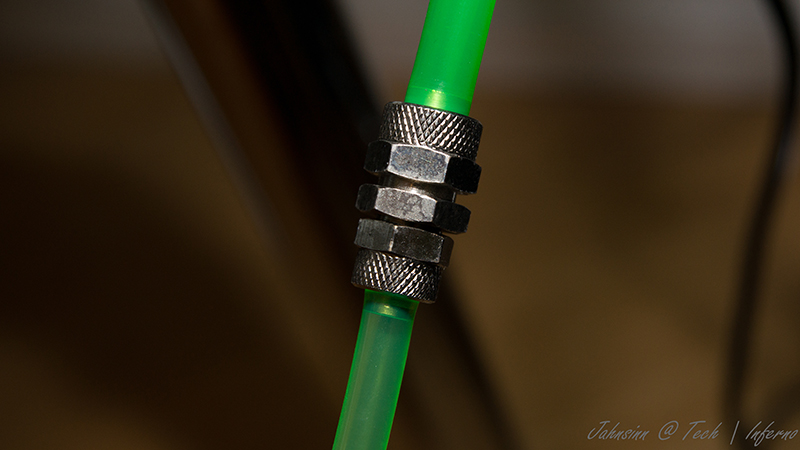
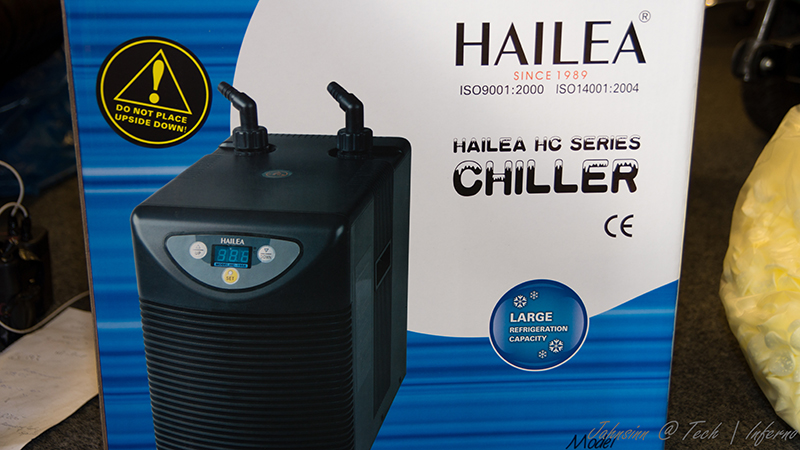
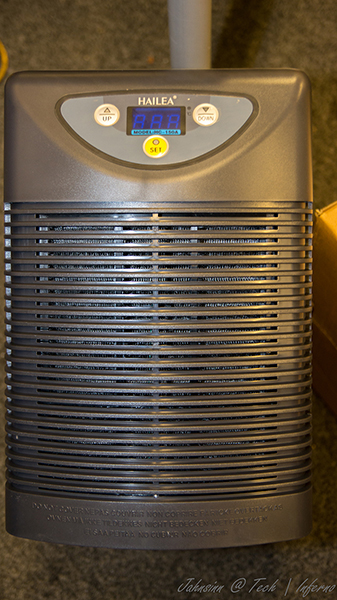
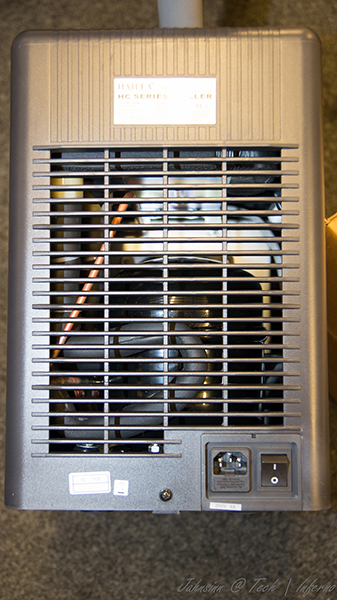
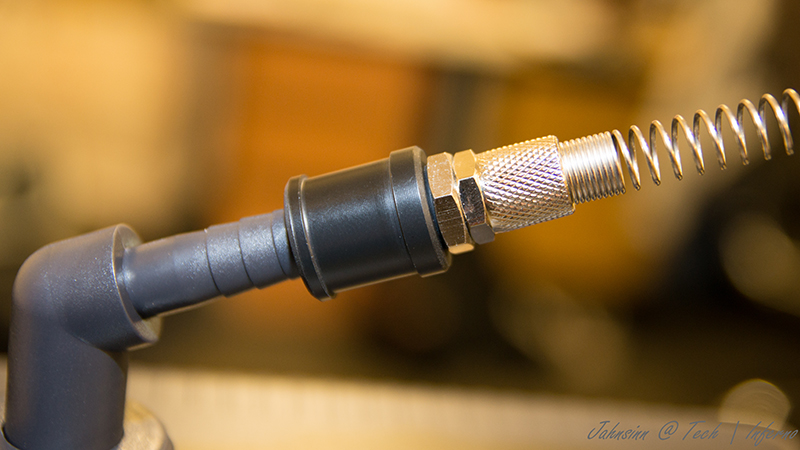
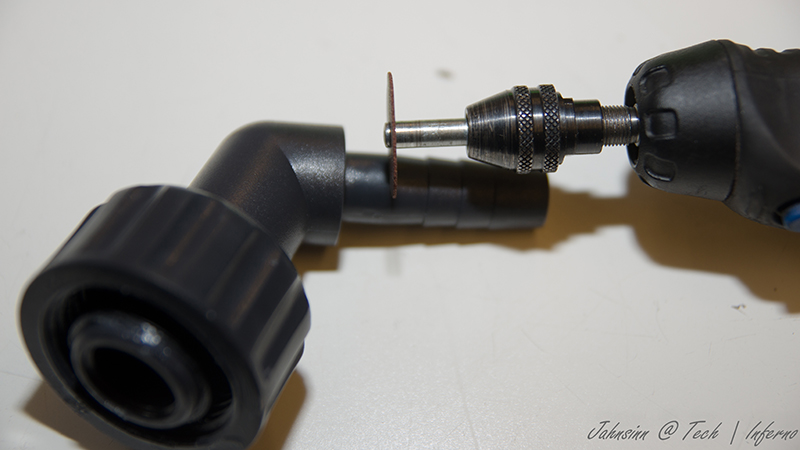
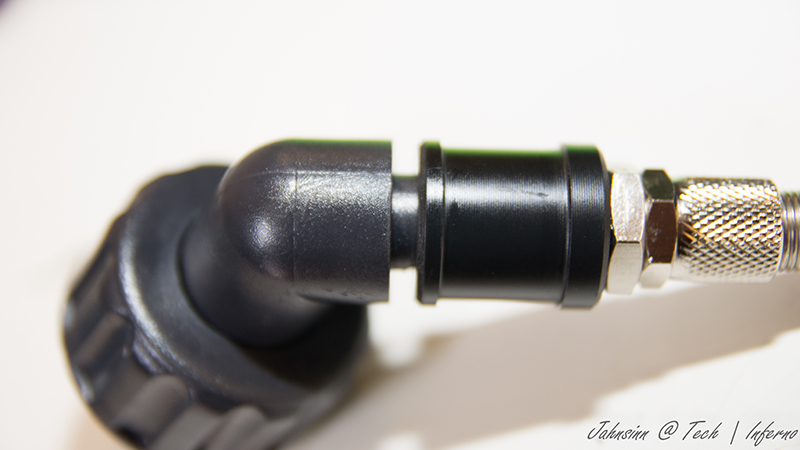
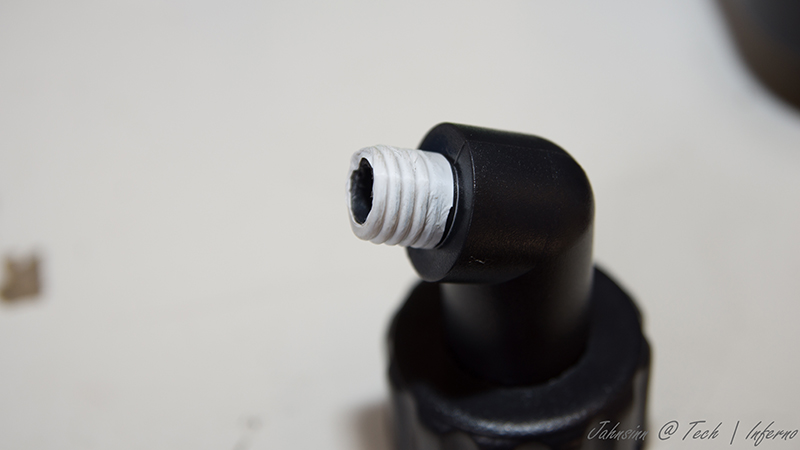
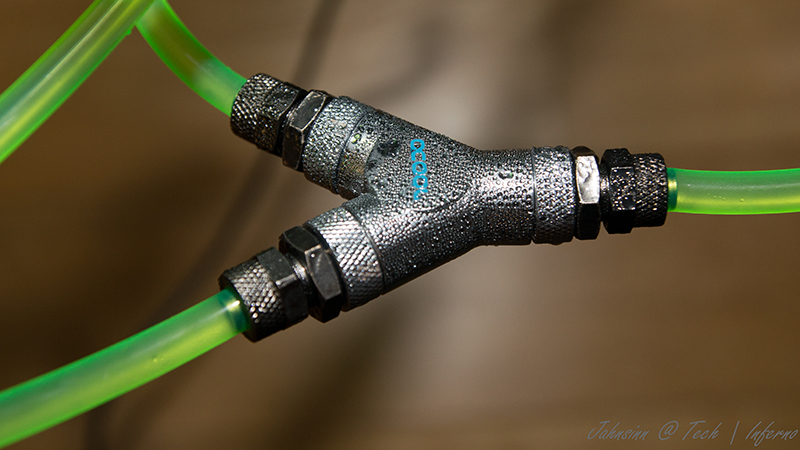
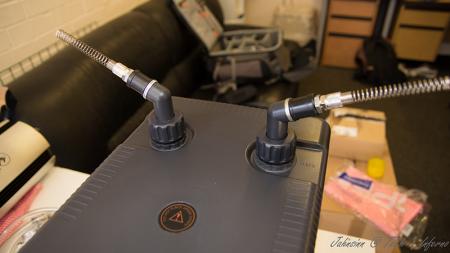
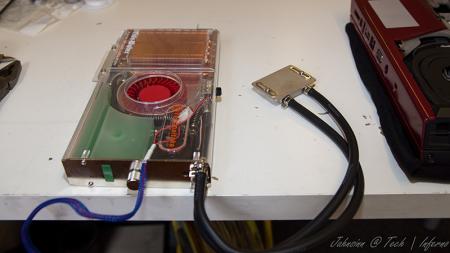
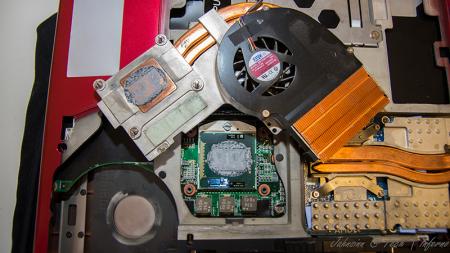
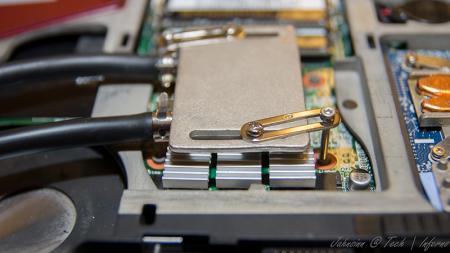
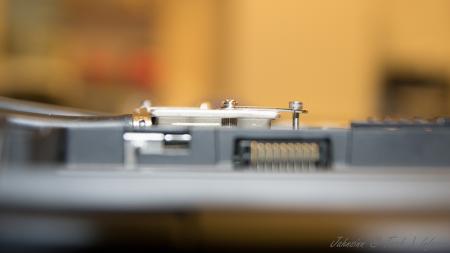
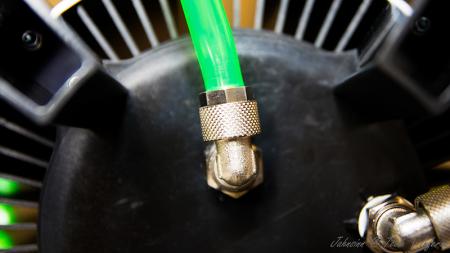
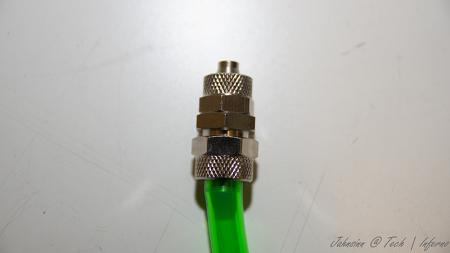
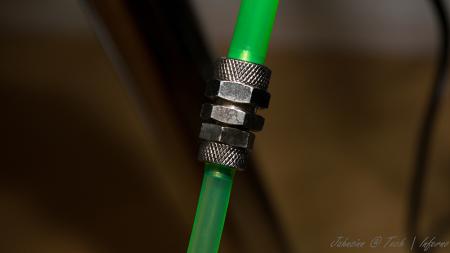
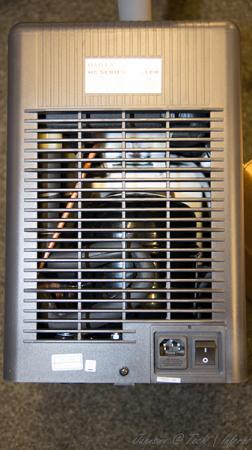
First of all, let me say I haven't finished yet. I'm still working on it and will update this thread from time to time due to much work at the moment. When I fitted my 940xm and the 7970m I got really mad of the heat and the fan noises even in idle mode. So I decided to get it all cooled with a silent, most important quiet, external water cooling system. I checked the internet and found evth I need to get it done. The most difficult thing was to find slim water blocks to cover the dies. I will list all the parts I used with article number and website if you're interested at the end of this post. First the overview. These parts are going to be used: Actually not much, so let's start. I start tubing at the inner hose socket of the reserator. This is the place where the pump is placed behind. You have to use a 10/8mm hose. By this, 10mm means the outside diameter of the hose, 8mm means the inside diameter. This is very important to know by everything you do on water cooling systems due to different fittings, barbs or reducers. Fit the hose and tighten it well with a spanner. Now you need a reducer to get on a 8/6mm hose. This is necessary to get in fitted to the chiller. At the other end you need to fit the 8/6mm hose. After this is done the 8/6mm hose leads into the chiller. A chiller pushs down your temps to a predefined value set by you, the minimum you can get theoretically is +3°C. Basically you can say it works like a refrigerator. This is very helpfully when you start gaming or other intense work on the laptop to keep the temps low. Here are some pics of it. To get the hose fitted the first custom made had to be done. Maybe I didn't know how it actually works, but I had no clue how else to do it without a modification... As you can see on the picture, the 1/4" adapter didn't fit to the chiller's nozzle. I really don't know what's the original idea by the developers. So the first adjustment had to be made. Cut the end of the nozzle as you can see on the pic. When this was done I noticed really pour casting quality inside the nozzle. This would massively reduce your flow speed. So I used a drill to get it out. Finally I got an outside diameter of 13mm at the nozzle. The adapter has 12mm inside diameter So just perfect to cut a M14 thread to both parts. Unfortunately I couldn't get closer due to the layout of the die. two washers solve this problem to get it proper tightened. To get it proper sealed I used teflon tape. Just the best way to get something sealed. Don't do it without any sealing! Use some Vaseline before you stick in the nozzles. Do the same with second side of course. At the end it'll look like that. Let's get to the CPU water block. I purchased the Thermaltake CL-W0052 Tide Water, originally made for desktop PCs to cool down the graphics card, on ebay to get all the stuff I'll need to do it. I chose that one because the water block has just a height of 8mm. Also all the hoses and clamps will be helpful. First drain the coolant. Then I opened the chassis and robbed all hoses and clamps. You'll need them in a couple of minutes. They're all bonded quite well, so just cut them at the ends. I also cut and removed the hoses of the water block itself, just to make sure everything is okay. I didn't want to get upset when I filled the system with water. So I cut them and removed the old adhesive. I then removed the original cpu heatsink and compared the die with the water block The water block as it was out from the box was just a touch too small to fit correctly onto the die. So I just removed the tape around the block. Now it was ready to get fitted. All I needed to do was loosing the existing bolts on the water block and tightened it with M2.5x20 hex nut bolts into the existing holes. At the end it looks like that. By the way, the mosfet heatsinks came with the tide water vga cooler. I also fitted the black hoses as they were, just without the glew and it still seals perfectly. To get the hoses guided out of the laptop you need to remove your fan control at the back of your laptop. When you're doing this, be careful not to touch the chassis as I did with whatever you use. I used the dremel and didn't see it for a while. What a shame! Nevermind, so let's get over to the gpu side. I bought a very tiny water block with just 15x15x7mm dimensions to not to exceed the height. So may be later I will be able to fit the backplate cover again. The water blocks would actually fit on the die, perfectly. But due to the layout of the gpu die the block just fits in diagonal postion. So useless for me. To get the water block in the right direction I unsoldered the copper plate of the original heatsink. That one has got the right dimensions to get this solved. Clean the copper plate from the old tin on top by using the Dremel or sandpaper. At the end that's the way it should work. Just to mention, also the holder came with Thermaltake tide water cooler. The bolts I bought seperatly on ebay. They are M1.6x20 but too long, so I cut them down to 15mm. Now they fit into the existing holes and push down the block properly Use now the -->small<-- black hoses robbed from Thermaltake chassis. These are the inside hoses, they're smaller. You need to use some adhesive because the clamps coming with the hoses are just a way too big and don't keep it tight to nozzle. Now just add some thermal paste between copper plate and die, and copper plate and water block. Tighten it all down. Finally it looks like that. [ATTACH=CONFIG]5105[/ATTACH] hoses leaded through the fan grill, gpu side. I mention again, just temporarily cause I'm still waiting for parts. in progress... [ATTACH=CONFIG]5107[/ATTACH] [ATTACH=CONFIG]5106[/ATTACH] cpu side [ATTACH=CONFIG]5108[/ATTACH][ATTACH=CONFIG]5109[/ATTACH] The hose laying is actually just in common sense. Nothing particular I should mention. Reserator -> 10/8mm hose -> 10/8mm to 8/6mm reducer -> 1/4" compression fitting -> 1/4" adapter for chiller -> chiller nozzle -> chiller -> nozzle, adapter, fitting -> 8/6mm hose -> Y-splitter first end hose -> 8/6mm hose -> quick coupling -> black hose (termaltake tide water) -> cpu block inlet-> cpu outlet -> black hose -> quick coupling -> 8/6mm -> Y-splitter second end hose -> 8/6mm hose -> 6mm barb -> small black hose (thermaltake tide water) -> gpu block inlet -> gpu outlet -> small black hose -> 6mm barb -> 8/6mm hose -> Y-splitter | Y-splitter -> 8/6mm hose -> 10/8 to 8/6mm reducer -> reserator update in progress...


- 25 replies
-
- 15
-

-
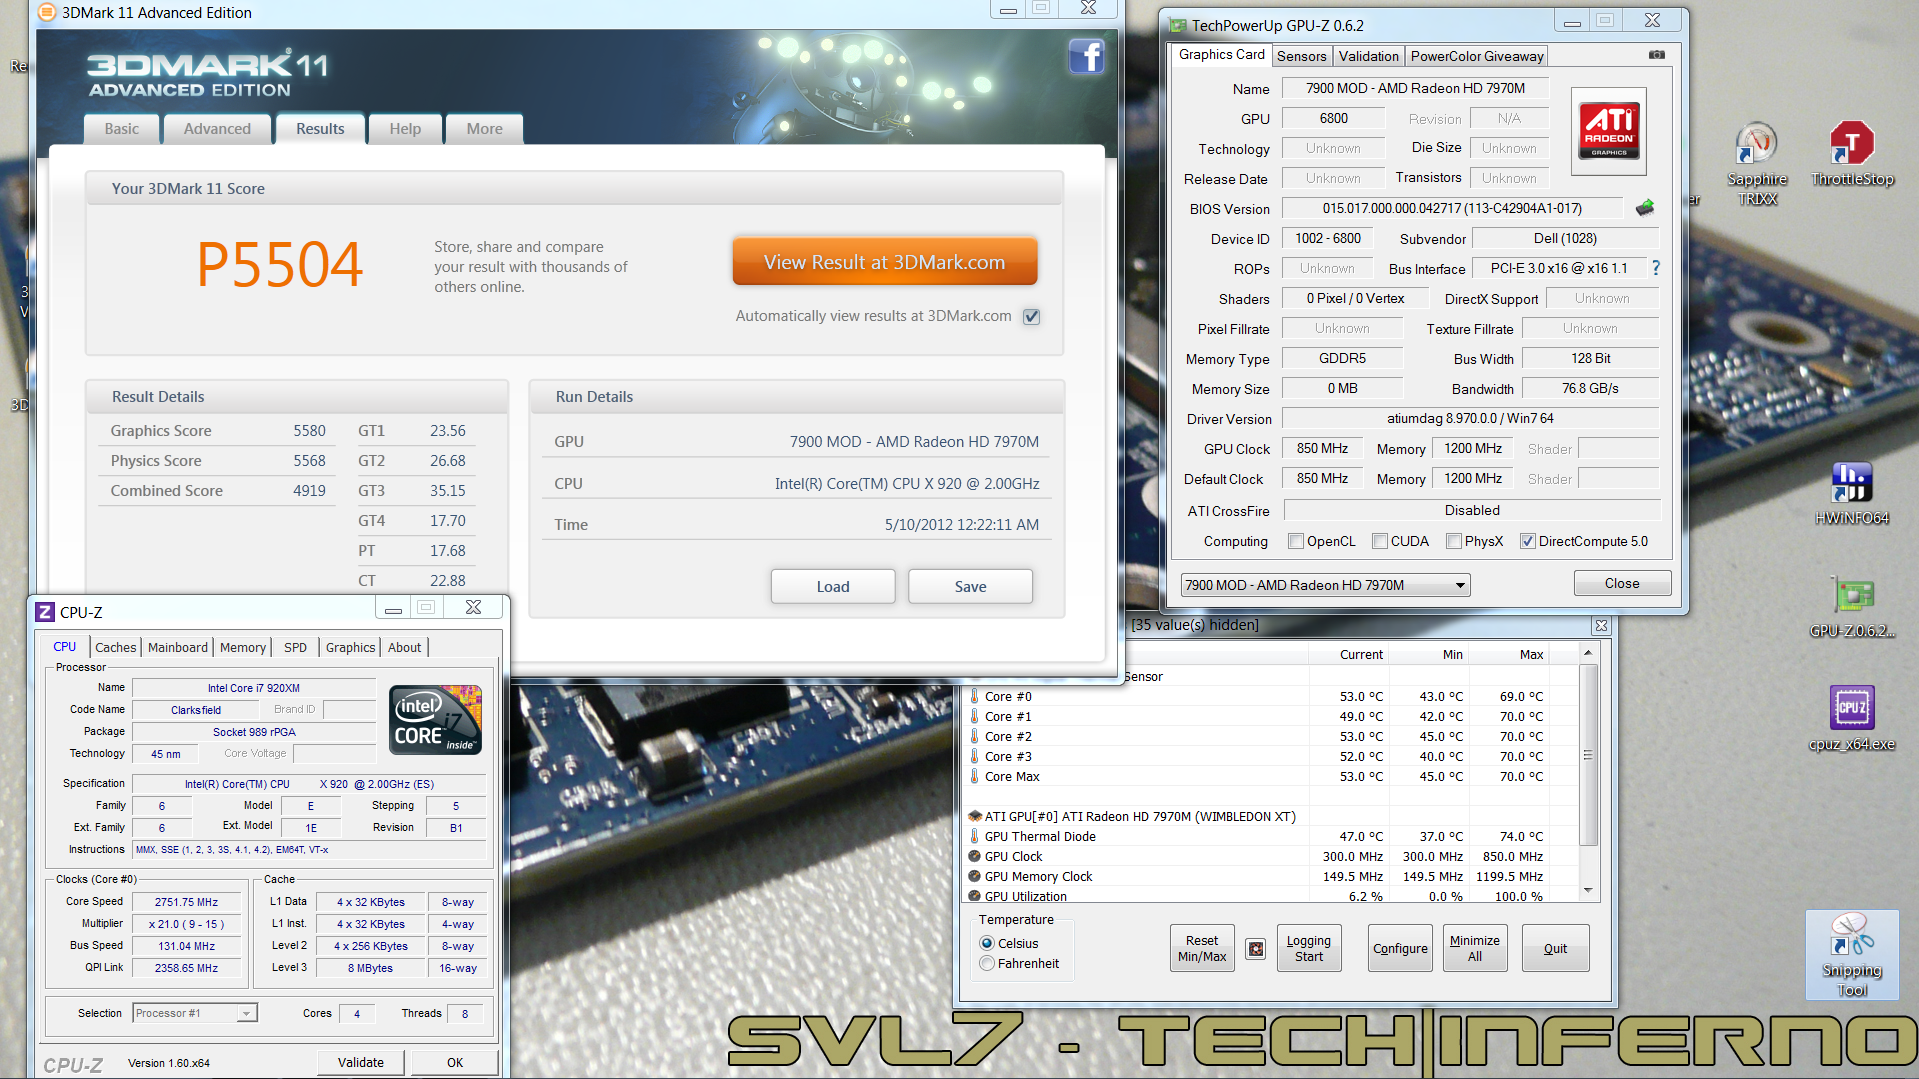
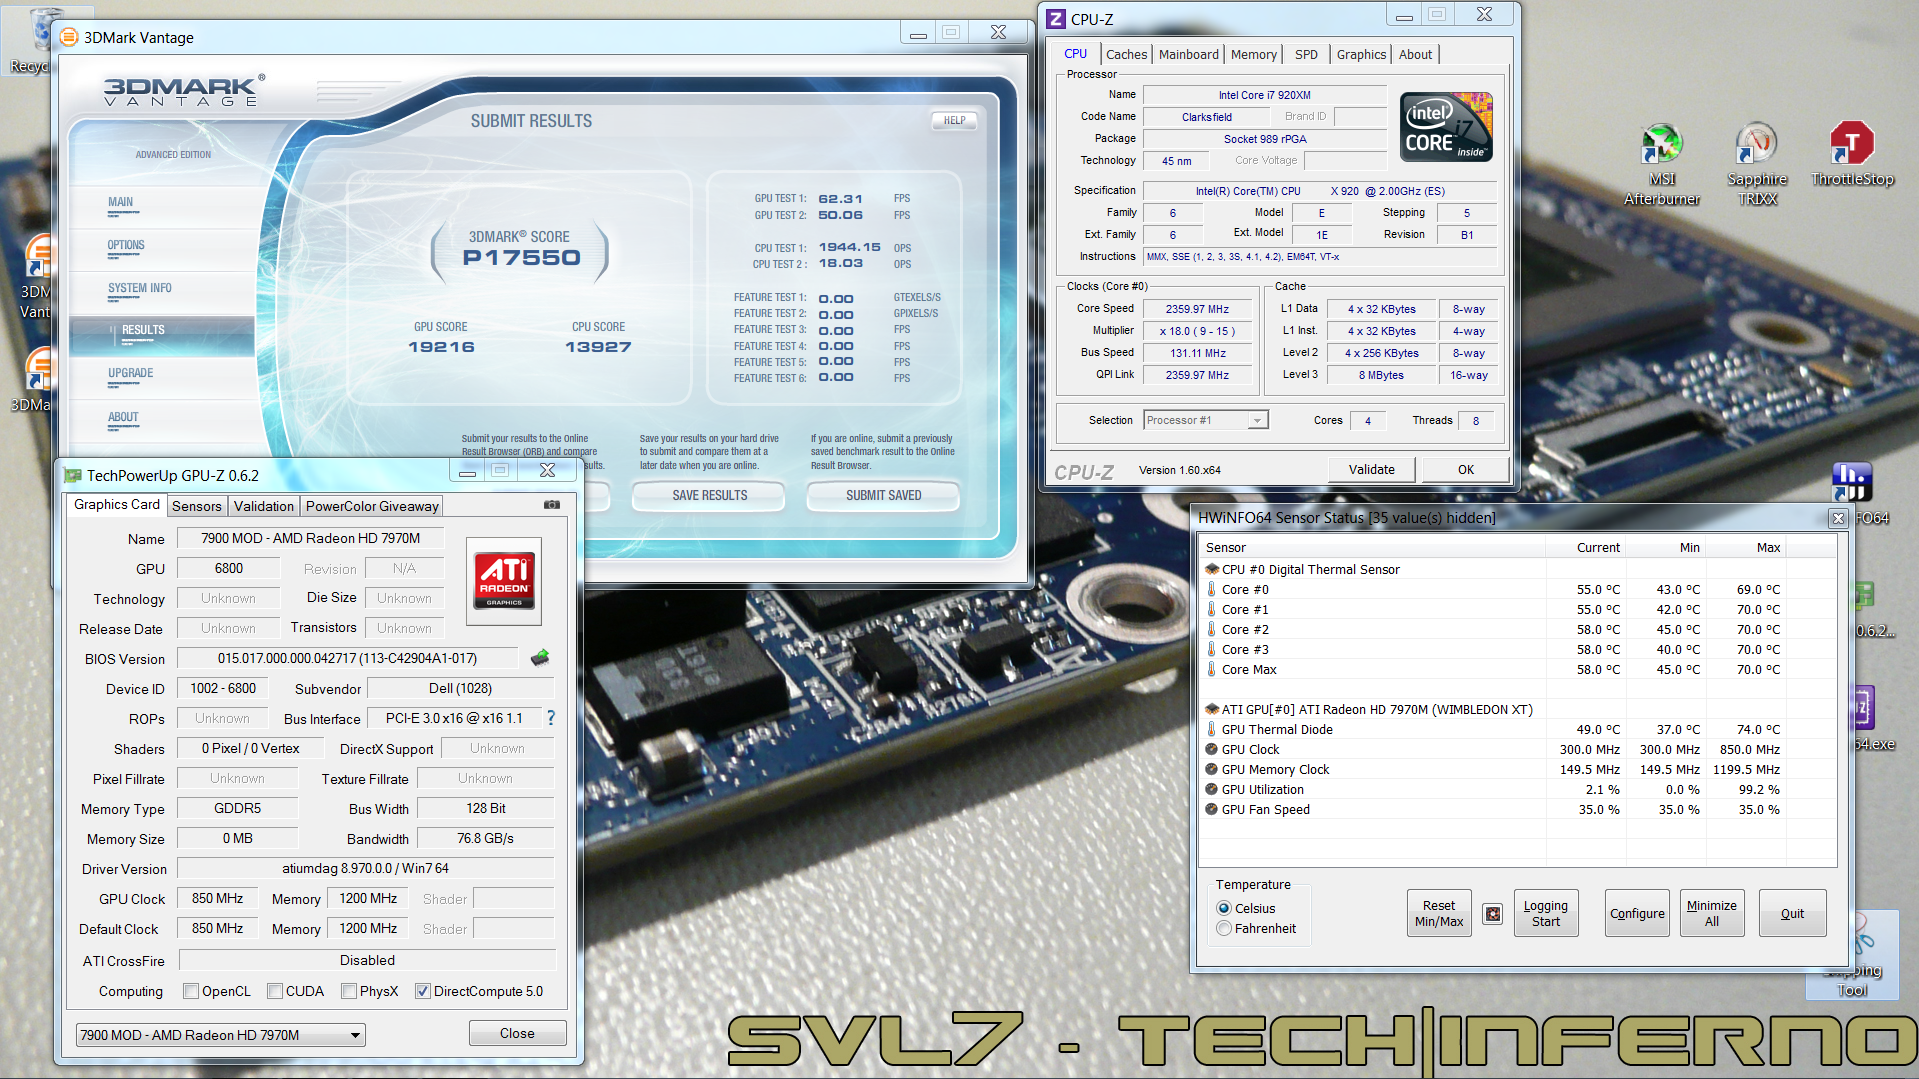
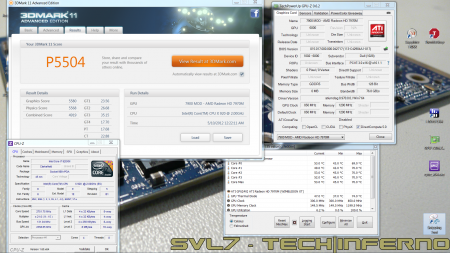
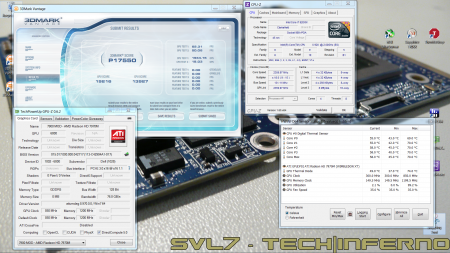
Got my Dell 7970m (ES) today... and so far it rocks! Native fan control, runs cooler than the 6900m series, and it simply kicks ass. It's pretty much plug-and-play, no issues so far, though I will need to continue the testing (and benching ). Only did a Vantage and 3dM11 run so far, with GPU and CPU at stock, Tess on, check it out, hehe: Confirmed for the Dell 7970m (part nr. 747M2) in the M15x: Fan control is working properly Sound per DisplayPort / HDMI is working GPU clocks and performs as expected Possible issues: The card runs slightly warmer than the officially supported cards, due to it's higher power draw. This also leads to less overclock headroom. The card works fine even if you have an i7 920XM in your system, but if you overclock the CPU too hard, the GPU voltage drops, resulting in a drastic performance drop. (This is actually not directly caused by a power limit due to the PSU... the CPU can draw as much power as it can get, but it seems that when the CPU draws more power than usual, the GPU voltage supply somehow doesn't get provided anymore with enough power, even though there's headroom power-wise, it's probably caused by the circuit design of the mobo). Things to do before changing the GPU: Download working drivers. At the moment you can either get the drivers of the M17x R4 from Dell, or the modified, but actually more recent (12.5) from "benchmark3d". Get some thermal paste, e.g. Arctic MX-4, or Prolimatech PK-1, or whatever you prefer, you'll also need something to clean the GPU die and heatsink, isopropyl alcohol or similar will do. I highly recommend using an ESD mat and wristband whenever working Get familiar with the upgrading procedure, respectively disassembling the system. Refer to the M15x service manual if you need help, or to this pictured guide which explains how to replace the GPU in the M15x. The upgrading procedure: Uninstall your GPU drivers. Make a power drain (Turn off your M15x, remove the power cord and the battery. Then press and hold down the power button (Alienhead) for about 10-20 sec. Remove your GPU - Here's a little guide with pics in case you need some help. Clean your heatsink, if necessary replace the thermal pads with new ones. Make sure the 7970m has the correct backplate on it. Insert your GPU, make sure that it sits properly. Apply the thermal paste, and attach the heatsink. More to come.
- 498 replies
-
- 18
-
-
 Hi, i just got my dads old M15x and started to play bf3 when it lagged like hell. I looked it up with both intel and EA and they said i should disable hyperthreading in the Bios. The problem is that my BIOS doesn't have that option so i would really appreciate if someone could give me a link to an unlocked bios or something? M15x i7 820qm GTX 260m
 -
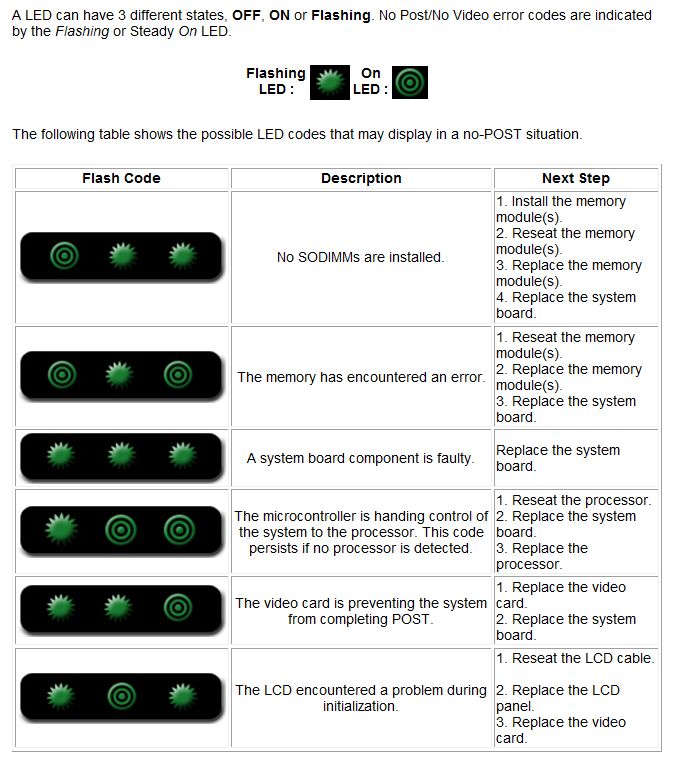
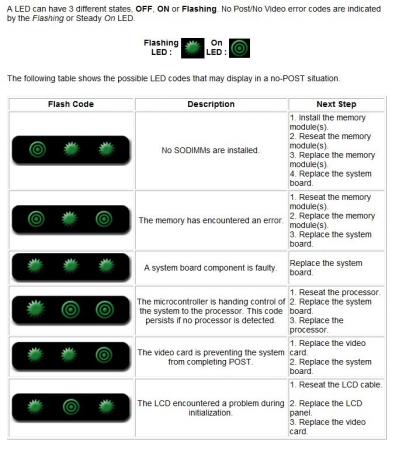
M17x and M15x LED Error Codes LED Error Codes Alienware™ M15x has a different keyboard status LED Layout, it is Scroll Lock, Caps Lock and Num Lock. source: Dell

-
So... let's see how good you are
-
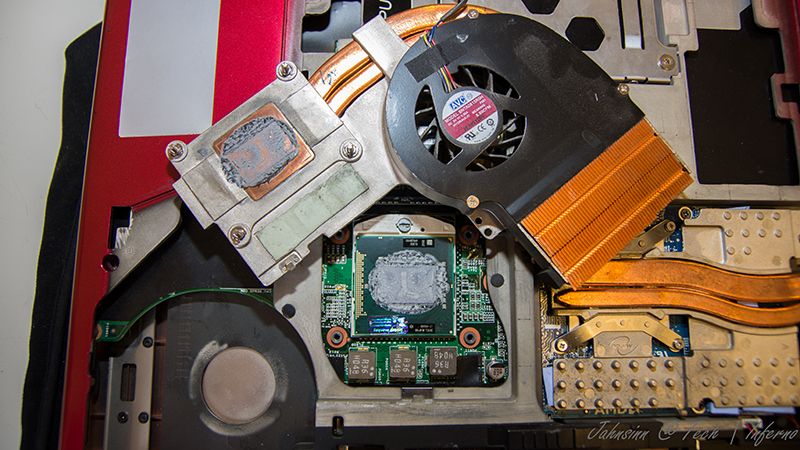
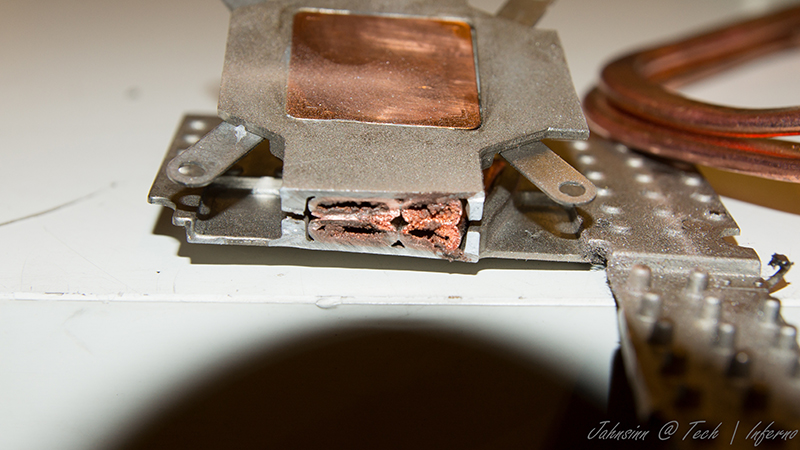
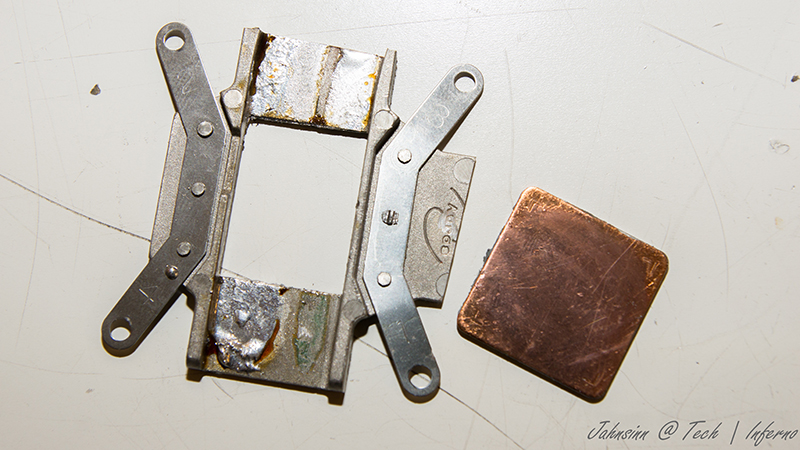
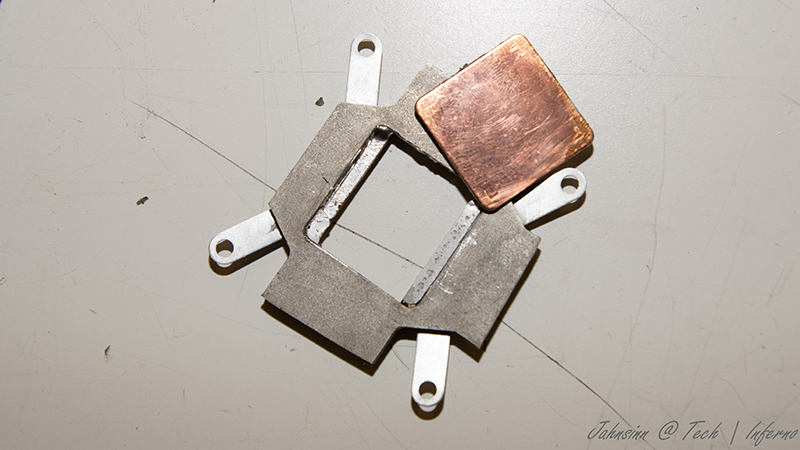
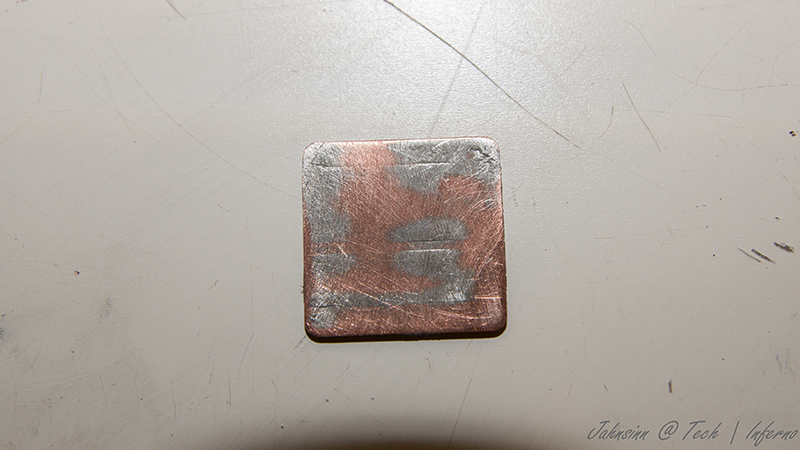
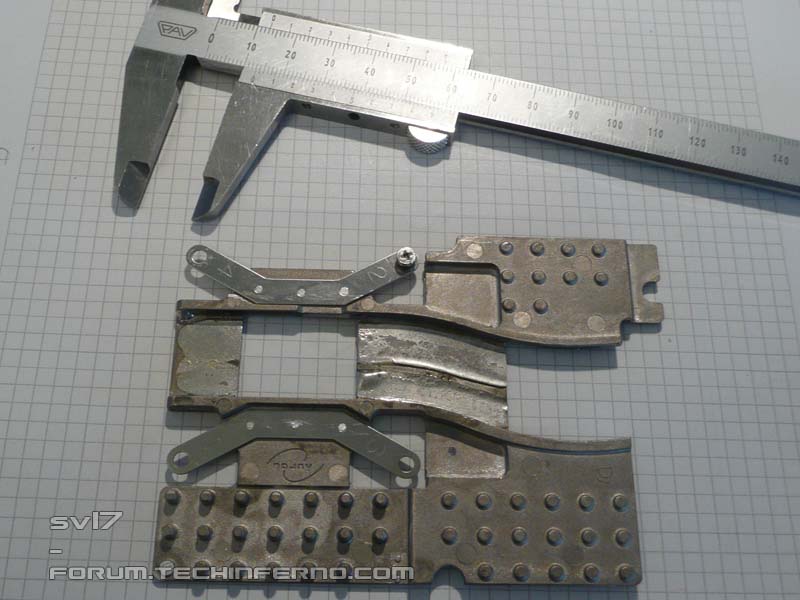
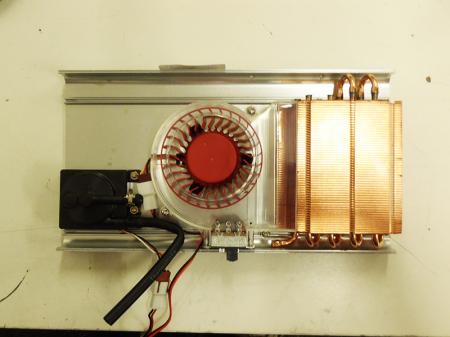
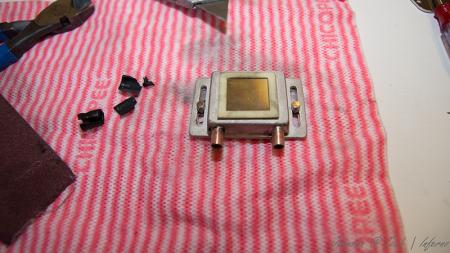
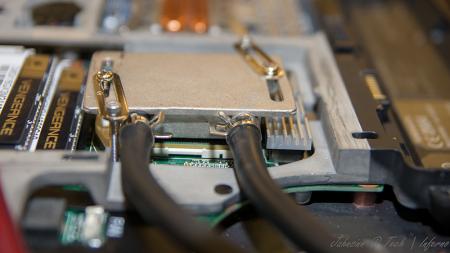
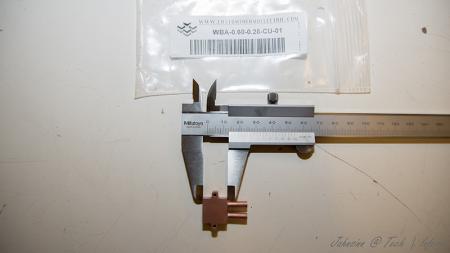
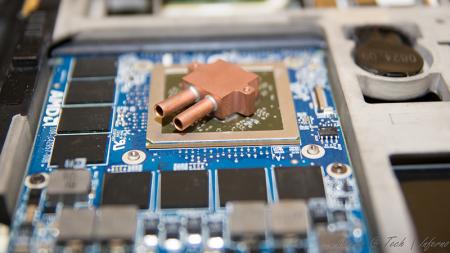
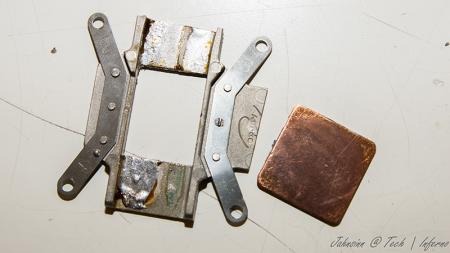
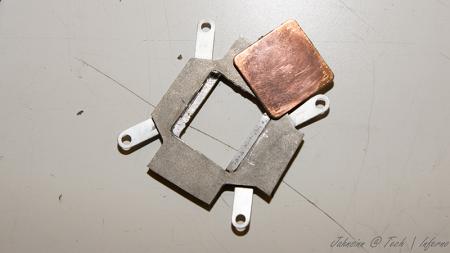
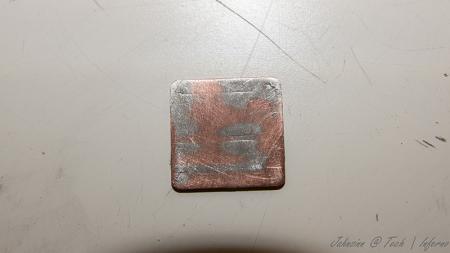
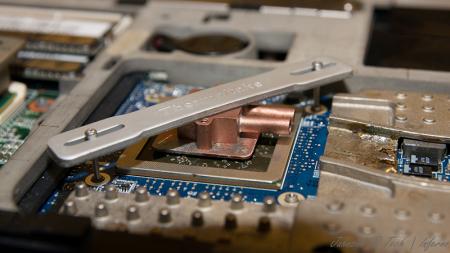
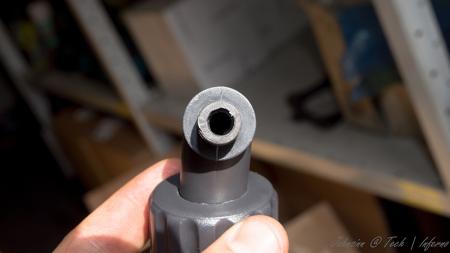
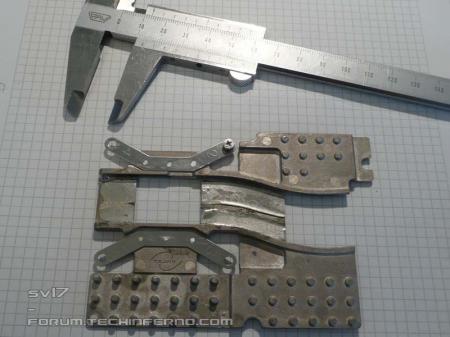
Hey guys, I'm about to design a custom heatsink for my system. I've got a little question and I'd like to hear your thoughts about this. As you probably know, the screws which are fixing the heatsink on the GPU are hold by two pieces of spring steel which get slightly bent when the heatsink gets screwed on the GPU. Now one possibility is, I could try to design the heatsink in a way that allows me to reuse those two pieces for holding the screws and fix them to the heatsink. The other option would be to just make a copper plate with holes for the heatsink screws. Do you think this would work as well? I imagine it'd require some care when mounting the heatsink on the GPU in order to prevent to much force getting applied on the die. I somehow think it may be difficult to get the heatsink flat on the die with such a design. What do you think? Are these spring steel screw holders necessary or not? Here's a pic in case you're not 100% sure what I'm talking about, it's the stripped down heatsink (no heatpipes, no copper plate, only the two pieces which are holding the screws are attached).
- 87 replies
-
- 5
-
-
- copper heatsink
- custom designed heatsink
- (and 6 more)
-
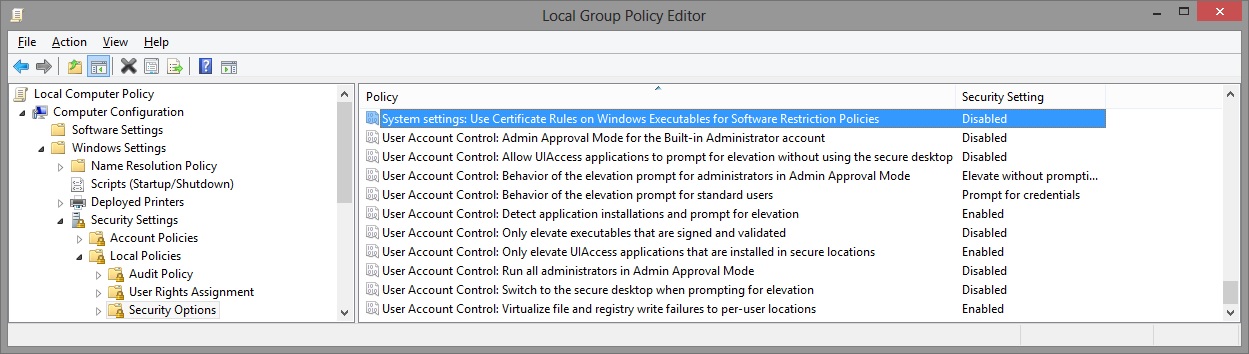
I've recreated the OSD Icons for the R1/R2/R3/R4 and R5 aka 17 as the standard ones are a bit dated. It should also work with the M15x though as my old M15x had the same setup for the OSD app. Regarding the R3 OSD, it seems its the same install for the M18x as well so it should work for you M18x owners too. I've also added the AW 17 OSD to the list. This exe is also compatible with the 14 and 18 as Dell uses the same OSD for all the new machines. There's also a set for you Area-51 m17 R1 owners. I've tried to give it a simular feel to the Invader Icon pack by Alienware. Hope you guys like it Install Instructions for R1 1. You need to end the OSD process in Task Manager since it may be using some of these icon files. Ctrl+Shift+Esc then find the OSD process and end it. 2. Backup your current icons if you want to revert to the originals (You can also uninstall and re-install the OSD application if you want to go back to the original icons) 3. Extract the attached "M17X R1-R2 & M15X.zip" contents to C:\Program Files (x86)\OSD\picture\. Overwrite if prompted. 4. Restart the OSD application. It is located in C:\Program Files (x86)\OSD\Launch.exe 5. Done! Install Instructions for R2 /M15x 1. You need to end the OSD.exe process in Task Manager since it may be using some of these icon files. Ctrl+Shift+Esc then find "OSD.exe" and end the process. 2. Backup your current icons if you want to revert to the originals (You can also uninstall and re-install the OSD application if you want to go back to the original icons) 3. Extract the attached "M17X R1-R2 & M15X.zip" contents to C:\Program Files (x86)\OSD\ICONs\. Overwrite if prompted. 4. Restart the OSD application. It is located in C:\Program Files (x86)\OSD\Launch_OSD.exe 5. Done! Install instructions for R3 / R4 / M18x 1. You need to end the OSD process in Task Manager since it may be using some of these icon files. Ctrl+Shift+Esc then find the AlienwareOn-ScreenDisplay.exe process and end it. 2. Backup the existing AlienwareOn-ScreenDisplay.exe by renaming it to "AlienwareOn-ScreenDisplay.exe.BAK" for example. Its in C:\Program Files (x86)\Alienware On-Screen Display\ 3. Extract the AlienwareOn-ScreenDisplay.exe from the appropriately named file depending on your OS and model to the C:\Program Files (x86)\Alienware On-Screen Display\ folder. 4. Restart the OSD application by double-clicking the file. 5. Done! Install instructions for 14 / 17 / 18 ** 1. You need to end the OSD process in Task Manager since it may be using some of these icon files. Ctrl+Shift+Esc then find the AlienwareOn-ScreenDisplay.exe process and end it. 2. Backup the existing AlienwareOn-ScreenDisplay.exe by renaming it to "AlienwareOn-ScreenDisplay.exe.BAK" for example. Its in C:\Program Files (x86)\Alienware On-Screen Display\ 3. Extract the AlienwareOn-ScreenDisplay.exe from the "AW 14-17-18 (Windows 8).zip" file to the C:\Program Files (x86)\Alienware On-Screen Display\ folder. 4. Restart the OSD application by double-clicking the file. 5. Done! The Area-51 m17-R1 install should be similar to the steps for the other laptop revisions above. They all basically follow the same process anyway, apart from filenames/paths. @robby_hd was kind enough to make a red version of these icons for the M17x R3 / M18x R1 which can be downloaded from his post here. **There seems to be a security issue with Windows 8/8.1 at this point in time since it doesn't allow modified exe's. I will update this post with a solution once it has been found. Also a few Alienware owners are having an issue with the unmodified OSD and Windows 8. Only the default Windows 8 OSD displays and not the Alienware version. Try the solution posted by Dell here and then attempt installing the mod. The below screenprint is a workaround by editing the security policies to allow the unsigned exe to run in Windows 8. If you are not aware of what these settings do and the repercussions of changing them, please do not attempt it. - Open the Group Policy Editor by typing "gpedit.msc" in the search or run text box. - Duplicate the settings below. Area-51 m17-R1.zip M17X R1-R2 & M15X.zip M17X R3-R4 & M18X R1-R2 (Windows 7).zip M17x R4 & M18X R2 (Windows 8).zip AW 14-17-18 (Windows 8).zip M17X R4 & M18X R2 (Windows 8.1).zip


- 171 replies
-
- 44
-
-
Ahmed Mossam at bios-mods.com has uploaded an unlocked BIOS for the M15x, based on the Dell version A09. A very big thanks to him for his work!! Here's the link to the original thread at bios-mods: M15x BIOS unlocking request I have flashed this BIOS and the system works just as with the regular BIOS, the only difference is that there are several new menus accesible in the "Advanced" tab of the BIOS: -IGD - LCD Control Sub-Menu -SATA Control Sub-Menu -SATA Hard Drive The performance options have new sub-menus as well: -Plaform Thermal Configuration -Clarksfield QPI-Sub-Menu -Clarksfiled Memory Sub-Menu Unfortunately there are no frequency ratio options in the bios. Each of those has a couple of further submenus. Check out the pics of the screen in the spoiler for all details: Not every of the new options will be useful though, e.g. enabling eSata port multiplying won't do any good since the PM55 chipset doesn't support this feature. I haven't tested all the new options yet, but I'll definitely take a closer look at them. Instructions for flashing: - Download the unlocked BIOS files, they can be found here. - Download the BIOS A09 executable file (R293649.exe) from the Dell driver site and extract it and copy the files to the root of a DOS bootable USB drive. - delete the following files W6702M.A09, W6702MB.A09.bin, W6702MB.A09 from the USB drive - extract the .zip archive with the modded BIOS files and copy the three files to the root of your USB drive - rename the modded files (W6702M_SLIC.A09, W6702MB.A09_SLIC.bin, W6702MB_SLIC.A09) to W6702M.A09, W6702MB.A09.bin and W6702MB.A09 -Shutdown your system and boot from your USB drive -Type fa.bat and hit enter -follow the instruction on the screen, after the flashing is finished, the system will shutdown itself -restart your system and don't do anything, it will restart a couple of times before it will boot into Windows, don't worry. Everything at your own risk of course, I don't take any resposibility for bricked mobos. Crisis information should be available at bios-mods.com in case you mess up totally. Hope some of you guys test this as well and give some feedback. Again, a very big thanks to Ahmed Hossam from the bios-mods.com forums.
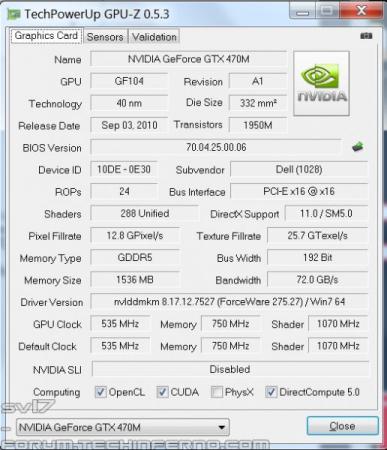
-
Guide - M15x with Nvidia GTX 470m IMPORTANT: The Nvidia 470m is not officially supported by Dell. Upgrading to this card may void your warranty. Some background to this mod: The first guy who tried to put a Nvidia 470m in an Alienware M15x was @iloveb00bs in December 2010, shortly after the card got released. Unfortunately it didn't work as desired, the card worked, but only at 2d clocks. All attempts to bring it to 3d clocks failed, and the card wasn't supported by Nibitor support at this time. Also @widezu69 didn't get it to work a couple of weeks ago, so I didn't think it would be possible. But in the process of trying to upgrade the Asus G73JW of a colleague I got my hands on a Nvidia GTX 470m and since we didn't get it to work in the G73, I thought let's try it again in the M15x... I had to mod the vbios to get it running at 3d clocks. I'm not that experienced with Nvidia cards, so that's probably why it took me a couple of attempts to get it working. First I changed the 2d clocks and voltage (P3 in Nibitor) to 3d values. The result was that the card idled at 3d clocks, but as soon as I opened a 3d application it went downclocked itself to about 73MHz core and got to 2d voltage again... pretty annoying. After some more tests I realized that I had to change the lower 3d clocks and voltage (P7 in Nibitor). This did the trick. Apparently the card only checks P7 and P3 in the VBIOS, the actual 3d clock entries (P15) seem to have no effect at all. The fan control works perfectly. Haven't tested DP/HDMI audio yet, but I'll do this sometime soon. Things to do before exchanging the card: Download the drivers. I used the latest Nvidia beta driver (v275.27) and the modded .inf files from laptopvideo2go. As the card comes from Clevo I guess the Clevo (and resellers) driver will work as well. But I usually prefer the latest driver for performance and stability. Also get GPU-Z for monitoring your video card and verifying it. Make sure you have thermal paste, maybe some new thermal pads as well as something to clean the heatsink (e.g. isoproply alcohol) and some cloths around. I also highly recommend using a grounded ESD-mat and a wristband. Know what you're doing. You need to partially disassemble your machine to get to the GPU. Prepare yourself thoroughly, check out my little GPU exchangement guide and if you need more information also the M15x service manual, as well as the . It can be helpful to write down all the steps in advance when you're doing this for the first time. In case there's still something unclear about the disassembling procedure after checking out all the stuff I just mentioned, just ask. Exchanging the GPU is really pretty easy. Very important: Make all the necessary preparations to flash the modified vbios to the card in order to get it working at 3d clocks: You'll need a DOS bootable USB drive with NVflash on it. If you have already such an USB drive you can skip the next step and simply copy the mod470m.rom file from the attached archive to your stick. If you first need to create such an USB drive open an read the Spoiler: Creating a bootable DOS USB drive (by [MENTION=5]Brian K.[/MENTION] ) Step 3: Download and extract Nvflash, the tool for flashing a Nvidia vbios to the GPU from DOS. Copy the files to the root of your already correctly formatted USB stick. Step 4: Download the modded GTX 470m vbios and put it on your USB drive as well. The upgrading procedure: Uninstall your GPU drivers. Make a power drain (Turn off your M15x, remove the power cord and the battery. Then press and hold down the power button (Alienhead) for about 10-20 sec. Remove your GPU - Here's a little guide with pics in case you need some help. Clean your heatsink, if necessary replace the thermal pads with new ones. Make sure the 470m has a retention bracket on the back of the GPU. If not take the one from your old GPU and put it there. Properly insert your GPU, make sure that it sits properly and that the die is clean. Apply the thermal paste, and attach the heatsink. Then (after reassembling your system), boot, install the drivers and reboot. Make sure the fans are running (otherwise you probably forgot to plug in the fan). Open GPU-Z and verify your card and the clocks. Default 3D clocks are 535/750/1070 MHz (core/memory/shader), you can see them in the "Graphics card" tab of GPU-Z. Make sure PowerPlay is enabled in the Catalyst Control Center. Also make sure Stealth Mode is deactivated. Check your temperatures. Idle temps should be 40-50°C, depending on your ambient temp of course. While gaming or doing something similar GPU-intense the system will run significantly hotter, 60-70°C, maybe a bit higher. >>> Now you need to flash the modded vbios to your GTX 470m in order to get your card working at 3d speeds <<<WARNING: Flashing the vbios of your GPU always involves some risk and can brick your card in case something goes wrong. Make sure you know the exact procedure before doing this. I do not take any responsibility for damaged cards, systems or whatever. -Plug in your properly prepared USB drive -Make sure your system is plugged in (AC adapter and to be safe battery as well) -Reboot -When you see the Alienhead press [F12] to get to the boot menu, choose "Boot from USB" A command prompt will appear. First of all, make a backup of your original 470m vbios! Use the following command: nvflash -b orig470m.rom Before flashing, test whether the file isn't corrupted (errors while copying it to the stick or similar): nvflash -v mod470m.rom The image size must be 64000 bytes and the CRC32 3C8FA599 Now flash the modded vbios: nvflash -5 -6 mod470m.rom Press enter. A couple of warnings will appear, follow the instructions on the screen to confirm the flash procedure. Remember, some Keyboard layouts have the [Z] key at the place where the US layout has the [Y] key. So in case you have such a keyboard you'll need to press [z] instead of [y], otherwise the flashing procedure will get cancelled. Then press [Ctrl][Alt]+[Del] to reboot your system, unplug the USB stick. You can use GPU-Z to verify the flash of the vbios. It should look like this afterwards: Here some first benchmarks, both at stock clocks, PhysX off and the rest in the Nvidia control panel on standard settings, CPU at 3.2GHz. I haven't seen other 470m benchmarks of other systems, but 9k stock vantage seems reasonable. The card is probably pretty overclockable, but I haven't tested this yet. I have yet to find overclocking tool with which I can set the core clock manually, so far I only managed to change the memory and shader clock with Nvidia Inspector. Otherwise I'll have to modify the vbios in order to overclock it (which isn't the best solution as I can't really push the card with this method) However, it seems the card can be overvolted, haven't tested it yet but Nibitor allows me to change the voltage to 0.99V (instead of 0.94V). The only issue so far is that the card runs either at 3d clocks or at 2d clocks. Nothing between this. (As I said, the card only seems to use P7 and P3, if anyone knows a solution to this, let me know). M15x GPU exchangement guide .pdf modded 470m vbios - only for AW M15x.zip
- 43 replies
-
- 10
-
-
- 470m
- alienware m15x
- (and 8 more)
-
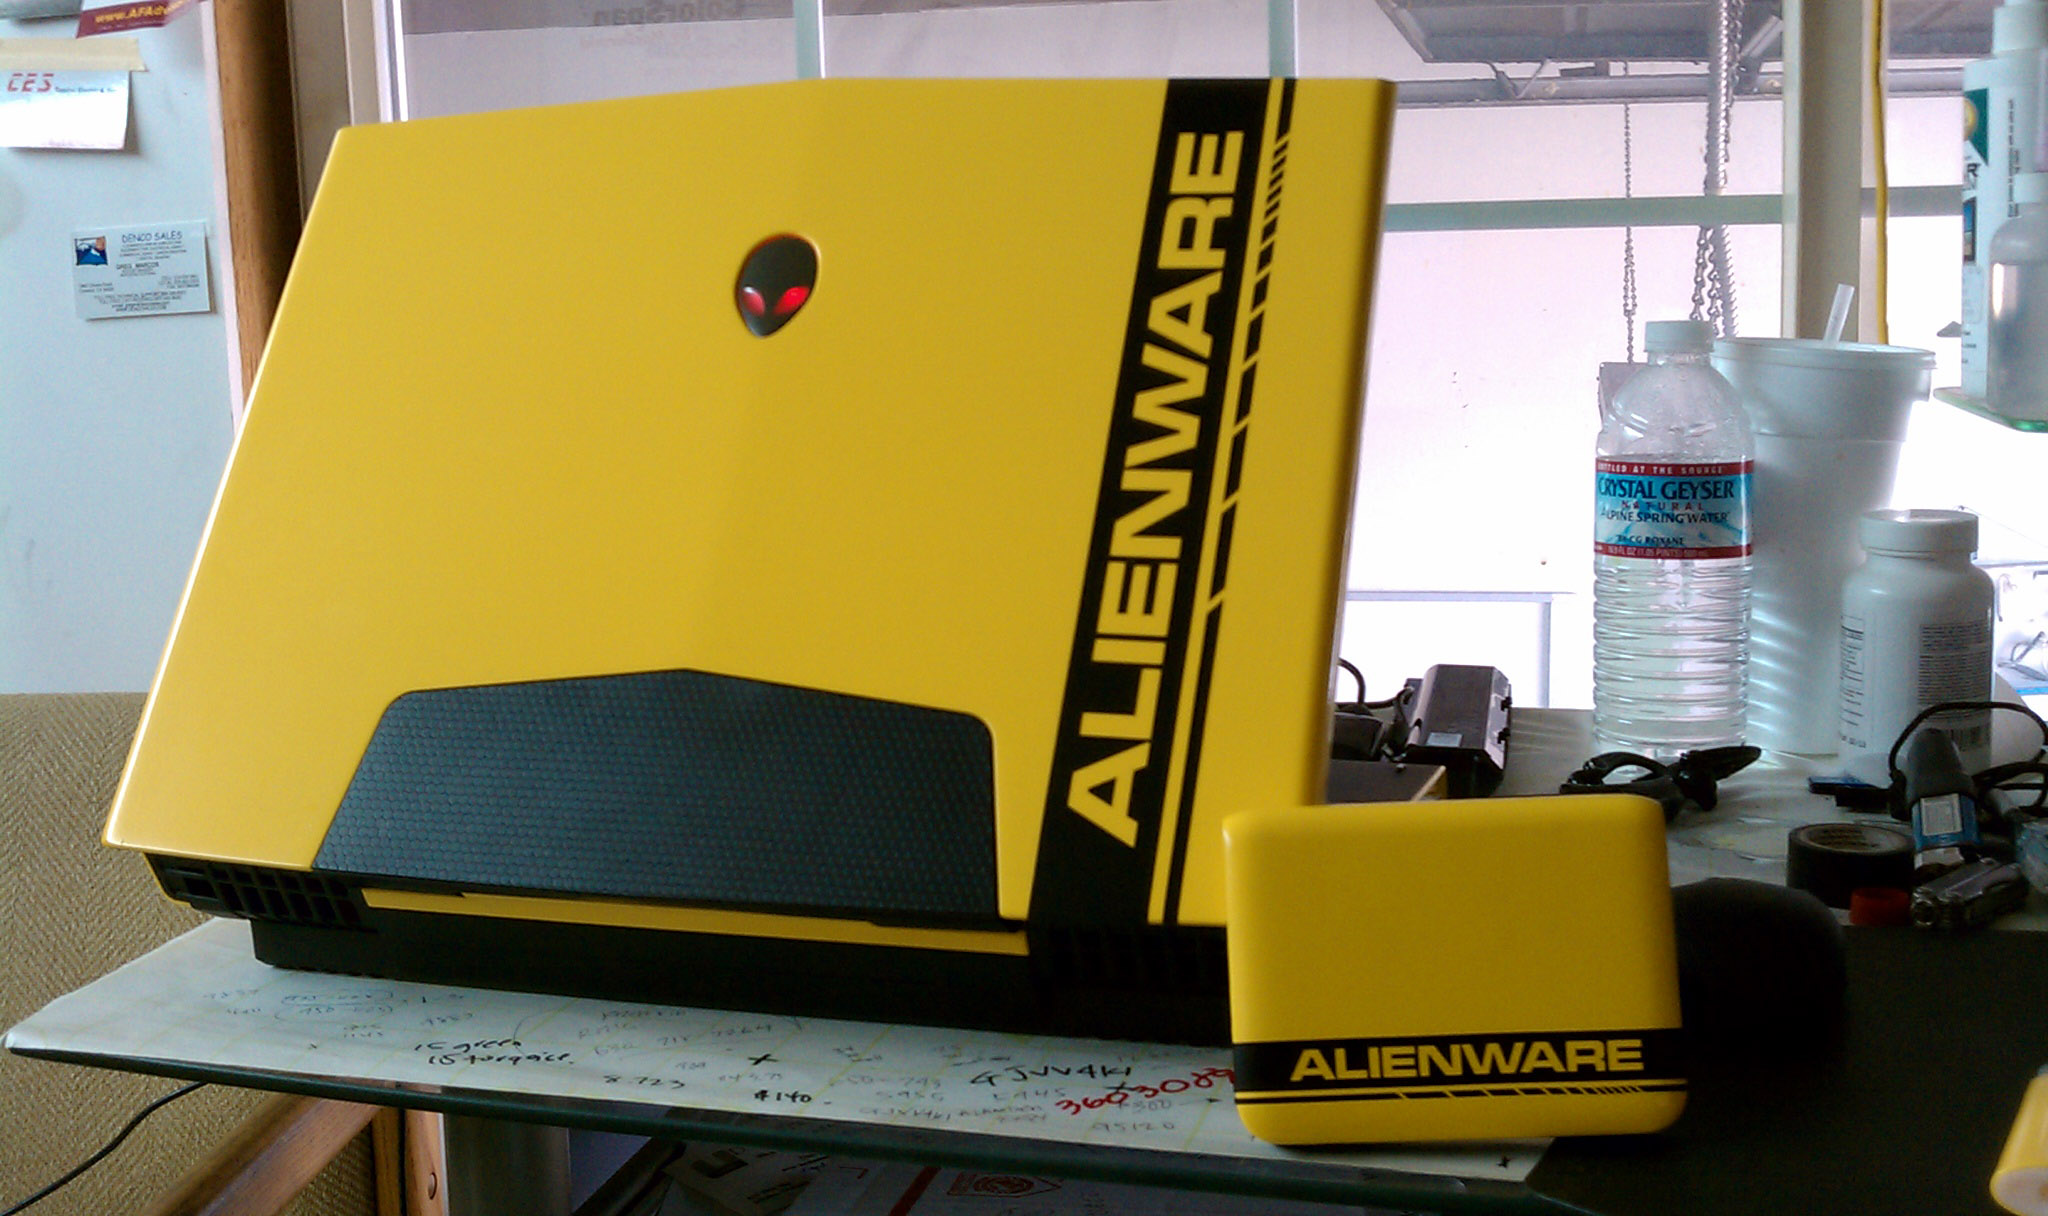
I was browsing the others forums and I come across this picture. I would die for a paint job like this, so here is the question, do you think this is achievable in our M18x which is an aluminum cover? I know inap aka iloveboobs aka iwillkeepyoudistractedwithmydesktops did and awesome job on his m17x-R2? Do you think this is doable with the the 3m tape? Wait a minute, It was you INAP!! OMG wow nice job, now do you think this can be done in the m18x?

- 10 replies
-
- 2
-
-
- alienware m15x
- custom alienware
- (and 8 more)