Leaderboard


Popular Content
Showing content with the highest reputation on 04/09/15 in all areas
-
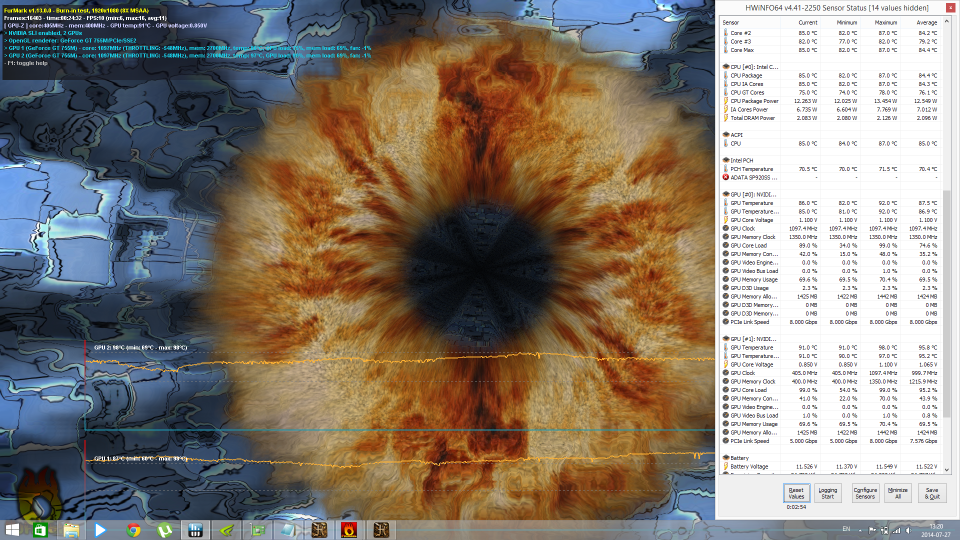
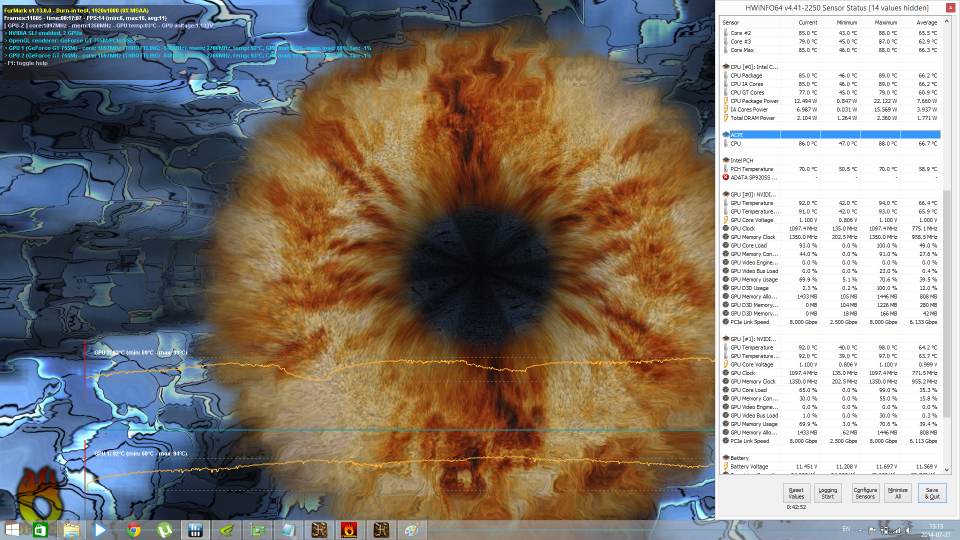
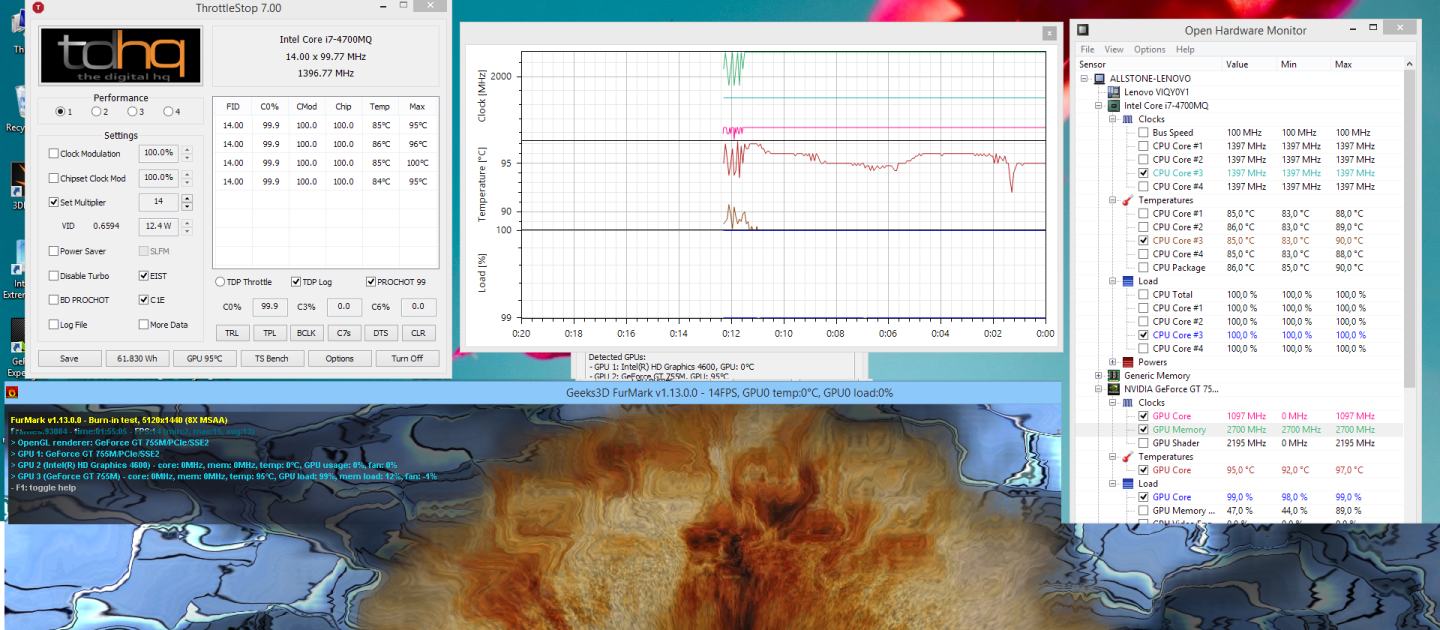
I have been trying to find a way to control fans on my y510p. As everything else failed up to the Embedded Controller (EC), I have made myself a program to call dust removal function. With a help of this forum members, I have perfected calling and stopping timing which works on my computer. Basically, running Furmark, if I do not run this program, I constantly run into 97C and thermal throttling for my GPU (see Mhz of core and memory): And when I do run this program, it manages to keep temperatures at 88-93C and there is no more throttling in a long run. Usage: run the program and it will enable dust function when you reach GPU/CPU temperature of 90C. Or Start/Stop it with keyboard shortcut Ctrl+Shift+Q or through menu on tray icon. Download: IdeaFan v1.6 (includes OpenHardwareMonitor 0.7.1.0 beta) So far, this has been tested on 2 computers (y510p Win 8.1/Win 8.1Pro/Win10). Both with Lenovo Energy driver v7.x and v8.x. I have tried it for both 2xSLI and 1x GPU, also for CPU stress tests or simply during high CPU usage, i.e. rendering videos. Feel free to use and leave some comments that it can be further improved if possible. Danger! Do not use Furmark to stress your GPU unless you know what you are doing. I have used it here for testing purposes only. Release Notes v1.6 *change* Migrated to OpenHardwareMonitor 0.7.1.0 beta) *fix* Temperatures are shown and working on Windows 10 (tested on build 1511) v1.5 *fix* Supposedly startup error with OHM should be fixed *new* Added another keyboard shortcut just for diversity v1.4 *fix* When fan is running, nothing should disrupt the cycle (not tray menu nor high cpu/gpu usage or temperatures) *change* Startup option changed from startup folder to windows task *change* Updated default settings *change* Removed sleeps, introduced timers/threads *new* Lower cpu usage v1.3 *change* Reverted default settings (to have several versions with all newest changes available) v1.2 *change* Updated default settings (provided by octiceps) v1.1 *new* Options are saved in ini file *new* Automatic dust function control based on temperature (OpenHardwareMonitor 0.6.0 beta included) *new* Startup option fixed *new* Ability to change timeouts in ini file v1.0 Initial Version to run dust function And here are possible improvement requests for the fututre: 1. Make fans start hitting the 9s/0.5-1s cadence right off the bat. Need to make sure that the last time fans are stopped, its within 0.5-1s gap when they are stopped. This is due to the EC somehow remembering where it left off the last time and resuming from there. If you stopped it in the middle of a spin cycle, the next time you run it the fans will be inconsistent inside the first minute before finding their rhythm again. The length of the gap is also determined by last your stopping point. I've gotten it anywhere from basically none (fans spin down and spin up immediately) up to 1s, but it never goes above that. Edit: tested to stop at 0.5-1s gap, but that seems to have no effect on the initial position. Also tried variable timeouts - seems for EC its no different, with variable its unpredictable, constant value may be required afterall. For now its seems the only way to start off the bat for sure is to know internals of EC - or at least get a fan RPM sensor readings which we do not have. 2. When OHW 0.6 is not started, IdeaFan throws errors (need to check for them), only at COLD first start. See http://forum.techinferno.com/lenovo-ibm/7358-ideafan-y510p-6.html#post102492 (should be fixed in 1.5) 3. Introduce easy HotKey settings in INI file (like Ctrl=yes, Alt=yes, Key=q) and let change the hotkey. Also handle hotkey cannot bind error.


 1 point
 -
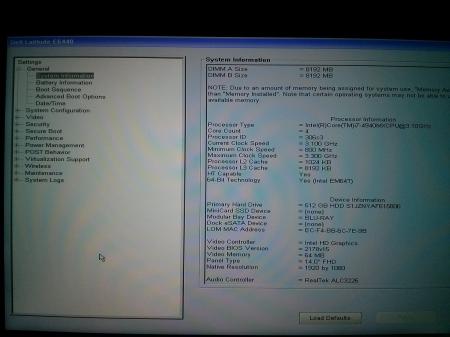
Consider this before purchase Tech Inferno Fan>> I recommend a slightly pricier BPlus PE4C V3.0 over any EXP GDC product as it has no Gen2 expresscard signalling issues when tested on my Dell E6440. The EXP GDC V6 does glitch occasionally with a "NVidia driver has stopped responding" with the manufacturer unwilling to supply an updated Beast product for review. I'm therefore assuming the problem isn't corrected in the newer version. 11-Nov >> Note: Beast product not integrated into purchasing guide below as yet. Comparison: EXP GDC Beast versus V7 (Ares) versus V6 -> Beast is the best!! The "BEAST" edition being the newest unit being that integrates all the desirable features of V6 (excellent connector positions, USB connector) with the best of the V7 (150W DC jack, x2 link support) and adding a new honeycomb acylic enclosure option as well as a new secondary boot delay (CTD - presumably CLKRUN). You'll note that Cloud is offering a Paypal purchase option in his aliexpress (English) store. These being the links of interest: Ê×Ò³-ÊýÂ빤³¡-ÌÔ±¦Íø (Chinese customers or Yoybuy taobao agents) hero cloud's store - Small Orders Online Store, Hot Selling set game card,mini iphone memory card,card reader writer software and more on Aliexpress.com (English/ROW customers) Comparison: EXP GDC V7 (Ares) versus V6 V7 has a 150W rated round DC socket, has a new NGFF.M2 (x2 2.0) adapter option and new enclosure options. V6 has better positioned power connectors AND has the USB port, though USB port has been reported as being flakey. No rating on the round DC socket suggests it's good for 75W slot power. Both use the same (BIG) 8pin jack for the DA-2 220W Dell AC adapter so will have no problems with either V6 or V7. V6 is better for standalone EC/mPCIe use with the 220W Dell DA-2 without an enclosure as gives a tidier cabling layout. The 220W DA-2 can power up to a GTX760/670/680/970/980. A 229W GTX770 could be accomodated if prepared to undervolt/underclock with MSI Afterburner software to get full load stability. V7 would be better if wanting to use say a smaller 150W AC adapter (GTX750Ti/660/970), use a NGFF.M2 PCIe slot, or want the new enclosure option. Why US$83-shipped 0W PE4C V2.1 is better than a US$50-shipped 0W EXP GDC V6? | Why US$134-shipped 220W PE4C V2.1 is better than a US$99-shipped 220W EXP GDC V6? Picture comparison: Download >> PE4CvsEXP + Tech Inferno Fan has found clean Gen2 signalling of the PE4C V2.1, whereas EXP GDC V6 has unreliable glitches + Has a PM4N socketted mPCIe option + BPlus have a history of delivering quality products to the DIY eGPU community. + Easier to purchase with quicker delivery + Has H1PA option -> can connect to a desktop PC to extend the slot + Has a x2 link option, though this is primary for users with 1st gen i-core or older systems. Intel locking down 2nd Gen i-core or newer systems to prevent that. + Has locking x16 slot + Support two delay switch (PCIe Reset Delay and CLKRUN) to avoid registration problems when booting + 0W BPlus offering includes the special PCIe power cable that the EXP GDC V6 0W package does not Why EXP GDC V6/V7s better than PE4C V2.1? + 0W US$50 offering is far more affordable. Their a user sources their own ATX PSU to drive the adapter. + import tax free for some EU countries + Dell DA-2 native input cable -> Customer can buy the PSU locally in their own country -> corrected in PE4C 2.1. It too has a native DA-8 8-pin input. + Rubber protected (re-enforced) mPCIe/EC cable + Very good shape of adapter + V7 has a x2 2.0 NGFF.M2 PCIe connector option + V7 has very stylish enclosure options Disadvantages: - V6 had some quality issues: USB port power, faulty mPCIe/EC cables, PCI Reset Delay faulty on some samples - logistics/delivery/purchase is more complex via Taobao agents like yoybuy - No x2 link option where can combine EC+mPCIe or mPCIe+mPCIe (Series-5 1st gen i-core or older chipsets) -No nasty surprises like crazy import taxes, unlike similar products! IMPORTANT: When buying from Taobao agents such as Yoybuy, ask the agent for the original Taobao order number! This is needed when contacting Cloud if the item is damaged/faulty NEWS "Say Hello" to EXP GDC V7.0: M.2 / NGFF support! Link to yoybuy Metal enclosure for the EXP GDC V7.0 or ask for V6.0 Link to yoybuy now accepting , Packages EXP GDC BEAST w/o power supply: US$50-$53 (incl. shipping and ATX-cable): banggood Store - IMPORTANT: The 6-pin PCI-e power cable is nowincluded! - IMPORTANT: The ATX power cable is included EXP GDC BEAST w/o power supply: US$68 (64 + $2 + $2) (incl. shipping): Aliexpress Store - IMPORTANT: Don't forget to add the 6-pin PCI-e power cable EXP GDC BEAST & V7 NGFF complete package (including 220W power supply and PCI-e cable): US$99 (incl. shipping): Yoybuy Store - IMPORTANT: (Optional) Don't forget to add the ATX power cable (if you intend to use GPU's higher rated than 220W) - IMPORTANT: When asked for extimated weight, use 2000g (2Kg) - IMPORTANT: 195W GTX680 would be the highest rated card to use with this 220W AC adapter. 229W GTX770 requires undervolting. - INFO: Sonek's post for images of complete package content. Accessories 6P-pin PCI-e power cable EU Coolermaster: 6-pin to 6+2pin, modular flat cable US Coolermaster: 6-pin to 6+2pin, modular flat cable US eBay: 6-pin to dual 6-pin, modular cable ATX power cable: Yoybuy Store Acrylic enclosure EXP GDC V6.0: Yoybuy Store | enclosure images by bichael and shared by Tech Inferno Fan Metal enclosure EXP GDC V7.0 (or ask for V6.0): Yoybuy Store WARNING: Some users had tried hooking up a regular PCIe 4-pin cable straight to the EXP GDC (8-pin/DA-2 power socket), this is very dangerous and will cause fire and harm/destroy your EXP GDC, GPU or System!!! The DA-2 interface has reverse polarity compared to PCIe power interface which means you will be shorting 12V -> GND & GND -> 12V. Use the ATX power cable: Yoybuy Store Video Review Donations for video? Recommend to not donate to the author of the video as he suggests. Instead donate to any of the members who have been pivotal in delivering eGPU content: Tech Inferno Fan, kizwan, angerthosenear, jacobsson to name a few. Metal enclosure for the new EXP GDC V7.0.
 1 point
 -
Yes I did and it works! However, the high TDP of this card means that it was shutting off my 240w power supply when running games that are both cpu and GPU intensive, I have had to buy a 330w power supply to sort that. My 2960xm is most likely contributing to the issue (higher TDP than the qm chips at 55w) but a 180w power supply is definitely not enough to cope with the 980m even with a qm cpu so anyone thinking about this upgrade needs to be aware. I'm delighted the upgrade works but I would advise the 970m as the better option for the gt780 as it has a lower TDP meaning it's a better balanced upgrade in terms of price, performance and plug and play results.1 point
-
Beautiful work buddy! This power breakout board must be able to get manufactured somewhere else rather than Bplus. The great thing about this breakout board is that it's made for a 220W 12V DC adapter, which means that it can not only be used for eGPU purposes but now as a regular bench power supply (battery chargers etc etc) w/o modifications. Oh, and look at it, it can even be easily panel mounted too. Again, great job!1 point
-
Updated last post with better pics and more details.1 point
-
Try this, but its not perfect. IdeaFan for y510p'>http://forum.techinferno.com/showthread.php?t=7358 IdeaFan for y510p1 point
-
Was a bit bored, and did some more upgrades.
 1 point
 -
Hi, The 350.05 are working very well on my AW17 / GTX 980m / 4710mq / Win 8.1. I installed them without any trouble on the first try. I wasn't able to install the 347.90, after several trials I had to reinstall my .88. On 3DMark11, I score 10398 using the 350.05 and 9920 using the 347.88. Thanks a lot.1 point
-
Install using nv_whql.inf instead. Correct, just disable driver signing before installing drivers -> nv_dispi.inf v350.05 below. 1- Win7 >Optimus<. 2- Install v347.90/sig. 3- BIOS -> UEFI (GPT) -> CSM/Legacy option ROM disabled -> Exit menu -> Save without exit -> Power Off -> Install 980M -> Install Win8.1. - - - Updated - - - GeForce Hotfix driver 350.05 Battlefield Hardline - crash with Direct X error message on some systems Dragon Age: Inquisition - TDR crash PhysX 9.15.0324 nv_dispi.inf: PEG/Dedicated & Optimus/M17xR4. nvcvi.inf: Optimus Alienware 17 / 05AA (only) GTX 980M - 970M - 965M @chiefule Try installing 350.05 using nv_dispi.inf, check throttling stock clocks. Soon modded .inf that removes throttling/stock clocks. Edit: Link v350.05 Mod (PEG) AW/900M Stock throttling removed (P1 switching). GeForce 350.05 HF nv_dispi.inf_v350.05_AW17_M17x_AW18_M18x_GTX_980M_970M_880M_780M_680M.zip nvcvi.inf_v350.05_Optimus_Alienware_17_GTX_980M_970M_965M.zip1 point
-
My frist Benchmark here but with problem "See Here"1 point