Leaderboard


Popular Content
Showing content with the highest reputation on 05/31/14 in all areas
-
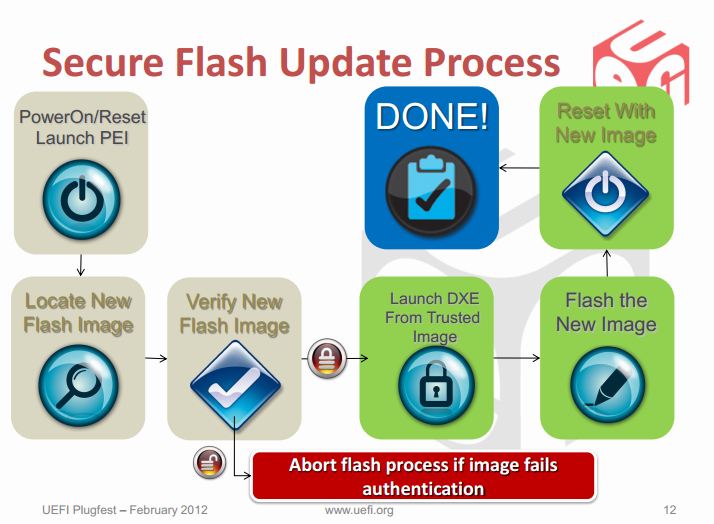
********** * This is only for systems with Intel chipsets. * * It still won't work for all of them, but for some it does. * This article is meant as an explanation for interested / advanced users. Since some of the more recent bios mods require the tool described below in order to allow flashing, I decided to share some information about it. Also I really don't like how users get locked out of their own hardware, this is a way to circumvent a couple of the more recent restrictions of certain systems. I hope this will be useful to some of you. If you know other ways to get around the current firmware updating restrictions (per software), please let me know. The problem: With the appearance of Windows 8 and Microsoft's requirement for OEMs to support 'secure boot' in order to get the Win8 certificate for their machines, a lot of the most recent systems (notebooks and desktops) use now firmware which is digitally signed. Since secure boot looses its purpose if firmware updates aren't verified and protected as well, the latest UEFI implementations come with a secure firmware upgrading procedure which makes sure that only properly signed and unmodified images can be flashed. This updating protections is active even if you don't enable secure boot. These two pictures explain the idea behind secure firmware updating very clearly: On the second picture you can see that the system verifies the firmware image even before it loads the drivers required for the flash. For bios modders or people who want to use modified firmware, the consequences of this are severe. It simply isn't possible anymore to flash digitally signed bios which have been modified, there's no way around the signature, at least not with the usual tools. The solution (at least for some systems): The only way to get around those new restrictions is to directly program the firmware flash memory and therefore leave out the verifying of the image. In Intel systems the flash chip is directly wired to the PCH, and it can be accessed by an Intel utility called Flash Programming Tool. It's a very powerful application which supports the most common flash memory chips. The requirement for it to work on a system are the following: - BIOS region of the flash memory must have write permissions - The OEM or BIOS vendor omitted to set an additional flash lock. - You can't flash an encapsulated firmware image, only the pure bios region. You will have access to the BIOS region for obvious reasons, but the second point can only be figured out by trying to flash a BIOS. If the tool comes up with an 'Error 28', download the attached 'prr' utility, as well as the DOS version of the flash tool. Put both on an USB drive which can boot DOS, boot from it and execute the prr.exe, if it manages to remove the protection on your system it will tell you 'ready to flash', in this case go ahead and directly flash with fpt, without rebooting before doing so. If prr can't remove the protection you're most likely out of luck, even though might be ways for certain systems, but the chances are pretty small. In order to flash a BIOS you will need to remove the capsule from the firmware image provided by your system manufacturer. You only want to update the bios. Then flash it by using this command: fptw64 -f FILE -bios (FILE stands for the image you want to flash) ***WARNING*** This tool is only for very advanced users. If you mess up it will override your BIOS without a warning or waiting for you to confirm. This means you can easily brick your system beyond any chance of recovery. You most likely don't need this tool. My BIOS mods which require this application for flashing will always come with a .bat file which will do the flashing for you. Again, for 99.9% of the users there's no need to mess with this. This version of the tool works only for 7 series chipsets. *InBeforeOmgMyYystemWontBootAnymore* The tool provided here by svl7 (prr2.exe and former prr.exe) may not be hosted anywhere outside of Tech|Inferno without the previous approval of the author. FPT_DOS.zip Fptw64.zip prr2.zip

 1 point
 -
Here are the M14x BIOS revisions A07 and A08 with all the menus unlocked, just as previously with A05. This has not been tested so far, as I don't own an M14x, if you want to test it flash it with the tool in the attached archive and please report back! Thanks in advance! After flashing I highly recommend to go to the BIOS menu and load the default settings! *************** If you like these BIOS releases, please consider a donation to Tech|Inferno. *************** As always with such mods... you're responsible for your machine and what you do with it. Edit: A08 confirmed to work, A07 as well. Thanks a lot for testing @alroar ! M14x [unlocked] BIOS A07.zip M14x [unlocked] BIOS A08.zip1 point
-
Did the 4 pin connector from the psu or from the exp gdc burn? What power supply are you using? Does it have "native" 6 pin pcie cords? if yes, I'd recommend using them1 point
-
Ouch, that sounds disgusting Can you make a picture of the whole stuff hoocked up but turned off? I can't understand why it does not work as I don't have any problems with the hardware.1 point
-
Not possible because of the electrical port layout of the expresscard and mPCIe slot. Screencap of Setup 1.x of my 2570P with eGPU attached shows what's going on: port1=unused port2=expresscard port3=SD card reader port4=wifi Had HP wired port1/3=expresscard slot and port2/4=wifi slot (or vice versa), then yes, we could do a x2 2.0 eGPU implementation. That would have involved flashing a new ME Firmware that hard sets port1/3 as x2 and using a PE4C 2.0 to do it. Now last time I used a Dell Latitude E6230, it appeared to have electrical port layout for x2 2.0. Problem there is no known easy way of flashing the ME Firmware. Meaning it would be necessary to de-solder the bios chip, program it with a USB SPI programmer with modified ME FW, then solder it back on. Not a readily accessible mod with that amount of work. PE4L doesn't have native wiring to use a Dell DA-2 PSU. It could be used, but modifications would be needed. If you wanted to use that DA-2 with plug'n'play ease then you'd need a EXP GDC V6 eGPU adapter. Note: Just released BPlus PE4C V2 uses a DA-2 with a non-standard single pin DC jack end.1 point
-
Oh, looks like I forgot to post this... P3547 with 3dm11 NVIDIA GeForce GT 650M video card benchmark result - Intel Core i7-3820QM Processor,Alienware M14xR2 hwbot infos here: angerthosenear`s 3DMark11 - Performance score: 3547 marks with a GeForce GT 650M1 point
-
US$90 PE4C V2.0 with a 220W Dell AC Adapter has been released Shipping is US$23, so US$113 total. Can purchase the expresscard or mPCIe version and add the additional mPCIe, expresscard or PCIe adapter+cable for another US$20. A much better package than any previous PE4L/PE4H. Highlights being: - looks like supports x1 or x2 links "Support dual channel signal transfer" - Gen2 compliant - supports user-settable Reset Delay switch via jumpers "Support two sets external pin to setup delay time. Support two delay switch to avoid registration problems when boot." - appears to support CLKRUN delay "Support Suspend Clock" - has ATX plug on board -> does this mean can draw slot power from second rail on multi-rail PSUs? Documentation still sketchy on detail with unresolved links. Looks like may have been a rushed release. Check it out --> PE4C V2.0 (PCIe x16 Adapter) <--1 point
-
L502X modded bioses download (GPU voltages and more!) (scroll down to "Descriptor Securiy Override") or #2627 Realtek audio IC has a different pinout. Mine need shorting pin4 and pin7.1 point
-
More stuff exclusive for T|I users, voltage mods: All the vbios listed here are attached at the end of the post. ******************************** Nvidia 800m series: Nvidia GTX 880m (8GB version only): 'OC edition' -> unlocked overclocking limits, voltage adjustable, power target adjustable, optimized performance at higher clocks Can be used for all current 880m (Clevo, MSI and Dell). Nvidia GTX 870m: 'OC edition' -> see above Nvidia GTX 860m (GK104 variant): 'OC edition' -> see above. Refer to the file name to know which version is suited for your system. NOTE: Only for the Kepler version of the 860m. Silly Nvidia started giving different GPUs the same name. ******************************** Nvidia 700m series: Nvidia GTX 780m: 'OC edition' -> unlocked overclocking limits, voltage adjustable, power target adjustable, optimized performance at higher clocks Can be used for all current 780m (Clevo, MSI and Dell). Nvidia GTX 770m: 'OC edition' -> see above Nvidia GTX 765m: 'OC edition' -> see above. Refer to the file name to know which version is suited for your system. ********************************* Nvidia 600m series: MSI GTX 680m (4GB version): 'OC edition' revised -> higher limits for software overclocking, stock default clocks ----------------------- Dell GTX 680m (2GB version) vbios: 'OCedition' revised -> higher limits for software overclocking, stock default clocks same with increased 3d voltage ('OV') -> refer to the file name ----------------------- Clevo GTX 680m (4GB version) vbios: 'OCedition' revised -> higher limits for software overclocking, stock default clocks. For P1xxHM based systems I recommend only using version 80.04.29.00.01 !! Some users reported issue with other vbios versions (stock or modified, doesn't matter). EM users make sure you're on the latest BIOS / EC same with increased 3d voltage ('OV') -> refer to the file name (Same warning as above applies to P1xxHM users). ----------------------- K3000m: (Nvidia) K3000m - 80.04.3A.00.07 'OCedition' -> higher software overclocking limit Should work on all K3000m, unless you got a board ID mismatch. (HP) K3000m - 80.04.33.00.2E - 'OC edition' - > same as above, but probably the better choice if you use a HP machine ----------------------- K5000m: (Dell) K5000m - 80.04.33.00.35 - 'OCedition' -> higher software overclocking limit, stock 3d clocks 758MHz It's Dell but should work on all K5000m, unless you get a board ID mismatch. ----------------------- GTX 670mx: MSI 670mx (1.5GB) - 80.04.5B.00.A5_'OCedition'_rev00 -> higher software overclocking limits, tweaked performance at high clocks. Same board as the Clevo card. Clevo 670mx (3GB) - 80.04.58.00.03_'OC edition'_rev02 -> same as above, plus voltage is adjustable per software. ---------------------- MSI GTX 675mx: MSI 675mx (2GB) - 80.04.58.00.14_'OCedition'_rev00 -> higher software overclocking limits, tweaked performance at high clocks. MSI 675mx (4GB) - 80.04.58.00.0E_'OCedition'_rev00 -> same as above, vbios for 4GB card (!) ----------------------- Clevo GTX 675mx: Clevo 675mx (4GB) - 80.04.58.00.05_'OCedition'_rev00 -> higher software overclocking limits, tweaked performance at high clocks. ----------------------- ASUS G75VW BIOS: - 660m at 1000MHz core / 1400MHz memory - additional BIOS menus http://forum.techinferno.com/asus-gaming-notebook-forum/2538-%5Bg75vw%5D-modified-bios-vbios-higher-overclocking.html ------- Donation link in case you want to buy me a beer Thanks and cheers! *** FILE DOWNLOAD LOCATION:1 point