Leaderboard


Popular Content
Showing content with the highest reputation on 12/11/12 in all areas
-
Here's a version which includes changes for the 670m as well. Clocks at 715/1650. BIOS is the same. I also included some changes for the 660m, with this version it shouldn't boost anymore, which makes it easier to control the overclocks as it doesn't just jump up to possibly unstable clocks. For all who are going to flash it - please let me know how it performs and whether the clocks are all properly set. - file removed - (See first post for current version)2 points
-
Heh.... come out for a drive with me then sometime. I'm a true metal head at heart..... I blare cannibal corpse and nile at 8 in the morning just to wake up. LOL2 points
-
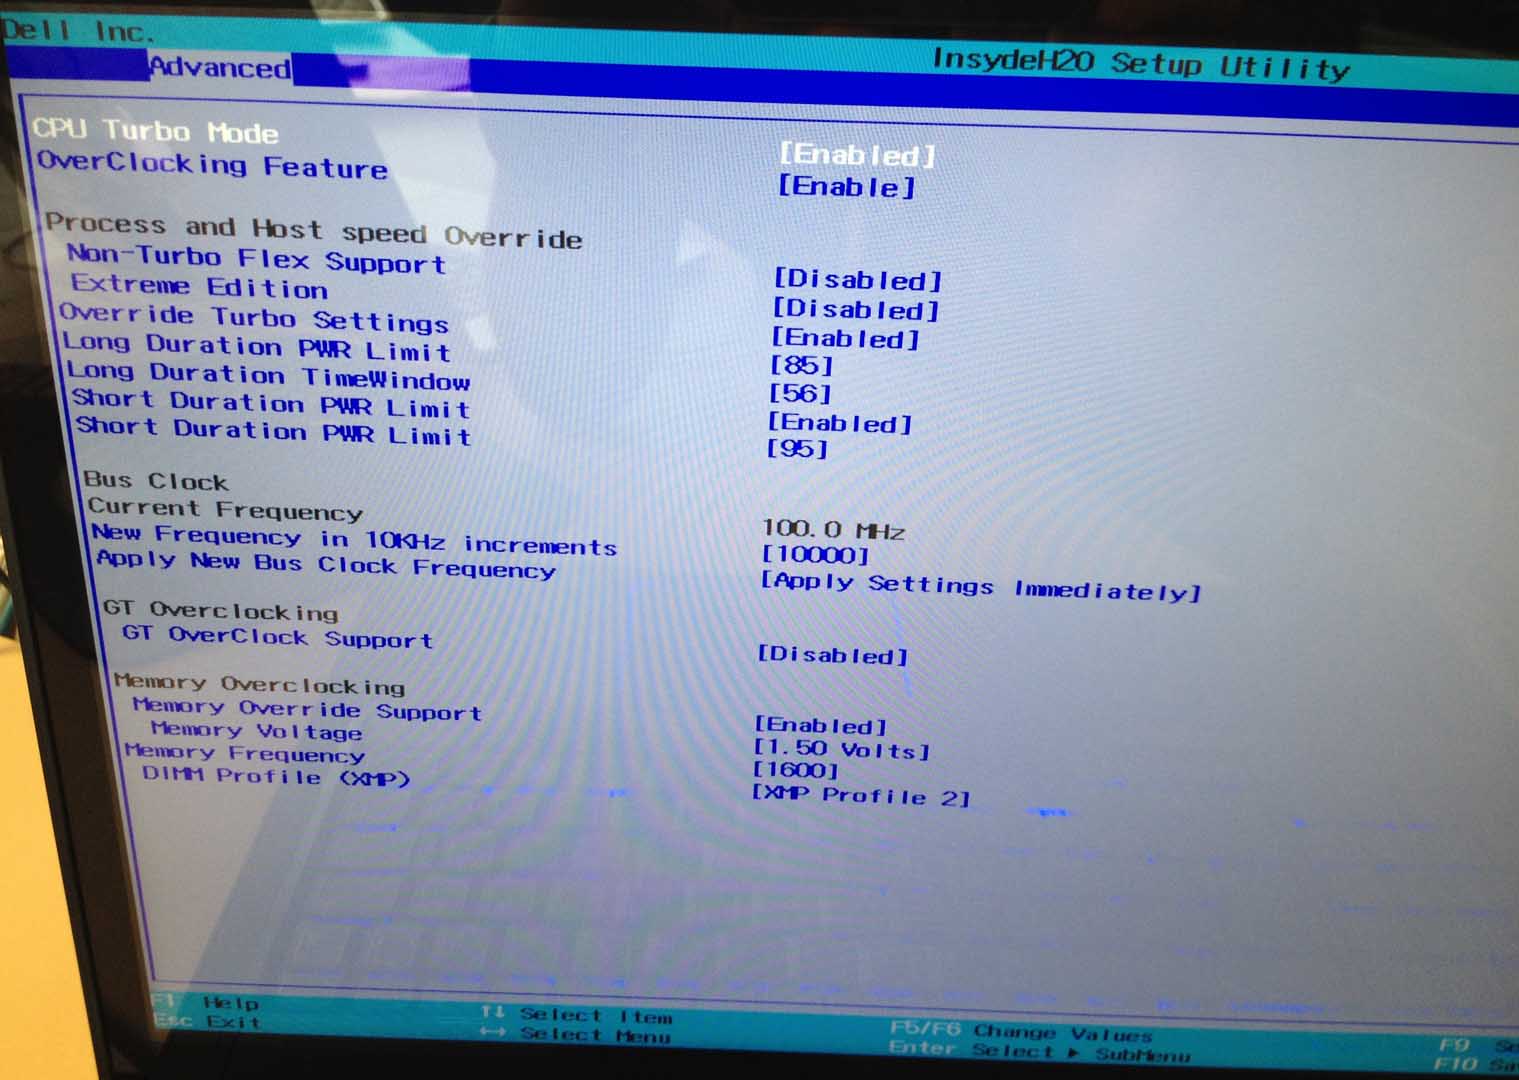
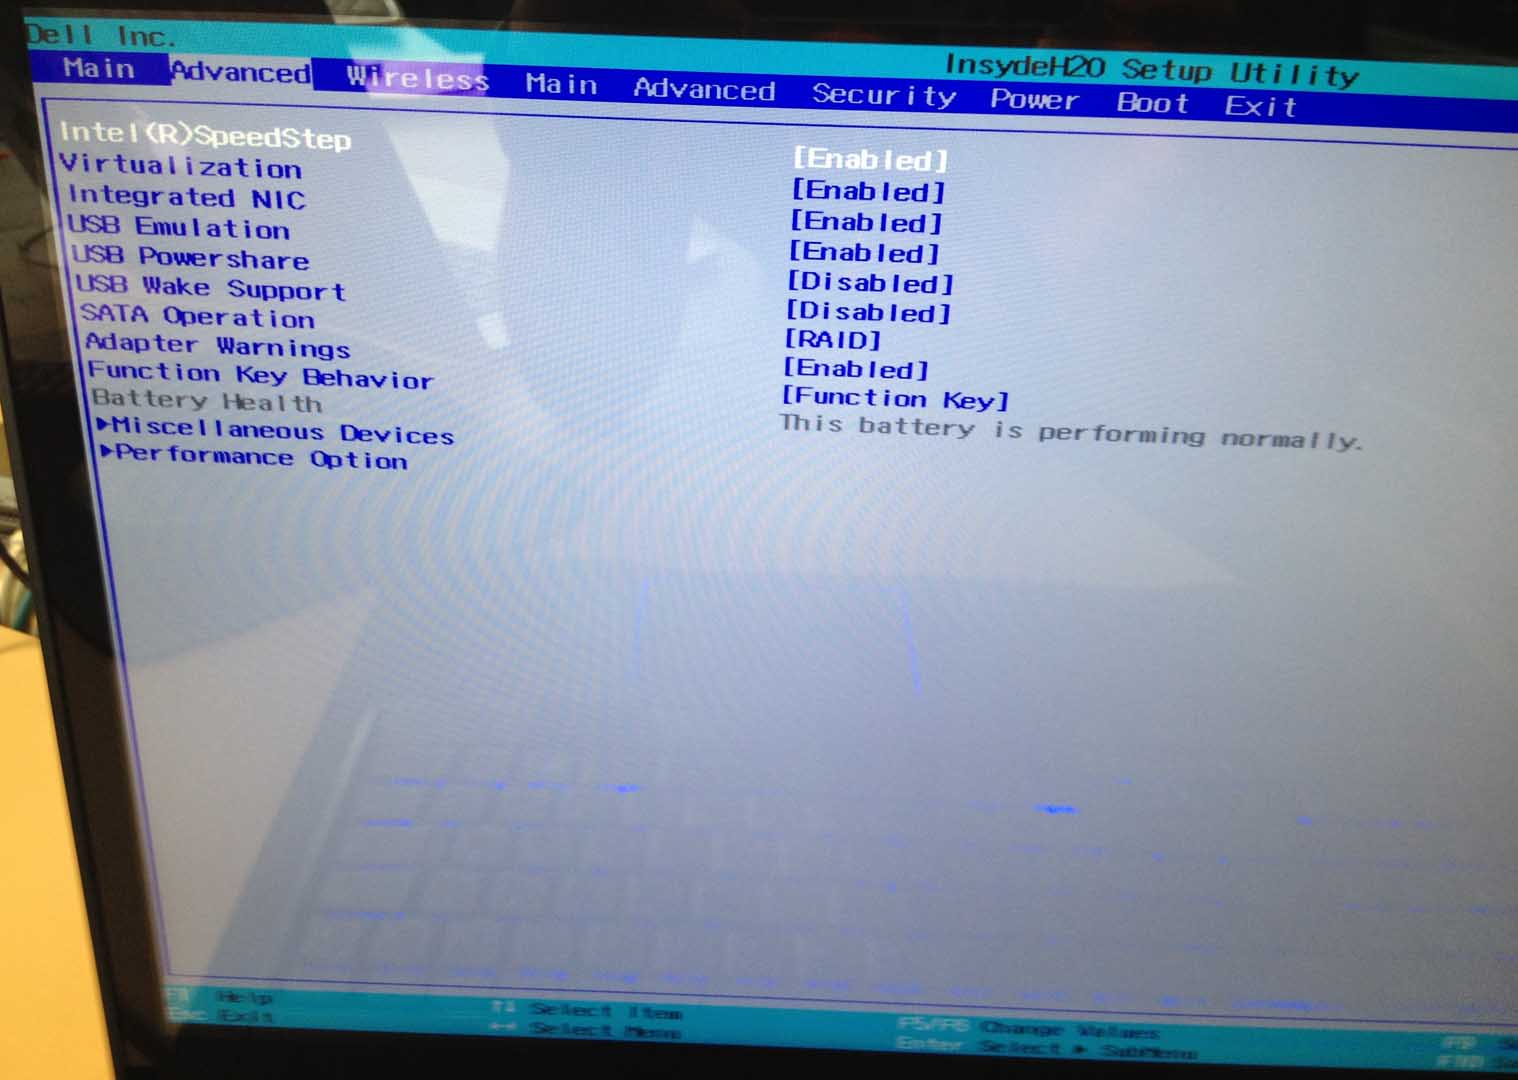
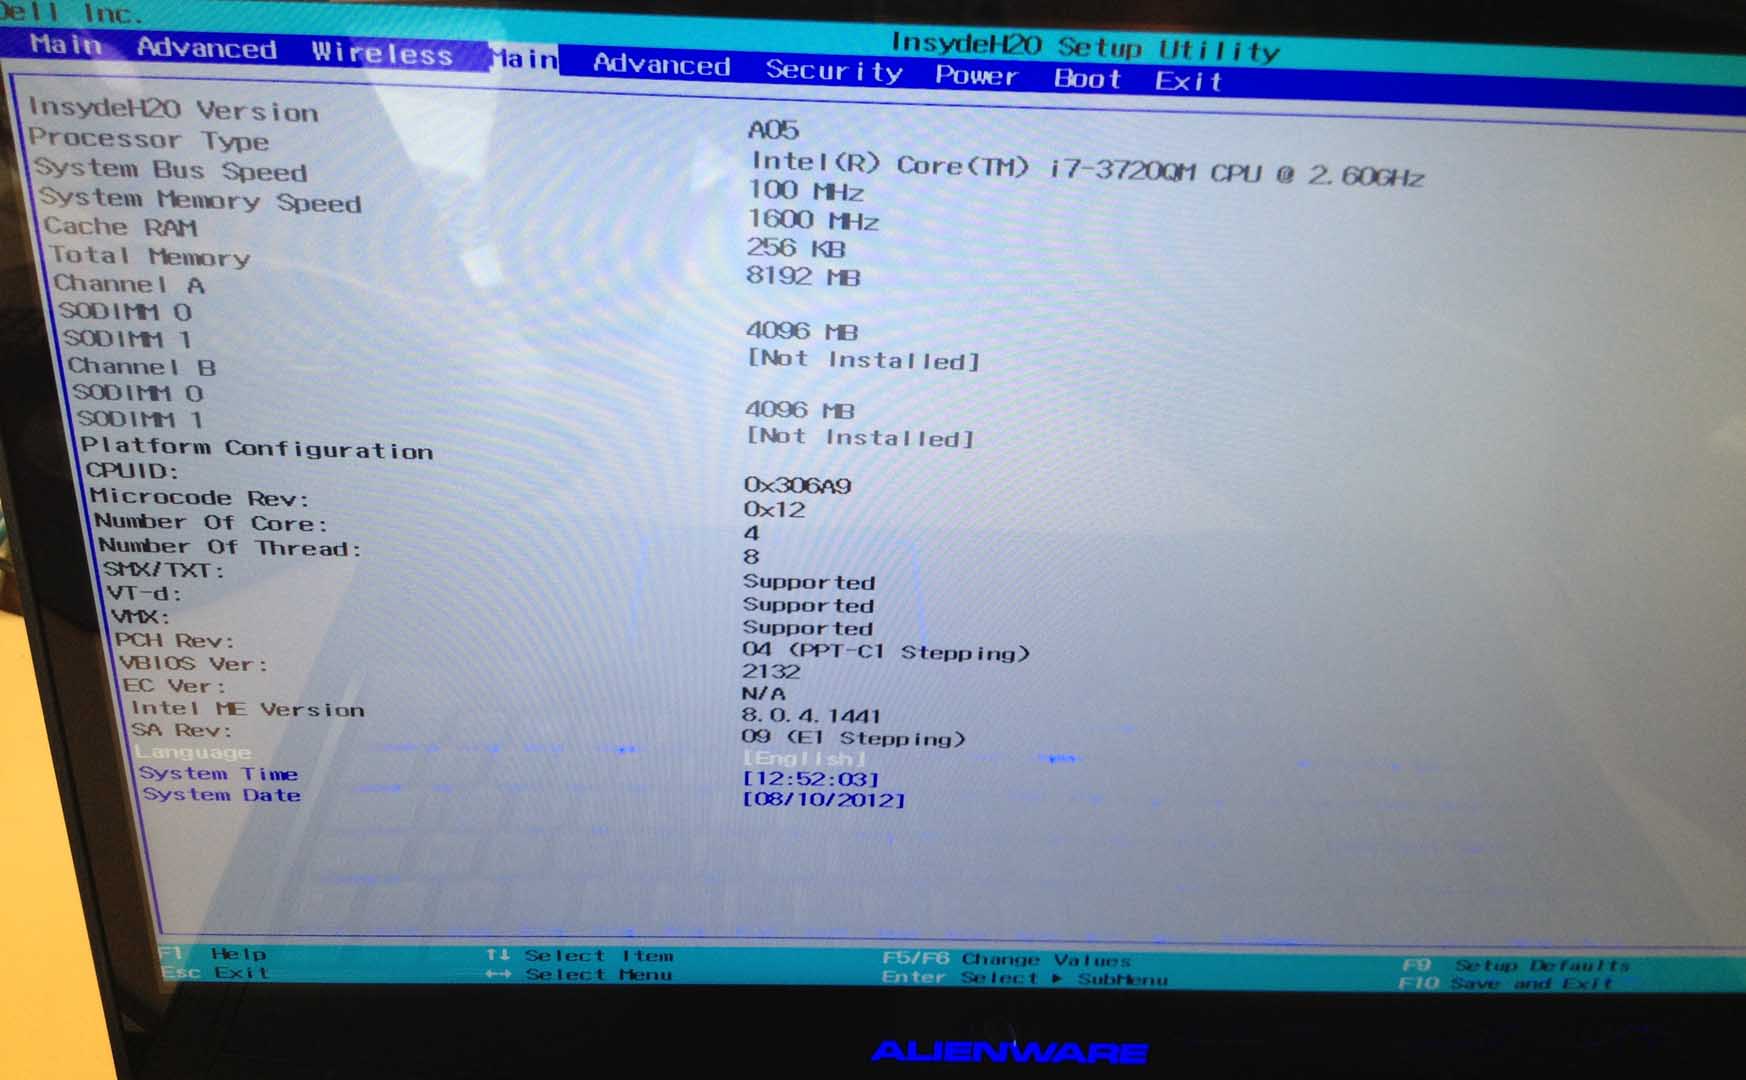
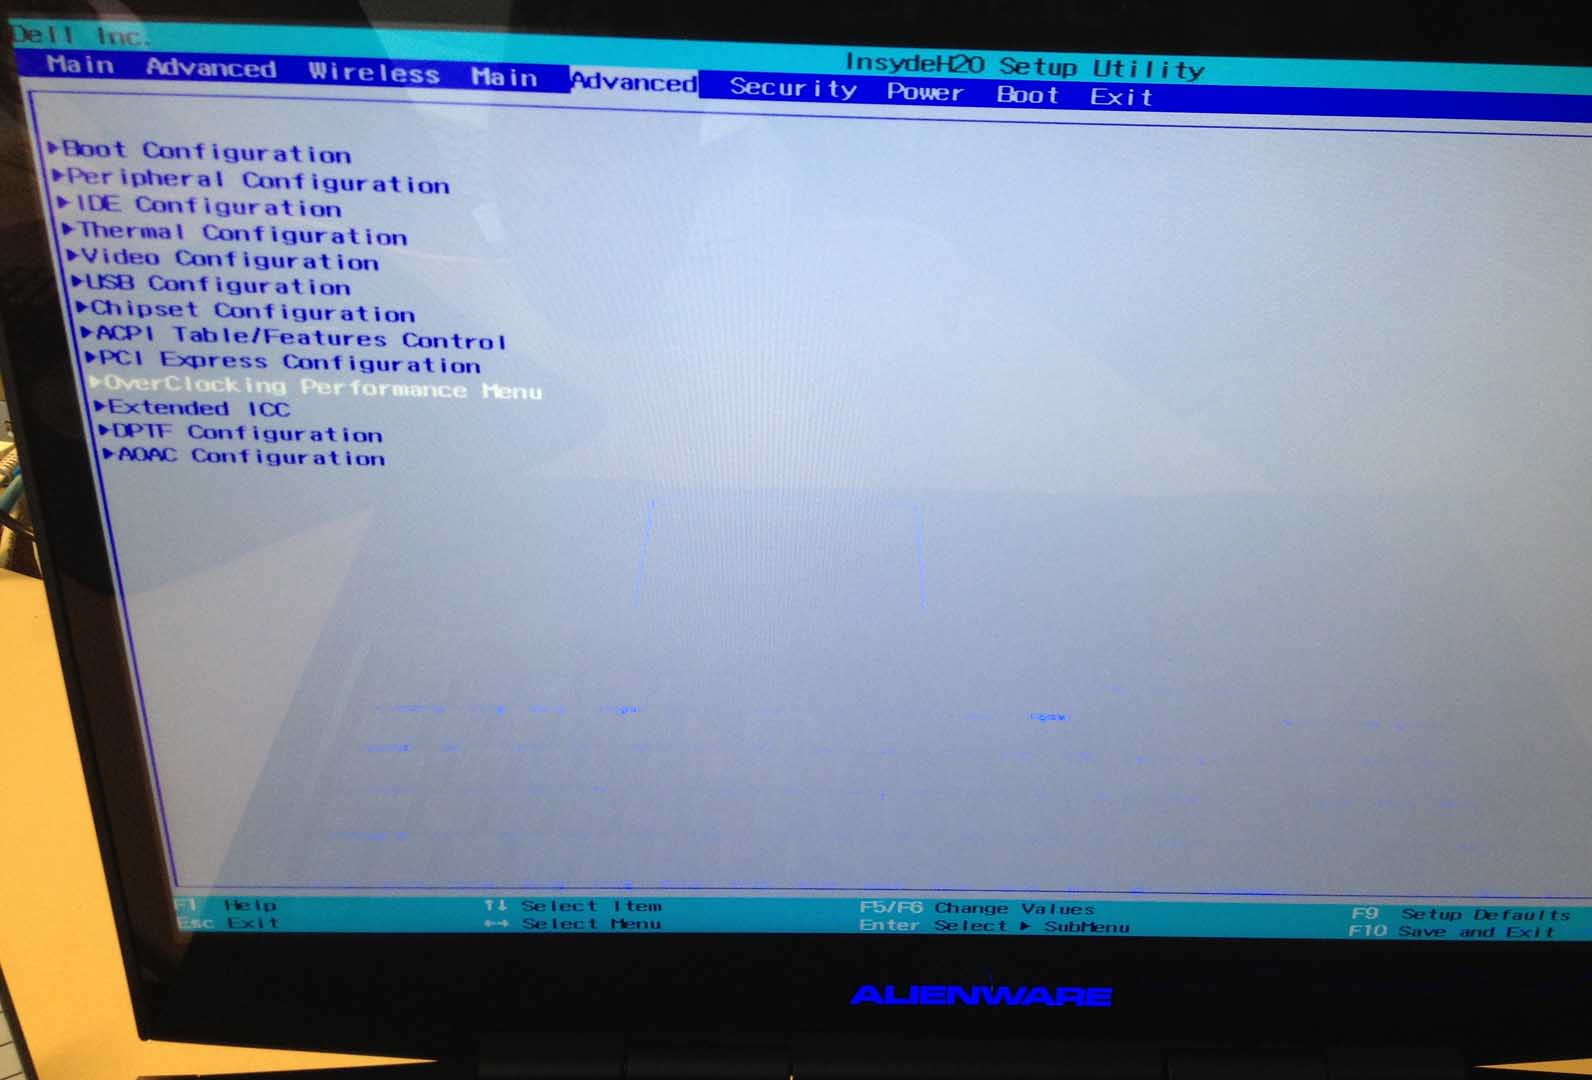
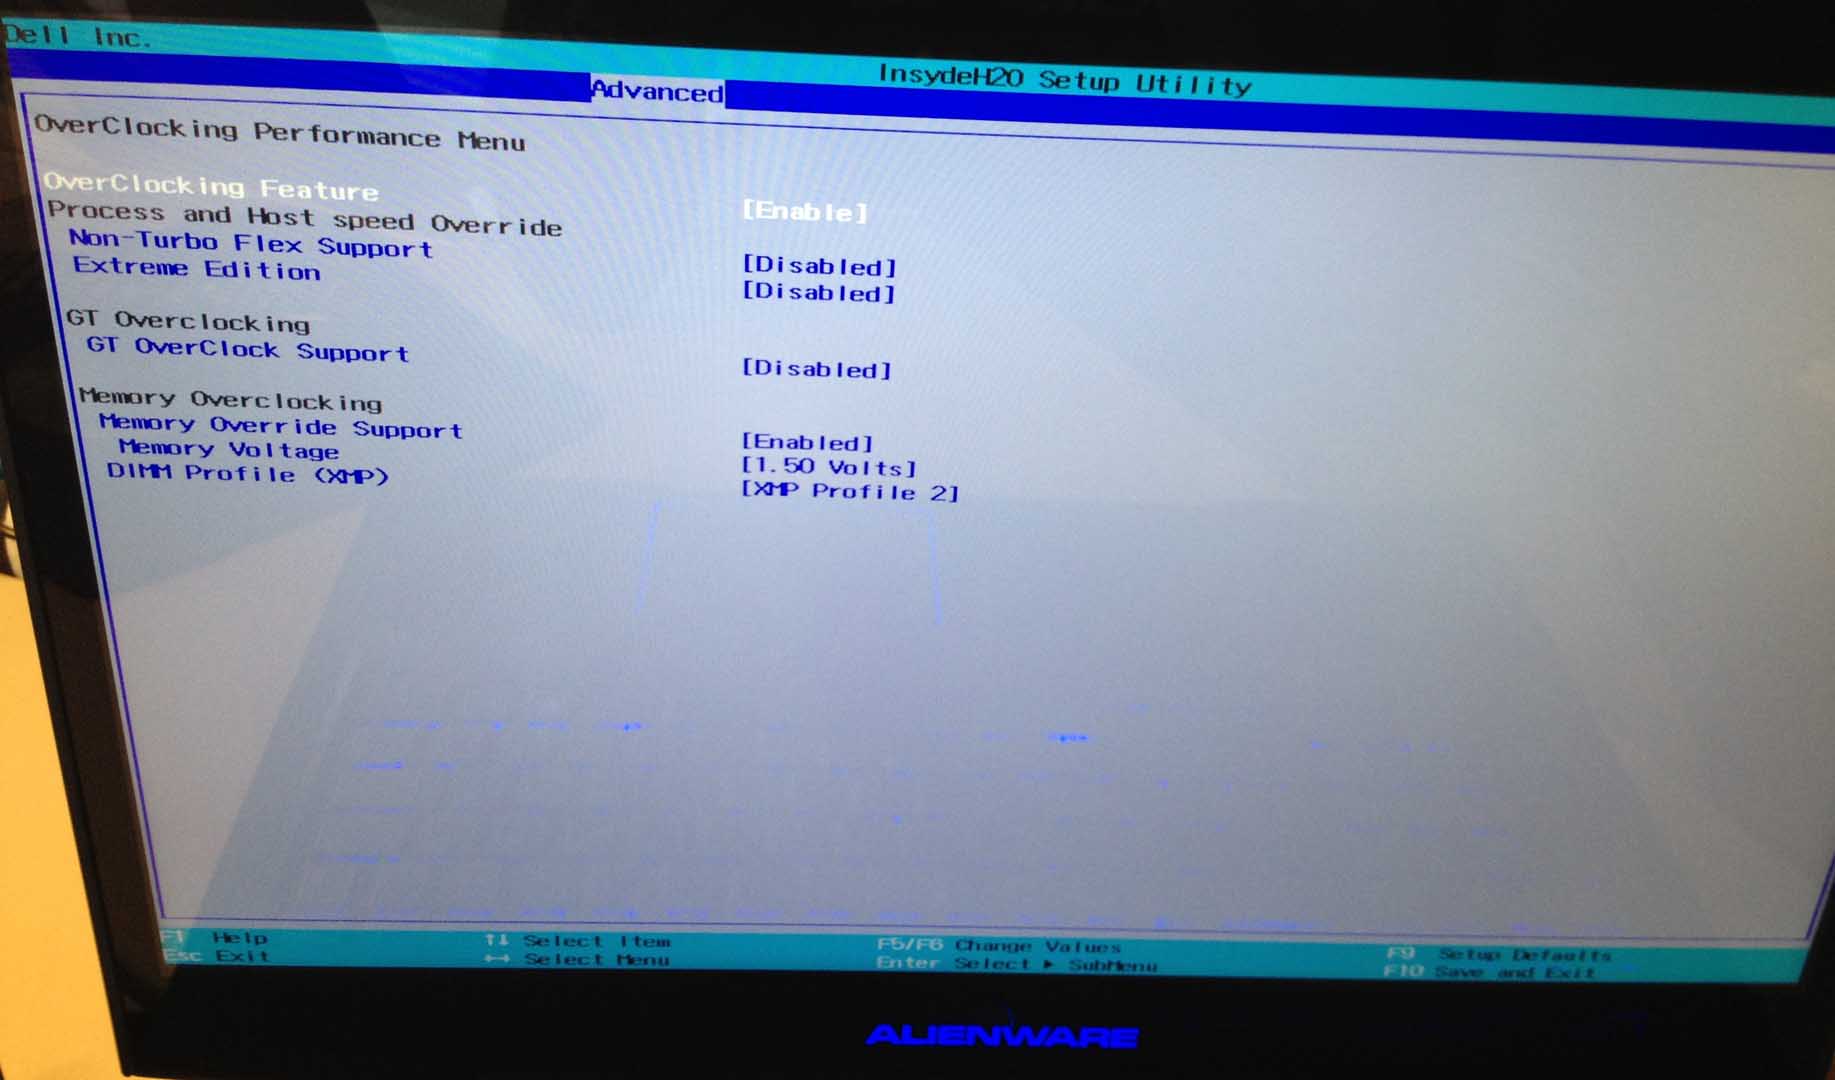
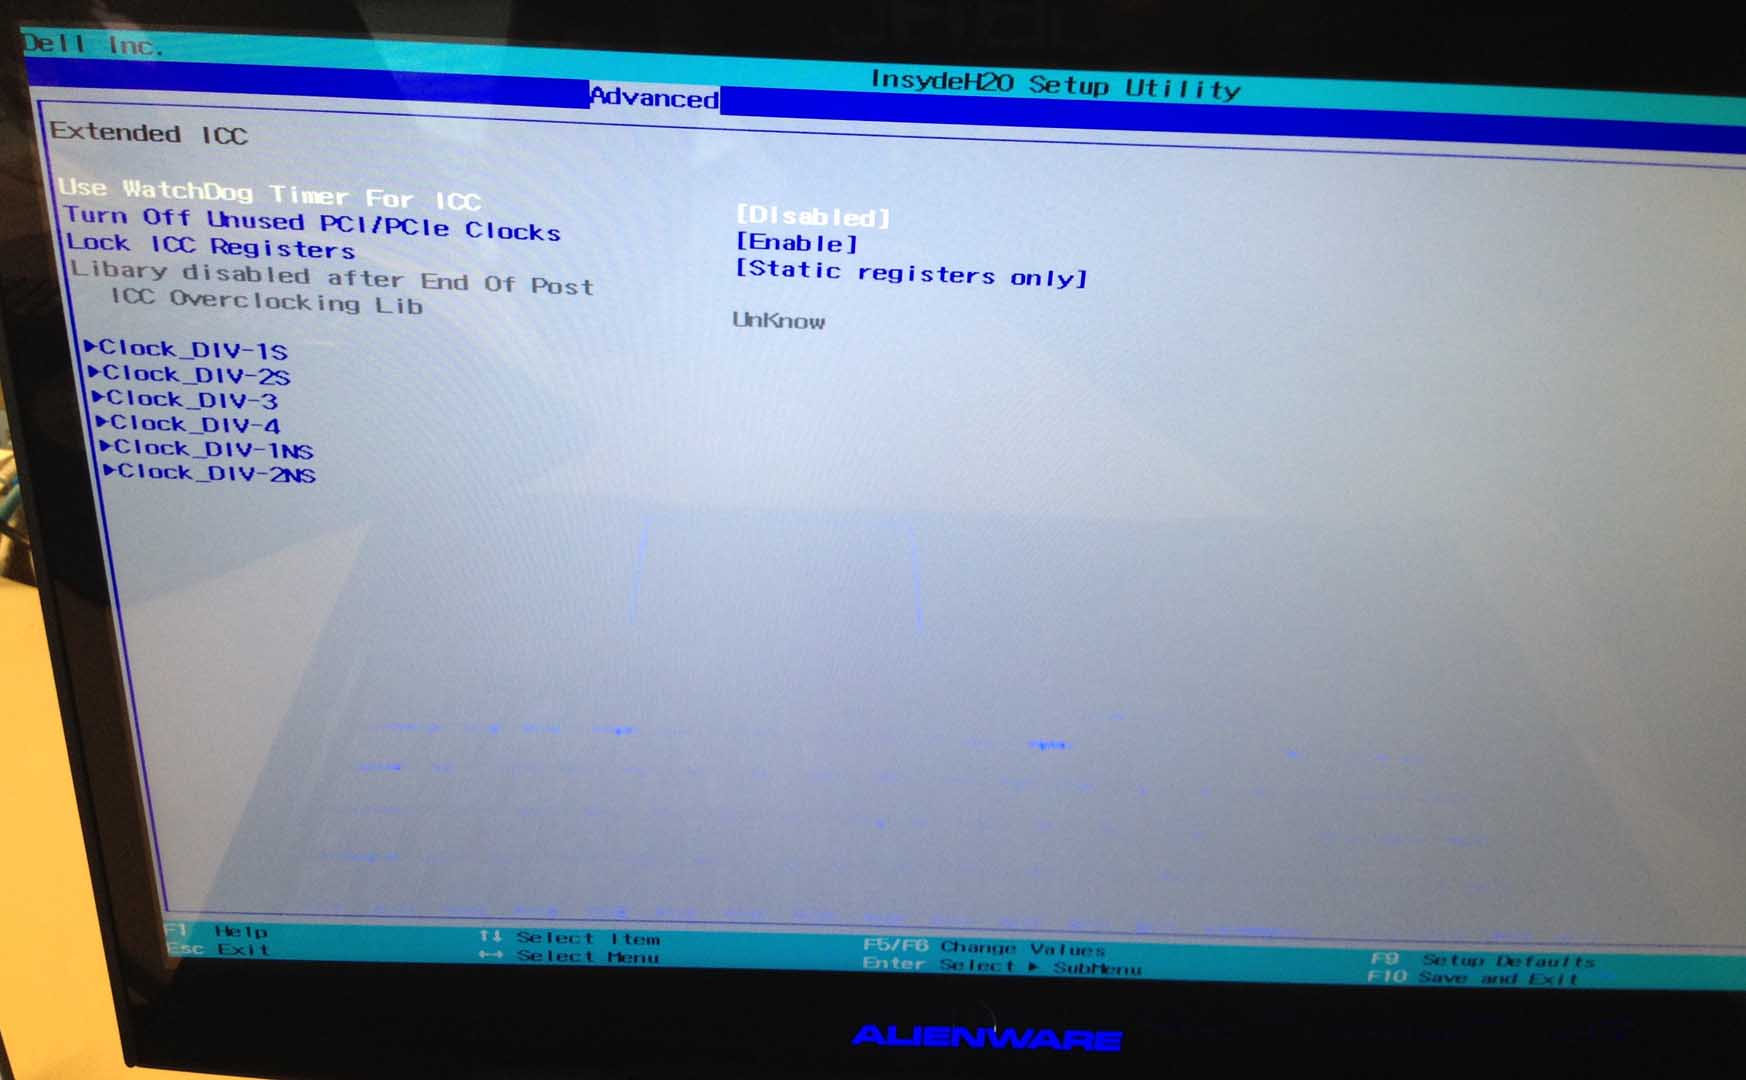
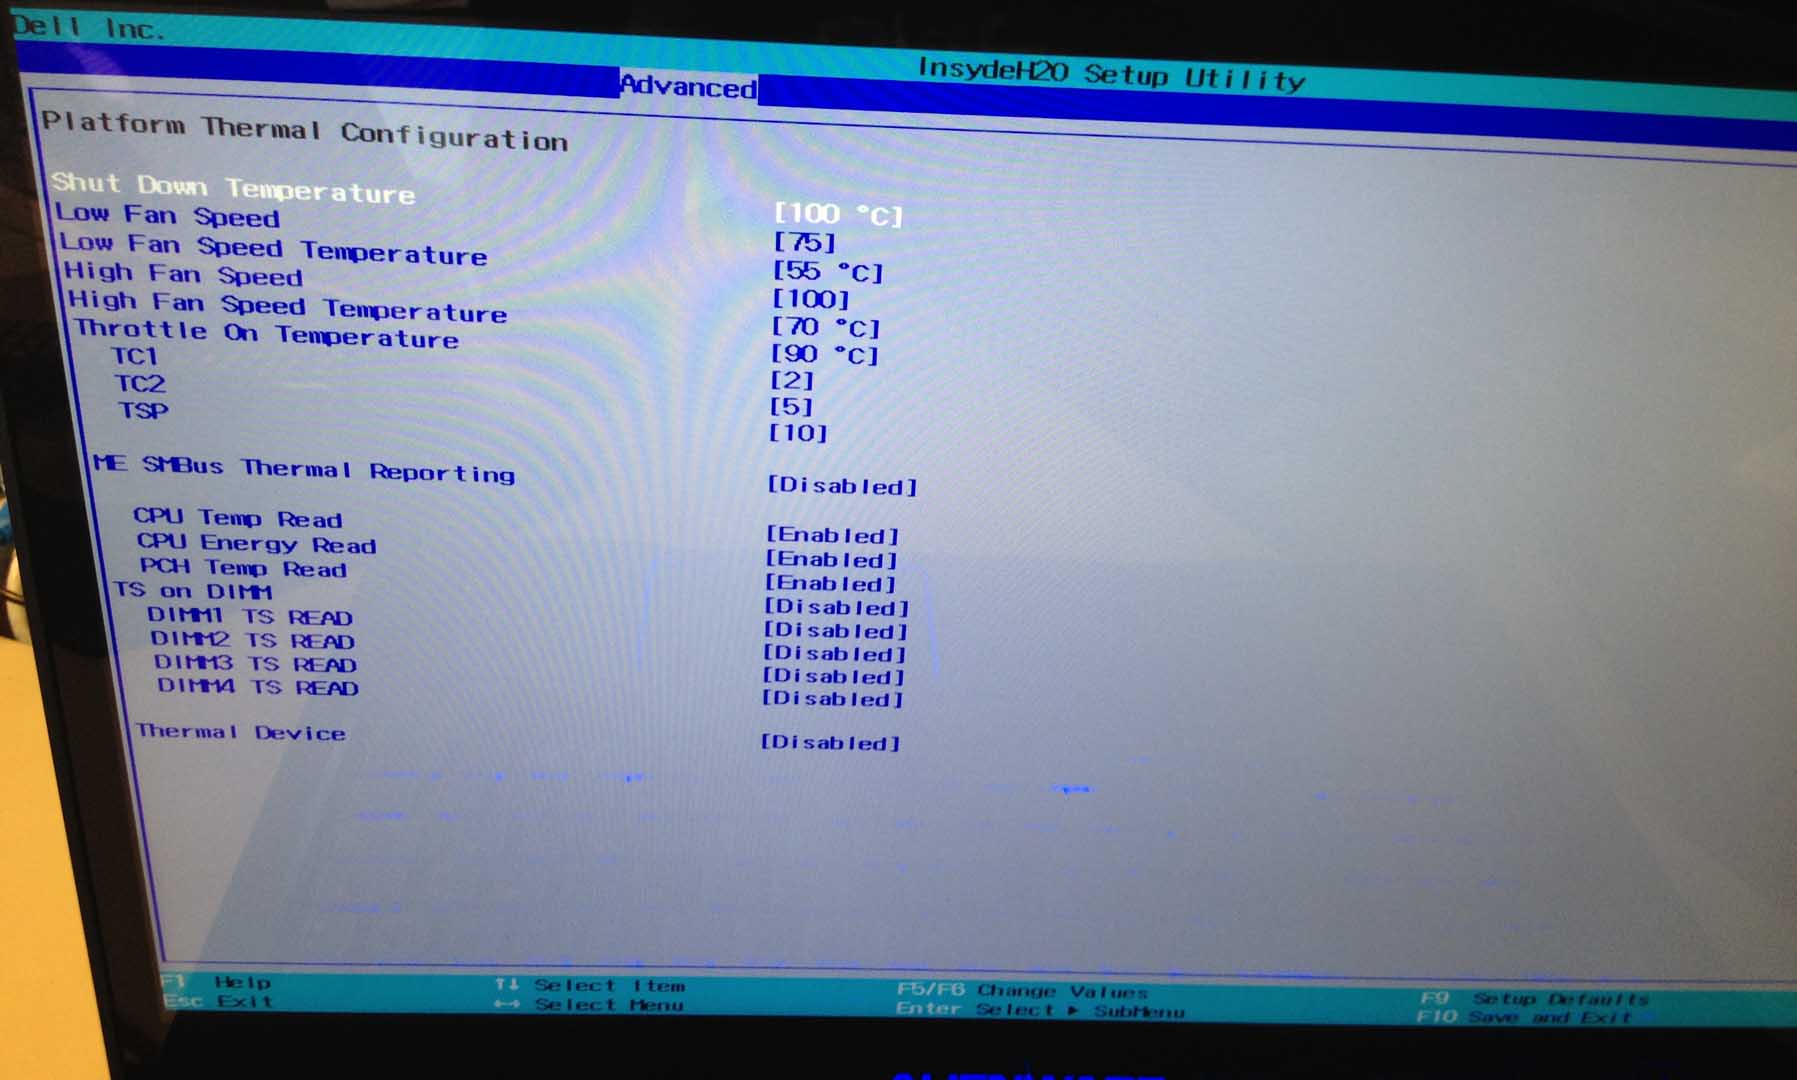
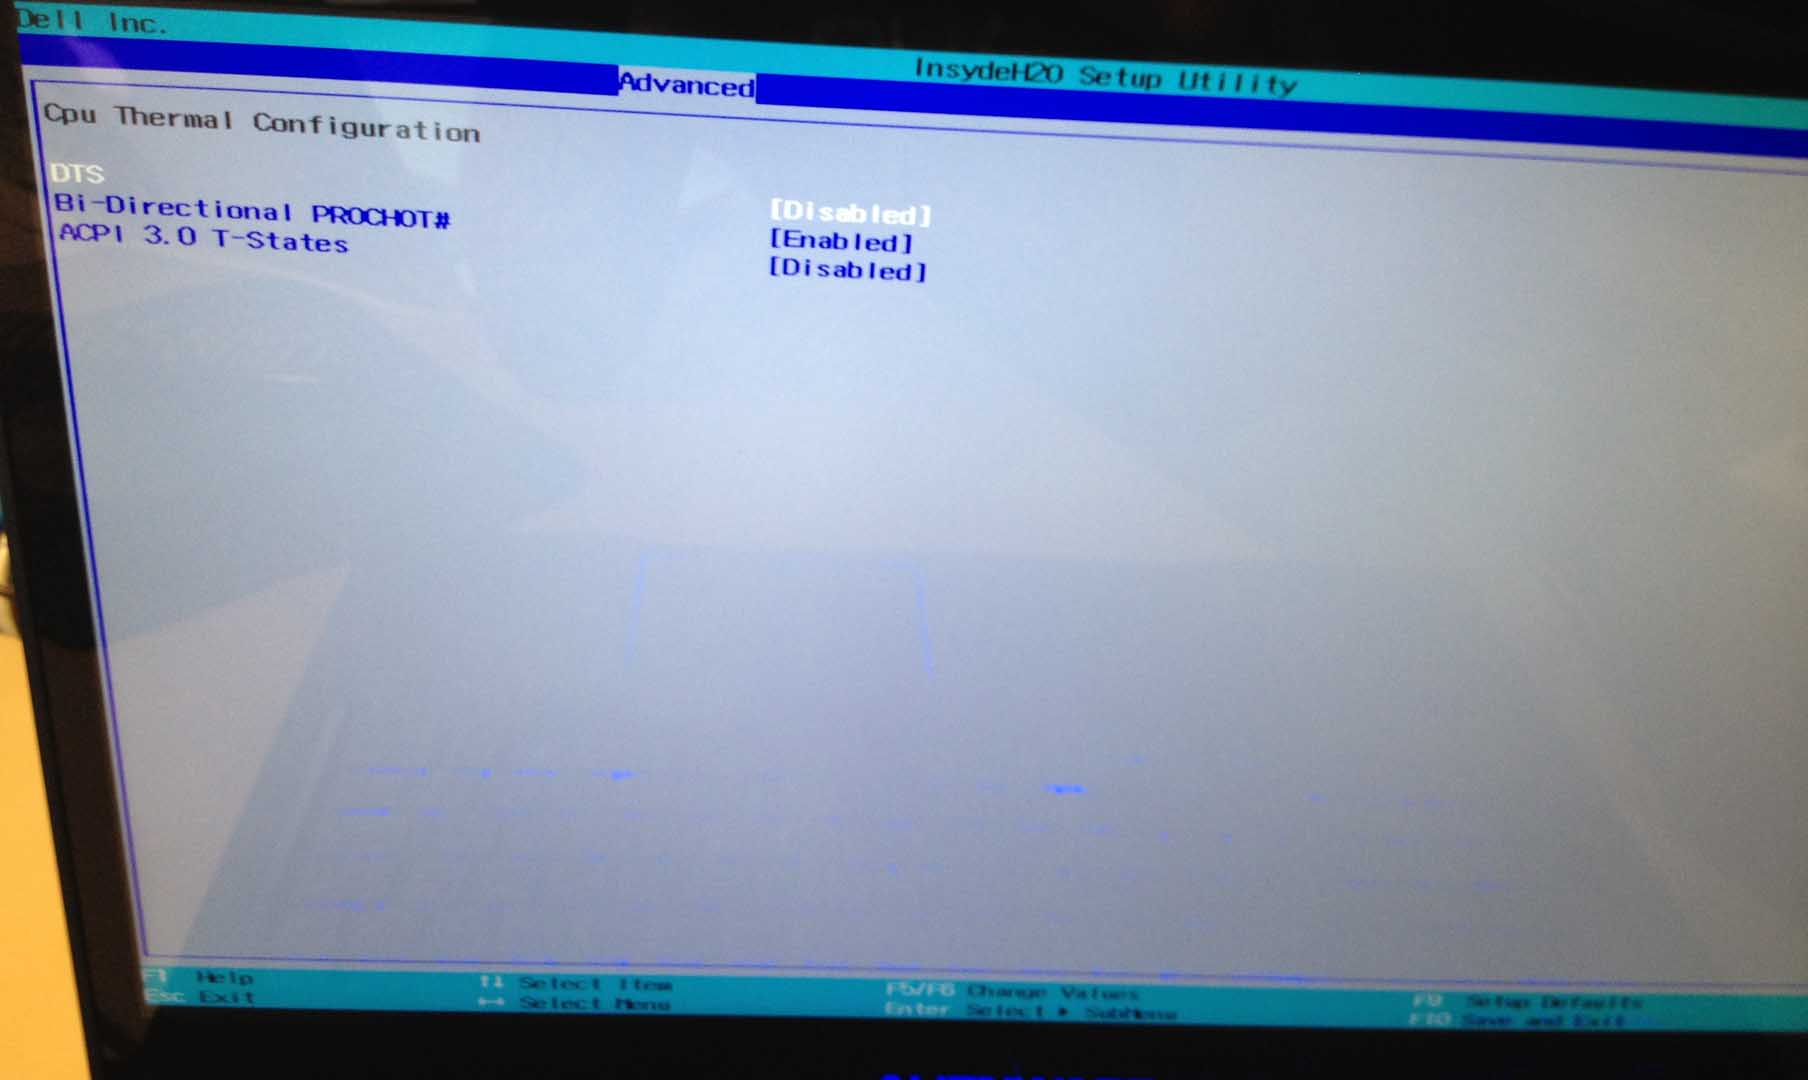
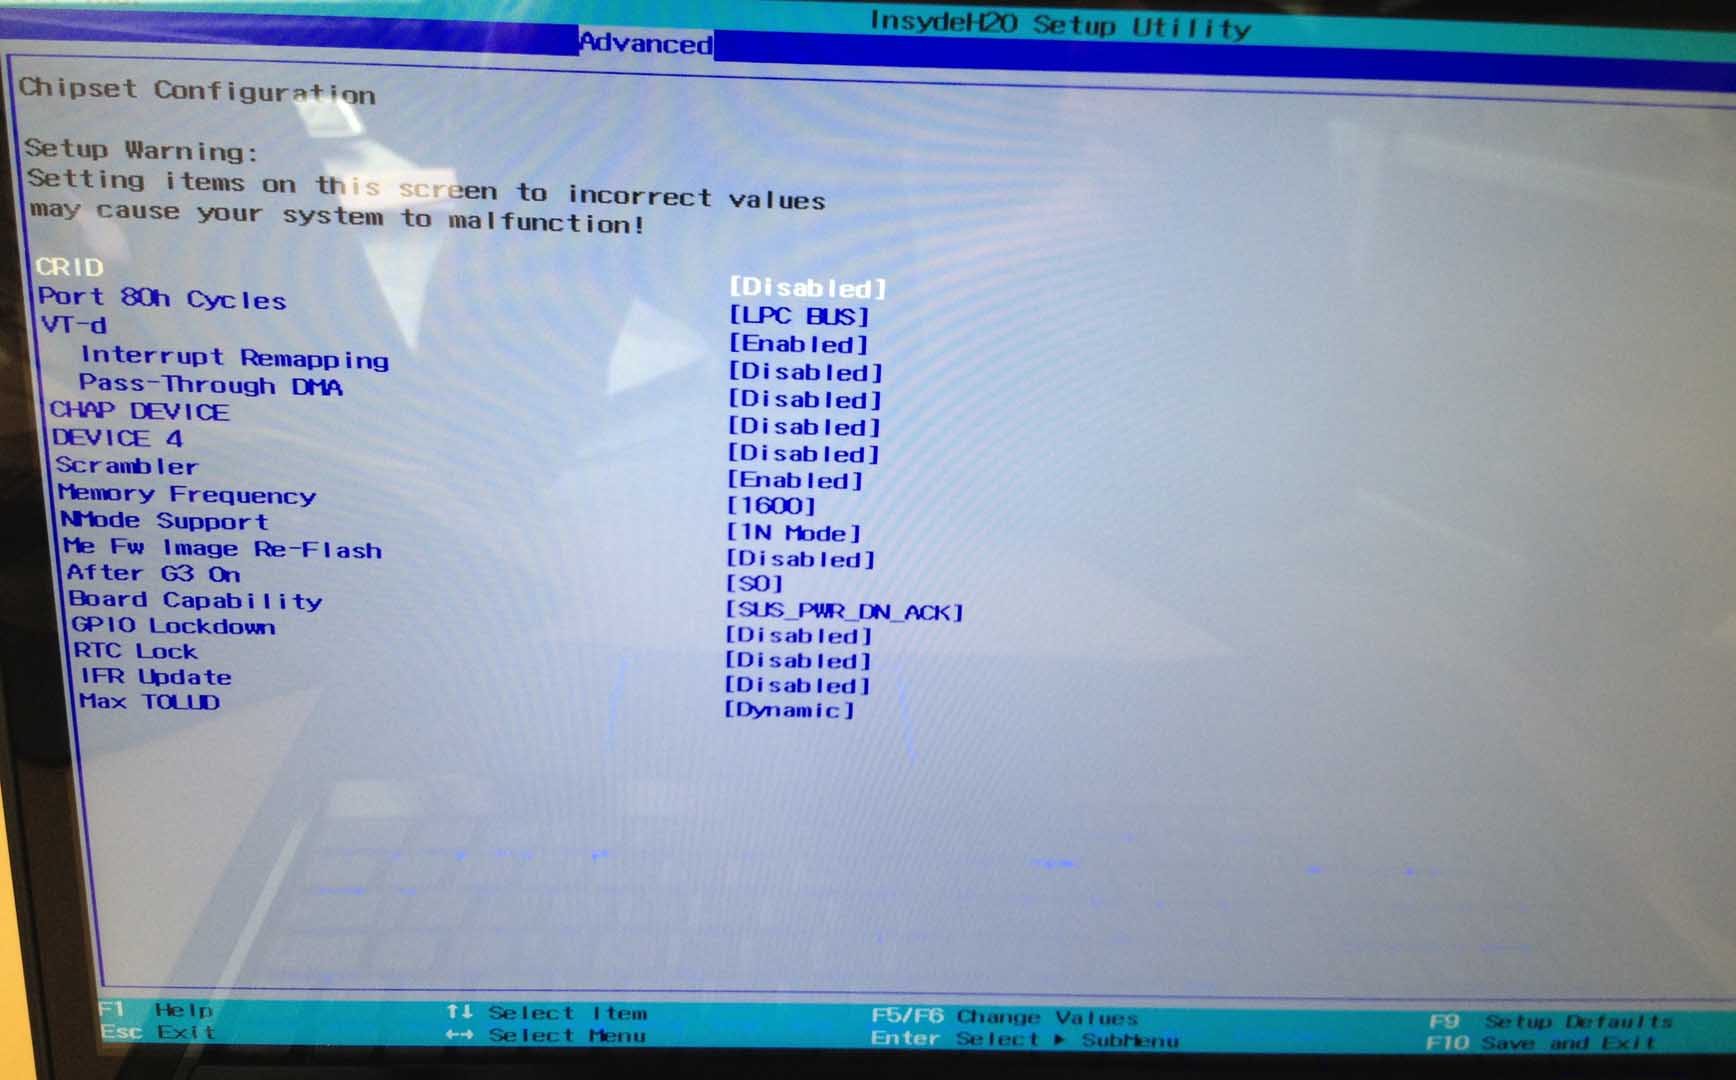
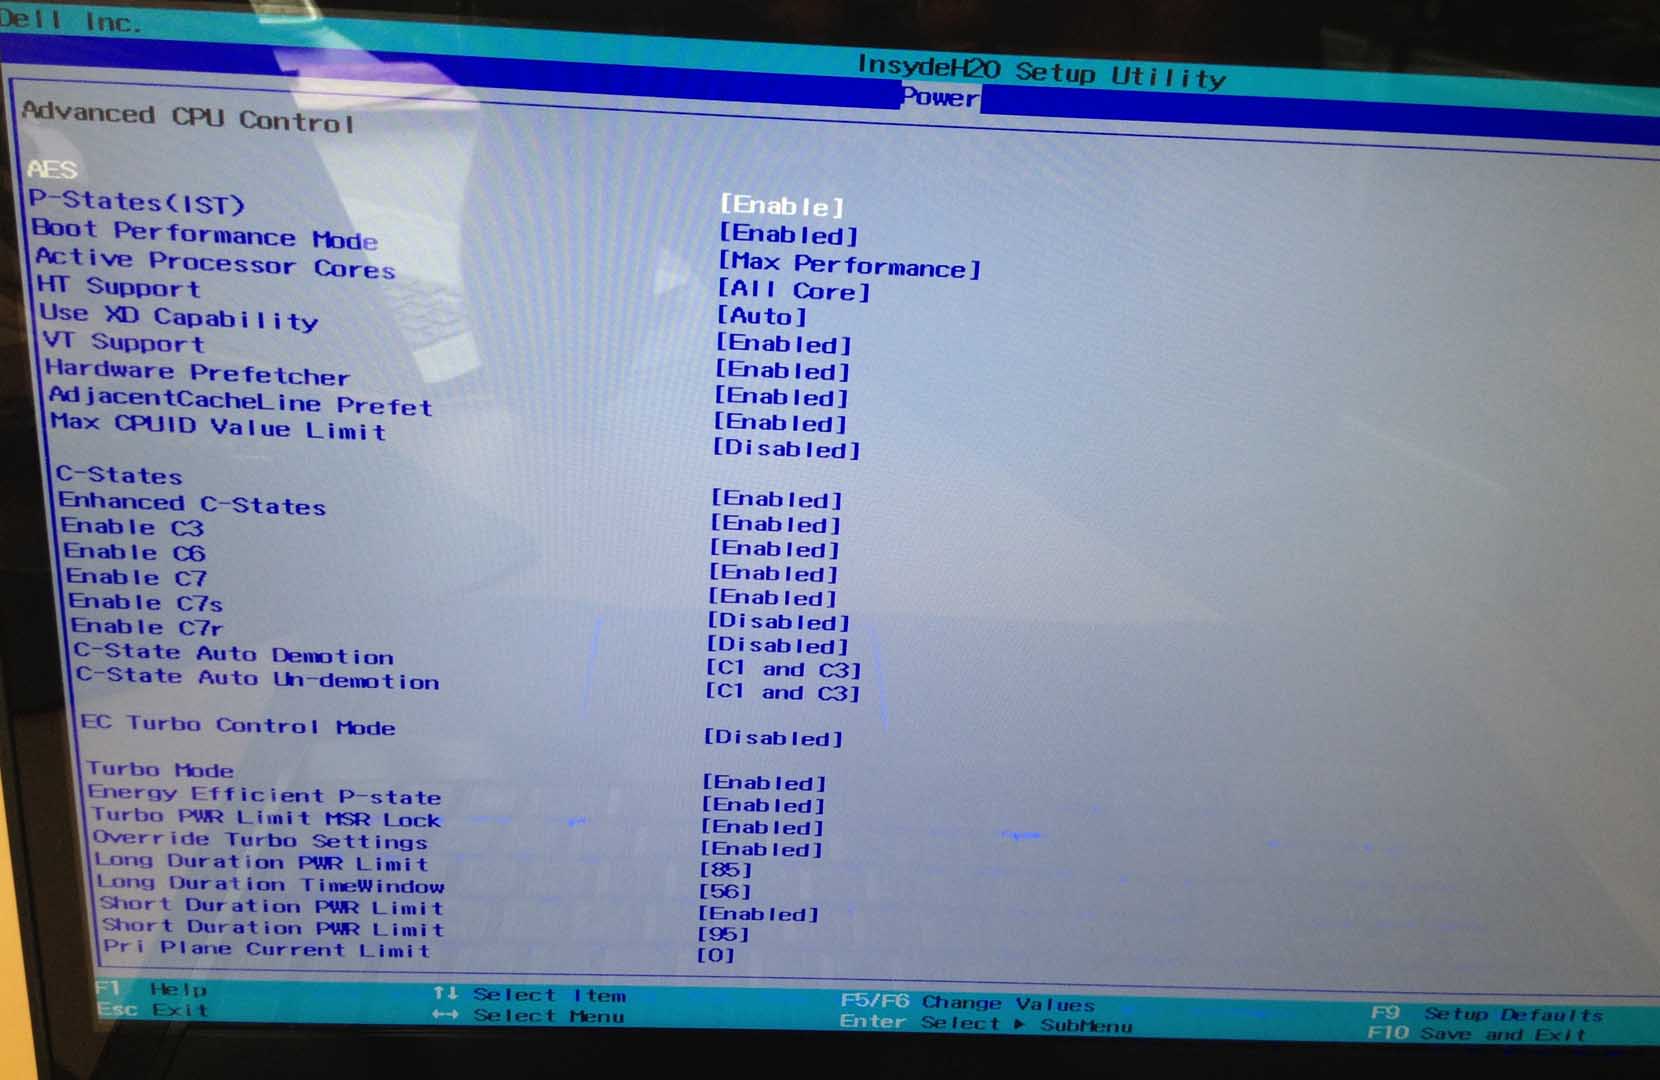
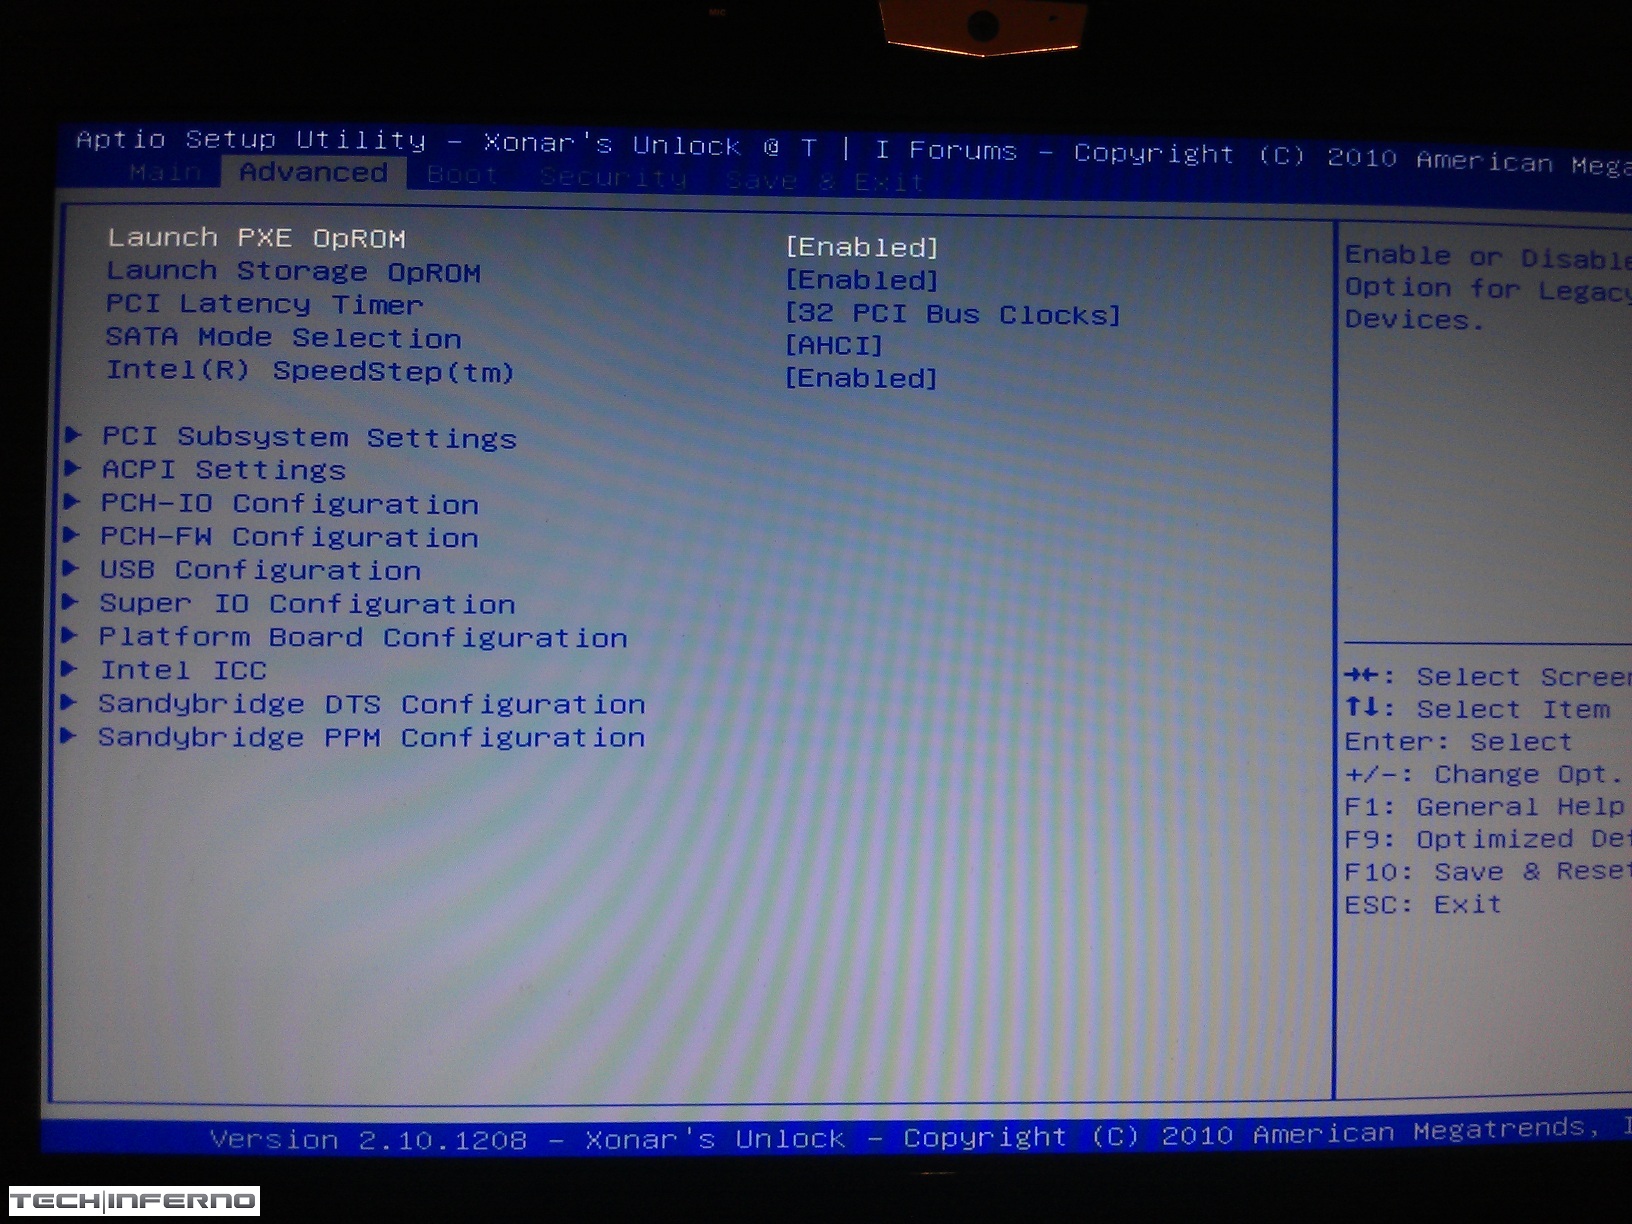
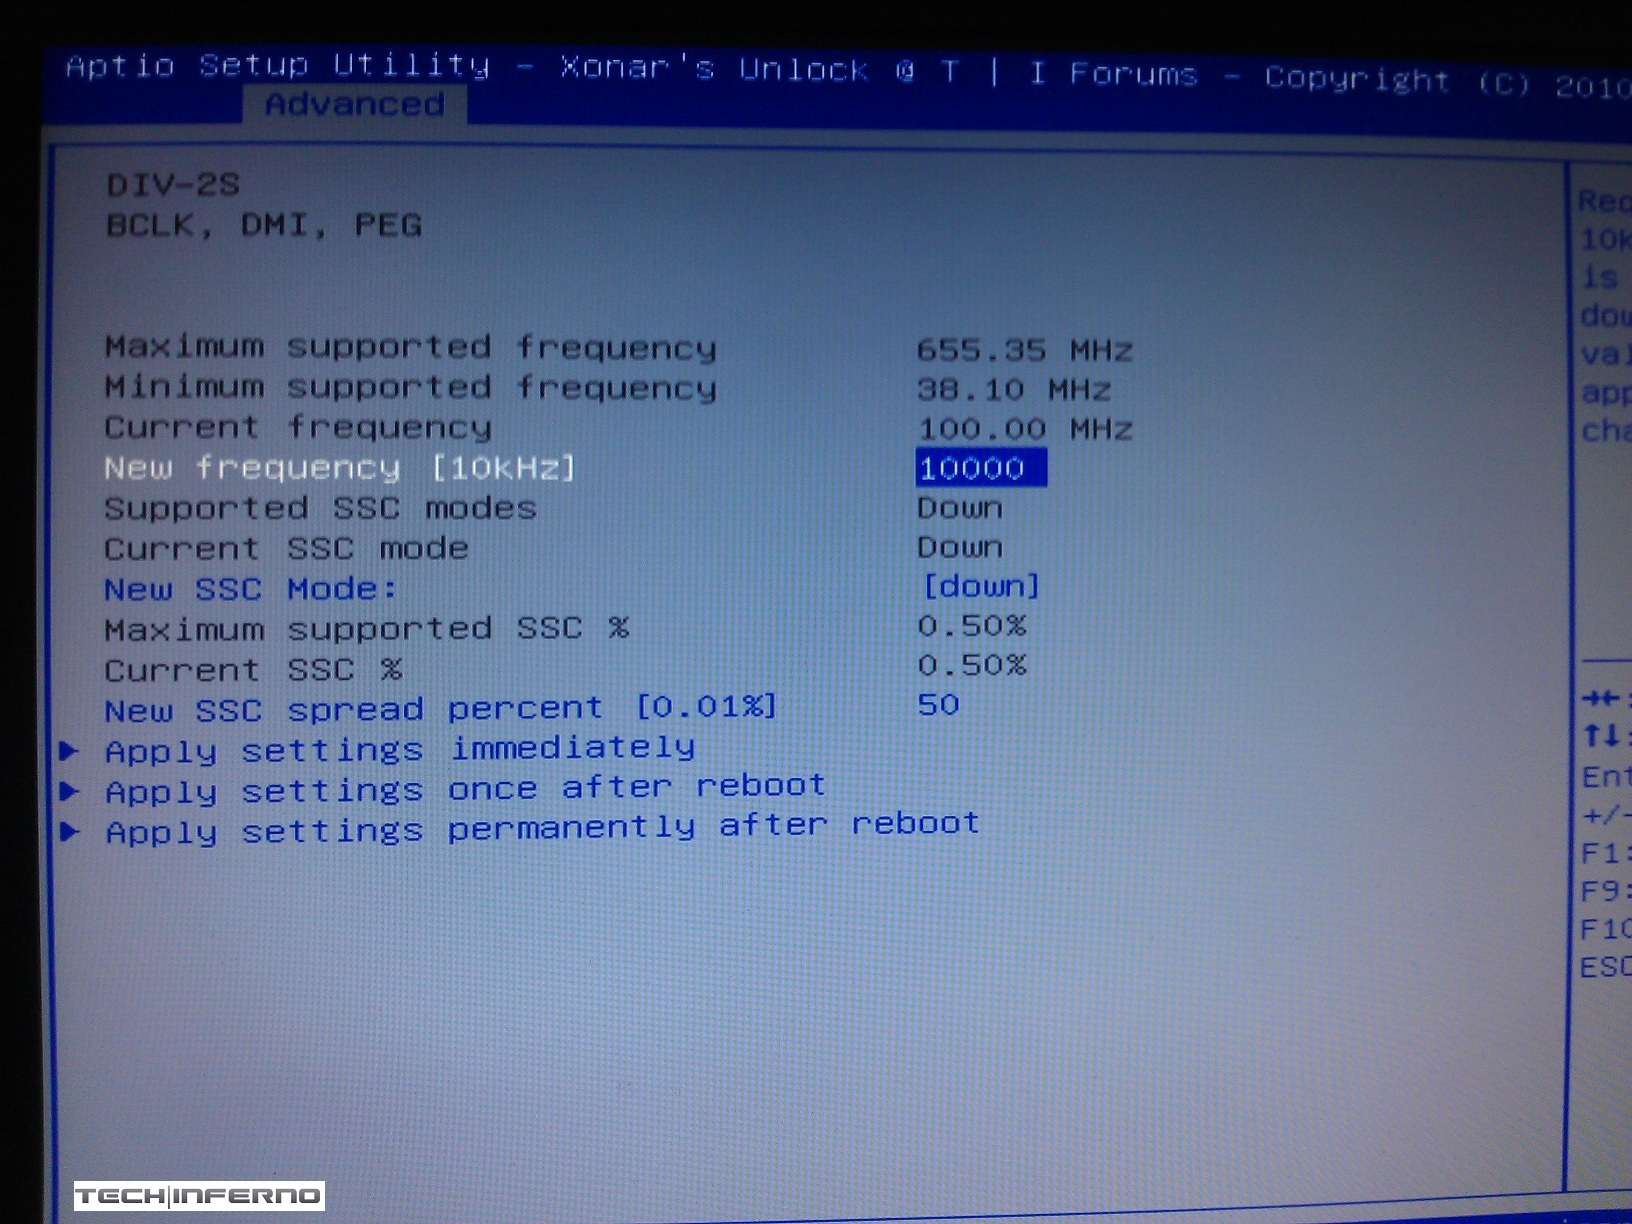
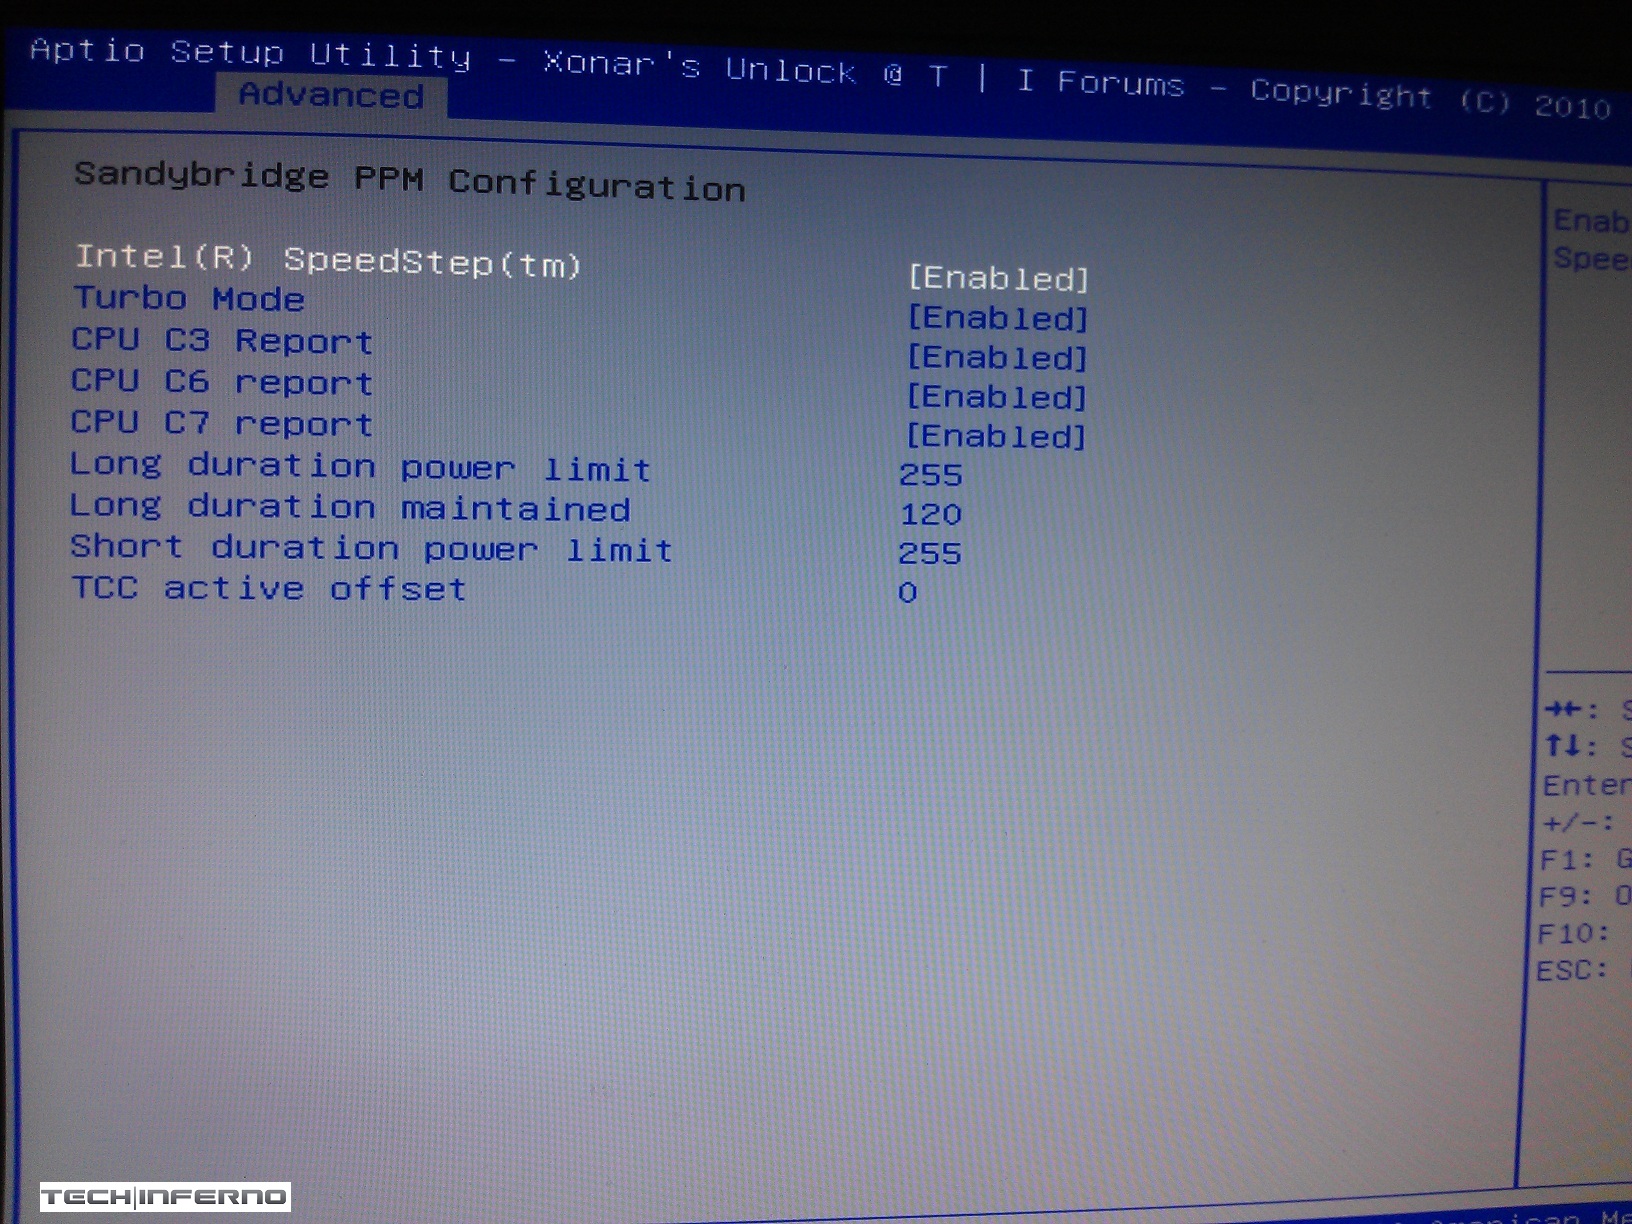
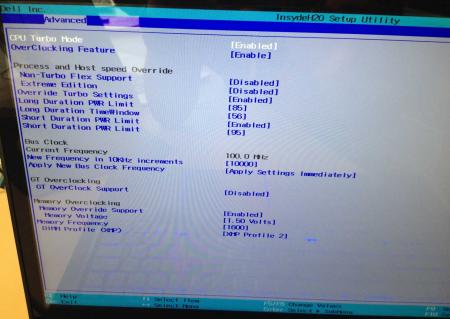
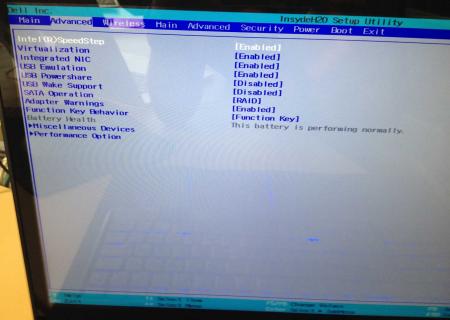
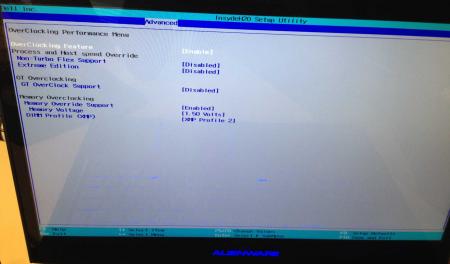
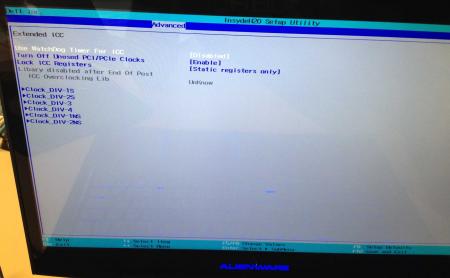
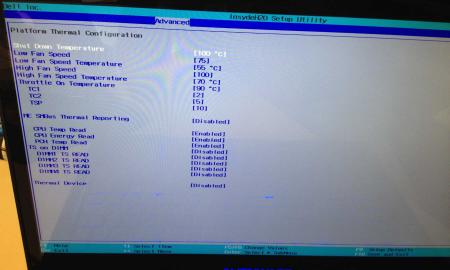
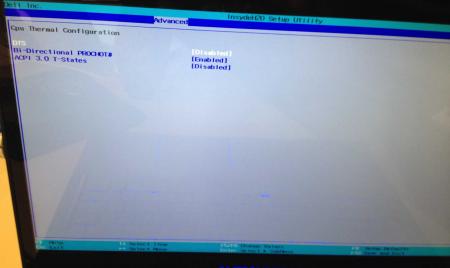
Dell has hidden a lot of options in the BIOS of the Alienware M17x R4, the modified BIOS versions here will show you all the hidden menus and allow you to further tweak your system and optimize its performance. Don't change anything you're not familiar with. There might be functions available which don't work on your system, so use this BIOS with care. It should only be used by advanced users. In case you mess up and your system refuses to boot after applying the changes you make, remove the AC adapter, battery and coin cell battery in order to clear the non-volatile ram of the BIOS. This should fix most issues. *********************** Instructions: If you're on A05 or an earlier version, you can flash the modified bios by simply using the InsydeFlash utility provided with the official bios update on the Dell support site. However, once you're on a version newer than A05, things get a bit more complicated. There are two options then: - Method 1: Revert to stock A05 or earlier by using the Insyde USB bios recovery method, and then flash the modified bios by using the official tools (InsydeFlash). - Method 2 (recommended): Flash the modified Bios from DOS by using the FPT tool: . Grab the DOS version of fpt for flashing, and my 'prr tool' to circumvent write protection.. Download a '[FPT]' labeled version of the unlocked BIOS. Put the DOS version of the flash tool on the root of the prepared USB stick (fpt.exe and fparts.txt), along with the prr.exe and the file you want to flash (plus the included flash.bat). . Restart the system and boot from your USB stick. Run prr.exe, then flash the bios by executing the flash.bat file. Wait until the tool completes the flash. If the verification is okay, reboot, else flash again.. Go to the bios, load the default settings and reboot. Done NOTE: The flashing from DOS as described above will only update the BIOS, not the rest of the firmware. Therefore I strongly advise you to first flash the stock version of the bios you want by using the official update provided by Dell, and once that's done you can go ahead and flash the modified version of your bios by following the instructions above. Download links to the unlocked M17x R4 BIOS versions: M17x R4 - BIOS A05 [unlocked] M17x R4 - BIOS A08 [unlocked] - see attachment M17x R4 - BIOS A09 [unlocked] - see attachment M17x R4 - BIOS A10 [unlocked] - see attachment [FPT] M17x R4 - BIOS A10 [unlocked] - see attachment [FPT] M17x R4 - BIOS A11 [unlocked] - see attachment Donation link, in case you want to buy me a beer Here some pictures of the menus (thanks a lot for the pics @deadbydawn!) I want to thank @widezu69 for testing !! It's hard to find users who are willing to risk their system in order to test a mod, I greatly appreciate this! Thank you!! ********* Flash and use at your own risk. I don't take any responsibility for any possible damages on your system. The software which I provide here ('prr tool') comes with absolutely no warranty to the extent permitted by applicable law. ___ M17x_R4_-_BIOS_A08_[unlocked].zip M17x_R4_-_BIOS_A09_[unlocked].zip M17x_R4_BIOS_A10_-_[unlocked].zip [FPT]-M17x_R4_BIOS_A11_-_[unlocked]V2.zip [FPT] M17x R4 - BIOS A10 [unlocked].zip M17x_R4_-_BIOS_A05_[unlocked].zip


 1 point
 -
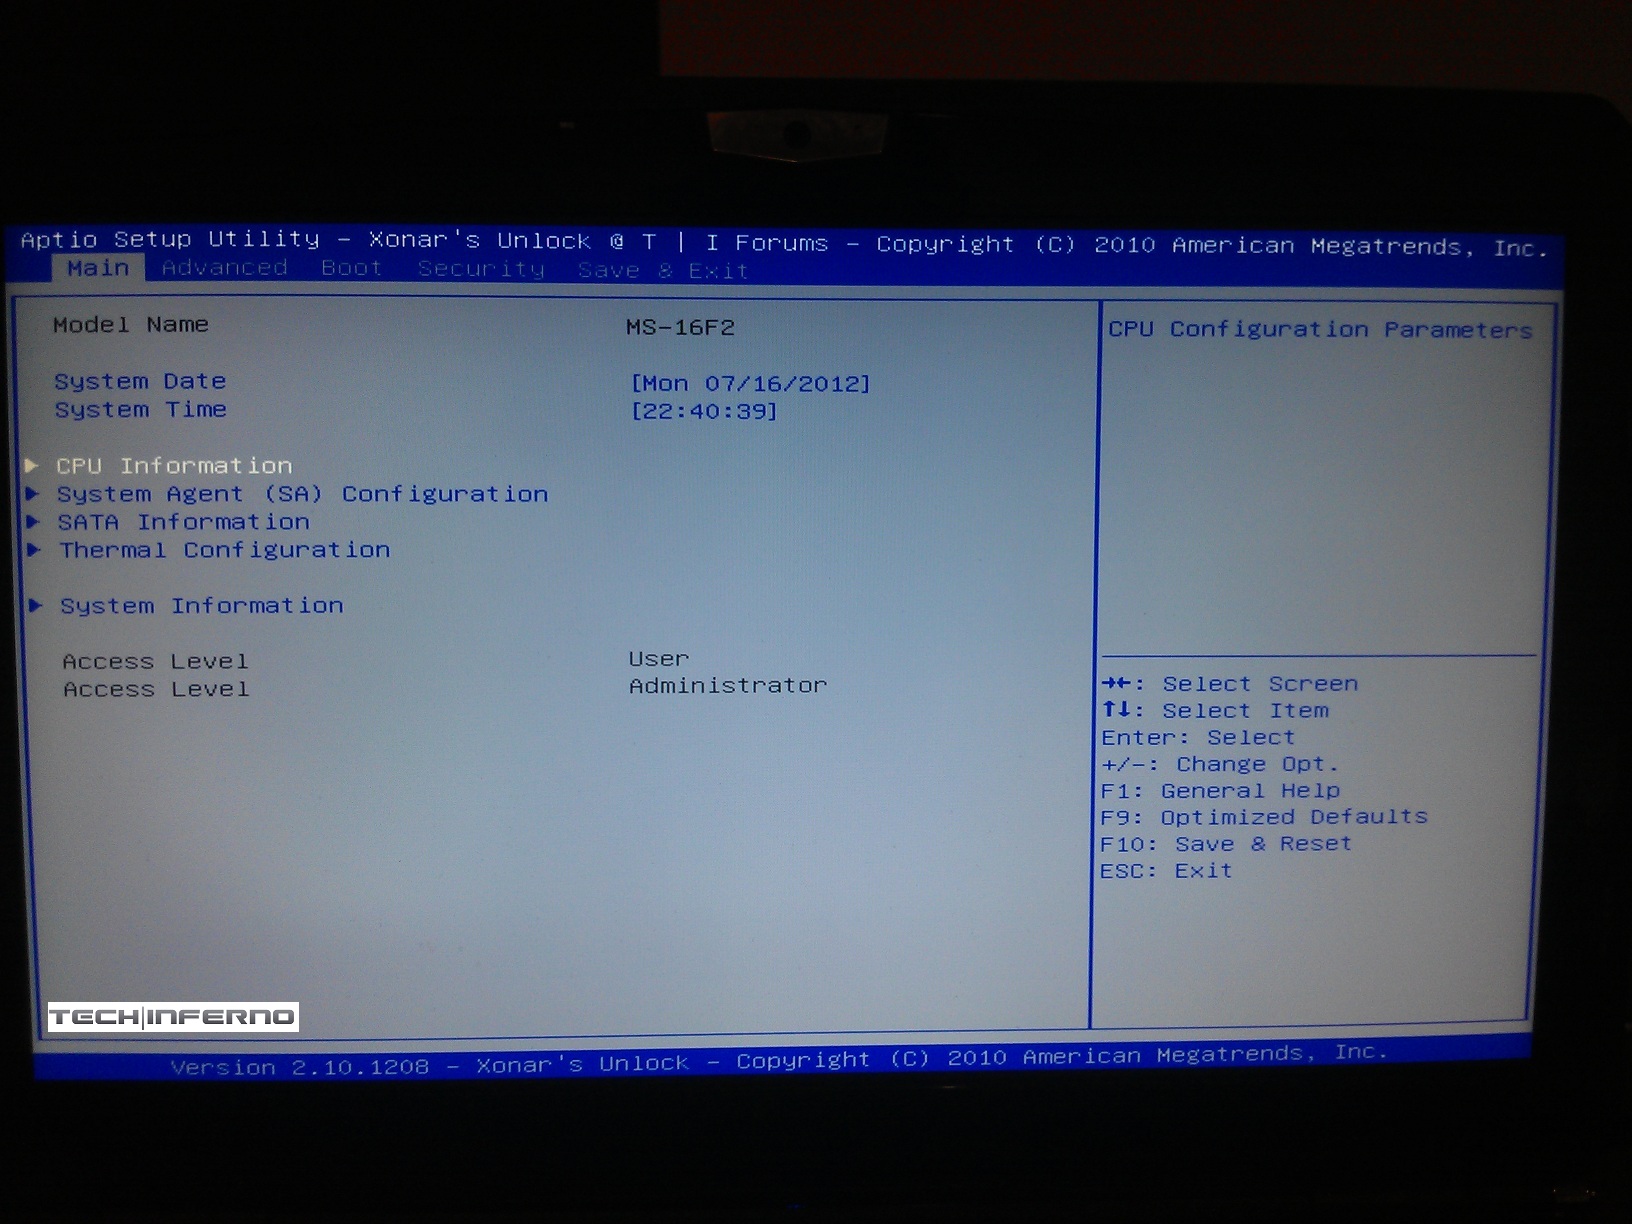
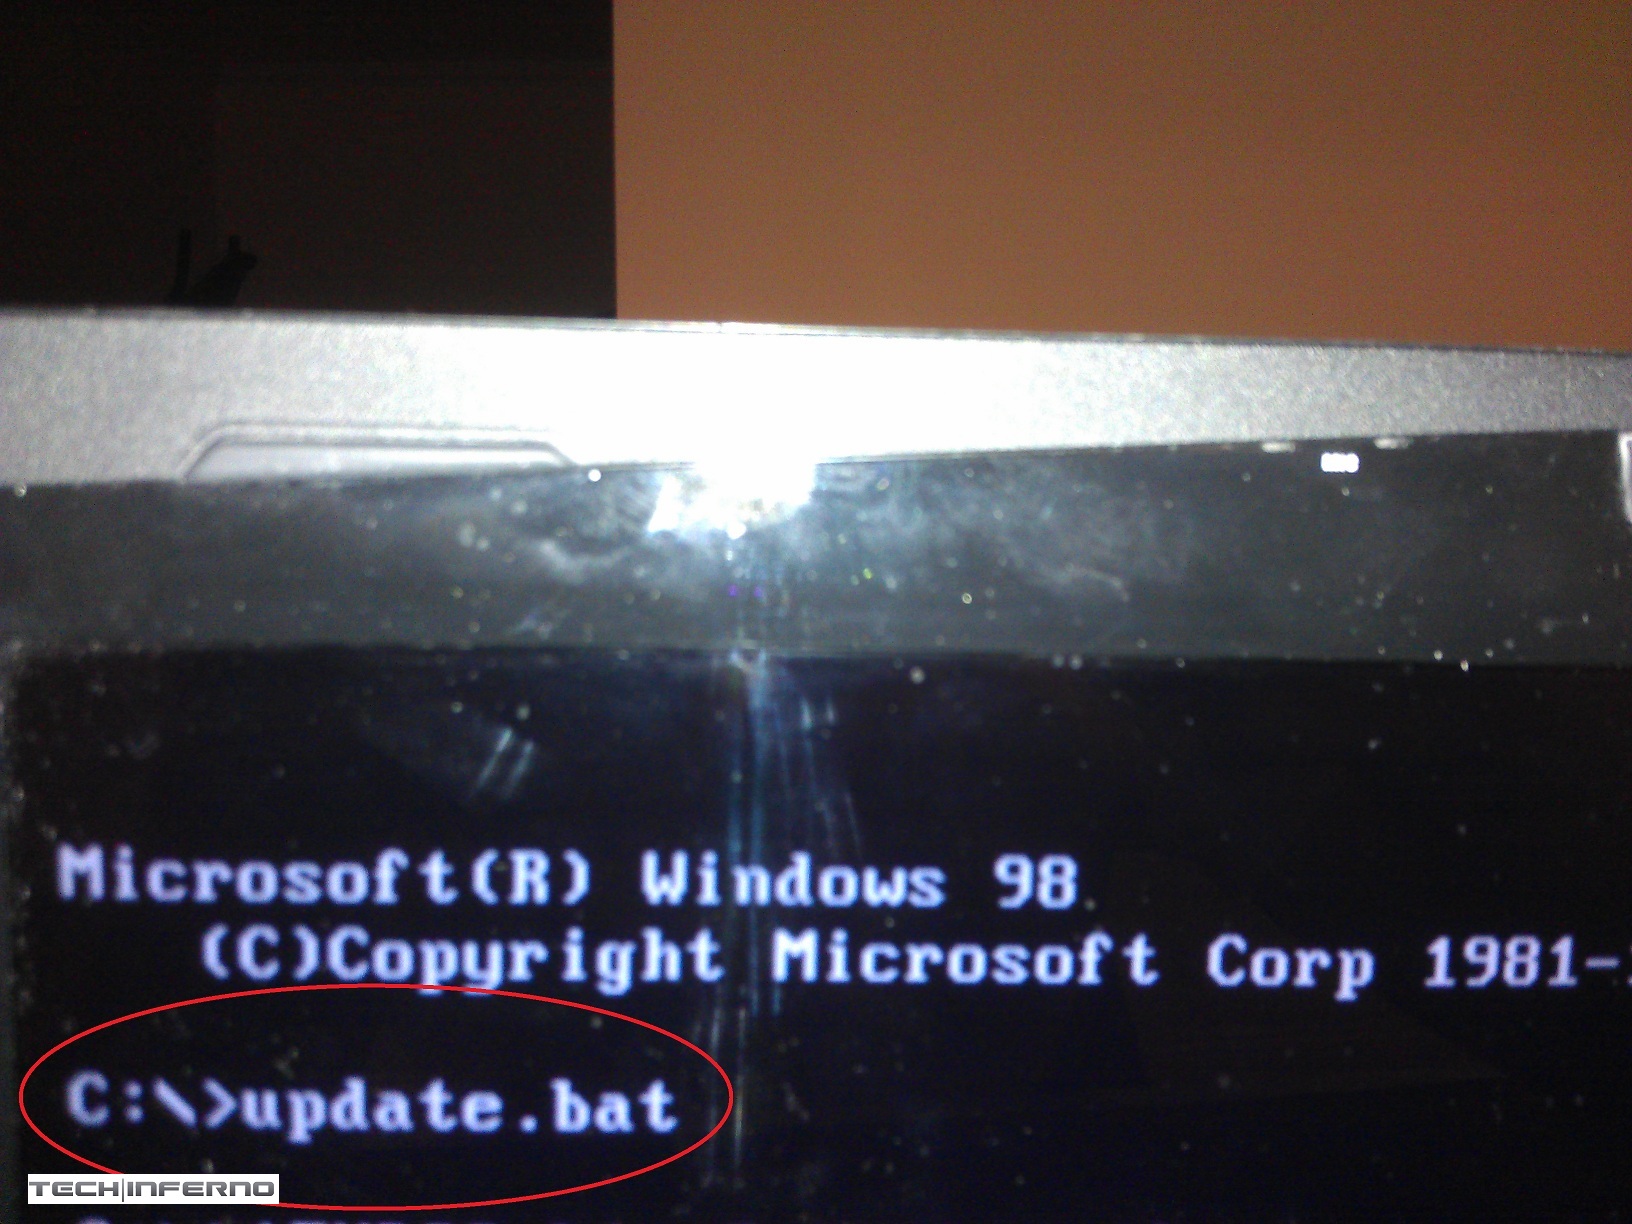
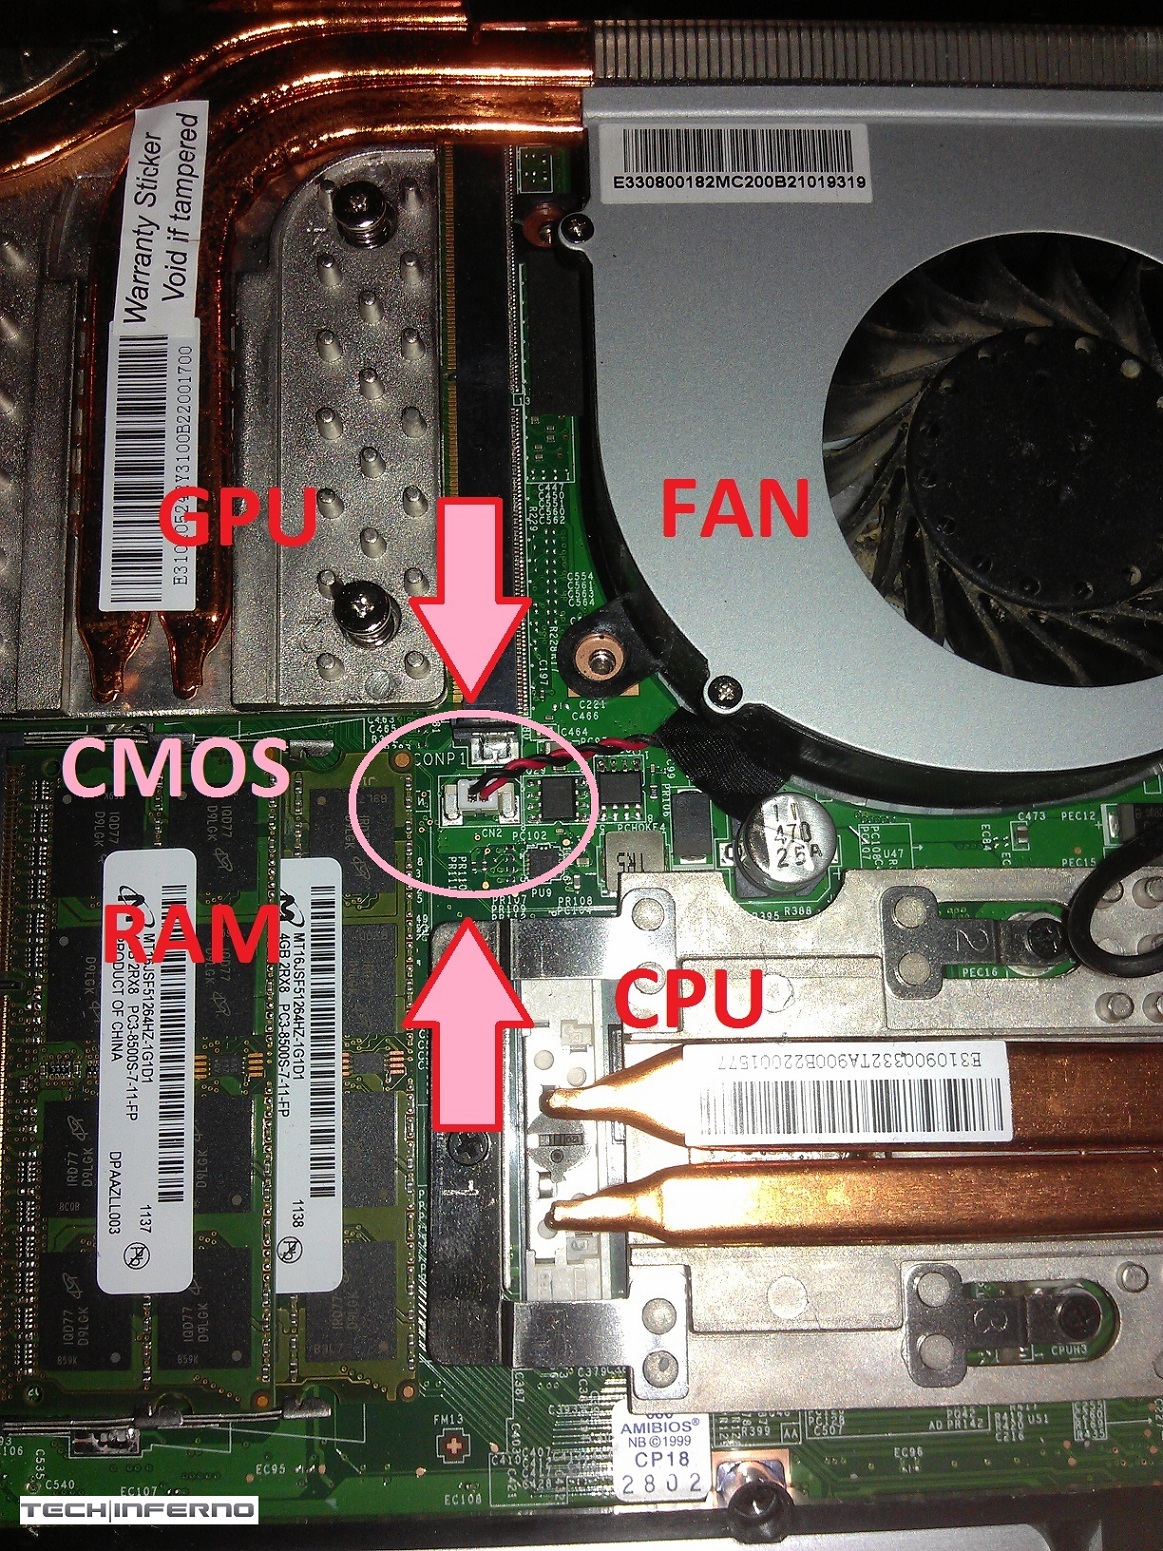
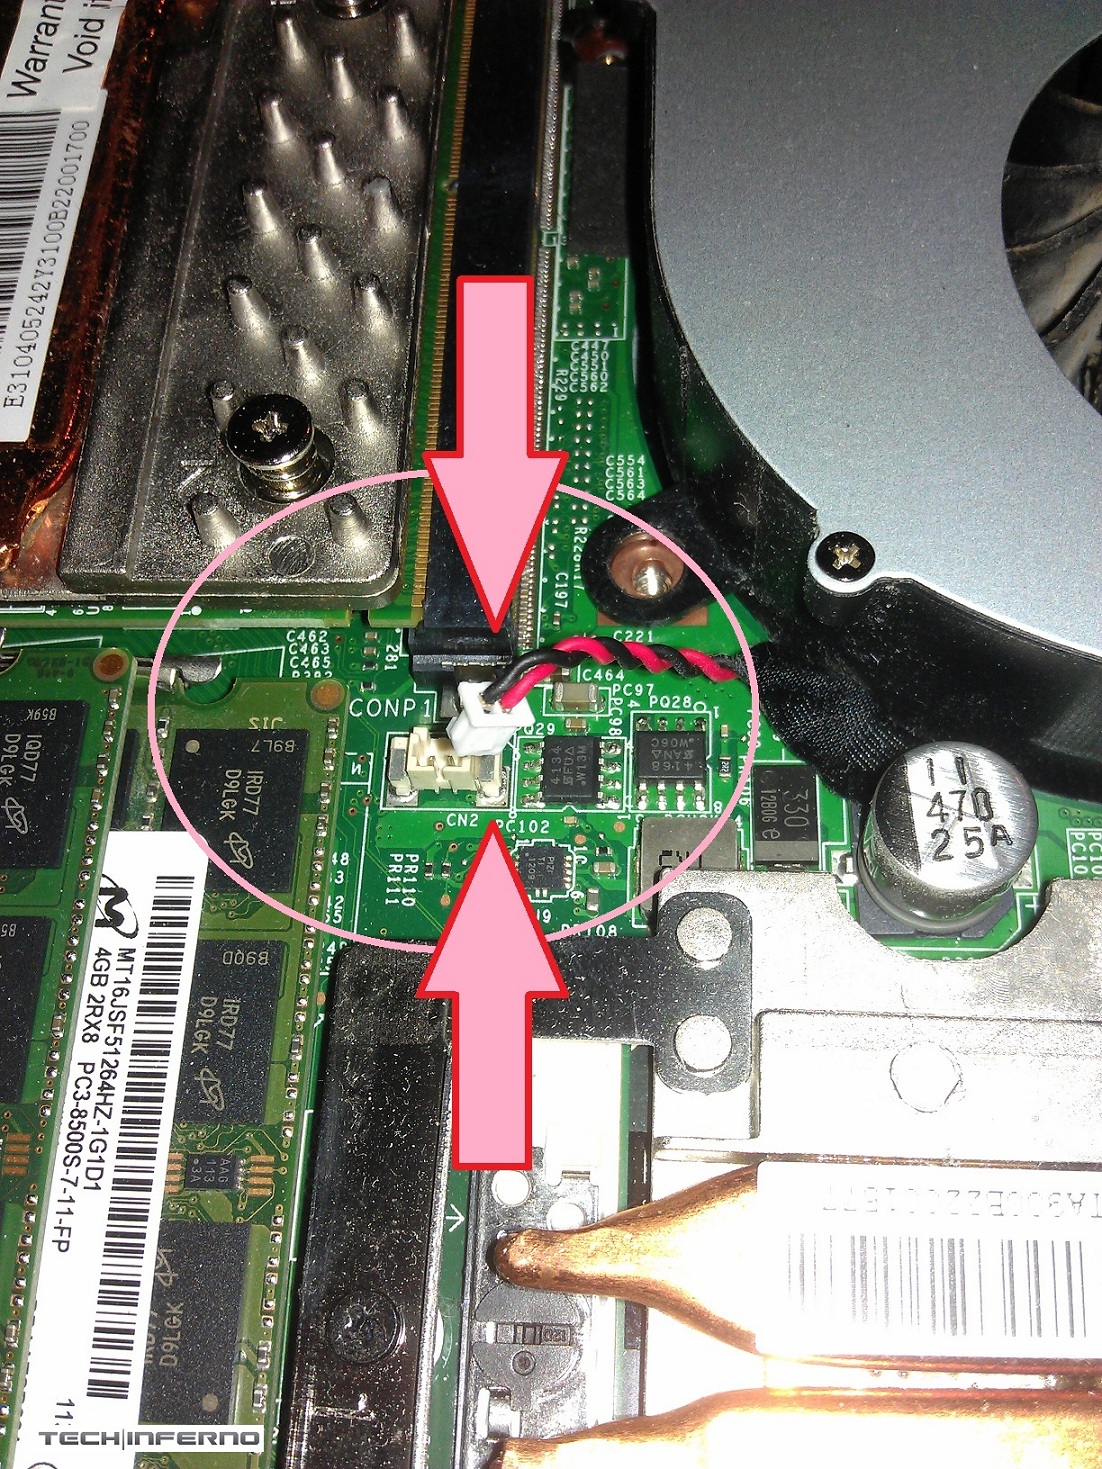
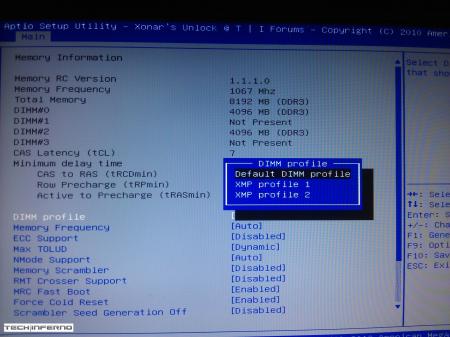
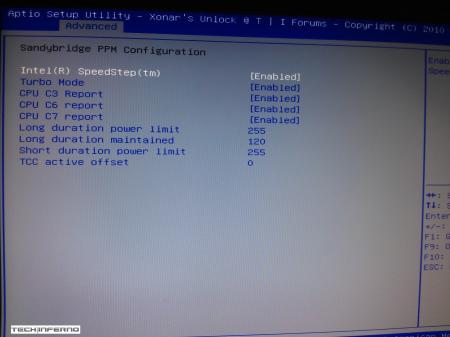
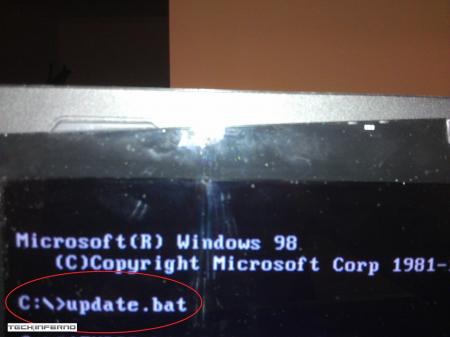
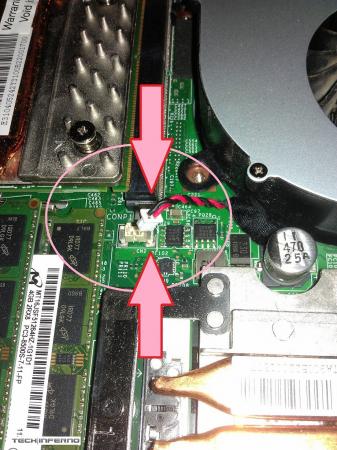
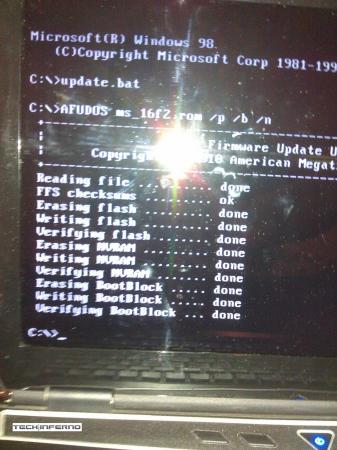
____________________________________________________________________________________________________________________________________________________________________________ *Note: This page is no longer updated, I am not taking requests anymore. Please do not PM me, because I will not respond. Other people have graciously posted their unlocked BIOS's within this thread, so you will have to do some searching to find the right one. I may come back to unlocked more later... I just don't have any time. Sorry. ____________________________________________________________________________________________________________________________________________________________________________ Welcome to my unlocked BIOS thread for MSI G-series gaming notebooks! Anytime you see an asterisk (*), it means that pictures for that part are included in the 2nd post. Introduction: In this thread you will find a list of MSI G-series gaming notebooks with their BIOS’ fully unlocked. Just about every feature that MSI has hidden is now available to be changed by the end user. This thread may be of particular interest to techies who love to squeeze every ounce of performance out of their notebooks or even the average person who is looking for a particular feature that has previously been locked. Should I Flash These BIOS? Anyone that owns one of the listed MSI G-Series notebooks is eligible. Who this does NOT apply to: - If you are afraid to brick your notebook, this is NOT for you. There is always a possibility for errors and accidents to occur. - If you do not understand what any or most of these acronyms mean, this is NOT for you. You will probably find little use for the unlocked features and the potential for risk is much greater than the reward. Who this applies to: - If you have an understanding of most of this thread and are willing to learn, continue reading. - If you are an enthusiast who loves modding and overclocking and have experience with this field, continue reading. Features: So what are these features that MSI had locked out? A short list would include: *- XMP RAM support (Up to 2133Mhz) [Warning: 4 DIMMs at 1866Mhz(+) may not be stable, 2 DIMMs are stable at 2133Mhz]. - BCLK Overclocking (Up to 5%, your mileage may vary, no guarantees). - TPL limits unlocked (With the combination of ThrottleStop, CPU throttling can be overcome). Necessary Tools & Knowledge: We’re going to need a couple things before we start flashing: 1. A bootable USB drive in DOS/ME/98. Guides can be found all over the internet. 2. The required BIOS file(s) for your specific notebook. 3. AC Adapter plugged into notebook. 4. Some common sense and bravery. Disclaimer: I claim no responsibility for any accident, damage, or brick caused by this, nor do I guarantee any technical assistance. Flash at your own risk. I am in no way affiliated to MSI, nor is MSI obligated to provide any support with these files. Proceed with caution! Your notebook's warranty will be compromised in the event of a repair! Redistribution of these files is not permitted without prior approval from me. You must contact me BEFORE you plan on hosting them. Thank you. Directions: 1. Add the three (3) files: "BIOS".ROM, AFUDOS.exe and update.bat to your flash drive. The root folder works best. Double check the READ ME.txt that you are about to flash the correct BIOS for your notebook. 2. Plug in USB drive and shut down your notebook. 3. Power on the notebook and during POST hit F11. This will bring up the boot menu, select your USB drive and hit enter. 4. In DOS, type:* This will start the flashing process. Warning: Once you hit enter, you CANNOT stop the flashing process. If you interrupt it via shutdown or remove its power source, you will brick your notebook with 100% certainty. 5. Sit back and wait for the process to complete itself. Note: Your fan will spin at 100% speed, it will be very loud. This is normal. Once your BootBlock has been verified and the command prompt comes back up, the process is complete.* Press Ctrl + Alt + Delete to restart your notebook and hit Delete to enter the BIOS. If your BIOS looks exactly the same as before and the flashing process came back with no errors, then you have to boot into Windows and shut down your notebook, NOT restart. Then check it out. Warning: The BIOS might reset the SATA mode into RAID. Please double check in the 'Advanced' tab that it is set to whichever mode you were using or else your boot manager may get corrupted. If this does happen, you will need to use your Windows 7 CD and repair the start-up process. Downloads: This part is under construction! More will be added. Taking requests as well. MSI Notebook Models: Version: Download Link: 1st-Gen Core-i Retail: MS-GX740(17''): 1.0F ms_gx740.zip Whitebook: MS-16F1(15.6''): 1.0L MSI 16F1 Unlocked.zip 2nd-Gen Core-i: Retail: MS-GT680/683(15.6''): .30Z MSI GT683 Unlocked.zip MS-GT780/783(17''): .30H MSI GT783 Unlocked.zip Whitebook: MS-16F2(15.6''): 3.05 MSI MS-16F2 Unlocked.zip MS-1761(17''): 3.06 MSI MS-1761 Unlocked.zip 3rd-Gen Core-i: Retail: MS-GT60(15.6''): .30M MSI GT60 Unlocked.zip MS-GT70(17''): .30M MSI GT70 Unlocked.zip Whitebook: MS-16F3(15.6''): MS-1762(17''): 3.0G MSI 1762 Unlocked.zip AMD APU MS-gx60(15.6'') 3.05 SecondGenAMDAPU.zip Recovery: Directions for making your notebook function properly if you encounter any errors. Case 1: In case of a GOOD flash, but you still cannot enter BIOS or boot into Windows: Common symptoms include: Endless looping reboots, inability to access the BIOS, permanent black screen, persistent BSODs in Windows or stuttering. The most likely cause was that your image was successfully overwritten, but some values may have changed internally and the BIOS may be having a hard time accepting them. If everything was a success and your notebook boots into one of the situations mentioned above, before trying a blind-flash recovery, UNPLUG the wire leading to your CMOS battery for 5-10 seconds.* This will RESET the stored values in the BIOS to their defaults. If this does not solve the problem, then a blind-flash will be required. Case 2: In case of a BAD flash, a blind-flash will be required. 1. Remove any files from your USB that aren't the necessary bootable DOS files. 2. Pick a ROM you want to flash (doesn't have to be the original), but it MUST be one for your notebook specifically. 3. Rename the file.ROM to AMIBOOT.ROM and put it on your flash drive. 4. Plug in your flash drive in a USB 2.0 slot. 5. As soon as your notebook turns on and nothing is displayed, spam Ctrl + Home (In my case, the MS-16F2 is Ctrl + Fn + PgUp or Ctrl + Shift + NumPad 7). 6. You should hear four (4) beeps and the BIOS should begin flashing itself. --------------------------------------------------------------------------------------------------------------------------- Redistribution of these files is not permitted without prior approval from me. You must contact me BEFORE you plan on hosting them. Thank you.1 point
-
Siuccessfully flashed!!! Thank you!!! Transaction ID # 0KP569349J486932U - - - Updated - - - 700/1650 is what a lot of users are using, but some go higher... since all GPUS differ somewhat, you may want to have a look at this thread: http://rog.asus.com/forum/showthread.php?19580-Overclocking-670m&highlight=overclock+670m1 point
-
Well, I'd say the heatsink mounting of the Clevos is a bit weak... if you manage to increase the pressure on the GPU die things might improve a lot. There different ways to do this, one possibility is to slightly grind down the four 'posts' of the backplate which are holding the screws (like this) or possibly by removing those two extra distant holders at hole 3 & 4 of the heatsink. Or with a copper shim if you have one, but that's probably less efficient.1 point
-
Ok thanks ... this is really nice to find help here, not really easy to do that alone, so if i can help someone who has the same config than me, i will be proud to try.1 point
-
I'm confused. The problems all go away when you turn off crossfire, yes? That could point to two issues: one, your crossfire cable is faulty...which you said it was. You can get a replacement crossfire cable for pretty cheap off of ebay. If that doesn't fix SOME of the lagging (won't fix all especially in newer games), then the secondary 5870m card may be having issues. The only way to check that is to take the secondary card and install it on the primary GPU's heatsink and in the primary MXM slot. If you still get high temps, artifacts, and/or lagging, you then know it's the secondary 5870m. Before you go swapping out the GPUs, take out the secondary card and leave the primary 5870m card and see what temps that card gives under load. If the primary card seems to run fine on it's own, it's probably not been damaged much by the extreme temps. If you do go with updating the crossfire drivers, I would recommend you do a clean install. Uninstall all the AMD software from your system. Then restart and go to the device manager. Select your AMD GPU from the Display Adapters, right-click and select uninstall. Make sure to check the box to delete the software driver files after they uninstall. Then restart again. You will need to repeat the process until the AMD GPU shows up a Generic VGA adapter under device manager. NOW all the AMD drivers are gone. You will need to initially install the stock Dell driver package for the 5870m crossfire cards to work correctly again. After installing the stock Dell 5870m driver package, make sure both your 5870m cards are working in crossfire like they should. If they do, you can update to the latest AMD Catalyst drivers.1 point
-
I think it's not just Dell, it's difficult to get drivers and support from other manufacturers too, like Lenovo. I tried using Ubuntu or Mint on my Thinkpad X200T and had so much difficulty getting all the drivers to work (most or all of them being unofficial) and some things I never managed to work properly, like switching from laptop to tablet mode and some features of the tablet functionality. I eventually gave up and went back to Windows. I'm hoping that Linux gets more love once Steam releases their Linux client, which Valve is pushing at least in part due to the new Microsoft's policies about app development in Windows 8. So there may be some really good things coming up due to "appleization" of Windows. I live for the day when we'll ditch the Windows all together and work equally well on Linux. After I've seen Win8 this day may come sooner than I expected.1 point
-
Pictures: Flashing Process: BIOS Options: Resetting CMOS Battery & Clearing the BIOS:


 1 point