Leaderboard


Popular Content
Showing content with the highest reputation on 11/30/12 in all areas
-
@gecko, i can try to create update AHCI in your bios, of course for free. Provide link for original bios and I'm start work2 points
-
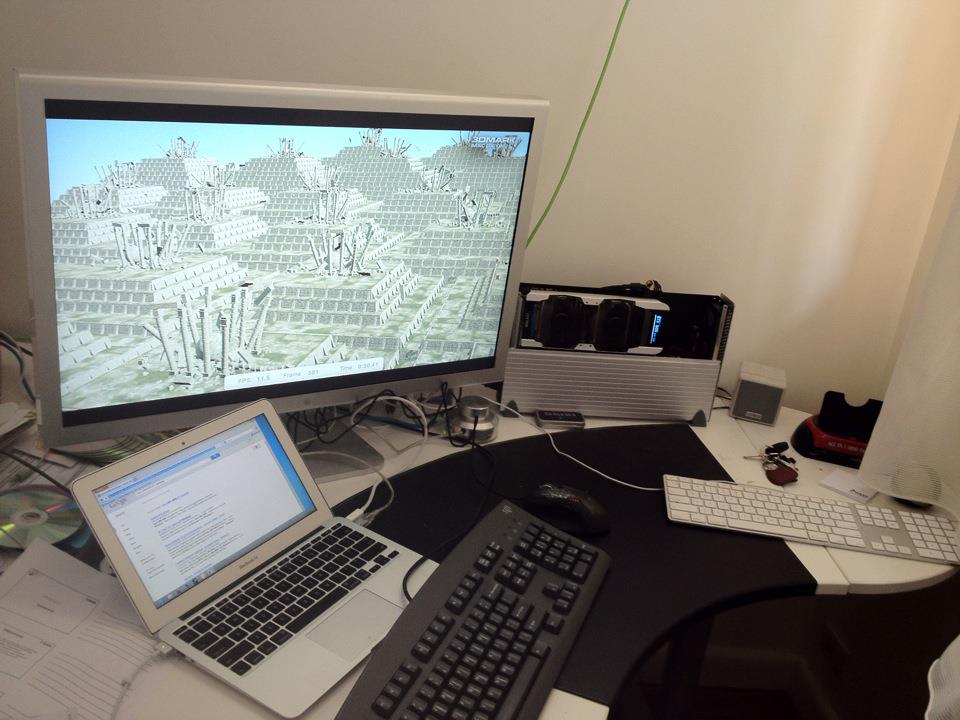
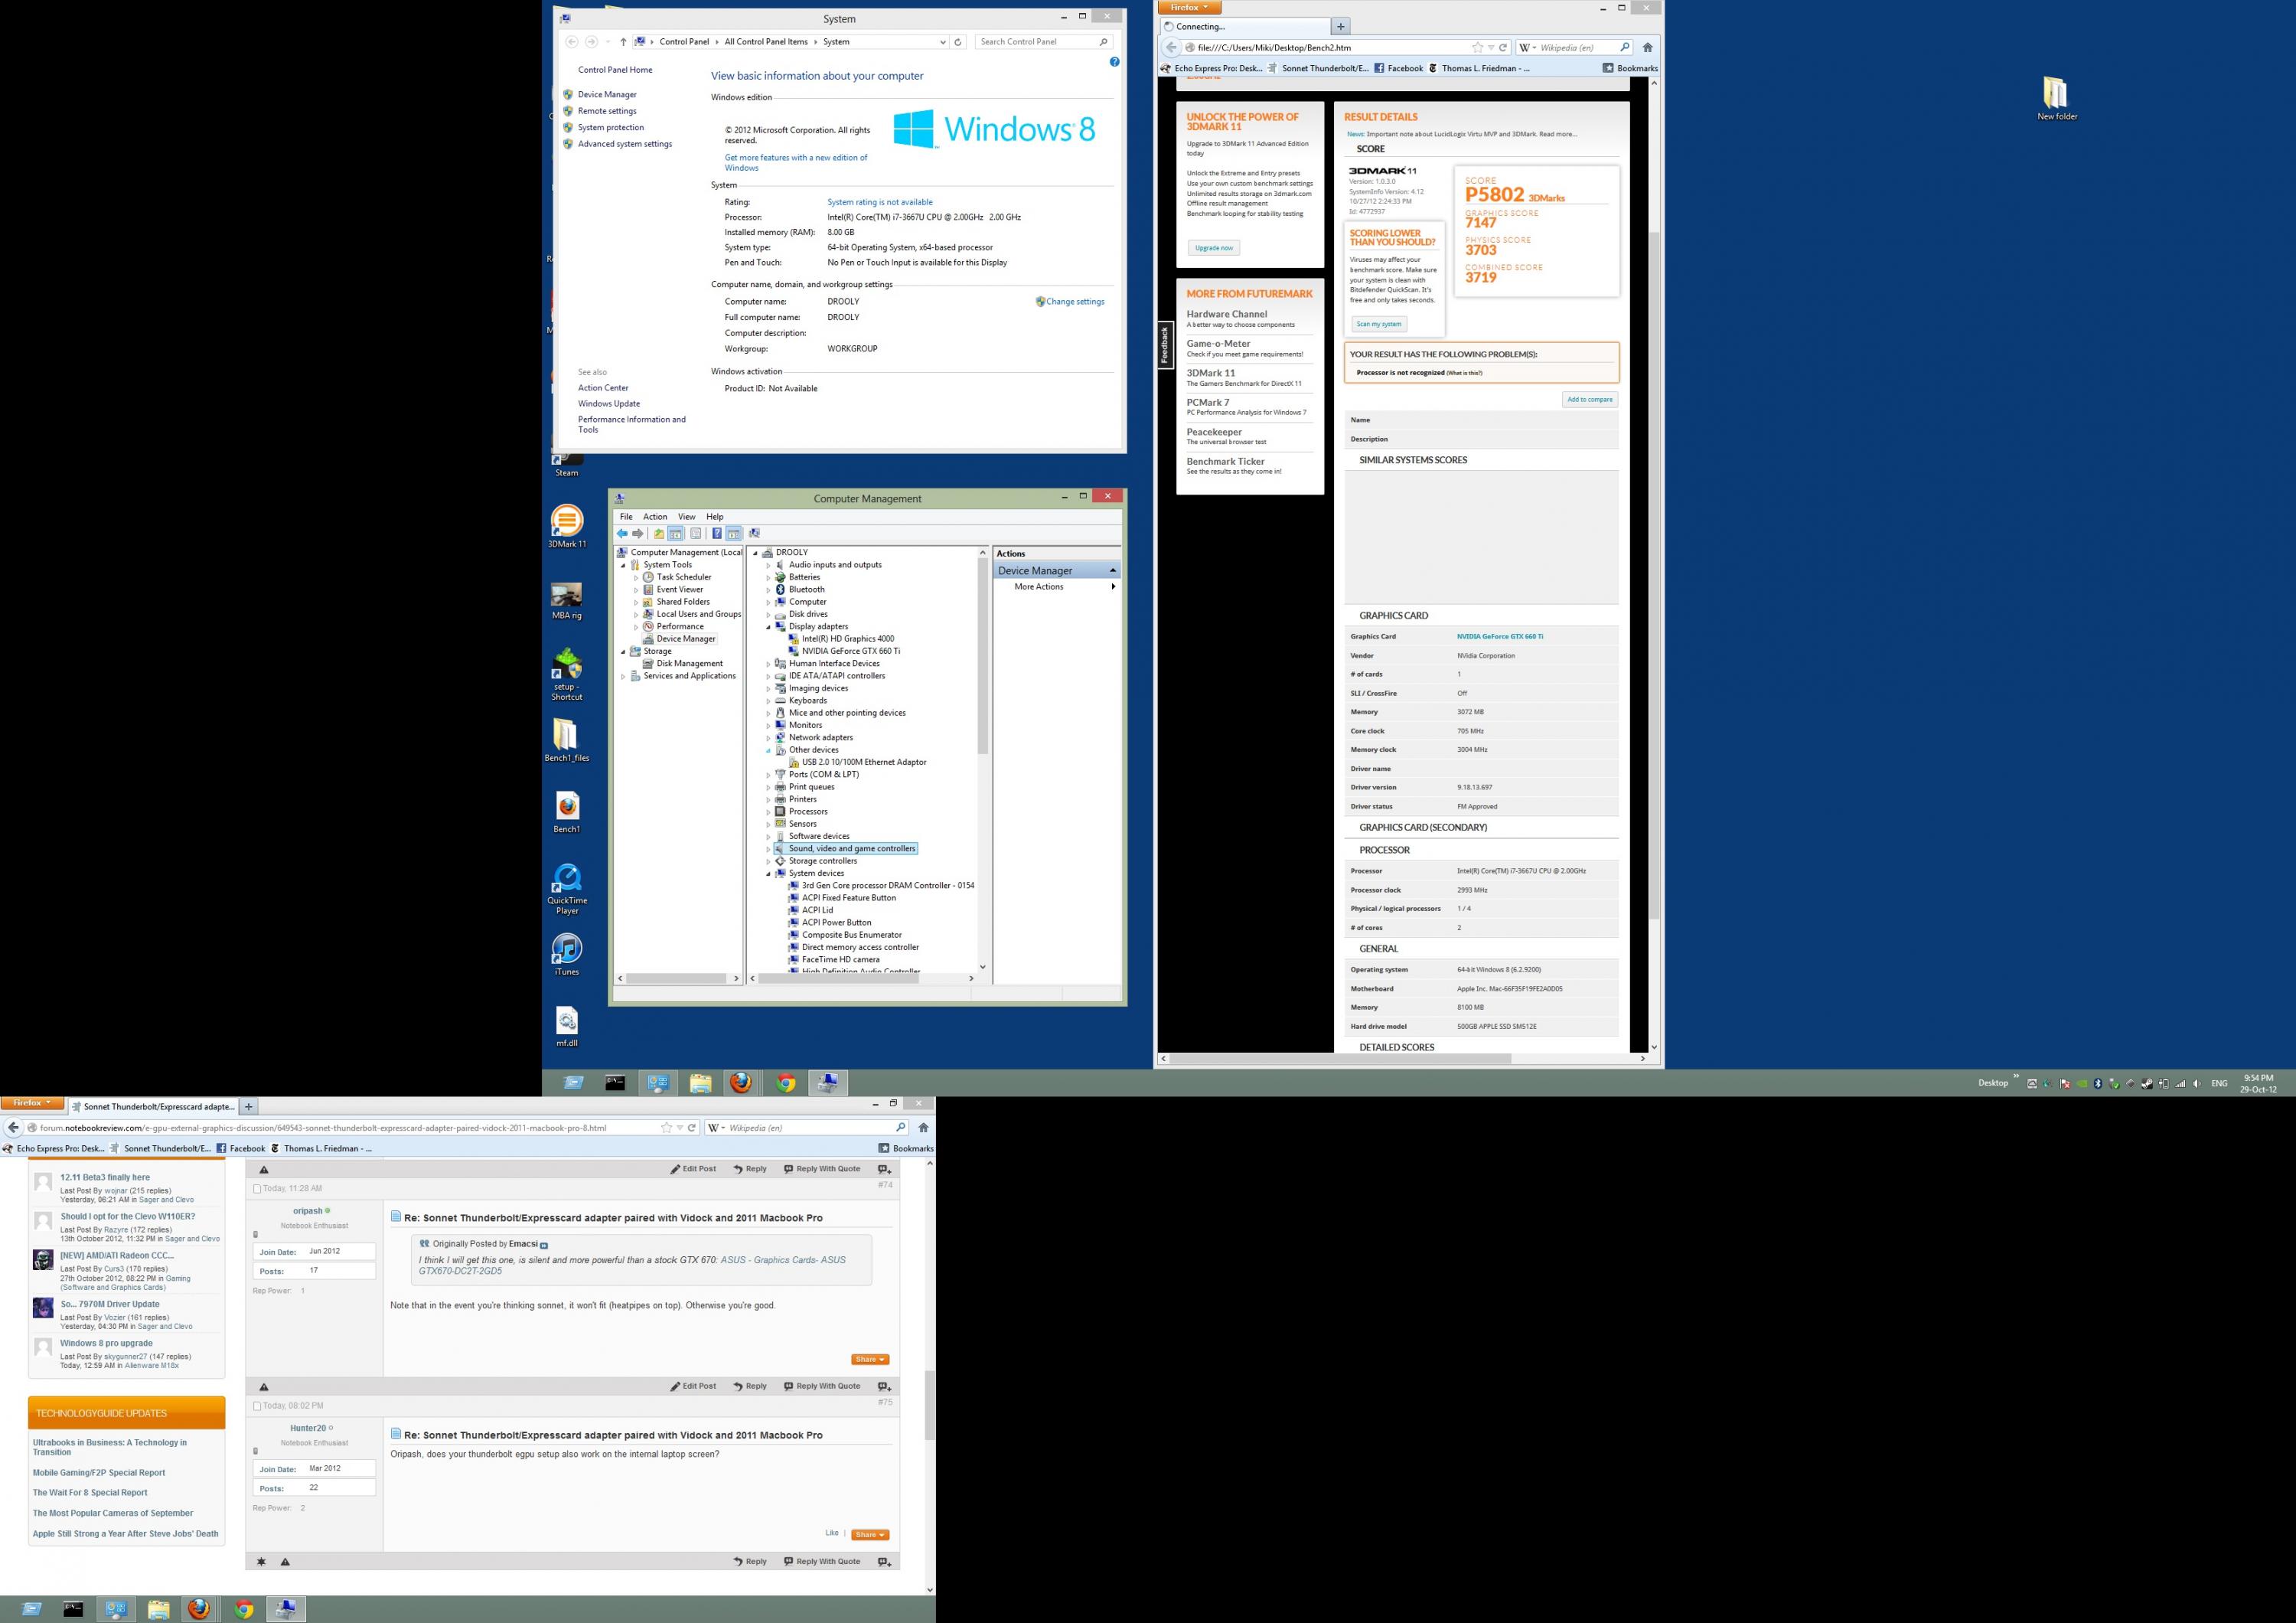
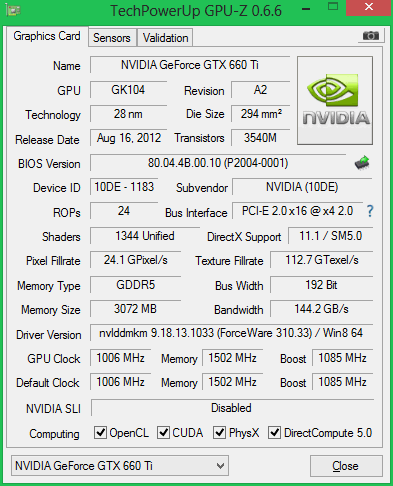
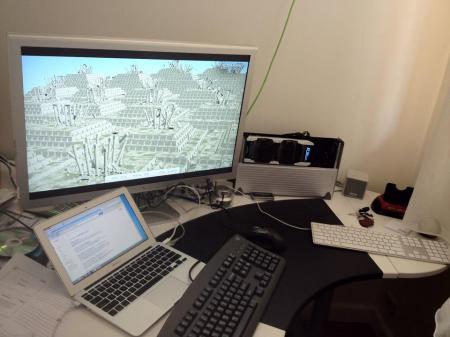
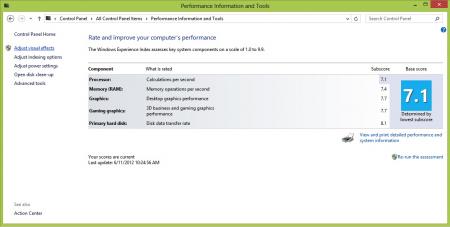
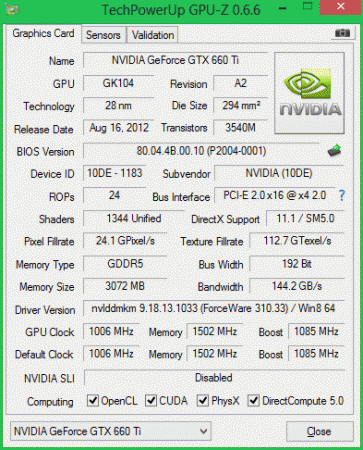
This is a loose guide for installing Windows 8 64-bit in EFI mode (e.g. not via bootcamp), dual-booting with MacOSX on a 2012 Macbook Air. It's a work in progress, so I update it from time to time. The purpose of this exercise is to set up a windows-based game rig on the mac using a thunderbolt-based eGPU, that will co-exist nicely with OSX. FYI: 1. This is a re-post from other forums which I've moved here. This is the one I keep updated. 2. Some of the specifications of this rig are very deceptive (It has two thunderbolt channels and four PCIe 2.0 lanes. Except it doesn't fully use either.). Please make sure you've read my short PCIe/thunderbolt Plumbing Primer to make sense of how stuff actually works. On to the fun: My experiences so far: There are two roads to install Windows on a mac. The road of BIOS and the road of EFI. Older PC's only have BIOS. Windows on those PCs talks to hardware directly through the BIOS. Macs come with EFI as the primary interface to the hardware. OSX talks to hardware directly through EFI. Macs also come with a BIOS emulation, because through BIOS, Windows works flawlessly (with the exception of thunderbolt...). This is how bootcamp makes your windows work. The newest Windows (Win7/64 and Win8/64 ONLY) can interface with hardware directly through EFI as well. Not all windows drivers are tested to work this way. What happens when we connect an eGPU - the new eGPU thunderbolt device tells EFI/BIOS it exists. On a BIOS-based PC, the BIOS would enumerate it and tell the OS the device is ready. Tomshardware review of the Sonnet suggests this works flawlessly on a thunderbolt-equipped desktop motherboard. On an EFI-based mac, things are a bit different. The thunderbolt device tells the EFI it exists. The EFI enumerates it as a PCI device and tells the OS the device is ready. That's what happens in OSX (which runs in straight EFI mode), and what happens in Win7/x64 or Win8/x64 if you installed them in straight EFI mode. If, however, you run windows in regular BIOS mode (if you installed Windows via bootcamp, this is the case), Apple's BIOS emulation does not pass the thunderbolt enumeration event back to windows, and your thunderbolt eGPU doesn't work. There's a way to make it work using a rain dance, where you connect the eGPU to the mac but not the AUX power plug to the GPU, turn mac on, get past the boot loader, immediately turn the GPU power on before windows completes booting, jump on one foot holding your left ear, bend over backwards twice, scream in agony, and on occasion your thunderbolt device gets recognized and appears in device manager. Even then, twice it disappeared on me while installing nVidia drivers. I gave up on trying to get thunderbolt eGPUs work it through Apple's BIOS emulation. I decided to install windows in EFI mode. I tried windows7/64bit/EFI, ran into a pile of weirdness installing and gave up. I'm using Win8/64/EFI instead. Setting up a dual-boot EFI on a macbook is easy: a. NO BOOTCAMP. b. when in OSX, fire up terminal, sudo to root and shrink your EFI OSX partition: # diskutil resizevolume /dev/disk0s2 250G (in this case, I have a 512GB SSD, I shrunk the partition to 250G). c. DO NOT create windows partitions under OSX. DEFINITELY do not let boot camp do this for you - it creates MBR partitions, EFI windows won't install on that. d. On some windows PC (or if you're like me, in your Windows7 parallels VM), Create a USB bootdrive of windows 8: insert 4GB or larger USB disk. Note: below steps will wipe it. Proceed at own risk. run command prompt as administrator > diskpart > list disk (check which disk number your USB disk appears as, use it in the next commands) > select your-usb-disk-number-from-previous-step > clean > convert gpt > create partition primary > select partition 1 > format quick fs=fat32 > assign > exit Now copy the guts of the windows 8 DVD or ISO onto this new drive. Congrats, you now have an install drive. e. Back on our macbook, I recommend installing rEFIt - install it, then open a shell, cd to /efi/refit and run: sudo ./enable.sh f. Reboot with the USB disk in. in the rEFIt menu, you should see two ways to boot from the USB disk - EFI and BIOS. Choose EFI. g. Installing windows: 1. First boot: windows installation. When you get to the partitioning stage, you should have a block of empty space on your macbook SSD. Let windows create its EFI partitions on them and tell windows to format the last big one of these. Then proceed with the install. It will copy files and reboot. 2. Seocnd boot: you don't need to do anything. It will go into a black screen (this is because the GMA4000 driver breaks in EFI mode), reboot on its own after a few minutes. 3. Third boot: Again, it'll go into a black screen again. LEAVE FOR 15 MINUTES for the installer to do its thing, then, after it presumably finished doing all the things it isn't showing you, HARD POWER-OFF. 4. Fourth boot: In the refit menu, choose to boot off the USB drive again. This time go into the recovery menu and fire up a command prompt. Delete the broken intel GMA4000 driver file (causing the default VGA driver to take over). Once in the shell, run: C:\> del c:\windows\system32\drivers\igdkmd64.sys Exit the shell and let the machine reboot. Finish the windows installation and go through the formalities. 5. Timekeeping: Windows likes to think that the machine's SAVED time (what time your machine thinks it is if you boot it completely offline) reflects the local time in your timezone. OSX likes to think SAVED time reflects time in Greenwich. They'll keep fighting between them over what time it is. Solution: In Windows, using regedit, navigate-to and add the following DWORD, and set it to 1: HKEY_LOCAL_MACHINE\SYSTEM\ControlSet001\Control\RealTimeIsUniversal Then reboot. Now let either OS set the time, and it will remain good across both. 6. Windows works!. h. DO NOT TRY TO UPDATE THE DRIVER FOR THE GMA4000 onboard graphics. It will just reinstall a new (still broken, as of the time I'm writing this post) igdkmxd64.sys file, and force you to go through step 4 above again. i. I installed Forceware 306.97 nVidia driver for Win8/64. It installed fine. j. Go back to OSX. Fire up boot camp assistant and select "Download the latest Windows support software from Apple". Untick everything else. Save it on your USB or somewhere where windows can see it. It will create a WindowsSupport directory with drivers for all the Apple bits and an installer that installs all of them. Boot into windows, go to the WindowsSupport folder on this USB stick and run setup.exe. This will properly install drivers for a few more things, including bluetooth. GMA4000, screen brightness controls & onboard audio will still not work. The boot camp control panel in windows won't work - its start screen shows bootable partitions and it expects a hybrid MBR which we've very deliberately avoided setting up in our non-1980's shiny GPT partition structure (you can manually install a hybrid MBR and experiment using gdisk and the 'h' option in the recovery submenu, but that confuses the hell out of windows). k. Things that don't work for me: 1. Screen brightness controls in Windows. 2. Sound driver. I just plugged in an external USB sound card I had lying around. 3. The GMA driver. There are four drivers you can use: a. The GMA driver bundled with windows (or an updated WHQL one from windowsupdate). b. The driver supplied in Apple's bootcamp driver pack. c. The latest GMA driver downloadable from intel's website. d. The default VGA driver in Windows. 4. Virtu (The installer fails to set up) As of 26/11/2012, (a-c) do NOT work in EFI. This has nothing to do with the eGPU and whether it is connected or not. It has everything to do with the driver not yet being written to be compatible with windows working in straight EFI. I'm sure Intel will fix this at some point, I'm just not sure when this will happen. (a) and ( will give you a yellow triangle in device manager, © will not (but still not work). (d) works FINE (it's snappy and not laggy or anything, it doesn't feel like the good'ol "video card without a driver" in windows). It'll be 100% good for everything except gaming. 4. Boot camp control panel (to tweak behavior of apple hardware, trackpad options, what the button on your apple display does, etc). It opens up on the "partitions" tab, which it can't figure out because we have no hybrid MBR, so it bombs out. The system tray icon still runs, and you can tweak some of the behavior via registry if you're thus inclined. At the end of the day: Steam works. So do all games I tried to date (Metro 2033, Borderlands, Portal 2...) 3DMark 2011 P5802 : Graphics Score: 7147, Physics Score: 3703 Combined Score: 3719 By contrast: A retina Macbook Pro 15 with a Kepler dGPU does P2275, and an alienware M18x does P5602. Mu-ha-ha. I would REALLY love to compare this rig in a benchmark that is HIGHLY influenced by PCIe constraints (such as the Dirt3min test Anand ran here: AnandTech.com - The Radeon HD 7970 Reprise: PCIe Bandwidth, Overclocking, & The State Of Anti-Aliasing) using [a] a 660Ti with 2GB, a 660Ti with 3GB, [c] a 680/690 (at, say, 1080p and 2560x1600 res) and [d] Same 680/690 with 4GB. This would show: 1. Whether having more GPU RAM results in meaningfully more on-card caching (both at the 660-level cards and 680 or 690 level cards), less need to shuttle textures over limited thunerbolt bandwidth and ultimately a meaningful performance increase. 2. Whether there's any point in putting a high-end GPU on this rig. I don't have the required GPU's, but if anyone is in the Melbourne, Australia area and has one he can lend for the sake of this experiment, shoot me a private message and we'll try. My kit: Macbook Air 2012: Dual-channel thunderbolt (Intel DSL3510L Cactus Ridge controller, details here), supposedly 2x10Gbit/direction (no more than 10Gbit/direction/GPU), 8GB RAM, 512GB SSD, CPU: Intel Core i7-3667U @ 2.00GHz/3.2GHz turbo'd (...always wanted to run a gamebox on a ULV 14Watt part ) Thunderbolt to PCIe: Sonnet Echo Express Pro (dual-channel thunderbolt, 2x10Gbit/direction, 1 thunderbolt channel->four PCIe 2.0 lanes) GPU: Galaxy GTX660ti 3GB Power supply: FSP X5, external to the Sonnet enclosure. (It's a 5.25'' 450Watt booster PSU). I'm too lazy to pull enough 12V rails from the Sonnet's built-in 150W PSU to drive the card (and I don't want to accidentally fry it, it is an $800 part), so I'm feeding the GPU's power from an external $80 source. Summary: to quote a vending machine, and referring directly to the number of PCIe lanes used... "FOUR HUNDRED PERCENT MORE AWESOME". Next stuff on the agenda to test: 1. I will re-install something similar on a macbook air 2011, which only has one thunderbolt channel (an a 1.8GHz i7). I want to see the GPU performance difference between the two... and confirm if indeed the Sonnet is putting its four PCIe 2.0 lanes on one 10Gbit thunderbolt channel or teaming both thunderbolt channels to achieve this. 2. Lucid Virtu doesn't from Lucid's website doesn't install on Windows 8. However, there is a newer version on ASRock's website, and you can grab it from here: LucidLogix VIRTU 2.1.220 64-bit.rar I want to try and install that, and see if I can get some mileage out of the GMA as well. 3. Optimus. The reason Optimus is interesting is the use of the internal monitor (meh.. it's 11''), and the compression it puts on PCIe (now THAT can be interesting). People say that it turns on when the nVidia driver shows you both GPUs in the drop-down. Mine does that. People also say it only enables when you have one PCIe 1.0 lane, and disables when you have more. I have a sneaky suspicion that compressing GIGABYTES of data in realtime - that's eight times what a single PCIe 1.0 lane carries - requires more oomph than the nVidia card has at its disposal, and the absence of said oomph is the reason it's disabled. Just a suspicion. That said, if this can be forced on somehow, I'd love to try. I haven't found any way of doing this, so this is just a background thought, not an active course of investigation I'm running with.

 1 point
 -
The Humble THQ Bundle (pay what you want and help charity) Great deal on this set of games. You can set your own price except for the Saints Row: The third, for which there is a $5.69 min atm. Really not big of a deal imo. EDIT 12/11: As pointed out by @silverkid, Metro2033 is free atm if you Like them on Facebook: https://www.facebook.com/MetroVideoGame/app_3958406304917821 point
-
The newest DELL bios works great in 17R3. I can software overlock to 1006/1125 and in 3D11 i got 76XX and GPU score is 81XX. svl7 you are amazing! Thank you very much1 point
-
It's because the game isn't stressing the gpu enough for full utilization. It has nothing to do with the vbios. Sent from my GT-N70001 point
-
Yep, you can disable it
 1 point
 -
Looks as things are coming nicely with the Dell cards as well Nice scores!1 point