Leaderboard


Popular Content
Showing content with the highest reputation on 11/10/12 in all areas
-
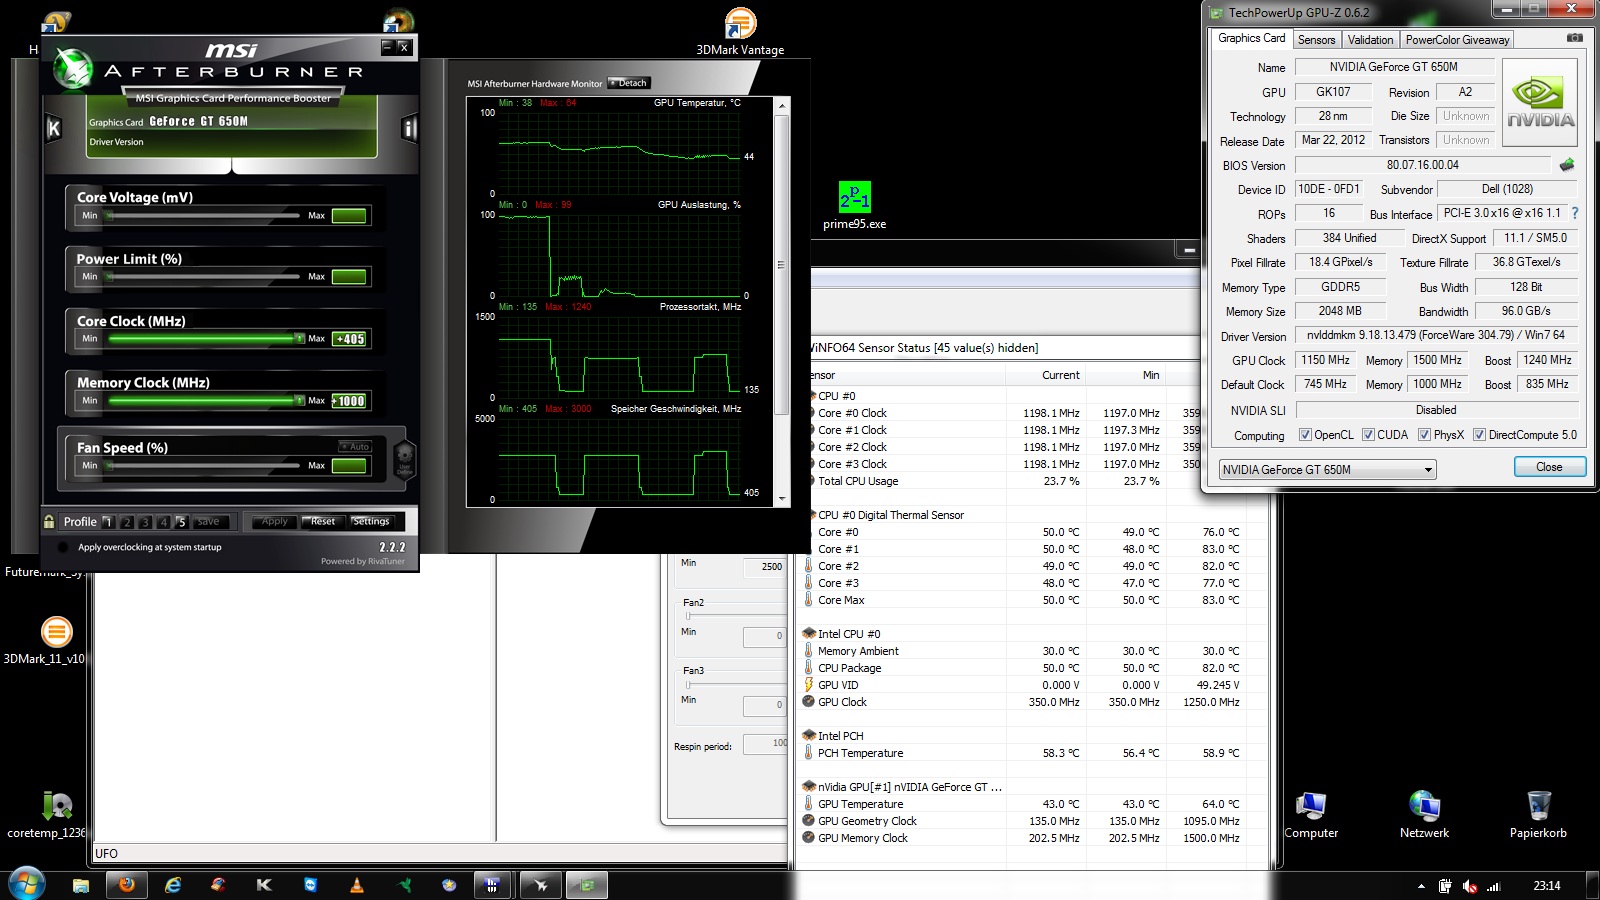
Alienware M14x R2 - Modified BIOS versions containing tweaked VBIOS files Similar to the original M14x (aka R1 nowadays), the GPU of the M14x R2 is astonishingly powerful and has much more power than it reveals at stock settings. The relatively low default clock and base boost as well as the apparent +135MHz core overclock limit holds back a lot of GPU power. These BIOS versions here will unlock this software overclocking limit and / or increase the clocks of your GPU and allow you to get much more power from your system. Mods based on M14x R2 BIOS A03: - A03 @ stock clocks, unlocked overclocking limits - more to come Instructions are included, refer to the READ ME file. Please provide feedback and leave a comment. I'm also still looking for some versions to be tested once in a while, if you're interested please take a look at this thread: http://forum.techinferno.com/alienware-m14x/1787-%5Bm14x-r2%5D-vbios-mod-higher-boost-clocks-test-versions-only-5.html *************************************************************** F.A.Q.: Why do I need to flash the BIOS in order to get higher clocks? Isn't the VBIOS responsible for the GPU settings? Answer: How can I revert to the original Dell BIOS? Answer: What exactly got changed compared to the original BIOS? Answer: *************************************************************** Credits: I want to thank all the testers, especially @Stevenxowens792 and @deadbydawn, also @lh6kean, @thanats007 and all the guys I forgot to mention. And remember, you are responsible for the changes you make on your system, flash at your own risk. M14x_R2_BIOS_A03_-_[unlocked].zip
 1 point
 -
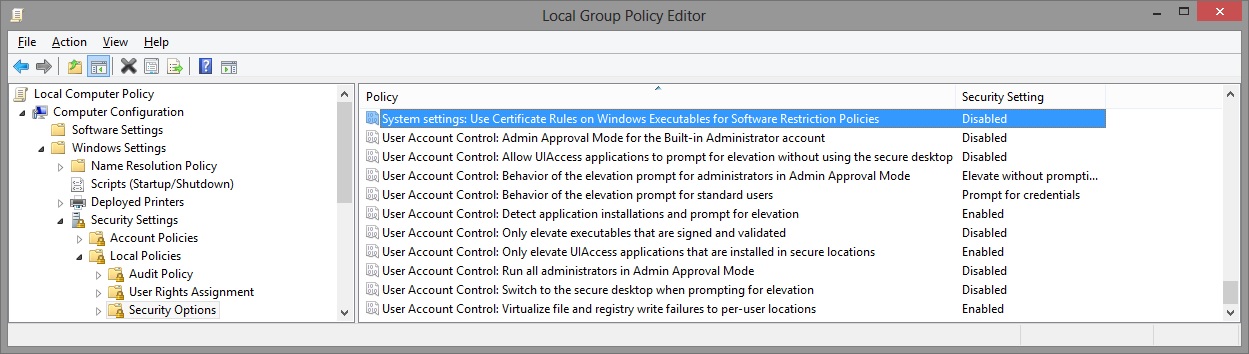
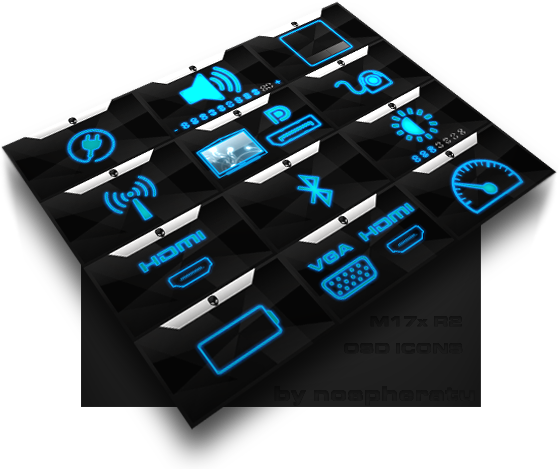
I've recreated the OSD Icons for the R1/R2/R3/R4 and R5 aka 17 as the standard ones are a bit dated. It should also work with the M15x though as my old M15x had the same setup for the OSD app. Regarding the R3 OSD, it seems its the same install for the M18x as well so it should work for you M18x owners too. I've also added the AW 17 OSD to the list. This exe is also compatible with the 14 and 18 as Dell uses the same OSD for all the new machines. There's also a set for you Area-51 m17 R1 owners. I've tried to give it a simular feel to the Invader Icon pack by Alienware. Hope you guys like it Install Instructions for R1 1. You need to end the OSD process in Task Manager since it may be using some of these icon files. Ctrl+Shift+Esc then find the OSD process and end it. 2. Backup your current icons if you want to revert to the originals (You can also uninstall and re-install the OSD application if you want to go back to the original icons) 3. Extract the attached "M17X R1-R2 & M15X.zip" contents to C:\Program Files (x86)\OSD\picture\. Overwrite if prompted. 4. Restart the OSD application. It is located in C:\Program Files (x86)\OSD\Launch.exe 5. Done! Install Instructions for R2 /M15x 1. You need to end the OSD.exe process in Task Manager since it may be using some of these icon files. Ctrl+Shift+Esc then find "OSD.exe" and end the process. 2. Backup your current icons if you want to revert to the originals (You can also uninstall and re-install the OSD application if you want to go back to the original icons) 3. Extract the attached "M17X R1-R2 & M15X.zip" contents to C:\Program Files (x86)\OSD\ICONs\. Overwrite if prompted. 4. Restart the OSD application. It is located in C:\Program Files (x86)\OSD\Launch_OSD.exe 5. Done! Install instructions for R3 / R4 / M18x 1. You need to end the OSD process in Task Manager since it may be using some of these icon files. Ctrl+Shift+Esc then find the AlienwareOn-ScreenDisplay.exe process and end it. 2. Backup the existing AlienwareOn-ScreenDisplay.exe by renaming it to "AlienwareOn-ScreenDisplay.exe.BAK" for example. Its in C:\Program Files (x86)\Alienware On-Screen Display\ 3. Extract the AlienwareOn-ScreenDisplay.exe from the appropriately named file depending on your OS and model to the C:\Program Files (x86)\Alienware On-Screen Display\ folder. 4. Restart the OSD application by double-clicking the file. 5. Done! Install instructions for 14 / 17 / 18 ** 1. You need to end the OSD process in Task Manager since it may be using some of these icon files. Ctrl+Shift+Esc then find the AlienwareOn-ScreenDisplay.exe process and end it. 2. Backup the existing AlienwareOn-ScreenDisplay.exe by renaming it to "AlienwareOn-ScreenDisplay.exe.BAK" for example. Its in C:\Program Files (x86)\Alienware On-Screen Display\ 3. Extract the AlienwareOn-ScreenDisplay.exe from the "AW 14-17-18 (Windows 8).zip" file to the C:\Program Files (x86)\Alienware On-Screen Display\ folder. 4. Restart the OSD application by double-clicking the file. 5. Done! The Area-51 m17-R1 install should be similar to the steps for the other laptop revisions above. They all basically follow the same process anyway, apart from filenames/paths. @robby_hd was kind enough to make a red version of these icons for the M17x R3 / M18x R1 which can be downloaded from his post here. **There seems to be a security issue with Windows 8/8.1 at this point in time since it doesn't allow modified exe's. I will update this post with a solution once it has been found. Also a few Alienware owners are having an issue with the unmodified OSD and Windows 8. Only the default Windows 8 OSD displays and not the Alienware version. Try the solution posted by Dell here and then attempt installing the mod. The below screenprint is a workaround by editing the security policies to allow the unsigned exe to run in Windows 8. If you are not aware of what these settings do and the repercussions of changing them, please do not attempt it. - Open the Group Policy Editor by typing "gpedit.msc" in the search or run text box. - Duplicate the settings below. Area-51 m17-R1.zip M17X R1-R2 & M15X.zip M17X R3-R4 & M18X R1-R2 (Windows 7).zip M17x R4 & M18X R2 (Windows 8).zip AW 14-17-18 (Windows 8).zip M17X R4 & M18X R2 (Windows 8.1).zip

 1 point
 -
Boobs better pack his stuff and head to Colorado or Washington haha, I bet it looks like a remake of the movie "the mist" over there. Hopefully without the bad ending.1 point