Leaderboard


Popular Content
Showing content with the highest reputation on 08/13/12 in all areas
-
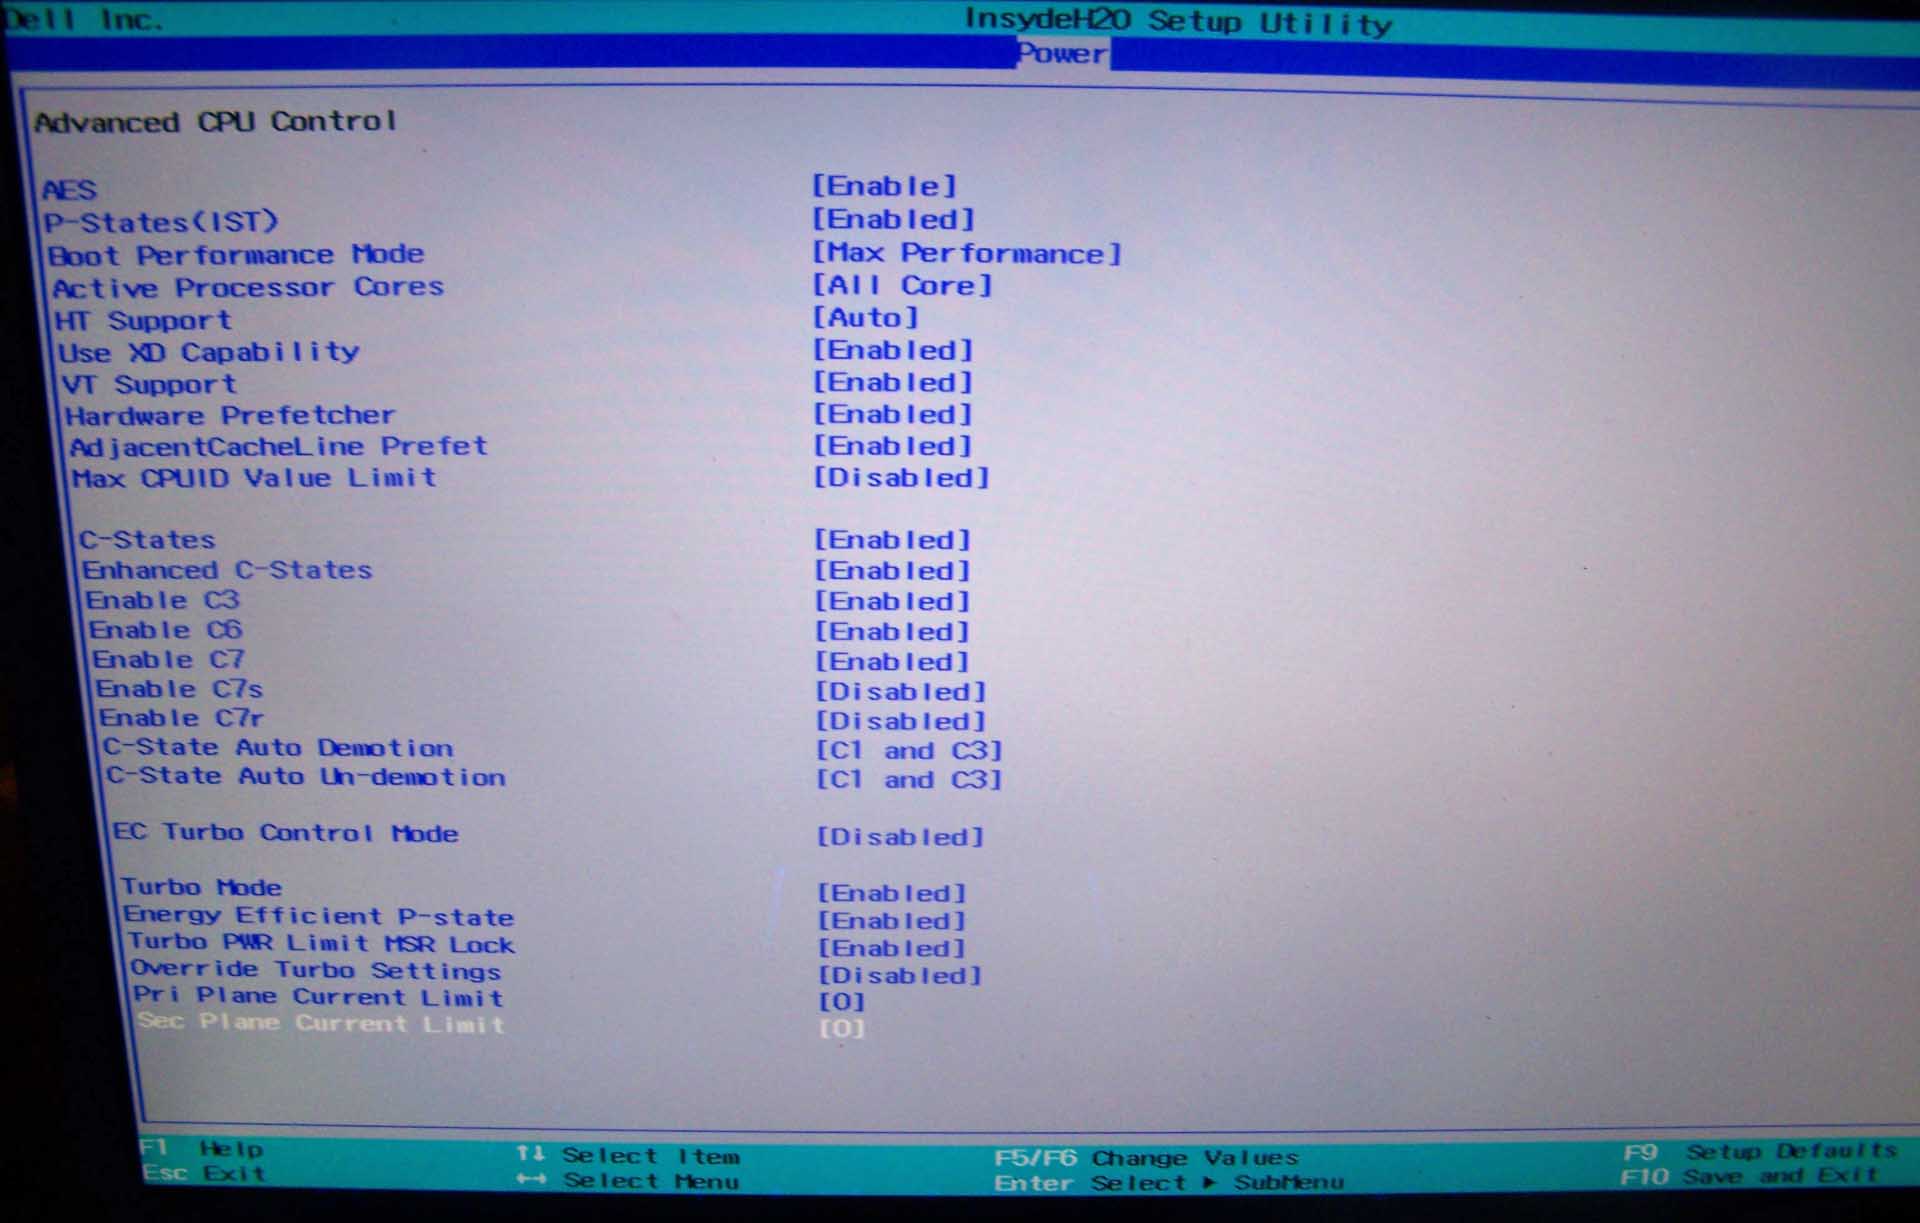
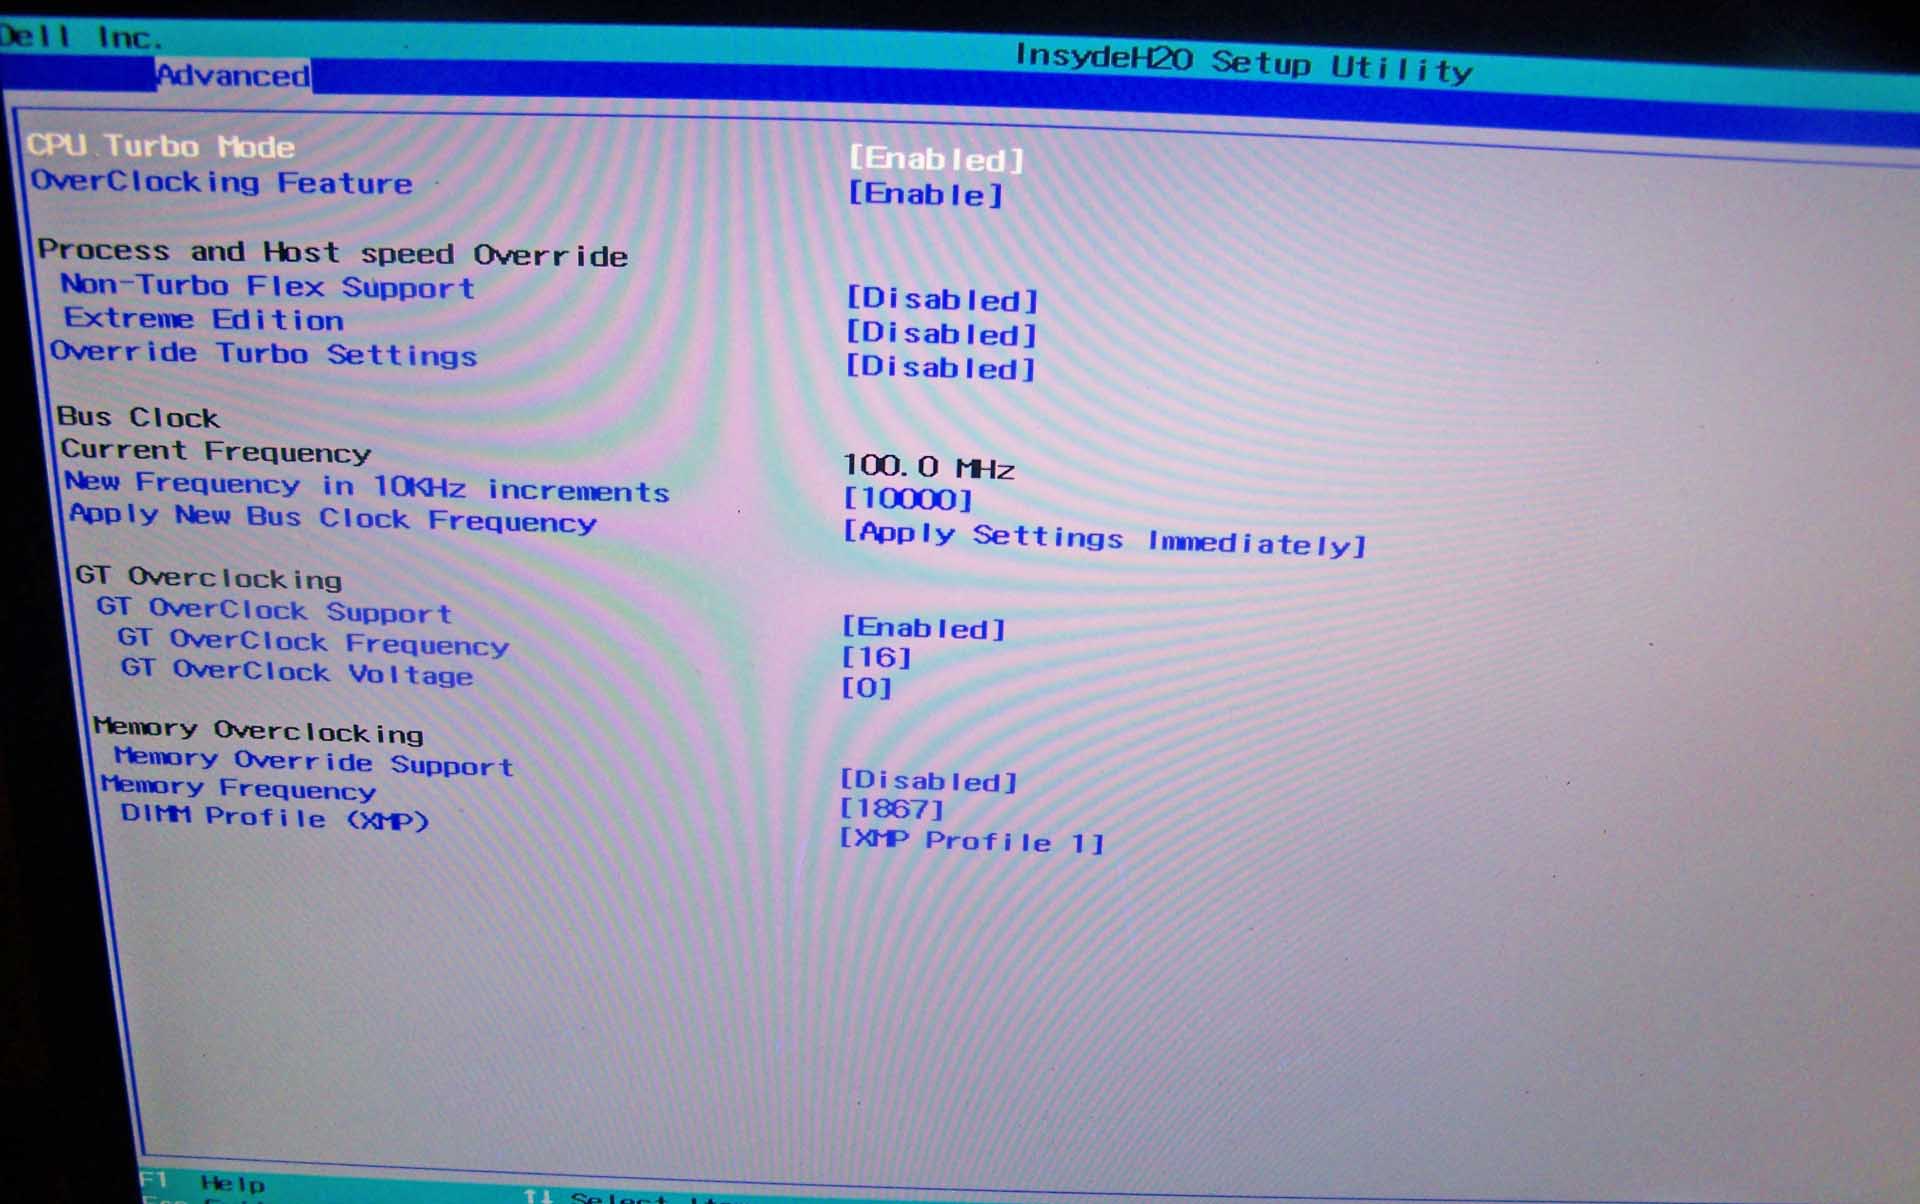
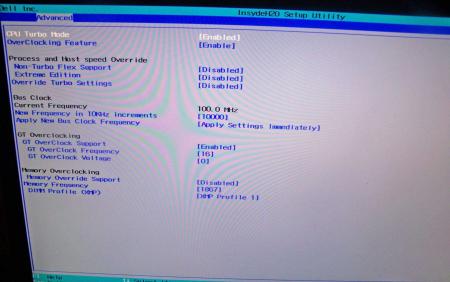
.If you're interested why not all modified BIOS versions can be flashed the 'usual' way with the official tools, read this:http://forum.techinferno.com/alienware/2252-information-about-bios-updates-a07-a08-higher-m14xr2-m17xr4-m18xr2.html M18x R2 - 'unlocked' BIOS versions The following BIOS of the Alienware M18x have been modified so that all hidden menus and options are visible. It will allow you to further tweak your system and optimize its peformance. Most of the options are only meant for advanced users. Don’t change anything you’re not sure about. It's possible that you see options which don’t work for your system, so be careful when changing settings. In case you mess up and your system refuses to boot applying new settings, remove the AC adapter, battery and coin cell battery in order to clear the non-volatile ram of the BIOS. This should fix most issues. *UPDATE*Instructions: There are two ways to flash the modified BIOS: Downgrade to stock A03 by using the USB recover procedure. (Thanks @Scott Matusow for summarizing the procedure). Make sure to closely follow the instructions, and wait until the system is done with the flash. Once you're on A03 flash the modified BIOS using the regular way (using the tools provided by Dell)..This method seems to work very well on the M18x R2, at least as long as you do as instructed. It can be a bit scary though since you can't see what's happening. .. Flash the BIOS from DOS with the FPT tool. This will only flash the BIOS part and leave out the EC and so on. It's a really safe option when done properly and less scary since you see the progress and information on the screen. For the USB recovery method follow the instructions in the link above. Second possibility - flashing from DOS: Prepare an USB drive so that it can boot DOS. If you don't know how to do this, check the instructions in the spoiler. . Grab the DOS version of fpt for flashing, and my 'prr tool' to circumvent write protection.. Download a '[FPT]' labeled version of the unlocked BIOS. Put the DOS version of the flash tool on the root of the prepared USB stick (fpt.exe and fparts.txt), along with the prr.exe and the file you want to flash (plus the included flash.bat). . Restart the system and boot from your USB stick. Run prr.exe, then flash the bios by executing the flash.bat file. Wait until the tool completes the flash. If the verification is okay, reboot, else flash again.. Go to the bios, load the default settings and reboot. Done. NOTE: If you want to use an unlocked BIOS newer than A03 I highly recommend to first flash the desired version of the unmodified BIOS (grab it at the Dell download site). Once you're on the version you want to unlock, follow the DOS flashing procedure described above. If you want to go A03 or earlier, the best thing to do is using the USB recovery method. Here two pics of the most interesting options: ********** Thanks @Riri-Fifi for the pics and testing! Thanks @johnksss for testing my prr tool! ********* Flash and use at your own risk. I don't take any responsibility for possible damage on your system. ___ The software which I provide here ('prr tool') comes with absolutely no warranty to the extent permitted by applicable law. Download the bios files referened in this post from here:

 1 point
 -
I make this thread for people who have bricked their bios on their r4(not the vbios), since the release of the A05 I have seen multiple people bricking their bios. The solution to this problem is really easy. Go to Drivers en downloads | Dell [Nederland] and download the .exe file. Use winrar to extract this file, you will have a file named like this QBR00EC.fd, rename it to M17R4.hdr. Now format an USB stick to fat/fat 32, and ONLY put this file on it. We are almost done!!! Unplug the battery from your laptop and be sure the power adapter is not plugged in, and put the USB in the eSate(NOT USB SLOT). Now hold the end button and plug in the adapter, your alienware should come back to live now!!!! It will beep some times and restart few times. Note: Leave CMOS battery in, or it wont work Thanks to SVL7/Brian, clearing things up for me, just go back into bios flashing1 point
-
Bad flash, the BIOS is fine and has always been.1 point
-
Oh, sorry Michael, the response was meant for Miguel, not you Cheers!1 point
-
Naldor is right, I just manually checked in the BIOS, and the recovery name stated there is definitely "M17R4.hdr". Make sure you use a freshly formatted USB stick (Fat or Fat32) with nothing else than the recovery file on it. Also it might be a different key you need to press on the new systems, I don't know, or even a different USB slot (though I doubt this).1 point
-
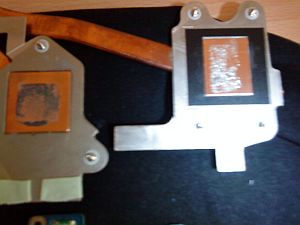
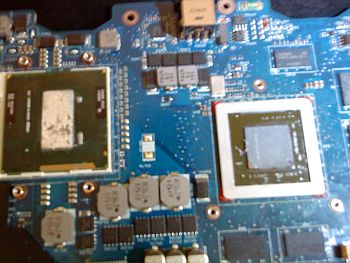
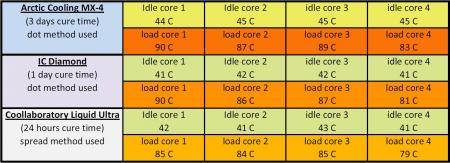
I have tested the following thermal compounds in the M14x R1 since it has the biggest heat problems of all Alienware Laptops and is therefor good as a testing subject. The specs are: i7-2760qm | 6 GB Ram | 750 GB HDD | 1.5GB GT555M | Turbo was on at all tests and the Notebook was lifted at the backside by about 3 cm. No VBIOS mods or Overclocking was used everything on stock speed. No external fan or cooler of any kind. I have used 3dmark vantage for the stress test since this is the most real usage of this Notebook as a gaming Notebook and mirrors how the temperature is in everyday use. To get average results i used alot of benchmark tests for each compound after different cure times and calculated the resulting temps i listed below. For every compound i ran about 5-6 tests after the declared cure time. Interesting was that the performance of the Liquid Ultra doesnt change no matter which cure time i tested it. The other pastes had different results after 1 day or more cure time. Here are some pics of the pastes on the CPU, GPU and heatsinks. This is Liquid Ultra on the CPU and MX-4 on the GPU heatsinks: On this pic you can see how it looks on the CPU and GPU: Well i tried to add some more pics but it doesnt let me upload more at the moment i will try later. However you can clearly see which paste wins and where the differences of them are. MX-4: + best application + easy to remove - worst performance compared IC Diamond: + 2nd best performance + no need to repaste for years - leaves scratches - hard to remove Liquid Ultra: + easy to apply + best performance of all tested + no need to repaste for years - hard to remove from the heatsink (only by sanding it) - electrical conductive My conclusion is that of course the Liquid Ultra is the best compound for the M14x R1 since it has the best performance and has the most advantages when it comes to high temperatures. In idle there is not much difference to other high end pastes but at high work load it clearly outperforms the best pastes by up to 5 degrees.

 1 point
 -
Another option is to enter BIOS. The service tag should be on the first page with the rest of the hardware info1 point