Search the Community
Showing results for tags '120hz'.
Found 6 results
-
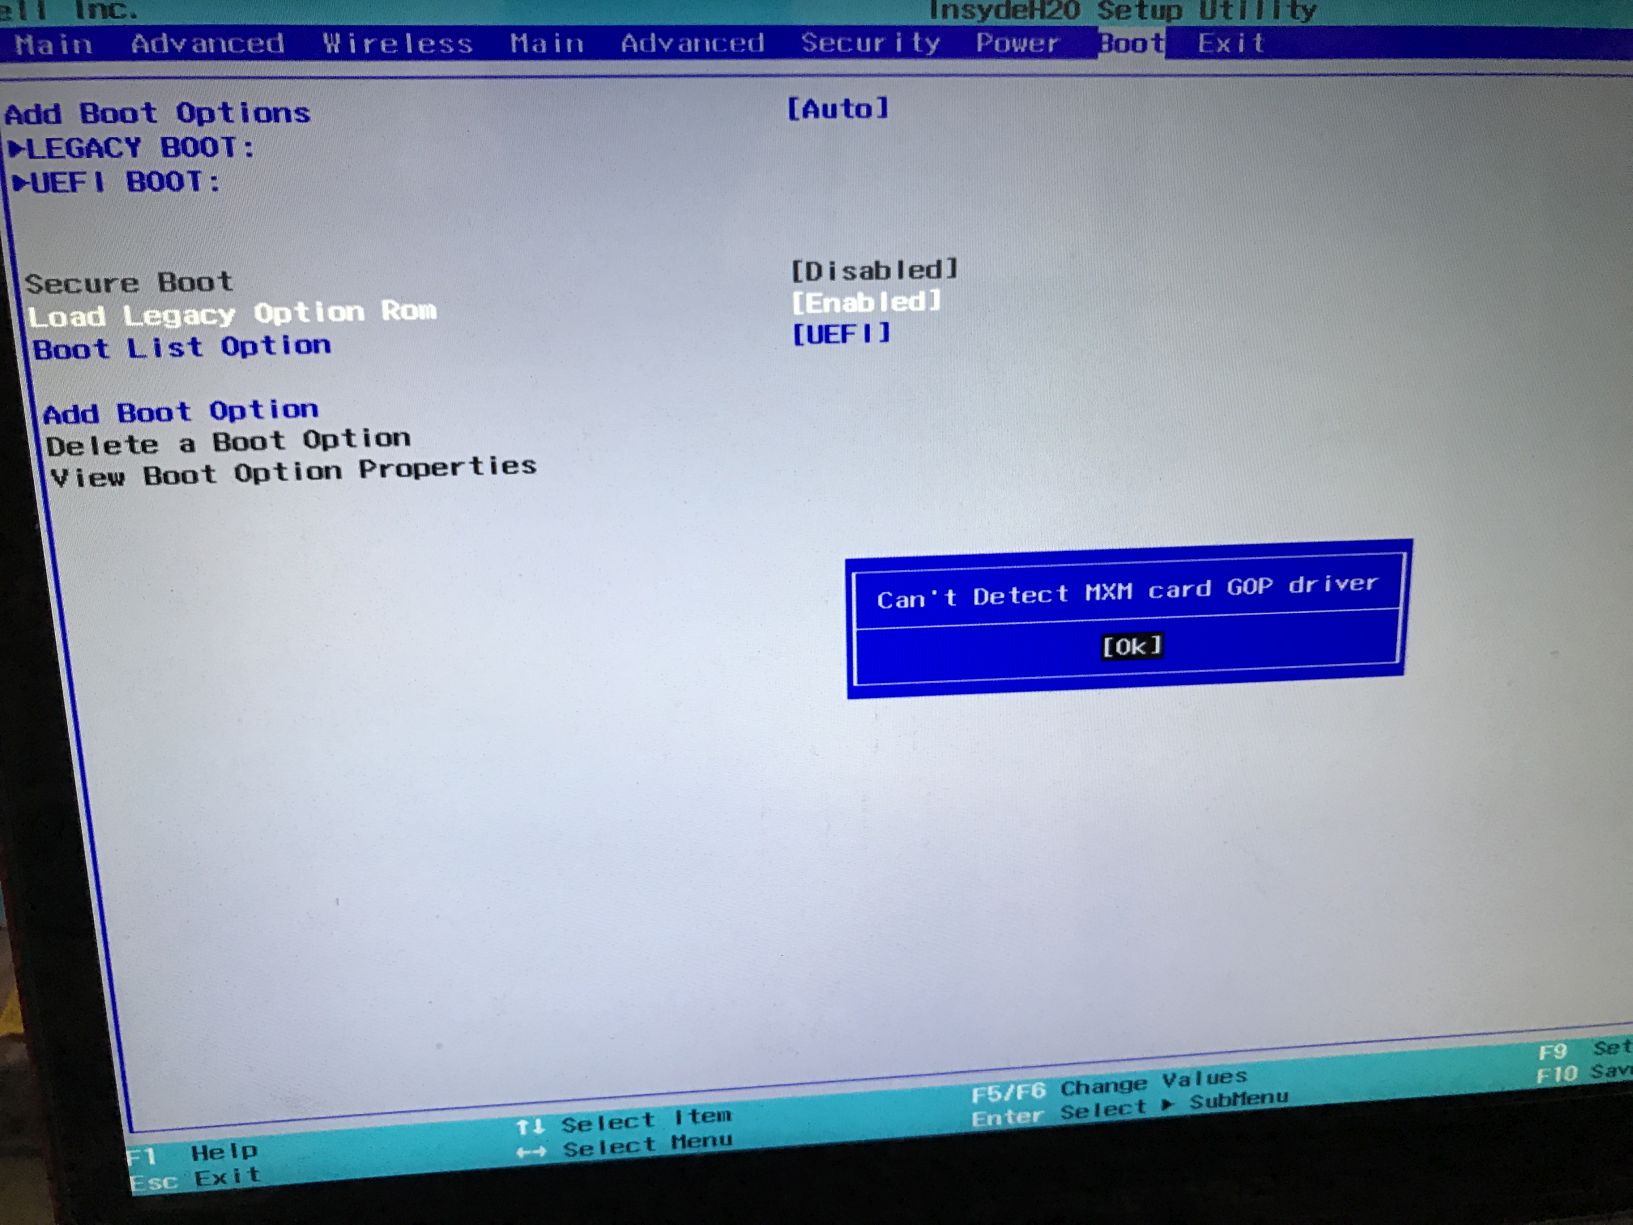
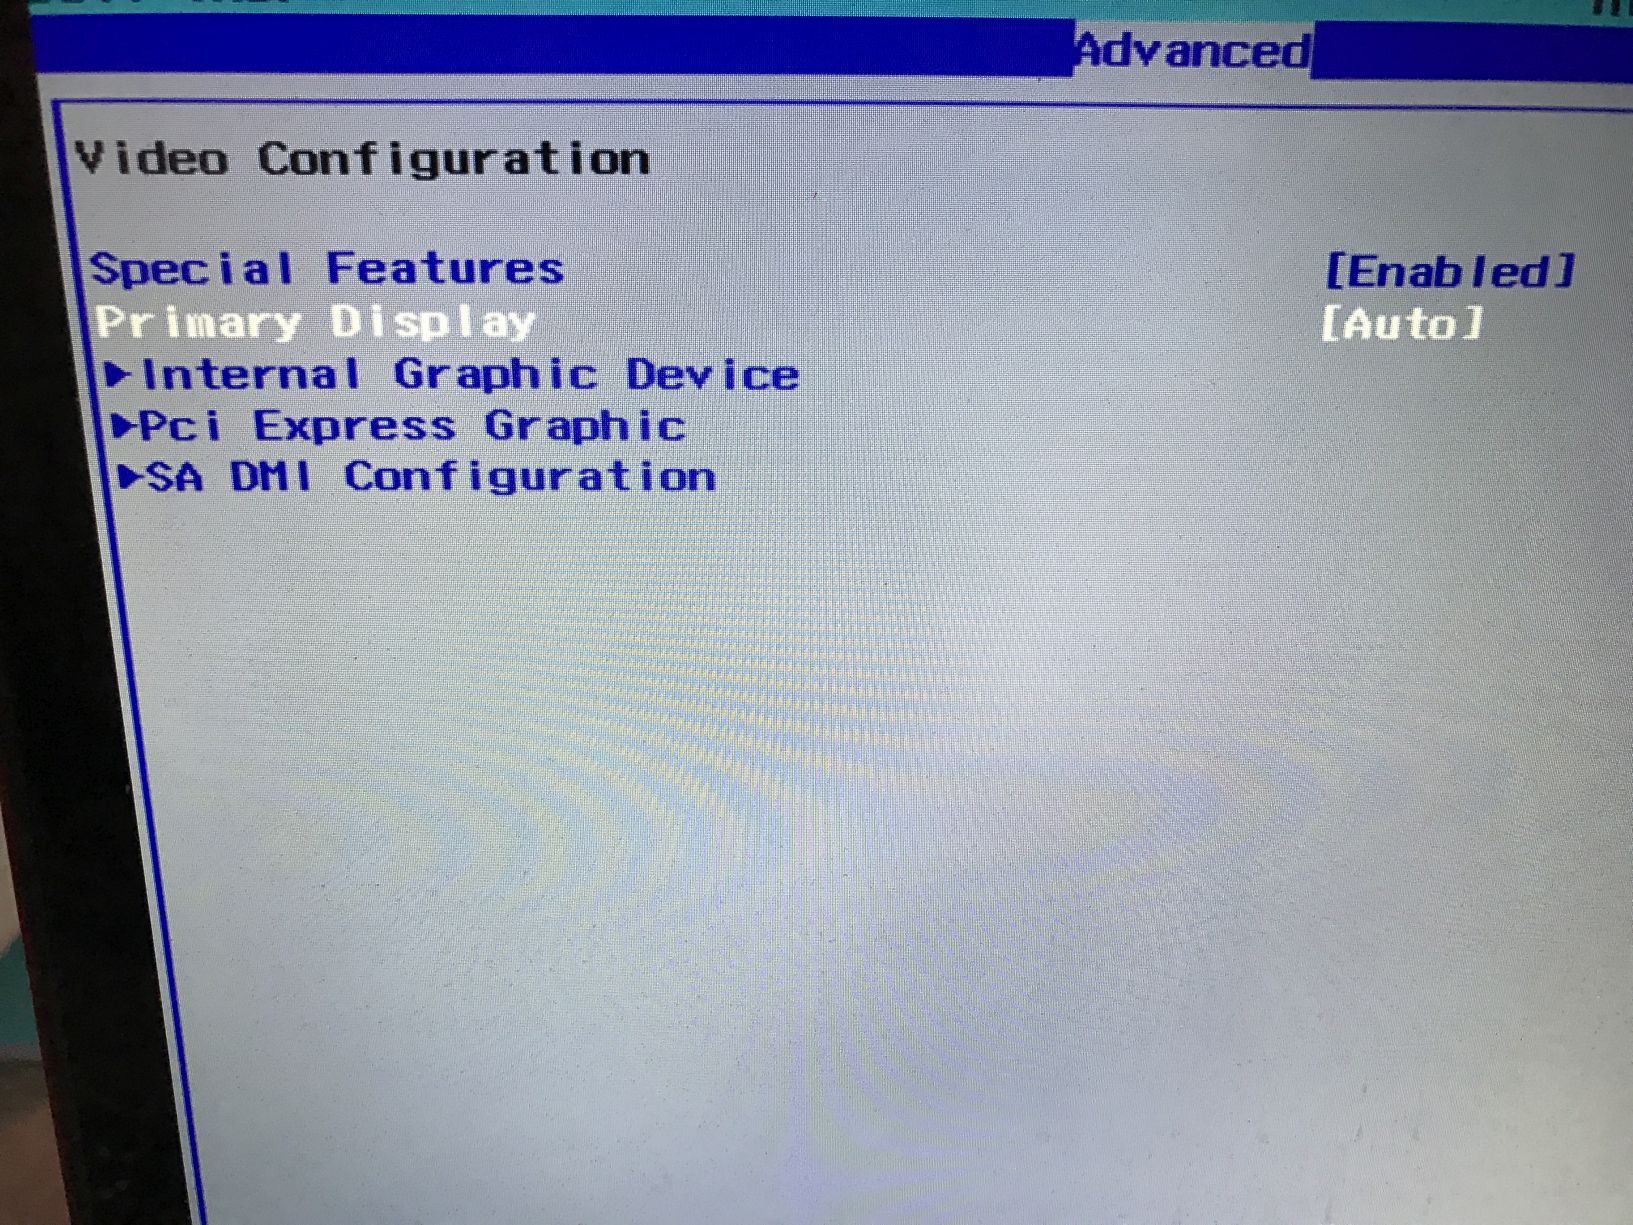
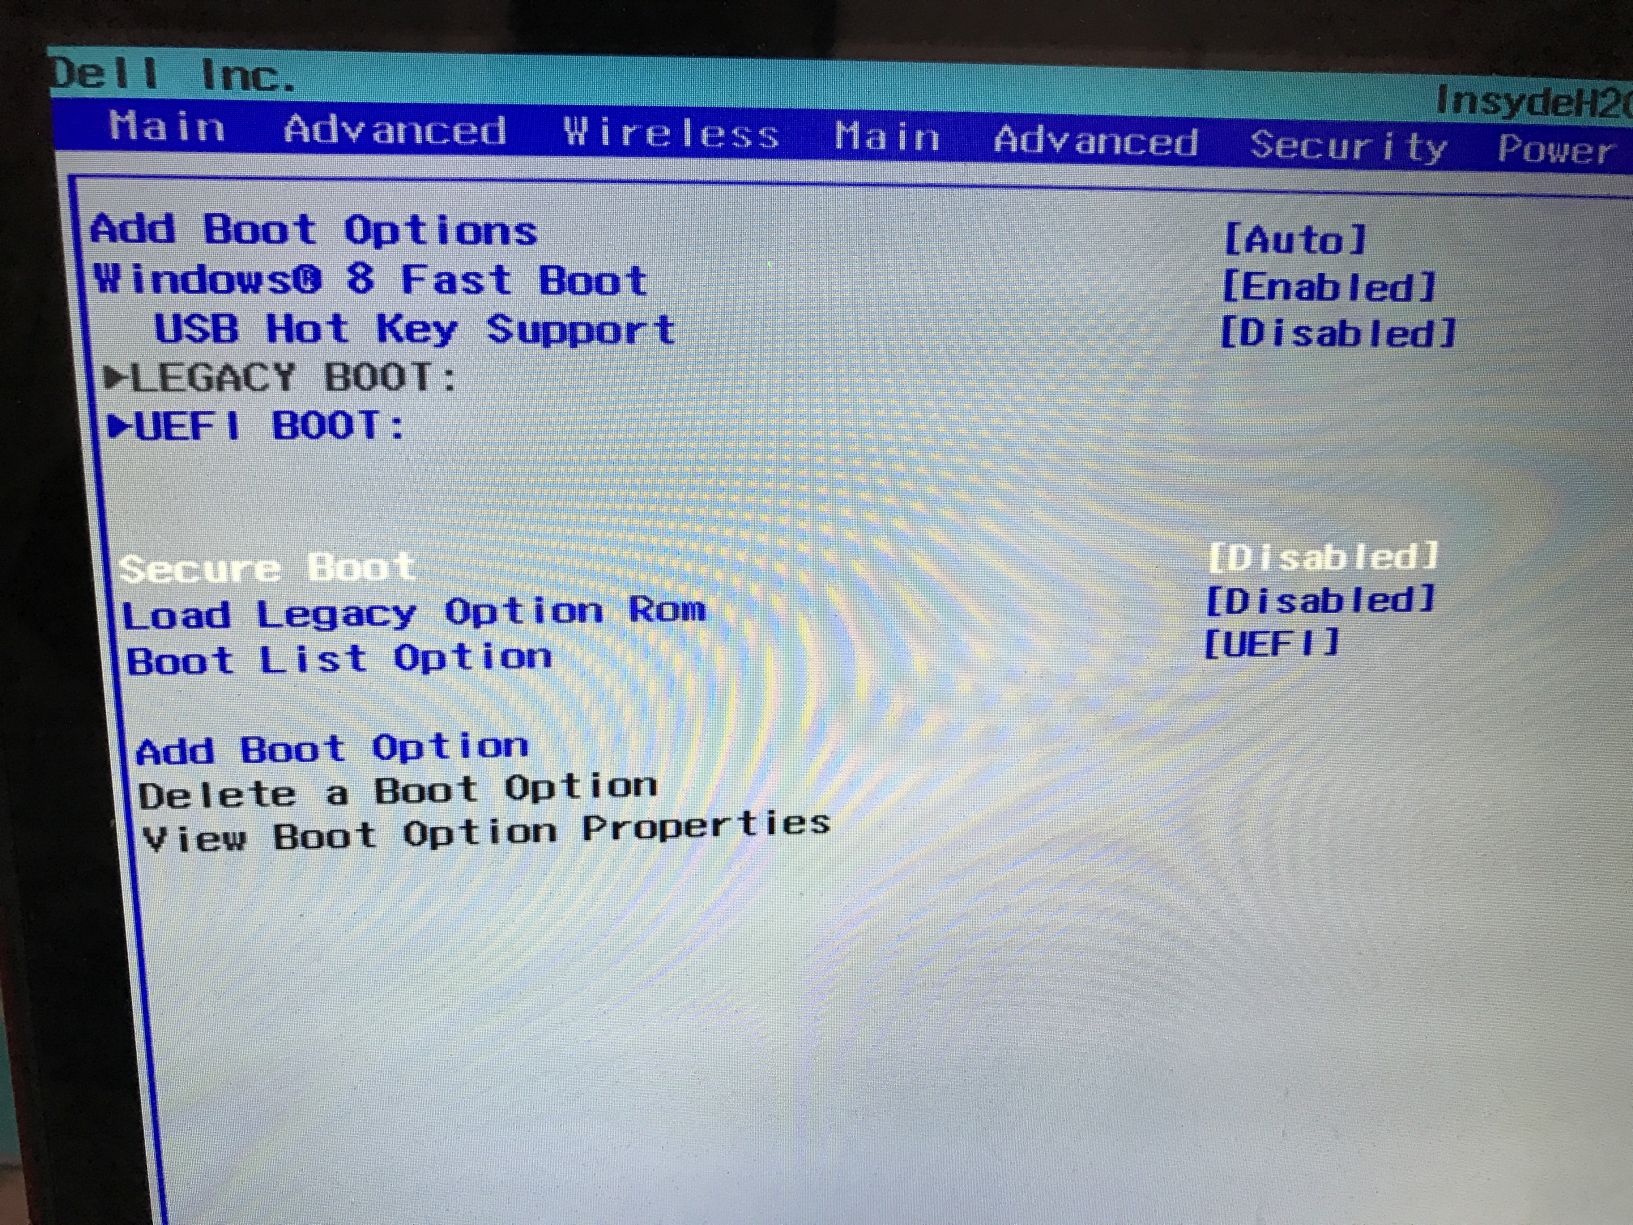
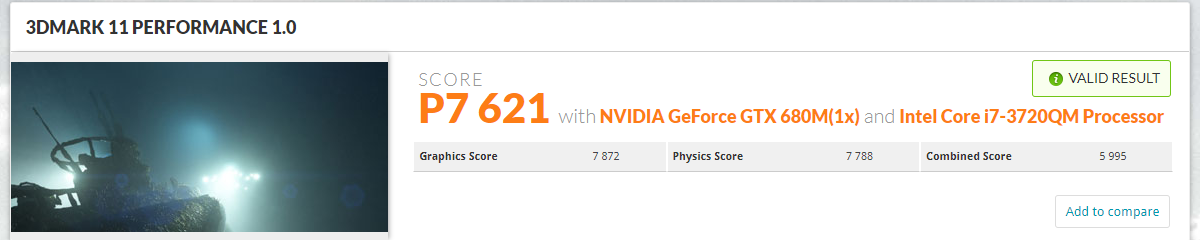
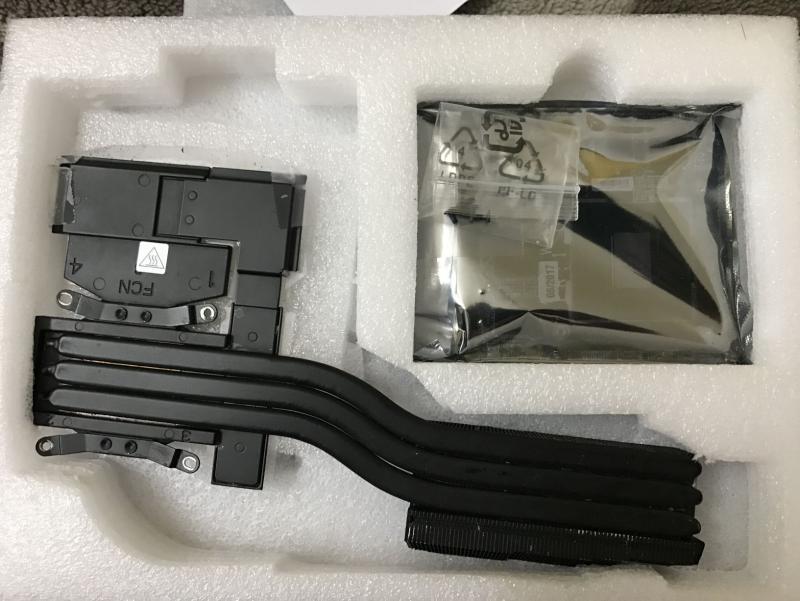
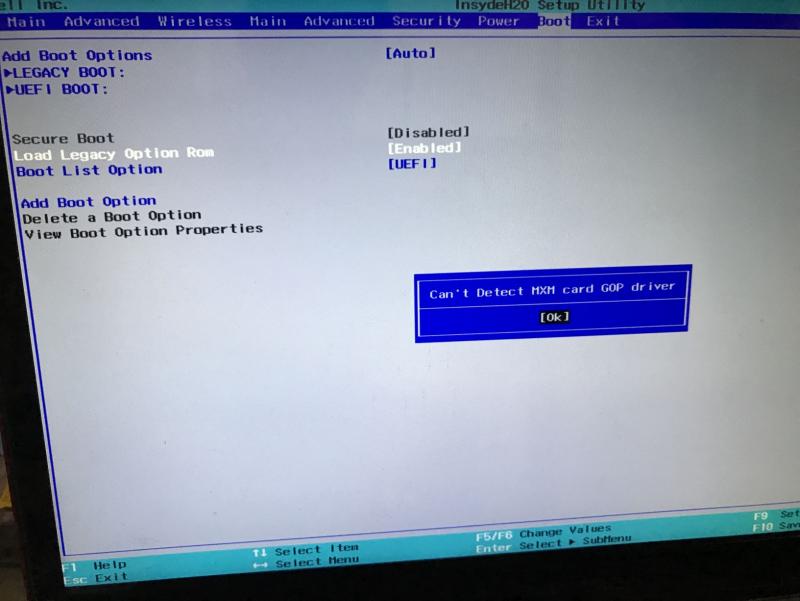
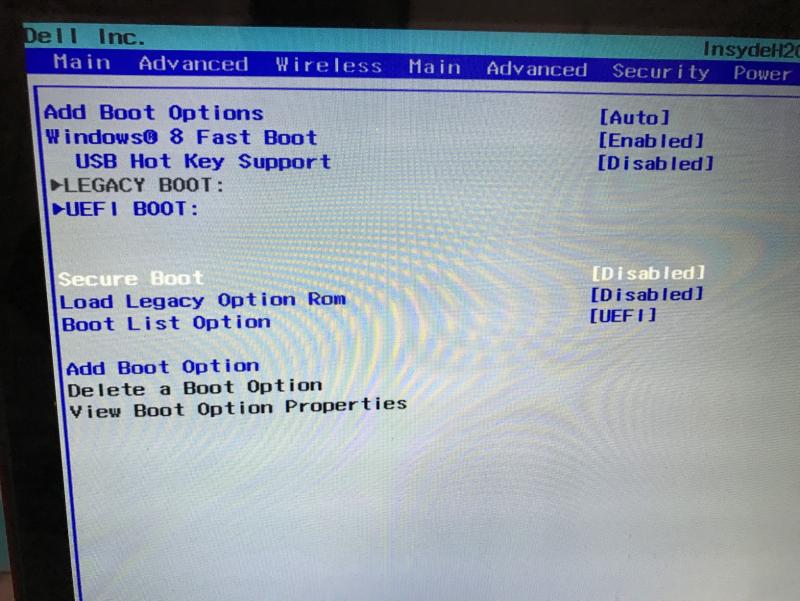
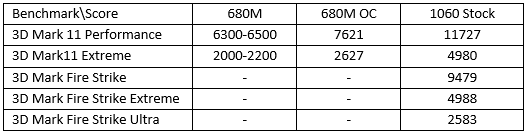
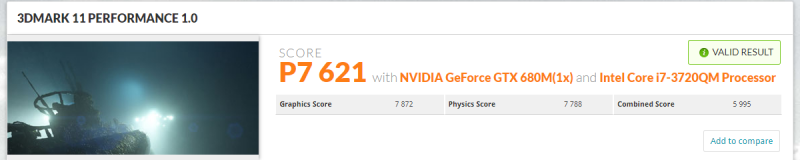
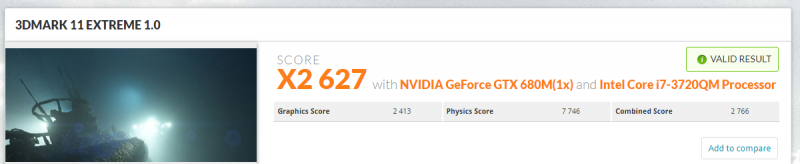
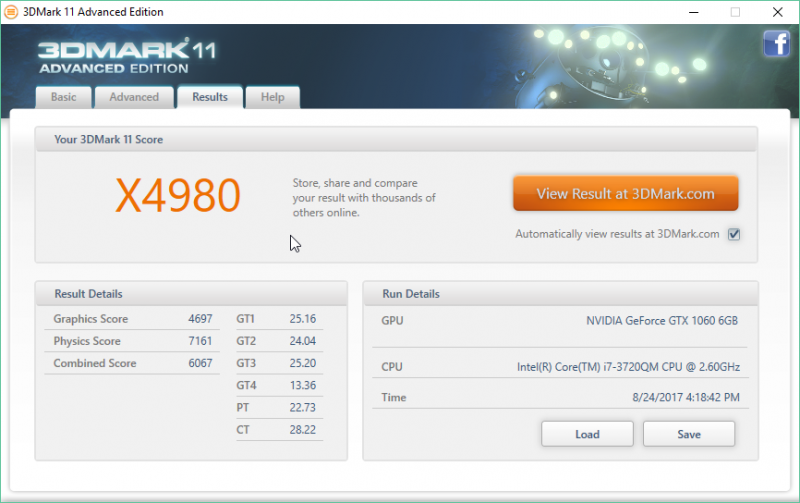
M17xR4 upgrade 680m to 1060I kindly apologise for my atrocious formatting, I have never written such a long thread before. Hey everyone, this is my experience regarding upgrading my m17xR4(2012) with a 680m and a 3D 120hz display to a GTX 1060. Please bear with me as it will be a long story.A little bit of background, on May 11, 2017, my laptop suddenly shut itself down when playing some Witcher 3. No response, no power, no lights, certainly dead.http://forum.notebookreview.com/thr...t-motherboard-replaced-but-still-dead.805508/Called Dell India, they recommended motherboard replacement (not quite as much as a recommendation but as an only option.) 15000INR for that. (~235USD)Still not resolved, no light, no post, no power. But if I remove the 680m, the laptop boots but gives 8 beeps, indicating a GPU or LCD failure. Putting the gpu back in causes a short circuit and no power to system.Dell technician recommended GPU and LCD replacement. Will cost about 15000INR(235USSD) for GPU and 8000INR(125USD) for the LCD.Sure, why not.New GPU time. And boy oh boy, I was in for a headache.Initial plan was for GTX 980m, easy and simple upgrade, tried and tested.I contacted @woodzstack, he suggested me the 1060, approx. 30% more performance for the same price. I went ahead with that.He is a well-known and an excellent seller here on NBR and other forums.So I got myself a 1060 with a heatsink. The heatsink on my 680m had worn out screws and I couldn’t remove it to reuse it (tried a Dremel to make grooves). The 1060 was available and ready to ship, the heatsink was on back order which caused some delay. Thankfully, woodzstack provided me with a free upgrade to faster shipping. Thanks! Then came the headaches. As I didn’t have a backup or fall back gpu (680m died), I wasn’t able to change the settings in bios required for 1060 and the system won’t boot with a 1060 ass the settings were incorrect. Also, I had the motherboard replaced which had stock bios. Got 8 beeps with 1060 installed, indicating gpu or LCD failure, which it wasn’t. Also, being a 120hz 3d display, I couldn’t use the intel gpu, as it won’t be able to run the display.Stuck in catch22 situation there. I contemplated returning the gpu as I hadn’t gotten it to work, and it had gotten quite expensive(motherboard+gpu+heatsink). I posted on various forums for 2nd hand 680Ms or even lower gpu. Woodzstack offered a 680M but shipping was quite expensive.Then @maxslo came to my rescue, he offered a used Quadro K1000M. Just pay for shipping and its mine. Notebookcheck states that its equivalent to a GT 630M, so it was from my series of gpu. I didn’t know if it would work or not, I took a gamble, if it didn’t work I would return all the stuff and get a new laptop (or a desktop maybe?)It took its own sweet time to come as it was via national post (can’t complain, got the card only for shipping cost)And when it came, I installed it, hit the power. I TURNED ON. It was alive!I quickly got into bios, changed the settings and installed the 1060.But alas, it didn’t start. 8 beeps again. Woodzstack helped here again.The issue was default display setting in bios and the uefi settings. Uefi needs a compatible gpu to save that setting and boot with that gpu. As k1000m wasn’t a uefi compliant gpu, I was stuck again. But changing the graphics settings to auto and then it let me disable the legacy settings. After applying these settings and installing the 1060, it let me boot.Somewhat.No bootable media detected. Press any key to restart.Turns out that the gtx 1060 is fussy even about bot drive partitions. Had to reinstall windows on a GPT partition. MBR to GPT conversion did not work. Needed a fresh install.Finally, after 3 months of patience, I could revive my laptop.II would like to thank these threads and their authorshttps://www.techinferno.com/index.php?/forums/topic/10982-m17x-r4-gtx-1060-upgrade/https://www.techinferno.com/index.p...x-r4-another-socket-victory-against-bga-crap/Note: for 680m, the benchmark was done on max overclock +300 core and +500 memory. Stock score would be nearer to 3DM11 P=6300-6500, Ex=2200-2400Unfortunately, I don’t have 3dmark scores for 680m Note: This is same as my thread on NBR. Posting here as well for people not on NBR. http://forum.notebookreview.com/threads/m17xr4-upgrade-680m-to-1060.808327 Some benchmarks


-
 Hello earth, WARNING: although this is a semi-guide, what you're about to read isn't for the faint hearted XD, I'm not responsible for any damage, fire, death to your pet etcetera if you attempt to do it... As you may already know, you cannot force custom timings on intel igps, unlike dGPU system only, since Intel IGP cannot do EDID overrides. More about EDID: https://en.wikipedia.org/wiki/Extended_Display_Identification_Data The solution was to dump the EDID which can be done using modeline in windows registry, linux modeline, or dumping directly from the EEPROM (electrically erasable read only memory found physically in most screen logic) which should be straightforward as we need to actually reflash it with our modification simply over i2c interface using arduino (simple 328 with serial-to-usb, can be from 8$ to 25$ max) you can also buy an EEPROM programmer which can be slightly expensive. The screen I have is a CMN1B, Chi . Should also work with AOU 95% gamut screen, any screen with i2c interface to eeprom, you can actually trace it along the 18th and 19th pin from the LVDS cable, however it should be pretty visible. So I ended up (easily), disassembling the screen as per this guide: [GUIDE] How to replace an LCD panel on a Clevo shell (pictures included) | NotebookReview I've then cut the film from both sides then taped for making it easier to work (i.e: instead of cutting EEPROM's pin location): There are 2 EEPROMS in my case, identified it simply by looking at the test point tagging, EE_SC SD etc, should be similar in any other displays: Tip size reference, basically any 15 to 30 watts soldering iron should work, unless the testpoints are tiny on other displays like AUO, though it is least likely you will ever have to desolder the EEPROM chip: Sold'er! Roger that(You can see the EE_* tags, SC for clock, and D for data etc): Connect to my Duino(wire it as you normal i2c): My EDID dumped in Linux before proceding to flash: EDID: 00ffffffffffff000daeb11500000000 01160104902213780231d59f56589527 15505400000001010101010101010101 010101010101963b803271383e405a3c 690058c21000001a9b2580ee70382340 3523350058c21000001a000000fe0056 434d3858024e31353648470a00000000 000041319e0000000002010a20200005 BACKLIGHT: 133 range: (0, 976) Backlight: 133 range: (0, 976) scaling mode: Full aspect supported: None, Full, Center, Full aspect Broadcast RGB: Automatic supported: Automatic, Full, Limited 16:235 audio: auto supported: force-dvi, off, auto, on 1920x1080 (0x4c) 152.5MHz +HSync -VSync *current +preferred h: width 1920 start 2010 end 2070 total 2226 skew 0 clock 68.5KHz v: height 1080 start 1086 end 1095 total 1142 clock 60.0Hz Pasted in Deltacast EDID editor then modified Pixel clock from 152 mhz (60hz calculated in DTD calculator) to 209 mhz, you have to calculate by entering these from the upper code repecitevly from top to bottom 920x1080 (0x4c) 152.5MHz +HSync -VSync *current +preferred h: width 1920 start 2010 end 2070 total 2226 skew 0 clock 68.5KHz v: height 1080 start 1086 end 1095 total 1142 Export the modifications in EDID editor as hex, make sure you add 60hz(original mod) in block 3 so you can switch between 40 60 120, then using find&replace method modify the format according to the next step Then modify the array in the code (acc to format, 0x and ,) upload to arduino: https://learn.adafruit.com/adafruit-tfp401-hdmi-slash-dvi-decoder-to-40-pin-ttl-display/editing-the-edid I'v managed to go up to 120hz stable, yours may be different although the same model number... xrandr output at 85hz: Had to reboot twice on Windows under UEFI boot manager in order to recognize the 120hz option, weird Again, this is not a thorough guide, just sharing my experience. It went pretty straightforward, and simple as a typical EDID modding over VGA cable or DVI.
 -
 Has anyone with the AMD 7970m GPU successfully upgraded to an aftermarket 120hz screen? I know there's no 3d support but otherwise? I've read the guide at 120Hz 3D Screen upgrade for Alienware 17 | NotebookReview and they point out that there would be no support for 3d which is not what I'm looking for anyway, and I know that Enduro must be disabled by setting display to PEG in BIOS, but the writer of the guide seems unsure whether it's otherwise possible for the 7970m to utilize the 120hz screen, stating that it requires testing. There are also posts here mentioning at least two people bricking their systems by connecting the 120hz replacement screen. I assume the cause was that they did not use the N392W replacement video cable mentioned in the notebookreview guide, and just connected the new screen to their existing cable? Has anyone here tried this combination (120hz LCD / 7970m) or know of any further references to it? Thanks guys!
 -
Not sure where to post this so I just added it to general. I just upgraded my M17X R4 120Hz from 675m to a 980m and I'm having a problem I hope someone here can help me with. To start: It was installed correctly and successfully on Windows 10 (I wanted to start somewhere more certain). Everything worked fine and everything read fine (as far as the graphics card goes). After I was sure everything was working properly, I reverted to Windows 7. As I read, with the current unlocked BIOS A11 (posted on this site) it's capable of running 9xxM series in windows 7. When I installed 7 on this laptop soon after buying it (reformatted old HDD, moved to bay 1, inserted 500GB SSD in bay 0 and installed 7 OS on it) I installed selecting the UEFI option and the drive is in GPT. As mentioned, I have Unlocked A11 BIOS (thank you to the maker on this site!). Anyway, once I reverted to 7 it started to boot up and said it needed to run startup repair. I allowed it and it froze once the bar filled at the bottom. Upon restarting I tried once more.. same thing. I tried to "start normally" and it starts boot looping. I then changed "Load Legacy Option Rom" from disable to enable. This causes the 8 beep post issue immediately upon power on. This problem doesn't exist when this option is disabled. I then utilized the HDMI trick (I made a separate post for this the other day. Connect HDMI out to any screen and it will cause post on the laptop screen [but not on the external device]. Can then immediately disconnect once post has occured and works fine with no error or beeps). This let it boot up and I'm able to get to the desktop and everything works fine. Can even run screen at 120Hz. I ran diagnostics on the card, checked drivers.. everything is reading correctly. This is workable, but far from an ideal solution as I need to have a cable and some kind of HDMI screen available just to boot up every time. I have two option here and I'm hoping someone can provide a little guidance one way or the other. I can either fix the boot looping issue on "Legacy Rom - disabled" (it hangs on classpnp.sys when I try safe mode if that information helps at all). OR, I need to find a way for it to post when "Legacy Rom - enable" without connecting to an HDMI device (just plugging in the cable doesn't work. It has to be connected to something on the other end). For the first, I have tried start up repair and tried repairing using my WIN 7 disc but it doesn't actually pull up the menu. It just shows the windows loading screen and then freezes after a while. For the second I have tried changing different video options in hopes it will post on boot without connecting to an external or tried to find a way to keep the HDMI port active without something being in it. I can make no progress with either of these as I'm unaware exactly what exaclty the selections change. I currently have it set to PEG. Also, I have tried bios reset through removing all power sources and the 2032 CMOS and holding power button 30 seconds. Didn't help. Any help or guidance would be greatly appreciated. Feel free to ask any questions you have that could assist in ascertaining the source of the problem in either instance. As a last resort, I could go back to 10, but I would really rather not. The R4 (in Dell's words) isn't being tested for compatibility. Many features don't seem to work, and overall I just much prefer 7.
-
Hey guys, I know I've seen many forums covering this topic (including this one) but I just recently installed the 980m in my M17x R4 with the 120Hz screen. I found an interesting trick that helped tremendously. Just wanted to share in case it may benefit someone else. I won't include all of the steps to the process as those are thoroughly covered elsewhere. Okay, so you have the card (980m) installed but it doesn't recognize it yet (no drivers / need to change bios settings etc.) meaning that you immediately get the 8 beep error on startup. A lot of forums say you need to reinsert your old graphics card to access menus, then switch it back to 980m. I've found that through using the HDMI out and connecting to another screen, it will actually stop the 8 beeps and you regain post. It will post only on your laptop, not the screen connected through HDMI. I believe this is due to the 120Hz not being supported when connected to an external screen, it makes it function as a 60Hz and seems to resolve the 8 beep posting issue making it possible to change your settings and even install the (modified) drivers on the desktop. I hope this helps to ease someone else's process in the future.
-
<article> I really want the p870dm (either Sager or Eurocom). That said, I also really want a 120hz monitor on my laptop. I play competitive CS:GO (that is the primary, but not sole, reason for buying the machine). I have a great desktop, but travel a lot, so the external monitor bit doesn't really work here. I know that i can get an x8 Extreme from Eurocom today (p377sm-a), which ships w/ 120hz monitor. It also, though, is a mobile haswell CPU (vs. desktop Skylake). Looking through these and other forums, it looks like people were initially optimistic about a 120hz mod for the p870dm but I haven't seen any progress on that front. Wondering if people here think A) a 120hz mod for p870dm will come (i.e., 3rd party purchase of 120hz laptop monitor), if not, how much I could overclock the p870dm refresh rate? and C) if not, how much worse is the p377sm-a from a performance standpoint? Thanks! </article>