


Aikimox
-
Posts
164 -
Joined
-
Last visited
-
Days Won
4
Content Type
Profiles
Forums
Downloads
Posts posted by Aikimox
-
-
Could you give me a little sneak-peak or description of your new heatsink mod?

EDIT: By the way, why is your HHD's only showing 3Gb/s?
Because these are 3Gb/s drives. I went for extra storage for now, sacrificing the performance. Will upgrade to SSD's soon

As for the heatsink mod, will do when I have some results, still expecting some parts to arrive. Also need a 90W PSU.
-
 1
1
-
-
Oh I thought you were getting a 3820qm. So how are temps with it?
Sorry for the delay on the BIOS mod. Been busy (school and my own stuff that I broke).
No rush, I'm still experimenting with heatsinks and pipes. So far so good. Idle temps are almost as good as with 3632qm. Haven't tried 100% load yet, need better cooling. Also, it's +27c in my room, crazy hot.
-
1
-
-
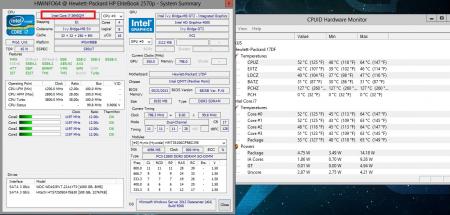
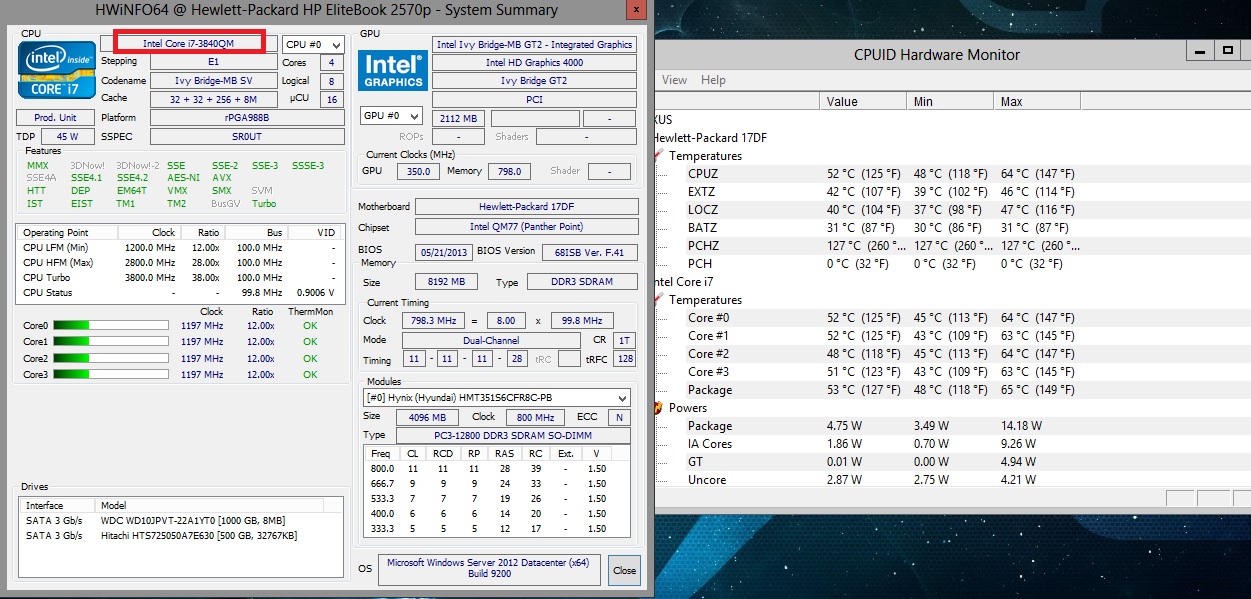
Boom! 3840QM has landed!

-
2
-
-
No eGPU here (yet), probably why I was having the issue. 65W has been fine otherwise. According to your quote you're running Server 2012 Datacenter on your laptop, are you doing this for any particular reason?
I work in IT Ops and do quite a bit of virtualization and networking. It's very convenient to have all my VM's with me on the go for quick access, instead of RDPing to the datacenter.
Here are results.[ATTACH=CONFIG]8855[/ATTACH]
I soldered second diode and I got:
255 = 0
200 = 2363
128 = 2363
120 = 2363
110 = 2386
100 = 2457
90 = 2761
85 = 2891
80 = 3110
75 = 3276
70 = 3510
65 = 3723
60 = 4096
55 = 4551
50 = 5015
45 = 5228
40 = 5228
25 = 5228
0 = 5228
nice! but there is something strange. few days ago I noticed strange sound from fan. With constant fan lowfrequencies noise there is something else, like some electric squek. I didn't hear it after first diode soldering. After soldering second diode there is still this strange sound. I started to checkin source of it, by listening to fan with bottom cover and without it. When there was no cover, sound dissapeared. So I concluded that fan moves some his vibrations to cover, because of diode between fan and cover plate. I tried today to solder additional wire to fit two diodes behind the fan, to avoid stick between fan and plate. Even after fitting a diodes between fan and SSD case, strange sound appears after bottom case is in its place. Its extremely weird. I cant find where is the reason of it. I was wondering if it is strange caused by currents but its impossible cause this sounds appears only when plate is closed. I don't have idea to overcome it.
Its minor problem cause it's regnosible only when there is no ambient sounds, so only at night.
After diodes mode I glued my heatsink. I decided to use option 1 and final is like this:
[ATTACH=CONFIG]8854[/ATTACH]
Im not sure if there is any bigger improvement but I got maximum 69C in 3dm11. Without modded heatsink there was 75C. Maybe thermal paste is not ready(?), I used Zalman STG-2. But maybe 6C is not bad, is it?

For now, I've been usng laptop for 40minutes with completely turned off fan and I have something like this.
[ATTACH=CONFIG]8856[/ATTACH]
Another case, during writing this post, I got almost full battery, and suddenly I was given message there is only 7% left, when I plugged laptop to adapter, I saw 69% left. Could it be caused by fan modes?
Wow, good job! So you cut out part of the radiator to mount the second pipe so it's sitting flush? Nice! But do you think it's safe to cut the pipe itself? Wouldn't it reduce its efficiency?
As for the battery status report, dunno, maybe that's your fan modding but I fail to see how it's related.
-
We have seen from the xps 15 that even without XTU flags set, BCLK will still be available in XTU. If the keyboard sequence I linked enabled the flash descriptor override then this should work. I do not know how to make the edits to allow the +4 multipliers on the 3840qm, but you should be able to get around 5% overclock out of either CPU.
If you are using an eGPU and you want to overclock the PCI-E for it let me know so I can tell you the change you need to make. The settings I listed only overclock the CPU, memory, the CPU x16 PCI-E, and the link between the CPU and the PCH. Once setting must be changed to also overclock PCH PCI-E.
Well, my main interest is in those 4 multipliers which alone gives a stable 10% boost. Now, is there a chance that even without flashing the bios, XTU will be able to manipulate them when the 3840qm is installed? Also, yes, the sequence you linked enables the flash descriptor override but I had to use a security file generated specifically for my machine (goes by serial #). I got it from HP to be able to overwrite the TPM settings as I forgot my admin password a couple months ago. Maybe that file is not needed for the ME FW part, I will doublecheck. Again, BCLK is not exactly the method I like to use to overclock the CPU, but if there's no other way, - will have to try.
-
Hi everyone! It's amazing to see so many successful attempts. Gives some hope. Now, since I only have a 3632qm which doesn't have partially unlocked multipliers (3840qm on the way!), is there a quick way to check if the method will even work on my hp 2570p? Or do I still have to dump the ME FW first, then compare the values, change, flash, install 3840QM, XTU and only then will I be able to tell for sure?
Thanks in advance!
-
Khenglish, Prema and others are in that thread to lend a hand. I figure those two mods might go hand as both involve bios flashing that can brick the machine. A cheap flashing and recovery mechanism would be to socket the 2570P bios systemboard pads and just swap in/out bios chips as need to flash/boot the system.
2570P gets recognised by Laptopmag
10 Best Business Notebooks Now at Laptopmap lists numerous Thinkpads along with our 12.5" 2570P. 11.6" 2170P and 13" Folio 9470M get mentioned too. Seems they have an eye for quality. Lenovo X230 isn't listed.
Yeah, 2570p is by far the best business machine in the 12-13" category. I used to be a thinkpad fan but not anymore. Even without any additional modding, I'd skip haswell and maybe broadwell without any regrets. But if we can unlock the cpu, add a msata support and upgrade the screen - this thing can last for a few solid years.
Alright, I'll dig myself in the BIOS thread and see what can be done.Thanks for your help!
-
1
-
-
@Nando4,
Let's start with the first one, unlocking the multipliers! I'll get my hands on a 3840qm in about a week, shipped today. Will also need to order another heatsink. I will follow the guide you linked to save the BIOS but have no experience when it comes to hex editing and stuff, so I'd appreciate some help.
As for mSATA, if that works, would be awesome. Having 3 hard drives in a 12.5" laptop is insane
-
I'd choose option 2. But would sand the top of the HS first so that there's no extra layer between the original and added pipes. Don't sand all of it, just maybe half. Also measure everything first, you might need to sand the top of the radiator too and disassemble the machine when mounting the new heatsink.
-
That is exactly my plan, but instead of just copper I'm gonna add a heatpipe instead.
That would be even better but more work and easy to ruin the heatsink, I already destroyed a couple and about to order one more, lol
So why they've been selling it with QM? You wrote that 2570p was in docking station, so You have really good temps. Without docking should be lower because docking cover exhaust exit. Do You mean to cut this part and put bigger and longer one?
[ATTACH=CONFIG]8838[/ATTACH]
Im going to dismantle this parts and glue them to the top (where jacobsson put pennys) and second plate will go area where heatpipe is bent.
Do You think that's proper way?
[ATTACH=CONFIG]8839[/ATTACH][ATTACH=CONFIG]8840[/ATTACH]
Ok, I need to choose one option. Which one is better in your opinion?
1) two plates covering almost whole area above CPU + added hetpipe on bending area.
[ATTACH=CONFIG]8844[/ATTACH]
2) two, oryginaly glued heatpipes on the middle of CPU plate + one plate on heatpipe bending area (Im aware that in this dimension on photo there is no option to fit it).
[ATTACH=CONFIG]8845[/ATTACH]
IMHO, it would be perfect if we could remove the original pipe and replace it with a 8-10mm one but the radiator part can't be easily modded. Now, the problem with putting a second pipe is that you can't efficiently dissipate heat from it. If you glue it to the radiator, like I did initially, it would create a bottleneck there since the radiator is too small for that. So it's either directing the second pipe somewhere else and gluing a lot of copper at its end (would probably work but still requires a lot of work), or expose as much of the original pipe as possible and gluing copper on it, similar to the copper coin mod but with more copper and coverage. There may also be a way of installing a more powerful fan or even an extra (smaller) fan.
-
When looking at Aikimox results the 2570P seem to do fine with the 2560p-heatsink combined with a 35W Quad (double check this), and of course some HQ thermal paste. Regarding your heatsink mod, make sure to add as much copper on the heatpipe as possible. The heatpipe need more material in order to move all that extra heat from the heatsink itself, my coin-mod suffers a little from this.
Yes, focus on the heatpipe and you gain the best results. I was gonna wrap it with a sheet of pyrolytic graphite but it's super expensive, so probably just copper instead. Also, if you sand/cut a section on the top of the heatsink to expose a portion of the pipe directly above the CPU, you may then slap a thick 3-4mm sheet of copper on it and further slash the temps. That's my next step after IPS project.
I'm not sure what it is, maybe it's just with my system but I can run the 3DMark13 on either power adapter without issue, but the ancient greek looking physics test in 3DMark11 will almost always crash. If I'm using the 90W power adapter, it will usually work, but on 65W it's only worked a handful of times. Other than that I've never had issues with any other programs.I usually see between 85-87C max temps when I actually play games. I've seen 89C for a few seconds in Prime95 but then it settles down to 86-87. Using HWInfo, each core sits at 2.8Ghz until reaching 88C, then throttles down to 2.7Ghz until 86C, afterwards back to 2.8Ghz. After 20 minutes it settled down to 86C. This is all while using the dock (I think that someone was asking about this earlier) and 90W power supply.
@bjorm, this laptop was never intended (by the manufacturer) to have a quad core, so no vents. There's a few on mine in the front, but nothing on the bottom (maybe to help with the keyboard drain?). Even if you don't game with this laptop, the quad core upgrade was definitely worth the upgrade from the 3360m. VMWare has had the biggest improvement, with the computer feeling generally snappier since the upgrade. For 150 bucks on ebay, you can't really go wrong, especially if you picked up the computer second hand.
Do you have a eGPU? If not, that might explain the crashes, as your CPU + IGP package goes above 60w when loaded. With the CPU only part loaded it should be fine.
-
1
-
-
Yes, I plan to use an SSD as the main drive and a 1TB HDD in the expansion bay. Wonder if it's possible to put a 15mm hard drive in the expansion bay? If yes, that would allow for a 2TB drive in there...
As far as battery life goes, I'm getting 6hrs+ of browsing and doing some mild virtualization (GNS3 + VMWare). This is with a 62wHr battery btw. Haven't done any tweaks to reduce the power consumption but will definitely do when/if upgrade this puppy to a quad core CPU. I wonder if the f.41 BIOS will let me unlock the extra 400mhz or will I have to do a blind flash back to an earlier version?
-
Awesome! Made my day, thank you! Will get one ordered asap....
-
Ok, so I ordered the heatsink but have a question regarding the PSU. The 65W adapter that came with my machine is rated: output: 18.5v - 3.5A. The 90W one is rated: 19v - 4.74A. Won't it potentially kill the mobo? I know in desktops max deviation is up to 10%. Here it's 9%.... Any thoughts?
-
Sounds good. Will report back when I get the parts. Need an extra heatsink (will mod it), copper shim, good thermal paste, 90W PSU and a 45W CPU...
-
Crysis 3 won't stress the CPU the same way synthetic benchmarks do. Prime95+Furmark would probably cause PSU tripping. I know, not many people would ever want to run those benches on their machines, just trying to avoid surprises in extreme scenarios.
-
I think the 65W PSU won't handle quad CPU @ full blast. Just checked some reviews and benches @ notebookcheck and it looks like a 3720QM requires 25W more than a 3520M when running Prime95. Would a 8470p PSU (90W) work with the 2570p?
-
Wow, 85C in 3DMark06 is quite ok! I might give it a shot then. Worst case, will do a cooling overhaul. You can slap 3-6mm of copper on the heatsink and if needed, land another fan instead of the DVDrom (but I'd rather have a second HDD there).
Also need to get my hands on a x220 IPS.....
-
Hi All,
I recently purchased a 2570p and absolutely love the little beast. Build quality, upgradeability and performance are very impressive!
A couple of questions:
1) Has anyone tried upgrading their machines to a 45W quad? Asking because I doubt the cooling system would let it run @ max load for more than a few min before overheating. My 3360M gets to 87C in Prime95 after about 10min (repasted with a mediocre quality paste) @ room 25C. We need to do some serious cooling overhaul to be able to bump the wattage by 25-30%.
2) Any good news on screen upgrades? I know the IPS from lenovo can work but it doesn't seem to fit the lid properly. Maybe it's still possible to mod the lid somehow? Also, anyone tried that 1080p panel from XPS 12 convertible? Seems like a nice option if it works.
-
Or, replace the ribbon sata cable. Those appear to be plagued with connectivity issues. The first cable I received was faulty, would only read 1 out of 3 connected hard drives and eventually stopped reading at all. I blame Dell for poor design of such a crucial piece of hardware, they should have made it as solid as in the R1.
-
1
-
-
You guys better find someone in the US since the US Dell price for a single 2-piped HS is only 20$ while in Canada it's 50$ (they charge shipping too
 )
) -
Yes but they cost 50$ in Canada and only 20$ in the US.
-
Yes and the temps have dropped substantially.
-
Dunno. I'll still try to unlock more power from the ES, just for fun, and then just keep it. Level 1 OC is more than I need.
12.5" HP Elitebook 2570P Owner's Lounge
in HP Business Class Notebooks
Posted
Ok guys, here's a crazy idea:
I was gonna try and mod a chromebook pixel screen (2560x1700p, IPS, 100%sRGB) into my machine but that would require a custom made DP to eDP cable (DP port would be permanently disabled for any other use), a backlight board which requires about 30v output and a lid mod as the panel is 12.85". Now, the only thing I'm comfortable about is the lid mod, lol.
Now, here's an alternative. There were 2 great panels in production in 2011 which were used in sony vaio z2 (13"). Those 2 TN panels came in 1920x1080 and 1600x900p and both had very good gamut (~98%aRGB or ~125%+sRGB), good brightness and contrast. If I'm not mistaken, there would be a perfect fit (LVDS 2ch) in our case. Later on in 2012 Sony replaced the LVDS with eDP and offered newer panels but those would be a pain to mod (see the first paragraph). So if we could find one of those panels, the only thing we would have to do is mod the lid, which is not a big deal. You could probably buy a spare lid for about 100$ for experiments. 13.1" RGBLED would an awesome upgrade, IMHO, and well worth the trouble. The problem is, I can't find the panels, most online stores have them out of stock and the price is outrageous ~300$