


pixma21
-
Posts
41 -
Joined
-
Last visited
Content Type
Profiles
Forums
Downloads
Posts posted by pixma21
-
-
You are very welcome
 I don't have those type of drivers but if you load the basic drivers/software from Win 7/8 like the alien osd from the driver disk and Dell/Alienware website and such it should all work okay and instead of win 7/8 intel drivers for example just get the latestdrivers from their website for the hardware like the win 8.1 driver for your model of intel hd graphics and the latest amd or nvidia gpu drivers from their respective websites, this way all is using the most up to date versions of software. Just look at what drivers get installed from your driver disk and for the non software parts look for updated versions on the company websites. Intel(igpu,wifi,ethernet,XTU,RST driver etc) Realtek(audio),AMD,Nvidia for example
Hope that helps
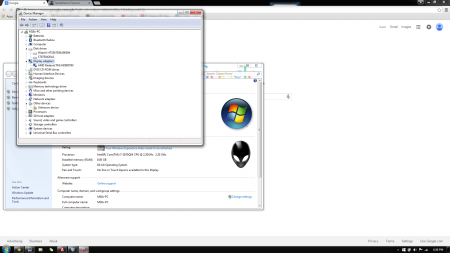
sir.. i need your help.. i had just flash my bios .. what i did was i extract the rar files and put in the desktop folder.. i click the insydeflashx64... and continue flashing with battery, and power adapter plugged in.. my problem is , it seems it is just the same.. the intel hd graphics card still wasnt shown on device manager( (i did include the image below). i continuously clicking f2 key but i can even enter the bios, no alienware logo appear , just some text and booting of windows comes next and desktop.. what should i do sir..? thanks and hoping for your answer again..

-
You are very welcome I don't have those type of drivers but if you load the basic drivers/software from Win 7/8 like the alien osd from the driver disk and Dell/Alienware website and such it should all work okay and instead of win 7/8 intel drivers for example just get the latestdrivers from their website for the hardware like the win 8.1 driver for your model of intel hd graphics and the latest amd or nvidia gpu drivers from their respective websites, this way all is using the most up to date versions of software. Just look at what drivers get installed from your driver disk and for the non software parts look for updated versions on the company websites. Intel(igpu,wifi,ethernet,XTU,RST driver etc) Realtek(audio),AMD,Nvidia for example
Hope that helps
thank you so much again sir..
.. ill inform you what will happen and and review about my updates..XD.. thanks again sir.. ill be sleeping for know . it is already 12:49 am or 0049h midnight in our place and its been 3 days i havent enoght sleep due to this update preparation ... once agian sir.. thanks for help and support.. cheers and goodnight... -
http://forum.techinferno.com/alienware-m14x-aw-14/1330-bios-reset-recovery-possible.html
@Brian was so gracious to post this back in 2011 which serves for M18xR1 generation instructions for blind flash recovery. Use the stock bios from the M18xR1 instead though

I would gather all these ahead of time on a usb prepared and @svl7 has the best advice always in the world to set boot device priority to usb first then your drives before proceeding with the flash in case you need the usb method it boots automatically off usb without seeing anything on screen. I never had issues flashing in ll time I had on my M18xR1 but you never know. Best keep all hardware stock then restore overclocks if any afterwards. Cheers Ill keep an eye out if you have any further questions. Been awhile was a refresher for me lol. On Alien 18 and Eurocom Panther 5 currently
cheers happy flashing. ~Marc*added link almost forgot lol
thank you so much sir.. your the first person who answered precise and detail^_^.. ill be flashing my bios after i gather all drivers i need for windows 8.1.. im having hard time to look for it.. because alienware/dell dont have update driver for m18x r1 windows 8.1.... im still downloading my drivers from driverscape though i know their drivers are kinda out of date.. do you have other source where can i download m18x r1 windows 8.1 driver sir..?
-
Hi Pixma21 I would be glad to help with the best of my abilities. Download A05 unlocked zip from OP thanks to SVL7 and unzip the file into a folder on your pc inside windows. Make sure you are plugged into AC and imho you should disable all overclocking of any sort and use stock aettings while you proceed. Go ahead and open the file InsydeFlashx64.exe and the process will start. The fans should spin up and you should see bios updating with InsydeFlash. Let it finish and it should reboot when it is done or ask to. Once it completes and system reboots enter bios and reset to bios defaults and start putting your settings back. If you used it on Raid mode wether you had a Raid array setup put it back to Raid or if you had installed Windows on AHCI similarly set the same thing there. Get aquainted with the available options. I hope all goes well. I can do my best to answer questions if you have any further inquiry. Happy flashing and cheers!
thank you so much for precise answer and help you gave sir..
.. one more thing bother me.. what is i accidentally brick or fail the bios... .. will the cmos battery option will do.? do you have other alternatives to recover the bios.? hoping for your answer... -
With the unlocked bios you can manually boot to the intel igpu. I forget the exact location and name but you switch from PEG to IGPU. If you install the original drivers from dell which include Alien OSD and etc it will allow the key combination that allows you to switch to igpu with a reboot from within Windows. Its on like the F5 button, I can't remember was a few year without M18x R1 now. Since these systems don't use optimus or the AMD equivalent the gpu in use must be switched to from bios or windows through a reboot.
The 7970m and 8970m is the same card i think so if it shows that and works it should be no issue.
sir ... how can i flash my bios ... can you guide me step by step..? i really want to have unlock a05 bios.. because my bios is kinda unstable... help me sir .. thanks ..
-
I learned some new stuff... here's BIOS A05 unlocked ...but I haven't got a system to test it... anyone willing to do so?
It's the first time I've done this, but I think it will work
In the worst case there's still the well-known recovery method.If anyone is going to test it, let me know and report back!
EDIT: Tested and confirmed to work, so go ahead and flash
 Thanks @mw86 for testing!!
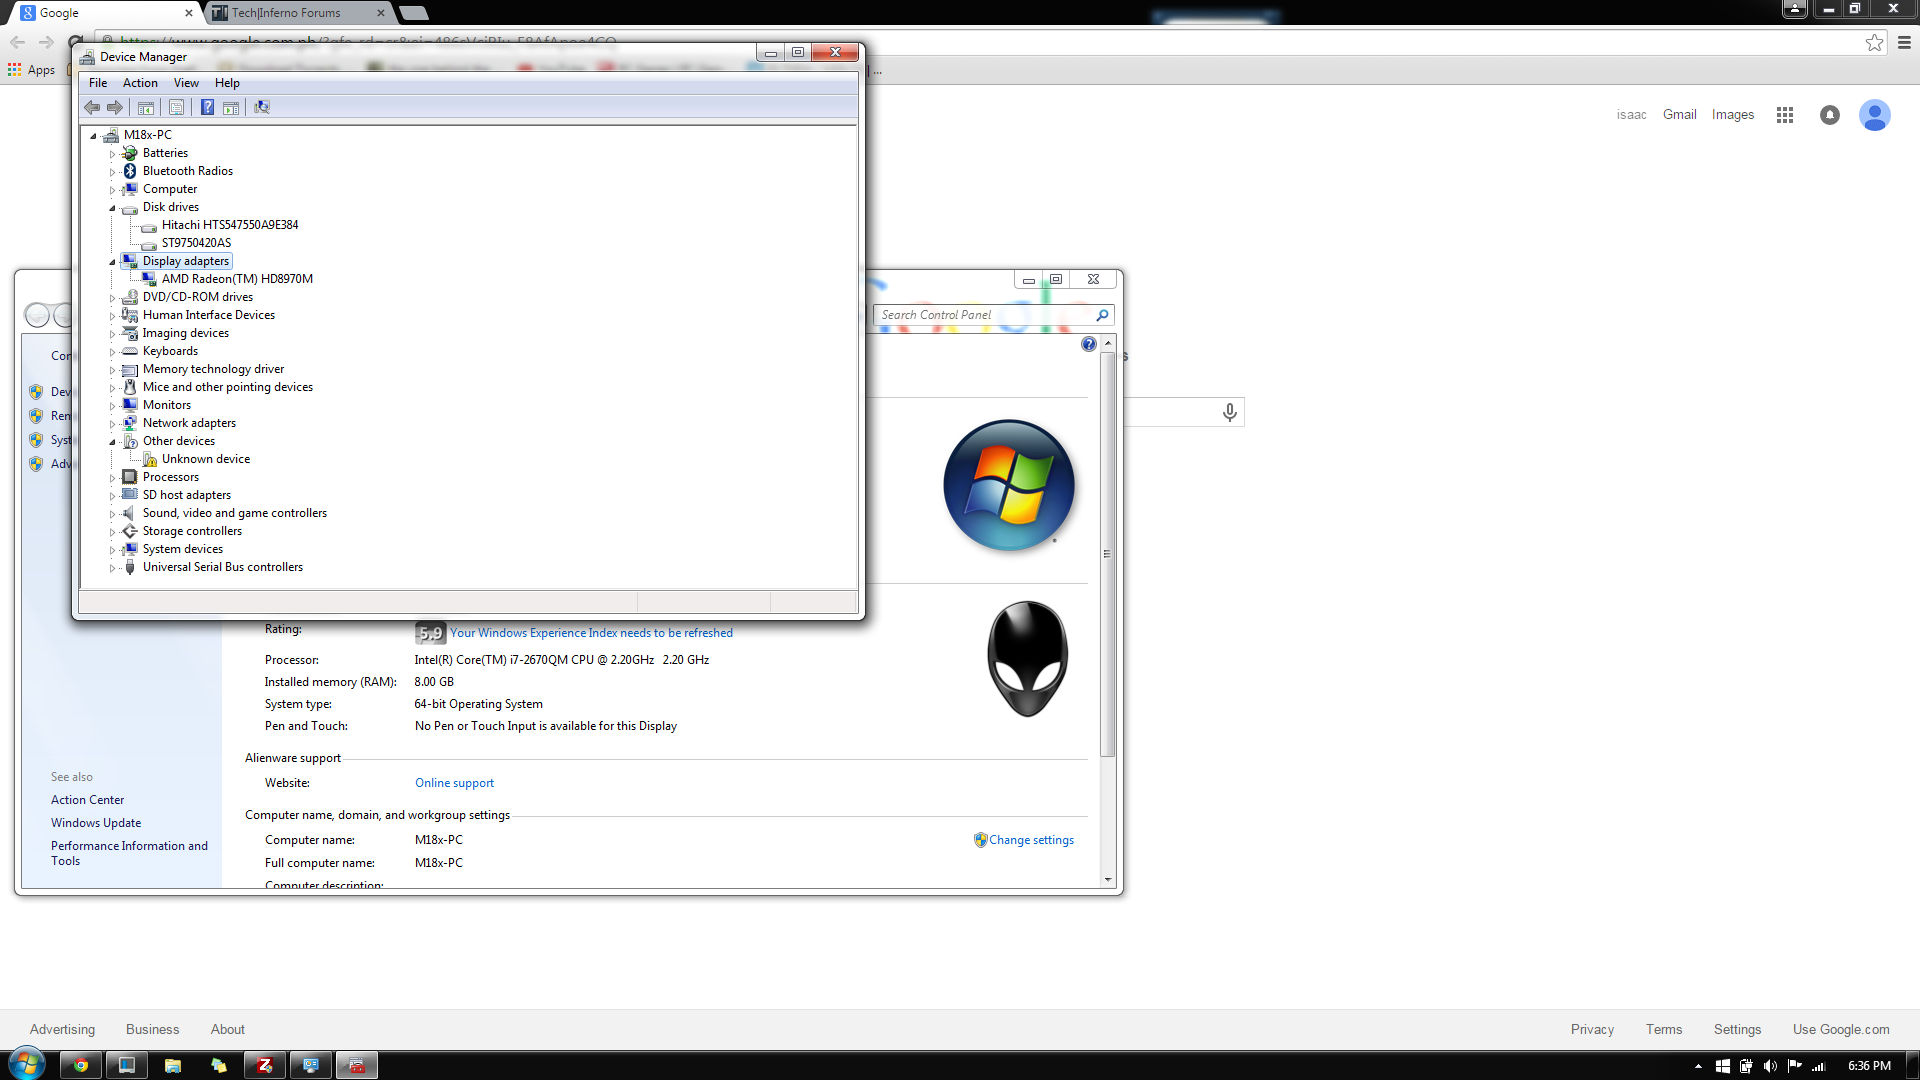
sir, good day.. im having problem on my m18x r1 with bios version a05, kinda unstable, and i notice my 7970m becomes 8970m after my brother updated the bios, intel hd wasnt shown to device manager> display adapters, i cant even install intell hd 3000 driver because it says that my "system doesnt meet the minimum requirements" .... can your m18x r1 a05 can fix those problems.? can you link me bios modded a05... can you give a guide how to flash my m18x bios..? thanks in advance sir..
iCcie21
-
sir, good day.. im having problem on my m18x r1 with bios version a05, kinda unstable, and i notice my 7970m becomes 8970m after my brother updated the bios, intel hd wasnt shown to device manager> display adapters, i cant even install intell hd 3000 driver because it says that my "system doesnt meet the minimum requirements" .... can your m18x r1 a05 can fix those problems.? can you link me bios modded a05... thanks in advance sir..
iCcie21
-
goodday.. how can i choose what bios update should i download.. i got p170em .. but the thing that bother me is, k2 and t2..?? how to know and what are they.?
-
Sir Slv7.. how can i update my bios without battery.? im stock at bios v0.19 .. and i wanna update my bios unfortunately my battery is pretty busted... can you help me .. thanks in advance. more power.
-
Before You Begin:
- Install disk imaging software. I recommend Macrium Reflect free which we used for this tutorial.
- Create a full backup of your system on an external drive. Using Macrium Reflect Free, you can simply select your hard drive under the Create a backup tab, click “Image this disk” and then choose a folder on the external drive for storing the image files.
- Clear space on your hard drive. Make sure you don’t have more data on your hard drive than the mSATA drive can accommodate. If you bought a 128GB mSATA SSD and your hard drive has 250GB of data on it, you’ll need to delete unnecessary files and temporarily move large media files onto external drives as necessary.
- Install EASY BCD, a free application that helps you control which drive is your boot drive.
- Make sure you have admin rights. The Windows account you use to perform the upgrade must have administrator privileges. If it’s the only or main account on the laptop, it probably already is an administrative account. To check, launch the User Accounts app in the Windows Control Panel and the word “Administrator” should appear next to your username either on the first screen or after you click the “Manage user accounts” or “Manage another account” links. If not, log in to the administrative account, before you proceed.
Physical Installation:
- Open the your notebook’s upgrade panel and locate the PCIe slot. A thin slot that’s made to accommodate a stick the size of a piece of gum, the PCIe slot is usually located next to the RAM. If your notebook doesn’t have an upgrade panel on its back side, you may have to check its service manual on the manufacturer’s website to find out how to access the PCIe slot.
- Remove the existing cache driveif your notebook came with one installed. If the slot is empty, skip this step.
- Unscrew the mounting screwand put it to the side.
- Insert your mSATA SSDinto the slot. Because of a groove in the slot, you cannot insert it upside down.
- Reattach the mounting screwto hold the mSATA drive in place.
-
Replace the upgrade panel or close any other parts of the chassis you had to open.After you install the drive, it should mount and appear as a drive letter on your computer. If you don’t see the drive, check Windows’ Disk Management Utility, which appears under Computer Management in the control panel’s Administrative Tools section. If you don’t see it there, check to make sure it’s connected properly.
Make the mSATA Drive Your Boot Drive:- Launch Windows Disk Management which appears as an option in the Computer Management control panel app.
- Shrink the main partition on your hard drive so that it’s the same size or smaller than your mSATA drive. To shrink the partition, right click on it and select Shrink Volume. Then click the Shrink button in the dialog box that appears.
- Clone your hard drive to the mSATA SSD. In Macrium Reflect Free, click “Clone this disk” and select the mSATA disk as your destination and follow the prompts. If the mSATA drive has any existing partitions on it, delete them when given the option. This process could take anywhere from 10 minutes to half an hour.
- After cloning, your mSATA drive’s partitions will appear as drive letters with the same volume labels and data as the primary hard drive. However, the mSATA drive’s main partition will probably not be the C drive, which will cause all kinds of problems until you follow the steps below to fix it. If the mSATA drive already labeled as C, you can skip to step 22.
- Restart your PC and Enter your BIOS. To access the BIOS setup menu, interrupt the startup by hitting the appropriate key for your notebook, which is usually one of the function keys (F1 on our ThinkPad).
- Change the boot order in your BIOS setup menu and rank the mSATA drive higher than the hard drive. The boot order submenu appears in different plac on different notebooks, but on our ThinkPad, it was located under the Startup Tab.
- Launch EasyBCD in Windows.
- Click BCD Backup / Repair
- Select “change boot drive” and click Perform Action.
- Select the mSATA drive’s Windows drive letter on the menu that appears. Usually this will be drive D or E, because the old hard drive still has letter C.
- Click Edit Boot Menu.
- Delete all the entries by highlighting each and clicking Delete.
- Click Add New Entry
- Enter “New Windows Drive” as Name and make sure Select Windows Vista/7/8 is selected on the Type pulldown.
- Select the mSATA drive’s drive letter and Click Add Entry.
- Make sure that the mSATA drive is both the boot device and Windows drive by clicking View Settings in EasyBCD.
- Reboot the PC.
- Launch Regedit. Either hit Windows + R and type Regedit into the Run box or find the program by searching.
- Navigate to HKEY_LOCAL_MACHINE\SYSTEM\MountedDevices
- Rename the \DosDevices\C: to \DosDevices\Z: so that the hard drive’s Windows partition will now be the Z drive. If the hard drive has any other partitions with drive letters, change their letters to lower-alphabet letters also.
- Rename the key associated with the mSATA drive’s Windows partition (ex: \DosDevices\D or \DosDevices\E:) to \DosDevices\C:. Rename any the keys for any other partitions on the mSATA drive to reflect the drive letters the original partitions used on the hard drive.
- Close Regedit and Reboot your PC. If you did everything correctly, the laptop will now boot off the mSATA drive, which will also be the C drive.
- Open the Disk Management tool and verify that the mSATA drive’s Windows partition is now the C drive.
- Extend the Windows partition on the mSATA drive so it uses all available space. To expand the partition, simply right click on it, select Extend and click Next a couple of times so Windows adds all available unallocated space to it.
- Delete all of the partitions on the hard drive. To delete a partition, right click on it and select Delete Volume.
-
Create a brand new partition on the hard drive, using all available space.To create a new partition, right click on the unallocated space and click Create New Volume then follow the prompts.Your laptop should now boot off of the mSATA drive with its Windows partition showing as your C drive. The hard drive will be a huge blank partition you can use for data.
-
Will other thought most files Will be deleted by the virus.. Will infact the just hide it..
Q. why i can see my files though i unhide using control panel and folder option..
A. well, i got solution for you.. here's how.. Follow my lead.
1. Gather what you need..
-Infected Flashdrive
-Computer/notebook and netbook will do .
2. Insert the Flashdrive to USB hub.
3. Verify what letter is you flashdrive is.. if your not sure.. Goto My Computer by pressing WIn+E at the same time. Look for you Drive letter.
4. Now go to RUN by pressing WIn+R. the Type CMD. sometimes need to be administrator.
5. At CMD. Type you Drive letter.. for example "E:" the hit enter
6. type the following
7. attrib -s -h /s /d *.*
8. Hit enter.. now explore you flashdive. if you see a folder without name then open it..COpy all Files to desktop by putting all in one folder. except Autorun.inf.. or something that unusual.
9. right click the Flashdrive the format it.
10.Copy all files you have just recently put at desktop.
and you are good to GO... How it HELps.. -SHin..
-
1. look for clean and dust free place. anti-static band might be need . remove cpu from the power. remove the heatsink from cpu. clean the waste thermal paste ( rubbing alcohol will do.. ) from processor and heatsink. dont touch the processor metallic side to avoid spaces cause by oil from your hand. apply thermal paste by putting little amount at the center of the processor. start spreading evenly. put back the heatsink into place. tighten up and your good to go..
3. yes.. i did decrease 10 degrees celcius. my system now is running at 37 degress at room temperature of 31 degrees.. note .. (we are near on the equator...)
4. well i said, custom made cooling pad.. if you want to buy and spend some money why not.. i do love to add my knowledge an experience.. wood is the best choice to fabricate homemade cooling pads.
5.no comment
6. well some use not powerful processor.. as we all know , old processor delivers low processing power and gives off alot of heat..
7. well commonly.. overclocks requires a lot more energy. lot more energy leads equals more heat, more heat equals overheat... commonly goes like that..
hope i had make my self clear enough..
-
[h=1]options[/h]1. apply thermal paste
2. clean exhaust vent and intake .. some dust might stick on the fan and vent, obstructing the air path..
3. apply thermal paste.. i prefer Artic Silver 5. on my experience my temperature decreases to 10 degrees Celsius..
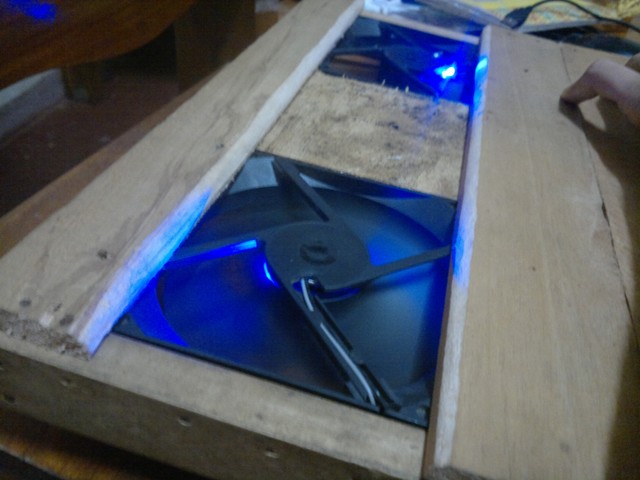
4. have a Cooling pad.. i made cooling pad on my own.. ill be making another thread for custom made cooling pads out of light wood and 120mm 2000rpm fan
5. dont cover the intake vent or put your laptop on pillow while using it.
6. disable background running apps or anti virus.. some anti virus eats processing ability of cpu .. that leads to high clock.
7. avoid overclocking ..
hope it help and i will add and update for more.. so tune up for more guys..
[unlocked] M18x R1 BIOS versions
in Alienware M18x / AW 18
Posted
i thing is for raid configuration sir... intel rapid technology and followed by distorted like this .... there is no alienware logo .. but i can still proceed to my windows 7 desktop,, my game crashes at first time while running about 3mins and stuck on white screen display, thats why i decided to force shutdown it by hiting power button .. so i restarted and run the game for almost 4mins no crash.. i still dont know if it would occur again in the future.. i did forgot to mention, my brother accidentally flash this incorrectly but the laptop still function , and an hour ago i did tried the a05 modded bios, and still no change, ive been thinking to reflash it with stock a05 bios ... and soon flash it with modded bios.. will it work best sir..?