


ghoul
-
Posts
67 -
Joined
-
Last visited
-
Days Won
1
Content Type
Profiles
Forums
Downloads
Posts posted by ghoul
-
-
It is normal, however i feel lucky now, since mine are 1.05 and 1.08.

probably related to ASIC quality. But yours are running same bios version, with mine, bios is different as well.
Simple bios upgrade won't change those values, since it is fused, but you can edit with kepler bios editor, force bios to use those values rather than fused ones.
internal bios should be extracted from system bios, edit, repack, and reflash system bios
Further unlock probably will be available when Svet from msi forum will support 750M in his bios editor.
-
Hi!
edit: merged with Conscriptvirus's post so it's easier to follow:
This modification is very dangerous, can lead to broken chips.
Don't say i didn't warned you...
I did this mod yesterday and it's really not too hard or expensive.
edit: he's right, it is easy
Lenovo did a sloppy job with cooler, too much thermal paste, weak springs, overheating and throttling machines...
First of all, disassemble the machine.
Then do a repaste, with bare minimum amount of thermal paste, and remove cooler again, check thermal paste spread.
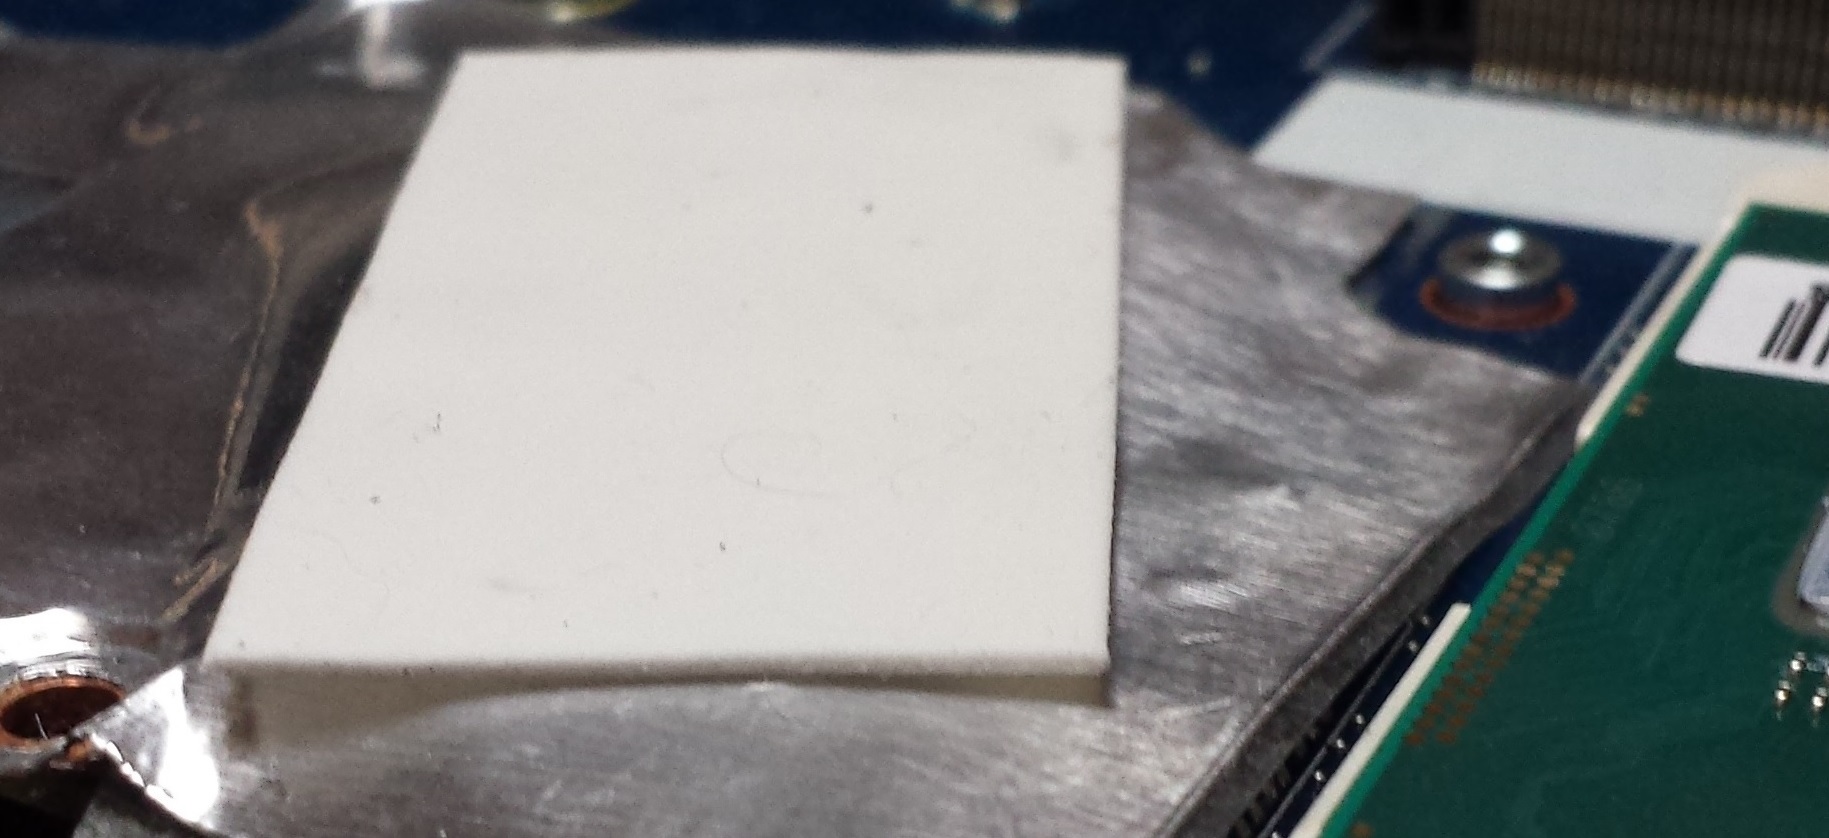
This is a picture of my heatsink attached with no thermal paste on. You can see there is a small gap between the GPU and heatsink which isn't very optimal. Optimal would be the GPU touching the copper heatsink and thermal paste filling in the scratches and micro-holes on the copper.
[ATTACH=CONFIG]9243[/ATTACH]
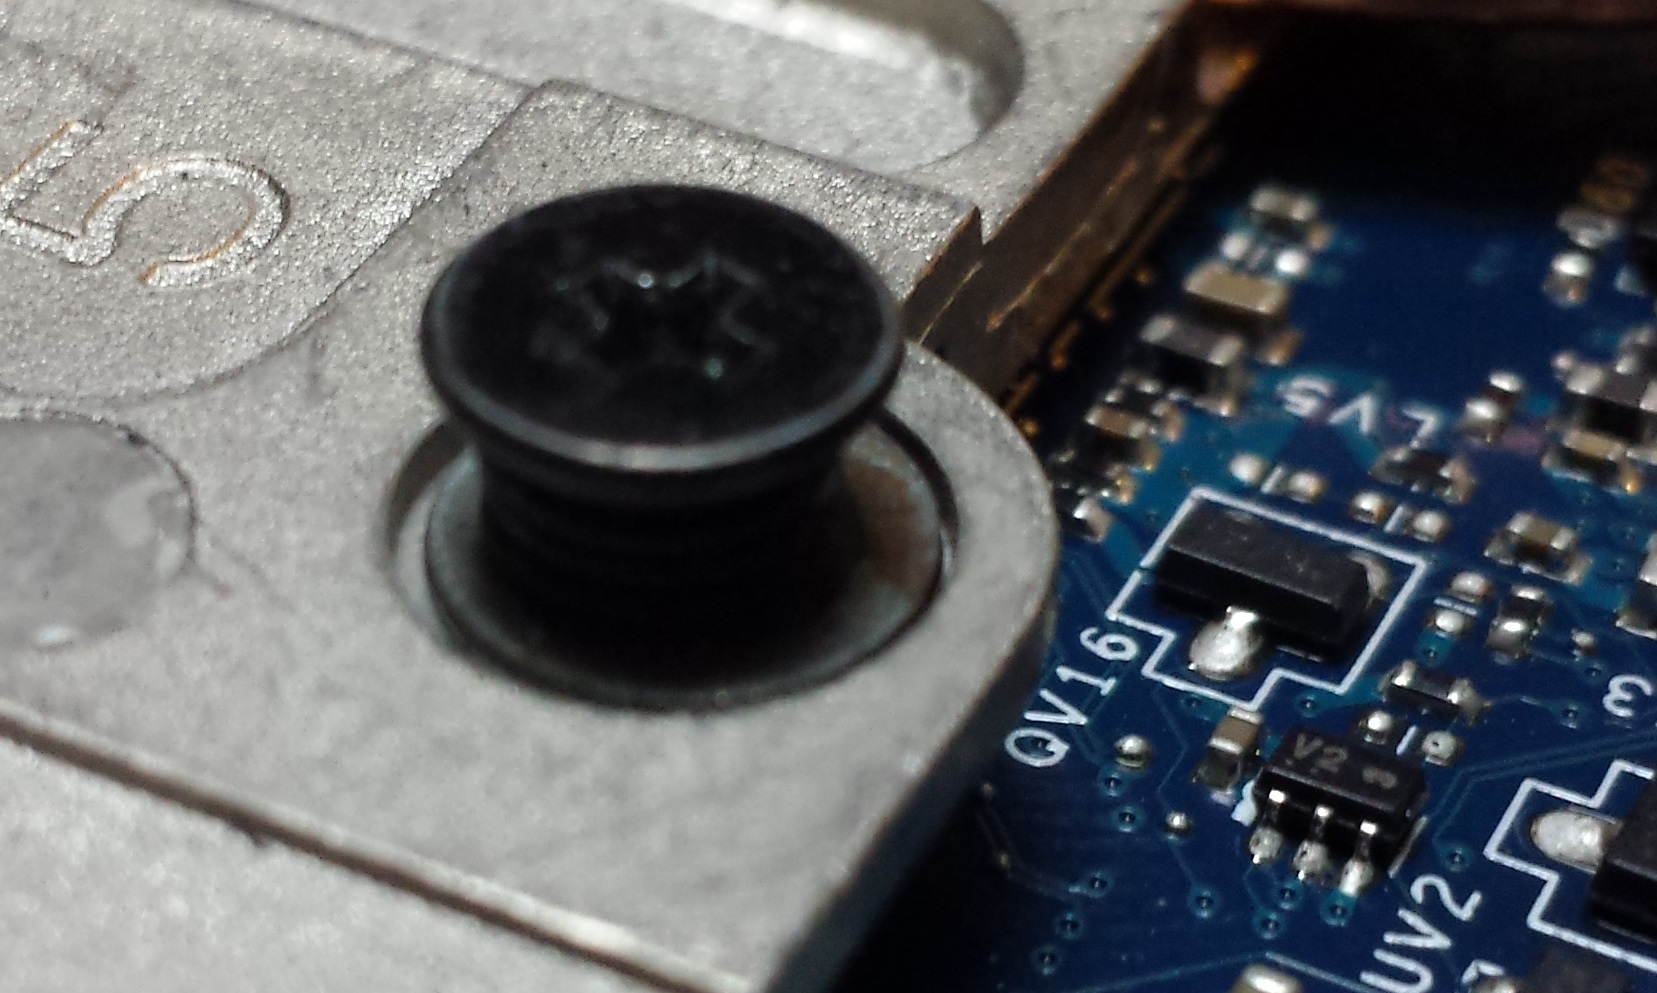
Remove screws from cooler, by removing little plastik washers, keeping the screws to fall out.
Here are some more pictures:
[ATTACH=CONFIG]9244[/ATTACH]
The circled things are the plastic washers that need to be removed. I ended up using a xacto-knife blade to cut them off. Remember, once the plastic things come off, the screw will fall through. Also, keep track of which screw goes to which hole.
My gpu heatsink was not paralllel to motherboard, so the corner without screw was slightly bended upwards.
Twist the gpu heatsink, so that corner is pushing gap pad a little bit harder. Be very gentle, you dont want to broke your heatsink.
You can check level by putting your heatsink on flat surface with gpu screws removed, cpu screws stays in place for now.
Then place a 0,5mm spacer under the spring like seen on the following pictures
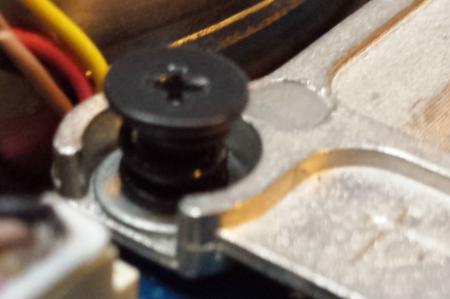
These are screw number 4 and 5.
Screw number 6 is using a weak spring, so use double spacer, or change it to a stronger spring:

[ATTACH=CONFIG]9245[/ATTACH]
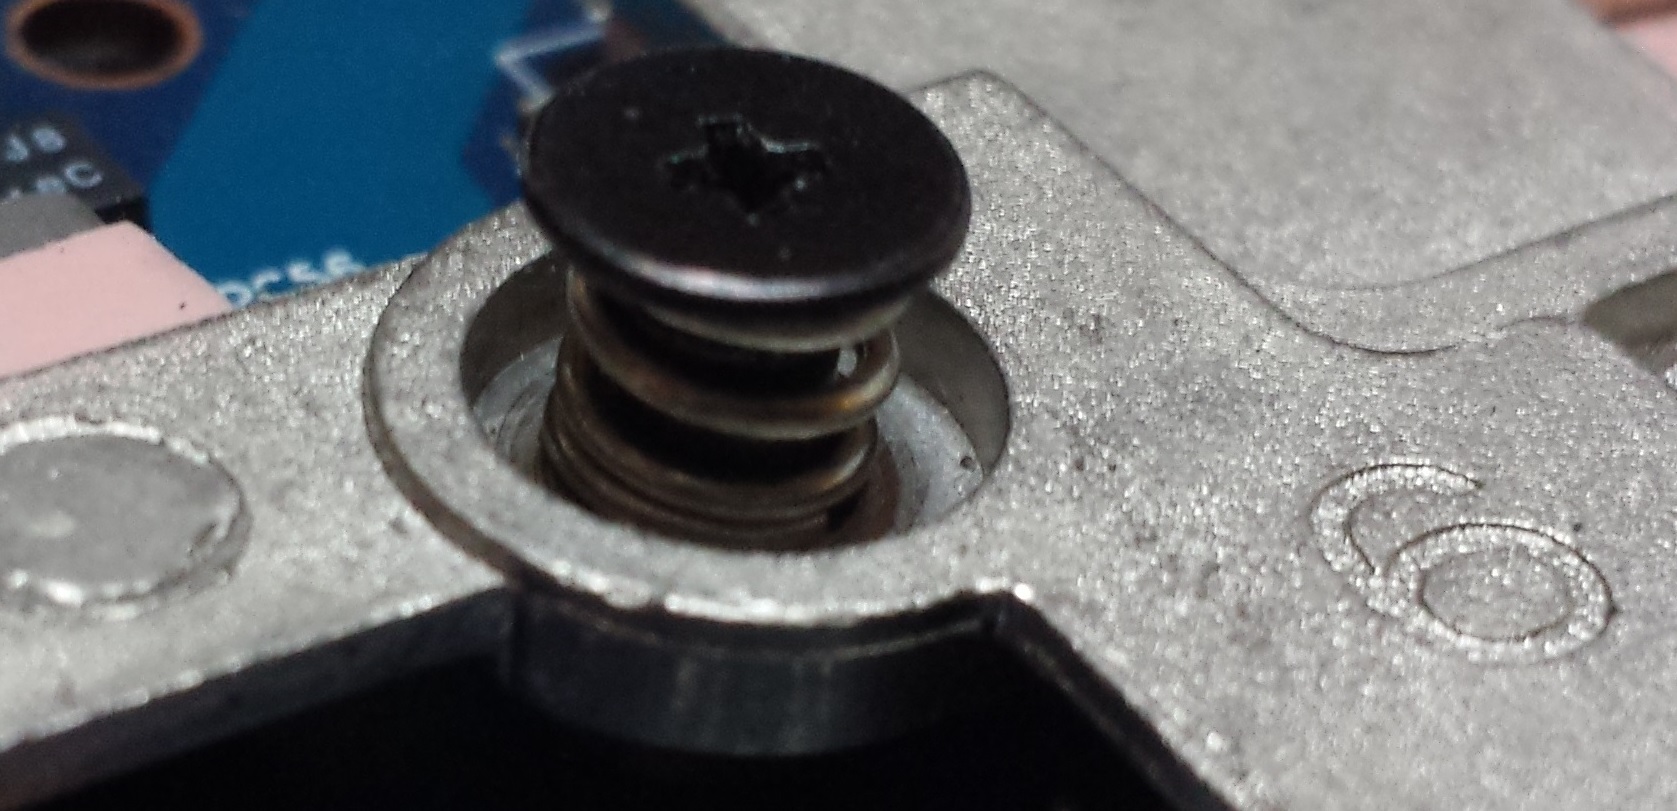
That's what mine looks like after it's done. The washer fits really nicely.
Put back plastik spacer, so screw stay in place.
Do the same process with cpu heatsink.
You can do this to ultrabay as well, but take extra caution, since there is no backplate, and it can lead to warped/broken board.
Lastly change the gap pad over cpu vrm area, because it is too tick, I used 0,5mm piece:

Aaand it's done!
Put back heatsink, use as little amount of thermal paste as possible, and enjoy 10-15+ lower temperatures.
Spacers was lying around, i had the spring from some old heatsink, so dont have exact types and diameters,
but Conscriptvirus did the mod also, his mod is better to look at, spacer perfectly fit into heatsink holes
I bought these washers:
Crown Bolt M3 Zinc-Plated Steel Flat Washers (5-Pack)-37428 at The Home Depot from home depot. They were 45 cents for a tiny bag of 5. Ended up buying 3 bags of them.
According to that site, the inside diameter is 3 mm and the outside diameter is 0.2785 inches.
Now, YMMV so keep experimenting and be careful. I ended up adding 2 washers to each screw hole and a third one to the weaker spring that Ghoul was talking about.
Results:
Battlefield 3:
Before: CPU 95C, GPU: 95C After CPU: 80C, GPU: 80C
Planetside 2:
Before GPU: 97C + throttle. After: GPU: 82C
edit:
I also did cpu mod, ended up adding a washer to screw 6, despite of changed spring, gained 1C-3C.
I can run XTU stress test under 85C with -95mV and 3,4Ghz 4core.
GPU and CPU idle is under 50, without notebook stand with fans.
Thanks to Conscriptvirus for his effort and pictures.

If it worth to be sticky, Mods, please make it one.
Regards

-
 4
4
-
-
Hi, can you take a look into this?
Did the bios mod on my y510P, with bios 1.09. Everything went as supposed to.
However, when I removed ultrabay, I noticed, my internal gpu bios version is changed.
No gpu limit override, and memory cant be overclocked. ( second part probably not related to this)
Attached screenshots of single and dual gpu bios.
When I opened system bios in editor,checked the dump folder, there are two vga bioses packed in the file.
The one, which is modified by your tool, and the other one, which is used in single gpu mode.
These bios files have different file sizes as well, so i think replacing them with each other is not advised.
ultrabay is ~93K, internal dual mode bios is 159K and internal single bios is 59K
Bios dumps has been sent you via email.
Thanks in advance!


-
Use intel Xtu. Look for dynamic voltage offset
-
If you want to lower temperatures, you have to repaste first of all.
The next part is strongly unadvised, unless you know what you doing.
You shoud change some gap-pads, since in my y510p,the gap pad next to cpu, over coils of vrm area, is pushing heastsink away. ( 0.5mm is ok)
Cpu springs are fine, however, the gpu spring have to be modded. internal gpu has 3 bolts, 2 of them is fine, but i inserted a 0.5mm spacer under them, 3rd one is changed to stronger one.
Ultrabay gpu heatsink is modded too, almost hardmounted, spacer with rubber spacer under it.
Ultrabay is still overhating under full load, but for example with BL2 it is at max 80, internal 75 max, and it is with 1230/1425, cpu at 3,4 4core with throttlestop, undervolted by 95mv.
-
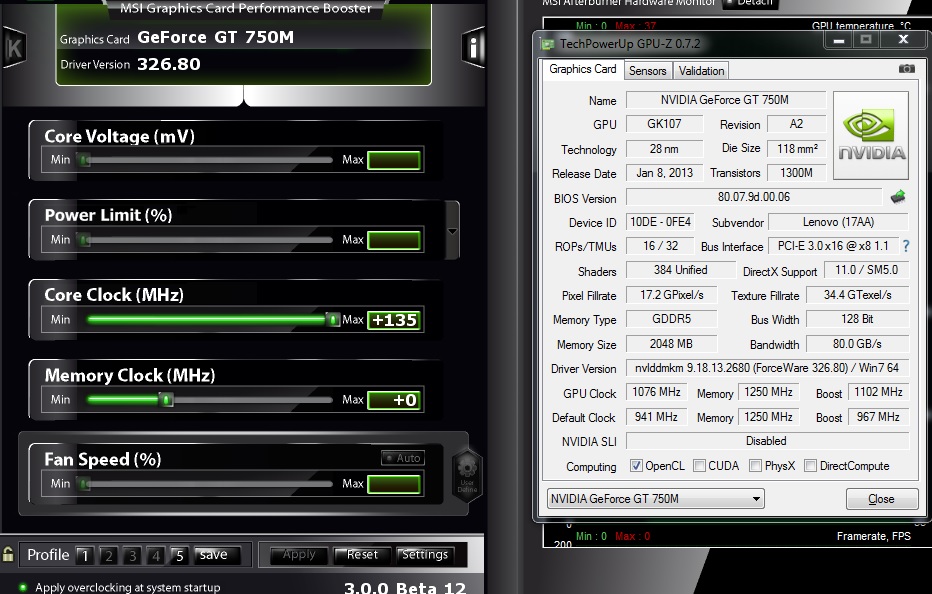
Just wondering if anyone has tinkered with the disabled by default "Overclocking Menu"? I can't really afford to be a guiney pig as this is my only machine... +3 for everything so far going smoothly.
Successful 1.09 Flash on y510p w/ i7-4700mq, SLI 750m's, new Wifi card in the mail as of now!
simple version : turn around, go away from that.
longer version: There you can set flex ratio, which is highest non turbo multi. only lowering is possible
You can up turbo multis by 2, by enabling extreme edition menu, and set 34-34 or 36,35,34,34, but if you didn't repasted cpu, dont do it.
Somewhere, cant remember properly, you can set HT on/off.
In chipset/power control, you can set MSR lock to disable, so you can alter TDP limits on the fly, with XTU.
Other setting are untested.
ps:
Dont panic, if your laptop is powering down after 1-2 sec after exit&save and restart.
Turn it on again. If not succesfull, now you can start panic.
-
I used a 256m usb flash disk, and tried the file name Yx01.bin, .rom, .wph, .fd, but none worked.
need I use crysis tool (wincris.exe) to prepare a bootable disk or remove other HD disks?
sorry to hear that

for recovery flashing, neither.
I ran out of ideas, maybe svl7 can help you somehow...
-
what was your backup bios file name on the usb stick?
bios.bin will not work, you have to rename it like the article said:
2.3. Download andy's tool for identifying the correct filename of the BIOS for recovery (andy's tool)
2.4. Load the *.ROM file with andy's tool. A Message box will popup. It will show a filename you should use.
2.5. For me the file was called "QIWY.bi?". I formatted a usb flash drive (1GB) with a FAT filesystem (FAT32 should work fine as well) and put a few copies of the QIWY3207.ROM file on the drive. I used some variations of the filename because the character "?" is not allowed in filenames. So it put *.bi, *.bin, *.ROM and *.fd on the drive (don't know which one acutally worked).
-
svl7, is flashing a bios by default overwriting the variable area, or you have to force it by parameters?
If yes, you should try making an auto flash usb stick, remove hdd, and boot machine like that.
Or try the emergency flash method in the linked article?
-
Yes it true, XMP is needed for the bios, but in XTU utility, there is no ram related settings at all. Maybe i will try XTU on my desktop.
There are no CMOS memory, which can be reseted? Didn't knew that. Thanks for the heads up!
-
maybe there is no other way, than desolder battery from motherboard...

-
Edmar Hobby - Electronic: Lenovo Ideapad Y580 Insyde Bios Reset/Recovery
Did not tried it myself, but it could help you.
-
1
-
-
@wtlobster: I have the same ram in my 510p, nowhere near xmp.
There are options like ram multiplier in bios, but unfortunately it is not working, tried to lower first, then upper a notch, nothing happened.
Ram voltage can not be altered, just one option in menu, which is auto.
@svl7: There are no ram options in XTU. Don't know are there any on other, fully unlocked platforms.
- - - Updated - - -
I used the tool to flash my Y410p BIOS and enter the BIOS Setup, when I "exit saving changes", my pc rebooted with only black screen, how can I recovey the orginal BIOS?You want to recover original bios setting, or want to revert unlocked bios?
What did you touched from unlocked options?
Similar things happened to me, but mine did power on, then 2 sec off. Instant hearth attack
Next power cycle was good, sometimes later, just entering bios, no changes, exit& save no boot.
So, just try to turn it on again, if it is not working, try to remove battery and power jack, wait a few minutes, and try again.
-
I dont think you would benefit anything from that.
And if you extract it from main bios, it has different size.(larger) Bios editor is able to open, seems fine, but could not flash integrated bios into ultrabay. Nvflash said all device id is full of zeros.
-
Hi,
Ultrabay has to be updated, since this mod is covering gpu bios unlock as well, and system bios doesn't containing that.
Probably off topic here...
svl7!
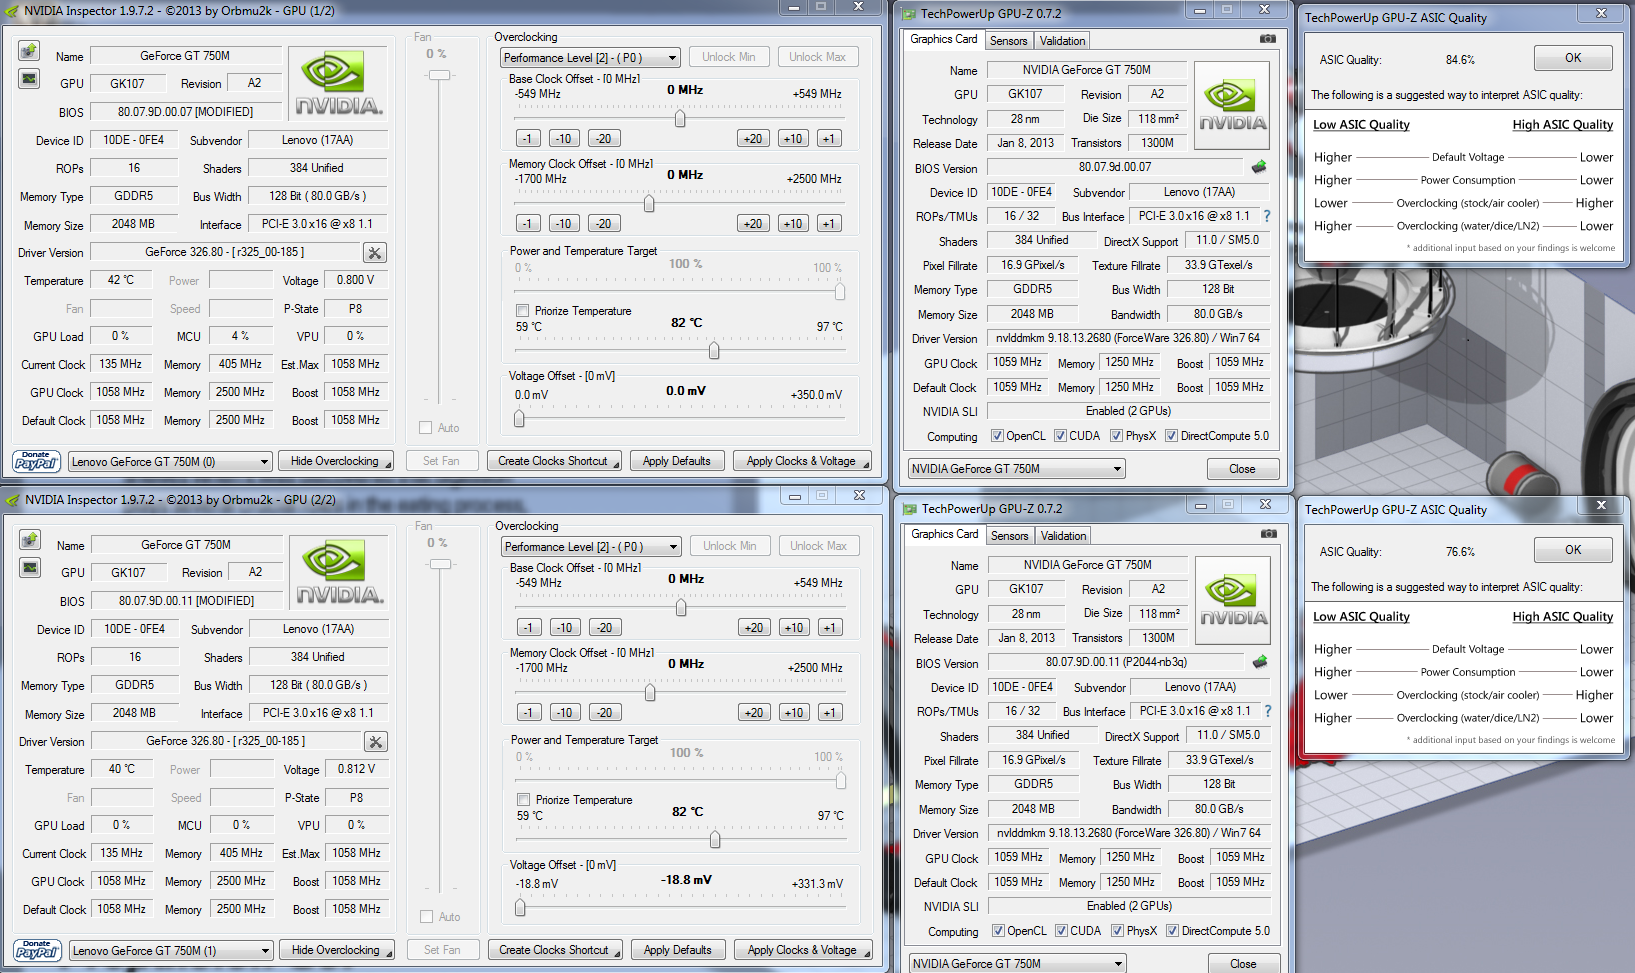
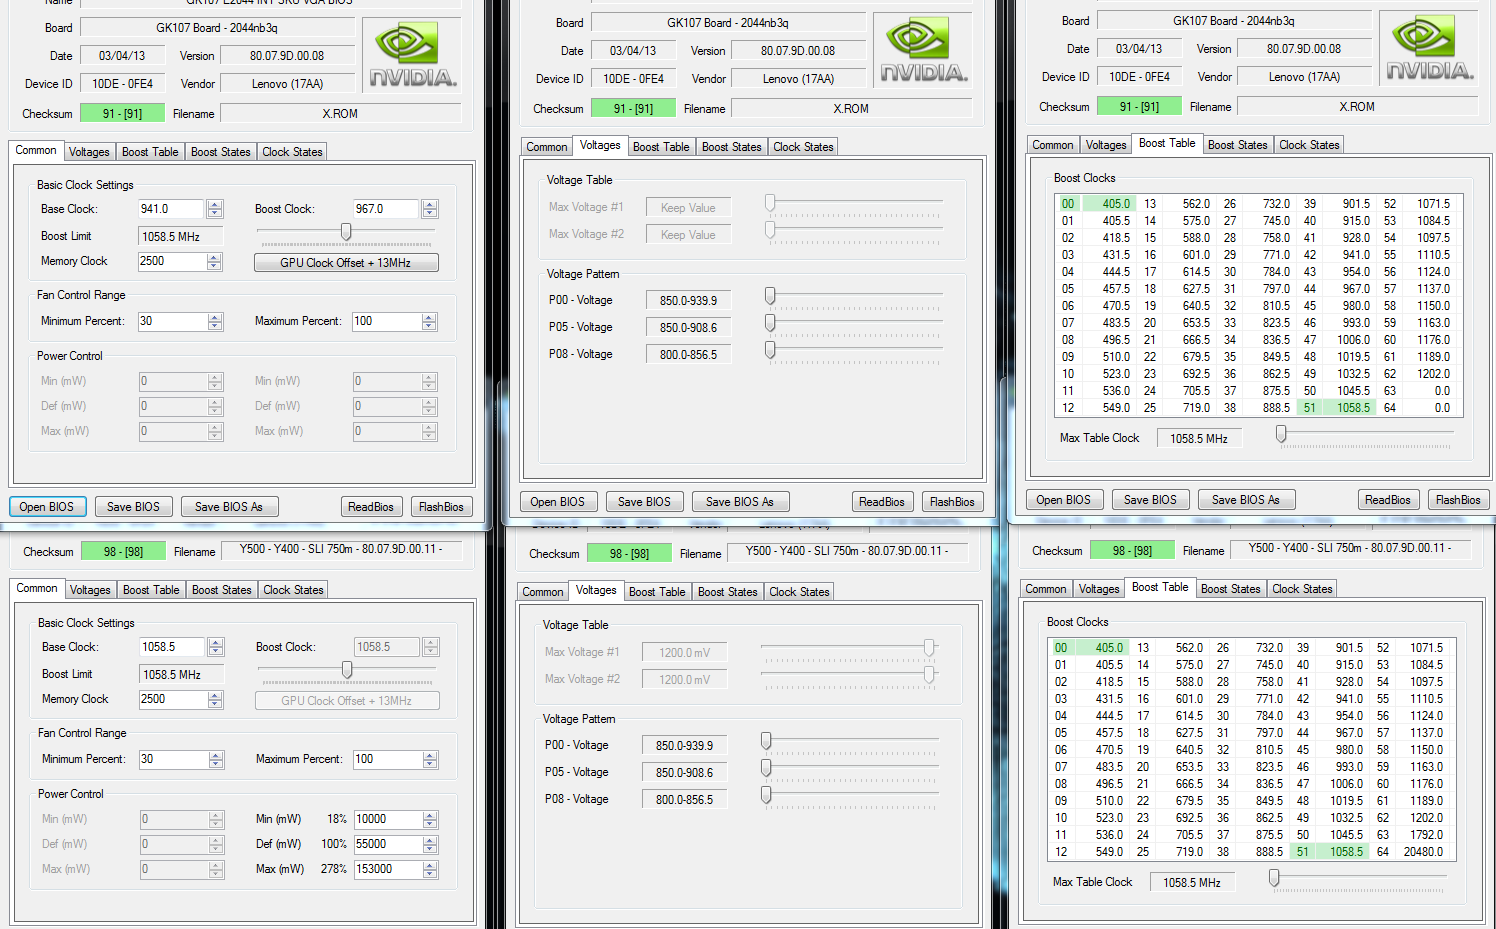
Is there a way, to further unlock vga bios? Talking about allowing on the fly software modification of TDP limits of cards, with like Afterburner.
The reason behind this is the following:
Kepler voltage is automatic, probably based on a voltage table, maybe linked to ASIC quality too.
If you set 1058 mhz, it will run at 1058, with for example 1.056V.
If you set it to +135 which is 1189 it will run at that speed, with 1.056V.
But, if you set it to throttle back, temp or TDP or usage limit, it will throttle voltage too, and will run stable at 1058mhz with 1.006V.
Temp limit is kinda hard to choose, to maintain a stable clock speed, but TDP limit could be.
Or a direct way to edit that voltage table, or be able to offset to negative values.
As seen on attached screens, ultrabay bios can be set to negative offset, but this offset is too low, still higher voltage, idle, load, whatever.
Integrated card can just be offseted to positive values.
Did a quick factory/modded ultraby bios compare in kepler bios editor, attached it via picture, some features still locked.
Unfortunately Svet's bios editor from MSI HQ is currently not supporting these cards.
With this, maybe we can shave a few degree from gpu temperature.
Thanks!
-
2
-
-
Kinda newbie here, frist post went to /dev/null
Greetings svl7!
First of all, thanks for your effort in modding! V1.07 works like a charm, now able to disable ht, manage TDP limits in XTU, superb.
As of ultrabay, the one WireMesh provided was 80.07.87.00.25, mine is 80.07.9D.00.08. But the modded one from Y500 thread, the 80.07.9D.00.11 is working as well, just have to flash it with -6 parameter. Default voltage stayed the same, probably fused, but undervolting would be nice, since my ultrabay is idling with 0.8120, however P8 voltage starts at 800 mV.
ultrabay750m.80.07.9d.00.08.zip
attached mine too.
Regards
-
1
-


Y510p overheating
in Lenovo
Posted
My ultrabay fan is this:
SUNON Maglev EG50060S1-C060-S99
A little help for those ultrabay cards, however fan speed mod is still needed. Probably with help from someone, who has better knowledge in EC firmware modding. ( My skills are limited in this, so i do hardware mods )
)
Tried to change fan to y500 replacement fan from ebay, (bigger, thicker, same dimension as main fan) but even with massive cutting and modding of ultrabay heatsink, chassis still thinner by ~1mm.
Probably with modding of the main chassis is doable, but did not wanted to cut machine to pieces, to find out it still wont fit.
Maybe i will try it sometime with removed motherboard, to check the benefit of bigger fan, but it will not happen in 2013.