Leaderboard


Popular Content
Showing content with the highest reputation on 01/26/13 in all areas
-
hi all I sucesfully unlocked BCLK on my xps 15 (L502X) had to phisically remove the bios chip, attach it to a hardware programer, and unlock the bytes at the descriptor to unlock the descriptor and ME regions read and write. however, I was just able to unlock BCLK overclocking setting am using XTU 3.1.201.5 (other versions refuse to start or install ) did any of u unlocked any other importants settings than BCLK? cuz I feel like this OC is kinda small :/ here is my modded me image, the one I flashed to unlock my BCLK l502x_me_overclock_by_capitankasar.rar you can open it with FITC if u want to give it a look if I missed any important setting2 points
-
Update: Moral Hazard used MESET.EXE on his clevo to force a dump and flash, but did not gain BCLK control. Update 2: SUCCESS by kasar on a Dell xps 15 (L502X) here! Unfortunately he needed to disable the ME region lock by desoldering and flashing the BIOS chip though. Update 3: SUCCESS by me on Clevo P150EM here! Mod relied on Clevo-only program to unlock ME region. Update 4: SUCCESS by Rhadamanthis on MSI gt780 dxr Update 5: SUCCESS by Akimox on HP 2570p here! At the hardware level, all 6 and likely 7 series laptops support overclocking. The problem is OEMs disable this ability except on laptops like the m18x. Clock configuration is NOT controlled by the BIOS. It is controlled by the Intel ME FW (management engine firmware), a BIOS extension. Only a few bits must be changed from a overclocking disabled ME FW to make it an overclocking enabled ME FW. Gigabyte accidentally leaked an intel utility that can read the ME FW, edit it, and write the new version back to the flash ROM, along with all the necessary documentation to make the correct changes. This flash ROM contains not only the ME FW, but the BIOS, flash descriptor, and 2 other regions called the GbE and PDR. There is one problem, which is that all laptop manufacturers (except ASUS) disable read/write access to the flash ROM. The read/write locks are contained in the flash descriptor. The security settings in the flash descriptor can be ignored by setting a special flag on BIOS startup known as the flash descriptor override, which enables read/write access to all regions. This override is used when you run a BIOS update. At this time there are methods to enable the flash descriptor override for HP and Clevo systems only. After setting the override and rebooting you can dump your whole flash image, edit the ME FW, rebuild the image, and flash. It is possible to flash either the ME FW region only, or the whole image. Obviously flashing the whole image is risky since you will also be flashing your BIOS, so I suggest just flashing the ME region. 6 series are more tolerable of corrupting the ME FW than 7 series. 7 series cannot run without a functional ME FW. 6 series can run without one as long as the BIOS detects that the ME FW is corrupt, and thus refuses to run its settings, however, the laptop can sill be bricked anyway if the BIOS thinks the ME FW is functional while it really is not, and attempts to run the inoperable clocking settings. Some of you may be aware of fwupdlcl.exe which can update the ME FW without enabling the flash descriptor override. This does not work for our purposes since it does not perform a full flash. It does not overwrite the hardware config portion of the ME FW, which is where clock configuration is done. However, if someone could figure out what this program does to write its partial image, it may be possible to use that knowledge to flash a full image. So here's the Intel Utilities and docs: 6 series chipset Link removed since the leaked FITC builds invalid images. Use the ME8 FPT and documentation for now. 7 series chipset: http://www.mediafire.com/?iwscmnadf5icnxq (thanks to kasar) MESET.exe to unlock Clevos: http://www.mediafire.com/?465pknsgc2z83s8 ME_Port by svet to unlock MSIs: https://www.dropbox.com/s/spmvxmz9pal1j6l/ME_Port.com BE CAREFUL WHEN USING FPTW64! It will happily overwrite your BIOS without any warning if you enter the wrong command. Even if you do things properly, still be prepared to have a dead ME FW and whatever the consequences of that may be. Although it is unlikely, trying to enable overclocking through my suggestions can kill your motherboard. There are a few combinations of mistakes that can be made which will most certainly do so. You have been warned, so don't blame me if you do. Also if you do, do NOT go RMA your laptop and make your manufacturer pay for what you caused. You took the risk, so you pay for the necessary repairs even if under warranty. If things go wrong I will do everything I can to help you recover, but please accept responsibility for trying this. Ok now that all that is out of the way so people can't justifiably yell at me. Back to how to try this. 1. Enable your flash descriptor override. Clevo users can use MESET.exe. MSI users can use ME_Port. HP users can use the keyboard sequence "WIN+left_arrow+right_arrow" during POST (got this info from Tech Inferno Fan). ASUS users don't have to do anything since they don't have the lock engaged. The rest of you guys are at this time out of luck. 2. So you'll first need to dump your ME FW image. This is done by running fptw64 in windows or fpt in DOS. It needs to be run in a cmd window with admin rights. The command to do so is "fptw64 -d imagename", where imagename is whatever name you want for your flash image dump. Prema found out that at least on Clevos, attempting to dump only the ME FW leaves out the clock control segment, so you need to dump the whole flash image. Note that you're also getting the flash descriptor when you dump everything, so you can edit it to not require the flash descriptor override to do any flash image reads and writes. 3. Now you need to change some bits to enable overclocking. By some, I mean you probably have to change quite a lot. The good news is that the settings on 6 and 7 series systems seem to be identical. When I edited my image, I followed the intel docs in the ME8 download. I've linked my original overclocked MW FW for comparison. You only need to make changes in the "ICC" section and subsections in FTIC. You can edit the ME FW as part of an entire flash image, or by itself. I edited it by itself, but have since then done several BIOS mods and flashing the whole image worked out fine. My modded P150/170EM ME FW: meoc.bin This image is just for reference to make sure you didn't miss anything. Don't just flash this ME FW. It might work, but there has been issues with flashing someone else's ME FW on HP and Dell systems and others may be affected. Dump and edit your own, or ask me to and I will if I have the time. Some manufacturers have additional changes. When it doubt read the manual or ask me if something should be changed or not. The Utility for editing the images is FTIC. This program has a GUI so it does not have to be run from cmd. Open your image and open the overclocking enabled image. Settings that are different from FTIC's generic 6 and 7 series file will be highlighted in yellow. What you need to edit is the ICC profiles under ICC Data. You can have up to 8 profiles. I think active profile changes depending on if you are say plugged in, on battery, on standby, temps are too high, etc. I don't really know how you identify which profile(s) much be changed, so I think you should just change all of them to make sure that if the flash works and you don't get overclocking, that you know you didn't miss something and that overclocking is impossible, so you don't waste time thinking about it and trying things. The number 1 thing to check that I found to make sure things don't go bad is your "clock source select" under "FCIM/BTM specific ICC registers". If it is 0x00011A33, then your laptop uses the PLL built into the PCH and you can keep going through trying this mod. It will be 0x00011A34 for enabling overclocking. If it is something else besides these 2, STOP NOW. This means that your PCH's PLL is not being used, and that instead an external PLL is feeding the PCH clocks to distribute. If you set your laptop to use the PCH's PLL, I think the PCH will get both clocks and you'll get a laptop with unintelligible clock signals. That would be bad. After making the changes you need to rebuild the ME FW image. You will then have a full image, and if you reopen this new image in FITC, FITC will create a new folder with the MW FW all by itself. You can use the full image or the MW FW image to flash. 4. Now the fun exciting part where we do the flash. I recommend doing it in DOS. The command to flash the ME FW only is "fpt -me -f filename", where filename is the name of your flash image. Don't forget the .bin extension. If you are flashing the entire ROM then you do need to leave out the "-me". If flashing the ME FW only and used the "build compact image" option in FITC, you should get a warning that the flash image is smaller than the total ME Region area that the flash descriptor says you can use, so the area after the file length will not be changed. This is OK and flash anyway. The image FTIC creates is not padded at the end, which causes the warning to occur. If you built a full image it is padded, so you don't get this warning. 5. You can now use Intel XTU to overclock. If you already installed it, you may have to reinstall it. BCLK can be changed in windows and takes effect immediately. Remember guys, this is risky stuff, especially if you have a 7 series laptop. If you're careful though everything should turn out fine.1 point
-
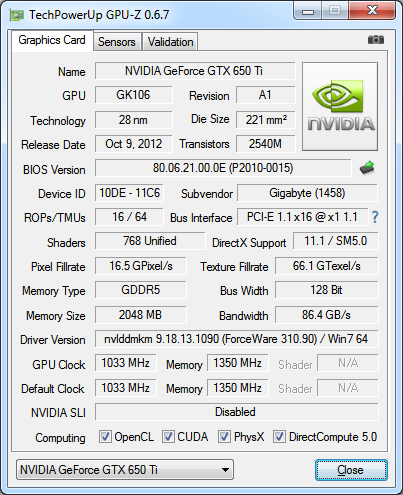
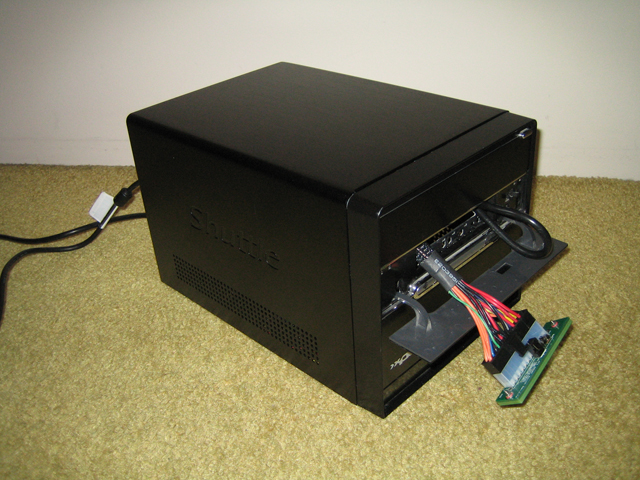
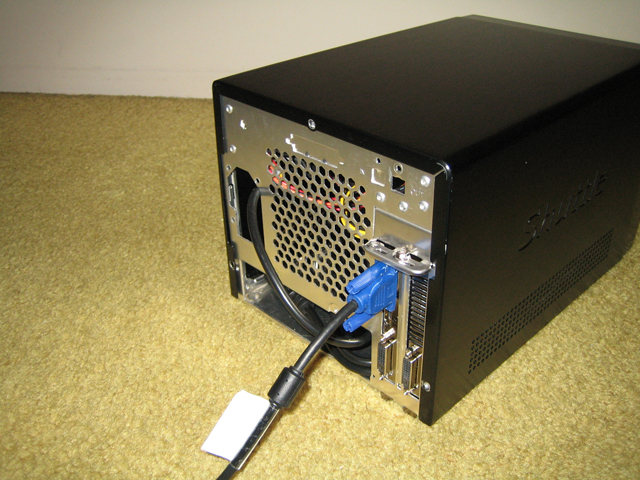
UPDATES: Feb 3, 2013: Added 3DMark06 and 3DMark11 benchmarks for dGPU GT 540M as comparative values between dGPU and eGPU Feb 17, 2013: Added pictures for mPCI-e slot underneath my laptop, and eGPU enclosure May 14, 2013: Selling my PE4H to upgrade to PE4L! First and foremost I want to thank Nando for all his troubleshooting and support as I worked to get my eGPU working. Without his help I wouldn't be up and running, especially with some of the interesting troubles I ran into. I hope this thread will help anybody else with a Dell XPS 15 L502x, or a similar machine, who wants to get an eGPU going. Please note that the following instructions are what got my eGPU working; it's entirely possible that following my steps may not work for you as well. You may have to make your own adjustments based on your own configuration. It should also be noted that I am only running 1.1Opt, as the GPU-z screenshot will confirm. I am working with HIT to exchange my current PM3N for the newer Gen2 capable mPCIe board. The PE4H is indeed PCI-e 2.0 capable, but the mPCI-e card itself is not. When I have the new mPCI-e card and cable, I'll run the benchmarks again for comparison. Benchmark scores and photos to follow. In this Post: Requirements Installing eGPU Using Setup 1.x Things you will need: Free mini PCI-e slot (not half size!) PCIe -> mPCIe adapter (e.g. PE4H / PE4L + the mPCIe adapter board and cable) GPU of your choosing (at this time of writing, Nvidia card is required if you want to get internal LCD support) PSU that meets the minimum power requirements of the GPU (something that can provide >150W on 12V1 rail should be enough) My current configuration is as follows: Dell XPS 15 L502x: Intel i7-2760qm 8GB 1333MHz Intel HD 3000 Nvidia GT 540M Windows 7 Ultimate 64-bit Setup 1.x (v1.10 and above) eGPU components: PE4H 2.4 (from HIT) PM3N (from HIT) mini HDMI , 60cm (from HIT) Setup 1.x (v1.10b5) (from HIT) Gigabyte GTX 650 Ti 2GB Coolermaster Extreme 2 Power Plus 625W PSU A shoebox (of all things!)A re-purposed Shuttle XPC case to hold the PSU + eGPU 1. Preparing the machine for eGPU Installing Setup 1.x Either purchase/donate for Setup 1.x from HIT, or follow the link they send you in an email after purchasing your eGPU kit Extract the installer's content to anywhere on your machine (default is C:\eGPU), and run the "eGPU-Setup-mount.bat" batch file to install Setup 1.x. This will add an item to your machine's bootable OS Uninstall mobile Nvidia drivers Uninstall all Nvidia driver items. It's easiest if you uninstall "NVidia Graphics Driver $drivernumber$" first, as it automatically uninstalls other items with it Navigate to your "C:\Program Files" folder (and if on 64-bit OS, "C:\Program Files (x86)") and delete the "Nvidia Corporation" folder 2. Installing and setting up eGPU components Installing the eGPU Shut down your computer Plug mPCIe adapter board into laptop; make sure you screw it in to secure it in place plug GPU into PE4H/PE4L board; the PCI port on the board is a little "loose", this is normal so don't worry if the GPU wobbles a bit Plug the mini HDMI cable into the PE4H board and the mPCIe adapter Plug the 6-pin PCI power cable from the PSU into the GPU Plug the 24-pin ATX power cable fro mthe PSU into the SWEX board Plug the 4-pin floppy connector into the port on the PE4H/PE4L board. If you do not have a 4-pin floppy adapter, then use the molex-to-floppy adapter cable that is provided with the PE4H kit. Connect your eGPU to an external monitor Switch on the PSU, leave it in the ON position Switch on the SWEX, you should see green LEDs appear on the PE4H board indicating that it is on. The GPU's fan(s) and PSU fan should also turn on Checking that Windows sees the eGPU Boot up Windows Open up Device Manager Expand the "Display adapters" branch You should see your eGPU, with a yellow exclamation mark beside it Open the eGPU's properties, you should see the Device status = Error 12. At this stage, this is a good sign, it means that Windows detects your eGPU assembly If Windows tries to install drivers automatically for your eGPU, let it, don't interupt it. We will replace this driver later on anyways 3. Running Setup 1.x Booting up Setup 1.x Turn on your laptop Select Setup 1.x from the Windows Boot manager menu Select Option 2, Start Setup 1.x in menu mode Running PCI compaction and disabling dGPU. Creating startup.bat script as we go along. If any of these steps fail at any time, see the section "Troubleshooting My Setup 1.x startup.bat". Failure can include the system locking up after performing an action such as PCI compaction or disabling dGPU. Select "Video Card > Hybrid GFX > dGPU [off]" to disable dGPU. Hit F3 to add to startup.bat script. If you have PE4H+PM3N, then select "PCIe Port > Link Speed > G1". F3 to add to startup.bat Select "Video Card > Initialize". F3 to add to startup.bat Select "PCI compaction > method 32-bit / 32-bitA" so that the "pci_alloc_valid=yes". F3 to add to startup.bat Select "Chainloader > win7". F3 to add to startup.bat Select "startup.bat > !Speedup". F3 to add to startup.bat Select "Run startup.bat". This will run all the commands you have added to your startup.bat script. It should run successfully, and prompt you to hit "[Enter]" when it's done. Select "Chainload win7" to chainload to Windows 7 and automatically reboot When at the Windows boot manager, select Windows 7. The previous startup.bat script you just ran has been chainloaded to the Windows startup event. So your dGPU should be disabled, and your eGPU ready to go 4. Getting the eGPU working in Windows The first thing you should notice is that your Windows will still show the boot sequence on your internal laptop screen. However, once you reach the login screen the eGPU should automatically kick in and display to your external monitor. If it doesn't do this automatically, don't fret, it might just be Windows deciding to leave your internal laptop LCD as the primary display device. Run setup 1.x and automatically run startup.bat, chainload to Windows Log into Windows Check Device Manager; your eGPU should now show up without the Error 12. If you see Error 12 still, see the section "Troubleshooting My Setup 1.x startup.bat". If not already outputing to external monitor, right-click on your desktop and open Screen Resolution. Set your external display as your primary screen. Download Nvidia drivers for your eGPU, install the new drivers Reboot, run startup.bat and chainload again And that's it. You should now have a working eGPU. It's not too difficult, but it's time consuming. The payoff is huge, however, as we can now use the desktop Nvidia driver on the mobile GT 540M as well. So if you need to pack up your laptop and travel, you still have full use of the dGPU! You'll likely have a lot of wires hanging about. It would be wise to collect these stray cables and try to keep them organised with cable ties or using some sort of box. I've found that a shoe box holds the PSU and GPU very well, and helps keep the cables out of the way.1 point
-
lots of modifications took place as to manage the fitting of the PowerColor HD 7750 1GB GDDR5 into the advanced dock, and to deal with the overheating issues due to the small space, but I consider the project done since last night as temperatures topped out at ~87 deg C in a 22 deg C room at full continues load, i.e. me playing Blacklight Retribution at 1024x768 with all on high except textures that were on medium. The game (free on steam) is playable but still slows down here and there. overall very happy with the result, considering the limitations of physical space, power consumption, BIOS issues, and the x1 PCIe link. here's my first run, with temp monitoring software running on the laptop screen using its own nVidia GPU: NVIDIA Quadro NVS video card benchmark result - Intel Core 2 Duo Processor T9500,LENOVO 8891CTO score: 11179 3DMarks gpu-z screenshot: http://oi50.tinypic.com/e6t9at.jpg ... kinda fun to see the only one system (mine) that tops the chart right there being twice as fast as the second place systems, lol.1 point
-
well, the alienware firmware posted at the first topic did not open with FITC for some reason. also they only way to get a non corrupt ME image flash, was to get the ME part of my whole chip image with FITC, when you open something in FITC, it created a subfolder with all parts splited like descriptor, bios, and other stuff. then I picked it and hex edited it to remove emty bytes from the header so it match like other images, then I edited the image with FITC and repeated the same hex process before flash it with fptw64 and it worked. I noticed also for some reason I can mod only once the image with FITC, if I mod it more than once the image is corrupt and I have to start again from a fresh unmodded image. offtopic: how I can set a custom avatar? on the forum control panel I can see only two options, no avatar or selecting one from the predefined ones. also , do posts require admin validation? I noticed it didnt posted directly when posted my first post1 point
-
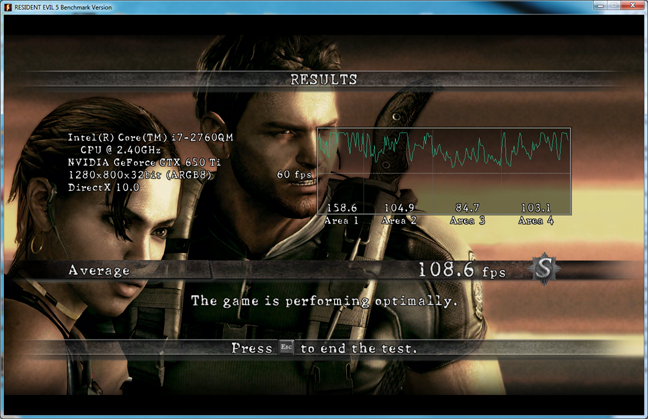
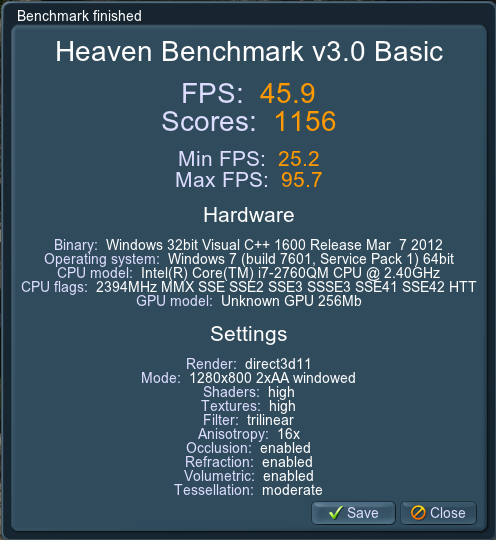
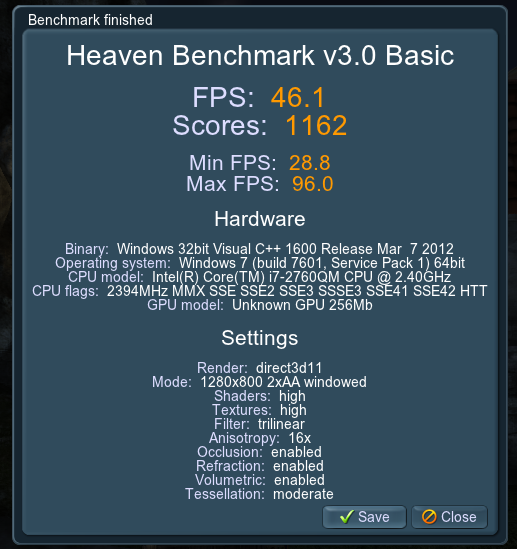
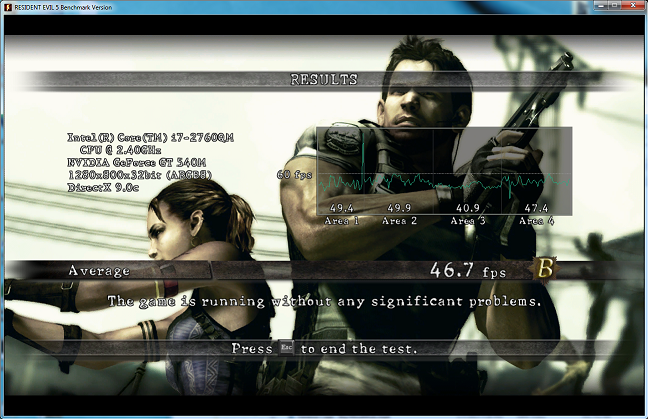
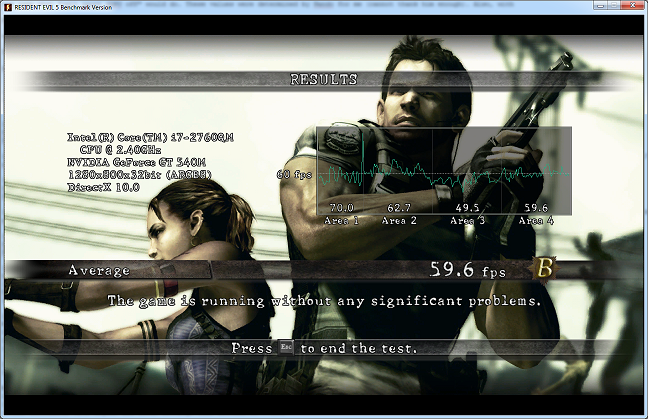
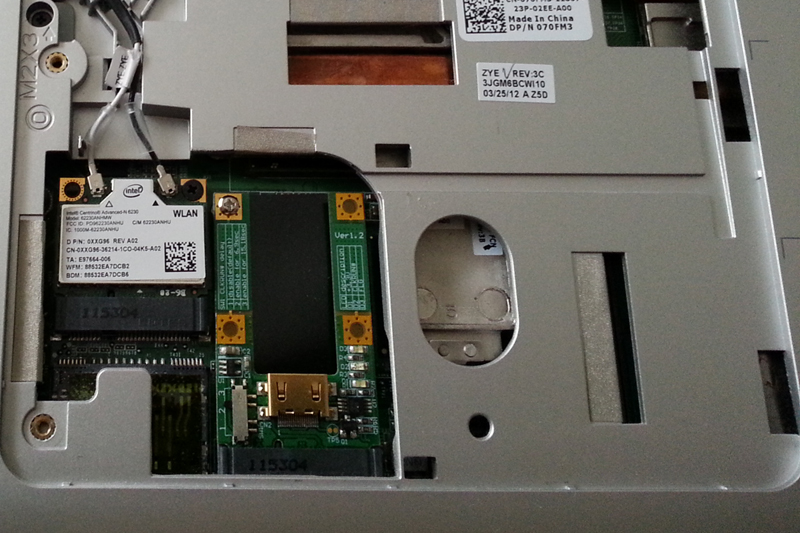
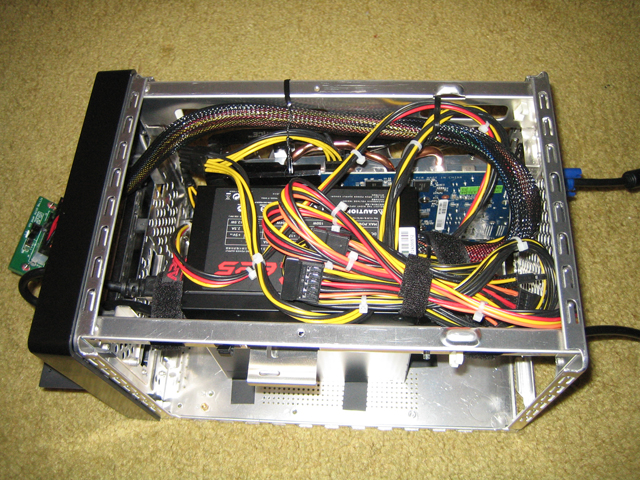
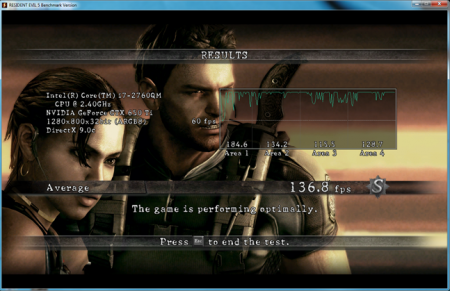
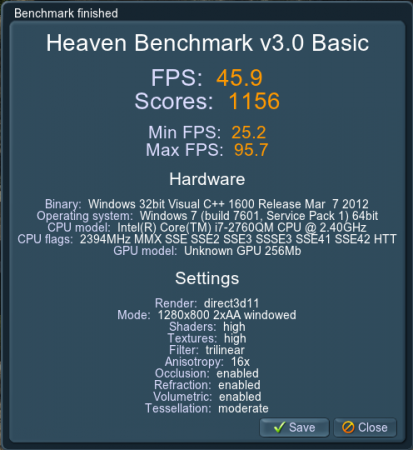
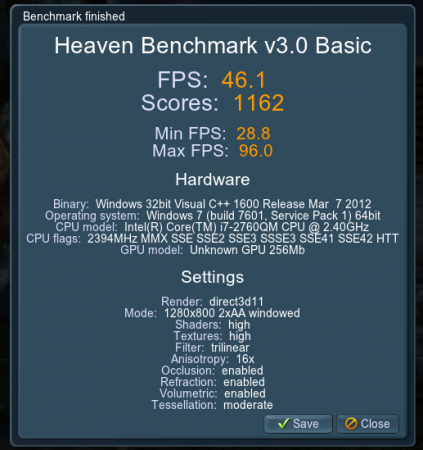
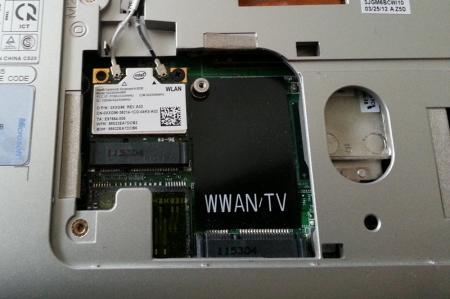
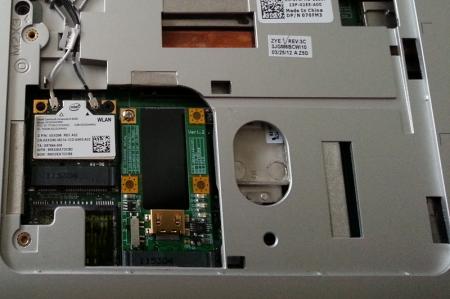
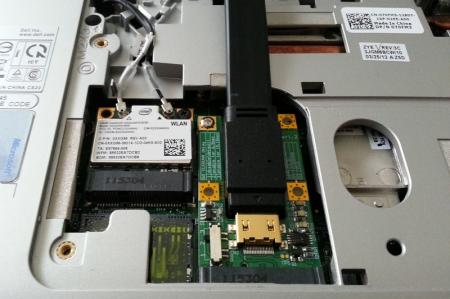
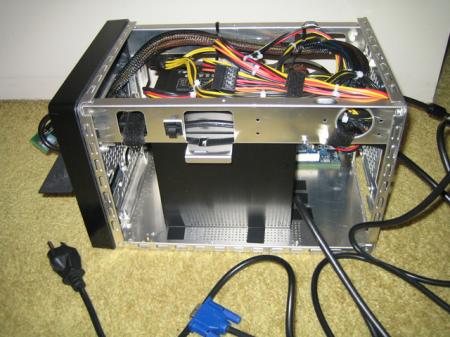
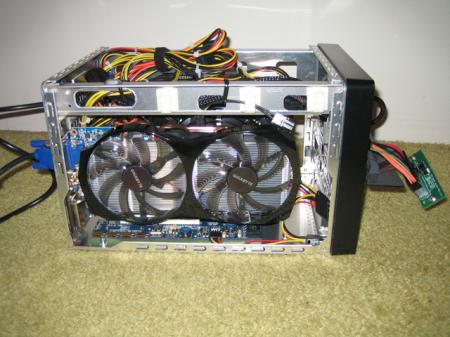
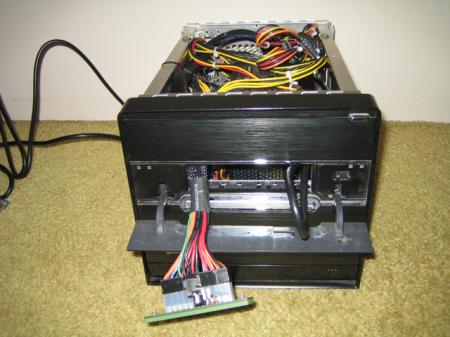
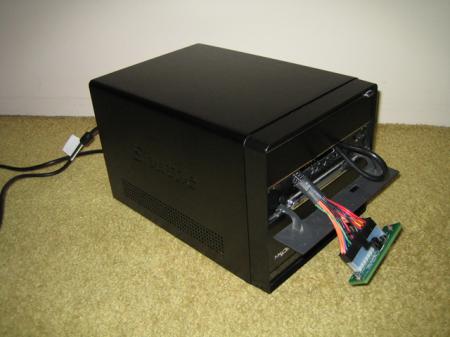
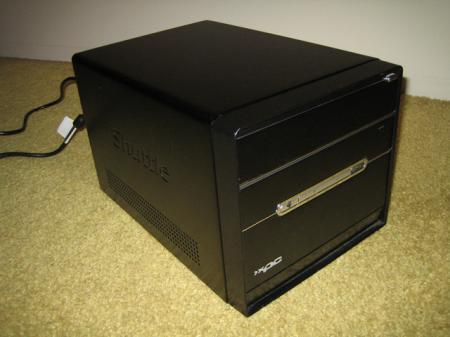
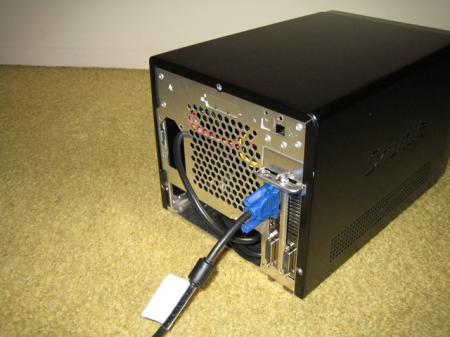
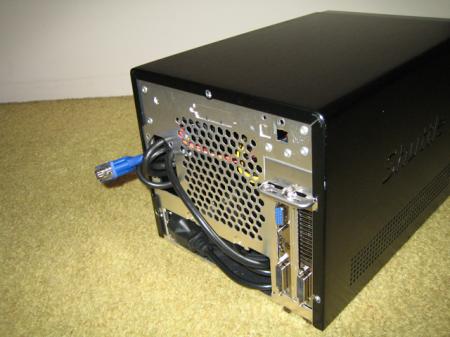
In this post: Troubleshooting my Setup 1.x problems Benchmarks Pictures Troubleshooting My Setup 1.x startup.bat I had a *lot* of trouble with Setup 1.x. The first problem to arise was the "dGPU[off]" command stopped working. While the script would run, it would immediately freeze when Setup 1.x attempted to return to the main menu. This happened consistently. In order to resolve this, Nando helped me cherry pick certain troubleshooting steps. Normally a startup.bat script would look something similar to call iport dGPU off call iport g1 1 call vidwait 60 10de:11c6 call vidinit -d 10de:11c6 call pci call chainload mbr However, as disabling my dGPU was causing trouble, we needed to work around it. So with Nando's help, here is my new startup.bat: Note that "call iport dGPU off" has been replaced by the "setpci -s ..." and "call iportbus force". These two lines effectively do the same what "call iport dGPU off" would do. These values were determined by Nando for me (cannot thank him enough). Also, with Nando's assistance, I used another version of Setup 1.x to help troubleshooting my problems. I am still uncertain if the different versions of Setup 1.x have helped my situation, but both versions I've used seem to work now. There were some other changes made to my DIYEGPUIMG:\core\pci.bat script as well, to test and try alternatives to the "call iport dGPU off" problem, but the updated startup.bat is essentially what fixed my issue. Benchmarks (Below are all results running on 1.1Opt) GPU-Z 3DMark06 3DMark06 DX9 (Highest of 5): 19935 (click link for 3DMark06 score) 3DMark06 DX9 (Lowest of 5): 19600 (click link for 3DMark06 score) versus 3DMark06 DX9 on the dGPU Nvidia GT 540M: 8430 (avg of 1st run and 2nd run). 3DMark11 3DMark11 DX9 (Highest of 3): P4204 (click link for 3DMark11 score) 3DMark11 DX9 (Lowest of 3): P4175 (click link for 3DMark11 score) versus 3DMark11 DX9 on the dGPU Nvidia GT 540M: P1149 (avg of 1st run and 2nd run) 3DMark Vantage 3DMark Vantage DX10 (Highest of 3): P13925 (click link for 3DMark Vantage score) 3DMark Vantage DX10 (Lowest of 3): P13895 (click link for 3DMark Vantage score) Unigine Heaven Unigine Heaven DX11 (Highest of 3): 1162 Unigine Heaven DX11 (Lowest of 3): 1156 Resident Evil 5 Benchmark Resident Evil 5 DX 9.0, Variable (1280x800, Shadow = High, Texture = High, Overall quality = High, AA x2, Motion blur On): 136.8 (other benchmarks with higher and lower settings fell between 90 - 150) versus only 46.7 on the dGPU Nvidia GT 540M: Resident Evil 5 DX 10, Variable (1280x800, Shadow = High, Texture = High, Overall quality = High, AA x2, Motion blur On): 108.6 (other benchmarks with higher and lower settings fell between 80 - 110) versus only 59.6 on the dGPU Nvidia GT 540M: Pictures PM3N mini PCI-e card installed, and with mHDMI cable eGPU enclosure - Shuttle XPC case - used VGA cable for demonstration purposes only Internal PSU side view: Notice the empty space around the PSU. Lots of room for arranging cables, etc (but I'm too lazy to get into that) Internal GPU side view: just the GPU and the 4-pin floppy connector powering the PE4H board. Note the placement of the mHDMI power in the far bottom left corner: this poses a problem with the XPC's enclosure sleeve. I will have to cut out part of the sleeve to make a hole large enough to safely allow the mHDMI cable to be plugged in at all times. Assuming I get a PE4L, this hole should accommodate the board as well Internal top view: bit of a mess, but it's mostly just extra cable sitting on top of the PSU. The PSU power cable has been fed through a couple of cable cable cinches along the inside of the top frame (closest to camera, out of view) Front view: the SWEX board, and a bit of the power cable poking out (to reduce stress on the PSU's input port) Front panel: that's the slot where the 3.5-inch floppy drive would normally go. It's perfectly sized to allow easy movement of the SWEX board and PSU 24-pin cable, and just large enough that I can tuck in/pull out the SWEX board for quick packing. For storage, I can unplug the power cable, and place it as well as the SWEX board inside the case. Makes it extremely easy to pack up and move around, or just pack away altogether Rear view. Note that I can very easily tuck away the power cable into the larger horizontal hole at the bottom. Makes it extremely easy to pack up. (Power cable exits the enclosure through the 1.5x3 inch hole on the left of the back panel) When cinched up, the video cable (DVI or VGA, but not both) can be tucked away into the enclosure, through the hole that the power cable comes out of. Plenty of room inside, beside the PSU.


 1 point
 -
Sorry if i'm late, my best performance in RE5-var-dx9-1280x800 benchmark is 76.5. My config il dell studio 1340 Core due duo P9600 8 gb Ram and egpu sapphire hd 7770.1 point
-
@MSI users: I just added fixed versions for the MSI vbios mods to the second post. The overvolts should now work properly, and the normal 'OCedition' (the not overvolted one) now runs at 0.987v instead of 1.012v. This will result in a cooler running card without loosing any stability. Default clock is still at MSI setting, 771MHz. Forget about the turbo button on your systems, those vbios run at 771MHz when not overclocked. It's uefi compatible, and the whole vbios is completely revised.1 point
-
Bios level. Basically as Bios on shipped windows 8 is EFI you can't upgrade a shipped windows 7 laptop with a windows 8 bios except playing with the files. One guy tried and bricked is laptop. Not sure if you can upgrade a shipped windows 8 laptop with a win 7 bios but I will not even try. Maybe you dont brick the laptop in such case but I am not sure to whatwill happen to your windows key and activation. According to MSI both BIOS are the same except the Windows 8 protection system. - - - Updated - - - IS that heat or throttling ? you can also try the Beta EC that you can findon MSI forums. Not sure if it helps for throttling but seems to ease for GC OC.1 point
-
Modded Nvidia nvdm.inf for alienware M17XR3 GTX 680M/660M + M17XR2 GTX 680M Dell/Clevo NVIDIA DRIVERS 310.90WHQL Windows 8 - Disable driver signing. 1) Open command prompt (Admin). 2) Type "bcdedit /set {current} testsigning yes" (without quotes) enter. 3) exit> reboot. 4) Install>reboot 5) Repeat/replace with "bcdedit /set {current} testsigning no" reboot. Clean install guide How to: Remove your Nvidia GPU Drivers. upgrade default. nvdm M17XR3 GTX680M v310.90.zip nvdm M17XR3 GTX660M v310.90.zip nvdm - M17XR2 GTX680M v310.90.zip1 point