Leaderboard


Popular Content
Showing content with the highest reputation on 07/21/11 in all areas
-
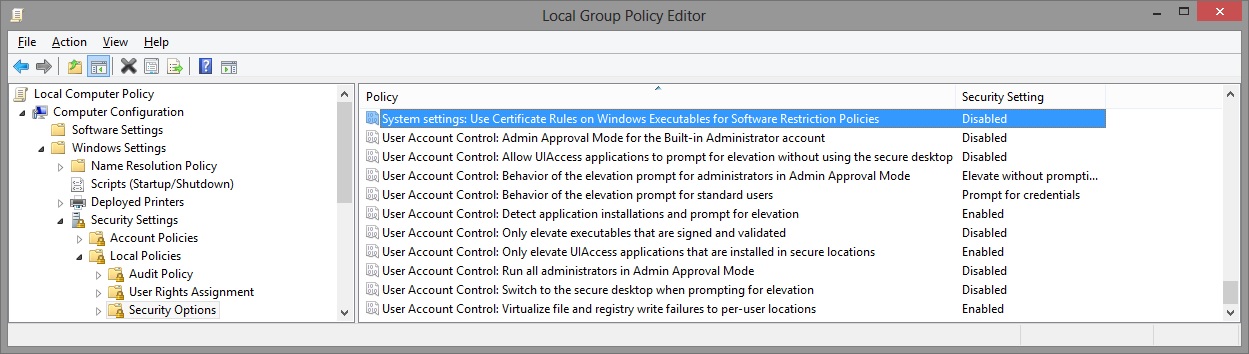
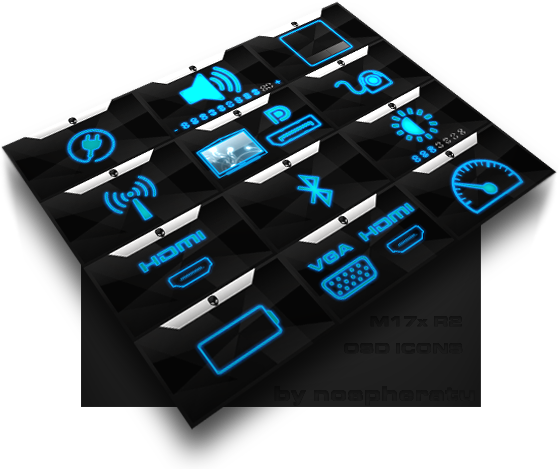
I've recreated the OSD Icons for the R1/R2/R3/R4 and R5 aka 17 as the standard ones are a bit dated. It should also work with the M15x though as my old M15x had the same setup for the OSD app. Regarding the R3 OSD, it seems its the same install for the M18x as well so it should work for you M18x owners too. I've also added the AW 17 OSD to the list. This exe is also compatible with the 14 and 18 as Dell uses the same OSD for all the new machines. There's also a set for you Area-51 m17 R1 owners. I've tried to give it a simular feel to the Invader Icon pack by Alienware. Hope you guys like it Install Instructions for R1 1. You need to end the OSD process in Task Manager since it may be using some of these icon files. Ctrl+Shift+Esc then find the OSD process and end it. 2. Backup your current icons if you want to revert to the originals (You can also uninstall and re-install the OSD application if you want to go back to the original icons) 3. Extract the attached "M17X R1-R2 & M15X.zip" contents to C:\Program Files (x86)\OSD\picture\. Overwrite if prompted. 4. Restart the OSD application. It is located in C:\Program Files (x86)\OSD\Launch.exe 5. Done! Install Instructions for R2 /M15x 1. You need to end the OSD.exe process in Task Manager since it may be using some of these icon files. Ctrl+Shift+Esc then find "OSD.exe" and end the process. 2. Backup your current icons if you want to revert to the originals (You can also uninstall and re-install the OSD application if you want to go back to the original icons) 3. Extract the attached "M17X R1-R2 & M15X.zip" contents to C:\Program Files (x86)\OSD\ICONs\. Overwrite if prompted. 4. Restart the OSD application. It is located in C:\Program Files (x86)\OSD\Launch_OSD.exe 5. Done! Install instructions for R3 / R4 / M18x 1. You need to end the OSD process in Task Manager since it may be using some of these icon files. Ctrl+Shift+Esc then find the AlienwareOn-ScreenDisplay.exe process and end it. 2. Backup the existing AlienwareOn-ScreenDisplay.exe by renaming it to "AlienwareOn-ScreenDisplay.exe.BAK" for example. Its in C:\Program Files (x86)\Alienware On-Screen Display\ 3. Extract the AlienwareOn-ScreenDisplay.exe from the appropriately named file depending on your OS and model to the C:\Program Files (x86)\Alienware On-Screen Display\ folder. 4. Restart the OSD application by double-clicking the file. 5. Done! Install instructions for 14 / 17 / 18 ** 1. You need to end the OSD process in Task Manager since it may be using some of these icon files. Ctrl+Shift+Esc then find the AlienwareOn-ScreenDisplay.exe process and end it. 2. Backup the existing AlienwareOn-ScreenDisplay.exe by renaming it to "AlienwareOn-ScreenDisplay.exe.BAK" for example. Its in C:\Program Files (x86)\Alienware On-Screen Display\ 3. Extract the AlienwareOn-ScreenDisplay.exe from the "AW 14-17-18 (Windows 8).zip" file to the C:\Program Files (x86)\Alienware On-Screen Display\ folder. 4. Restart the OSD application by double-clicking the file. 5. Done! The Area-51 m17-R1 install should be similar to the steps for the other laptop revisions above. They all basically follow the same process anyway, apart from filenames/paths. @robby_hd was kind enough to make a red version of these icons for the M17x R3 / M18x R1 which can be downloaded from his post here. **There seems to be a security issue with Windows 8/8.1 at this point in time since it doesn't allow modified exe's. I will update this post with a solution once it has been found. Also a few Alienware owners are having an issue with the unmodified OSD and Windows 8. Only the default Windows 8 OSD displays and not the Alienware version. Try the solution posted by Dell here and then attempt installing the mod. The below screenprint is a workaround by editing the security policies to allow the unsigned exe to run in Windows 8. If you are not aware of what these settings do and the repercussions of changing them, please do not attempt it. - Open the Group Policy Editor by typing "gpedit.msc" in the search or run text box. - Duplicate the settings below. Area-51 m17-R1.zip M17X R1-R2 & M15X.zip M17X R3-R4 & M18X R1-R2 (Windows 7).zip M17x R4 & M18X R2 (Windows 8).zip AW 14-17-18 (Windows 8).zip M17X R4 & M18X R2 (Windows 8.1).zip

 2 points
 -
Project 1 The back panel Some time ago some one over the NBR forum had an idea to improve the cooling on the alienware M17 by creating a custom back pannel. I decided to give it a try the goal is improve the size of the air intake and the airflow across the laptop so i though about it that way if i put someting directly over the fan and a hudge air intake just beside it should force the air to cycle inside the laptop. click on the pictures to get a bigger version so we start with this And this is the fan positionings (note that pic is not from my m17 i found it on the web and it was faster to use it then take a picture of mine after i was done with the mod and wanned to game) so the idea is to build something like that (ya ugly i know my picture manipulation skills are VERRY lacking) Material used this mesh use a cuting tool in my case a dremel 4000 with a flex shaft and the metal cutting wheel cut the shape in the mesh after that cut the shape of the air intake in the back pannel (that's water on my back paneli had to clean it cause cutting through a sort of plastic/rubber makes an anoying powder that stick and "burn" your finger) once done assemble both part and ajust the mesh to be sure it fit with mounting holes and other stuf then glue all part together and enjoy. i also covered the original grills that where just over the fans Project 2 a preview of what is comming The pcb you see has been custom designed by me for that project my projects are posted faster over there Granyte and cie but i'll end up posting them here anyway i have quite some modifications plans for that laptop so what do you guys think?2 points
-
Hehehe, it "accidentaly" drew 330W power and ignited spontaneously2 points
-
arrived today
 2 points
 -
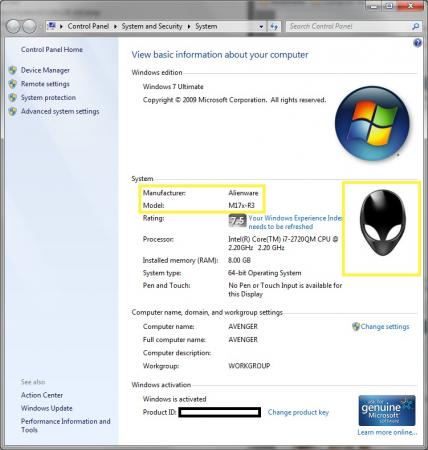
I've owned a lot of high end gaming notebooks since the Dell Inspiron XPS Gen 2. I haven't owned a mainstream or a multimedia powerhouse notebook since then; strictly gaming notebooks. My first notebook mod was making a hybrid between an Inspiron XPS Gen 2 and the newer XPS M1710 (Gen 2 Lid, M1710 base and motherboard). That experience got me hooked on modding the other notebooks I got my hands on; from green palm-rested M9750s running Radeon 3870s in Crossfire to a OCZ Whitebook that was actually white and carried a TV tuner. Now comes the M17x-R2. In terms of functionality, specs and everything in respect to its time of introduction, this is the best gaming notebook I have ever owned. Attractive design, modular components (MXM, Mini PCI-e), amazing screen; it's hard to find a notebook that can beat the M17x in terms of the overall package today (and I think the M18x has the best shot of doing that). So now comes that time again to fully mod this machine before I send it off and upgrade to another gaming notebook in the late future. This time, I'm going all out: from changing the GPUs to reanodizing the frame (yes, reanodize it) and I've already gotten started, despite it being exam week for me. Now since most of you guys are notebook enthusiasts like me I'd like to hear your input of what I should add/upgrade to this machine. Here's a check list of what I've done so far: Keyboard/Key Replacement (darker, but more luminescent keys) Unlocked A10 BIOS V1 IR Remote And here is what I plan to do: 1) WiFi/Mini-PCI E replacement: getting rid of the Ultimate N-6300 to possibly the following: - Intel Advanced N 6230 (since it has bluetooth, it opens up the other Mini-PCI E slot for something like a TV tuner or a WiHD module) - Atheros WiFi/Bluetooth combo (similar to the 6230) - BigFoot Killer N 1103 (and deal with the loss of bluetooth and upgrade the second slot to TV tuner, WiHD module, or something else) 2) GPU Replacement: I already tested a 6970M in the system and there are still things to be worked out. Thanks' to Mumak's progressions, the 6970M in a R2 seems to be more practical. Though I got rid of my 1120 shader card, I bought an even better setup. Probably not as exciting and most can guess what it's going to be... 3) Optical Drive replacement: This system came with a boring 8x DVD burner. Time to upgrade to a Blu-ray burner. There's the 4x BD-R Panasonic UJ235A that's on ebay, or I can wait for the slot-load version of the UJ240 with 6x BD-R. I'm still looking for a Sony/NEC slot-load BD-R as I've had a better experience with that brand for optical drives 4) Body work: I thought about powdercoating or just spray painting, but something about anodized coating stands out more. So, I decided I'm going to go with that. I've already bought a spare lid and a spare bottom base that I've already stripped down so that it's just the aluminum pieces. I'll have to remove the current anodized coat using Lye and send it off to the nearest plating firm to coat it. That, or I can do it myself... I haven't decided on the color yet, but I'm leaning towards a dark sapphire blue. 5) Power: Thought about getting an extended life version of the M17x battery, still looking into that. All depends on how much of an improvement in average life and average decay they provide. Also, depending if the new 330w PSU that comes with the M18x works in older systems, that's another option. Nothing too fancy or ambitious. 6) Heatsink modification: This is probably the most ambitious of all my goals, but I know a few shops that could help me out with this. Basically my goal is to completely redesign the GPU heatsinks to make it more focused on dissipating heat through the vents. This includes adding three copper pipes for each GPU heatsink (the third to soak up the heat from the memory banks, which the current heatsink doesn't have. And if I can't make my own, I'll see what I can do to improve on the current one. So that's what I'm looking at now. What do you guys think? any suggestion of what to do/what not to do? This project should easily replace the amount of gaming I do and also reduce my daily caffeine intake. EDIT: Also, I'll use this post to document any updates on this project if you guys are interested.1 point
-
Looks like I may have to RMA one of my cards. It's giving me BSOD, and anytime it hits the 3D Clocks now it auto shuts down the computer as if I yanked the power cord. Tested it in both slots. X-Fire it results in a BSOD since it's the slave card, when put in the master slot it auto shuts down. It has been running sketchy for a few days. To make matters worse, when I stored the 5870s, it looks like one card had gotten some sort of condensation on the corner which ate some solder. Now it beeps and gives me the GPU signal on the scroll/caps flashing at boot. *sign* looks like I'm going single carded for a while. At least I was able to squeeze the last bench run out of it, and was able to keep the CPU score a little higher. Had I used some Dice I think I could have hit the 24K overall mark. At least I was able to squeeze this out between issues. I prepped the system and put a little dice on it, but only made it though one run. Maybe once I get the RMA (6970s), and replacements from dell (for the 5870s) I'll be up and running full speed. Things looked so promising. 3DMark Vantage: 23405 GPU: 24381 CPU: 20896 http://img231.imageshack.us/img231/9273/23405.jpg1 point
-
there are probably some more advanced and some less this guy channel is just great for astronomy video tdarnell's Channel - YouTube1 point
-
Heres what I've been able to do thus far with 6970 X-Fire. Havn't been able to even come close to the GPU capabilities due to the PSU limits. But well see what I can do when I get more time. 3DMark Vantage: P 22724 GPU: 24438 CPU: 18823 3DMark11: P 72341 point
-
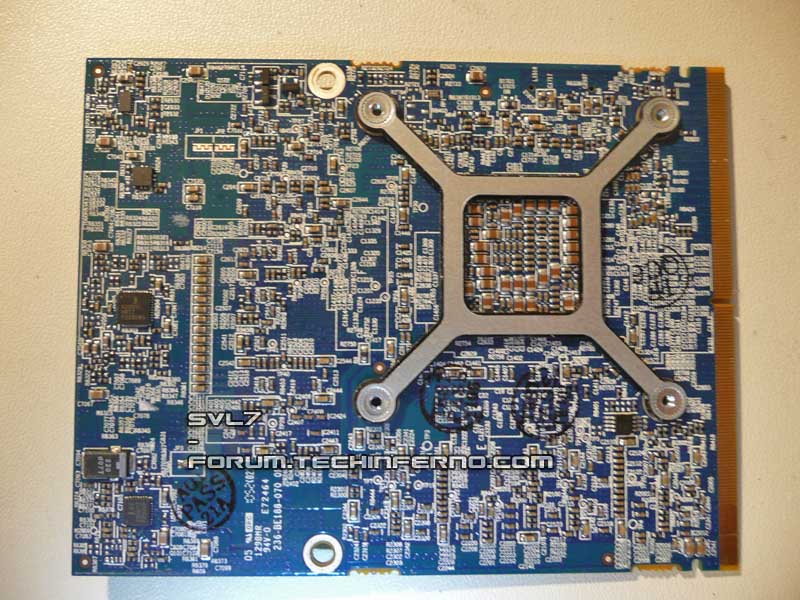
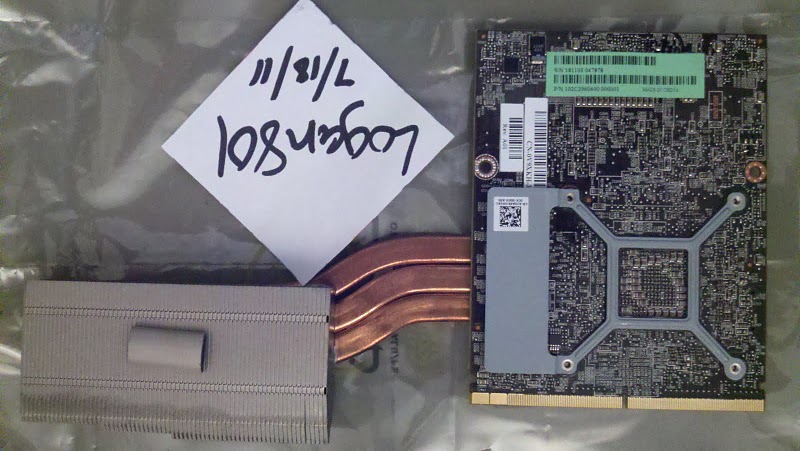
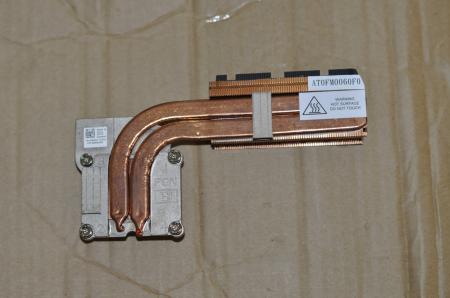
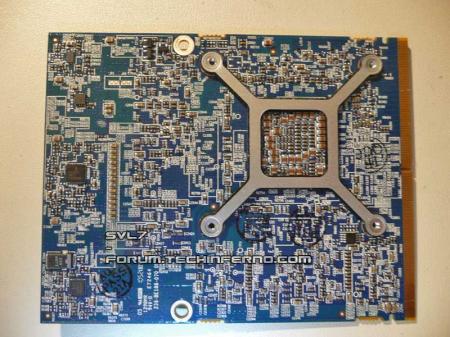
There must be something like a thermal pad on the backplate, otherwise it could possibly short something on the PCB, but to be honest the big metal piece on the backplate is absolutely unnecessary, it doesn't make any sense at all... At least I can't see why it should be needed, there's nothing to cool there, the only two parts that can get warm on the back are the two voltage regulators (for the core and memory voltage), but they aren't at covered by the metal piece of the backplate. If there's nothing on the rectangular piece of metal on the backplate, put some duct tape there to make sure it's not conductive. The only place where you need thermal pads is on the VRAM modules, the eight rectangular black things that are surrounding the die, but don't worry, the VRAM doesn't get as hot as most people think, the most important thing is that the die runs cool enough, the thermal pads probably shouldn't be thicker than 1mm, otherwise the gap between heatsink and die gets too big. When I had the 470m in my system I didn't cool (heatsink/thermal pads) the VRAM modules on the back of the card at all, and it worked fine. Here's a pic showing where the pads belong, it's not a 6970m, and it's not the heatsink you have in your machine (it's a disassembled M15x heatsink) but it'll be enough to illustrate where the pads belong. The pads should be on the part of the heatsink which is highlighted in green, the pink things are coils, it's not that important that they're covered with thermal pads, I don't have them covered. Blue are the VRAM modules. (Which should get covered by the thermal pads on the heatsink). Let me know if something's unclear or if I missed a question.
 1 point
 -
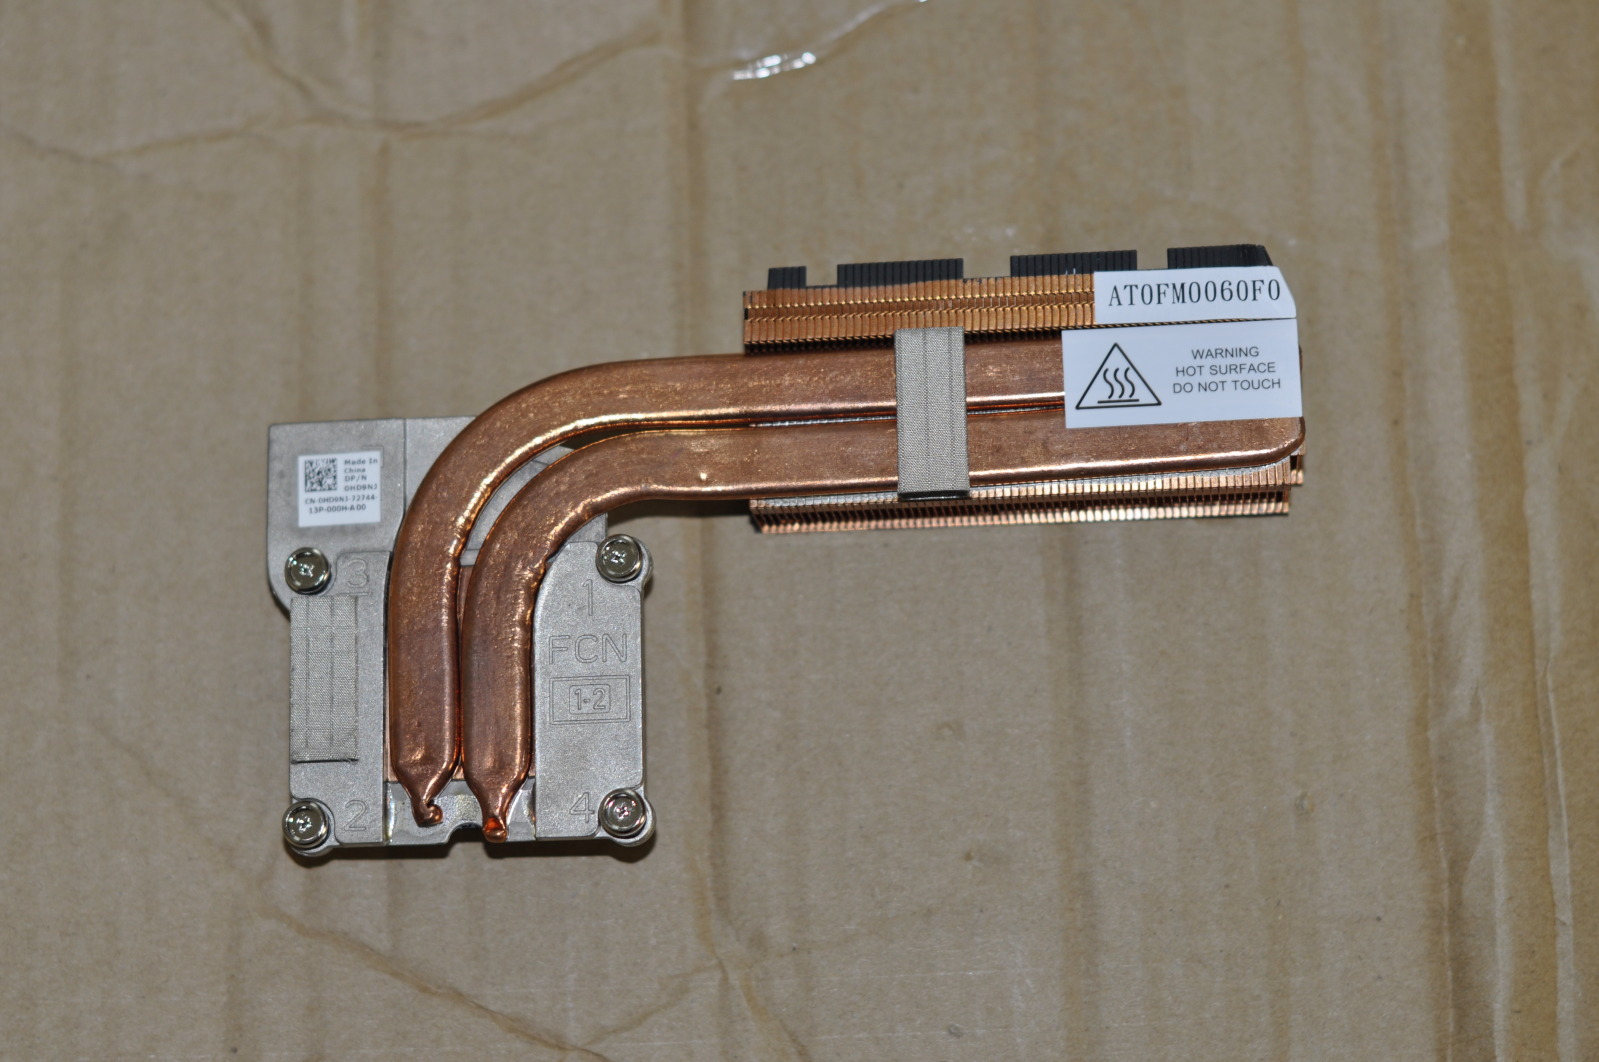
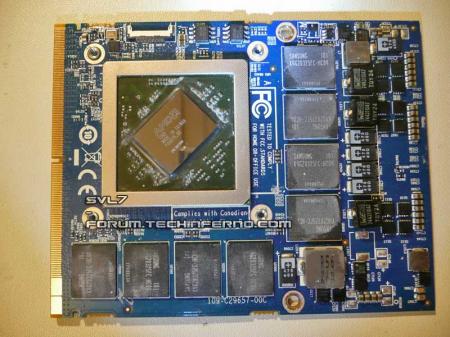
This is a Sapphire/PCPartner 6970m, but the layout of the components is the same on the Dell cards. Here's a Dell 6970m with a M17x r3 heatsink attached (pics by logan801):
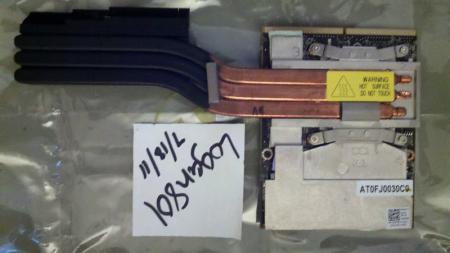
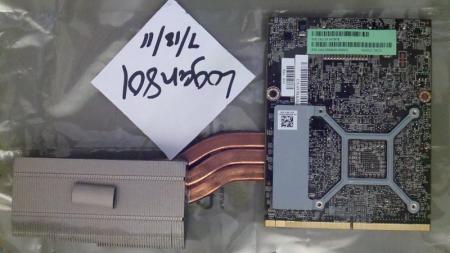 1 point
 -
LOL I guess they supposed that you have lots of banks to rob1 point
-
Some guys having fun with a rope and a crane at the lake of Zurich, not my video, but this is still on my to-do-list for this summer.1 point
-
I got this from Darth Vader on Google+ before they deleted his account. The title is "Death Star over San Fracisco" (lol)1 point
-
How to deactivate your cat http://www.youtube.com/watch?v=223zNMaM1bk1 point
-
It's real easy to do. 1. Open regedit (Click Start, type regedit.exe and press ENTER) 2. Navigate to HKEY_LOCAL_MACHINE\SOFTWARE\Microsoft\Windows\CurrentVersion\OEMInformation 3. Create the following three String Value entries Logo - Place a path to a 120x120 BMP image of your choice Manufacturer - Alienware Model - Your model here 4. Exit registry editor I suggest we rename this thread to Alienware Windows Customizations - Restore Alienware's Look & Feel and sticky it. Lots of good info here for those who reformat and want to keep the branded AW windows look.
 1 point