Search the Community
Showing results for tags 'macbookpro'.
-
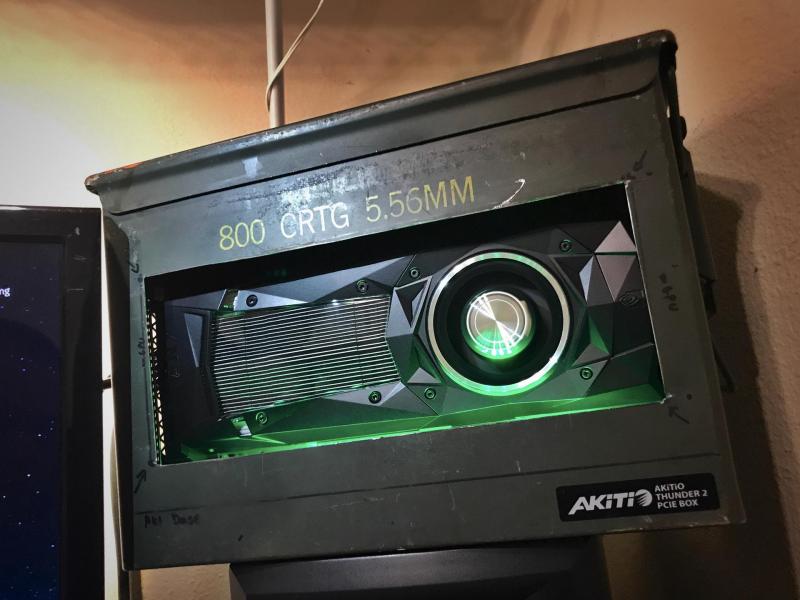
This isn't even my final form! "DotPusher III" Hardware: Mid-2014 MacBook Pro (15-inch) Core i7-4980HQ (2.8 GHz) NVIDIA GT 750m NVIDIA TITAN Xp 12GB (GP102-450) (previously 980, 980 Ti) Also tested with: EVGA GTX 1080 SC (see bottom of post) Akitio Thunder2 Corsair 550w ATX PSU "Fat .50" Ammo Can (800 rd 5.56mm) Software: Windows 10 Latest macOS version automate-eGPU.sh rEFInd Boot Manager apple_set_os EFI application Tools: Screwdrivers Channel-lock Pliers (or vise grips) Jigsaw / Dremel / Angle Grinder / Metal File / Sandpaper The Build Honestly, the build was surprisingly simple! Popped open the Akitio, used channel-lock pliers to pry the front side of the Akitio open to allow for the length of the GPU. Added gaff tape over all of the metal parts, just in case the card came into contact with the bare metal of the bent Akitio enclosure. Got the card handy, a gorgeous little reference model GeForce GTX 980. On a side note, I actually had an MSI GTX 980 GAMING 4G but ended up trading it for this reference unit, as it was one of the ugliest pieces of hardware I've ever seen, and the reference models are just beautiful. (Form over function, but isn't that the Apple way? :P) The card slotted right in, no problems here. Next up was the power supply. I used a Corsair 550w unit, but cut everything besides the two PCIe power connectors and the CPU 12v rail (to power the Akitio). Terminated all the ends with shrink wrap and gaff tape on top of that, and taped all the unused lines down to the side of the PSU. It was also during this step where I hotwired the PSU to always be "on" via the paperclip trick...except I just traced those wires back to where I was going to make my cut, and soldered them together. For the Akitio's power, I used the molex-to-barrel-adapter guide, but instead of being patient and getting a proper barrel connector with two leads, I cut the barrel connector off of the Akitio's power supply that came in the box. I like to live life in the moment, I guess...but the fruits of my labor were revealed when I stripped the wire and it turned out to be coaxial instead of side-by-side! No matter, I said to myself, as I twisted the outer fibers into a solderable piece of wire, and stripped the inner wire as well. Verified polarity via a multimeter, and soldered the Akitio barrel connector to the CPU12v line from the PSU. A bit of shrink-wrap and gaff tape later, and I had a nice little feed for the Akitio coming off of the PSU. No powered riser bs, no extra Akitio power supply. Clean and simple. PCIe plugs went straight into the GPU, I gave em a little bend so they'd hug the edge of the magazine holder. I also re-routed the front LED from the Akitio's box around the back of the PCB to where the Akitio power plug is, so that that area of the magazine holder lights up blue when the card is active. At this point, I took the magazine holder and made cutouts for the GPU ports, ventilation, and PSU ventilation. Covered the rough edges with gaff tape so they wouldn't fray and get sucked into a fan (plus it looks a bit less janky). The Akitio with GPU slid perfectly into one side of the magazine holder (make your measurements first before going shopping!), but was sitting too low for my cutout to be centered on the GPU's cooler...nothing a little packing foam (from the Akitio box!) couldn't fix. The PSU slid in with...some effort. From my measurements, I knew the PSU wasn't necessarily going to fit, but it was close enough that with a bunch of gaff tape to keep the bottom and sides secure, it doesn't move anywhere and there are no signs of any danger of it falling out after a good 2 weeks with the setup. I just try to keep this side hidden, it's pretty garish. EDIT 070416 (MURICA DAY) Added green underlighting because #AMDsux #teamNVIDIA (lol). Here she is at work (literally, at my work), powering 2x 120 Hz displays & a bunch of OpenCL compute. The Experience It was time to start her up. Plugged in PSU, switched it on, plugged my 4K 60Hz monitor into the eGPU, plugged the TB cable into the Mac and hit the power button. Fired right up, booted into Windows and re-installed the NVIDIA drivers. After a reboot, the card was recognized, and I was playing Doom (2016) at ultra quality 1440p inside of 10 minutes. Not too shabby! I spent some time in MSI Afterburner, customizing a fan curve to keep it pretty quiet during moderately high gaming workloads, but ramp the fans up quickly if the temperature went north of 70º C. Boy, this thing is loud when the fans are at full tilt, but I'm glad they; the reference cooler is no slouch, and with fans cranked to max it's actually able to pull down the temperature from 80 down to 70 while furmarking! With a bit of tinkering, I settled on a final, furmark-for-8-hours-stable overclock of +225 MHz core, and 7400 MHz on the memory. Using ThrottleStop, I also undervolted the i7 in the laptop, and downclocked it to ~2.4 GHz. Windows runs a bit hotter than OS X, figured I'd help out as much as I could. I gotta say, it feels good to put down an 80th-percentile score in 3Dmark Fire Strike with a MacBook Pro. On the OS X side of things, automate-eGPU.sh took care of everything without a hitch. I did notice some weird stuttering every second (and exactly on every second), but with some tinkering I found out that the "Displays have separate spaces" option was the cause of the issue. Disabling it made OS X run perfectly smoothly afterwards. Final Cut Pro X immediately took advantage of the new GPU, and I was able to play back Sony FS5/A7s 4K footage with a few layers of colorgrading on it much smoother than with the 750m. It can almost handle playing it back at full-res, which was just astonishing to me. Analyzation of footage for stabilization just rips, along with optical flow retiming. Adobe CC was able to take advantage of the card as well, Mercury Playback Engine (CUDA) felt much smoother than on the 750m, though I haven't been using Premiere in a while so I didn't do much testing in CC. Unfortunately, After Effects is not really accelerated by the card, but oh well. To get Optimus to work with a 750m-equipped MacBook Pro, I turned to this reddit thread detailing the installation of rEFInd and using an EFI utility called apple_set_os to get the Mac to expose the Iris Pro when booted into Windows. I also customized the rEFInd interface because the default skin looked like something out of Mac OS 7.5.3 (I half expected little puzzle piece extension icons to start loading across the bottom). The reasoning for using apple_set_os instead of the built-in spoofing feature in rEFInd is because I'd like to normally run Windows without the iGPU enabled, but retain the ability to switch into "Optimus mode" when I'm mobile. My full boot/setup process for mobile gaming via Optimus, coming from normal eGPU usage with external monitor is as follows: Leave eGPU unplugged Boot into Windows Disable the 750m in Device Manager (I usually leave it enabled when booting Windows normally) Run the switch-GPU script to set the iGPU as primary Shut down Windows Plug in eGPU and start the computer Select apple_set_os (I've renamed this to "iGPU Enabler", the far right icon in rEFInd) Boot Windows If all goes well, I'm in Windows with the GTX 980 as the Optimus "high-performance NVIDIA processor". Game performance takes a bit of a hit, but not anything significant...I can still play most titles at 1080p ultra quality, and they look great on the MacBook Pro's retina IPS display. Lingering Issues Thankfully, all of the lingering issues I have only involve the boot process. Sometimes the entire system refuses to POST (sits at a black screen without ever chiming), and I have to hold the power button for a few seconds and try again. When it does POST though, the next hurdle is whether the driver (in OS X or Windows) will initialize properly. Sometimes it doesn't want to play nice, and I'll get a BSOD on booting Windows with DRIVER_IRQL_LESS_OR_NOT_EQUAL, but a restart or two will do the trick. FIX FOR BSOD ON BOOT: I figured it out, a trip to Device Manager and I noticed there was a "show hidden items" menu option. Clicking that revealed that I had two GTX 980 devices that weren't connected for some reason, and the driver was fighting itself upon initialization during boot. Rebooted into Safe Mode and ran DDU to clean out the NVIDIA driver, reinstalled it in normal mode with the eGPU connected, and all is well. One GT 750m, and one GTX 980 in Device Manager when viewing hidden devices. If you're having driver issues like I did, you might want to check this. (NEW) FIX FOR macOS NOT BOOTING: Run Goalque's script in "-a mode". This alters something regarding the thunderbolt chipset on every shutdown, so when rebooting back into macOS, the eGPU will initialize properly every time. For OS X, I just get a black screen with my monitor showing no signal input. Again, a restart or two fixes this. (Honestly, I've had the NVIDIA Web Driver do this with the internal 750m, so it's just a normal driver-crashing-on-init issue, not specific to the eGPU.) But once the system is booted, it is rock solid, and I've never had anything crash or fail (besides overclock-induced crashing in Windows, but that's my own fault). It all seems to be based on luck of the draw, as I'll have some days where it'll work flawlessly and I'll be bouncing between the two OS's with no problem, other days I'll get 8 failed starts in a row. If anyone has any idea how to help mitigate these failed starts, I'm all ears. The only other issue I can think of is lack of display brightness control when running in Optimus mode (anyone got any clues?), but it just means I have to set the brightness from within OS X first before going through the boot process. Final Thoughts It was totally worth it. I'm in love with this setup, it truly feels like the best of both worlds. The i7-4980HQ in the MBP is no slouch of a CPU, the only thing my setup was missing was some graphics horsepower, and the GTX 980 more than comfortably steps up to the plate. My work experience has had amazing fluidity, and gaming has gone from sub-720p resolutions on the latest titles to gorgeous looking, maxed quality 1080p and higher. Less demanding titles (CSGO, Borderlands Pre-Sequel) even run at 4K 60fps, which is a sight to behold. The Oculus Rift that I got my hands on runs perfectly smooth, with no VR-sickness to speak of. And all this, in a "portable" setup. I now have 3 levels of portability (with associated levels of performance): full desktop mode, Optimus (so I don't have to lug a monitor around to LAN parties or remote editing / rendering of CGI), and of course the laptop by itself (which, with its Core i7, is still no slouch, at least when it comes to CPU compute power). It's also extended the longevity of my machine a lot, since I was looking at the 2015 and purported 2016 models for their GPU upgrades...but not anymore! The only thing I'm looking at is the moment NVIDIA releases Pascal drivers for OS X...and my poor wallet might have to take the brunt of a GTX 1080. The Future I'm still on the hunt for a better case, but all of the computer cases I've found are...well, computer cases, and far larger than this magazine file setup. So I'm looking at...different solutions. An old army surplus ammo box looks like my next case, and it has a handle at the top, which I can't live without after having this magazine file for a couple weeks. I'd love to pick up a modular SFX PSU so that the PSU actually fits into the magazine holder without any modification necessary, and if it's modular, it'll help keep the cables clean and tidy, with no drive and fan power cables to cut. Hope you guys enjoyed the adventure, and that some of the solutions to the little quirks I found help out someone! Happy eGPU-ing! --- EDIT 070416 (MURICA DAY) Just for kicks, slapped a buddy's GTX 1080 into the chassis to test with Windows. It required a driver reinstall as the system didn't detect the 1080, even after rebooting...it seems that the NVIDIA driver enumerates the cards in your system at install time and will only install the drivers it needs to, not all of them (different from the way OS X does it). The driver install worked fine without having to run DDU and cleanly install. YMMV though. The added compute power of the GTX 1080 was more than welcome to help mitigate the performance hit you take when using Optimus. Crysis 3 ran at the laptop's native resolution (2880x1800) at around 45-60fps with all settings cranked. Beautiful. I was really looking forward to testing out Rise of the Tomb Raider on it, but ironically there's a bug with Pascal cards and NVIDIA VXAO, so I couldn't get a fair comparison. Wish I could keep it, but the lack of Pascal drivers for OS X keeps me on the 980. For now. EDIT 071816 Acquired a "Fat .50" (actually an 800x 5.56mm) ammo box and made the primary cuts using a pneumatic angle grinder + cutoff wheel. Test fitted the Akitio and PSU. Currently need to drill the PSU & AKT mounting holes, but also trying to figure out what thread pitch the Akitio's mount holes are (anyone got a clue?). Specifically, the ones that the Akitio's own case's captive thumbscrews screw into. EDIT 072016 Finally finished the ammo can case after much measuring, cutting, and drilling. As the barrel plug was going to be flush against the side of the case, and I didn't want to have to loopback the cable like I did in the magazine file, I ended up soldering the CPU12v rail to the back of the Akitio's PCB. Pre-tinned the wires and plopped them onto the PCB, then secured it with gaffer's. Verified the correct solder points thanks to /u/Dippyskoodlez, who found the info from these very forums. Singed the PCB a bit, but oh well, close enough. EDIT 050517 NVIDIA released Pascal drivers for macOS. Upgraded eGPU to a TITAN Xp. Benchmarks available upon request. Yes, it's completely a ridiculous setup now—I was only able to upgrade due to external circumstances. Diminishing returns starts to creep in (even for the much-more-fairly priced 1080 Ti) due to the TB2 bottleneck.
-
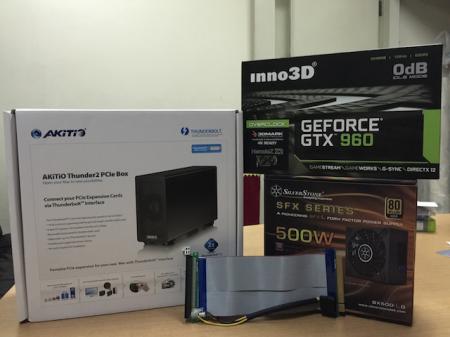
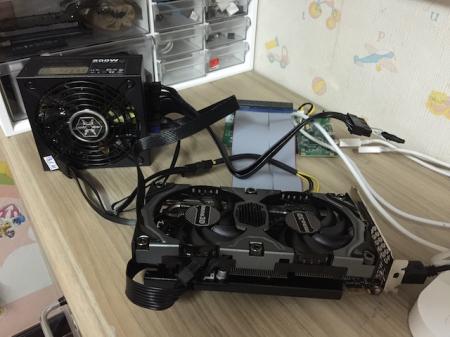
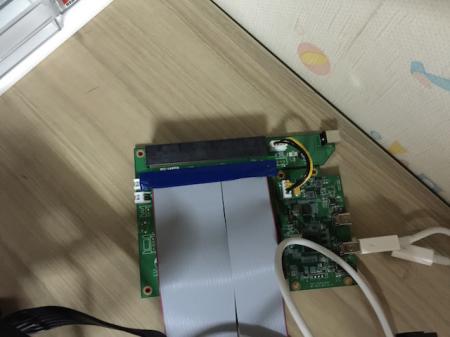
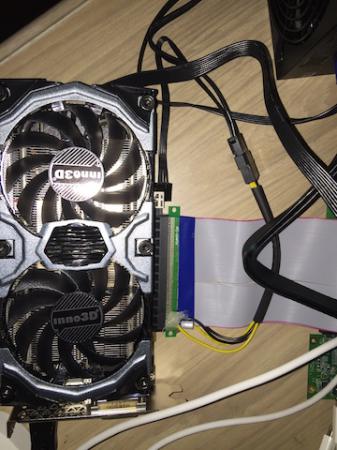
Hi guys, I write this guide to remind myself how to setup the system and sorry for my bad english. it’s not my mother language. (Feel free to correct me if I wrong) This guide is based on karthikrajanv’s post as following: http://forum.techinferno.com/implementation-guides/8006-%5Bguide%5D-2012-15-macbook-pro-gtx750ti%4010gbps-tb1-akitio-thunder2-win8-1-bios.html#post109488 Some parts may be copied from his posts so the credit goes to him. At first after I read many threads I was confused which method should I use and found out that Apple computer those were released after MacBook Air mid 2013 will have UEFI for the Bootcamp and all Apple computer’s released before will use BIOS. This would determine the method you have to use. For Windows 8.1 will use UEFI by default if it capable. For Windows 7 will use BIOS by default. The BIOS method do need DIY eGPU Setup 1.x from @Tech Inferno Fan so please donate if you want to use it. The UEFI method doesn’t need it so you can setup it easier than BIOS (If I understand correctly) Things you will need: Hardware - MacBook pro 15” 2012 (non retina) 650m with TB1 - Akitio TB2 Box - Inno3d GTX 960 (This manufacturer is not so famous in US but it’s the cheapest in my country which still cost around $216 included tax) - Silverstone SFXL 500w - PCI x16 riser with Molex you can find it from eBay - Dell U2414H with Displayport - Apple Thunderbolt Cable 2m (Akitio does include the cable but it’s too short) Software - Windows 8.1 Pro - DIY eGPU Setup 1.x - Latest GPU Driver from website Configuration: Hardware - Connect Graphic card to PCI riser female >>> Connect PCI riser male to Akitio >>> Connect Akitio TB to Mac - Connect PSU molex male to PCI riser Molex female >>> Connect PSU 6 Pin to Graphic card - Connect Display port cable from Graphic card to Monitor - Do Paper clip trick for the PSU Software - Install DIY eGPU Setup 1.x from @Tech Inferno Fan it will extract to your c:\eGPU - Go to c:\eGPU, right click "setup-disk-image" select "Run as administrator" then reboot - Choose DIY eGPU Setup 1.x from your boot screen (Before Windows start) - Press 2 to select “Menu Based Setup” (don’t press anything else it will freeze the system) - Go to initialize and select eGPU. This will create the startup.bat file. - Go to PCIe compaction and choose a 3.87GB/32-bit PCIe compaction on ALL except SATA+.. with closeunusedbridges = off .(no root sign) This will create the required pci.bat file. - In my and karthikrajanv’s cases this will freeze our Macbook saying "Remove disk a, Insert disk b" at the end of the compaction if it is, please following this: - Force Shutdown by holding power button - Reboot into DIY eGPU Setup 1.x again - Go to PCI Compaction > Edit pci.bat and change all a:x.x and b:x.x to 0a:x.x and 0b:x.x (Beware the letters must be stick together not a space between them) then press F10 and go to File and Save or just press Ctrl+S then Go to Test Run and test it - See if the right side of the menu shows “PCI Write” and “all_alloc (256MB)” are “YES” - Reboot to DIY eGPU 1.x Setup again this time press 6 (Chainload using MBR) it will go to boot screen then press 1 “Automated Startup via Startup.bat” then boot to Windows 8.1 In Windows 8.1 - The Intel HD4000 will not be able to use. - Go to Nvidia Control Panel >>> Set up multiple displays from the left menu. - Choose which display you want to use eGPU only or both then click Apply Booting eGPU - Turn on MacBook Pro and select DIY eGPU Setup 1.x - Choose eGPU in Initialize like Software Setup - Test run (not necessary but for making sure) - Go to Chainloader and press Test then press 6 (Chainload using MBR) it will go to boot screen then press 1 “Automated Startup via Startup.bat” then boot to Windows 8.1 Troubleshooting Like karthikrajanv’s post. My system has the same problem while starting eGPU sometimes (many) MacBook Pro will not boot in to BIOS. It will freeze at the white screen after the chime even I press alt to choose the drive it still freeze after I choose Bootcamp (though I can go to OS X without any problem). At first I thought my problem is different and I almost give up on eGPU but after many tries I found 3 solutions that might work 1. Boot up normally if lucky it will go straight to select boot Windows or DIY 2. If it freeze try disconnect yellow and black wire from Akitio like karthikrajanv’s post and replug at Menu Based (But mine still can’t find eGPU after that even though I press F5, weird?) 3. If it freeze try disconnect yellow and black wire from Akitio shutdown both Akitio and MacBook Pro boot up everything then reconnect the yellow black cable These give me 2/5 times for successfully boot into Windows with eGPU so I’m okay with this and waiting for refresh of the next MacBook Pro to replace this one with less hassle. LOL edit: I tried using 90 degree riser between the card to raiser and the booting performance is greatly increased. It's now almost no problem at boot up. Here are 3DMark score for 960 compare to 650m (same system except gpu) 960: http://www.3dmark.com/3dm/6203202 650m: http://www.3dmark.com/3dm/6205394


