
octiceps
-
Posts
1016 -
Joined
-
Last visited
-
Days Won
6
Content Type
Profiles
Forums
Downloads
Everything posted by octiceps
-
Reboot your system, press F2, and look in the BIOS. Believe me, it's in there. There are some thermal management settings where you can specify which temperatures the fan kicks in and such. The beauty of svl7's unlocked BIOS is that all these advanced options, which were previously hidden in the stock Lenovo BIOS, are now open to us. SpeedFan usually doesn't work for mobile system because there's no software fan and thermal control. It's gonna be in the BIOS if it's even available at all.
-
No problem. Good to hear you were successful.
-
Yes it is supposed to be a .rom file.
-
It wouldn't matter either way though LOL.
-
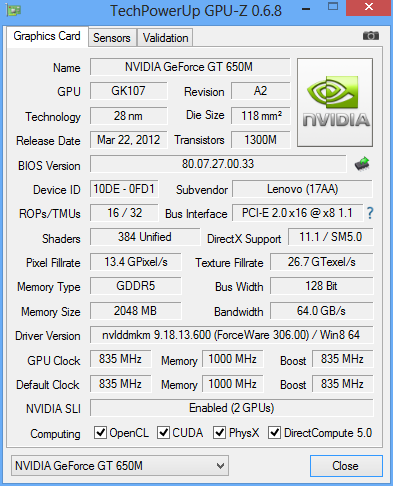
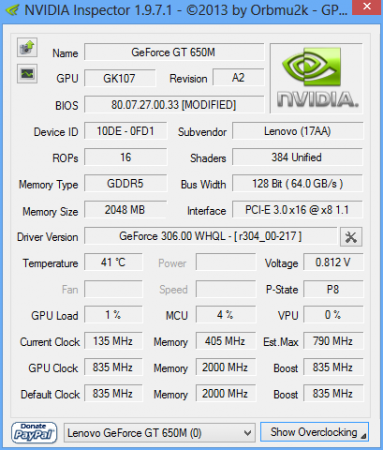
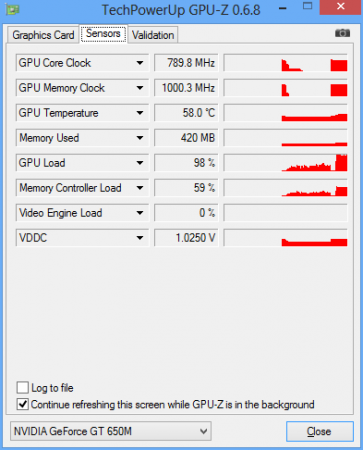
Yeah 3DMark 11 is also showing my core at 405 MHz on the scores page. That's actually the core speed in the lowest performance state (P8). If GPU P-states are enabled 3DMark seems to always report that number regardless of how much you overclock. For the results that are showing the correct core speed I'm pretty sure those people are forcing P0 using Nvidia Inspector. It makes no difference in the scores either way. I leave the P-states where they are because overclocking only affects P0 and the core clock in P5. I don't have to worry about manually switching back and forth and this automatically saves power when idle. BTW I noticed that after flashing the vBIOS, Nvidia Inspector and GPU-Z both report the default core to be 835 MHz when in fact it is still 790 MHz. So those of you who flashed may get confused when GPU-Z and Inspector show a core clock that is +45 MHz higher than what it actually is. Anything that reads the clock speed from the sensor, however will still report the correct value. Doesn't mean anything but just thought you guys should know if you didn't already. GPU-Z and Inspector both show a default core speed +45 MHz higher than actual: However, the sensor readings are still correct:
-
LMAO I'm guessing you're playing the new AoE 2 HD from Steam? Funny how they have SLI support for such a non-demanding game.
-
 I used to own a G73Jh. I don't think you can upgrade it to the GTX 680M, only the Radeon 7970M. There's a huge thread on the Notebook Review Forums with all the information you need. I do believe that only the Clevo and MSI 7970M are confirmed to be working properly but you need to flash a vBIOS that disables Enduro. Plus you need a higher wattage power brick and a modded heatsink. I haven't kept up with all the information in that thread so this information may not be entirely accurate and I never performed the upgrade myself before I sold the G73.
 -
I have also seen others mention this but with no pictures or other evidence. I myself have spent a lot of time poking around in the modded BIOS and I don't believe such an option exists. In the rare event that the i7-3630QM is overclockable, it would not be through the multiplier. Only the i7-37xxQM and i7-38xxQM have partially unlocked multipliers (4) while the XM ones are fully unlocked. It might be possible to OC our CPU using SetFSB to increase the base clock, but IIRC it is incompatible with Ivy Bridge. Plus using this method disables Turbo Boost so you'll have to bump up the BCLK enough to compensate otherwise you may not not see any gains. All of this is assuming, of course, that you can somehow keep the CPU temperature in control. Even at stock it's already close to reaching its limit. - - - Updated - - - What a waste...
-
True, it's an extreme stress test. But just running FurMark by itself isn't very representative either since you're basically just maxing out the GPU and putting little to no load on the CPU. You need to have something running at the same time that will also put a significant load on most or all threads of your CPU to be representative of a very demanding game like Crysis 3. As you know Crysis 3 is very CPU hungry and will utilize all available threads on the i7-3630QM. Running a simultaneous CPU and GPU burn test is a little beyond that on the CPU side to be sure. I think an even more accurate representation of thermal conditions during gaming would be to run FurMark while transcoding a video on all CPU threads and using 50-70% of the CPU overall. This kind of stress testing is causing me to reminisce about my ASUS G73Jh I sold prior to getting this Lenovo. Man that thing had a beastly cooling system. Not many gaming laptops out there can do FurMark+Prime95 24/7 without crashing or overheating and it was one of them. It was built like a tank and weighed 2-3 lbs more than the Lenovo but that dual-vent design and large case airflow was so much more efficient. I ran the extreme test for 1.5 days non-stop when I first got the machine for stability testing and the CPU and GPU both stayed in the 80's the entire time. Absolutely amazing considering that it had to manage hotter components like the 45nm i7-740QM and 40nm Mobility Radeon 5870. The Lenovo has the benefit of two shrinks on the CPU and one on the GPU but it still chickens out after mere minutes.
-
Der because you're not running a GPU burn test and CPU burn test at the same time. Go ahead and try it out yourself: Prime95 torture test on all 8 threads with FurMark or MSI Kombustor burn test in fullscreen. Or OCCT Power Supply test like what I did above which is easier to use because it incorporates both tests in one program. Guarantee you your CPU will exceed 100 C in short order if it doesn't throttle before then. I have to you warn you though that running this test repeatedly isn't good for your system. Even though I've got the 170W adapter the OCCT test makes Windows Explorer crash and restart after I exit it. And I'm on stock clocks too ATM. This program will test every ounce of stability in your rig. Like I said having the CPU in the 90's when gaming is way too close for comfort IMO. One core spike to 105 C and BAM say goodbye to your game. Which is why I'm so wary of overvolting the GPU, especially the main one, because it essentially shares the cooling system with the CPU and any increase in its heat will transfer over. Running two GPU's has nothing to do with it. I get the same temperatures on the CPU and GPU0 regardless of whether GPU1 is plugged in and running or not. Like I said the Ultrabay GPU is actually the coolest of the bunch since it's all the way on the other side of the laptop and has it's own heatsink and fan. - - - Updated - - - Don't think it's gonna help much if at all and I don't think there's enough thickness in the case to fit any RAMsinks. Plus I don't think airflow is good enough in such a small case to seen any benefit. The main problem is the proximity of the two components and the sharing of the single copper heatpipe and fan.
-
Hey @svl7 isn't the GTX 660M already 1.1V at stock? Our GT 650M is probably a lower binned GK107 and clocks in at 790/2000 on 1.0V or 1.025V while most GTX 660M I see are at 950/2500 on 1.1 V or higher. So I definitely think the 660M has more overclocking and overvolting potential since it's already got a head start. Don't know what system the 660M is from, but I bet your cooling system is probably better than what we have here in the Y400/Y500 as well. The CPU and internal GPU share the same copper heatpipe and fan which in this case is bad news for the CPU. It's runs 20-30 C higher than the GPU at full load. Without a cooler and everything at stock the CPU gets within 10 C of instant thermal shutdown (105 C) in 3DMark 11 which really scares me. Based on my limited experience so far overclocking the GT 650M SLI I have found that because of the close proximity of the CPU and GPU0 the extra heat produced by the latter causes the former to overheat by about the same amount. So when @RedLionRisen says that the GPU got to 86 C that really concerns me because in our case that would mean that CPU would be past thermal shutdown. The Ultrabay GPU fares best since it's got it's own fan on the other side of the laptop and runs 10 C cooler than GPU0 and 40 C cooler than the CPU. I don't think the thermals on this system can be improved much short of a complete cooling mod. Repasting is not going to help because others have already repasted their CPU and GPU and didn't see improvement. I personally have taken apart the Ultrabay GPU and Lenovo's stock thermal paste and application are actually very decent; they don't use crap and glop it on like most OEM's I've seen. I repasted the Ultrabay with my best TIM, OCZ Freeze, and it didn't drop temps at all. My relatively powerful Cooler Master cooling pad doesn't help much either, maybe a 3-5 C drop at most. Here's is an example of my worries regarding the thermals in this machine. When I run the OCCT Power Supply test, which runs a FurMark-like test for the GPU and Linpack for the CPU simultaneously, the CPU gets to 100 C in less than a minute. GPU0 and GPU1 were 68 C and 60 C respectively when the CPU tripped 100 C. Keep in mind I was using the cooling pad and the GPU's were at stock. I know that this is kind of an extreme scenario test, but 3DMark 11 and some CPU-intensive games like Far Cry 3 already heat the CPU to 90+ C. So for people like @RedLionRisen who are interested in overvolting I definitely don't think the cooling system is good enough for that. No matter how cool your GPU(s) may run it's the CPU heat that will limit you in the end. With stock clocks and voltage it's already choking up so having more heat spilling over from an overvolted GPU isn't helping matters.
-
I'm guessing you just want 1.1 V for benchmarking purposes and then flash it back to stock for normal use? That is an absurd voltage to be using on a regular basis and I guarantee will significantly reduce the lifespan of your card if not fry it outright. Remember, this is a 14''-15'' notebook with a single fan we're talking about, not some full tower with liquid cooling. You're gonna have to mod the cooling system in this thing while you're at it too because the tons of extra heat from the GPU will spill over to an already too-hot CPU. Doubt it's even possible to get it that high anyway, assuming there's no hard lock in the first place. Even if it is possible, the inconvenient thing is that you have to flash the card every time bump it up. I'd recommend 0.005 V increments to be safe and you can count how many times you'll need to flash to get to 1.1 V. Flashing always carries risks and the fewer times you do it the better. Personally, I'm not going to concern myself with adjusting the voltage on this thing, and certainly not increase it. Whatever is the highest OC I can attain on stock voltage is the one I will be happy with. No sense in reducing the lifespan of this machine for some higher benchmark scores.
-
Bro you need to use ThrottleStop or enable Turbo Boost if you've disabled it or something. That Physics score is way too low. I'm getting 1000 more points than you.
-
Power adapters usually run hot when you're gaming or doing anything strenuous. You should test with a Kill-a-watt power meter if you're worried but I doubt you're even close to maxing out the 170W charger. Plus you have the i5 which uses less power than the i7. FurMark + IBT is a good extreme scenario stress test but it's not at all representative of real usage. You're never gonna be maxing out the GPU's and exceeding TDP on the CPU in any game. BTW since you have SLI you need to use the fullscreen 3D test in OCCT to utilize both graphics cards. FurMark and MSI Kombustor in fullscreen both only run on the first GPU regardless of which AFR mode or rendering API you use.
-
YYEEEESSSSSSS!!! You guys are freakin' geniuses. Here's how I got it to work: Use DOS version of NVflash. Follow svl7's guide to but make sure you first turn off write protection with nvflash -r for the Ultrabay GPU which is index <1>. Then flash ONLY the Ultrabay GPU (remember it is GPU 1). Press y twice to confirm and wait until it reports that it has flashed successfully. CTR+ALT+DEL to restart and PROFIT.
-
Gonna try this out soon and will report back. Keeping my fingers crossed.
-
Don't have it.
-
Not a chance. Do you see the size and shape of the PCB on that thing? And it's not even using MXM. It's impossible to disable the internal GPU as well.
-
I don't think this CPU can natively run anything faster than DDR3-1600 without some kind of workaround, which it looks like this machine doesn't have. Look at Intel's spec sheet. Unless you're using integrated graphics I don't think you'll get any benefit form faster RAM. I'd be surprised if you saw even a 5% increase in anything.
-
Well I'm lazy so anything that's not set it and forget it is too much work for me.
-
@LewsTherin05 what method are you currently using to overclock in SLI with matching clock speeds? I just flashed to modded V2.02 and can't figure for the life of me how to get the two cards to match core speeds. The internal GPU's default core has been bumped up to 835 MHz due to the vBIOS mod but the Ultrabay one is still at 790 MHz and this is giving me all kinds of problems. When I use Inspector and individually set each card to match one another (using +45 MHz on the second GPU to compensate), they both go up but don't match what Inspector shows they are set to. When I use Afterburner I don't have control over each card separately and no matter how I mess with the settings I can only get the first (internal GPU) to increase while the second is always at 790 MHz.
-
But even with 310.90 still have to use the .bat files to force P-states which is a really cumbersome way to overclock since you have to manually switch to the lower power states or else you're running at full clocks and voltage 24/7. If the vBIOS on both GPU's got modded then we could just use something very simple like Afterburner to set some OC profiles and forget about it. I've been corresponding with svl7 for the last couple days since this issue came up and even took apart my Ultrabay GPU so that he could take a peek at the EEPROM that holds the vBIOS on it. It looks like Lenovo's implementation of SLI on this system leaves little to no hope for it ever to get fixed.
-
You only need 5 posts to download files on here. This BIOS mod removes the hardware whitelist which allows you to use third-party WiFi cards, which are blocked on the stock BIOS. Also, it shows a bunch of advanced BIOS settings that were hidden before. Lastly, it mods the vBIOS of the internal GT 650M GPU so that the artificial +135 MHz overclocking limit on the core is unlocked. However, if you are using SLI, it won't mod the vBIOS of the Ultrabay GPU and that looks to be unsolvable for the foreseeable future. - - - Updated - - - Thanks for the info. Man that sucks. The Ultrabay GPU is basically limiting the performance of main GPU then. The core on this GPU can go so much higher than +135 MHz.
-
I'm bumping this up for all those people asking questions about modding their particular BIOS version. For everyone who owns a Y400/Y500 and wants a modded BIOS and vBIOS, regardless of whatever version modded or unmodded you're currently on: First go to here and download the latest official Lenovo BIOS update which is 6BCN42WW(V2.02). Even though it's from Baidu (AKA Chinese Google) I have scanned it with multiple malware scanners and it checks out. Then, run the .exe and it will restart your PC and flash your BIOS to V2.02 unmodded. It will also reset any BIOS changes you made previously, but don't change them back yet. Now, follow svl7's instruction in the OP and use his modded V2.02 BIOS I've attached. Once that's finished flashing you can change all the BIOS options to what you had before. I was able to use these steps to flash my modded V1.05 BIOS to modded V2.02. Svl7, if you want to update the OP with this information, I think it will help a lot of people asking to get their particular revision modded.
-
You need to use a modded BIOS because the vBIOS is part of the BIOS on this system. Or you can use the Nvidia Inspector and .bat files method.