benjaminlsr
-
Posts
51 -
Joined
-
Last visited
Content Type
Profiles
Forums
Downloads
Everything posted by benjaminlsr
-
Selling mine on ebay right now: http://www.ebay.fr/itm/302060894498
-
While it might be true, don't take this too literally. I'm basically having the same performance (Battlefield 1) on my combo NUC + 16GB + 1060 (over TB3) than my friend with it's 4560K, 16GB + 980 GTX PCIe 16x.
-
This one will be on eBay soon I'll build a new one as soon as I can get the Akitio Thunder3 casing.
-
US$280 InXtron Thunderbolt 3 HDK
benjaminlsr replied to tamer1009's topic in Enclosures and Adapters
Is the casing coming with it ? -
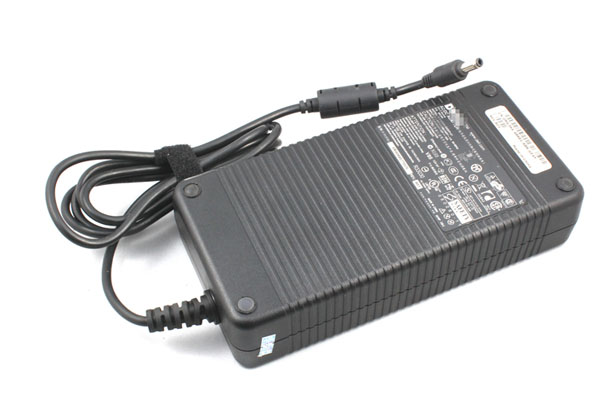
220W Dell DA-2 AC adapter discussion
benjaminlsr replied to jacobsson's topic in Enclosures and Adapters
1\ I use the Akitio casing barrel plug. It's not getting hot and it's working perfeclty. 2\ NO. 3\ 50v 1a = 12v 4.2a Again, i've been using mine for weeks now and it's working flawlessly. Wires aren't getting hot, neither is the barrel plug / connector. -
Hey, I don't have closeup photos of those steps. 4\ Those are not mine but I somehow followed the same process (except I used three thick yellow/back wires) and used 600v isolation tape between wires and pcb. /!\ Make sure your soldering points don't touch the casing /!\ 5\ You'll have to dismantle properly each pin from a PCIe 6pin connector. Use some heat shrink tube to isolate each pin from the casing on top of the GPU (as shown here).

-
220W Dell DA-2 AC adapter discussion
benjaminlsr replied to jacobsson's topic in Enclosures and Adapters
Exactly This is what I did here. -
220W Dell DA-2 AC adapter discussion
benjaminlsr replied to jacobsson's topic in Enclosures and Adapters
I think we don't understand each other. You can send 220w to the Akitio barrel plug so they can be splitted between the casing and the GPU. To send watts to the GPU, you have to solder 3x GROUND and 3x 12V pins from the internal connector of the barrel plug to a PCIe connector. This will allow you to use demanding GPU like Zotac 1060 and this is where a modded DELL DA-2 PSU (like I tried) will spare you few minutes of soldering. -
220W Dell DA-2 AC adapter discussion
benjaminlsr replied to jacobsson's topic in Enclosures and Adapters
Like I said : It's only if you don't want to do soldering on the PSU (for any reason whatsoever). You're right, to deliver the 100+W needed for the GPU using only the barrel plug to deliver power, you have to solder your PCIe pins from the barrel plug (like displayed). -
220W Dell DA-2 AC adapter discussion
benjaminlsr replied to jacobsson's topic in Enclosures and Adapters
If you're willing to proceed as follow (and don't want to do soldering on the PSU), you can order an already professionally modded DELL DA-2 (43$) from : http://ultrabook-battery.net/ While it might sounds a bit expensive, the job is done properly !
-
Yes, I had to cut the plastic to release each pins. Then I used some heat-shrink tube to isolate each of them from the casing. It fits perfectly. Yes I'm connecting to the eGPU instead of the back of the NUC. If I don't do it, I'm having huge performance impact. The prototype is to be used for my job at Intel.
-
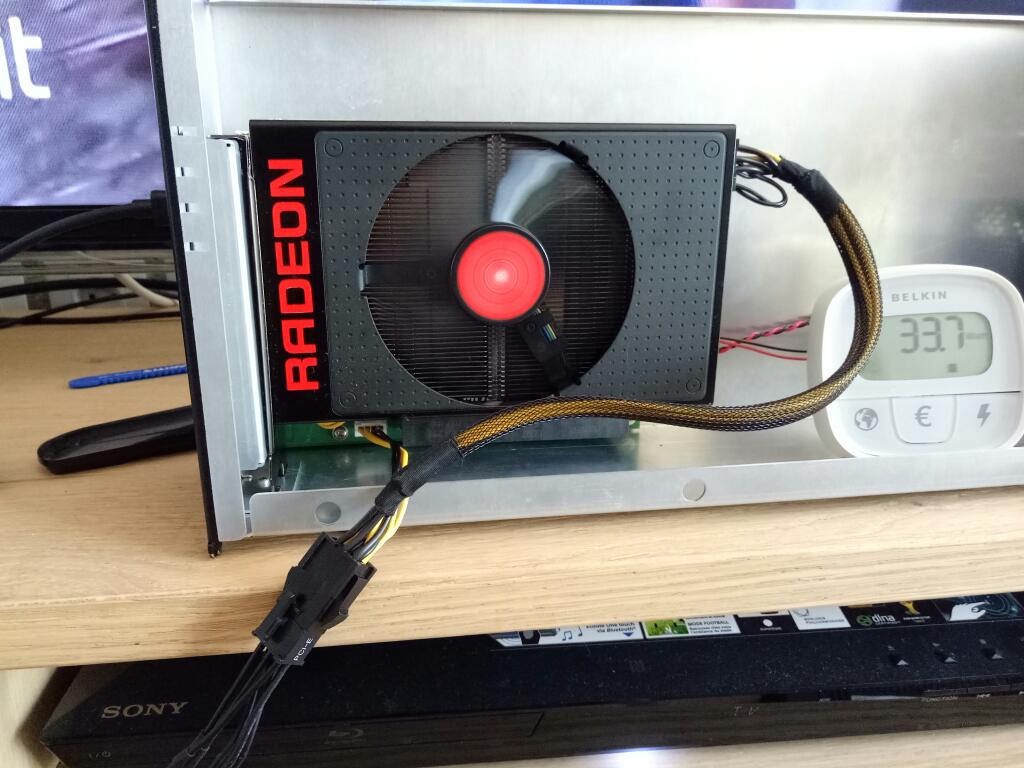
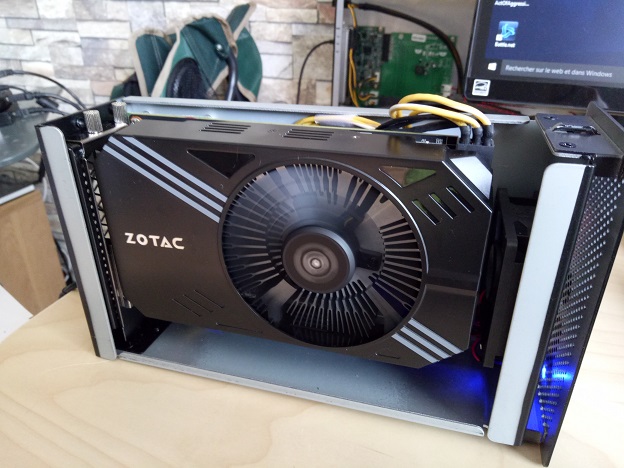
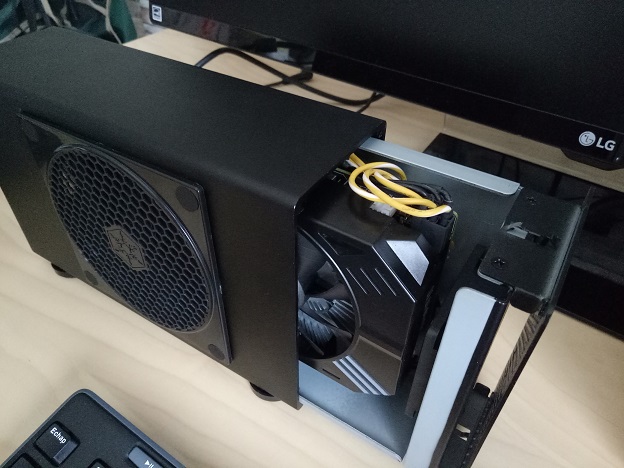
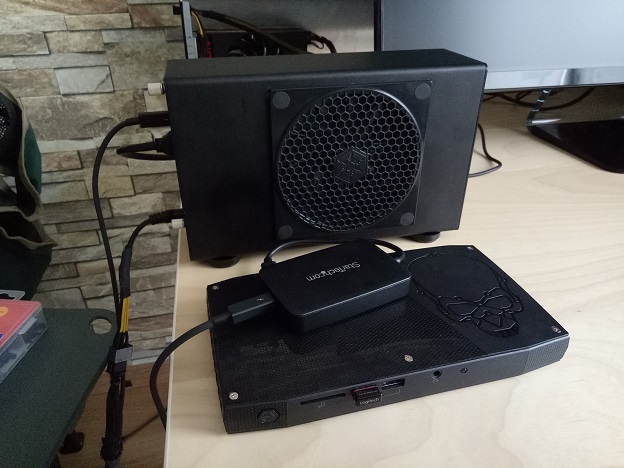
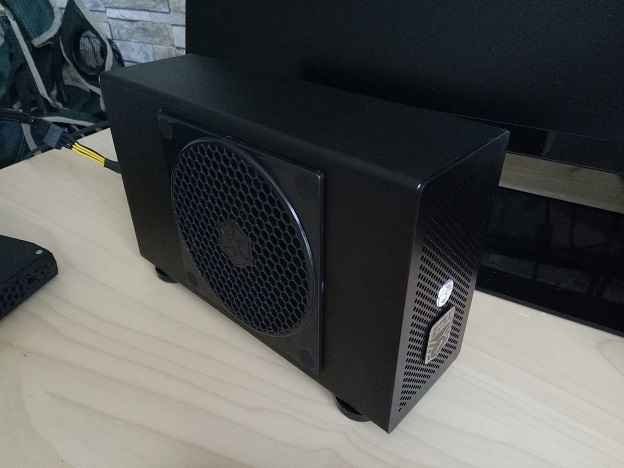
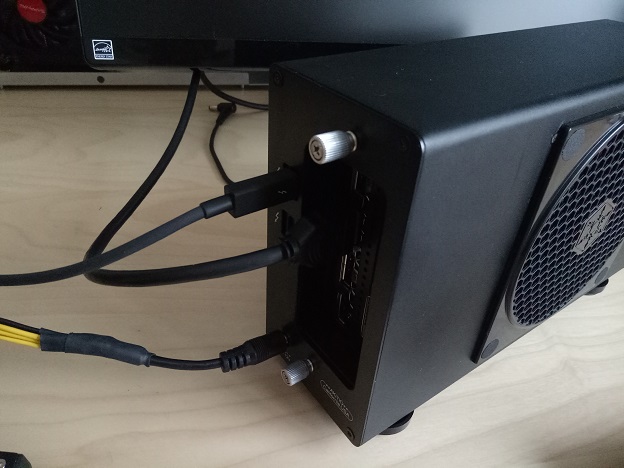
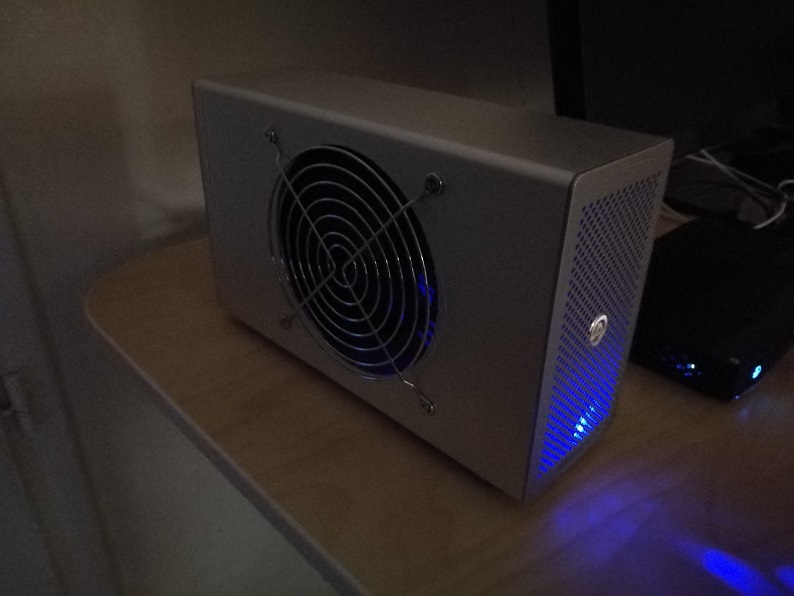
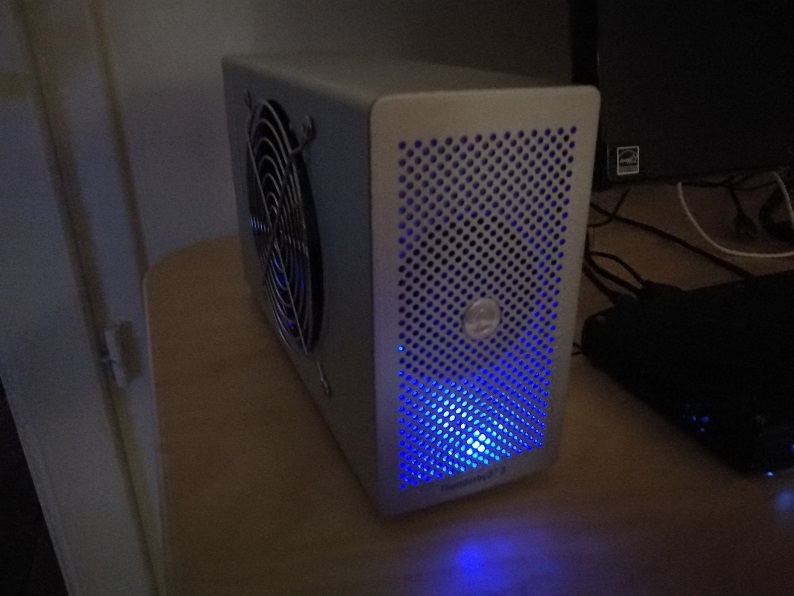
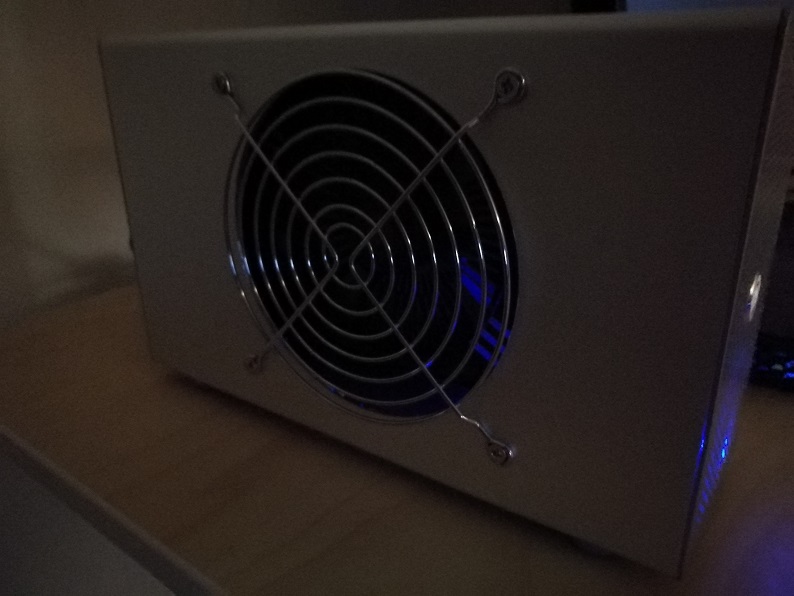
Here is my first attempt of doing building an e-GPU. What I wanted to do : Due to the fact that having a Razer Core is a pain in the *** and because it's a 7Kg not so portable solution, I decided to build myself my own e-GPU using an Akitio Thunder2 casing for the latest Intel NUC6i7KYK “Skull Canyon”. I also wanted not to change the power connector of the casing. Costs : Akitio Thunder2 : 211.45€ Thunderbolt3 to Thunderbolt2/1 adapter : 95.19€ Dell DA-2 Power Supply : 27€ ZOTAC GTX 1060 6GB : 320€ (174mm x 111.15mm) The Plan : The steps : 1\ Cut the DELL DA-2 cable properly to expose the 8 wires. 2\ Solder all GROUND together as well as all 12V together. 3\ Solder the 2 obtained wires to a 5.5x2.1mm barrel. 4\ Solder two thick wire from the barrel to the top back of the casing (15cm). 5\ Split the two wires into a 6 PIN MOLEX connector. 6\ Cut a 110mm hole inside the casing. 7\ Fix a fan/dust protection. How it works : Great ! Not so much test so far but pretty stable playing the latest DOOM. 2560x1080, HIGH settings with V-SYNC ON :60fps 2560x1080, HIGH settings with V-SYNC OFF : 90fps Next steps : Figure out if there is a difference in performance using the Akitio TB3 prototype. Photos (new model: Akitio Thunder3): Photos (old model: Akitio Thunder2):
-
US$189 AKiTiO Thunder2 PCIe Box (16Gbps-TB2)
benjaminlsr replied to Tech Inferno Fan's topic in Enclosures and Adapters
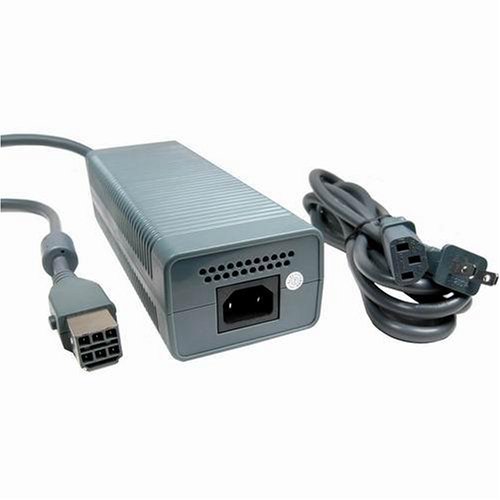
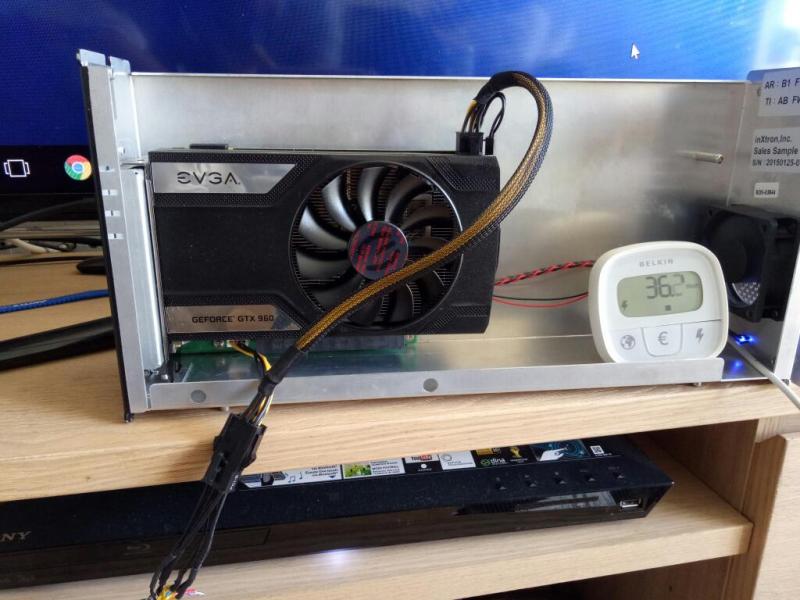
Few watts I received from the PSU was due to a low power mode inside the X-Box 360 PSU if you solder the thin yellow and black wires with the three other. Also, let me tell you that the following, is working great. I built myself a X-Box 360 PSU to 6 Pin PCIE. I also built a 6 Pin PCIE to Barrel Plug. It worked great with a EVGA GTX 960. Tomorrow I should be able to test it with a ZOTAC GTX 1060. Anything with a power consumption greater than 140/150W will be too much for a 200+ W PSU.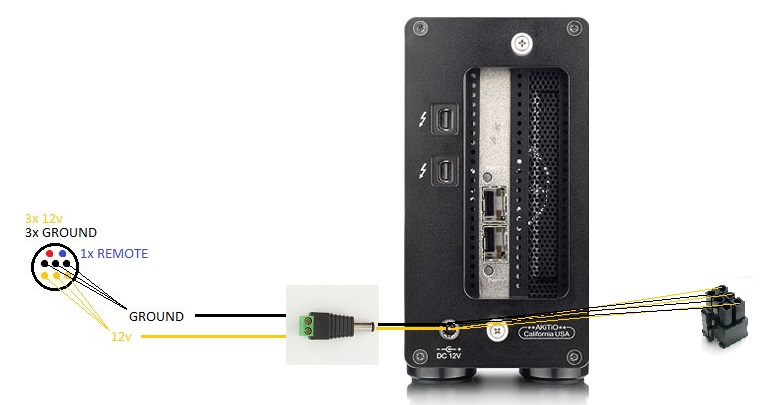
-
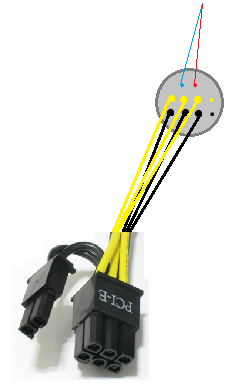
For all of you looking for a reliable, cheap (28$) and easy to find PSU, I can only recommend you to look for a X-Box 360 PSU. You're looking for the bigger one that comes with a FAN in it and can deliver 203W. Just like the Dell DA-2, it comes with: 3 yellow wires (12v) 3 black wires (GND) 1 blue wire (REMOTE) 1 red wire (5V) Note: Some will come with 1 extre yellow wire and 1 extra black wire. Those are thinner than the others and won't be used here as they're only used for low amp delivery. Soldering them with thicker wires will result in PSU only delivering ~30W. Ignore them. Now, you may want to strip the three yellow wires, three black wires and solder them to a 6 pin PCIe connector. Then solder the red and blue wires together (or solder a switch between them so you can switch the PSU between powered (front led = GREEN) to sleep mode (front led = ORANGE)).
-
220W Dell DA-2 AC adapter discussion
benjaminlsr replied to jacobsson's topic in Enclosures and Adapters
What if you use the top Thunderbolt connector instead of the bottom one ? -
US$189 AKiTiO Thunder2 PCIe Box (16Gbps-TB2)
benjaminlsr replied to Tech Inferno Fan's topic in Enclosures and Adapters
Hey Guys, I also tried the following using the same XBOX Power Supply (203W 12V) : Power Supply -> External 6 Pin Molex -> GPU 8 Pin (or 6 pin if using my GT960) + 4 Pin Akitio Motherboard. When using my Asus I can read ~20W from my Wattmeter. When using my Radeon I can read ~40W from my Wattmeter. On both case Windows report GPU is not getting enough resources and or crash when launching 3D apps. What's wrong... ?
-
US$189 AKiTiO Thunder2 PCIe Box (16Gbps-TB2)
benjaminlsr replied to Tech Inferno Fan's topic in Enclosures and Adapters
@Tech Inferno Fan can you help me here ? -
US$189 AKiTiO Thunder2 PCIe Box (16Gbps-TB2)
benjaminlsr replied to Tech Inferno Fan's topic in Enclosures and Adapters
Hi Guys, Please find my work below. Unexpected results with my setup: - The card is being detected properly by Windows (without the warning insufficient ressources available within device manager) one in two. - When properly detected, I can't start game with it as it will freeze and fan will try to turn but fail most of the time. It looks like the GPU isn't receiving enough power. I'm using a 203W power supply from an XBOX 360 and followed the soldering patern attached. I checked and I have proper 12v flowing from the power supply to the barrel plug then to the 3 yellow pins. Any idea ? -
220W Dell DA-2 AC adapter discussion
benjaminlsr replied to jacobsson's topic in Enclosures and Adapters
moved -
220W Dell DA-2 AC adapter discussion
benjaminlsr replied to jacobsson's topic in Enclosures and Adapters
Well I checked twice each of them before. The Dell DA-2 looked not so new (dusty). It worked for minutes until nothing. Any idea on why the green led vanish as soon as I plug it ? By the way, I ordered a XBOX 3 Power Supply 12v 203W (way cheaper, 19.95€) as well as another 220W with a 5.5 barrel plug from ultrabook-battery.net for 43.11$. -
220W Dell DA-2 AC adapter discussion
benjaminlsr replied to jacobsson's topic in Enclosures and Adapters
Hi guys, I modded my DELL DA-2 and soldered all 12v together, as well as all GROUND together, then soldered remote to GROUND. Then I soldered 12V and GROUND to a barrel plug to power my Akitio casing. It worked for sometimes but now the light will go from GREEN to NOTHING right after I connect it... (connected it to another device, same result). Any idea ? Thanks -
220W Dell DA-2 AC adapter discussion
benjaminlsr replied to jacobsson's topic in Enclosures and Adapters
Sorry, wanted to say two of the three 12v pins. I received my StarTech.com Thunderbolt 3 to Thunderbolt 2/1 adapter (to be used with a NUC6i7KYK). Q: Did someone measured the impact of an adapter on latency ? Waiting for the other elements to start making a video / photo tutorial. -
220W Dell DA-2 AC adapter discussion
benjaminlsr replied to jacobsson's topic in Enclosures and Adapters
120W won't be enough as the EVGA GeForce GTX 960 SC GAMING can draw 128W plus 10W from the Akitio Casing. If I were you, according to your pictures, I would just finish the work on the Dell power supply to send all power to the barrel plug like attended by the guy who sold it to you. You don't have much to do here. One thing though: Double check why only two of the six 12v pins going to the GPU are wired on your picture. -
220W Dell DA-2 AC adapter discussion
benjaminlsr replied to jacobsson's topic in Enclosures and Adapters
@mcbeav it looks like the guy did what I'm planning to do, so, refer to my drawing on top to solder your Dell power unit properly to the barrel plug. -
220W Dell DA-2 AC adapter discussion
benjaminlsr replied to jacobsson's topic in Enclosures and Adapters
Thanks for your feedback here. Well I'm willing to power a GPU inside the casing but I don't want to cut through metal and / or unsolde a component inside the casing. So that's 220watt available inside the barrel plug. 25watt for the casing, 190 for the GPU. Am I correct ? I will use strong and thick wires from the barrel to a splitter going to the 6pin plug.