


Ultrax5
-
Posts
27 -
Joined
-
Last visited
Content Type
Profiles
Forums
Downloads
Posts posted by Ultrax5
-
-
After a day of "experimenting" and nearly bricking my laptop I'm quite confused with the BCLK stuff.
One time I seem to be able to get 104Mhz, then 100.5 hard crashes the laptop. Is there a thing I'm missing or it just behaves like that on Hsw chipsets?
-
4 minutes ago, EDk-TheONE said:
Could you mod my ME.bin?
here is my me: https://www.sendspace.com/file/ljxzkw
i used fptw64 with switch -ME.
i flashed your me but my notebook to turn on lately and notice that your mod and my ME has different size.

Just flash it, ME isn't tied to particular laptop. Yes, it's smaller than the flash size(probably lacks the padding or sth), but it flashes fine.
-
 1
1
-
-
5 minutes ago, Khenglish said:
It sounds like you probably missed enabling some clock dividers. I'll take a look later today.
Nah, actually after reducing memory frequency to 1333Mhz(can't change timings) it allowed me to set 103Mhz BCLK and pass a few minutes of Prime95. I haven't tried increasing it more, but I'm pretty sure it overclocks exactly as it should.
-
Sooo I decided to fiddle with BCLK OC on my Haswell-based Lenovo Y50 and I've managed to unlock the ME to enable the slider in Intel XTU. I'm attaching the one I've created, you can use BCLK from 90 to 120, either set it using BIOS or XTU.
Now, to my overclocking results, I've got a mind-blowing 0.5236Mhz increase, which equals about 0.5% of performance increase. Great stuff worth every minute I spent on it.
Actually, it's probably because I'm using the pre-installed Ramaxel RAM, which is just bad.

-
If anybody wants, I can:
1. add additional tabs in the BIOS(mainly advanced and power tabs)
2. remove Wi-Fi whitelist
3. unlock GPU OC limits, allow for voltage change up to 1.2V
4. change BIOS splash screen logo to your provided one.
Price? Absolutely free (no need for donations, etc.) , just PM me with your BIOS.
-
The VCCIN is usually 1.75V, doesn't matter if it's desktop or laptop. I've never seen values other than that You can try going lower, just remember to keep a 0,4 delta between the core voltage and the VCCIN, for example if your vcore is 1,1, the lowest VCCIN you should use is 1,5V.
-
1
-
-
If the battery is at 100%, the CPU can reach 58 Watts, so that allows for 3.6Ghz@all cores. You can try setting core VCCIN to 1.75V and using PowerCut, that will allow for any multiplier because it wil hack the power reporting, so it won't trigger PL1 or PL2. Anyway, the setting doesn't stick after reboots and is basiccally a huge hack, so use it with caution. C7s section can be helpful in getting more battery life, and TPL is only needed when you overvolt your CPU.
I've tried undervolting the GPU on Clevo vBIOS and I've managed to get it to 1.09V(minimal voltage allowed). The max overvolt limit on the other hand is 1.2V, but it didn't really help me much, because after certain frequency my GPU starts erroring out in OCCT and no overvoltage helps it. Doesn't matter if on my modded vBIOS or the Clevo one, it just hits a hard limit of the GPU silicone quality itself. I still don't know how to unlock undervolting using my modding knowledge (I only know how to unlock core clock slider + voltage up to 1.2V).
-
Dang, you got me. I lied about the frequency, thought nobody will notice :<
I'm joking obviously. I never understood how 3dmark calculates the max turbo freq, but in reality the max turbo clock is set to 3.8Ghz.
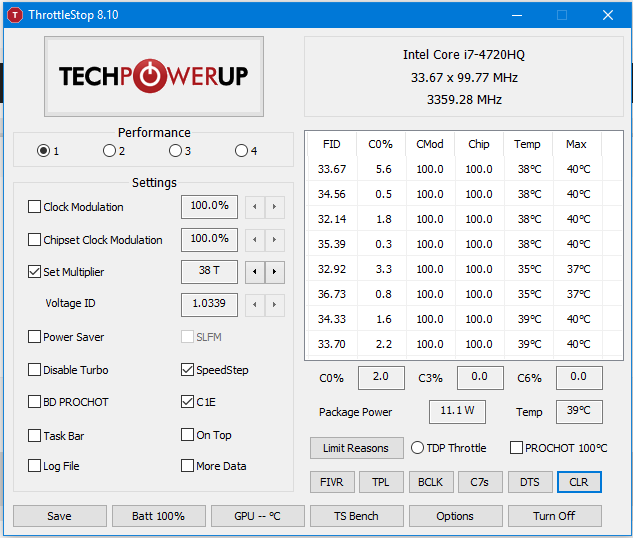
I've also attached some screens of my settings in TS as you asked before. I've changed my cache undervolt to -100mV instead of -125, because it crashed one time and undervolting cache doesn't really help that much.
Just wanted to say - my settings won't give you maximum overclocking - my setup is designed to be quite balanced, so I'm conservative when it comes to CPU stuff.
To get the most out of your CPU you should downgrade your microcode to 01,02 or remove the microcode updates completely, and then use TS to raise the voltage and overclock to insane freqs. Yet to my way of thinking without extra cooling it's pointless because the temperatures shoot through the roof when going over 4ghz and it requires insane amounts of voltage.

-
1
-
-
2 hours ago, iAchilles said:
thx
what software did u use for overclocking the cpu ?? didn't u hv any problem with throttling ?
I'm using ThrottleStop to do it. Throttling isn't a problem at 3.6Ghz, especially with undervolting, which substantially lowers the temps. Basically if you have temps that are good enough, throttling will only occur at 4.0+Ghz where you have to raise the voltage and VRM temp throttling kicks in. That's why I settled on 3.8Ghz.
The thing is I didn't really try overclocking it to extreme core clocks since I finally learned how to unlock the vBIOS properly(not just forcing the clocks with MBT). I don't think the drivers differ in overclocking, because I'm getting artifacts at the same clocks as before.
Actually my modded one allows for a bit more voltage so probably I could get even more points in 3Dmark but it's just pointless if it's nowhere near my stable clocks.
-
2
-
-
@iAchilles
http://www.3dmark.com/3dm/13106042
Settings for reference:
CPU:
OC'd to 3.8 Ghz single core/ 3.6 quad core. -80mV core, - 125mV cache, microcode v20 from June 2016.
GPU:
Core: 1401Mhz Mem: 3005Mhz.
-
1
-
-
As far as I remeber I got it to 1480 core and 3005 mem clock at 1.87V. Anyway, it was only for the benchmark, these settings artifact heavily when used outside 3Dmark.
-
1
-
-
Could anyone help me with unlocking this vBIOS of 960M, because apparently my modification attempts don't really work.
I've found some unlocked vBIOSes for this GPU by furiously googling, and one made for Clevo and another random one worked for me and I had my 135mhz limit removed. Yet I wanted to do it the most clean way to avoid any possible issues, so I tried editing my BIOS according to the changes done in the ones I mentioned - and even with the same changes, it didn't work. I even tried changing the Vendor ID from Lenovo to nVidia, but it didn't help at all. Did Lenovo implement other locks or what?
I just want to know what am I missing.
-
@EDk-TheONE
http://www.3dmark.com/fs/8322052
This is what's possible with a bit of voltage increase + overclock using MBT (if I remember correctly it was around 1500mhz core on this one). Scores should be identical with the Prema modded BIOS - it's just a cleaner and more convenient solution.
EC is extractable from Lenovo BIOSes (the full ones on Lenovo website). I don't know how to mod it though, but I'm attaching it just to help people with 3.03 BIOSes and 1.14EC's.
@Kamalnath93
-
1
-
-
Welp, I just wanted to do a little update on the overclocking stuff. It's quite a big one this time
") https://imgur.com/31rtEXV THIS ISN'T MY WORK, I'M USING A PREMA MODDED VBIOS COURTESY OF @Prema
https://imgur.com/31rtEXV THIS ISN'T MY WORK, I'M USING A PREMA MODDED VBIOS COURTESY OF @Prema
One can use Clevo W230SD/Sager NP7339 vBIOSes (NOT SYSTEM BIOSES) with our Y50 (960M version), which means we can use Prema modded vBIOS extracted form his BIOS mod here: https://biosmods.wordpress.com/w230sd-np7339/
REMEMBER, THE FACT THAT IT CAN BE DONE DOESN'T MEAN IT'S SAFE OR SUITABLE FOR DAILY USE. FOR NOW IT'S A CRAZY EXPERIMENT THAT WAS FUELED BY DESPERATION AND IT HAS TO BE TREATED WITH CAUTION. EVEN PREMA HIGHLIGHTS THE FACT THAT THE VBIOSES SHOULDN'T BE USED ON DIFFERENT HARDWARE THAN THE ONE THEY WERE MADE FOR.
Tbh it didn't blow my laptop so far, but better safe than sorry.
By using his mod you will gain unlocked core clocks, controllable voltage up to 1,2V and few other things.
The complete set of instructions (it's vague for a reason, so inexperienced people learn about the procedures before diving into it ;))
SpoilerWARNING AGAIN: Seems like Clevo/Sager are using tighter timings on their 960M's VRAM, but
almost allY50's should be suitable for the mod. UPDATE: My VRAM was overclocked to +500 on stock, but I had to set it to 0 on this mod, even with +50 I get artifacts.1. Download the file given in the previous link (again, credits to @Prema for making such an amazing mod, can't stress this out enough)
2. Extract W230SD34.PM using Andy's tool from MDL.
3. Now, make a BIOS backup of your laptop and extract the BIOS into a seperate folder.
4. Take C5D7EAAD-B218-482C-A909-E3B8CDB00E94_1109.ROM from the W230SD DUMP folder, rename it to BE13645B-2C2C-44D2-A64F-0EA052C34597_1796.ROM, put it into your laptop's BIOS DUMP folder and properly reassemble the BIOS also using Andy's tool(the tutorials are scattered around the internet, do a little research if you don't know what's going on).
5. Downgrade to BIOS v1.14, flash your modded BIOS and EC (for bios use DOS fpt and for the EC use DOS Flashit tool(put the tool and the file attached to the post on the DOS drive and right after flashing the BIOS, use:
flashit ec.bin /ec6. Reboot, hopefully leaving your laptop in a working state

7. If everything works out and you want to gain full control over the silicon die, install MSI Afterburner.
8. In the Afterburner folder, add a file called MSIAfterburner.oem2 with this inside:
;OEM

[VEN_10DE&DEV_139B&SUBSYS_397817AA&REV_??]

VDDC_Generic_Detection = 1
9. Fire up Afterburner, in settings unlock the voltage mode and set it to third party.
10. Well, pray that it won't blow up.
SIDENOTE: You can unlock more undervolting with the .oem2 files(and much more stuff), it's easy to do, just google it.
-
1
-
-
On 4.04.2016 at 7:09 PM, Ferkosza said:
Hi Ultrax5,
Thanks, that's good news, indeed. Could you please explain in detail how to increase the power/voltage limit for our cards?On 4.04.2016 at 10:55 PM, iAchilles said:there is a sth i encountered with the power break. some times after playing a game like 2 hour with the laptop on AC power, suddenly the power key on laptop (above keyboard, right corner) starts blinking and as i tested, if i don't take power cable out and then put it in again the laptop gonna shut itself down, it seems as if the power break can not provide enough power in some situation.
would u pls explain in detail how u managed to increase power limit ? thx
Basically, to increase the power limit you need to mod the vBIOS, just change the values to your desired ones in Maxwell BIOS Tweaker power tab. Don't set them too high though, it could cause some nasty problems to happen.
And - for voltage you only need to open up nVidia Inspector and move the voltage slider all the way to the right. Even if it says +275 or +262.5, it won't give voltages that high anyway, setting it to that sets the voltage to 1.187, which drops to 1.17 after a while. It's only a few milivolts but it allowed me to reach some nice overclocks that unfortunately are artifacting like crazy after a few minutes.
-
On 31.03.2016 at 1:22 PM, Ferkosza said:
") Yes, I am fond of literature, I love writing well formatted texts .
Yes, I am fond of literature, I love writing well formatted texts .
However,I did not really research the difference between 2 and 4 GB variants... You are perfectly right, this chip (960M) is simply too weak for very high resolutions and/or details. So probably we could be just fine with 2 GB. Here I had a great offer recently so I bought the 4GB variant.Indeed, my final clock is 1454 MHz (w/ boost). Whenever I tried to go above, I had a driver crash. It seems we need more power if we want to achieve a higher clock. However, I don't really think that we can go much above 1500... We are already reaching our limits here. I am curious about your results.
Actually, we can increase the voltage and (by bios modding) increase the power limits. Nvidia inspector can set the voltage to 1.17V if I remeber correctly, and that allowed me to run the GPU at 1475mhz(possibly even more can be achieved), but there were 2 problems I encountered:
1. The power brick is way too weak to handle such overclocks reliably if one unlocks the power limits. Furmark started to eat the battery like crazy the second I started the stress test.
2. This is actually my GPU's own problem - at 1475mhz and 1.17 it was artifacting a lot, but it was enough for me to complete 3dmark Fire Strike test. So unless someone has some better quality silicone in the GPU, higher overclocks won't happen.
-
1
-
-
6 hours ago, Arise said:
58W is a value that implies that the cpu is in full load, or at least stressed with something.
At first you should try only raising the multiplier and validate the frequency.
After you do that you can switch back to the tdp rating?
What laptop do you have? What is the temperature when you have 58W in load?
Sent from my iPhone using Tapatalk
Yeah I understand that perfectly. 58W is the short time power limit which apparently works as a long term limit when I set short one to 80 and the long one to 100. Basically I'm aiming to get the multiplier to stick on full load, and with a 58W limit I can only hit 3,4-3,6ghz@8threads.
My laptop is Lenovo Y50-70.
The best thing about this is that my results are terribly inconsistent - a few times I managed to run a full 40+ multiplier on 8 thread load, and the power consumption skyrocketed to 80W but after a reboot it all faded away and I was back at hitting a brick wall at 58W, even when no conditions changed.
-
55 minutes ago, EDk-TheONE said:
01 version.
Tried 01 one, disabling MSR locks in BIOS, setting the limits inside the BIOS or via TS and it still only hits 58W which is only sufficient for a maximum multi of 34. I don't even know what's wrong with my setup now. :/
-
My BIOS is also unlocked and I can also set the limits, but even after setting it up like on your screenshot it seems to just ignore it. Btw, what version of microcode update did you use? 02, 01 or a different one?
-
Can I ask one thing - how did you guys manage to overcome the 47W TDP limits? I've downgraded my microcode to 02 version, but it doesn't really cooperate. I'm able to set the multiplier to 42 or even higher, but it only maintains this for two cores because for 4 it just throttles down to use exactly 47W. I've messed around with TPL settings and power limits in the BIOS but it still doesn't really care about the limits I chose.
-
Meh, the unlocked BIOS doesn't really provide much more control/things you can't do using ordinary software, at least from my perspective of a person who likes to tinker with overclocking and such. Most of the options in the unlocked BIOS either don't work well or can brick the laptop(ie undervolting which just bricks one's laptop even when going with -1 increment). The only thing that's valuable when it comes to BIOS modding is the ability to force GPU overclocks much higher than the 135 mhz limit, but it is a seperate mod not connected with BIOS unlock. Frankly the only thing that was interesting in the unlocked BIOS I have was the removal of MSR locks on the power limits - with this one can kinda force the CPU to consume 58 Watts, but it's not really consistent with it - sometimes it works, sometimes it doesn't.
So basically the gains achieved with an unlocked BIOS aren't that good. The best that can be done with this laptop is OC'ing the GPU and forcing the CPU to run on 3.6Ghz on 4 cores. Then the beast in this laptop is unleashed, but for that to happen one also needs a repaste or any other cooling mod, because the temps aren't great even on stock and skyrocket when the clocks are raised.
-
1
-
-
Can anybody be kind enough to help me with unlocking 960M vBIOS to allow overvolting and full-range overclocking?
Here's my extracted vBIOS:
https://drive.google.com/file/d/0B6lwngDOamxtbXVIU3BCazE2NXM/view?usp=sharing
-
Idk why but voltage offsets are broken in Lenovo BIOSes. I have a Y50-70 laptop, broken the same way, even BIOS recovery didn't work for me. However, this thing below actually did:
1. Disconnect the battery and the CMOS battery.
2. Remove all RAM modules.
3. Connect AC and turn it on, then the laptop will endlessly turn on and off.
4. Then when it turns off, connect the CMOS battery.
5. You will be still in a bootloop, then when it turns off again, plug one of the RAM modules in.
6. Done, you should get to BIOS setup
It should work fine even if the laptop is different, as long as you are able of quickly swapping RAM modules and the CMOS battery.
-
Actually, BIOS recovery in that case wouldn't do much. I've been through that situation before, and Insyde Crisis Mode was also kinda broken after messing with undervolt settings.
The only thing that helped me was:
1. Disconnect the battery and the CMOS battery.
2. Remove all RAM modules.
3. Connect AC and turn it on, then the laptop will endlessly turn on and off.
4. Then when it turns off, connect the CMOS battery.
5. You will be still in a bootloop, then when it turns off again, plug one of the RAM modules in.
6. You should be able to get into BIOS setup screen, with your overclocking menu settings reset to default ;).

Lets enable overclocking on all 6 and 7 series laptops
in General Notebook Discussions
Posted
I'm using 2 4GB Ramaxel 1600Mhz CL11 sticks. Lowering the frequency seemed to help, but after messing around with the BCLK I can say it is working the same way like on 1600Mhz - it's just a lottery.
And maybe I wasn't too clear about the ME being tied to a particular laptop. I meant that if user A has a laptop A and user B also has a laptop A, their ME's are identical.
Actually there are 2 Lenovo Y50-70 revisions, one has i7 4710MQ CPU and the other one has an i7 4720HQ. It seems like the first one uses HM86 chipset, and the second one runs on HM87. They use the same BIOS packages and they share ME, but as it turns out, one can have its BCLK unlocked, and the other one can't.