Minihack
-
Posts
9 -
Joined
-
Last visited
Minihack's Achievements
Curious Beginner (1/7)
3
Reputation
-
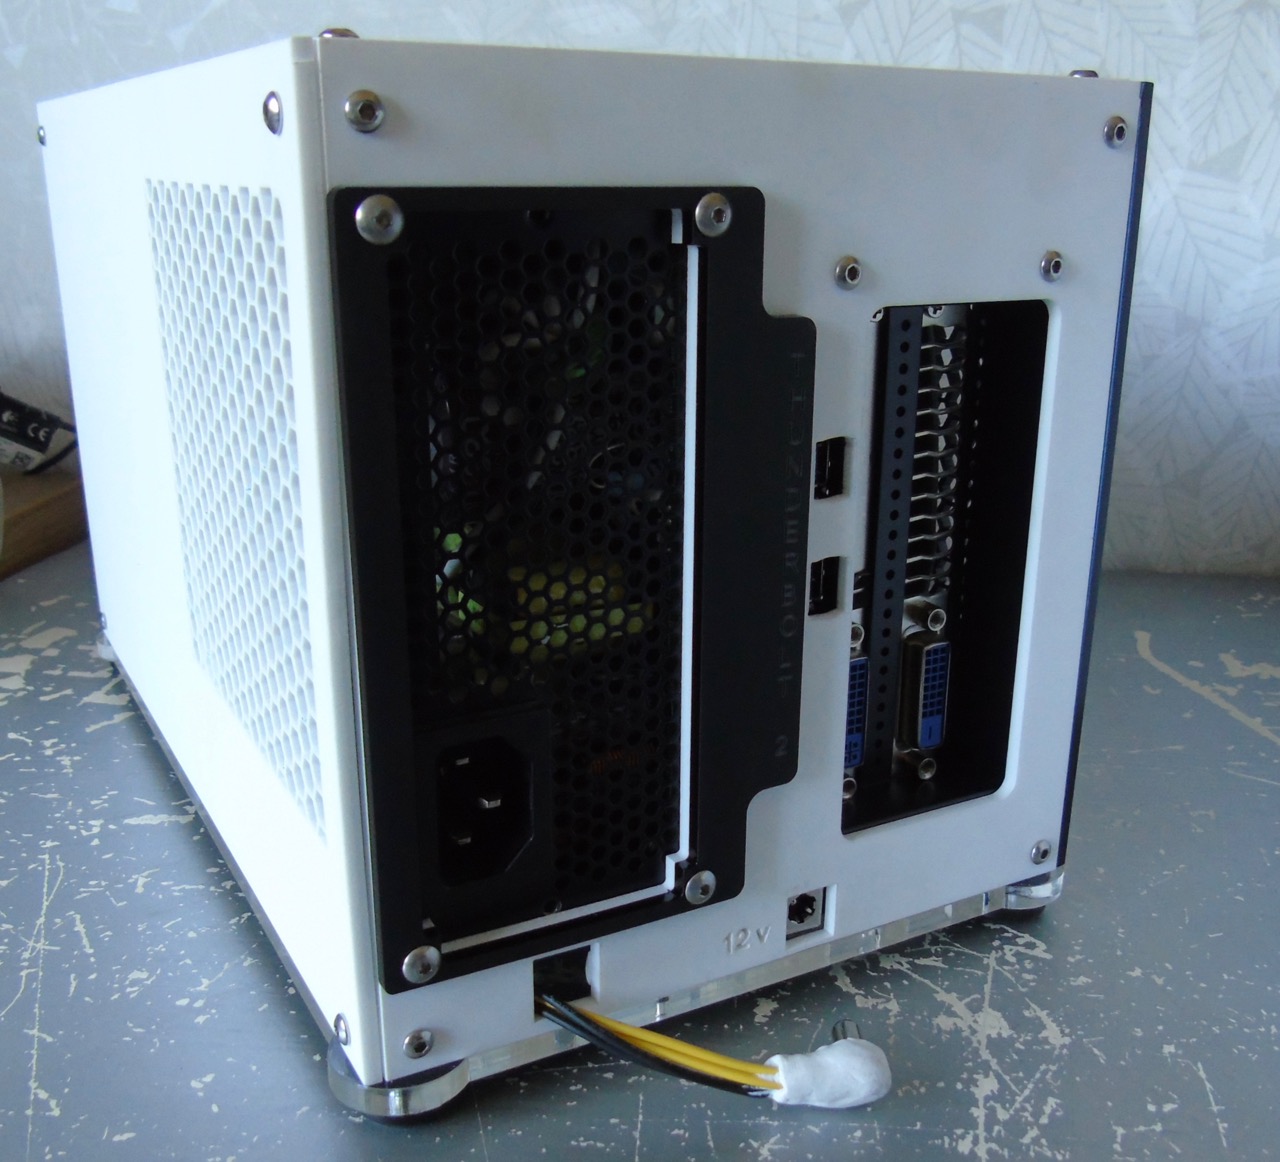
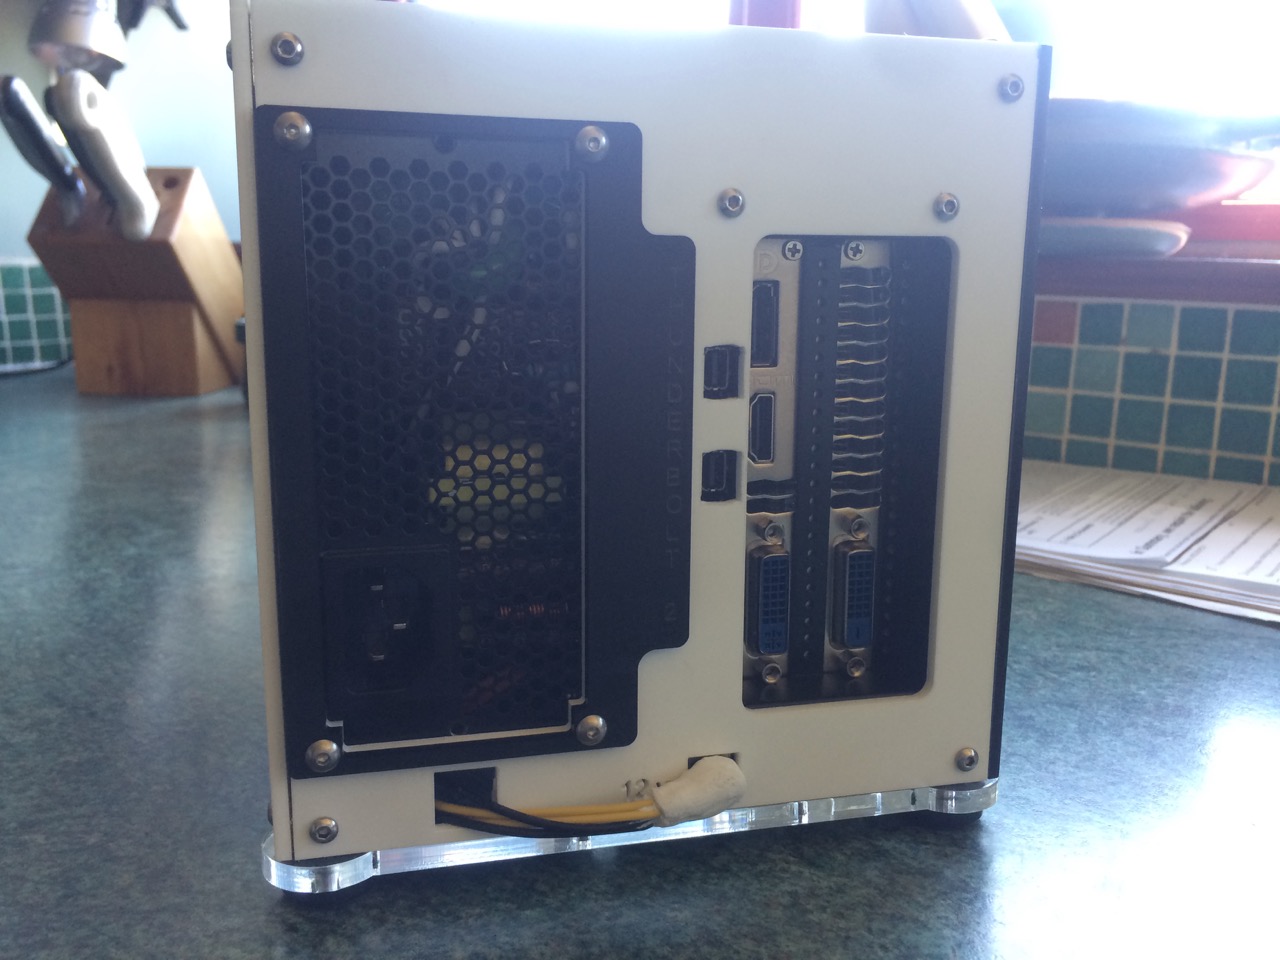
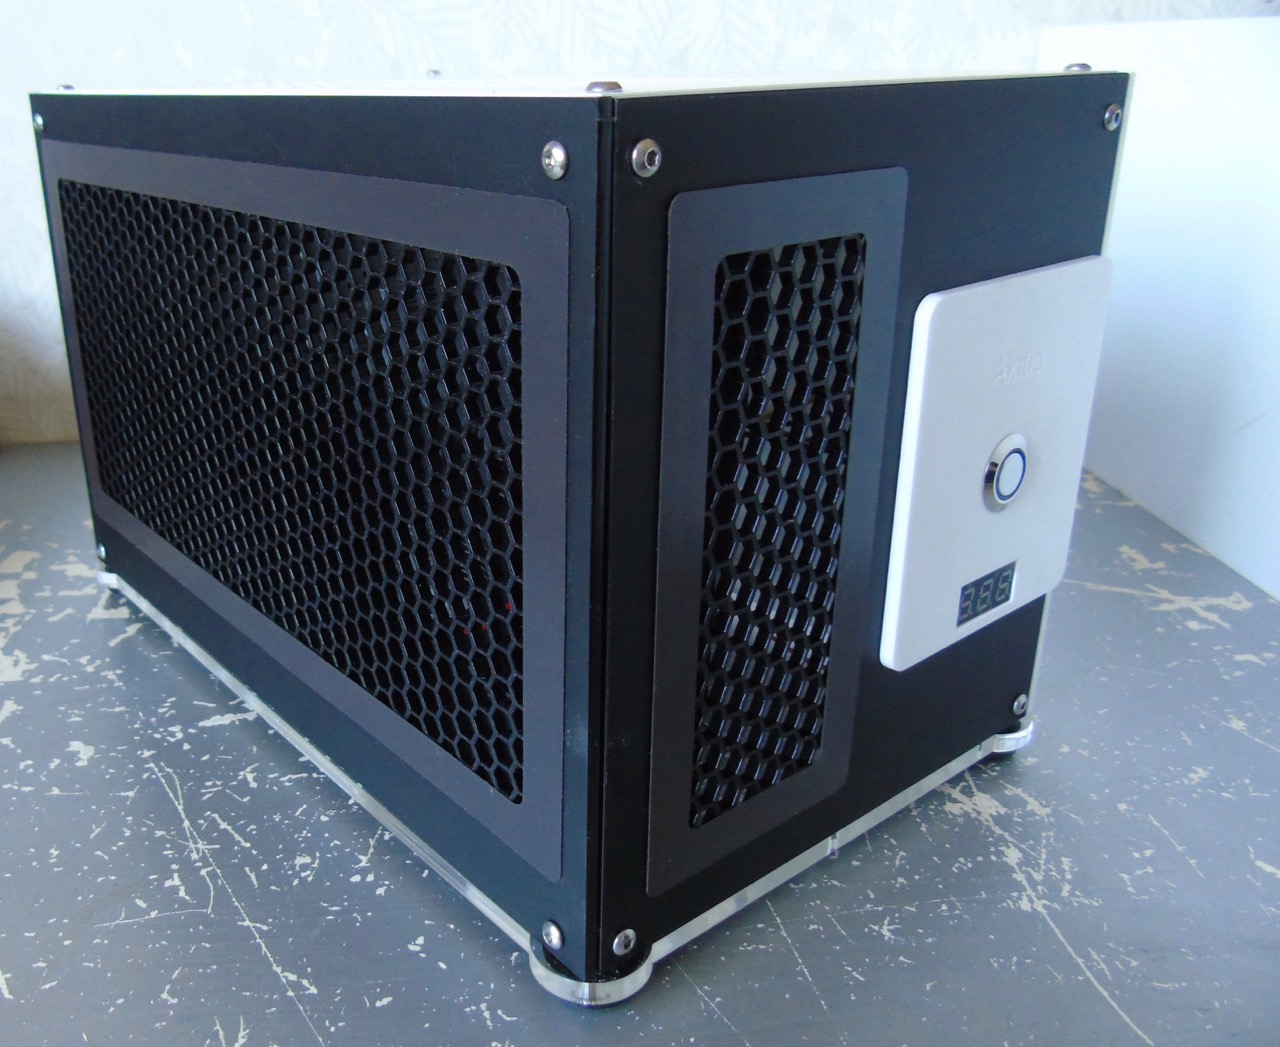
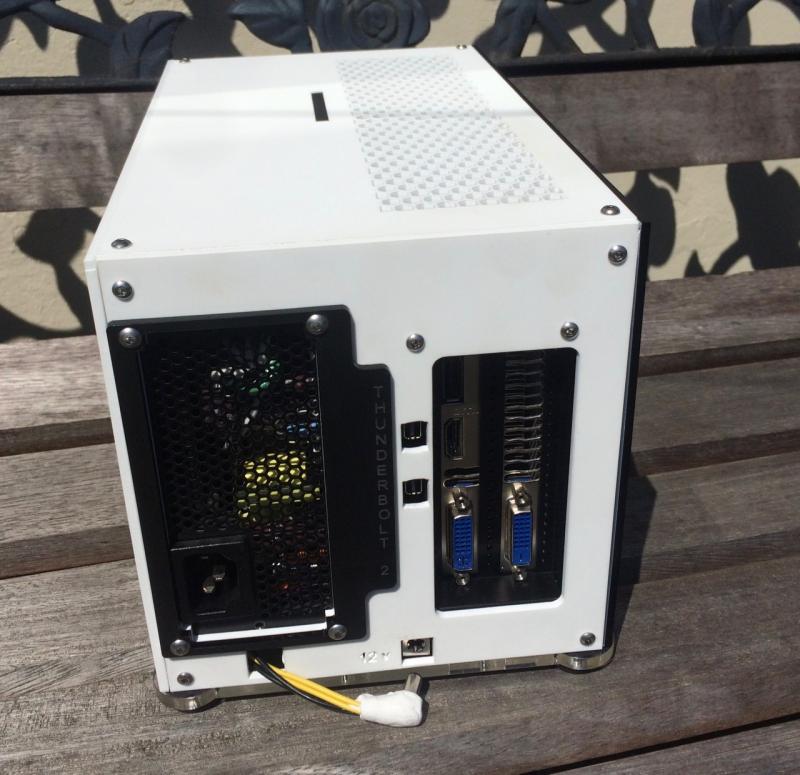
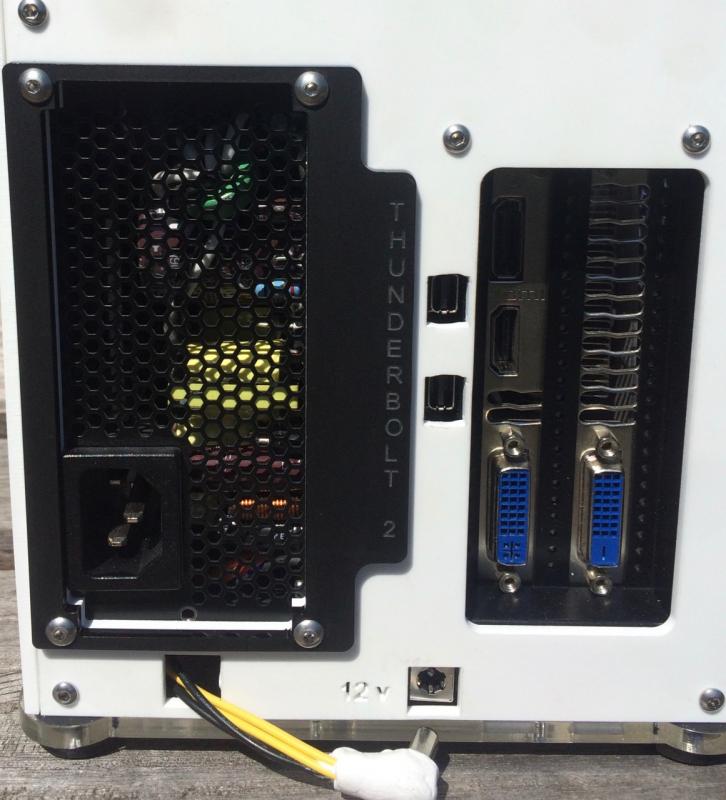
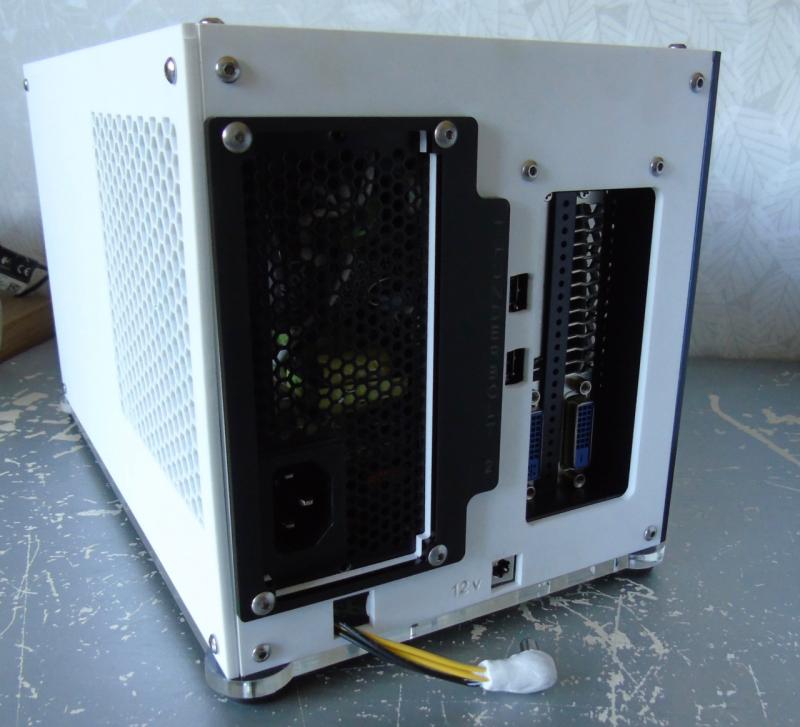
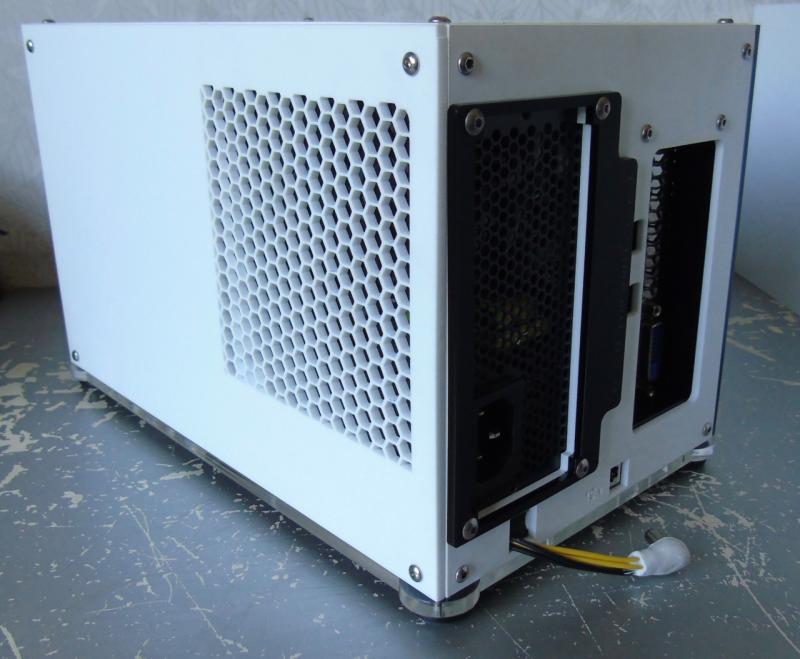
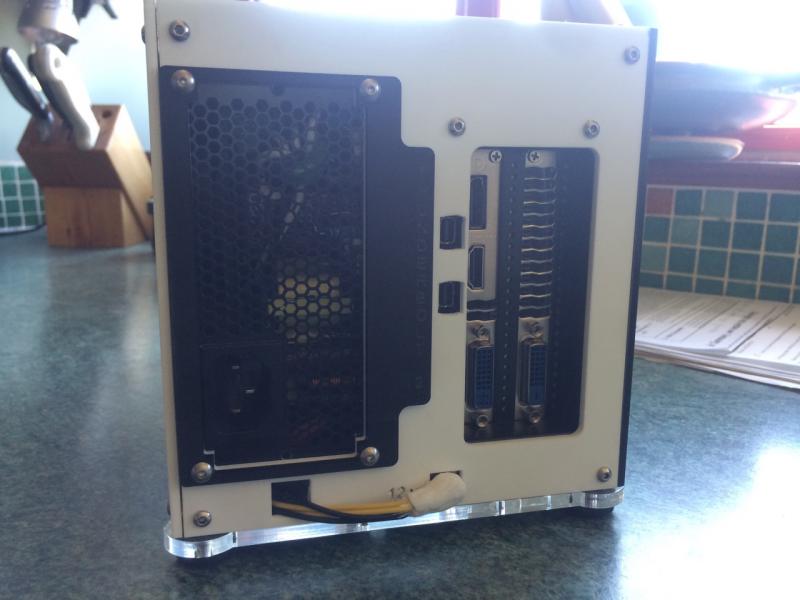
Here are a couple more rear views showing engraved detail alongside the ports. Re-used parts from the Akitio thunder are: Circuit board and ports (obviously); PCI-e card holder (it is such a neat design this really was needing to be re-used); Case feet. All the screws removed from the original parts have been bagged up and placed back in the box so it can be re-assembled if need be in the future. Here are some build details: 1. I made this to fit my MSI GTX 660 twin frozer III and so it is made to the GPU length. 2. Made to fit the Silverstone range of SFX Power supplies - I have a 450W example to hand. The above 2 factors means this comes in at 268mm long, 164mm wide and about 150mm high - it'll take 2 slot GPUs up to 260mm long. External acrylic is all 3mm as mentioned already and, if making one from a single colour then you can squeeze it all out of a piece that is 600mm x 400mm. Internal acrylic used is a inverted T frame design from 5mm clear perspex. The 2 pieces needed can be cut from an A3 sized sheet. Other items used are: 8 x 12mm corner cubes with 3mm tapped holes in the centre of each face. 8 x 10mm standoffs with M3 internal threads and M3 extremely sections where they are screwed into the upright supporting piece of 5mm perspex. Rather than trying to tap the perspex with an M3 thread for the standoffs (never a good idea in my opinion) I instead have used threaded inserts that can be heated up and pushed into pre-cut holes in the perspex and provide an incredibly strong unstrippable threaded connection [ I use these for all my motherboard trays in my business and they have never let me down].
-
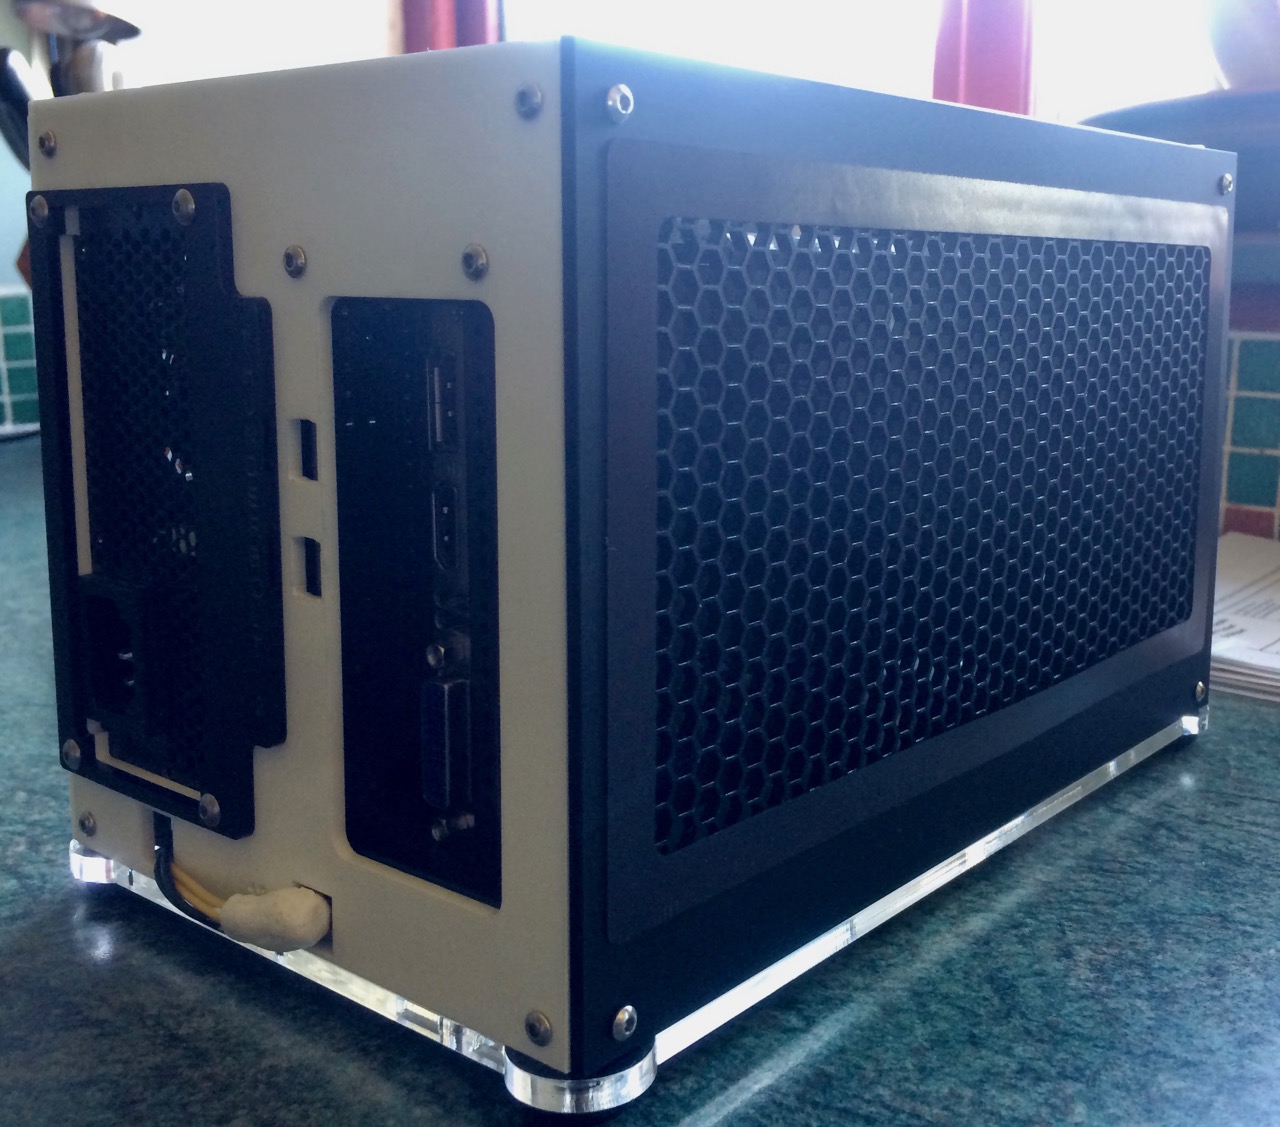
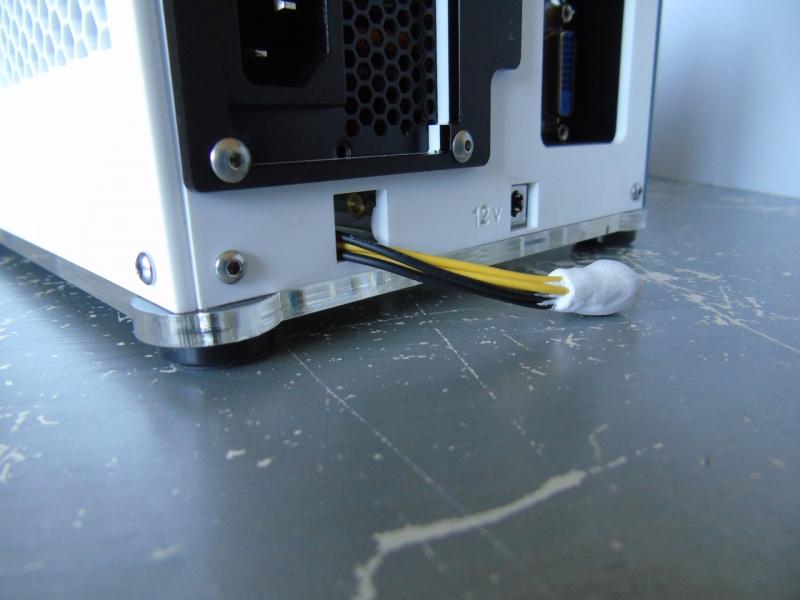
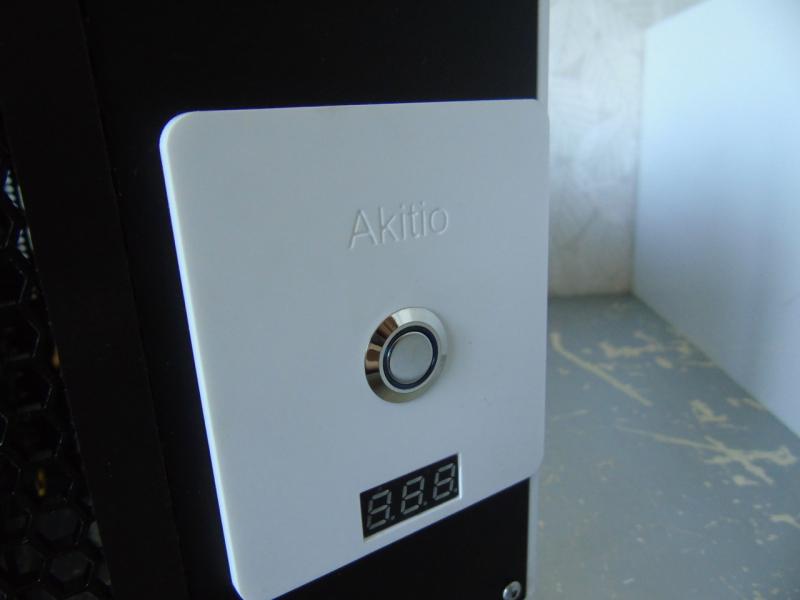
As you'll have seen from the first post I went for a honeycomb ventilation pattern - reason: this hexagonal pattern give maximum open area for minimum strength loss. The inlets and outlets should be filtered, so I have used demciflex filters to front and GPU side (and will also be buying for the roof outlet and for PSU fan inlet). Mix of matt white and black sort of evolved from the parts I had to hand, and these parts are all 3mm thick. I used the feature of putting white onto black at the switch area both for style points and for extra re-inforcement. 3mm is, in my view, not a structural strength product and doubling up can compensate for that in stress areas. And so, we come to the back of the case: I'll upload some more once I am allowed to!!! Anyway, you get the gist of it so far. Back of the case also is double thickness around the SFX power supply to give it good strength to withstand plugging and unplugging of the mains lead. Let me know your thoughts!!!

-
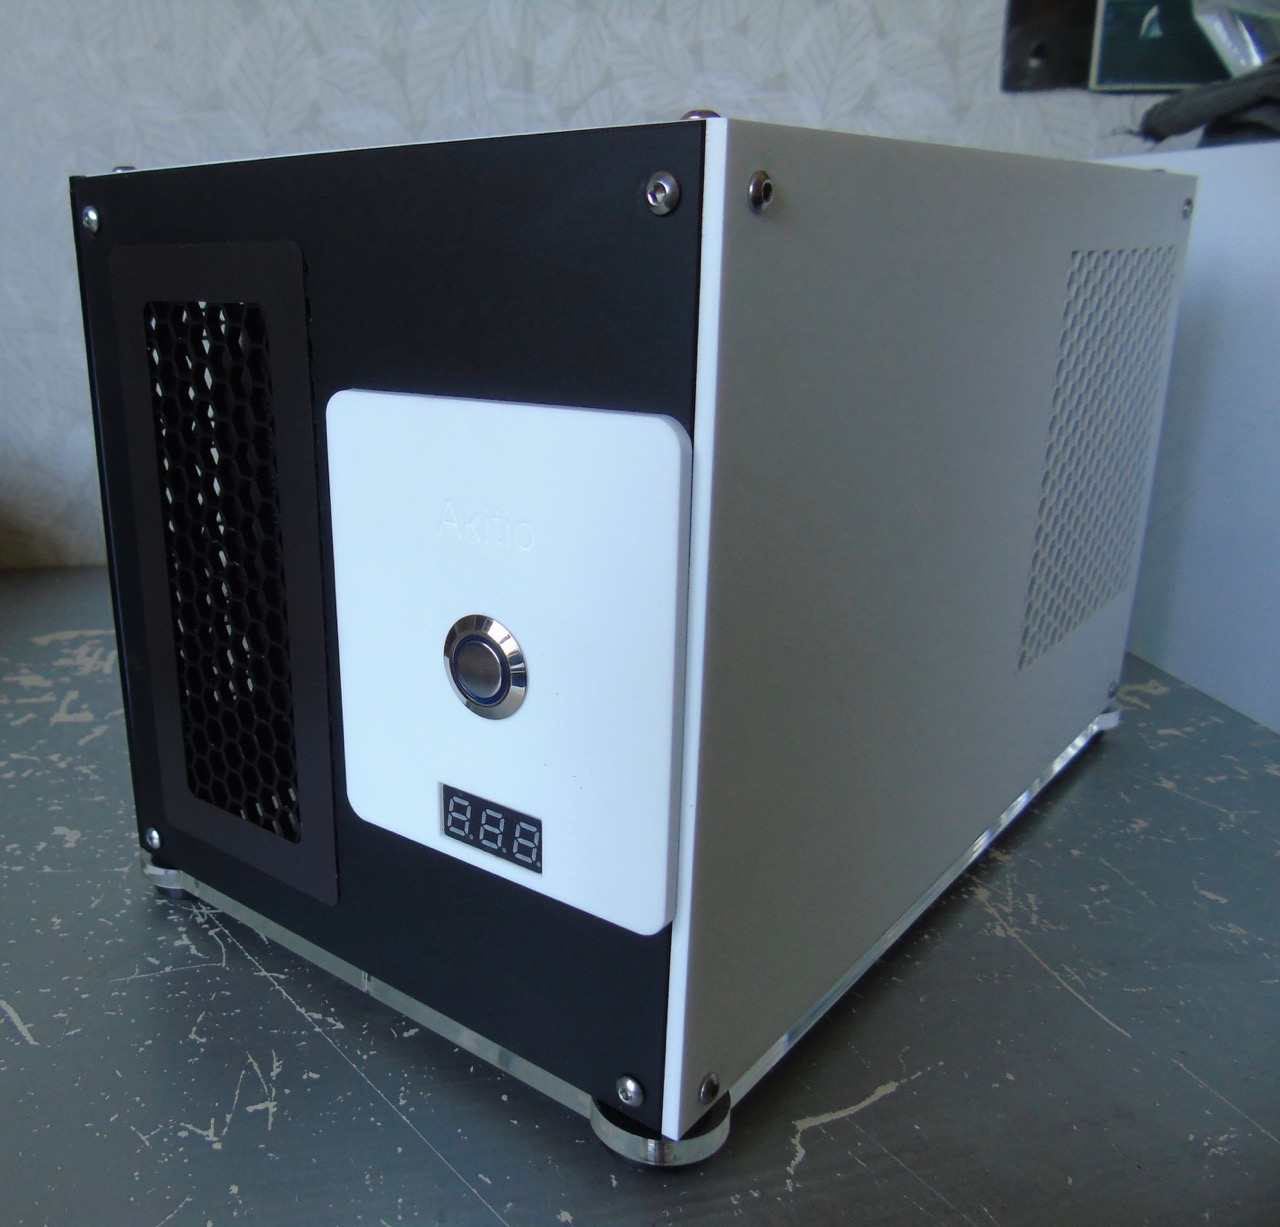
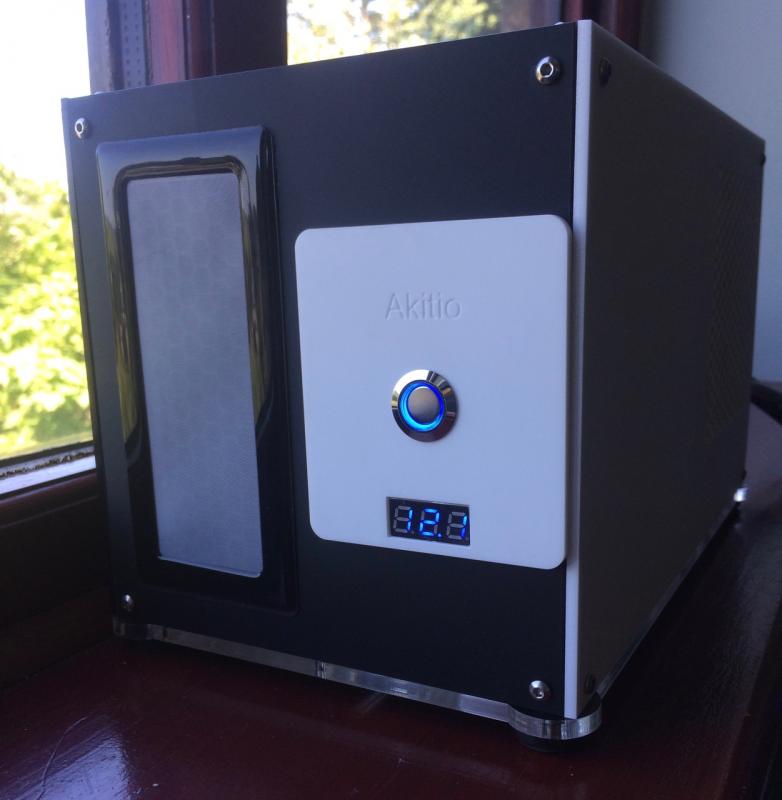
A little while ago I bought an Akitio 2 to play with for my Mac Mini. I did not like the idea of chopping the original enclosure and also was not happy with the idea of separate power supply and wires running all around the desk so, as I run my own one man laser cutting business I decided to make my own design. I wanted to develop something that met the following criteria. 1. No cutting of the original Akitio Thunder box, but re-using everything that I could from there in such a way that the Akitio could be re-assembled into 'as new' condition' if I ever wanted to sell it; 2. On board power supply to power everything (i.e. one mains lead in); 3. Switch at the front; 4. voltage indicator at the front to check stability of 12v line; 5. Lots of ventilation for the GPU; 6. Filtered input air; 7. Stylish look (shouldn't scream 'home made'. 8. Potential for expanding design to take longest GPUs on the market. I won't bore you with all the development side in this first post [ but will add the detail if you'd like it], but I did go through a lot of perspex before I settled on the first proper prototype I am showing in this post. Some sheets were wasted through simply not getting measurements right, others from fundamental design changes to get maximum strength from minimum materials cost. I'll explain more after the pictures, but here is the enclosure in the current state. I will have to split this post due to the 1MB upload limits per post. In this first post: front view with engraved detail, on/off switch and voltmeter:


-
EXP GDC Beast/Ares-V7/V6 discussion
Minihack replied to jacobsson's topic in Enclosures and Adapters
Hi, This is true. If you are powering the unit from an ATX supply then just use the cables from that to power the card. If you are using a power brick though and want a simple splitter this will do the job I think: http://www.ebay.com/itm/NEW-male-to-male-6-PIN-PCI-EXPRESS-Y-SPLITTER-POWER-CABLE-12-MADE-IN-AMERICA-/261465988702?hash=item3ce0965e5e:g:G5AAAOxyOalTXrXo Remember the GPU must be inside the power limits of the power brick and also be 150w or less. -
Member Introduction Thread - Post Here!
Minihack replied to Xonar's topic in Site Announcements, Rules & New Member Intros
Hi, Just got started here. Didn't know this site existed until I recently started looking into the possibility of an external GPU for my Gigabyte Brix - and from reading what I did here I found that what I wanted to do was possible. So after finding that out - I did it and it works. SO I then posted a provisional guide on this site so that others wanting to try it can read of my experience. One of my interests is in re-bodying PC guts into other cases and scratch building cases. I run a small laser cutting business to indulge my hobby and help others with the same passion. -
Also perhaps of interest is the fact that I have this set up as triple boot OS X Yosemite on the internal mSATA drive and WIn7/Ubuntu on the 500GB SATA. More detail on the OS X elements can be seen on my thread over here: http://www.tonymacx86.com/user-builds/182987-gigabyte-brix-bxpi3-4010u-using-external-gpu-egpu.html
-
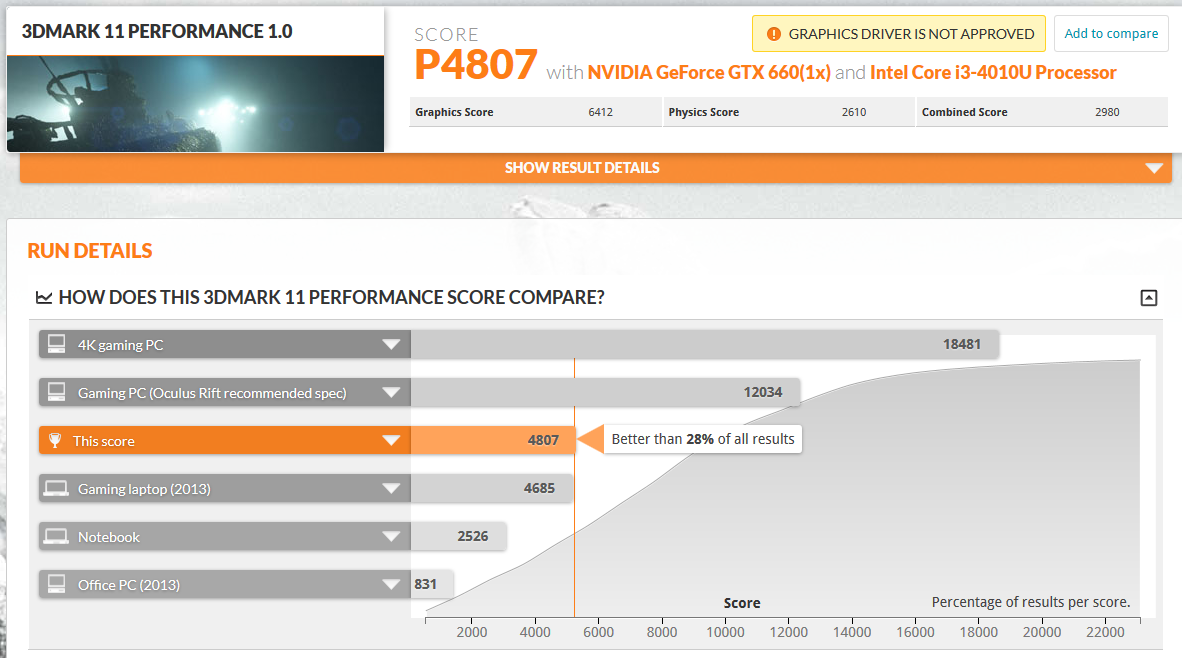
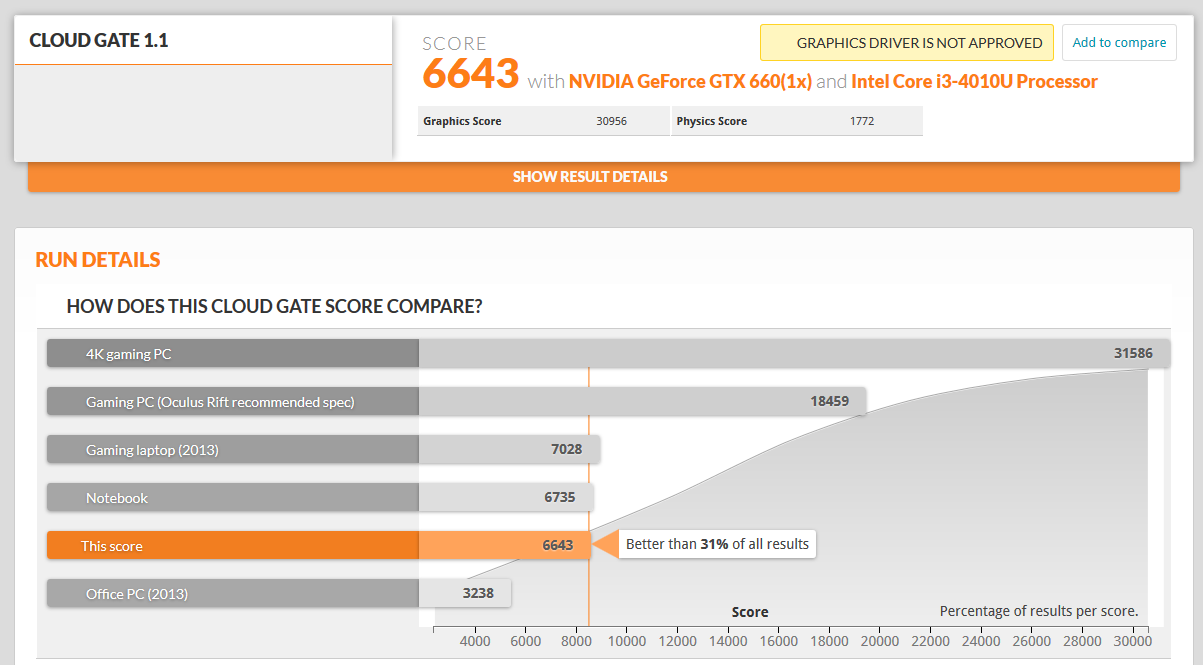
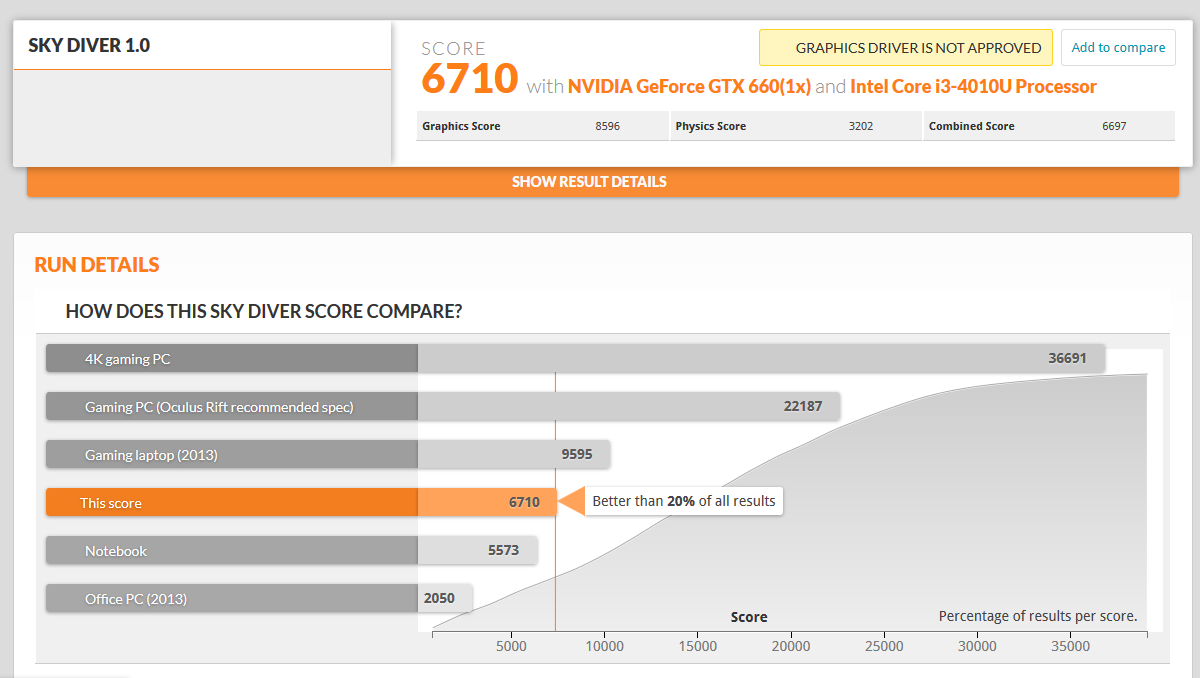
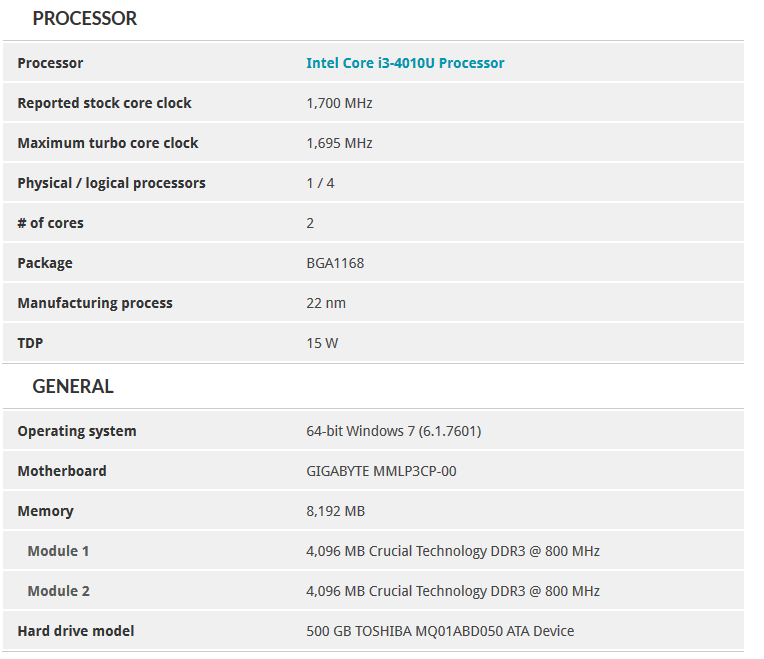
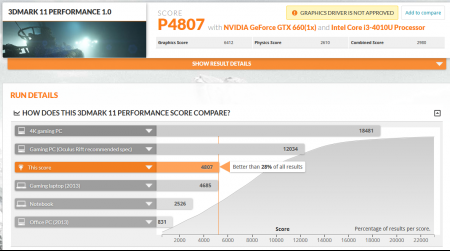
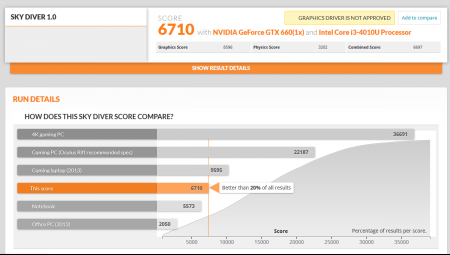
Hardware list, essential components: Gigabyte BXpi3-4010U; Beast V8 with Mini PCI-e connection; MSI GTX 660 Twin Frozr III; FSP 150w 12v power brick. Bios version F9; OS: Win 7 64 bit; No Bios mod.s or DSDT mod.s needed. IGPU is disabled so the on board DP, HDMI and in built projector connection will not work - graphics is using the GTX 660 only. There is an external connection to the projector though and I imagine that will wok by relaying output from the GTX 660 to the external port. I have not tried this though as the projection function itself is very low res. and not of great interest to me. I run a laser cutting business and so the bottom of the case is one which I fabricated myself to house the 500GB disk and this also allows an easy routing of the flat cable out of the back of the Brix. it would not be a problem though I think to simply file down the lip of the original case bottom to permit the cable to exit. Benchmark results from 3DMark 11 and also the Cloudgate and Sky Diver scores from the latest 3DMark are in the attached png files


-
Okay - probably tomorrow I will have time to lookup those benchmark softwares do some runs and make a list.
-
For sure it was surprisingly simple. Just removed the onboard wifi card, inserted the mini PCI-e connection from the Beast kit (I used this one: http://www.ebay.co.uk/itm/181943864835?_trksid=p2057872.m2749.l2649&ssPageName=STRK%3AMEBIDX%3AIT ). Power brick used for my Beast is just a 150W FSP unit. My Brix unit has integrated projector (I bought this one just because it was cheap at £120 because no-one wants to buy them - and it has the same actual hardware inside as the non projector version). When the Beast is connected the internal graphics are disabled (which of course is fine for me) but if you disconnect the Beast adapter then it simply reverts to the internal HD4400 graphics. I have the Brix sitting in front of my TV and the Beast adapter is hidden behind the TV - so to the casual onlooker it seems as if I have some surprising graphics in my small box (!). I made a false bottom for the Brix and in that I have installed a SATA 500GB drive to complement the 250GB mSATA that I have sitting above the Mini PCI e connection and the false bottom sandwiches the Beast connection lead in place between it and the main Brix housing so it can't be disturbed.
-
Just a quick post here to let you know that the V8 version is working perfectly for me via the Mini PCIe slot of my Gigabyte Brix BXpi3 4010U to connect with my MSI GTX 660 twin frozr III - the attached images for Unigine Heaven 4.0 benchmarks tell the story. I am using this with a 150w power brick and using the 6 pin Beast connection to directly feed the 6 pin 660 connection. Hitting the power switch of the Brix activates the external card automatically and it powers down fine with the Brix too. USB connection on the Beast however is non functional but I don't care about that. I couldn't be happier.