


jacobsson
-
Posts
873 -
Joined
-
Last visited
-
Days Won
14
Content Type
Profiles
Forums
Downloads
Posts posted by jacobsson
-
-
It takes after Spectre/Pavilion more than Elitebooks
 what a disgrace...
Wow, that's a real waste of space. Don't bother put in a numeric keypad for god sake!
-
-
Hi guys!
Anyone notice the new usb3 adapter on hwtools? It might be a new detachable option for us? Not saying that the upcoming usb standards might surpass the TB bandwith too. So this could be a more future proof setup. What do you think about it?
-
It's that time of year again, eGPU issues...
I cannot update my driver at all. It fails during install (after the screen start flickering when it tries to install the new one).
I'm currently trying to install the 327.23 driver (I'm currently on 314.22).
I don't dare uninstall my current driver, that's a few hours of work in hopes of getting it reinstalled.
Is there something I'm missing that I can't install any driver updates?
--
I noticed the Intel HD Graphics 3000 is shown as the main GPU, is this due to compaction and whatnot? Would this be why driver updates are error'ing, since the nvidia drivers sees the nvidia eGPU but tries to install over the intel ones?
Had this problem 2 weeks ago!
Nvidia seems to f-ed up with their drivers.
I re-installed my drivers in safe mode, tell if it works for you!
-
Possible, I removed a second heatpipe after gluing it with AC thermal adhesive. Just need to apply some force

I heard the freezer method should be good for this!
I'm also going to use 15x15x0.5mm for my radiator (removing the black thermal tape first I guess?).
For the the heatsink I'm going to use 20x20x2mm shims, the coins are ~1.85mm so that should be alright.
I also saw this ridiculous fan that I'll give a go =)
-
..
Im going to drill 2560p back plate in this way:
My desired lines

I just jumped on your wagon and ordered a 2560p bottom plate
+ copper shims to replace my coins with, if it's even possible to even remove them

-
Ok, guys, I ran a few stress-benches (wPrime 1024mb and Prime95 10min). First of all, the temps are now completely adequate. Under full continuous load the system settled under 89C in Prime. That is with the fan at full blast and stock BCLK. With a back plate removed the same test showed 81C max. Same test at 104.8 BCLK - 82C max. So, drilling holes in the cover would definitely bring some improvement but no more than a couple of degrees. Still, I might do it just for kicks.
Alright dude, that's really nice temps!
So the biggest difference between our mods is that you basically have more copper than me, and not to forget, I have a ES CPU which might behave a little different temp wise.
I think I'm going to make a similar "pro" mod as yours =)
-
Still experimenting with cooling. So far, was only able to slow down the heat buildup, which also means a slow cool down process (which is fine by me). Shaved off about 5c at max load, which is very much in line with the expected results. To get a significant improvement beyond that would require adding and extra pipe => complete HS overhaul. The biggest problem would be to find a way of directing the heat out of the machine. I'm thinking about getting an extra bottom cover and drill holes in it. Also, a micro fan from some ultrabook might also help. Dunno, need new ideas....
Damn!!
And the mod is not even more complicated than my coin mod from what I see?
Did you choose any specific copper shims?
NICE!
-
Hello everyone! I recently purchased a HP 2570p after Nando4's comparison confirmed my choice over the Lenovo x230. I have the i7-3520M CPU variant and am looking for a good eGPU set up. Should I purchase the PE4H with PCIEMM-060B cable or the A cable? I'll post my results based on your suggestions here and I might be trying out some mods. I don't have too much experience in laptop modding, but I am familiar with programming.
The 2570p uses express card slot so the PE4L2.1b-ECxxxA/PE4H 3.2-EC is what you want, all versions with non-soldered cables is currently not GEN2 capable. Regarding modding/upgrading, the 2570p is very easy to open up and upgrade. I glued copper coins on my heatsink and can now run my 3820QM without any problems.
-
just show me how to use the egpu without an external monitor
-
...Chromebook pixel requires about 30volts for backlight (uses about 18.5 mA and draws about 5.6w max).
Couldn't this be easily done by the use of a step down regulator?
I'm heading to work at the moment but I'll look into it later.
EDIT: What voltage is required for 2570p?
-
No rush, I'm still experimenting with heatsinks and pipes. So far so good. Idle temps are almost as good as with 3632qm. Haven't tried 100% load yet, need better cooling. Also, it's +27c in my room, crazy hot.
Could you give me a little sneak-peak or description of your new heatsink mod?

EDIT: By the way, why is your HHD's only showing 3Gb/s?
-
like what the title said, help ??
What system do you have?
Read first page for info about nvidia optimus, which enables internal display as output.
-
Things are looking up for Thunderbolt.
A smaller Thunderbolt 2.0 box from Sonnet $500 and 80W power.
Might just fit one of these 'mini' 760s - unfortunately not enough to supply 170W.
At least we might get some Thunderbolt 2.0 traction.
My ASUS mini GTX670 is shorter, better performance(?) and draws ~160W. Maybe a good candidate to fit the box?
-
@bjorm: 5c lower on 'high load' is pretty good! You should really try GC Extreme for thermal paste, it gave me 5c lower temps without mods... And nice work man!
-
Yeah that would be great, but the performance boost will surely be not as good as in 16bit but I hope it's like 50% more FPS at best I've myself notice arround 100% more FPS in 16bit with msi kombustor benchmark (KMark).
Btw Thanks for posting on ENBdev forum
No problem buddy, very nice find!
-
- Show your interest in this particular feature/request (or even 24bit for no visual degradation), be polite and patient !
.
Wow, forcing 24-bit color would be really awesome for eGPU. Please keep us updated if this can be possible!
-
 1
1
-
-
...Also, if you sand/cut a section on the top of the heatsink to expose a portion of the pipe directly above the CPU, you may then slap a thick 3-4mm sheet of copper on it and further slash the temps...
That is exactly my plan, but instead of just copper I'm gonna add a heatpipe instead.
-
You are second person who discouraged me to use this tape so I'll go with adhesive paste
During using 8460p with 2630QM I was able to run all tests with 65W adapter so I conlude that may not be the main reason of crashes.
In my opinion, If we want to reduce temps we have to do some vents in bottom case (near heatsink and fan). For me it's very strange that HP created 12,5" QuadCore CPU capable laptop without any vents on the bottem. Take a look on the 8460p/8470p bottom. There are a holes covered with mesh, I've been planing to do the same but I cant find spare cover in poland (I don't want to order from ebay cause in poland, sometimes we are able to find this cover or whole cooling system for less than 10$).
I'm going to swap i5-3230M with 3612QM/3632QM but only when I do my heatsink mod (using copper plates (instead of pennys) from VAIO cooling system) and bottom case mod. We need remember that I already have modded fan to lower rpms in first treshold and Im going to solder another one diode to lower rpms wit anothe 400rpms
I need to maintain <50C in idle and max 85C with gaming (not Prime test) with QM, If I wouldn't be able to do this, I will be forced to give up with QM.
On nbr Aikimox is going to fit IPS screen, he is very capable (more than me) so maybe he will be able to overcome problems found by me during fitting IPS
When looking at Aikimox results the 2570P seem to do fine with the 2560p-heatsink combined with a 35W Quad (double check this), and of course some HQ thermal paste. Regarding your heatsink mod, make sure to add as much copper on the heatpipe as possible. The heatpipe need more material in order to move all that extra heat from the heatsink itself, my coin-mod suffers a little from this.
-
...Something else, if you're going to get a quad core you should strongly consider upgrading your power supply to at least a 90W version. While running 3DMark11 with the 65W version, I would almost always get driver crashes and the test would rarely finish. With my 90W power supply it finishes more often than not.
Hmm that's weird I've no problem running 3DMark11/10.Vant/06 with my 3820QM, using 65W adapter. I use eGPU for graphics but there is still a lot of tests for CPU only, and only crashes I've ever had was due to a weak eGPU power supply.
-
@bjorm I've read very mixed opinions about the thermal tape so I can't say if it's good or bad. What I do know is that thermal adhesive glue works great (uses it myself), especially the Artic Silver one.
I would go for the latter if I were you!
Please report back when you tested =)
-
-
Introduction
The RAID_0 was very easy to setup thanks to Mr.Fox's "windows installation guide", I've only made these instructions custom for 2570P users.
What do I need?
· 2 x SSD drives: I used 2 x 256GB Sandisk Ultra Plus
· A knife
· Some sturdy glue, I used LocTite Super Glue.
· 4GB+ USB thumbdrive
Instruction
RAID_0 Setup for Win 7
- Make an WIN7 USB installation with Windows USB/DVD download Tool and a Win7 ISO (fully legal)
NOTE: If can't find Home edition of your language you can download Pro edition and delete \sources\ei.cfg to be able to choose home edition later on in the installation.
- In bios: Set ‘Sata Device Mode’ to RAID
- In bios: Set USB-boot in top of the list of BOOT Devices
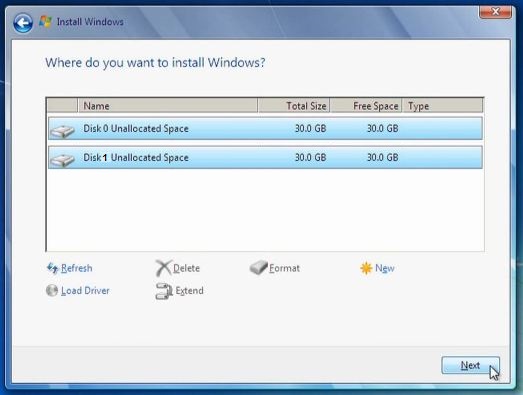
- Boot up Win7 installation from the USB-drive
- Inside installation make sure to delete all partitions so that you end up with two unallocated disks (disk 0 and disk 1)
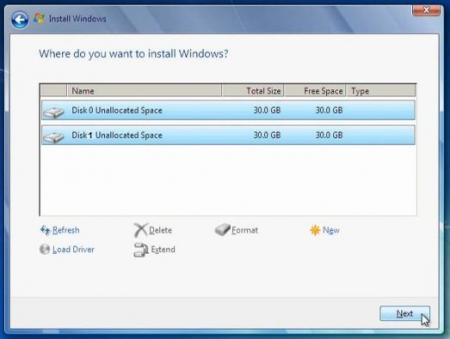
- Install Windows 7 one of the unallocated drives, for me disk 1 worked whilst disk 0 didn't (can’t explain why, but I guess it has to do with the RAID setting from BIOS).
- Windows should now be installed. Since we only have allocated space on one disk we need to enter Disk Management in Windows: type “partition” in start menu search field (no quotes) press enter.
- Inside Disk Management: Extend the allocated disk (C:\) with unallocated space of the second disk by choosing “Extend Volume”.
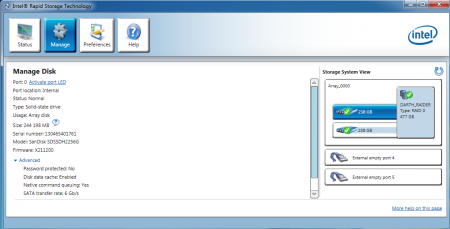
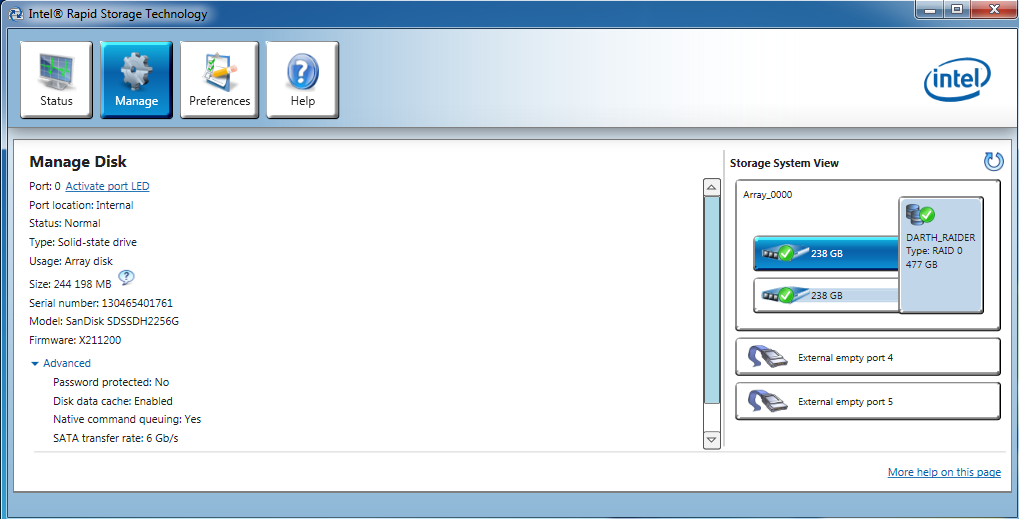
- Now it's time to create our RAID-array. Install RTS (Intel’s Rapid Storage Technology) from HP or Intel website. I took my RTS from HP's 2570P drivers archive.
- Under “Create” tab: You can create the RAID-array, choose RAID 0.
-
Setting Stripe size? This is something I forgot to do and had to settle with default 32KB. I’m happy with it so I don’t really care. In other words, I have no clue what's preferred.
- Press next and wait some 30 minutes or so in order to migrate data from (in my case) disk 1 to disk 0.
- You’re done! Now it should look something like my "Darth_Raider" =)
ODD Face Plate mod (text instructions only)
1. Remove the optical drive (one screw under the notebook's back cover)
2. Take pictures of how the original bezel is attached to the optical drive
3. Pry of the bezel off of your optical drive (no point of being careful)
4. Cut off all ‘hinges’ from the bezel so it’s then flat and nice
5. Remove the (very useless) bezel from the eBay caddy by removing two screws under the sticker.
6. Use a light touch of glue (or tape) to test-fit the odd bezel on the eBay caddy.
I7. f you're happy (nothing is sticking out?), glue it on permanently!
Results
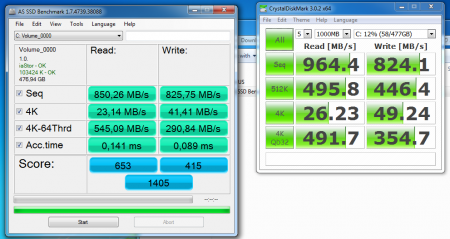
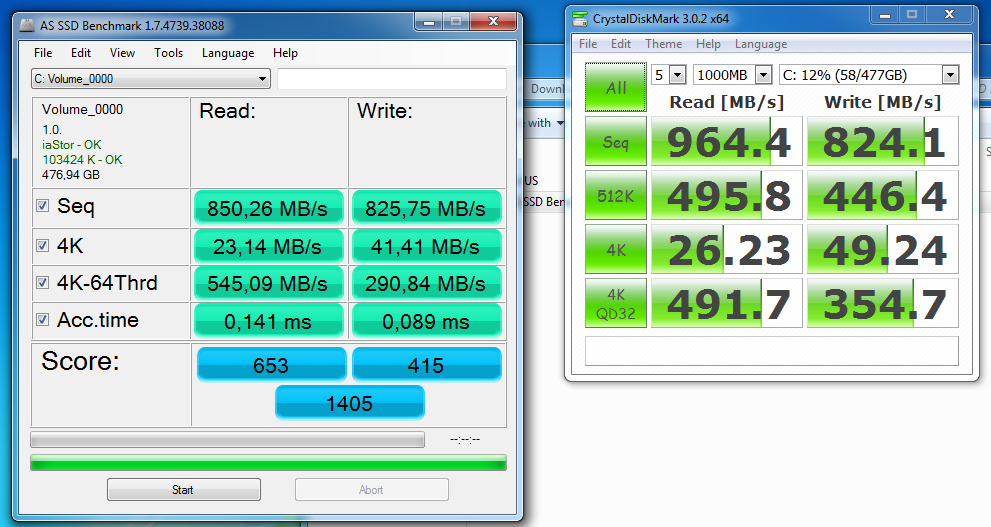
RAID_0 Benchmarks: AS SSD & CrystalDiskMark
Boot-up Time (Video): ~16s from power on to desktop
-
5
- Make an WIN7 USB installation with Windows USB/DVD download Tool and a Win7 ISO (fully legal)
-
Introduction
Why making this mod, isn't the stock cooler enough?
My former laptop had a clumsy 15.6" screen with an average 35W 3612QM,I wanted make a mean and portable gaming setup so it had to go.
I found that the 2570P is a 12.5" socketed little beast which allows for 45W Ivy-bridge CPU's, perfect choice for me!
This mod is simply necessary in order to absorb more heat comming from the 45W 3820QM.
Wait sir, you can't do high-end gaming with that integrated GPU right?
No you're right, I paired up my socketed little beast with my GTX670 eGPU setup, see my sign for benchmarks.
Instruction
Materials used
· $10 - 30$ 2560P/2570P heatsink from ebay
· Copper coins, Cu 97% (coins or you’re not an anarchist)
· Rasp (don’t worry it’s for the coins, not the notebook itself)
· Cohesive thermal compound (I used Artic Silver)
· Thermal paste for CPU (GC Extreme gav me best results)
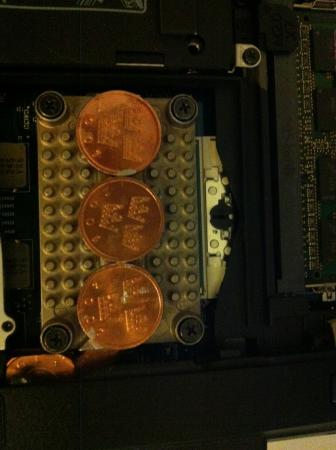
Coin sizes
-
All coins: I choose to flat them down with the rasp on one the side, which will be the smooth contact surface on the heat sink.
-
Heat pipe, coins: Flat down 2 x coins so that they obtain a rectangular shape in order have a snug fit when assembled in the notebook.
-
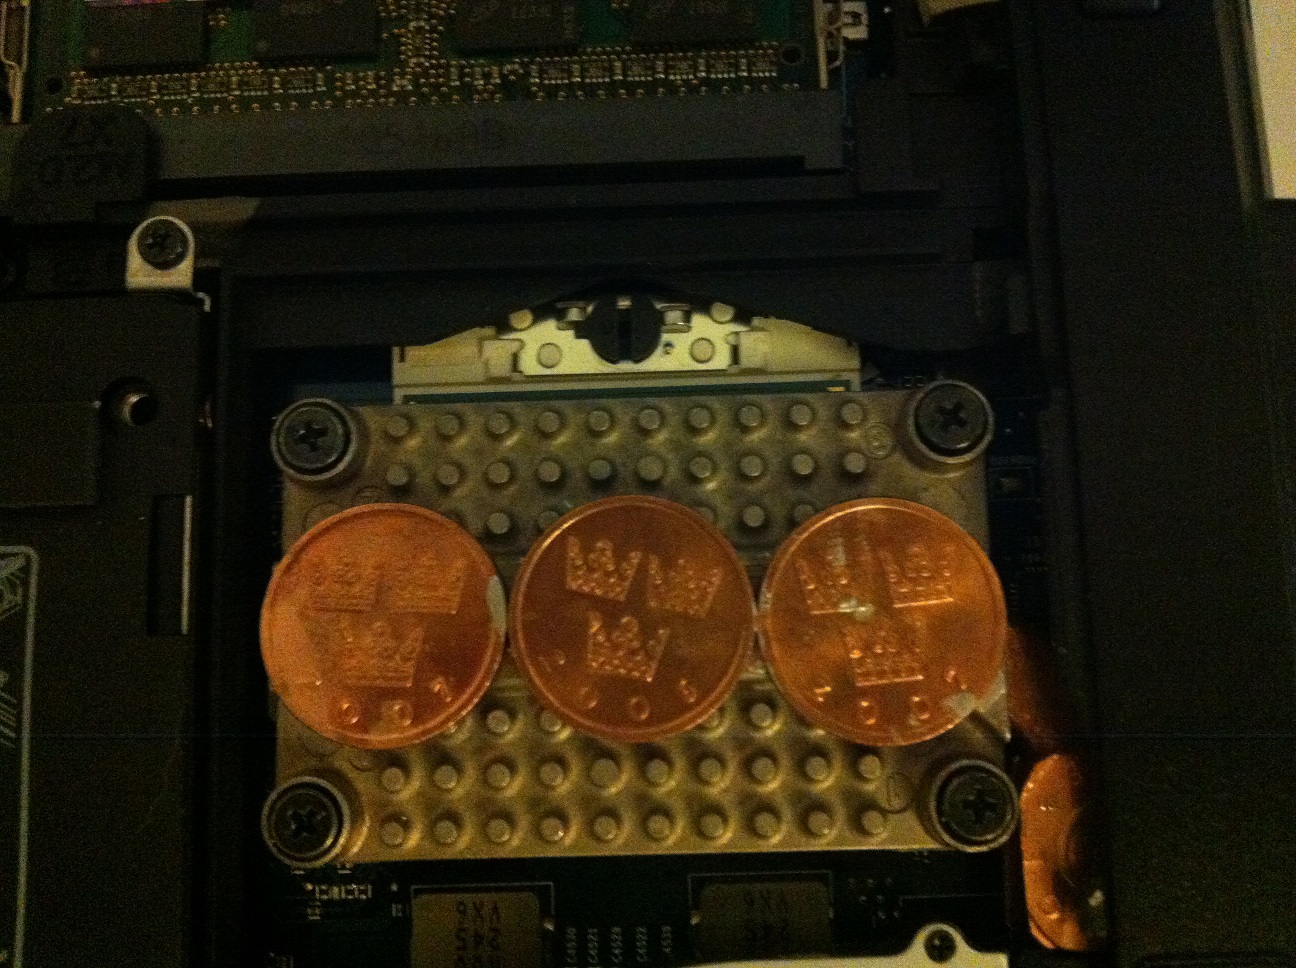
Heat sink, coins: Depending on your coin size you have to test how many you can fit on the flat surface of the heat sink. It turns out the heat sink fits exactly three of my coins.
[Pic 4]
Applying coins
- On heat pipe: Check carefully that the coins will fit with the heat sink assembled; I taped mine to the heat sink in order to test. If not, trim them some more and try again.
- On heat sink: These coins should be good to go by now!
- Now mix your adhesive thermal compound (if 50/50 mix: just spread two equally long lines in parallel and mix them).
- Apply adhesive compound to the coins: I suggest that you begin with the coins for one side of the heat sink (and pipe), now let them dry. Now do the other side, let them dry. [Pic 5 – all coins of one side/last coin on other side]
- Apply the other thermal paste to your CPU, NO not the adhesive compound you crazy person!
- Carefully install your Anarchist Heat Sink, remember the space will be more limited for the heat pipe now so don’t scratch up your CPU.
- DONE, you’re now officially an anarchist!
Results
Mod Results


Temp Results
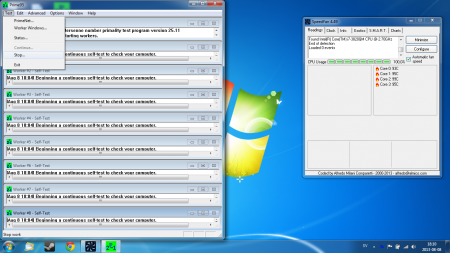
These are the temps for each core when completing the Prime95 Mixed test.
Core #2 is always hotter than the others in all tests I've done and this is probably due to the fact that the CPU is an engineer sample.
Prime95 Mixed test
What about normal use temps?
Idle (doing nothing): ~45c (seen it drop down to 39c for a while)
1080p, youtube (fullscreen): ~58c
Battlefield 3: ~82c
Chivalry: Medieval Warfare: ~75c
Conclusion
This mod helped, not only to clear the prime95 test with temps ~97C, but also make sure that normal use like browsing/streaming/gaming would not throttle my CPU, one have to admit that Prime95 doesn't correspond to near normal use.
As you can see there is room for adding more copper to the heatpipe in order to have higher efficiently transporting heat from the heatsink, this will be in my next update!
-
3
-
All coins: I choose to flat them down with the rasp on one the side, which will be the smooth contact surface on the heat sink.


12.5" HP Elitebook 2570P Owner's Lounge
in HP Business Class Notebooks
Posted
You might see similar results with your 3236QM since you probably will apply some HQ thermal paste. Is this without any extra copper to the heatsink?