


bsohn
-
Posts
66 -
Joined
-
Last visited
-
Days Won
2
Content Type
Profiles
Forums
Downloads
Posts posted by bsohn
-
-
If as noted Intel has given the eGPU's a green light then the best thing Akitio could do is to Make an eGPU Case by providing the following:
#1 - Power supply connector that can handle upwards of say 300-400 watts (possibly supplied with a 200watt min power adaptor so that it would be able to handle most cards right off the bat)
#2 - On circuit board Dual PCIe 6 pin ports with (3) 12v and (3) Ground pins, By PCIe standards this would allow people with 8 pin cards to use a PCIe 6 pin to 8Pin adapter. My set-up is ONLY capable of running 6pin cards as I reduced the power lines by one to my PCIe connectors for compactness.
Other than that it is all cosmetic and packaging.
If the really want to get fancy they could have an external SLI connection so you could add Akitios next to each other for SLI if you wanted later but at that point you might as well not really have an eGPU and move on to a full case set-up.
I still like the compactness even though I wasn't going for portability myself so a case just a little longer to be able to facilitate more cards internally with the ability to maybe remove the front plate for the that want longer cards.
The internal dimension of the case does need to be about 10mm taller to facilitate using just standard PCIe plugs with low profile cards.. It probably needs about 20-25mm in height to facilitate tall cards and plugs
As I mentioned in the private correspondence posted dual front fans or the ability to add an additional front fan with a little trimming, like they did on older computers where they stamped the port openings but if you wanted to use them you had to break out the tab. Power port on card would need to be available for use. On the additions aspect possibly a temperature based fan curve.
The current price is good granted additions and changes normally bring about more cost the competing point here would be that someone would say I'm spending too much I will just build a new PC. Granted using this for the Mac side is different as you are generally stuck with the card they hand up to you with your purchase.
Brion
-
 1
1
-
-
Thanks Brion! That looks good. Seems like your card is hitting differnt limits:
- power
- termperature (target at 80°C)
If any of that targets is reached, the card will clock down to get below the target.
The limits that were set for it were the EVGA Programs Default which I believe was 100% power and 80c Temperature with maintaining power as the primary.. Maybe it was flirting on that 80c limit and dropping the mHz slightly.. Wondering why it didn't decide to just press the fans harder though to maintain temp as from what it looked like it was only running at about 75% fan speed at 80c.. I probably won't push it for Maximum performance as I am not sure I would need it but it looks like from those numbers that I might have some room there to be able to if I chose as the fan speed wasn't maxed and it fell pretty much with in default targets.
Brion
-
Please log the temps one time

I would be really interessted.
OK I downloaded the EVGA version.. Not sure how to get it to log but I watched the Graphs and took some notes during the 3DMark13 test.
With stock settings with 1379mhz boost these were the max numbers and some other noted numbers:
Base Idle temp (low usage just displaying normal stuff) is approx. 30-35c
Base Running Temperature is approx. 50c
Base Fan Speed is 1100rpm (30% speed) estimated MAX speed 4000rpm
Ice Storm 1.2 running numbers -
Max temp noted 62c
Max fan noted 2075rpm
Cloud Gate 1.1
Max temp noted 70c
Max fan noted 2500rpm
Fire Strike 1.1
Max temp noted 80c
Max fan noted 2825rpm
Other notes: I do think that the push pull of the fans works to a good advantage as cool down time is about 2c every second so temps do not appear to build when running continuously. Between tests the eGPU cooled to what I would consider the base running temp of 50c. The 80c peak on Firestrike was only for a second and it cooled to and more or less ran in the 75-77c range.
I did note a little bit of MHz and voltage fluctuation during the Fire Strike test dropping intermittently to 1366mhz and about 11.5V - 11.75V consumption. Generally with the other tests it was pegged at 1379mHz at 12V.
It actually ran 4 points better on the benchmark than it did in my first test on this run through (8734, 10518GS)
anyway there are some numbers, no shroud to tunnel air with the card fans pulling in air and the Akitio's fan set up to push air out the front.
Brion
-
1
-
-
You can use MSI Afterburner or EVGA Precision X to monitor the temperatures. These tools also enable you to OC the card or to change the fan profile.
Most GTX 970 have a coil whine/buzzing problem because all manufactures are running them beyond the "reference" specifications. You might get a less noisy card by downclocking and lowering the power target. Of course that will also lower your performance!
For the sliding mechanism I tried to attach everything to the inner cage. Only the outer fan grills are screwed to the outer case. With them beeing countersunk screws there is luckily no collision.
I am guessing I should just log from one of these programs while running the Benchmark tests for a temp profile. The coil whine actually wasn't all that bad I just noticed it at times under the heavier loading segments of the Benchmarking. if it wasn't sitting right next to me while doing it I probably wouldn't have even noticed it.
On mine with the shroud might take a bit of experimentation because the grill is epoxied to the inside of the case, I had to trim the internal carriage flap next to the outputs so that it could slide past the grill. So the issue for me would be that the shroud would catch on the grill as I am sliding it in. I'm not totally sure the primary gaming I am going to be doing will use the amount of power this is capable of so I might not need the shroud but it could be a good test.
Brion
-
@bsohn: Did you monitor your temperatures of that build? I'm interessted if that exhaust is enough to get rid of all the hot air. By intaking fresh air the temperatures should be fine.

Also did you consider building a "shroud" to make sure the GPU fans are only getting fresh air and are not reusing warm air from the inside of the case, as there should be a gap betwenn the fans and the intake mesh.
I didn't really monitor the temps (not sure how to software wise but I think there is a method) but during the benchmark tests the temperature of the air coming from the case through the front was not insane (warm yes, hot no) and the actual Akitio case never got too warm.. My Macbook n the other hand when running the internal GPU tests with the 650M got quite hot, couldn't really touch above the keyboard for more than a second (typical macbook heat buildup location) under the load.
I did note that the X970 did put out some whine when running but I have read that is common with the X970. I'm still considering the shroud and what would be the best method of accomplishment for that as I have to be able to of course slide the internals in and out without catching it.
Brion
-
How did you cut the side panel? Looks extremly clean!
Did you paint the cutting edges? I simply used a black permanent marker.
I have access to a CNC Machine with my business so I was able to do the side opening and the custom power plate on the machine. The cut edge was sprayed with a satin black paint this is easy as all you need to do for masking is to put tape all around the edge and then cut it back with an exacto to the shape. Cover the rest of the box and if you want stick a piece of paper inside and spray. I actually thought of the Marker for a quicker way of doing it but I don't like the red haze Sharpie ink leaves and I was already having to paint the grill (straight aluminum) so the paint was there.
Brion
-
1
-
-
Wow that is a lot to read ^^
I really love the build and the idea to route the plug through the Galax IO. By that you don't have to make any modifications to the case.
Some things I would like to mention:
- You can use (with a bit force) any 6 or 8-Pin PCIe plug on the DA-2
- 20 or 24 Pin ATX plugs can connect to the DA-2 in two ways without any force
- 145W for the GTX 970 is for the (not existing) reference card. All the cards on the market will use much more power (up to 200W at stock settings)
- I doubt that one slim 60mm fan will be capable to get all the heat out of the case
Regarding the cooling. It could work the way you inintended it to work, if you seal up the intake side so good, that the fans can only pull in fresh air. So ou should remove any gap between the fan (shroud) and the case, make it like a intake tunnel.
By that you would create a higher pressure inside the case and would force all the air out of it. With the 60mm fan on the front beeing the only "exit" it could work (maybe even better without the fan because it is limiting the amount of air).
Keep up the testing and the good work! Love all the creative ideas people come up with
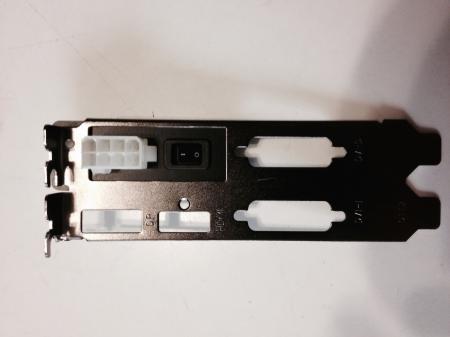
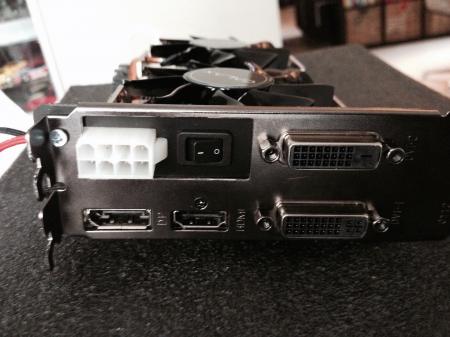
On the power I figure the Galax is going to pull more as it is Overclocked a bit, standards say that it could pull up to 225watt based on the power config (75 PCIe + 75 PCIeSUP + 75 PCIeSUP) which still puts me at the 4A per PCIe pin (37.5 watt/3.125A per pin) and 7-8A at the DA2 Connection (still within spec). If it actually does pull 225 watt then I will be a little out of luck as the DA2 is only 220 watt.
Yea, I am a bit concerned with the cooling but haven't had issue yet running one monitor (not sure when I get the three running) normal cooling methodology would say to have similar to electrical wiring in that the input and output being equal so there is a cooling bottleneck with what I currently have.. It actually probably wouldn't be to hard to seal fan gap with some window foam to create a higher pressure system. At least I realized that both fans were putting air into the box, not realizing that would have been bad for heat.
On the Molex the 12 pin I found required no force for the 8Pin match on the one end so that is probably the smallest plug that can be used direct without tearing up an Optiplex or forcing the fit. I just cut down the four unused and actually ended up using one of the empty pin location to use a screw to more securely lock the custom board to the card (the screw right above the DA2 port).
This was actually a little more fun to do than I thought it would be.
Brion
- - - Updated - - -
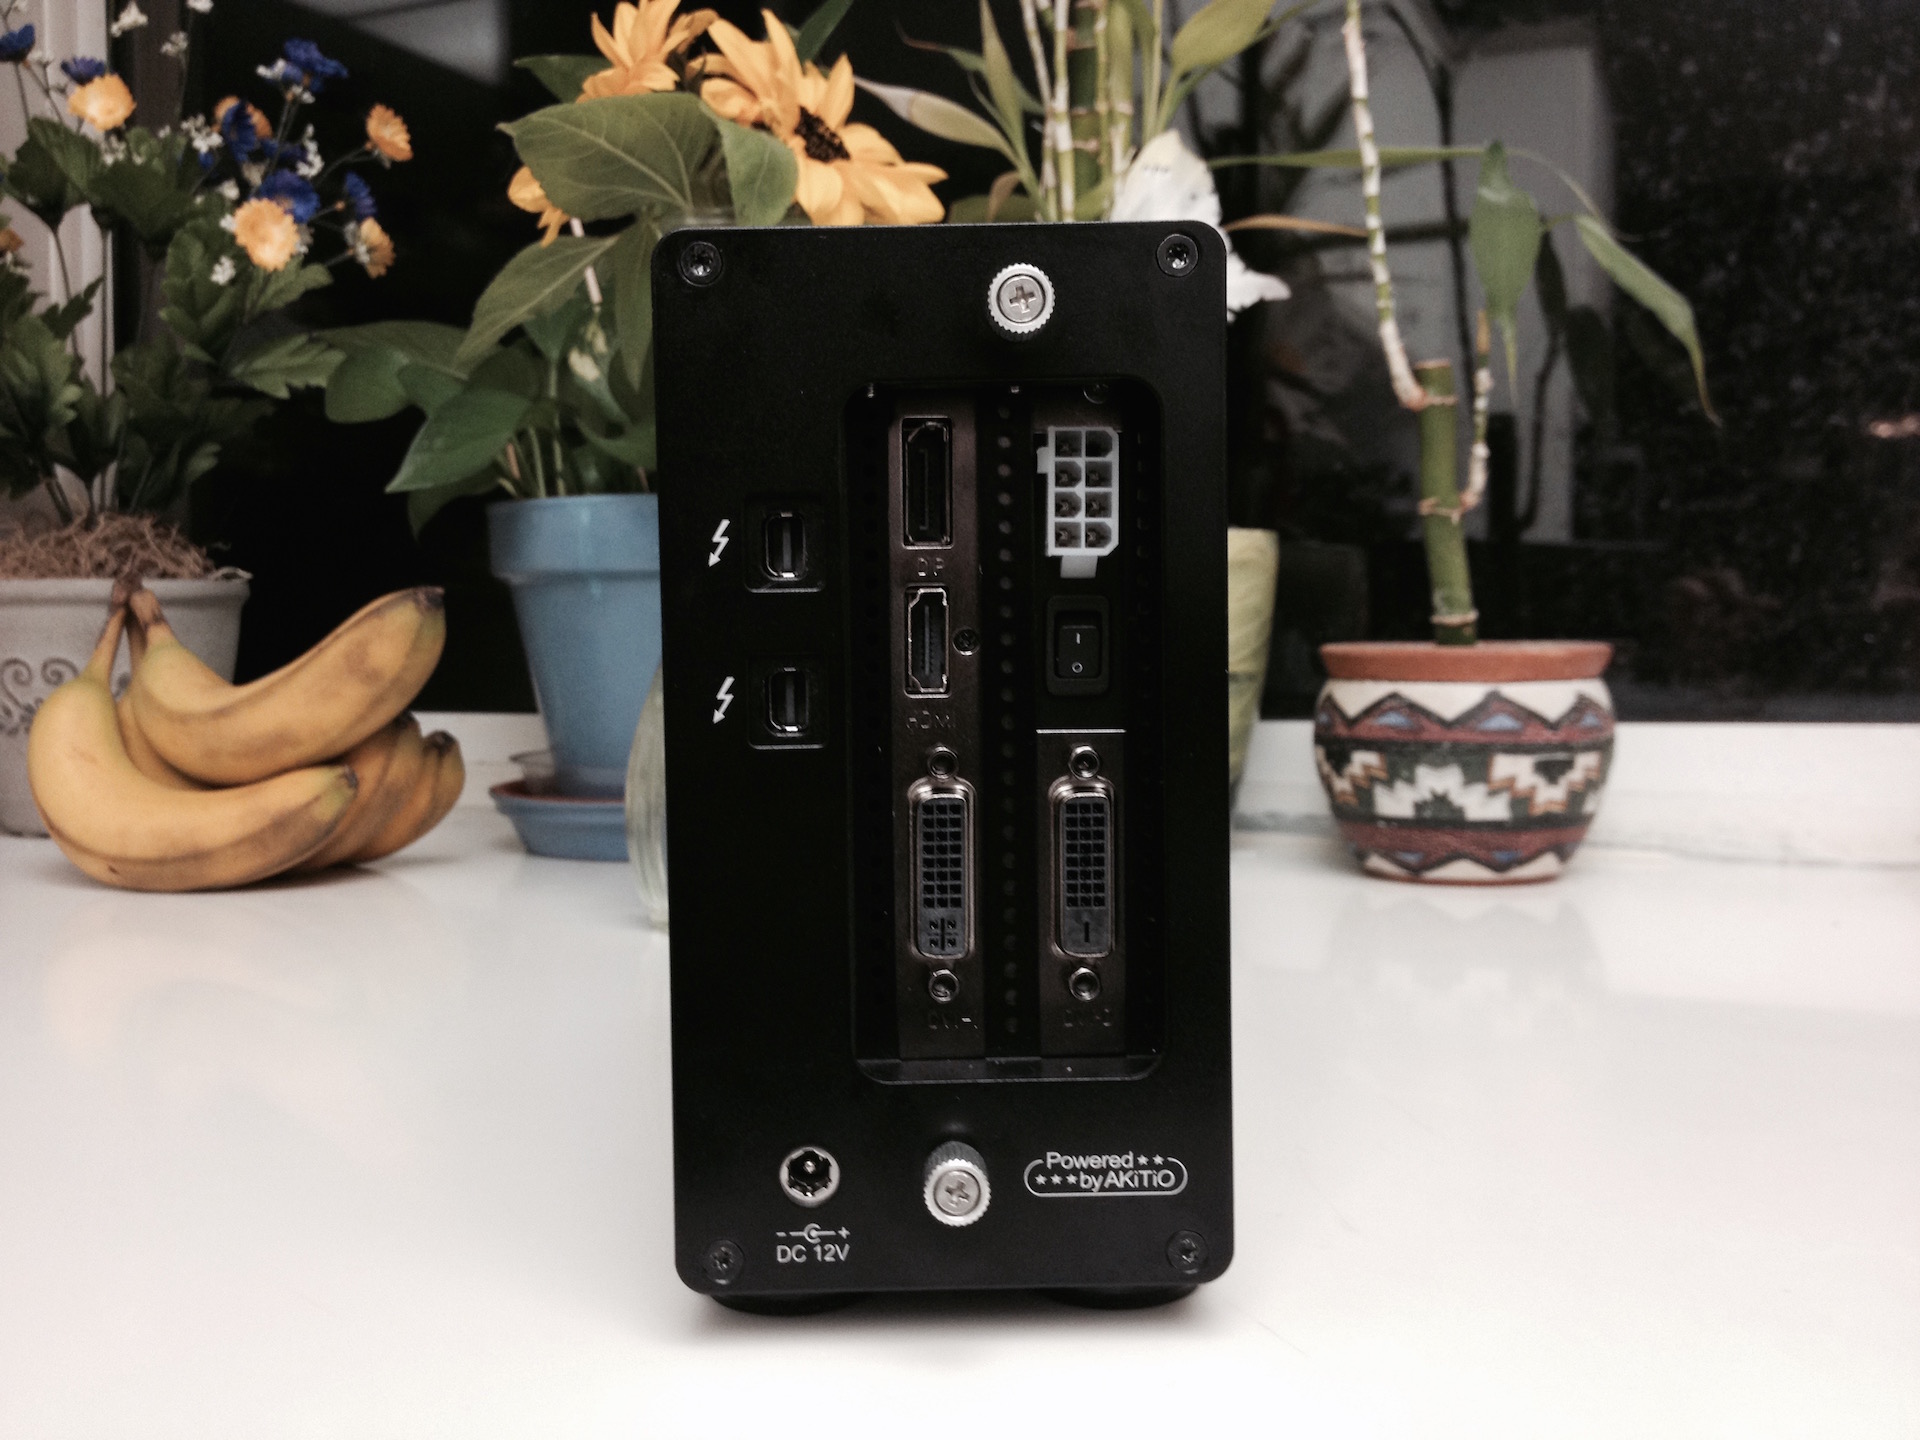
Ingenious mod of the dual-slot PCIe card slot plate. One I hadn't considered.I'll add that the on-off switch is nice but not entirely necessary. The AKiTiO manages it's on/off when getting a TB signal when the notebook is on. Sure, the Dell DA-2 remains on (green) but with no load on it will not be using much power. When you "off" the DA-2 the light goes orange meaning standby.
Your idea raises the possibility of someone creating a ready-to-buy faceplate solution or at least a kit. One which:
- provides 75W slot power via the 4-pin connector: remove the AKiTiO yellow/black cable and have a cable that directly attaches to the 4-pin plug on the TB board. Only loss would be some filtering done on the DC input which seems not necessary given some ppl were "back powering" using a powered PCIe riser.
- provide 6P+8P PCie connectors of suitable length, preferrably as low-profile connectors that could allow the top cover to slide over.
Great stuff
I chose to keep the on/off switch because I knew from reading that there can be start-up issues at times with the system modifications. By having the on/off switch I don't have to always be connecting or disconnecting the power or thunderbolt cables to cycle the eGPU. For general on off though it isn't really needed as @Tech Inferno Fan is correct in that the Akitio turns everything off with Thunderbolt signal loss, the DA2 stays in active mode.
Brion
-
My Hardware at the time of build:
Computer Hardware (option #1 - Win7pro or Win10pro)
15" Mid 2012 Macbook Pro (non-retina)
i7-3615QM 2.3GHz quad-core CPU
Intel HD4000 iGPU + NVidia GT650M dGPU
10Gbps Thunderbolt 1 port
Hybrid HD bootcamp with OSX 10.10.3 + Windows 7 Professional (64bit)
16GB Memory
2012 MacMini (option #2 - Win10pro)
2012 MacMini + GTX970@10Gbps-TB1 (AKiTiO Thunder2) + Win10 [bsohn]
Intention for the build - External GPU to host multiscreen set-up for gaming in Windows but would also like it to work in OS X
eGPU Hardware
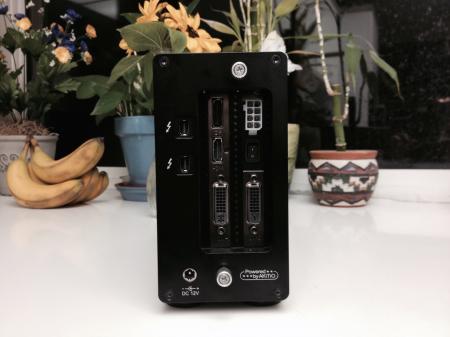
AKiTiO Thunder2 PCI expansion box ($210 Amazon or $189 from AKiTiO Sales)
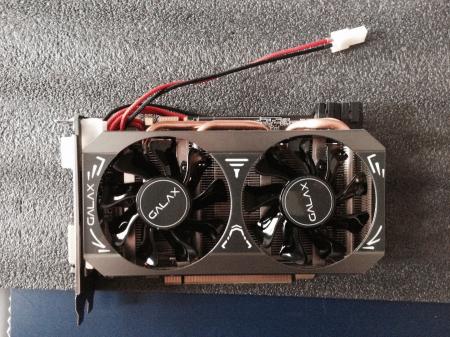
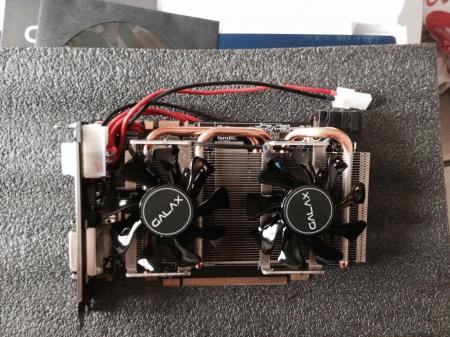
Galax GTX970OC ($337 Galax)
220W Dell DA2 Power Supply ($18 eBay)
Misc wiring, plugs and switches ($20 local electronics stores)
Custom Fan Grill ($35 customcargrills.com and paint)
Software @Tech Inferno Fan Setup 1.2/1.3 ($25)
Custom CNC parts, wiring, and case adjustments (done by me at Penguin r/c)
Total cost: $645 (Sans the custom CNC work as I have no price for that since I was able to do it)
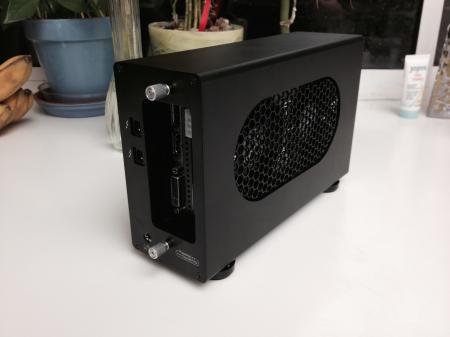
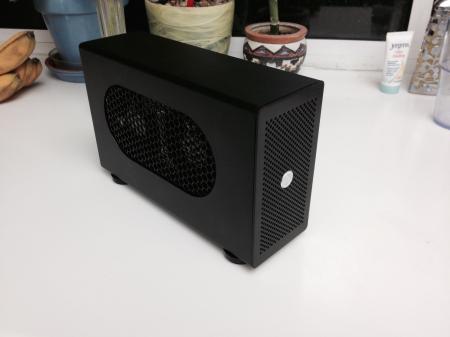
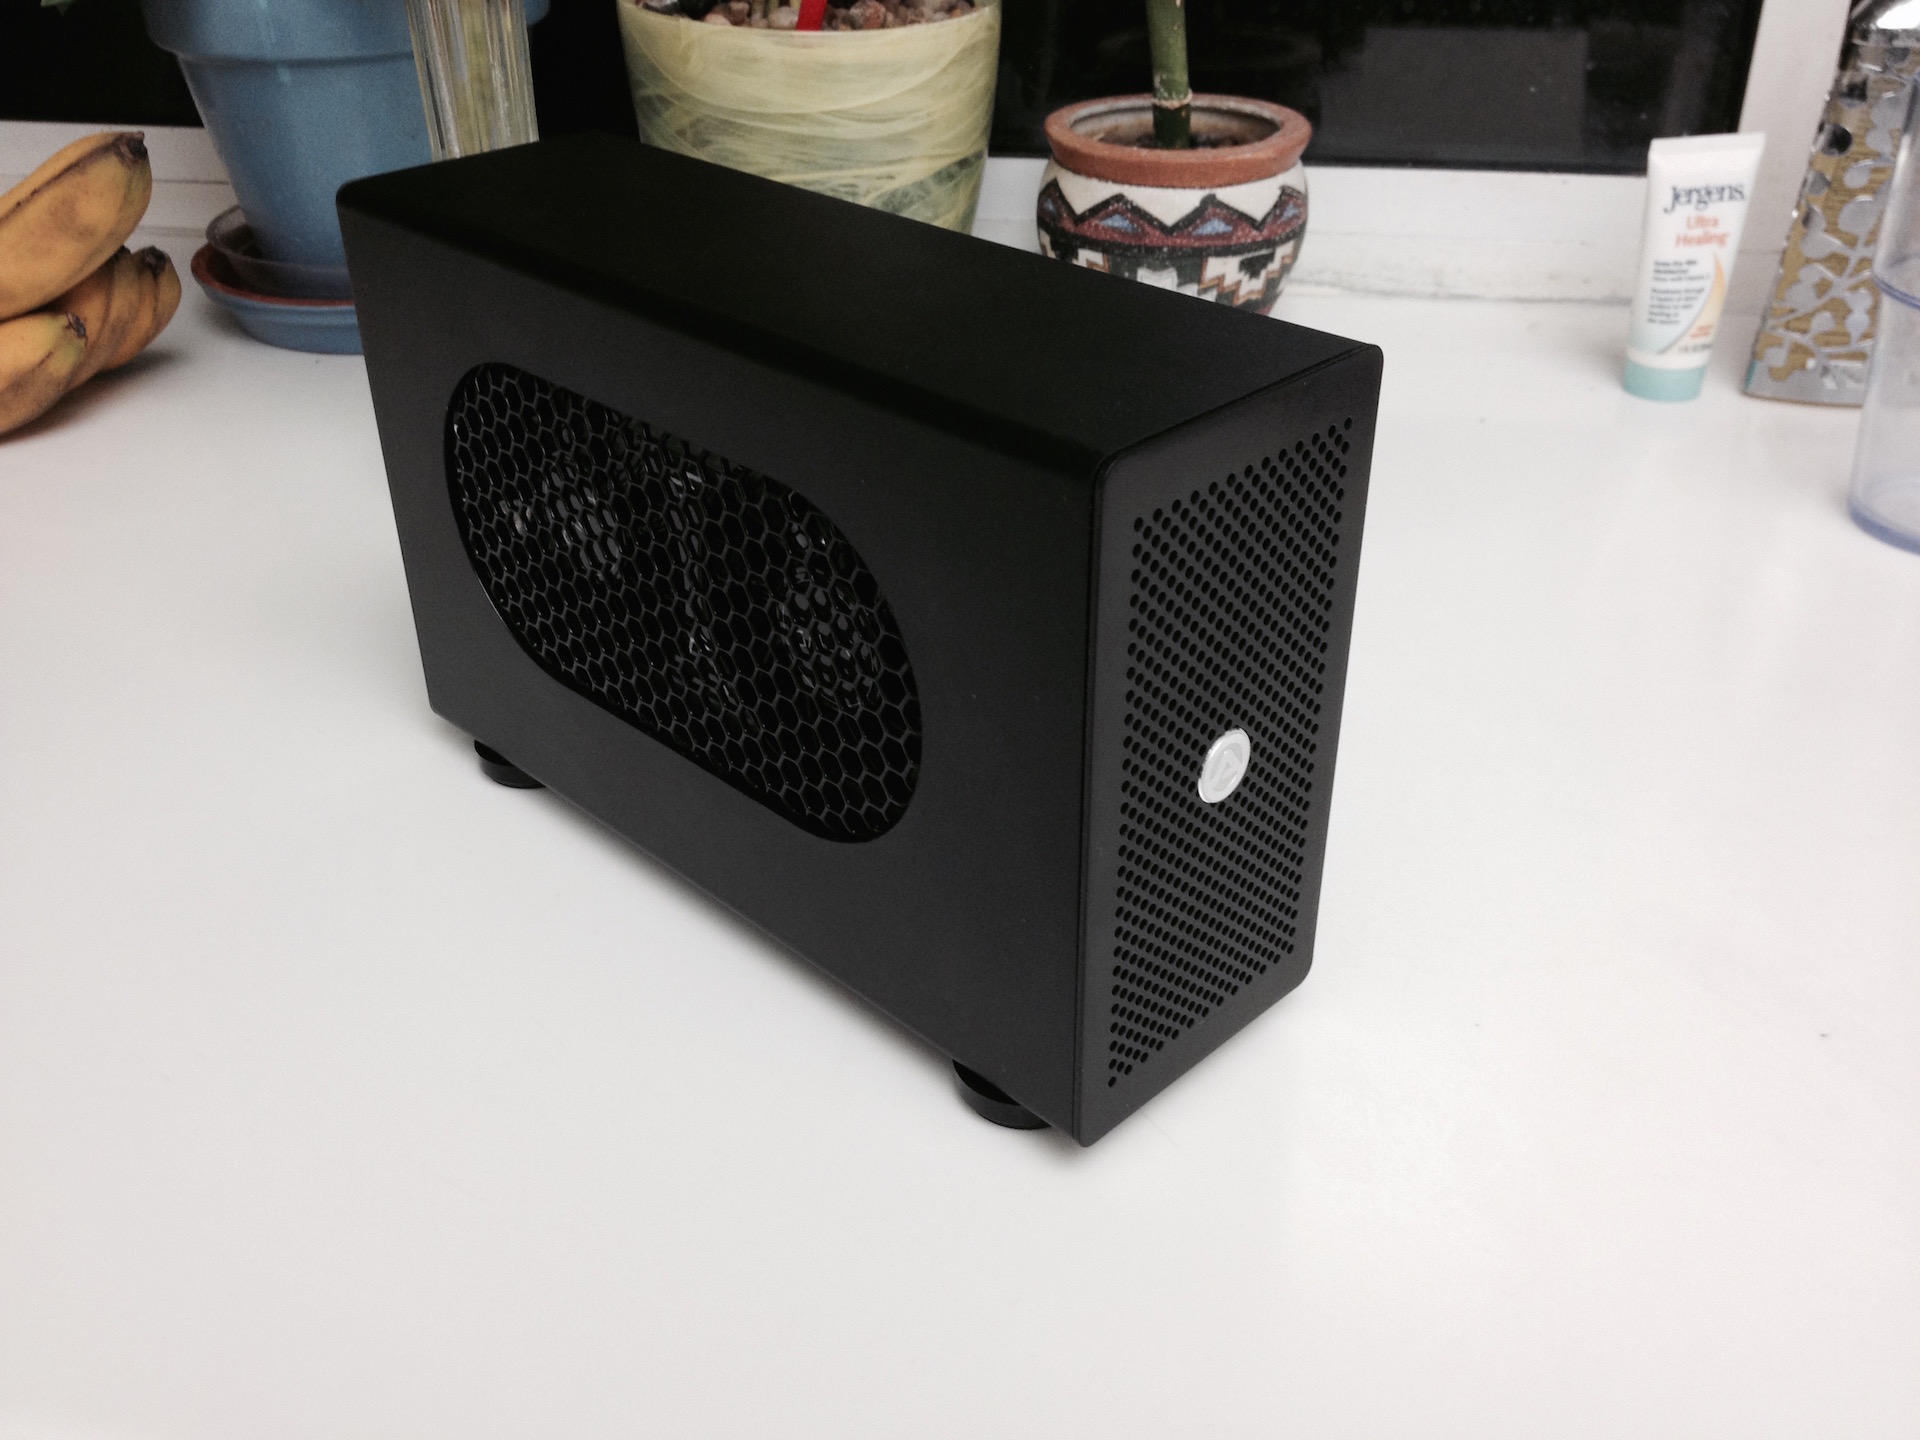
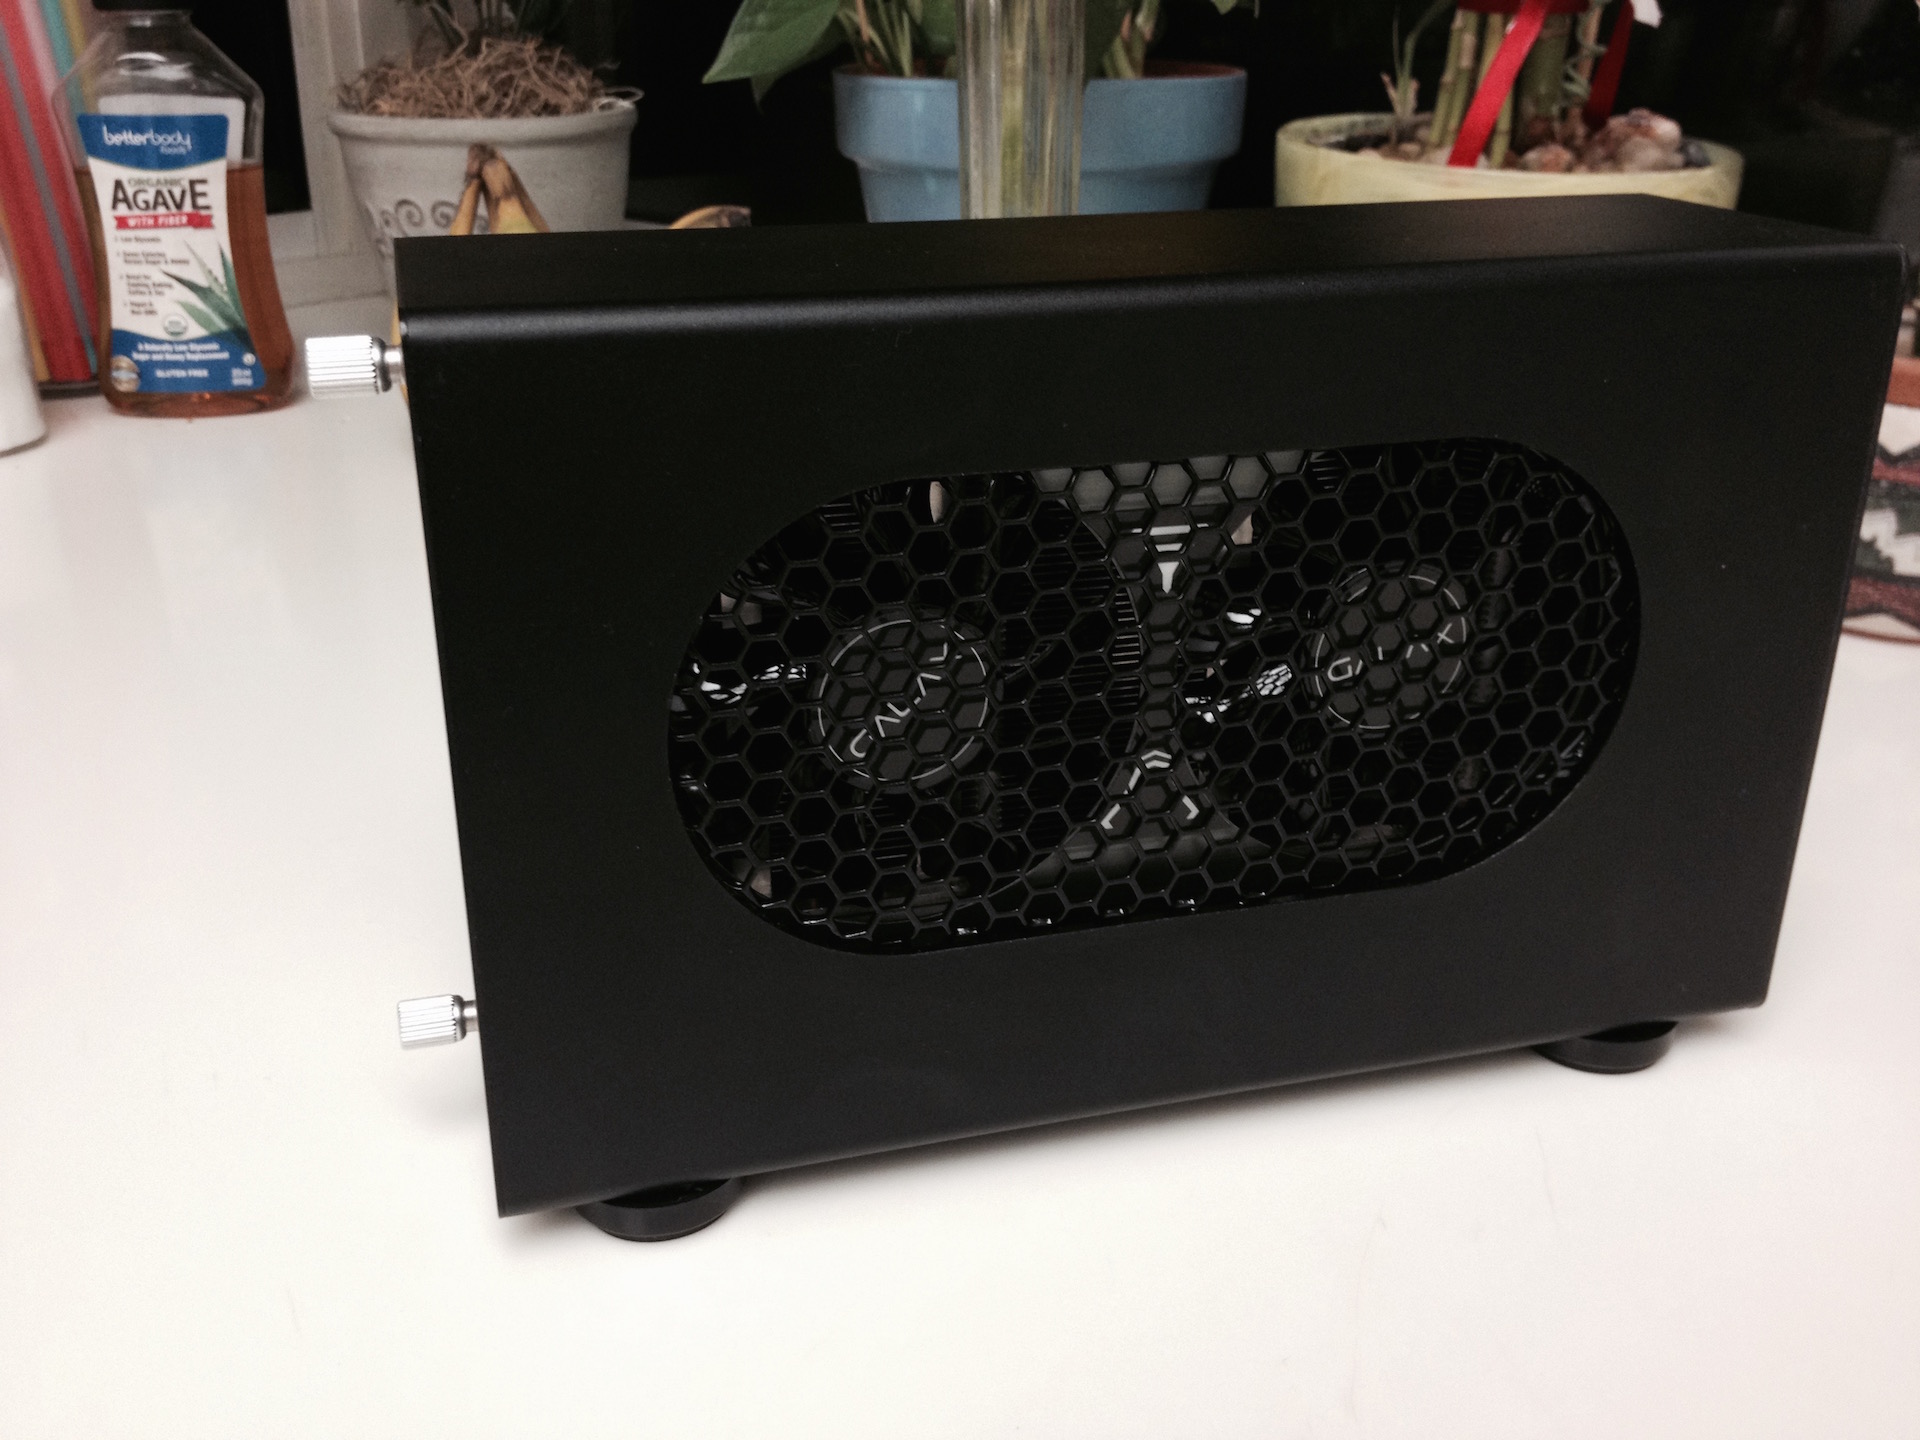
The Case
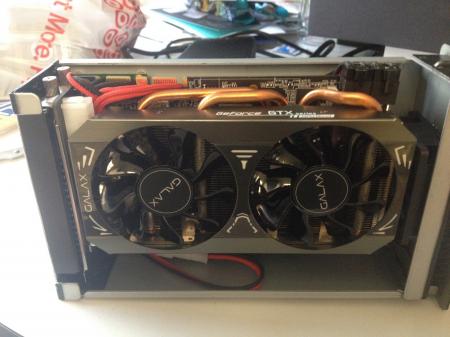
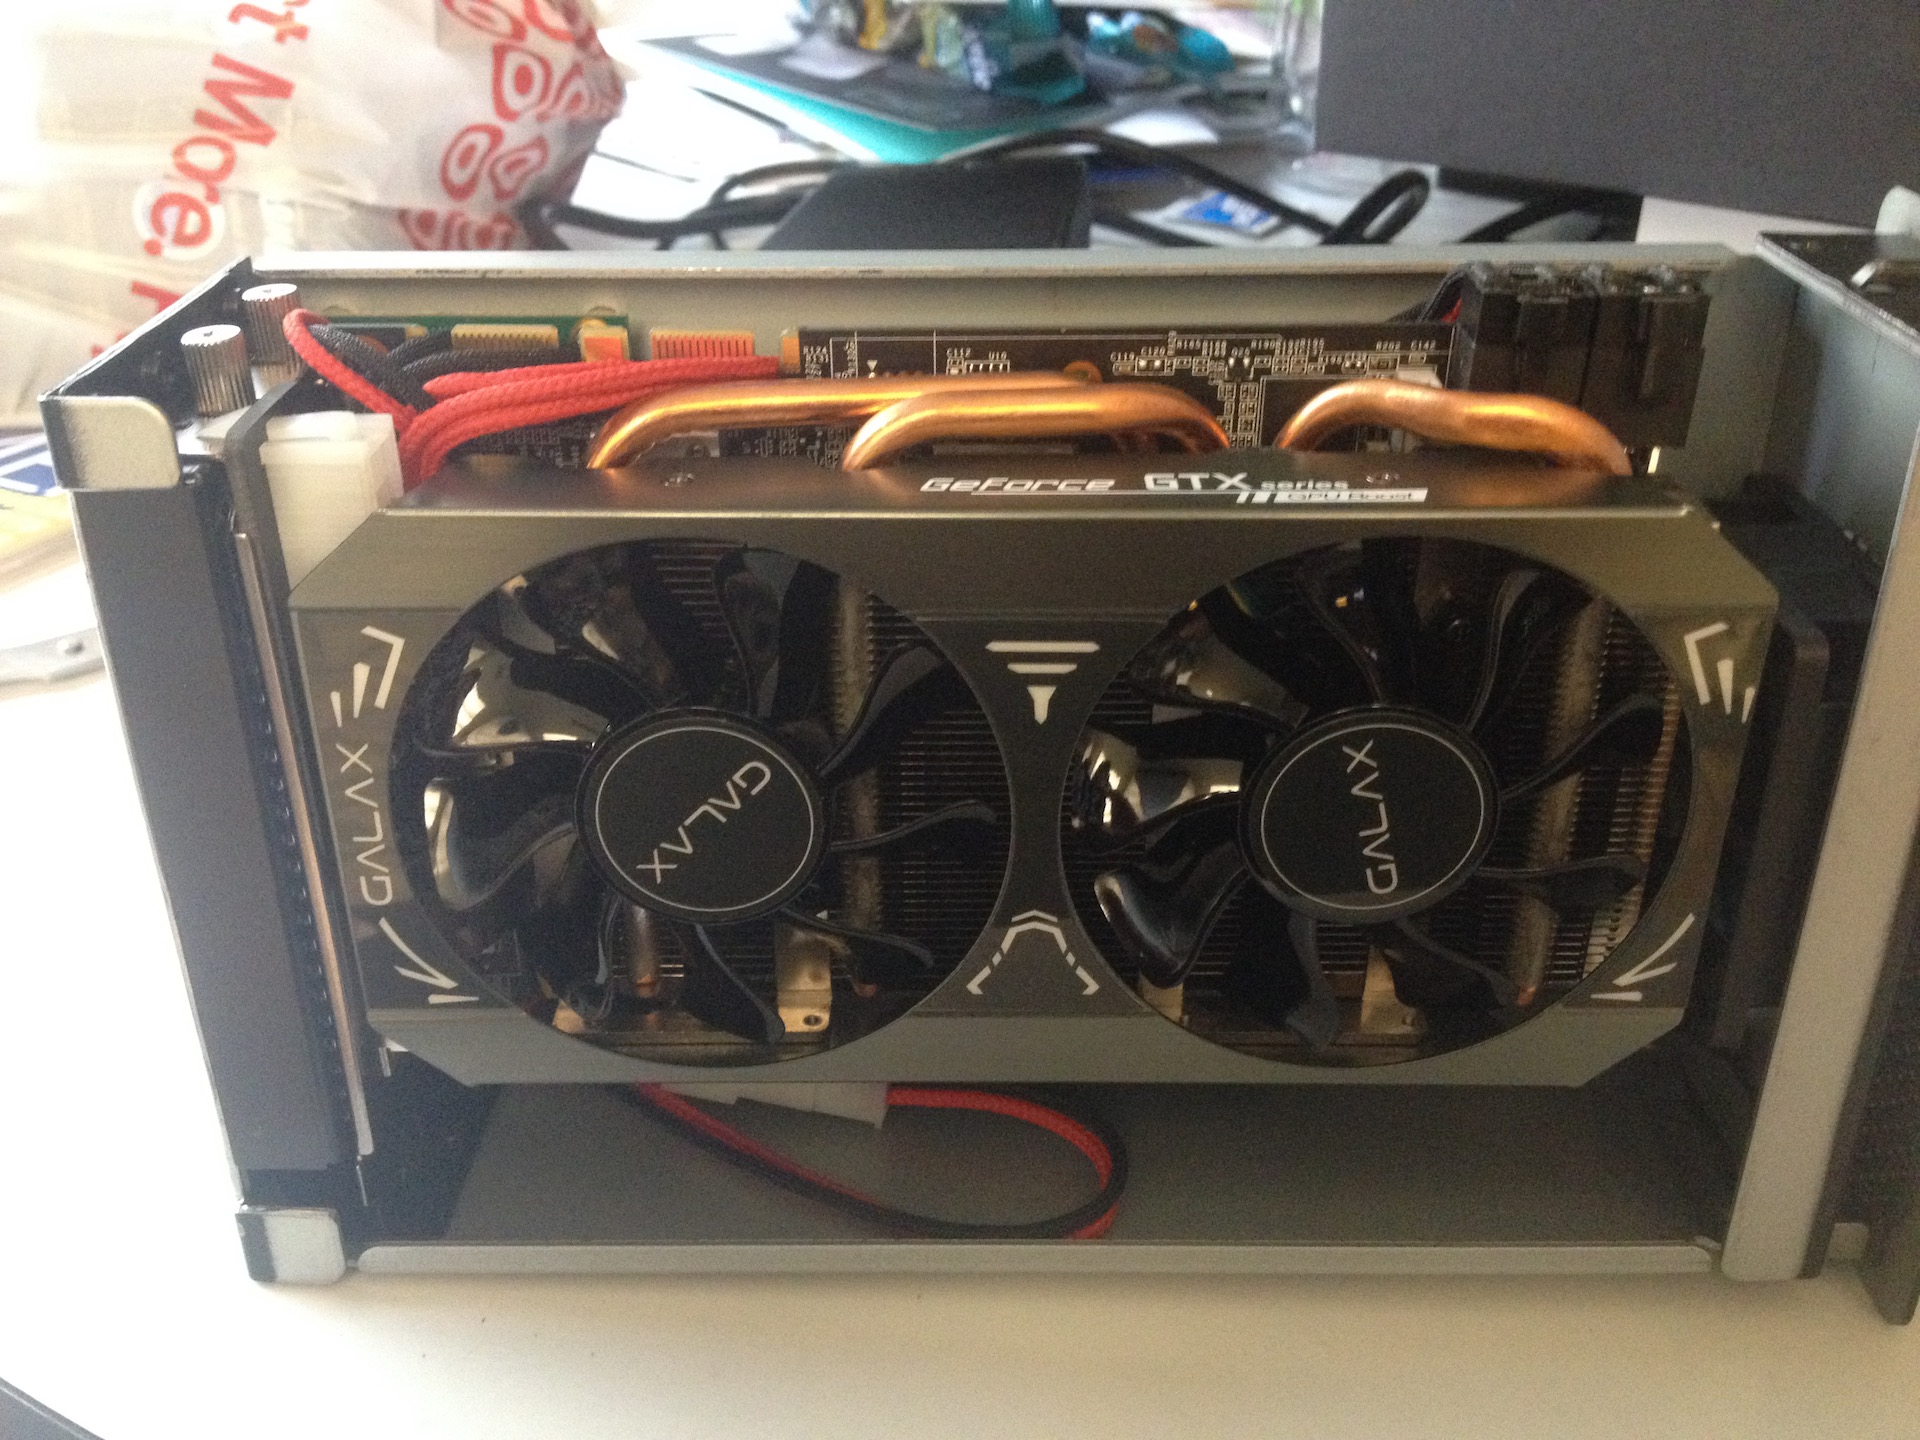
Goal of the build was to create an eGPU that would be as small as possible to take up as little extra space as possible. In looking through all of the builds and doing research I found that the Thunder 2 case By Akitio was the best option to create a reliable, minimally connected, solid unit. It is small and well built. Only issue with the Akitio is actually it's small size as I found that very, very few cards of the latest style were able to fit fully inside the case.
The Card
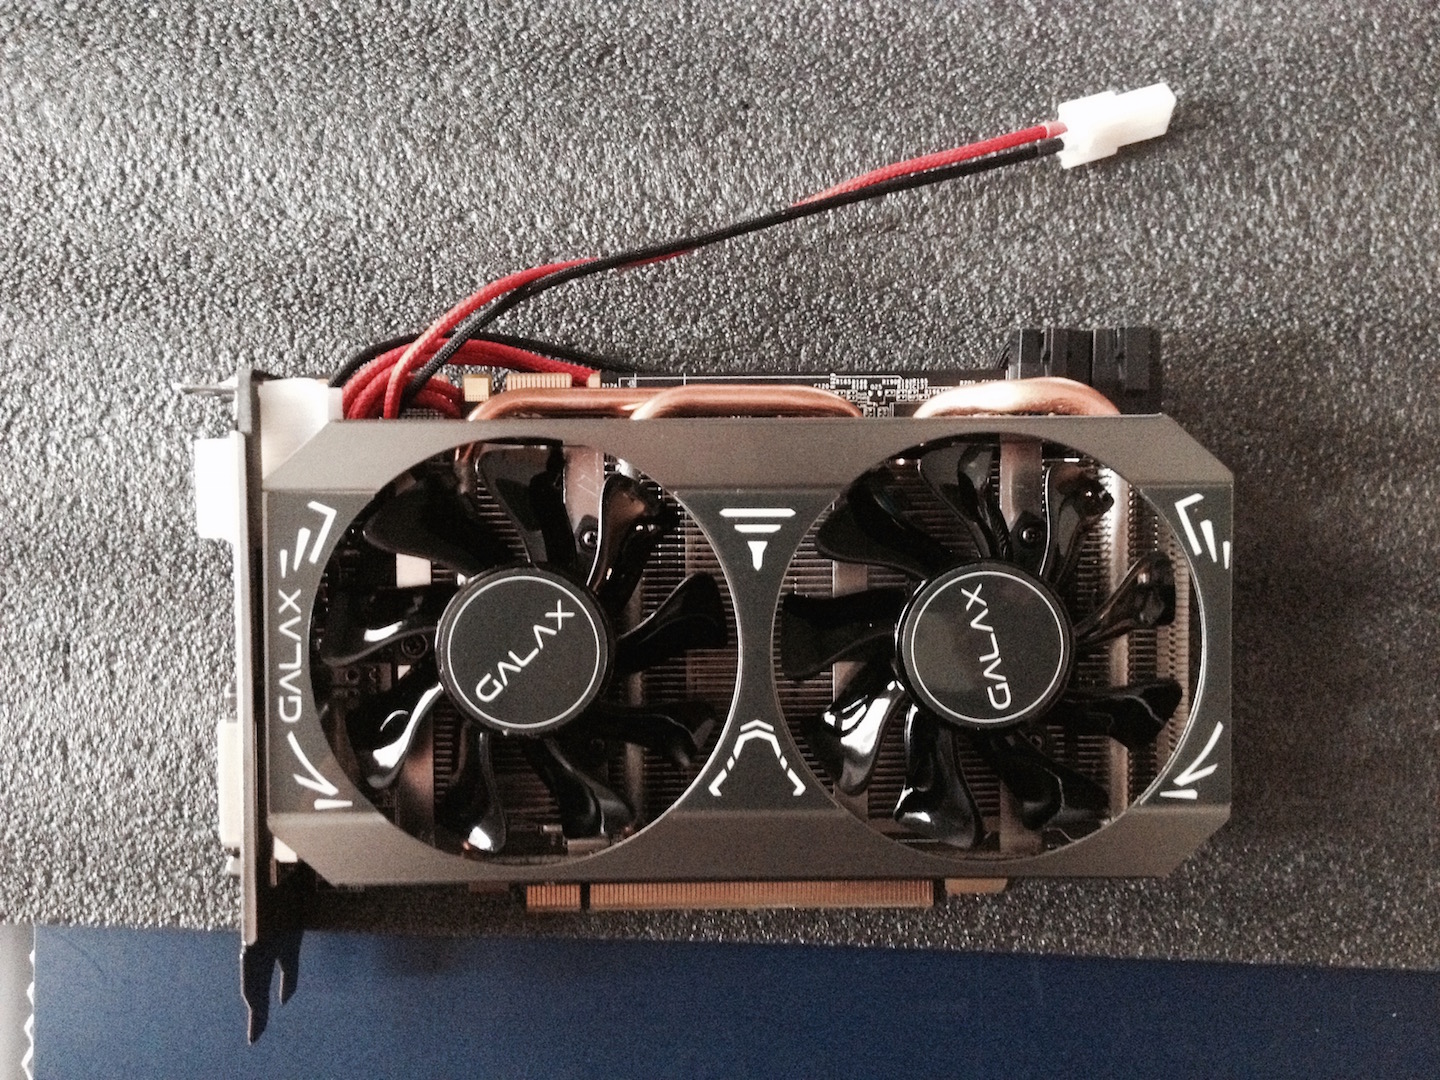
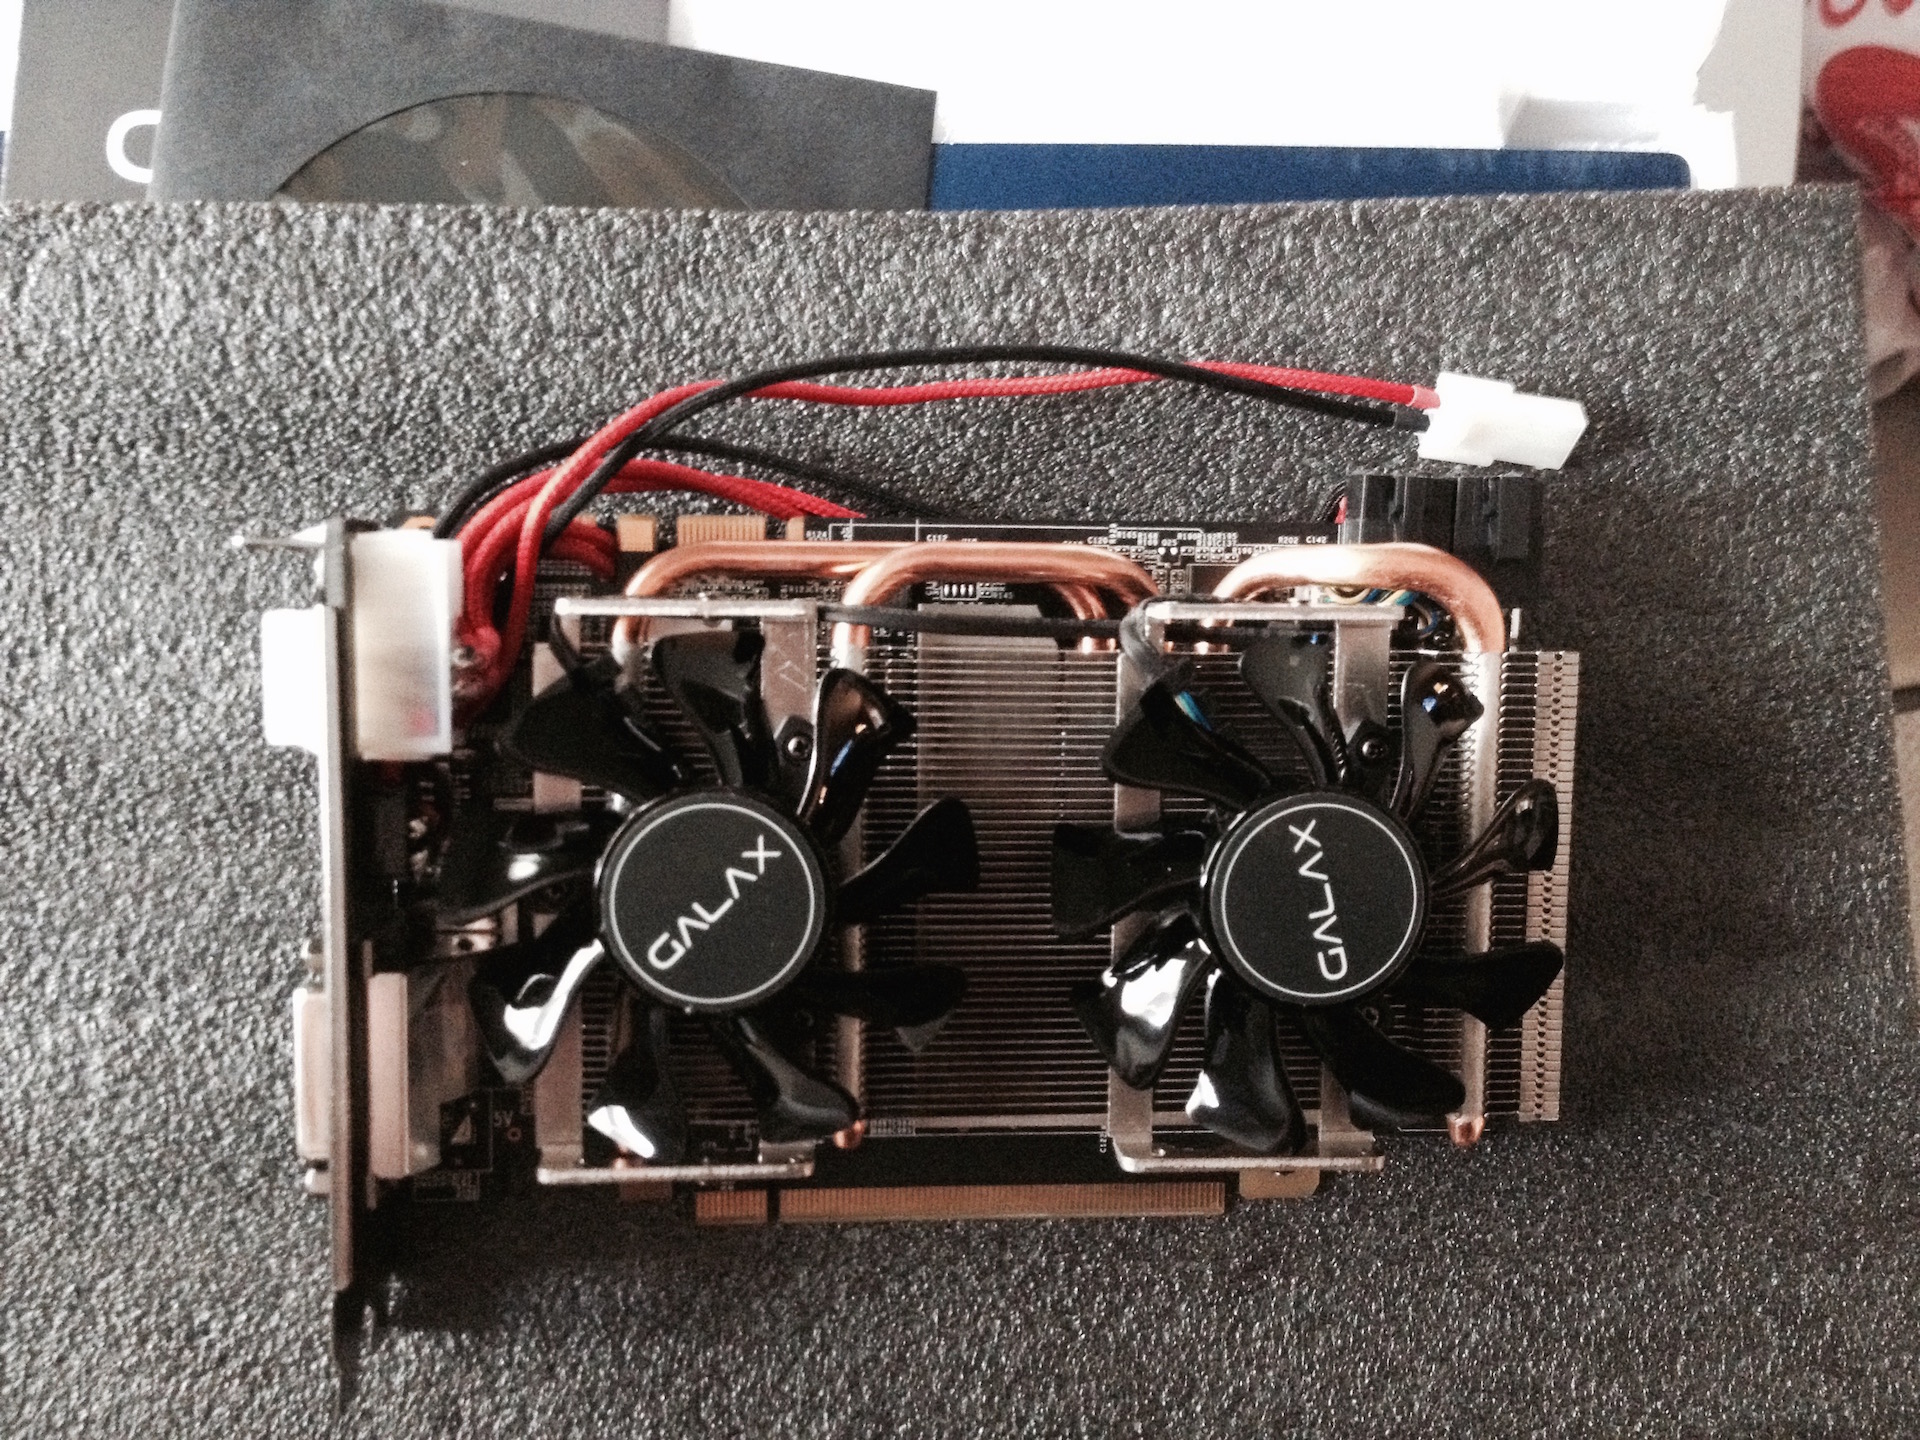
First thoughts on the cards were the Gigabyte and Asus ITX X970s. I was leaning toward the Gigabyte due to the majority display port outputs. These two card I found however did not fit dimensionally within the Akitio (they fit length wise but not height wise. I then saw a build that used an EVGA 960 that fit perfectly inside the Akitio's case. For a short while I contemplated getting that EVGA 960 (seen in @elfxmilhouse 's build http://forum.techinferno.com/provisional-guides/9754-2013-13-macbook-pro-gtx960%4016gbps-tb2-akitio-thunder2-win8-1-%5Belfxmilhouse%5D.html) but in the 4GB rather than 2GB card (see note1). I still wanted a 970 so I pursued all of the builds I could find and studied the cards, their layout and their length and found one tell tale sign as to whether or not a card will fit height wise in the Akitio. That tell tale sign was what height the actual circuit board extended above the PCI screw plate flat. If the flat was at the same level as the bottom of the SLI pins or above then generally the card would fit, if the bottom of those pins was any amount above the plate height there was no way. By this criteria and a little information about dimensions I decided on going for the Galax GTX970OC.
note1: I contemplated the 4GB card for the 960 only due to the fact I wanted to run multiple monitors. When running multiple monitors more memory is a good thing because more pixels have to be drawn for each frame. i.e. a normal 1980x1020 would need to only draw and store one 1920x1080 frame but if you have 3 monitors it needs to draw 3 frames at 1920x1080 and retain all of them in memory.
The Power Supply
Do to my goal of compactness I was dreading the power supply. I kept reading you need 500watts of power and would need to use an ATX style power supply. Problem was I just didn't like that idea, after doing a ton of research I found out that that level of power was needed by the card AND the rest of the system and that an ATX for just powering the card would be overkill. I researched out a few different power supplies but always came back to the Recommended Dell DA2 that @Tech Inferno Fan and @Dschijn have used in their builds in the past.. Most of the other power supplies I found output 14-15V DC rather than the needed 12V that the card and the Akitio required. The DA2 is 220watts, fairly small, and more than enough to power the Nvidia recommended power for the GTX970 of 145watts, granted the Galax would probably draw a bit more than that due to being overclocked slightly. The issue with this power supply is the odd Molex plug.
The Build
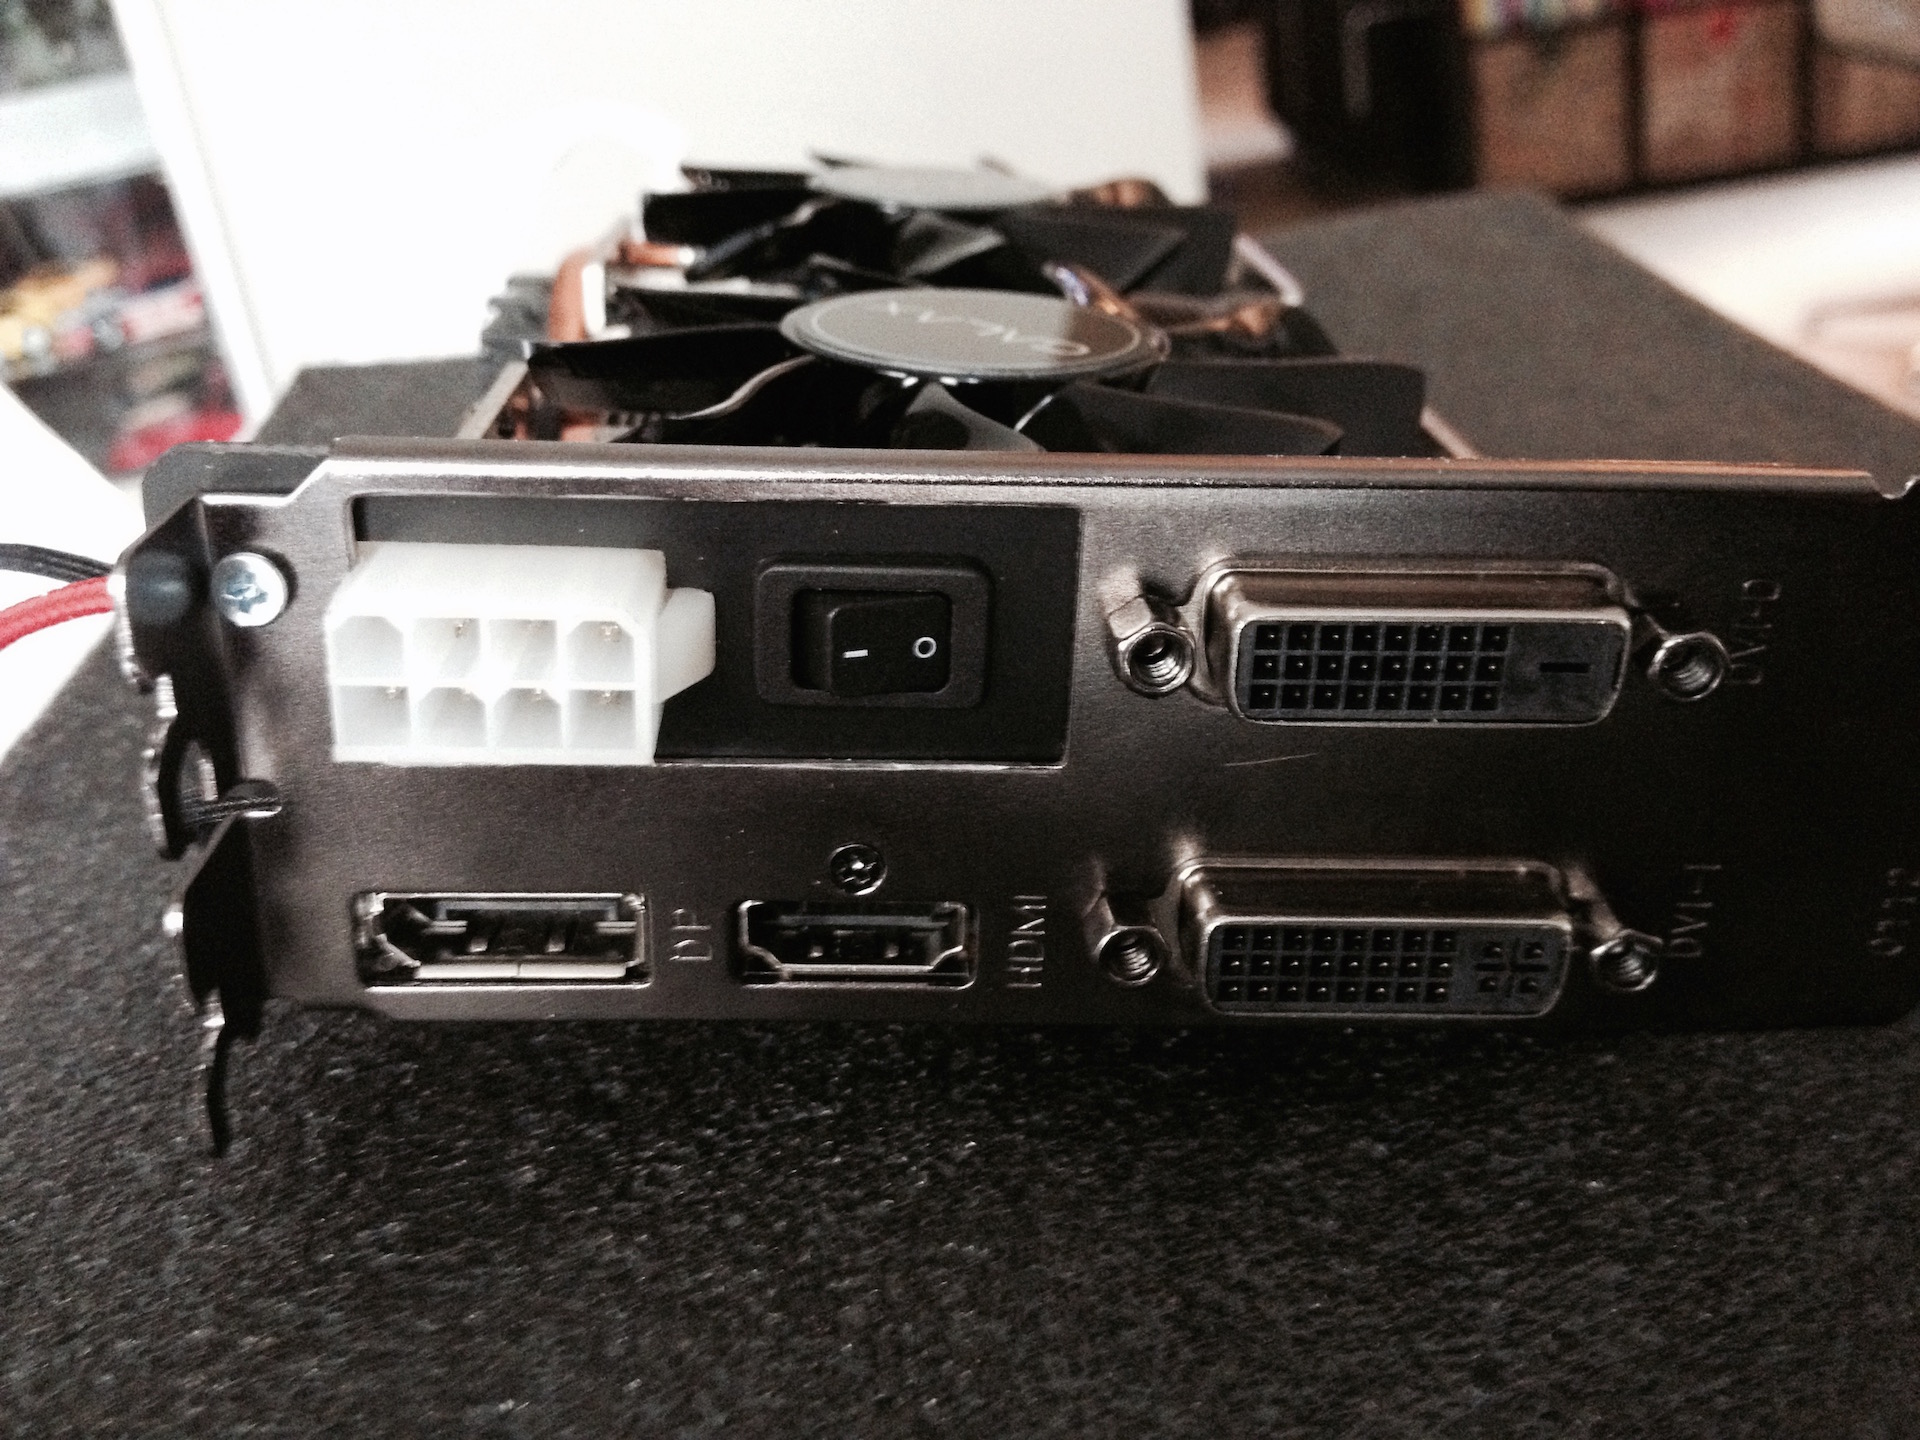
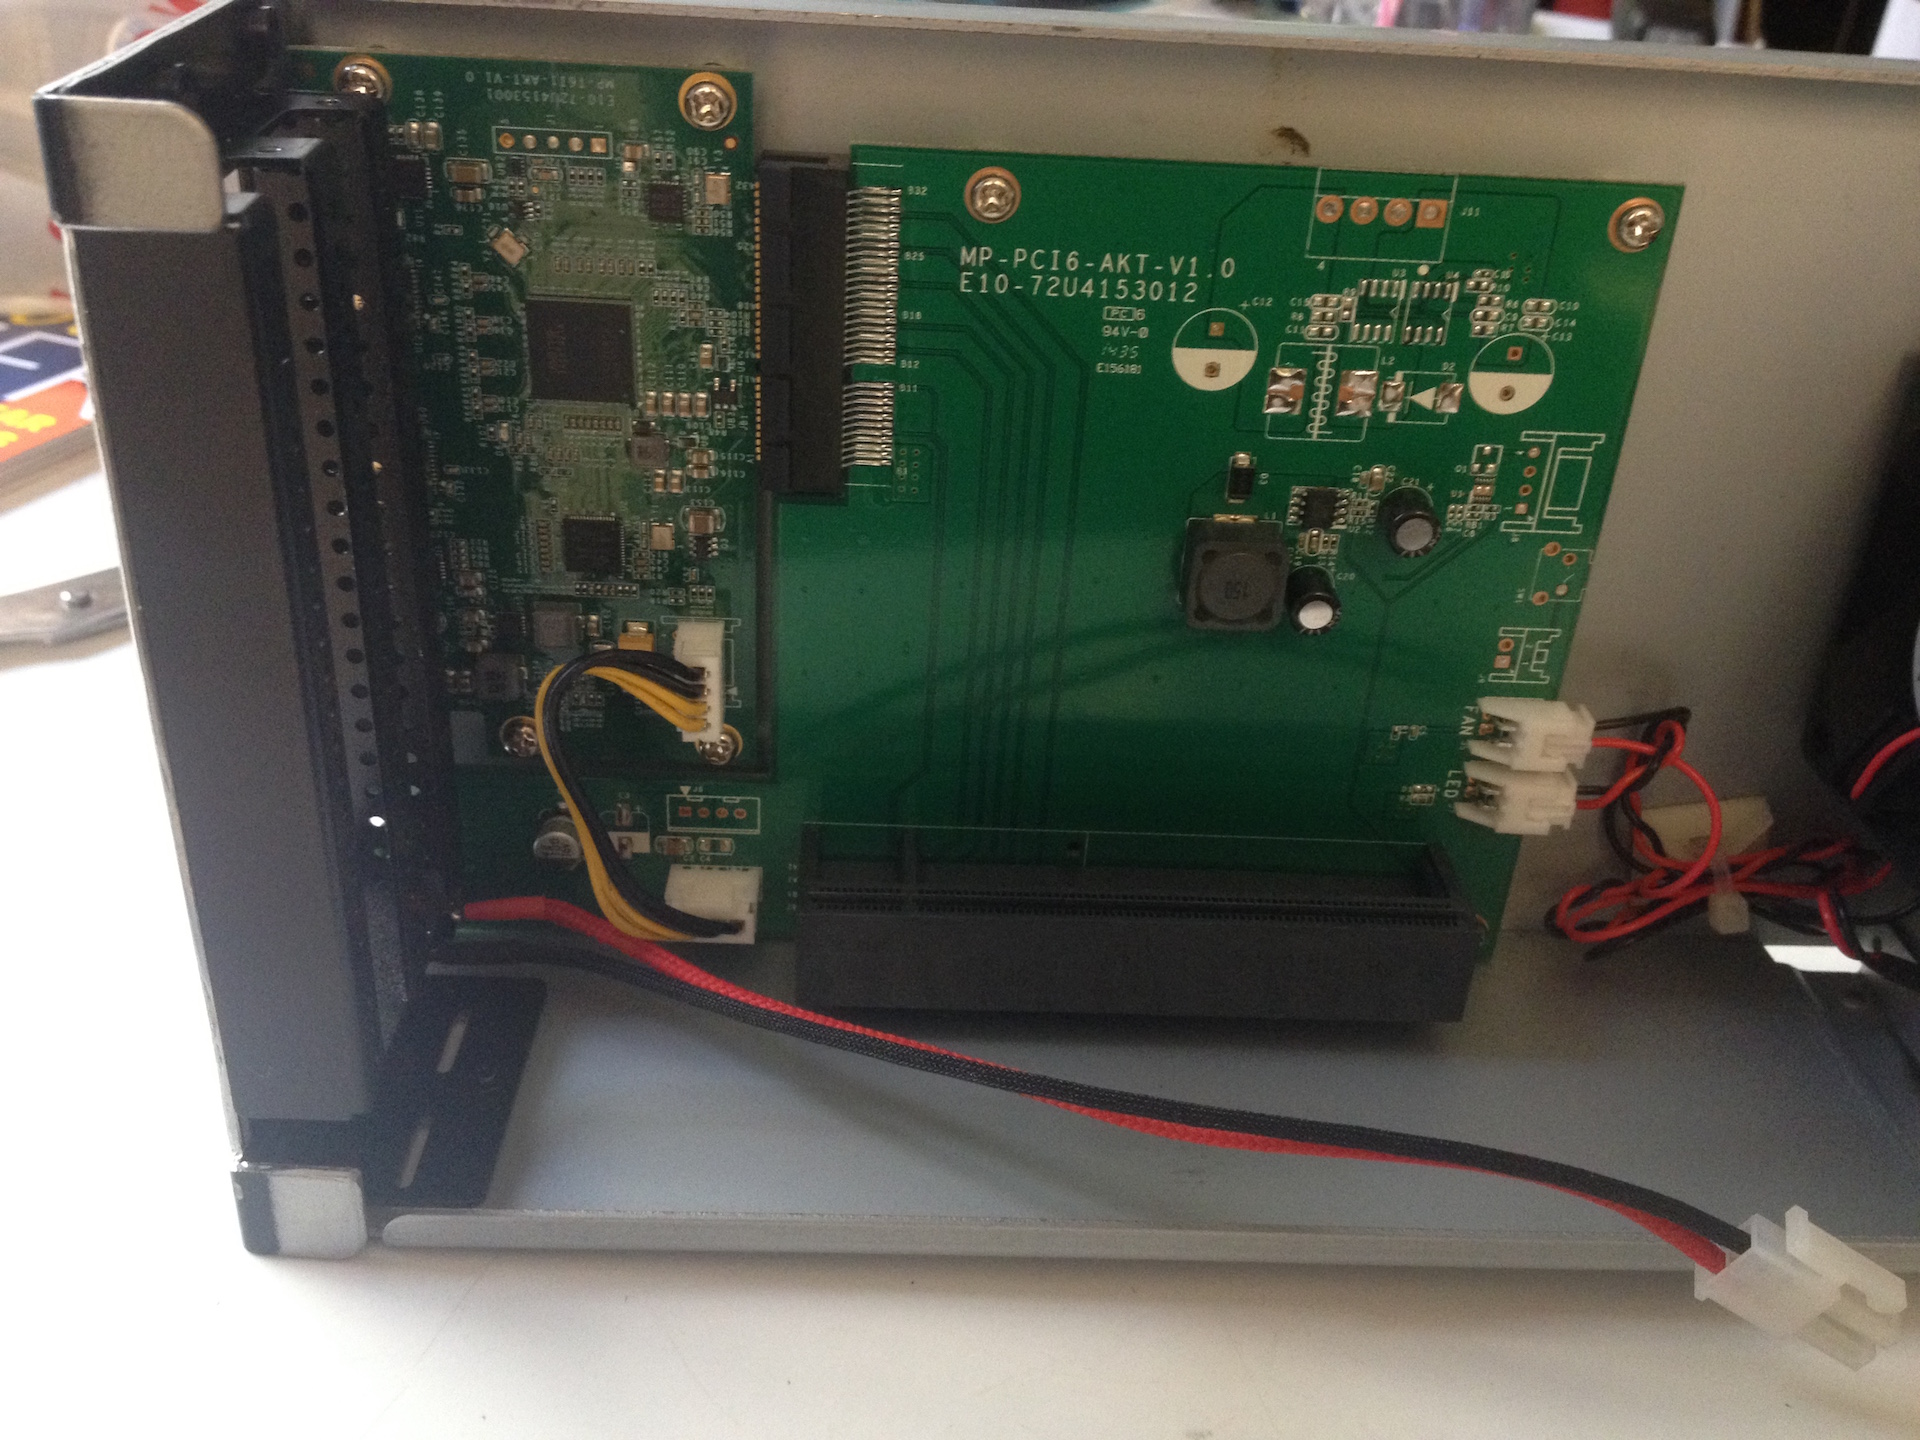
OK so what to do now. I have all the parts but how to fit them together. I wanted it all self contained so I wanted to keep everything in the Akitio (except of course the power supply). I really didn't want to modify the DA2 so that if I ever needed to replace it I could easily. I wanted a power switch to turn the DA2 on and off so I didn't have to disconnect everything all the time (found out the remote on the DA2 allowed for this via @Tech Inferno Fan 's DA2 writeup http://forum.techinferno.com/enclosures-adapters/9426-220w-dell-da-2-ac-adapter-discussion.html), I didn't really want to modify the Akitio unless it was required, and I really didn't want to screw anything up. So head to the Electronic Store with the DA2 and one of the Galax supplied PCIe Power adaptors in hand to try to find a Molex plug for the DA2 and some unbuilt PCIe connectors.. Well as it turns out nothing was to be found.. The DA2 uses an odd Molex shaping that appears to be exclusive to it and the PCIe 6pin plugs are again specialized for that purpose so standard Molex Mini plugs are a no go. Upon finding this out I was a little discouraged but decided that I would de-pin pre-made PCIe power extenders and I happened to run across a 12pin Molex Mini that just so happens that 8 pins line up with the 8 pins on the DA2. I figured that it was small enough that I could get it to work. At this time I also came across a small SPST switch that I had originally planned on cutting a small hole in the front panel to install it.
So now I have all of my wires and am ready to built. (this thing is way tighter inside than I thought it would ever be). I put the card in the Akitio and just stared at it for a while with ll of the parts hanging around, placed the plugs and the switches all over the place seeing how they might fit in my mind. I knew I would have to make custom short height PCIe power connectors but arghhh 12 wires. Turns out for the PCIe 6Pin not all of those wires are needed (thank you). I was looking at the Galax adaptors that came with the card and realized that there were only 4 -12volt lines and 3 grounds to each plug so I did some research, turns out the PCIe 6 Pin Spec is only 2x 12volt, 2x Ground on the outer 4 pins and then the middle ground is only used as a Sense line for the card to determine that there is actually a 6pin plug connected. So cool Only 5 wires are needed (down to 10) so far so good we are making it easier at the 12pin molex as all of these wires have to go into the 6 x12v and 6 Ground spots on the DA2. In further research I learned a lot about Parallel wiring and the goods and bad about it. As it turns out the card could actually be power by 1 x 12v and 1 x Ground run across all of the 12v positions. Only problem with that is that is the wire would have to be fat to carry the amperage and the Molex pins themselves cannot handle enough current to do so. Parallel wiring allows the Amperage load and pin load to be spread across many lines evenly IF the wires are the same length and generally the impedance is the same. Understanding this and the Way that the PCIe standard was the key to my next decision. As it turns out I only need 4 wires running from each PCIe 6pin and a Ground Bridge to the Sense to turn on the 970's external power acceptance. I calculated that each wire would at most, by Nvidia Spec of 145watts for the card, need to carry 36.5 watts of power or 3-4 Amps of power. Molex pins are rated to carry 9AMPS of power per pin and 18GA wire is more than sufficient for that level of draw so with this set-up granted at the DA2 side now with 4 wires going into 2 we are looking at 8A per pin which is getting close to the max. That being said this calculation is based on the Nvidia 970 total power draw excluding the fact that the card can as well draw from the PCIe bus. If any wattage of significance is drawn through the bus then it would reduce the load on the PCIe Supplemental power plugs. This realization helped out significantly in wiring the DA2 as I could now use 4 of the pins for the supplemental PCI connections with 2 power and 2 pounds going to each plug. This left the final 12V Position and Ground for the DA2 to power the Akitio. I would also use this last ground to round the sense for the remote through the power switch.
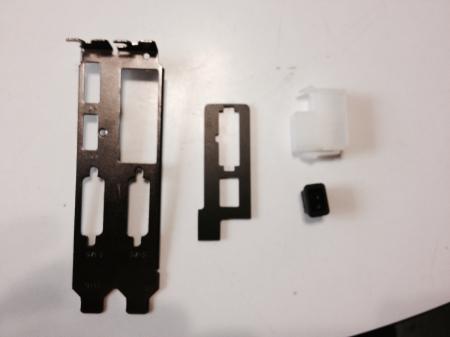
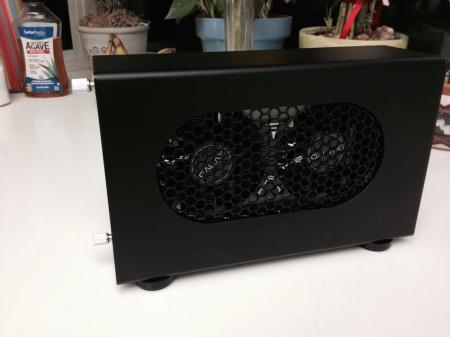
Wiring all figured out it was off to work on putting everything into effect. In the meantime while visualizing what could be done I found that the rear venting on the Galax looked interesting.. The 4 cutouts then made in that area right above the single DVI-D Port looked like a good place to put the switch (cool its on the back rather than the front).. then I thought wait there is more area there, could I fit a plug. Turns out I could, not initially but with a lot of looking I found that if I cut out the Molex 4 pin positions that I was not using I could make this area fall behind the plate and it would fit. To do all this though I had to trim the crossbars out of the Galax card PCI plate to make one large opening. By this point I already knew I would have to cut a hole in the side of the Akitio for cooling so I wasn't too worried about covering that small area. I also had to make a custom mounting plate and found that I could fit it behind the plate and it would allow the Molex for the DA2 and the switch to be attached to it solidly. My worry The number of wires and the space provided. Since I had already been able to modify the PCIe plugs to be short enough I decided to modify the Molex the same way. this however was more difficult being that there was less space between the plug and the fan. Needless to say I got it all wired well. At this point I realized that the power functionality was all contained on the Video Card itself except for the connection to the Akitio. I had already planned to attach the power lined for the Akitio to the backside of the Barrel plug so that I didn't have to have an external connection. I decided at this point to put a plug inline with this (chose a 2 pin molex) so that I can now detach the Graphics Card and all power connections from the Akitio by that plug.
Build process photos in
All in all working well so what about cooling?
Cooling
To get the cooling I decided to cut a hole the shape of the Galax fans in the side of the Akitio. I placed a custom mesh grill over the hole to make the case look professional. The Grill is made from Aluminum grill plate that I got from customcargrills.com and then created a hole pattern and hammered it to shape in that pattern, this made the grill face almost flush with the outer surface of the case even though it is mounted inside the case. The Grill mesh is fastened to the case internally with epoxy. I did need to trim the metal out of the center of rear of the internal carriage to be able to get it to pass the grill when closing the Akitio. (you can see the trim in the last picture of the spoiler) Once done I tested the fan direction and found that the Galax Fans pull air into the case and as well found out that the Akitio Fan does the same. This would not allow for proper airflow through the case so I disassembled everything and removed the Akitio Fan, Turned it around and reinstalled it. This now creates an airflow pattern where the Galax pulls air into the case and the Akitio's fan pulls air out of the case. I believe that this will provide adequate cooling but if it should prove not to I will probably add vent holes to the top of the Akitio's case.
Next step is getting it working.
Windows Setup - (Macbook Pro 15" with Windows 7)
For Windows Pro 7 (64bit) (which I run through bootcamp) I actually found the eGPU really easy to install but I did figure out a few things in the process. It didn't seem to take as much to get done as some others have had in their builds. The first thing I did was download the latest drivers from Nvidia for the GTX970 and Windows 7 (don't remember the version number). Installed them as normal with the normal installer. This updated the internal GPU with the latest drivers. I then turned on the eGPU and restarted Windows, it of course froze at the boot loader immediately after the bootcamp system select and I had to hard restart. Trying to load with the eGPU again did the same thing. So, I turned the eGPU off and hard restarted agin and allowed Windows to load normally. Once loaded fully I turned the eGPU back on and restarted the computer, went through the bootcamp loader, and windows appeared to freeze however a few seconds later it loaded into Windows just fine no hangups. It passed the boot loader it just took it a few seconds (probably 15) longer this time (the first two times I let it sit and it was sitting for a minute or so). Once loaded Windows installed a bunch of plug and play software for the Akitio and the PCI bridge (note: I had never hooked the Akitio up to Windows prior to this with or without the card and this may have made a difference in the manner in which Windows recognized the eGPU).
At this point I looked at the Windows device manager and found that the eGPU was being recognized as a normal VGA Adapter and the devices control panel had the Yellow Triangle and the normal (as mentioned in the forums) code 12 resources not allocated error. I restarted again without turning off the eGPU and the computer froze again at the boot loader. So I repeated what I did earlier and loaded without the eGPU turned on, turned it back on after windows fully loaded and restarted. Once I restarted it again took a few additional seconds to get past the boot loader but it did load into Windows again with the VGA Adaptor and the code 12. To test I restarted the computer a couple of times with everything connected and it went straight into windows (after selection in the Bootcamp loader) with no issues.
At this point I decided to manually install the Nvida driver to the eGPU, it took successfully and now the eGPU was being recognized as a GTX970 in device manager. Again restart, Again Freeze, Again load without GPU on, again turn GPU on and restart, again a few seconds and again successful load. Starting to see a pattern here. Any Subsequent loads of Windows 7 were successful and recognized as a GTX970 but with code 12
Turns out through all of this loading and installing there is something with Windows 7 and its clean-up procedure after installing new components that causes it to freeze immediately at the boot loader if new software has been installed and the eGPU is connected. Once Windows is started normally once it allows the clean-up procedures to take place uninterrupted and it will then recognize the eGPU without issue the next time around. I am guessing the extra few seconds at the boot loader with the eGPU connected is windows trying to allocate resources but being unsuccessful. So for me from this point on I just made sure that if anything was installed in windows I did a clean restart prior to turning on the eGPU and it seemed to work fine (had to do a System update in the process as well as updated the bootcamp drivers, both coming after I figured out that lock-up procedure)
At this point I knew I had to get rid of the code 12 error to get this to work and that it was probably the only thing standing in my way (it was). Researching i was thinking that I could just do a DTST override. Turns out it was not possible. I received information that @Tech Inferno Fan ' s Setup 1.3 was the only thing that would work but I really didn't want to use more software so I still researched a bit. In the meantime I contacted @Tech Inferno Fan about the DTST override and basically was informed that Setup 1.3 was the only thing that could do it through PCI Compaction. So I ordered Setup 1.3 from @Tech Inferno Fan http://forum.techinferno.com/diy-e-gpu-projects/2123-diy-egpu-setup-1-30-a.html and told him about my set-up technical specs. He recommended using Setup 1.2 which he also provided a link to and pointed me toward @errin 's implementation http://forum.techinferno.com/implementation-guides-apple/9312-2012-15-macbook-pro-gtx960%4010gbps-tb1-akitio-thunder2-win8-1-bios-%5Berrin%5D.html as he was running the same computer that I was running.
Installation of Setup 1.2 was a breeze, followed the instructions provided by @Tech Inferno Fan and proceed to do compaction to get the eGPU code 12 eliminated. It took one compaction to get Setup to recognize the eGPU and I decided that I would skip actually trying to see if that alone worked and followed the steps and modifications in @errin 's implementation. Everything happened just as described in his implementation, even the request for "Remove disk a, Insert disk b" so I did the modifications to the pci.bat file. The only thing that I didn't get right was after the editing of the pic.bat I ran the test run on the compaction and couldn't get the right side Setup 1.2 menu to show “PCI Write” and “all_alloc (256MB)” as “YES”. Turns out I was running the wrong test and needed to run the test on the startup.bat after I did that all came up good. I restarted and everything worked perfectly no Code 12 and full external monitor support.
One thing to note is that with Setup (confirmed by @Tech Inferno Fan) you must always load the PCI Compaction by going through Setup's startup procedure, One more step but not a big deal Just load Setup 1.2 and select 1 (auto load) as all of the files should be correct then select start Windows and it just works. So, basically, the procedure is (boot loader/setup 12./boot loader/Windows) each time you load and wish to use the eGPU. In Talking to @Nando there is a way to eliminate this procedure using Setup 1.3 or you could eliminate the boot loader steps by opening Setup 1.2 directly from a USB stick. I haven't tried either of these as I am not sure the stick changes that much and @Tech Inferno Fan informed me that the other method if it didn't take properly could cause having to reload BOTH systems.
Windows Setup - (2012 Macbook Pro 15" with Windows 10 64bit on External USB3 Drive)
I installed windows 10 on an External USB 3 SSD Drive and was able to get it working with the same basic method that was used for Windows 7. I did run into a few Macintosh boot screen issues which I finally figured out were related to Windows starting up in Selective boot mode rather than in Normal boot mode. Once these were corrected for both Windows 7 and Windows 10 through msconfig and System Configuration respectively (and made permanent) everything worked as it should without any major issues.
Steps in order for Windows 7 Professional (64bit) or Windows 10 Professional (64bit USB external) on 15" Macbook Pro in spoiler.
I eliminated some of the things that I did above to streamline process as it should work.
eGPU Install
1. Install newest Nvidia drivers to internal GPU (GT650M)
2. Restart Windows
3. Turn eGPU on after Windows has started fully.
4. Restart Windows (Windows should code 12 with eGPU as VGA device after automatic installation of Thunderbolt and PCI bridge drivers)
5. Manually install Nvidia Driver to eGPU VGA device.
6. Restart Windows with eGPU tuned off
7. Turn eGPU on after Windows has started fully.
8. Restart Windows. (Windows should now load with code 12 and eGPU fully recognized with the correct driver)
9. Install Setup 1.2 from @Tech Inferno Fan
10. Follow PCI Compaction process in Setup 1.2 to get eGPU recognized. (all devices except SATA, Sound, ect...)
11. Follow PCI Compaction process in Setup 1.2. (all devices except SATA, Sound, ect...)
12. Edit and Save pci.bat as indicated by @errin (change all a:x.x and b:x.x to 0a:x.x and 0b:x.x)
13. Use Test to test the startup.bat and check for “PCI Write” and “all_alloc (256MB)” being “YES”
14. Once everything comes up correct start windows and everything should be good to go.
Startup Procedure
1. Windows boot loader select Setup 1.2
2. Select option 1 in Setup 1.2
3. Windows boot loader select Windows
4. Enjoy the use of the eGPU
Windows Issues if anyone knows fixes for these please let me know.
#1 - Problem:
Windows Crash w/Shutdown upon Hibernate Recovery as noted by the bootloader upon restart after it happened. - cause: Tried to close computer to use only the external display.
#2 - Problem:
Nvidia Surround (3 monitor) causes slow performance, crashy programs, and messed up bootup.
Fix:
Turns out that this issue is within the Nvidia driver being used (current as of 6.01.15) in that it doesn't co-exist well with Internet Explorer in the Windows 7 environment. The Boot issues were due to forgetting to restart Windows with the eGPU disconnected after a crash as Windows has to do some clean-up to its system as noted when installing. I now use Google Chrome when I am using the eGPU with the 3 monitor set-up in Surround and to be safe as there was a little weirdness going from the GTX7970 to the GT650M Internal Monitor I have also made the Surround display my primary and turned off Extended Desktop.
Update: The latest Nvidia Driver (as of 7.01.2015) still does not like Explorer when running Surround (3 Monitor) in Windows 7, The New Win 10 Web Browser has no issues
Benchmarks
GT650M dGPU results in spoiler:
3DMark11 v1.0.132 - dGPU Nvidia GT650M - Intel i7 2.3Ghz[/b ]
Final - P2310 (GS2086 / PS7829 / CS1851)
3DMark13 v1.5.893- dGPU Nvidia GT650M - Intel i7 2.3Ghz
Firestrike - 1065 (1241G / 8348P / 316C)
Cloud Gate - 9702 (11672G / 6100P)
Ice Storm - 78455 (106250G / 40956P)
OSX 10.10.3
I have decided to wait to try to get this to work with OSX until the next major System release in October. It is not a priority to get OSX implementation for me as I am using it for gaming within Windows.
Thank you,
Brion Sohn


-
5
-
-
@bsohn: You can post pictures with the "Insert Image" button in the answer section. You can choose between using a www domain to link a picture or uploading a picture by yourself. There might be restrictions in the resolution of image!
Spoilers can be set with
[spoiler ] and [/spoiler ] without the space before the ]
@taiwanjen: Please read: http://forum.techinferno.com/diy-e-gpu-projects/10061-basic-egpu-hardware-guide-macs.html
A GTX 970, especially the manufactor overclocked versions (so all of the GTX 970s) can use more than 150W. 150W is the limit of the 2x6-Pin PCIe plugs.
The PCIe slot itself is the main and first power source of the card to supply up to 75W!!
Thank you for the info on the Posting with pictures..
Now does anyone have a link or Answers to these things:
What and how to modify the OS X Kext files for Yosemite 10.10.3?
and
Which Nvidia WebDriver set is a match for build "14D136"?, as I understand that is a key part of Getting the Nvidia drivers to work with Yosemite.
This is all I need to get figured out along with final case modifications for cooling and I will be fully up and running as I want to be.. Currently I am not planning on using Optimus so I don't currently think I need mods to get that to work only for OS X to recognize the Akitio as a second card.
Brion Sohn
-
More Update.. In Win 7 the Card is now fully recognized when attached and ON when Windows is opened through the BootCamp Launcher.. Drivers are good for the GTX970. Still getting the Code 12 but I really haven't attempted anything to get rid of it yet as I am not sure what the Best method is DTST Override, Setup, ???.. I am guessing that once the Code 12 is gone that things should work well as everything is up and running..
Still havent attempted the OS X Kext Mods to allow it to be recognized but part of that is I am having a hard time locating what exactly needs to be done.
Update again:
WINDOWS is now up and running.. Thanks to Nando and eGPU Setup 1.2..
Now to see if I can't get it running on Yosemite 10.10.3 though windows was really what I was after.
BTW on a side note how do you post pictures and spoiler sections so that I can create a thread with the build after I am done so that others might have an easier time.
Brion Sohn
-
Update: OK the eGPU is recognized through the Akitio in Windows 7 64bit with Code 12 as a Standard VGA Adaptor at the moment. So I am guessing that all I need to be able to do to get it to be recognized in Windows is to figure out how to reallocate the PCI resources to eliminate the Code 12 and then clean Install the NVIDIA Drivers so that it can run the GTX970 and also the GT650M as well.. Please correct me if I am wrong and there is a lot more to it.. Though that being said I am not sure how to go about Reallocation of the PCI Resourced with a Bootcamp load. As I mentioned earlier Getting it working in Windows is Primary..
As for OS X I have been reading that the NVIDIA drivers for the GTX970 don't currently support Yosemite 10.10.3 so getting it to work right now in OS X Might be Futile even if I can get OS X to recognize it.. Though if anyone has any pointers or methods with this it would be greatly appreciated as well.
BTW I do plan on posting the build as soon as I am totally finished and get it running. I think I have the first fully contained GTX970 on here meaning that all all I have as far as seen parts are The Dell DA2 and the Akitio (which will be modified for airflow but will be closed and dimensionally standard. It a bit beautiful BUT Honestly it was a PITA to wire and did take all custom wiring and a special made board to hold the DA2 plug-in port and power switch Which are both on the rear of the Akitio.
More Update.. In Win 7 the Card is now fully recognized when attached and ON when Windows is opened through the BootCamp Launcher.. Drivers are good for the GTX970. Still getting the Code 12 but I really haven't attempted anything to get rid of it yet as I am not sure what the Best method is DTST Override, Setup, ???.. I am guessing that once the Code 12 is gone that things should work well as everything is up and running..
Still havent attempted the OS X Kext Mods to allow it to be recognized but part of that is I am having a hard time locating what exactly needs to be done.
-
Actually, I think that you have a 2012 rMBP with Nvidia GT650M and an Intel 4000. If so, if you follow the standard Nvidia Kext Mods it should work in OS X. I have the same machine and eGPU on it in OS X is a piece of cake. It is the TB2 Macs that seem to have the issues.
I took the "r" in rMBP to mean retina display.. Which I don't have but I do have the internal card setup that you mentioned.. Is there a Link to a thread with the standard Kext Mods and how to do them.. Haven't ever gotten into doing anything like that before.
Brion Sohn
-
OK Time for a buch of help needed..
I have my eGPU up and running from a power and connection point of view but now I have no Idea what I need to do to get it to run.
It is an Akitio w/Galax GTX970 powered by a DA2
I am just looking to get it to run an external monitor set-up not needed to run the internal graphics.
Currently OS X Yosemite 10.10.3 is recognizes the Akitio (not sure if it should recognize the card at this point).
In Windows 7 64bit (it appeared to install all of the drivers for the PCIe bridge but notifies the Code 12 error on the MacBook.
I have a Macbook Pro 15" Mid 2015 with TB1 and the internal 650M Nvidia Chipset along with the IBM 4000
Any help would be greatly appreciated at this point, step by steps or otherwise to get the computer to recognize the eGPU in both OS X but Primarily In Windows 7 64bit
Thank you
Brion Sohn
Update: OK the eGPU is recognized through the Akitio in Windows 7 64bit with Code 12 as a Standard VGA Adaptor at the moment. So I am guessing that all I need to be able to do to get it to be recognized in Windows is to figure out how to reallocate the PCI resources to eliminate the Code 12 and then clean Install the NVIDIA Drivers so that it can run the GTX970 and also the GT650M as well.. Please correct me if I am wrong and there is a lot more to it.. Though that being said I am not sure how to go about Reallocation of the PCI Resourced with a Bootcamp load. As I mentioned earlier Getting it working in Windows is Primary..
As for OS X I have been reading that the NVIDIA drivers for the GTX970 don't currently support Yosemite 10.10.3 so getting it to work right now in OS X Might be Futile even if I can get OS X to recognize it.. Though if anyone has any pointers or methods with this it would be greatly appreciated as well.
BTW I do plan on posting the build as soon as I am totally finished and get it running. I think I have the first fully contained GTX970 on here meaning that all all I have as far as seen parts are The Dell DA2 and the Akitio (which will be modified for airflow but will be closed and dimensionally standard. It a bit beautiful BUT Honestly it was a PITA to wire and did take all custom wiring and a special made board to hold the DA2 plug-in port and power switch Which are both on the rear of the Akitio.
Thank you
Brion Sohn.
-
OK Time for a buch of help needed..
I have my eGPU up and running from a power and connection point of view but now I have no Idea what I need to do to get it to run.
It is an Akitio w/Galax GTX970 powered by a DA2
I am just looking to get it to run an external monitor set-up not needed to run the internal graphics.
Currently OS X Yosemite 10.10.3 is recognizes the Akitio (not sure if it should recognize the card at this point).
In Windows 7 64bit (it appeared to install all of the drivers for the PCIe bridge but notifies the Code 12 error on the MacBook.
I have a Macbook Pro 15" Mid 2015 with TB1 and the internal 650M Nvidia Chipset along with the IBM 4000
Any help would be greatly appreciated at this point, step by steps or otherwise to get the computer to recognize the eGPU in both OS X but Primarily In Windows 7 64bit
Thank you
Brion Sohn
-
Reading that and thinking about it... It might be that it is there to sense the voltage of an internal battery allowing the power supply to turn off when that voltage matches a certain reading to keep from overcharging the battery.
Finally figured out what the sense port on the DA2 would be used for.. I'm 90% sure from reading that this port is unneeded in our application as if it works the same as the Sense position in the PCIe cables all it does is tell the original use computer that the correct power supply has been plugged into it (protection from using a non-complient power supply).
Brion
-
1
-
-
Please report any success feeding the SENSE wire 12V. BPlus wanted to wire it that way for their proposed SWEX-DA2 adapter here but I objected since only known good config for SENSE was GND.
Not totally sure I am going to try anything with the sense but I might do some checking to see (haven't decided yet.
Brion
-
Thanks for your great explanation. I dont mind having the parts on the desk. i have a "man cave" anyway so the aesthetics isnt that important.
I was thinking of using one of the small gtx 970, and just keep the top open. If i have read the forums correctly they fit, but u cant close em, which is fine for me.
So, if i understand you correctly i need the following.
AKiTiO box
GPU: GTX 970 (like this: https://www.komplett.no/img/p/800/ea6cc7cf-662b-4e3f-bc68-37f39655bd78.jpg)
Molex -> Barrel plug (like this? Molex 4-Pin to Gridseed Power Plug (2.1mm DC Barrel Plug) - modDIY.com
PSU
Now comes maybe the stupid question. So i setup everything.
I connect the 8pin pci-e to the card from the PSU. The Barrel-Molex plug, do i hook that also up to the PSU using molex connector?
Is that all i need?
Thanks again for taking the time to lecture a beginner
I only started my quest to get this done about a month ago and have gotten far enough to order the parts.
There are very few cards that will fit completely in the Akitio as I have found and actually listed in a post not too far back. I chose the Galax 970 which fits and is a 970.. I actually think it is the only one that will fit without modificationor the Case or Card and can be closed with careful planning of the power lines.
For power the DA2 seems to be the optimal option if you want it to look complete but some have used traditional power supplies. You will need to create a splitter to be able to power the Akitio through the Barrel connector or direct soldered (riskier solution if you don't know what you are doing) and be able to run separate balanced power lines to the power ports on the graphics card itself. I did find out about the number of wires that need to be run and generally you need to run as many wires as there are positions in both positive and Negative feeds. Each wire set must be of the same wire and length as each additional wire balances the Amperage across the set. IE you can run 6 x 18 ga wires or one singular 12 ga (the parallel wire solution are used in computers as it is easier to route several small wires as opposed to one thick wire through a tight case.
So on the Hardware side I believe I have things figured out.. Software side is where I know I will be back asking lots of questions to get it to work as there are from what I read different things that need to be done for each system (OS X, Windows) as well as sometimes different models of the MacBook (Pro).
Brion
-
Glad to hear that
I'm currently also changing my build to that setup (Galax 970, DA-2 inside the AKiTiO). What are your ideas about the better cooling? I will cut open top and left side and cover it up with fan grills to get maximum airflow:
Currently my thoughts on cooling are to CNC Mill (I have access through my work) an oval cutout in the side of the Akitio where the fans are on the Galax. Backed by aluminum grill plate to make it look again like a box (as opposed to a box with a hole in it). Then set the orientation of the amities fan to complement the airflow direction of the card (i.e. Positive or negative pressure (so the fans aren't working against each other, Both sending air into the card or out of the card).
With the same direction airflow and the help of the amities fan with pulling cool air from outside I believe this should be enough cooling.. if it is not then I will probably add some vent holes on the top.
Brion Sohn
-
Oh wait yea I just realized what you are saying.. I wasn't thinking as I forgot I actually had power to the akitio while I was plying around. Im not sure there is any internal pick-up unless it is at the thunderbolt connection and that is one place I don't think I want to mess with.
Brion
-
Consider if you really need the switch. My AKiTiO powers down with the notebook, powering down the video card with it. However the Dell DA-2 still has a GREEN LED on to signify it's on. With no load on the DA-2 it should not have much power draw that way. I do have a OFF switch which puts my DA-2 into AMBER (standby). I haven't been using the OFF switch.
Consider pulling the Dell DA-2's power lead to power it off completely.
Sounds good.. I wonder does the Remote wire pass any voltage or it it just looking for a grounding (I get my DA2 tomorrow).. I wonder if there is a method to link the DA2's remote to the Akito's fan or LED which in playing with the Akitio turn off when the thunderbolt connection is cut IE turning off the ground and would auto put the DA2 to sleep as well. It would possibly need a relay in the loop though to keep from back voltage and that gets more complex in a small space.
Brion
-
Guess it is sth about this. Just not sure how to use that information

Reading that and thinking about it... It might be that it is there to sense the voltage of an internal battery allowing the power supply to turn off when that voltage matches a certain reading to keep from overcharging the battery.
-
The rather short (179mm) Galax/KFA2 GTX970 which fits without needing to modify either the video card or the AKiTiO chassis. See for yourself: http://forum.techinferno.com/implementation-guides-apple/8882-2014-13-macbook-pro-gtx970%4016gbps-tb2-akitio-thunder2-handle-win8-1-%5Bphantron.html#post121260
Went ahead and pulled the trigger on the Galax as all the others were basically the same and the Galax GTX970 OC (other than the Gigabyte with the added video outputs, which won't fit how I want) - seems to have the best deal right now ($339.00 shipped with free 120GB SSD Drive).. Now to actually build the thing... Everything seems pretty straight forward to me as far as the Hardware goes..
Have the Akitio, Have the Galax, Have the Dell DA2, Have the mesh material to modify the case for better cooling. Still have to work out the power points that I am going to choose to set up the wiring, the wires and plugs themselves, and a integrated switch to turn on the DA2 at the Akitio.
After that comes getting the system to recognize it for what I need though reading through here I believe that it can be done without too much issue.. Mainly need it for Win7 Professional so I will probably have to work out the general error on that.
Brion
-
1
-
-
If you are referring to the Gigabyte mini ITX GTX970, yes, it fits into the chassis however it's too tall to allow the cover to slider over.
It's W=43, L=183, H=129 mm(include bracket)
Here's the slightly smaller ASUS mini ITX GTX970 (W=41, L=171, H=122mm) which again fits the chassis, but is too tall to allow the outer cover to slider over it.
Card needs to be the standard height (4.376" - 111.15mm) to allow the AKiTiO cover to fit. The other twin-fan GTX970 cards by Galax, Zotac, ELSA, Leadertek, Inno3D listed on http://forum.techinferno.com/enclosures-adapters/7205-us%24189-akitio-thunder2-pcie-box-16gbps-tb2.html would allow this clearance but note their width and whether the fan shroud would need to be removed to fit the chassis.
Thank you that is what I was thinking.. I figured out a bit that if I look at the cookout board photos if the Lower edge of the SLI pins are even with the top of the Port Bracket the card will more than likely fit (Galax 970 and EVGA 960) the ASUS and Gigabyte have about a 1/8" - 1/4" visually at this point which was telling me it probably would not fit which is what you confirmed. The Zotac looks like it will fit Height wise but I believe from reading that it is actually too long to fit inside.
Looks like Inno3D now has a 1x as well which is of course shorter.. From Specs it looks like the Galax, Inno3D 1x will fit without modification where the Inno3D 2x, Leadtech, ELSA and Zotec would need to have covers removed or/and maybe the Akitios's rear fan to fit. All appear to be width wish around 40mm which will fit, Visually as long as the cover is not wider than the dual width Port Bracket.
Thanks for the information
-
OK It looks like I may have finally figured out what I am going to do.. Already have the Akitio, DA2 Power supply is coming tomorrow. Probably going to get a Galax DTX 970 OC (as they currently have a deal for this month on the card with a free 120GB SSD) and it fits in the case.. I actually would prefer the Gigabyte version of the 970 due to the additional display port outputs (planning on using a three monitor set-up) but I believe it is too tall when installed to be able to even make low profile Power connectors (Someone please correct me if I am wrong on this) I know the Galax has enough room for custom plugs.
If someone has information or pictures of a Gigabyte card in the Akitio please let me know..
As I build this thing I will probably next have questions when I finally work to get it installed as I have been reading up on wiring and what is needed and can be done and believe I can keep it all in case.. should be interesting...
So Again any info on the Gigabyte card would be appreciated.
Thank you
Brion


low profile PCIe connectors discussion
in Enclosures and Adapters
Posted
Pretty ingenious method of doing the plug (Wish I thought of that would have made life easier on my build). The 14GA (15A) should be capable of the 150watt (12.5A) theoretical of the dual 6pin PCIe. However, If you were to be linking to 8Pins 12GA would be the choice.. Very cool dropping to 2 wires.. Personally though I might have gone for Dual 16 GA as it would make it easier to pinup at the power supply as you can run one wire to each of (2) 12V pin outs and (2) Grounds.. The issue with running the single 12 might be an overloading of a single pin at the supply side if you do not direct connect.
One more note, I would cover the backside of that board in epoxy or something to protect still as it does have exposed power contacts.
Brion