


deadsmiley
-
Posts
201 -
Joined
-
Last visited
-
Days Won
1
Content Type
Profiles
Forums
Downloads
Posts posted by deadsmiley
-
-
Pictures would be very good. That way we can have something to show resellers to pressure clevo about and maybe get this fixed from the factory. I've fixed all of my heatsinks so I can't take any.
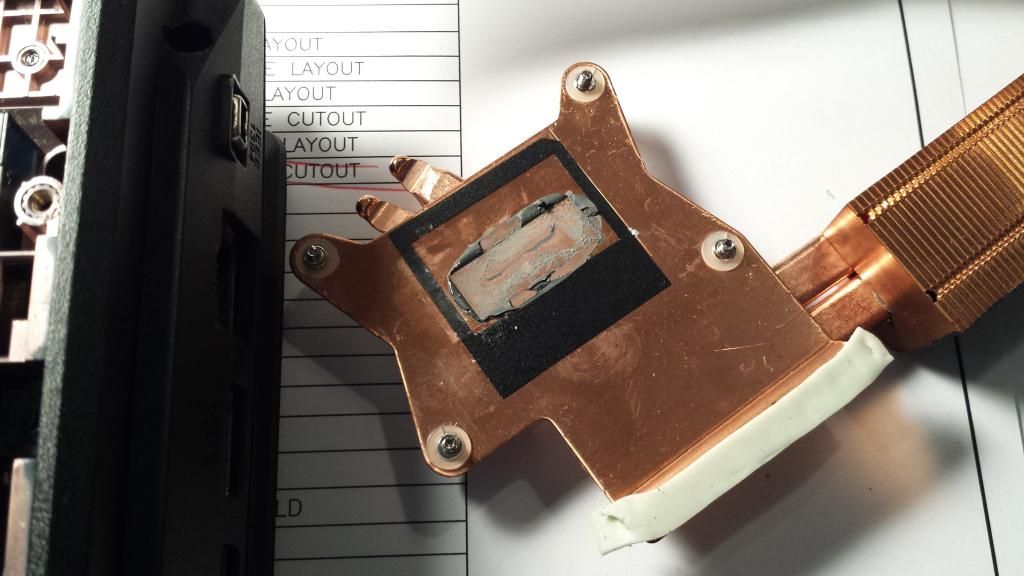
Pictures of the CPU heatsink. It wasn't as bad as the GPU heatsink. I didn't take temp readings before I did this so... yeah.
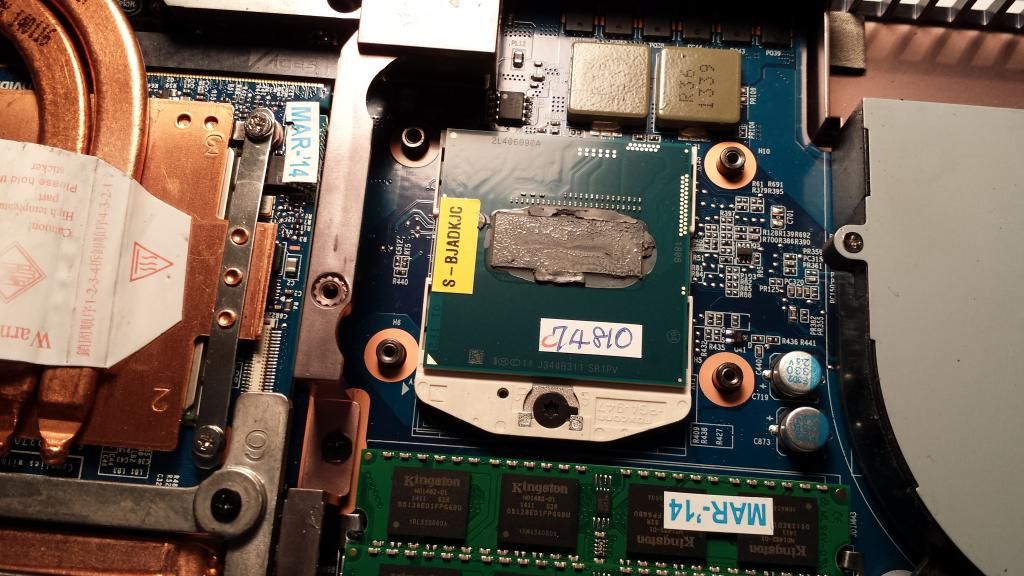
CPU with the ID7. I don't like this stuff. It hardens over time and is hard to remove. I haven't been able to do it without scratching the die on my GPU/CPU.
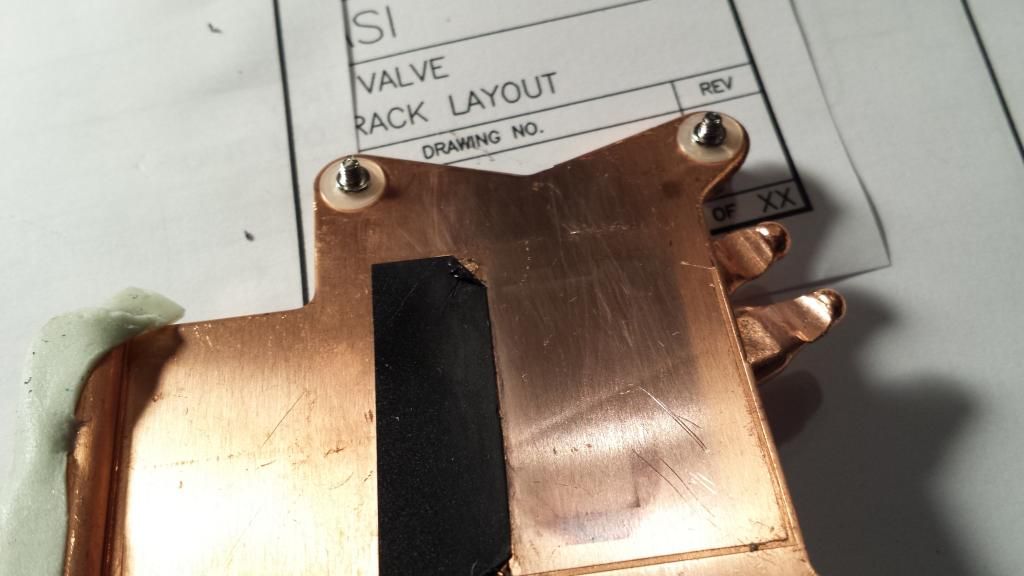
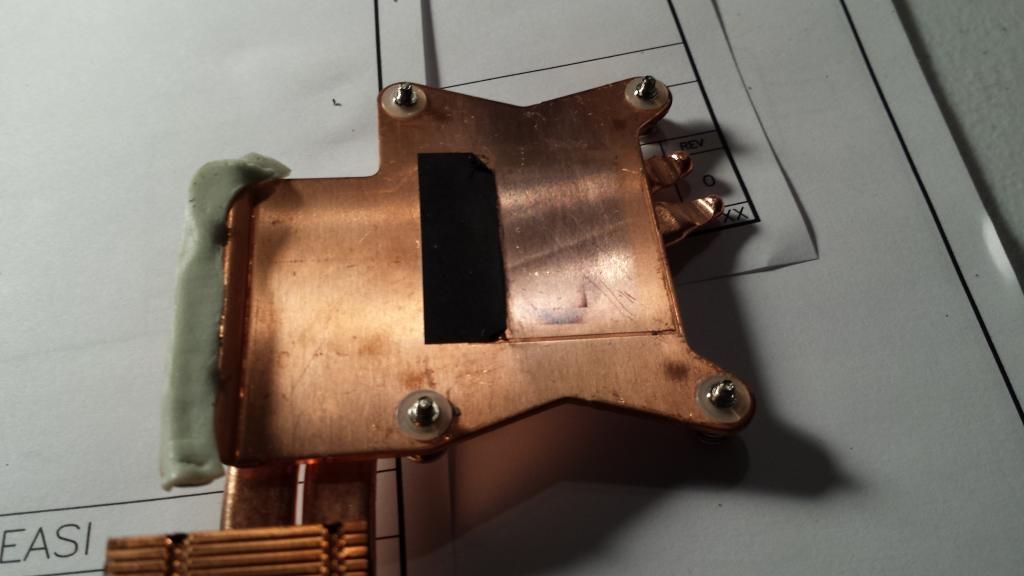
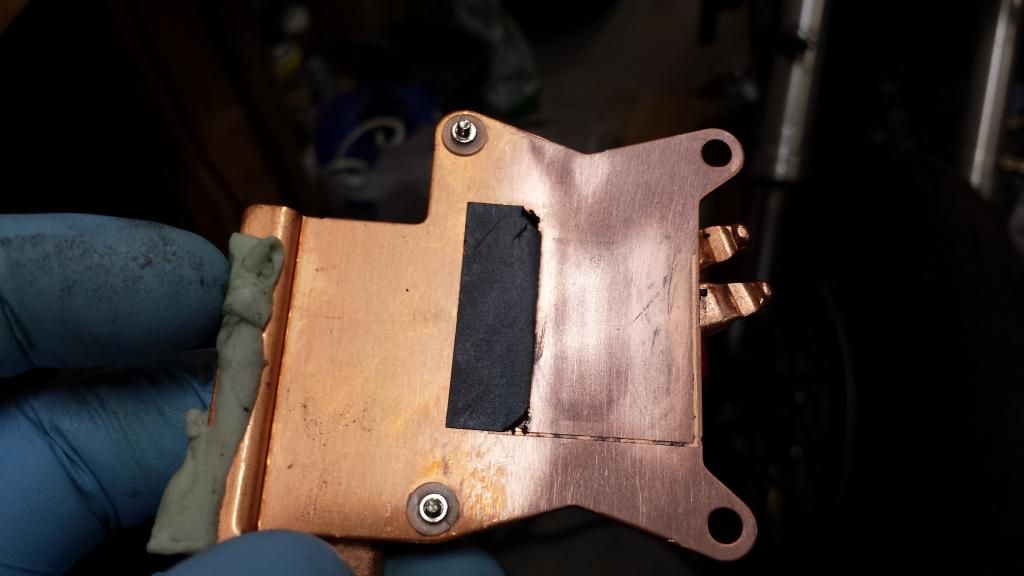
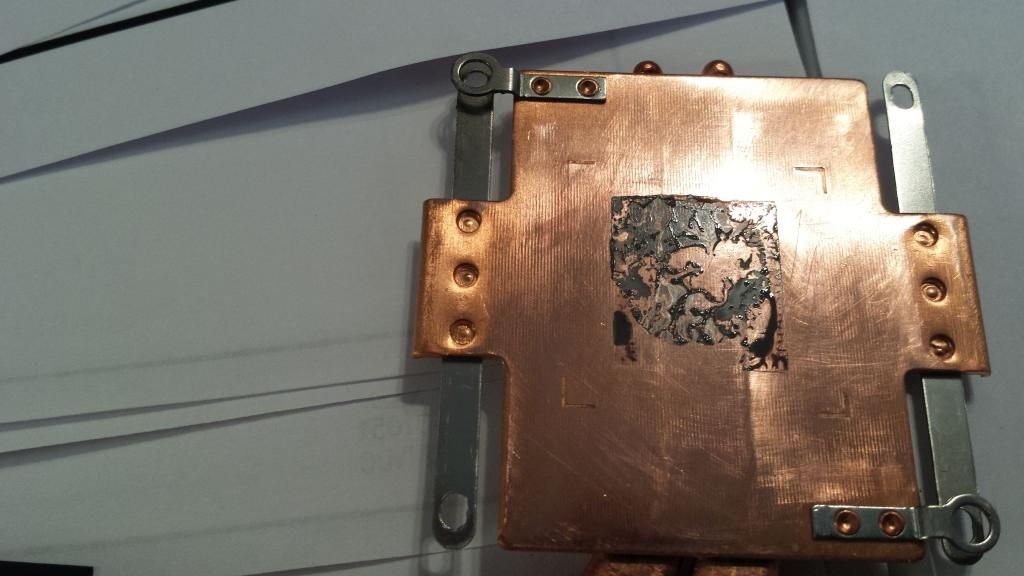
CPU heatsink after cleaning. The deformations in the heatsink from where the heatpipes were attached are clearly visible when reflected in the light. As I said above, this is not as bad as my GPU heatsink, which was really warped. It had high spots and low spots. Notice that the deformations run right through the center of the die contact area.
Notice the insulating tape applied to the heatsink. This (I assume) is to prevent accidental contact with the row of tiny components on top of the CPU (see pictures above).
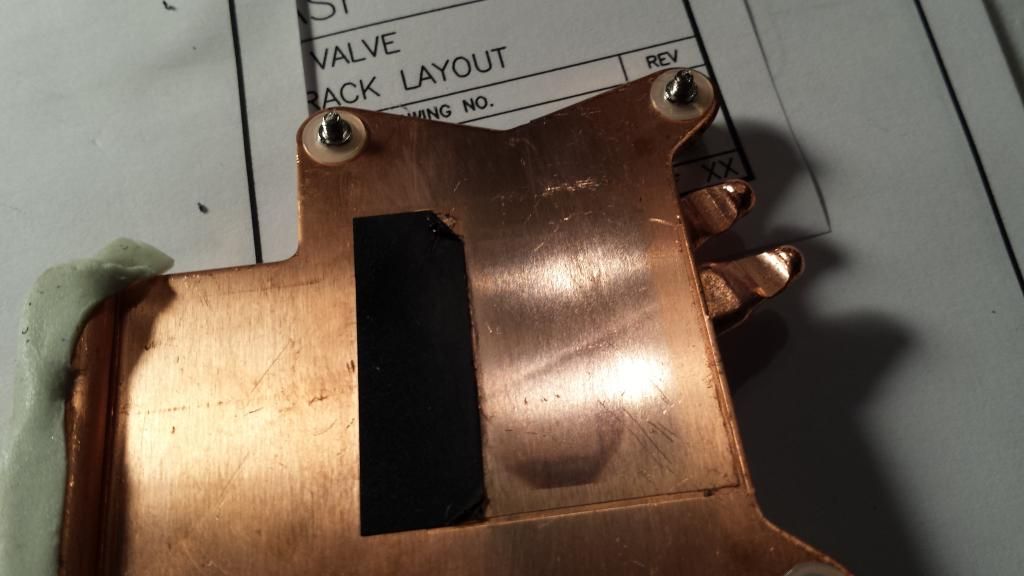

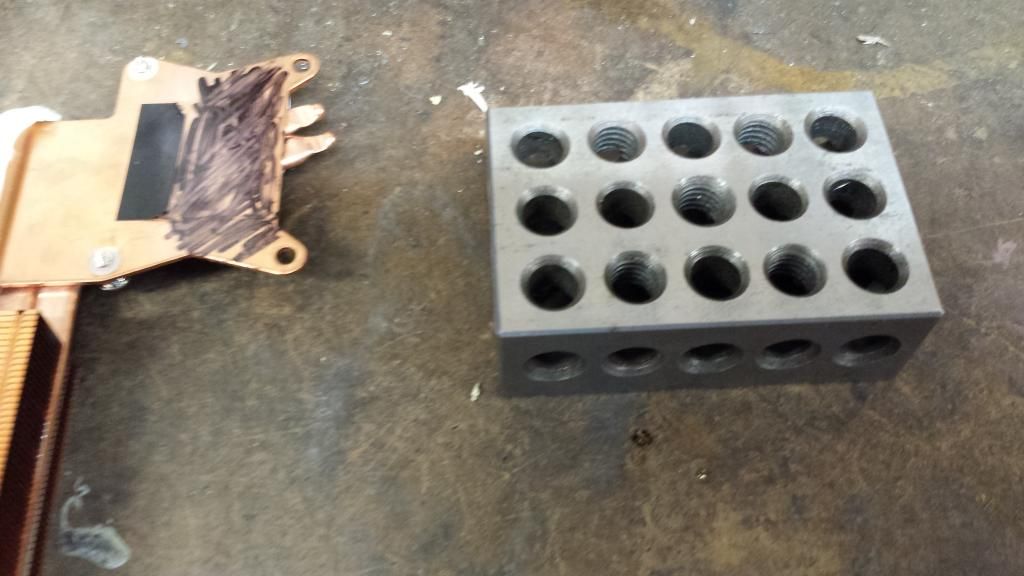
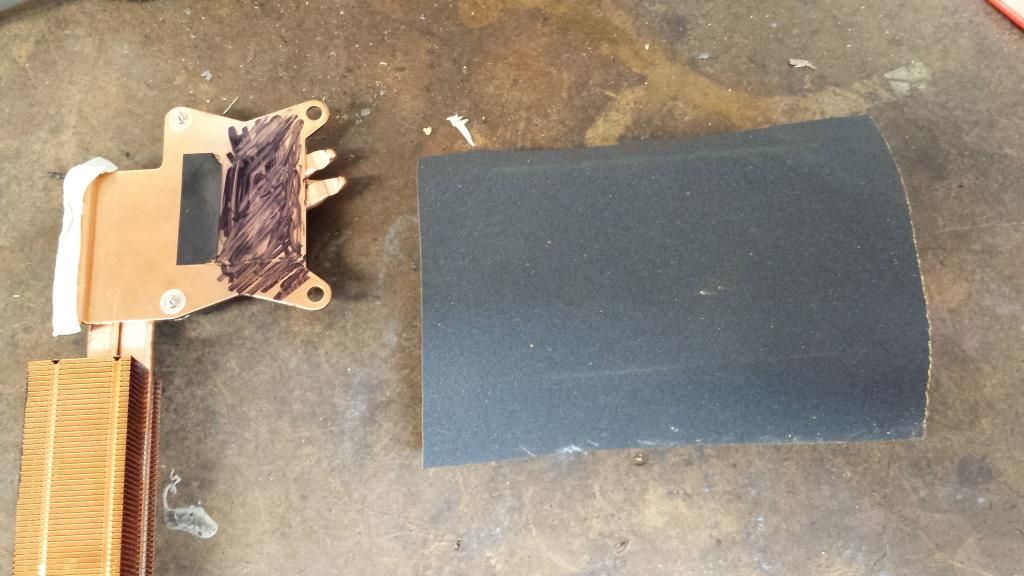
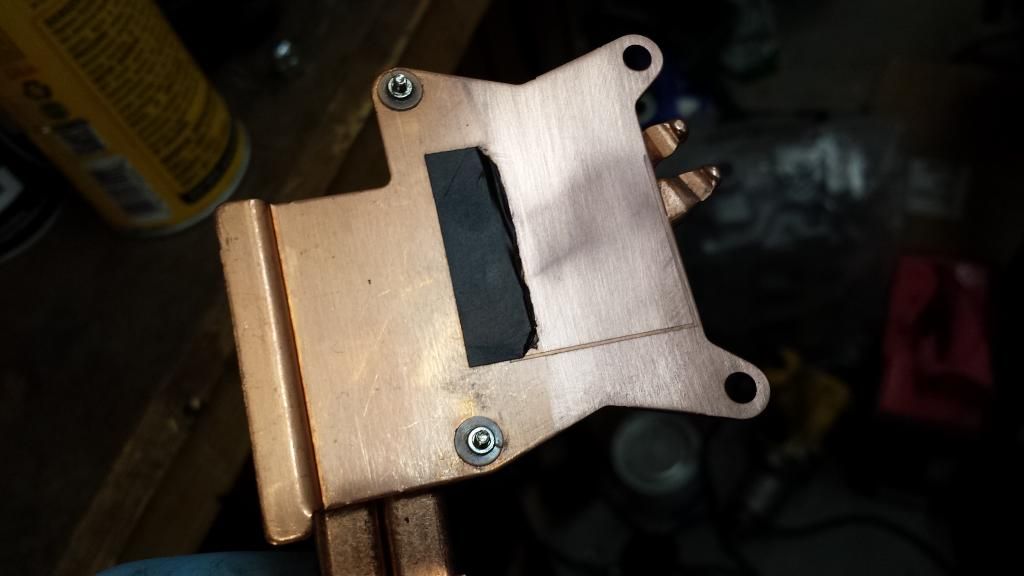
I used a sharpie to blacken the heatsink. In theory, this would help me see the high spots and the low spots. Overall it was surprisingly flat with the exception of the where the heatpipes were attached. I removed a portion of the insulating tape. There isn't anything the heatsink base can contact on the short side. I also removed two of the mounting screws. Be care with the little plastic washers that retain the hold down springs. They are small. The washers are split in one spot. That is my machinist 1-2-3 block. One without holes would be a good choice since it would support the sandpaper better, but it's what I had so I used it.
I used WD-40 to wet the sandpaper. I was pointed to a desktop CPU lapping guide and they used water and a drop of dishsoap. That would probably be better. Cleanup would be a lot easier. You just can't do this dry, it has to be wet. It is messy, so do it outside or someplace you don't want copper slurry. I used gloves too.
One thing I should have done was remove the thermal pad along the lower edge of the heatsink. I ended up mangling the crap out of this without even trying. I pieced it back together. New thermal pad material has been ordered.
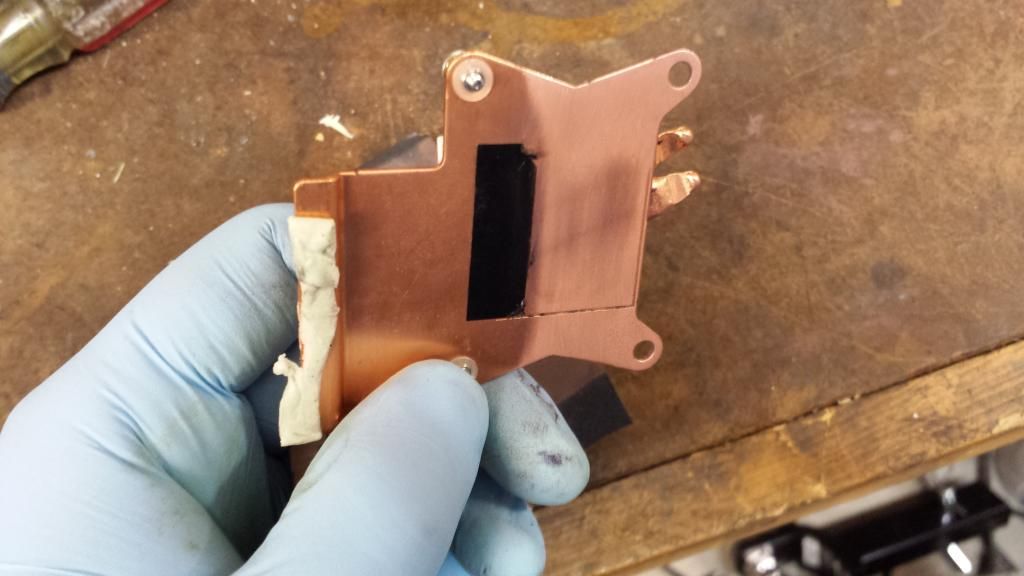
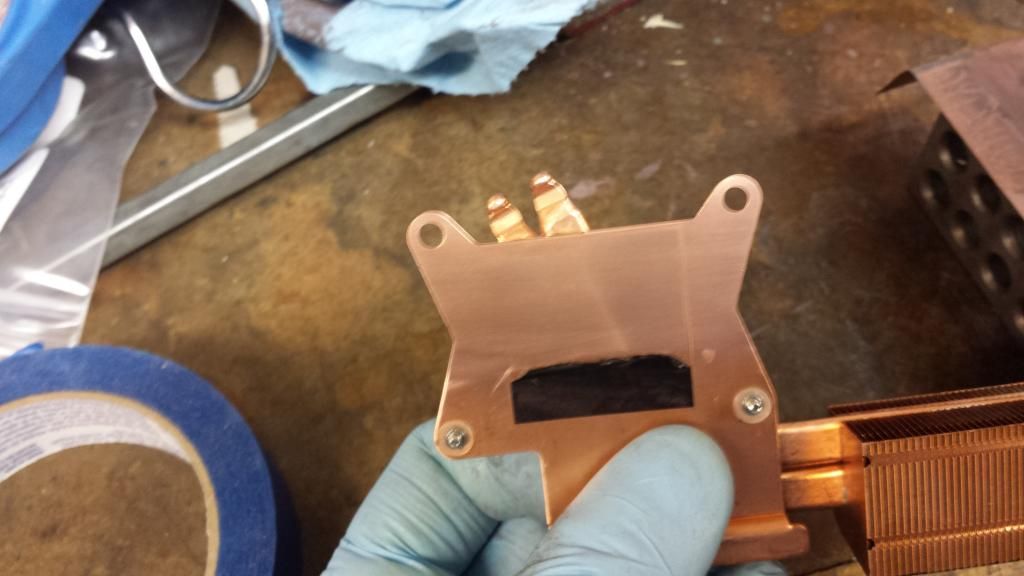
I had 320, 500 and 1000 grit paper. I mostly used the 1000 grit since I didn't need (or want) to take off a lot of material. I got most of the deformation removed. I will come back to it later after my thermal pads arrive.
Here is a picture of before I removed the ID7 paste from my GPU heatsink. The deformations from attaching the heatpipes can be clearly seen.
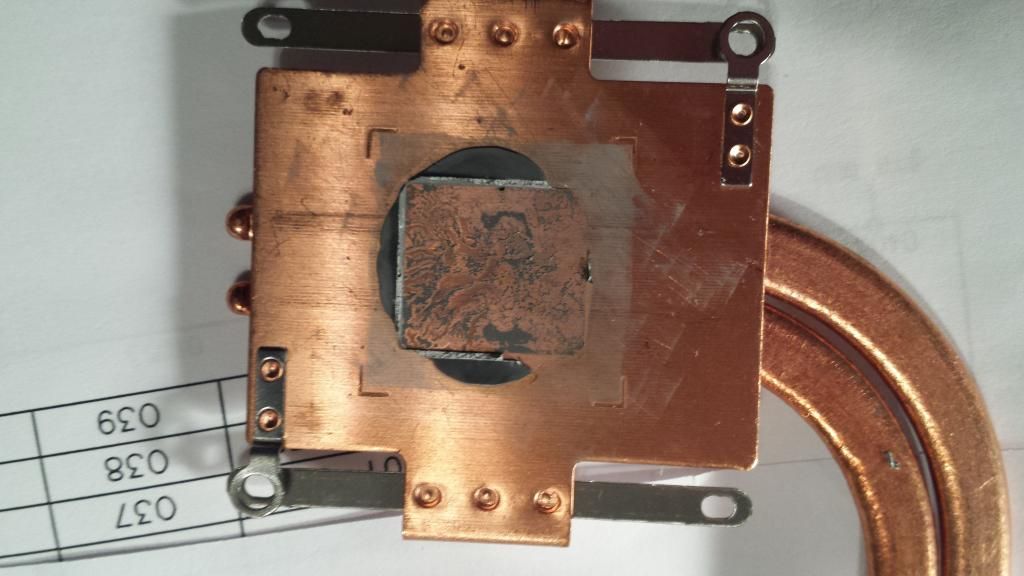
I did find a pic of my bad repaste job. I noticed that my heat sink had some high spots in the middle, so I took a stone too it. These are the shiny spots in this picture. You can't see the bulk of the high spot because it's covered in thermal paste. It was much worse than my CPU heatsink.
-
 4
4
-
-
Another huge issue is that the underside of the CPU radiator needs to be foiled. The fact that the radiator extends below the motherboard makes it so that the fan sucks back in lots of air that blew through the radiator.
I didn't really look at that. I don't overclock my CPU though.
- - - Updated - - -
I used a small file to widen each individual slit on mine. It's still strong enough to hold the laptop by the air intake vents.I did that too initially. It may have been your post that suggested it. It's crazy how tiny those slits are.
-
I have the P170SM-A with a GTX 880M. They appear to have the same cooling issues and the fixes are very similar. I know for a fact that my GPU and CPU heatsinks are (were) warped on the die contact area. I think fixing that issue along with the airflow through the inlet vents are where you will see the biggest cooling gains.
-
I am using driver version 327.23 with no issues. Of course, none of my games need the newer drivers to run really well.
-
Can you post a picture with what you are trying to accomplish?
Sent from my iPhone using Tapatalk
Sure. It will be this weekend before I will be messing with it again.
I will be getting the CPU flat. It hasn't been touched yet so it should be easier to see.
-
1
-
-
I see what you're saying now. Well clevo's fault or foxconn's, the damn plate is bent ruining what would otherwise be the top laptop cooling hands down.
That gives me hope. I have already seen very positive results from less than an hours work. It could use more work. Still has a bit of a low spot.
-
What AW/Dell does different is they have a much thicker copper contact to the processor die. This is too thick to accidentally bend when bonding heatpipes. Clevo uses a thin copper sheet for their heatsink base, and too much pressure is applied when bonding the heatpipes, bending the heatsink base. I'm fairly certain clevo does not specify that their heatsink plates are supposed to be bent.
I agree with you! However, if Clevo does not specify a tolerance for die contact surface flatness then anything that Foxcon produces would be good to ship. Or... I could be full of crap. Just speculation here. All I really know is that my GPU plate was about as flat as a Lays potato chip.
-
@deadsmiley Yeah the difference is big. Remember that the CPU heatsink has the same problem too. Hopefully clevo can someday figure out how to not warp the plate when bonding the heatpipes and this will no longer be necessary.
I read that you hit 92C still even after these mods, and the cooling and do even better than that. With fans at full speed I would expect your voltage and clocks to never exceed 85C with the gpu fan intake fixed and a level contact plate. One problem I had is that I would slightly bend my heatpipes without realizing it after sanding the plate, and thus the radiator would be hitting the laptop frame before the contact plate was level with the die when tightening screws. I would check that. I think you also still might not be getting enough die pressure. When removing the heatsink and looking at the die you should only see a layer of paste that is so thin that it is transparent, evenly across the entire die.
If clevo resellers reading this could tell clevo this problem maybe we could make this happen. You can visibly see the warping when looking at the die contact plate on the die side. You will see stress marks perfectly following the heatpipes on the other side. The heatsink must be very clean to see them.
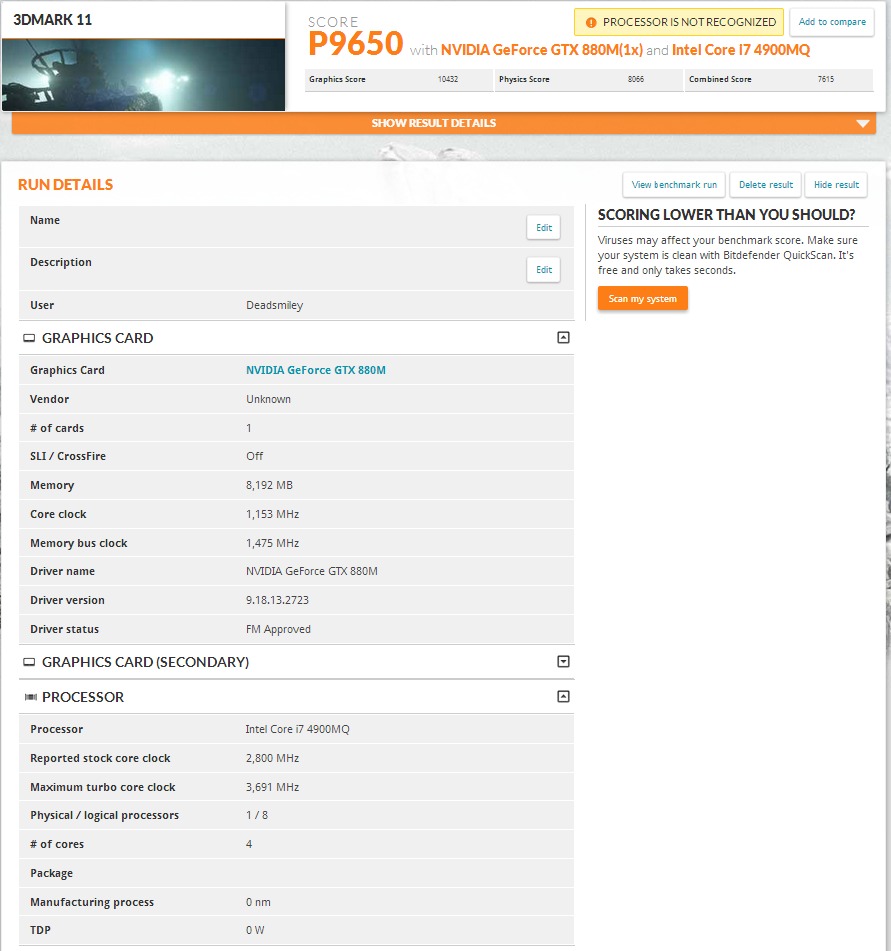
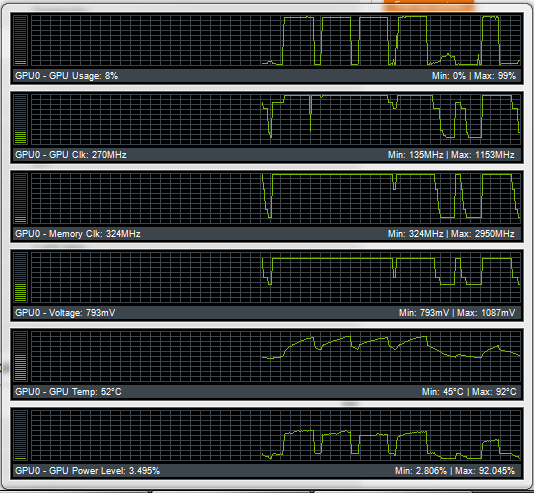
I hit 92c after the mod, but I ran this at 1153 core, 1475 memory, 1.0875v. It was toasty. I don't have any cooling issues on the GPU running locked at 993 core, 1475 memory and .975v. It gets to the upper 60's during gaming so it's a good 15c cooler as it sits.
I figured the CPU heatsink would be no better. Thanks for the confirmation.
If the Alienware heatsinks are better (flatter with a finer finish) then this problem lies squarely on Clevo. They specify the requirements for the heatsink which is manufactured to Clevo specs by Foxcon. That is my opinion from many years in the manufacturing industry. Just because a component is sourced from the same company does not mean that component is (literally) built to the same standards. Think VW vs. Porsche.
-
Robbo,
No sir. The die contact area was not flat. It had high spots and low spots. I am more concerned with it being flat and less so about it being shiny. My heatsink is not shiny after I worked on it. It has a matte finish. The surface is smoother along with being flatter. It seems that warped heatsink contact areas are a common problem with the Clevo.
Looky here:
-
Prema also has 2 fan speed options for his BIOS. If you have problems make sure you use the "cool" option. Your reseller probably is using the "quiet" version. Make sure you backup your BIOS first in case you have to RMA for any reason in the future. This might be enough to make your temps fine without resorting to modifying the heatsink.
Did you foil-wrap the bottom side of the CPU radiator? There is a gigantic air gap that reduces air flow by around 1/3 if you don't add foil. If you did then this is likely why your CPU temps are now fine, with the repaste having little impact.
Also all clevo heatsinks (CPU and GPU) ship with a warped die contact plate. Have you tried increasing the pressure at all? This helps some, but the only true fix it to sand the contact plate on a level surface. If you do this GPU temps are actually much better than m18x temps since the Clevo fan moves 2.5x more air than the alienware GPU fans. Clevo uses much stronger fans because they don't realize they have the die contact problem :/
I sanded my the die contact plate yesterday for my P170SM-A (Sager NP8278). Huge difference in my temps. I used a machinist's 1-2-3 block standing up on the 1" side to get at the contact area. My temps have dropped from low 80's playing games to high 60's. I also replaced the AS5 with MX-4 and tweaked the springs a tag for more force against the GPU die. Be careful doing that last part. Previously I cut a big hole right over the fan inlet for the GPU. Got that idea from this thread as well.
-
@deadsmiley, that's a good result! So, how much did your heatsink smoothing & mx4 paste lower temperatures by? If you've done a like for like comparison at the same overclock or at stock - what are the temperature differences before & after? Would be interesting to know just how much difference the heatsink smoothing/spring bending/mx4 made. (Although can't ascertain which one of those 3 things made the most difference, might just have been a bad paste job before).
Robbo,
I think that getting the heatsink *flat* so it makes the best contact possible with the GPU die is critical to achieving the best cooling that the heatpipe can offer. Getting the surface smooth helps. Remember that the purpose of thermal paste is to close up the air gaps between the GPU and the cooler. The surface of my Foxcon heatpipe was definitely not flat. Others on the this forum have experienced the same thing on previous model Celvos. I cannot speak for Alienware products, but I suspect that the surface that contacts the GPU is better (in terms of flatness and surface finish) than Clevo's model. I it would be cool (pun intended) if one of our Alienware brothers could check out their GPU heatsink the next time they have it off and report back. While the big hole cutout in the bottom cover made a difference in cooling. I think that flattening the heatsink surface made a bigger difference by far. I have no numbers to back this up, just general feelings from lots of testing and past experiences with desktop GPU cooling systems. I am kicking myself for not looking at the heatpipe sooner. Part of the reason I didn't look into it was because I wasn't sure how to approach the process of getting the thing flat, or at least getting it on a flat enough surface to check it. This is because the heat sink has rivets that protrude beyond the mating surface of the cooler, which makes it a challenge to get something in the space to work on that surface (a picture here would be nice).
As far as thermal paste goes, I really can't say. I am pretty sure I had a good AS5 paste job previous to using MX-4. It was my second attempt with AS5 on this machine. The first one I didn't apply enough paste and temperatures were very hot under gaming loads and worse while benchmarking.
Springs are tough to quantify too. I paused for a moment considering whether I wanted to test with just the heatsink refinishing and AS5, then with MX-4, then with MX-4 and spring tweaking. I decided that I simply didn't want to take the time involved to do that so I did the three things all at once. NOT scientific and we don't get to learn much except that some combination (or all of them) yielded good results. The springs themselfs are not robost. One of them bent at the rivet (the weakest point) and gave me an "oh shit" moment. I wanted them all to apply force equally. I have no idea if I succeeded in that or if tweaking the springs brought any positive or negative results.
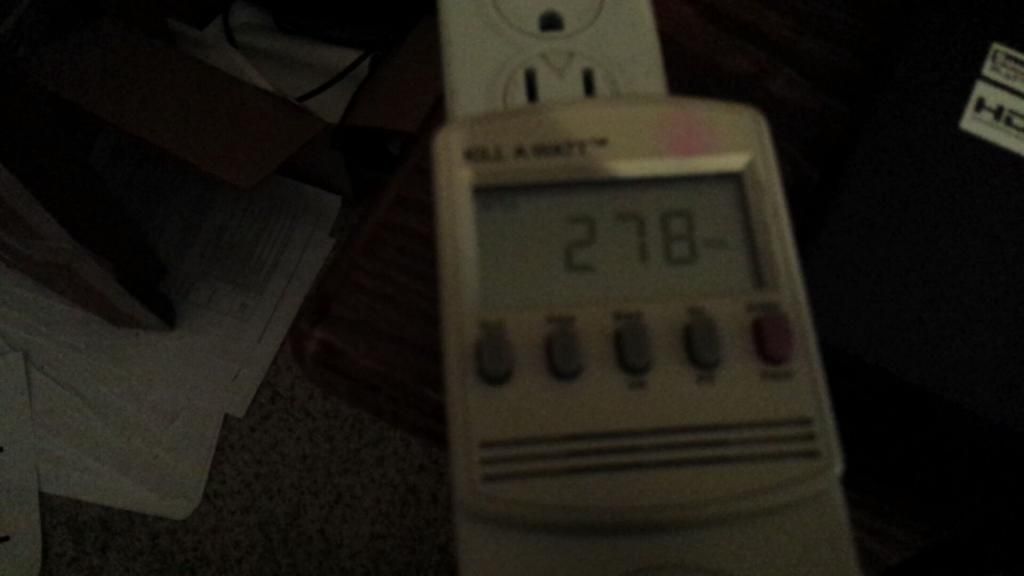
One other thing I need to stress is this. My AC adapter was pulling 278w at the wall. It's rated for 230w output. Assuming 85% efficiency, we are looking at 236w. I really can't push any further without risk of popping my AC adapter. I really don't want to go back and test at this level without having a spare AC adapter on hand. I use this machine for work (self-employed). It's my money-maker. I probably shouldn't be monkeying with it like I am!
Proceed at your own peril! I am not responsible for your system if you fuck it up, void your warranty, explode it, implode it, create a tear in the space time fabric, etc...

-
I have been have some discussions over in the Alienware section. After LOTS of testing I determined that my GPU was simply running too hot to be pushed any harder. I did a hardware mod that involved cutting a big ol' hole in the bottom cover to let more cool air into the GPU fan.
That helped a lot.
Today I repasted with MX-4. Before I did the repaste I took the heatpipe to my garage and used 1200 wet or dry along with a 1-2-3 block on the 1" end to flatten and smooth the die contact surface of the heatpipe. I also slightly bent the springs on the heatpipe to apply a little more pressure on the GPU. The results were quite good.
I ran this at 1153 core, 1475 memory, 1.0875v. Temps did hit 92c so I am at my limit again. I saw a Kill-a-watt load of 278w at the wall with my 230w AC adapter.
Again, cooling is my limiting factor... although I am not sure how much more my AC adapter can take!
3DMark 11: 9650
NVIDIA GeForce GTX 880M video card benchmark result - Intel Core i7 4900MQ,Notebook P17SM-A
-
There are just a lot less issues with the 780M vs. the 880M.
-
Why did I get quoted in that string? lol
@deadsmiley - let me know how the MX-4 works out for you. I'm starting to agree with svl7's notion that there may not be enough pressure with this heatsink to use a thinner paste like MX-4 so I ordered a tube of IC Diamond.
I haven't applied the MX-4 yet, but I did a quick write up on my Sager cooling mod here:
-
I didn't come anywhere close to 92C, neither card passed 87C and the average was 80C so it throttled for some reason other than that. It most likely needs more power for that card, it seems to be weaker than the other one.
I did a modest overclock and this was my 3DM11:
Second GPU hit 85C, primary hit 78C. There isn't much room for overclocking in these machines because of the way Clevo designed the cooling for the secondary GPU. That overclock took a 37.5mV overvolt and 140% power target to complete. Not a bad score but if the cooling system was better, the score would be better.
Firestrike: NVIDIA GeForce GTX 880M video card benchmark result - Intel® Core i7-4940MX CPU @ 3.10GHz,Notebook P377SM-A
I think at this point, I should just enjoy my machine and use it at stock clocks until such a point that I'm ready to cut out holes in the chassis to allow more air to get into the fans to cool things down more.
Clevo's cooling works great at stock clocks... they have it set up to where temps max at 87C with the secondary GPU always being one step up in fan speed over the primary. Its just not an enthusiast system. Gotta get the 9570 for that. I'm still thinking about it but I have to get a stock 9377 BIOS if I'm going to exchange it and there doesn't seem to be a stock Sager BIOS floating around for the 9377 and I can't very well send it back with Prema's BIOS.
Ask someone to backup a stock bios for you?
Sent with love from my Galaxy S4
-
Guys with 880 SLI aren't getting good results. Go with 780 if you can.
Sent with love from my Galaxy S4
-
Wow, these 880M cards seem like a right mess, and also seems like NVidia's latest beta driver (340.43) just makes it worse based on what you're saying. What a cluster f*ck! Can anyone else substantiate that 340.43 driver breaks overclocking on 880M cards? Perhaps the advice should be not to uprgrade to 340.43! Although, it's not really workable keeping your GPU on old GPU drivers. What a mess.
As long as my my card still works I am leaving it alone. No way an I updating drivers.
Sent with love from my Galaxy S4
-
It's one thing to have the underside have some over-dremel, it's a whole other thing to cut a 3" hole in the bottom and superglue a 5V fan to the underside.
hahahaha! Right you are sir! [emoji12]
Sent with love from my Galaxy S4
-
Yeah man that'd be awesome to see. Custom cooling mods (that look good) are a step forward in overclocking/managing temps, so I'm always interested to see custom solutions that don't look like garbage.
Eh... the dremel got away from me a couple of times. It doesn't look fantastic, but it is functional.
Sent with love from my Galaxy S4
-
I'd actually really love to see some pics of your mod.
It's a work in process. Right now I don't have pics and the foam is gone because it was just held in place temporarily by tape. After taking the bottom cover off a few times it was loose and getting into the GPU fan. Currently I have a rather large open hole where the "grill" once was. I have some black wire mesh I want put over the hole to keep stuff out of it. Right now I am working out of town so it will be a while before I get to it. When I do I will make a separate thread.

-
1
-
-
-
I am running mine at 954 core, 2950 memory. It runs pretty good like this. Not as good as I was expecting but still good. Running with boost enabled just makes it hot.
Sent with love from my Galaxy S4
-
UUUUUUUUUUUUNNNNNNNNNNNNNNNNNNNNNNNLLLLLLLLLLLLLLLOOOOOOOOOOOOOOOOOOOOOOOOOOOCCCCCCCCCCCCCCCCCKKKKKKKKKKKKKKKKEEEEEEEEEEEEEDDDDDDDDDDDDD!!!!!!!!!!!!!!!!!!!!!!!! \o/
AWWWESOOOOMEEE!
Sent with love from my Galaxy S4
-
Is your laptop Alienware M17x?
Sager NP8278
Sent with love from my Galaxy S4


NVIDIA Kepler VBIOS mods - Overclocking Editions, modified clocks, voltage tweaks
in General Notebook Discussions
Posted
Make sure you have the nvidia card selected and not the Intel Graphics. I did that once...