Ok guys, first of all, this is really a great job you all did here. I read everything from the beginning. Kudos to everyone in this topic for what you've achieved!
So for the moment as far as I know this is what we've got:
- GTX 980M running (along with the integrated graphics) with Optimus, on either Windows 7 or 8, so no SLI, no 120Hz or 3D possible in this configuration, and Optimus is not really interesting
- GTX 980M running (alone) without Optimus when the BIOS is set to TRUE UEFI mode (no Legacy). In this case SLI and 120Hz are working (no 3D), but until now, it was limited to Windows 8
I just got Windows 7 to boot fine to the desktop on my M17x R4, with the BIOS set to TRUE UEFI, with Legacy disabled, Secure Boot disabled, and Fast Boot disabled as well.
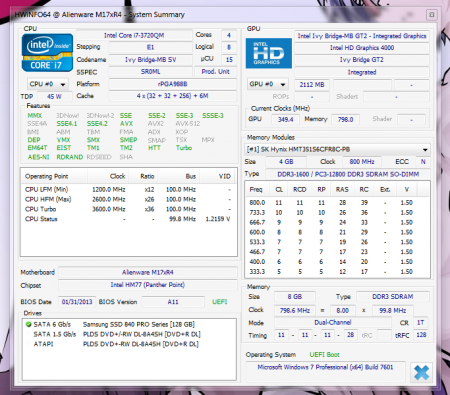
Here is the video: Windows 7 UEFI boot on Alienware M17x R4 - YouTube
As you can see, I don't have a GTX980M to test everything at the moment, I only have the integrated HD 4000 (something went wrong with my AMD months ago, it's not working anymore).
I hope I'm going to get one soon, next month probably, for the moment you guys can try this method and tell us if it's working well on Windows 7.
-----
So, now how I did it...
1. Get a disk or an ISO of Windows 7 x64 SP1 (I used the Pro edition, but it should not matter anyway). Be sure this is not an upgrade disk, because those ones kinda have some issues with booting in an UEFI environment.
2. Either burn it to a DVD, or create a USB boot key with Rufus (I used the latest 1.4.12 version).
Download here: Rufus - Create bootable USB drives the easy way
If using Rufus, you need to select your ISO first (or it will reset all the other options set before). Then select your usb key, GPT for UEFI, FAT32 for the filesystem (and I used 4096 for the last option). Leave the last 3 options checked, hit the Start button and wait until it ends. You key is ready to be plugged to the Alienware.
3. Now get into the Bios (I have revision A11 unlocked). In the boot menu, ensure those options are set correctly.
Boot List Option => UEFI
Load Legacy Option Rom => Enabled (for the moment)
Secure Boot => Disabled
Windows 8 Fast Boot => Disabled
Save the changes. Okay, now the Alienware is ready for Windows 7 install.
4. Insert the DVD or usb key, reboot the computer and hit F12 to choose the UEFI version of the DVD or usb key to boot from.
5. Once you get to the installer, you have to ensure your hard drive is empty, and in GPT partition table.
To do so, you need to go to the "Repair your computer" menu, "Use recovery tools [...]", and select "Command Prompt".
Then type in those commands.
> diskpart
> list disk (Check that your hard drive has "GPT" checked, and remember the disk number)
> select disk # (# beeing the disk number for the drive you're going to install Windows 7 on)
> clean (erases all partitions on this disk)
> convert gpt (only if the disk needs to be converted to GPT partition table)
> exit
You can now close the commamd prompt, and start the Windows 7 setup.
6. Do a fresh install, select the empty disk and let things go on until you get to the desktop.
Now you have a working, clean, Windows 7 you can work on, but it's still booting in Legacy mode. The thing is, now you can try to disable Legacy into the BIOS, but you will notice that the system boots up, gets to the desktop in background, but you will still see the "Starting Windows" screen showing up. So it's still not working. Get back to Legacy mode, there are still some things to do to get rid of that issue.
7. Let's install all drivers needed EXCEPT Intel Rapid Storage Technology driver!
8. Now, connect the laptop to internet if not, and refresh Windows Update. Let the computer download and install all the updates needed until it says "No important updades available". Double check with "Check for updates".
9. Then, you need to download the Intel Rapid Storage Technology driver and software from Intel website here. It's the file named "iata_enu.exe".
IRST: http://downloadcenter.intel.com/Detail_Desc.aspx?agr=Y&ProdId=2101&DwnldID=22194&ProductFamily=Software+Products&ProductLine=Chipset+Software&ProductProduct=Intel%C2%AE+Rapid+Storage+Technology+%28Intel%C2%AE+RST%29〈=eng
Install it, reboot your computer
10. Now you can reboot again to the BIOS, and change this option.
Load Legacy Option Rom => Disabled (finally we get to it...)
Save the changes. Reboot to Windows 7, everything should now be fine. You should be able to boot to the desktop again, and your operating system is running in true UEFI mode. Congrats!
-----
So now let us know how it works on your laptops!