


Dewos
-
Posts
112 -
Joined
-
Last visited
-
Days Won
1
Content Type
Profiles
Forums
Downloads
Posts posted by Dewos
-
-
Noope, my system is the e6430 @1.1opt right now.
Anway, if you don't need absurb resolutions and filters than the performance are pretty good. CPU overclock +400 is nice and games actually use less bandwith that we think mostly of the time.
2570p is a very very nice machine too, but CPU limited with top i7 'cause the TDP limitation and no overclock capabilities. Oh well, and you could be LUCKY and have both
")
-
15 hours ago, ipta_only said:
Dear all,
This is my 1st post and sorry for the bad English.
It's not my 1st language.
Currently wondering about using eGPU, right now I'm confused between these 2 laptops.
Dell E6430 or HP 8470P.
Is it really no solution to get PCI-E 2.0 2x at Dell E6430?
From what I heard (or I read), the only thing that we could get the 2.0 2x is by using PE4C V2.1.
And as far as I know, it has been discontinue and replace by the newer PE4C V3.0.
Using the V3.0 (whether EC or mPCI-E) on Dell E6430 wil only result on 2.0 1x which 4Gbps, right?
On the contrary, EC's bandwitdh on HP 8470p has 5Gbps.
Both laptop are great.
Has RAID, support XMP, 900p, excellence build quality etc.
Is there any other IB laptop that has wider bandwidth than HP 8470p?
Exclude the thunderbolt one coz I never found any IB laptop that has Thunderbolt port here, in Indonesia.
Not to bring you bad luck, but I was not able to make the PCI-E 2.0 work on my E6430 + PE4L V2b. The same configuration works on the HP 2570p, so.... is the EC link on the dells that is lacking, it seems.
-
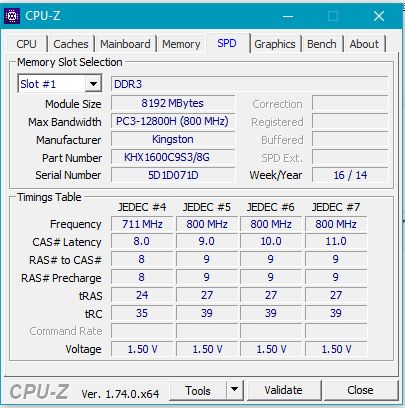
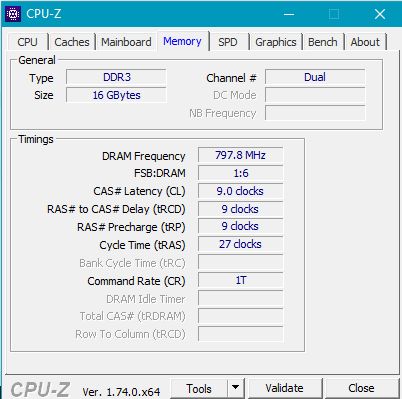
0x1EE: 0x1 and 0x1E6: 0x4 tried: no changes in CPU-Z (mem freq 800x2)

-
44 minutes ago, timohour said:
I have initially tried but I finally used the XMP profiles to go to 1866 and then used some PnP Kingston modules to go to 2133.
There are two way to OC RAM. One is to use BCLK OC and gain 4,5% more meaning that your 1600MHz memory module will run @ 1672. This works following the guide to unlock your Descriptor and mod your ME FW to allow BCLK OCing.
The other is to run with a different multiplier meaning that you can run @ 1866MHz or even 2133MHz (I have seen my ram going @ 2000MHz sometimes when using 2133MHz XMP Profiles that had tight timings.) Some users reported that memory tweaking works, Khenglish though reported that
You can try for yourself and report back.
This post had everything regarding RAM tweaking variables by kondilac but somehow are lost (he maybe deleted it?), I don't know why...
I am giving you some hints from the part of the IFR file that contains the most RAM tweaking variables.
Make sure you select here Custom profile. Otherwise non of your options below will apply Also make sure that you set all the timing cause if a timing is wrong or missing this will may trigger the BIOS to revert to Default profile.
Setting: DIMM profile, Variable: 0x1EE
Option: Default DIMM profile, Value: 0x0
Option: Custom profile, Value: 0x1
Option: XMP profile 1, Value: 0x2
Option: XMP profile 2, Value: 0x3
End of OptionsSelect the Voltage DDR3 is 1,5V and DDR3L is 1,35V
Setting: DDR Selection, Variable: 0x1E9
Option: DDR3, Value: 0x0
Option: DDR3L, Value: 0x1
Option: Auto, Value: 0x2
End of Options
Numeric: DDR Reset Wait Time, Variable: 0x1EA
Default: 32 Bit, Value: 0x9A43D899
Endset 0x4 for 1866MHz speed.
Setting: Memory Frequency, Variable: 0x1E6
Option: Auto, Value: 0x0
Option: 1067, Value: 0x1
Option: 1333, Value: 0x2
Option: 1600, Value: 0x3
Option: 1867, Value: 0x4
Option: 2133, Value: 0x5
Option: 2400, Value: 0x6
Option: 2667, Value: 0x7
End of OptionsThis should be for the second channel (ignore this cause there is no second channel available)
Setting: Memory Frequency, Variable: 0x1E7
Option: 1067, Value: 0x42B
Option: 1333, Value: 0x535
Option: 1600, Value: 0x640
Option: 1867, Value: 0x74B
Option: 2133, Value: 0x855
Option: 2400, Value: 0x960
Option: 2667, Value: 0xA75
End of OptionsKnown as Command Rate (CR)
Setting: NMode Support, Variable: 0x1EF
Option: Auto, Value: 0x10
Option: 2N Mode, Value: 0x2
End of OptionsCAS Latency
Numeric: tCL, Variable: 0x1FE
Default: 8 Bit, Value: 0x4
EndRAS to CAS delay
Numeric: tRCD, Variable: 0x1FF
Default: 8 Bit, Value: 0x3
EndRAS Prechange
Numeric: tRP, Variable: 0x200
Default: 8 Bit, Value: 0x3
EndCycle Time
Numeric: tRAS, Variable: 0x201
Default: 16 Bit, Value: 0x9
EndWR
Numeric: tWR, Variable: 0x203
Default: 8 Bit, Value: 0x5
EndRow Refresh Cycle time
Numeric: tRFC, Variable: 0x204
Default: 16 Bit, Value: 0xF
EndRRD
Numeric: tRRD, Variable: 0x206
Default: 8 Bit, Value: 0x4
EndWTR
Numeric: tWTR, Variable: 0x207 {07 A6 F1 02 F2 02 28 04 02 00 07 02 14 10 00 FF 01 00 00 00 00 00 00 00 00 00 00 00 00 00 00 00 00 00 00 00 00 00}
Default: 8 Bit, Value: 0x3
EndRTP
Numeric: tRTP, Variable: 0x208
Default: 8 Bit, Value: 0x4
EndRC
Numeric: tRC, Variable: 0x209
Default: 16 Bit, Value: 0xF
EndFAW
Numeric: tFAW, Variable: 0x20B
Default: 16 Bit, Value: 0xA
EndEven if you don't manage to alter your frequency you will definetely be able to tighten your timings and increse your performance.
Something like this one? Worth a try.
Setting: DIMM profile, Variable: 0x1EE
Option: Default DIMM profile, Value: 0x0
Option: Custom profile, Value: 0x1
Option: XMP profile 1, Value: 0x2
Option: XMP profile 2, Value: 0x3
End of OptionsSetting: Memory Frequency, Variable: 0x1E6
Option: Auto, Value: 0x0
Option: 1067, Value: 0x1
Option: 1333, Value: 0x2
Option: 1600, Value: 0x3
Option: 1867, Value: 0x4
Option: 2133, Value: 0x5
Option: 2400, Value: 0x6
Option: 2667, Value: 0x7
End of OptionsSetting: Memory Frequency, Variable: 0x1E7
Option: 1067, Value: 0x42B
Option: 1333, Value: 0x535
Option: 1600, Value: 0x640
Option: 1867, Value: 0x74B
Option: 2133, Value: 0x855
Option: 2400, Value: 0x960
Option: 2667, Value: 0xA75
End of Options -
@timohour can I change my 2x8GB 1600 RAM to 1800+ with just the UEFI variable? (without a XMP flashed profile, I mean).
-
On 15/1/2016 at 10:08 AM, timohour said:
That's true... It is worse with the 9 cell battery too..
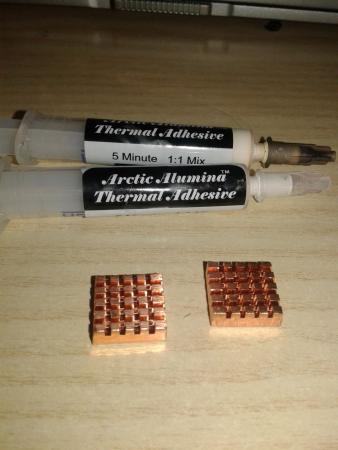
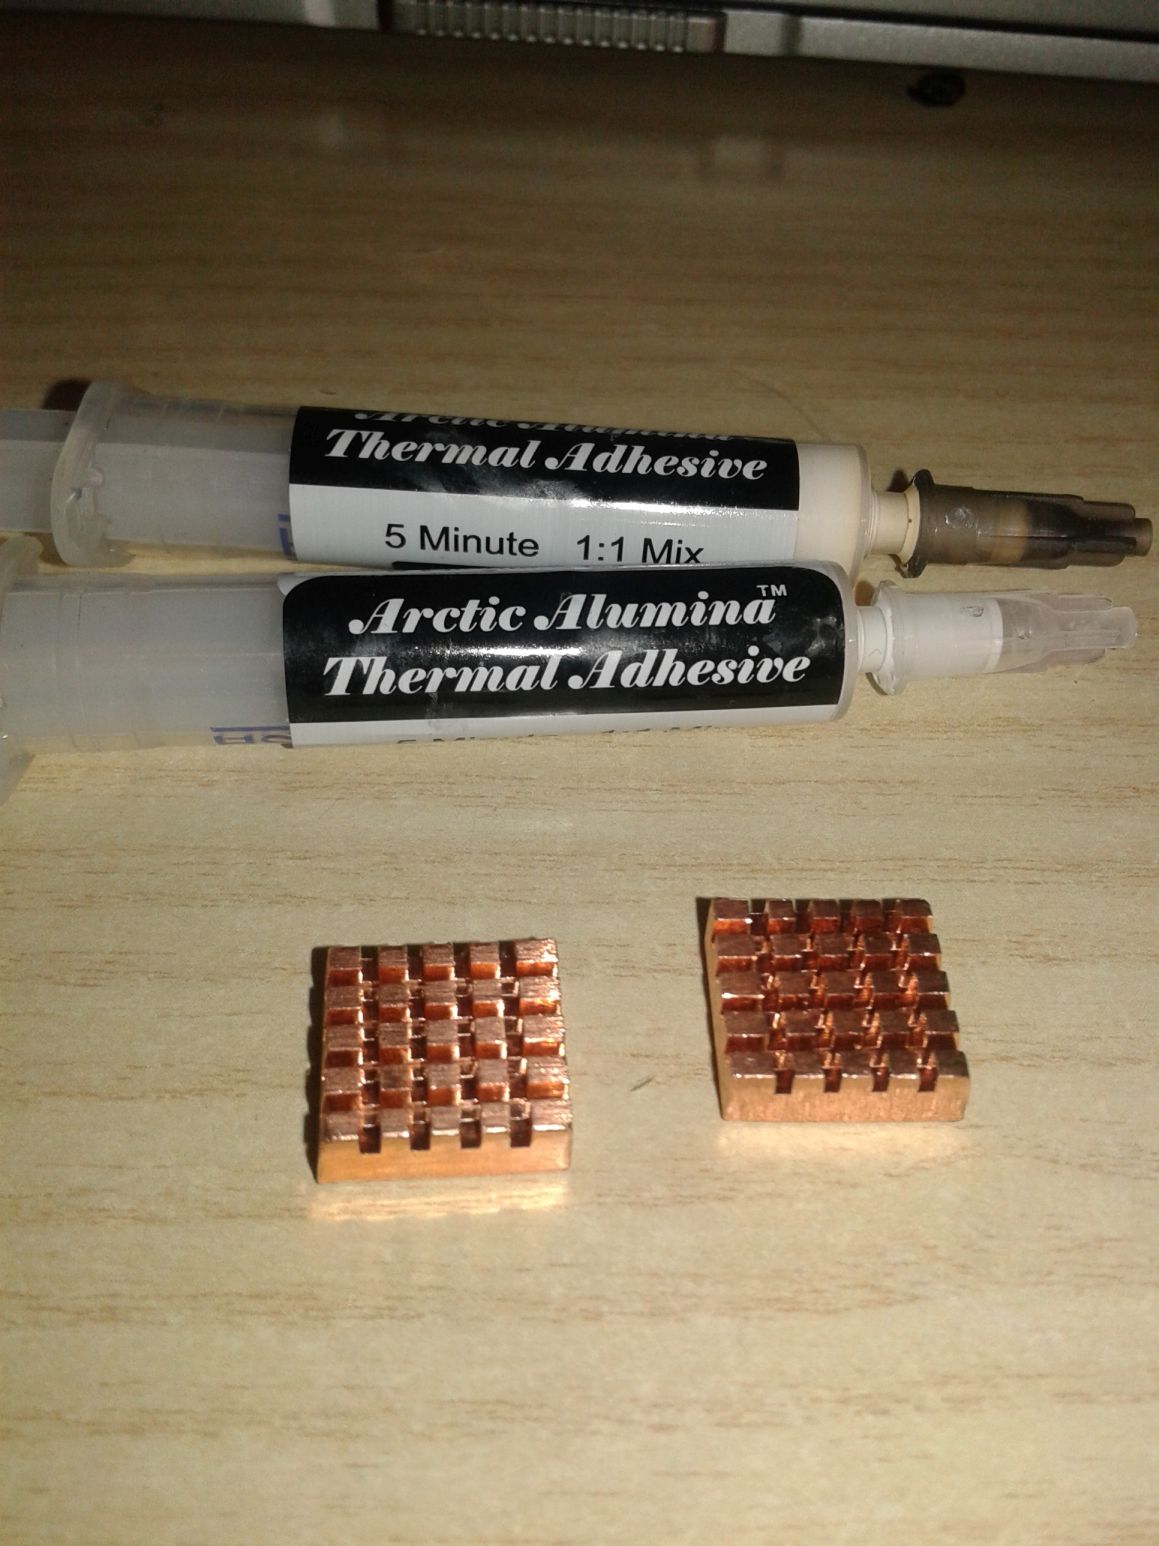
I was talking about the new copper heatsinks though... I saw that you used Alumina Adhesive, so they are no removable, right?
I cannot separate the single pieces of copper from each other, but the "block" is stacked with a single drop of adesive to the laptop, hence mechanically could be separated with a little force.
-
10 hours ago, timohour said:
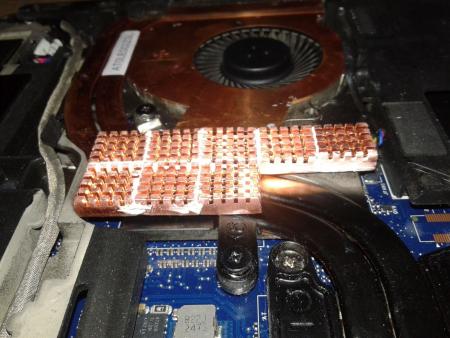
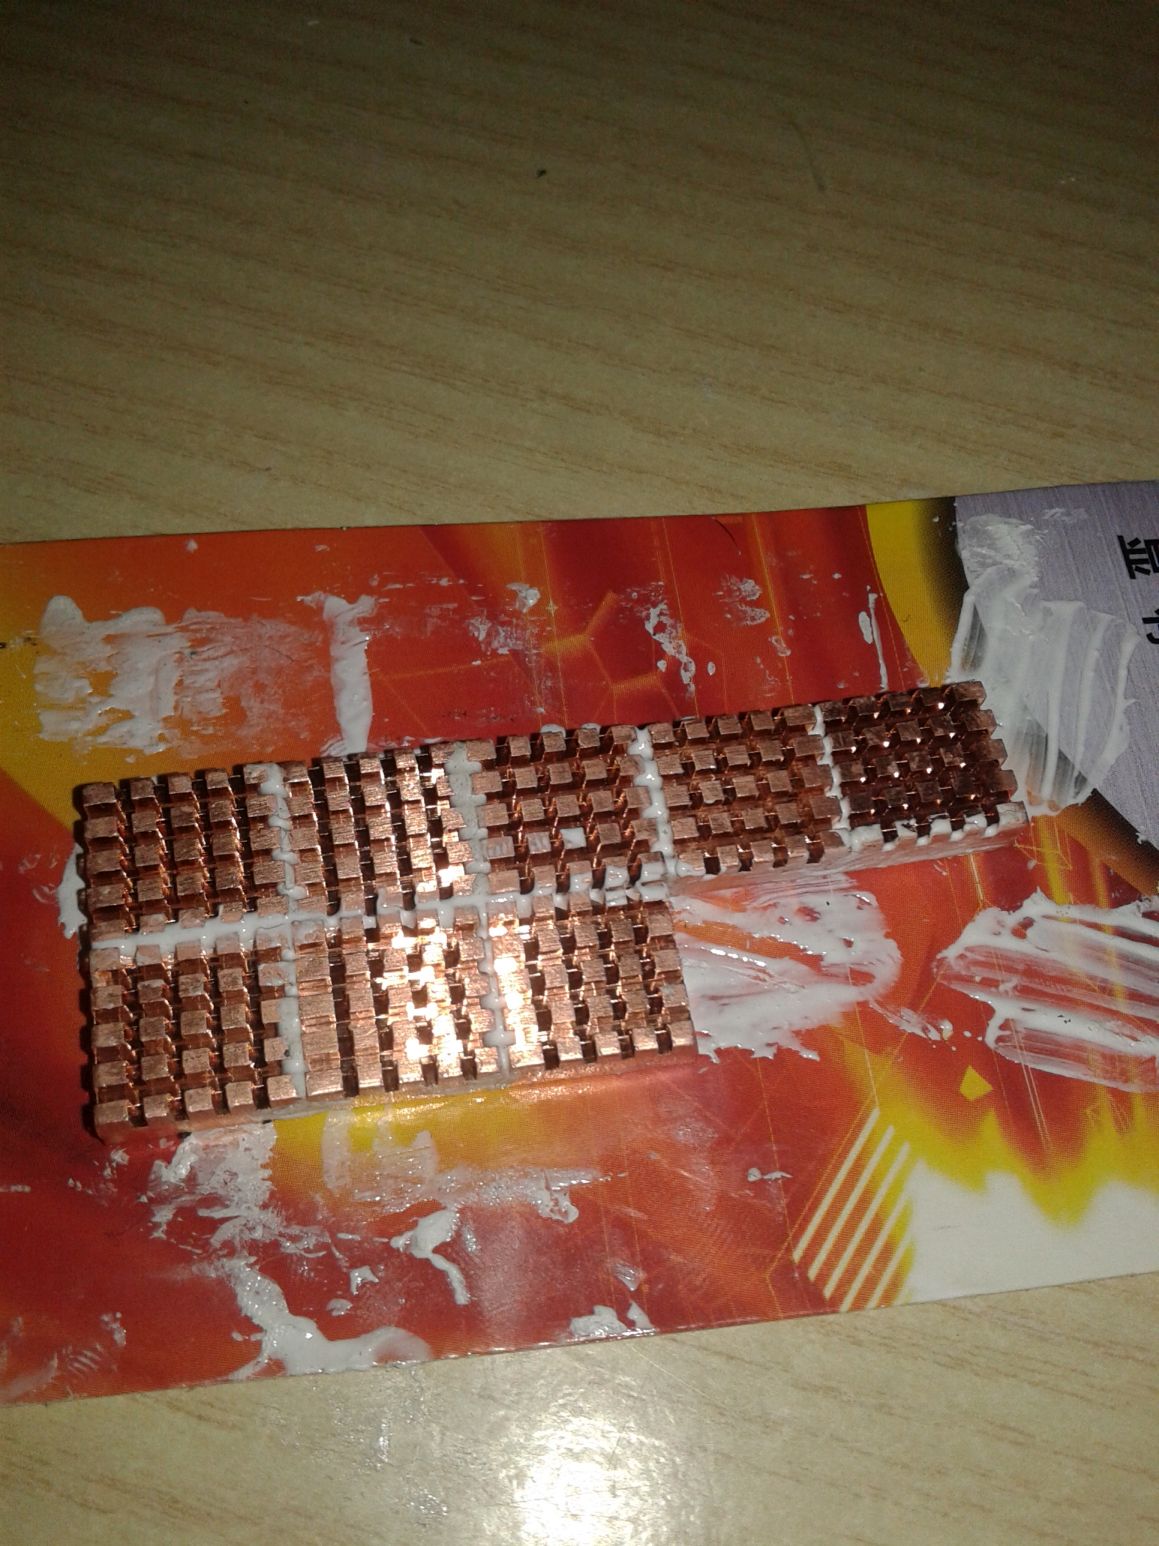
Nicely done.. This was a great idea using smaller copper pieces.. 7-10° lower is a great advantage... i assume that your fan is kicking now less often when at idle..
And the only drawback seems to be the extra weighI assume that now you can't remove the extra copper pieces right?
The copper shims? I have already removed them (after test I can say they are useless now). The fan in idly almost never starts now (nice!). For the weight yeah, this thig is bulky as hell (not only for the new copper)
-
5 minutes ago, Tech Inferno Fan said:
Running the system without the bottom gives much better venting/airflow, as does using a notebook cooler. However, there's an innovation included in the latest TB3-equipped 15" HP ZBook Studio i7-quad ultrabook that might be of interest. Was for me.
They've enmeshed the complete bottom to keep the i7-quad temps down.
Nice, but it's not worth (for me at least). I'm just waiting one year at most for the Thunderbolt3 eGPU to stabilize, before make the jump to a dell xps 15 or something.
-
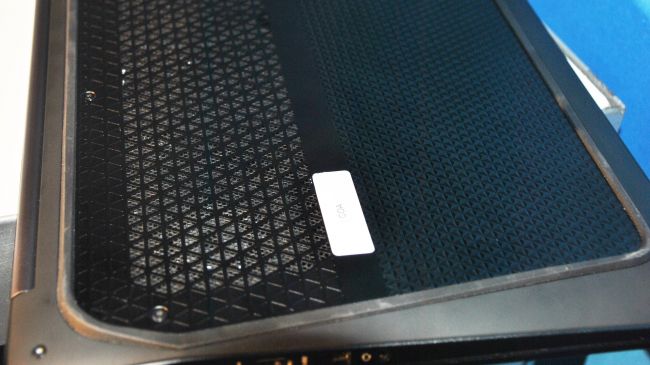
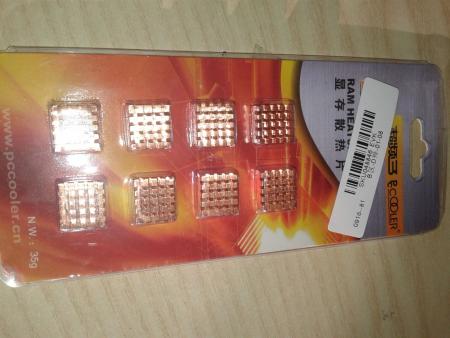
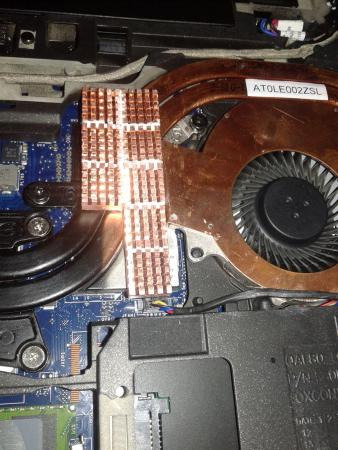
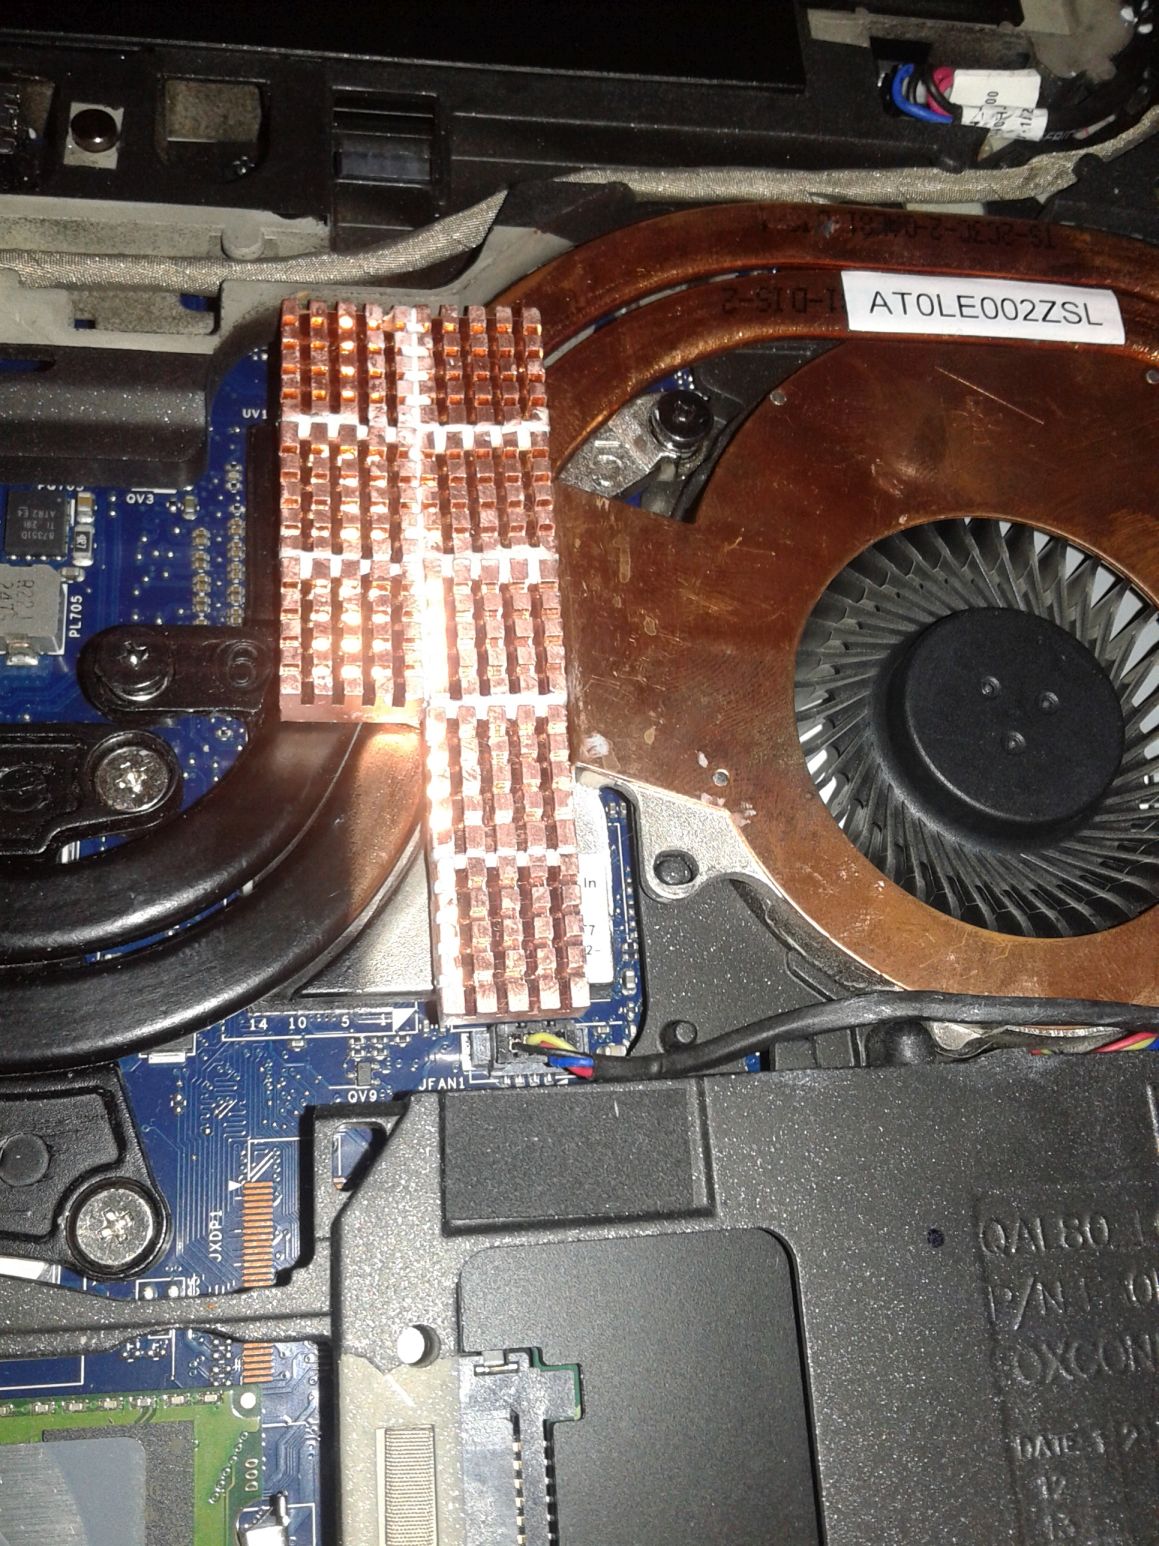
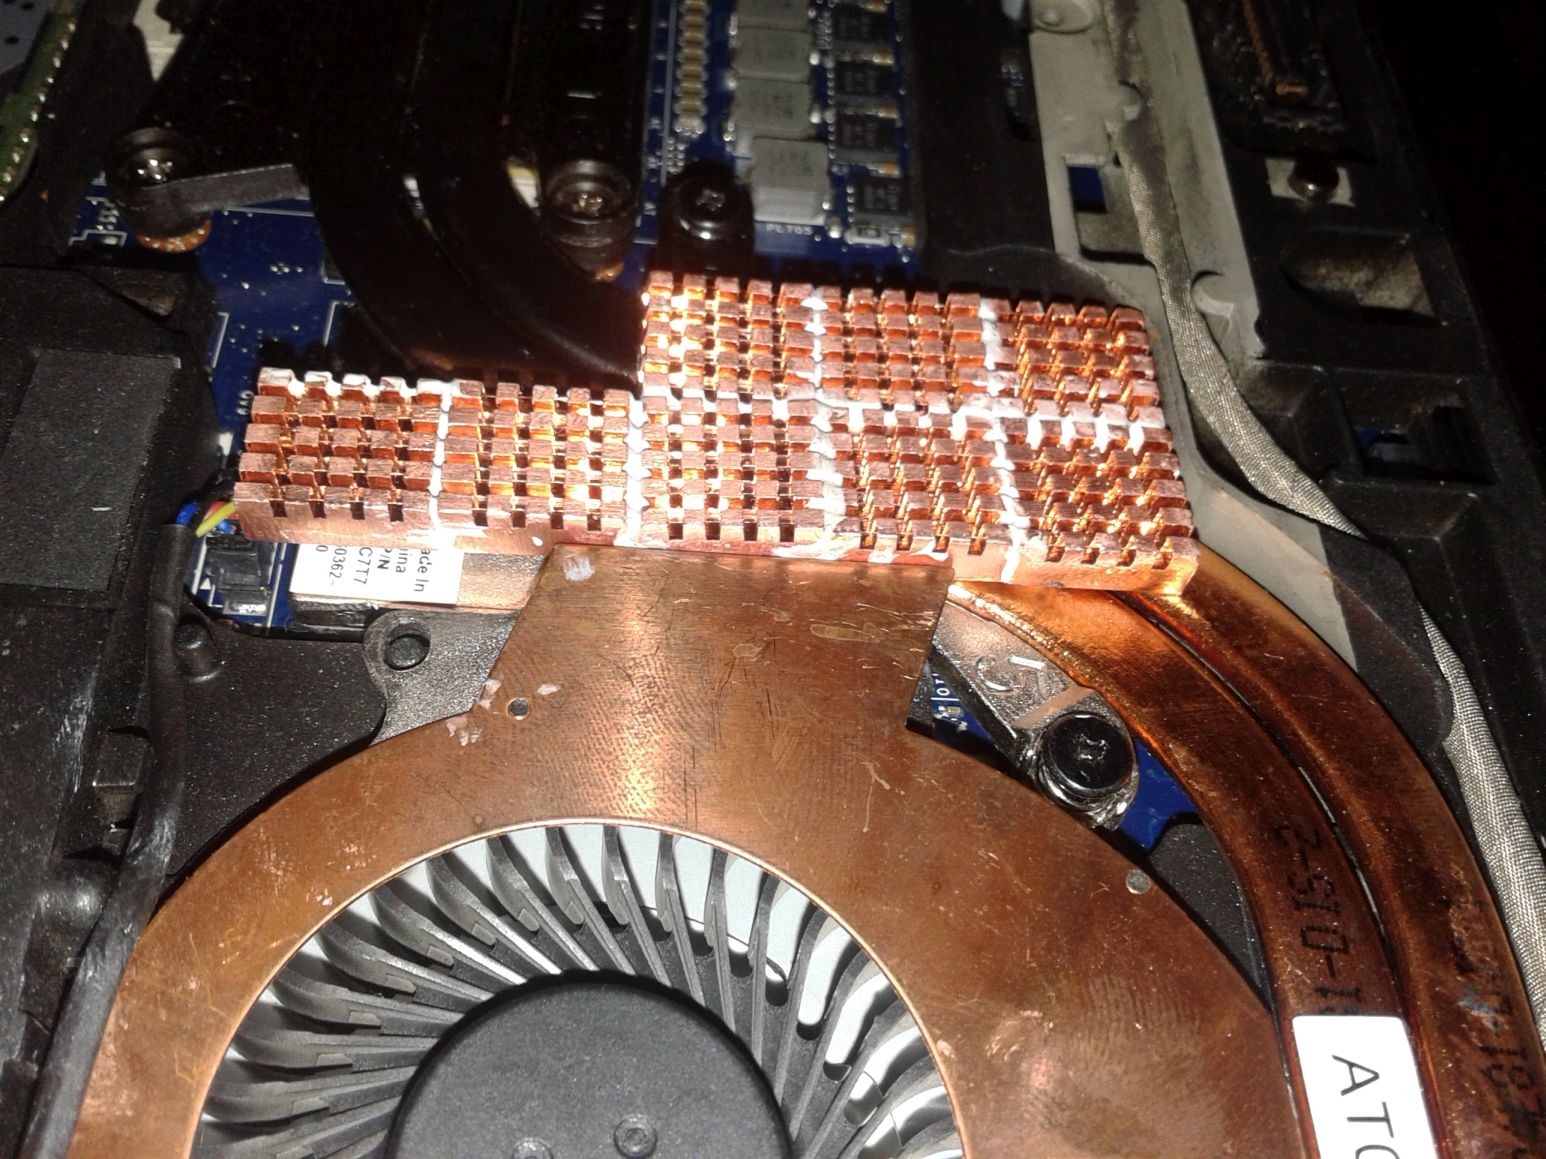
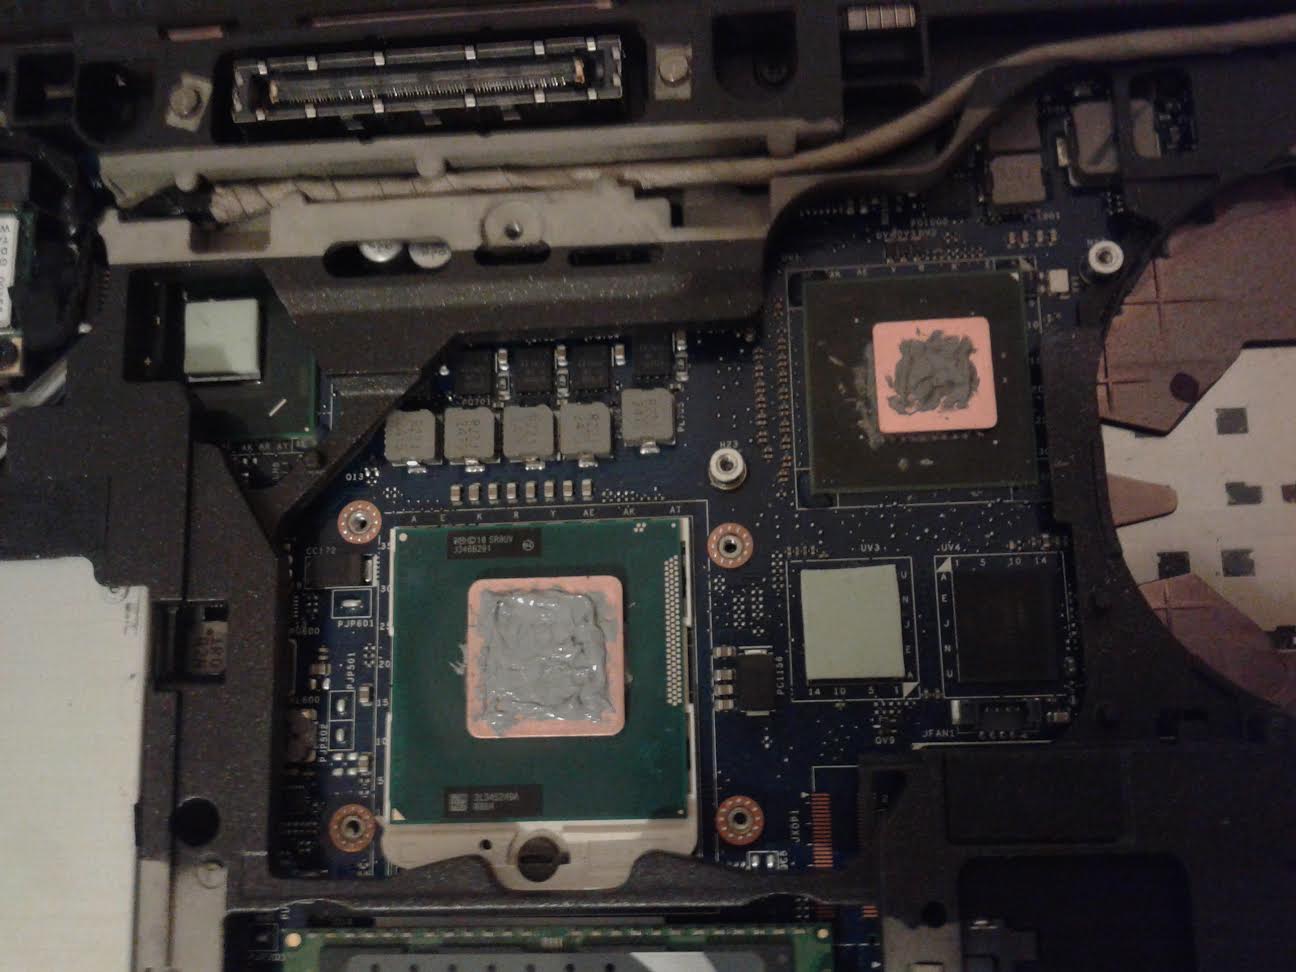
Cooling Mod
So, some info about a little project of mine. Very similar to timohour's, but with copper. It should be noted that the "tetris" position is the best one, with the space available. Temps are < 7/10° lower (but, after more seconds, it maxes to >99° anyway).


-
 1
1
-
-
30 minutes ago, timohour said:
Ok thanks. Have you set new limits with UEFI variables and it still downclocks to x37 or is it the default limits?
Yeah, Just not a lucky one, I guess.
-
Just now, timohour said:
with the original or the unapproved?
Unapproved 90w. I do not have an original right now.
-
3 minutes ago, timohour said:
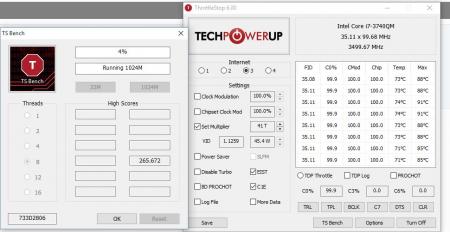
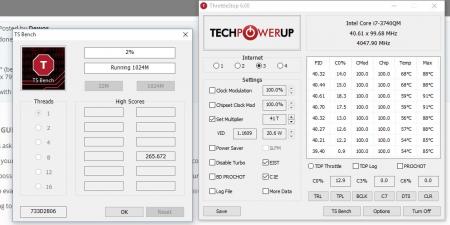
Check then @ x38 what's your consumption @ 3.8GHz?
Around 57,6 for 10 seconds, then x37\36
-
On 9/1/2016 at 5:38 PM, timohour said:
ICould you test your 3740QM with your unapproved psu adapter?
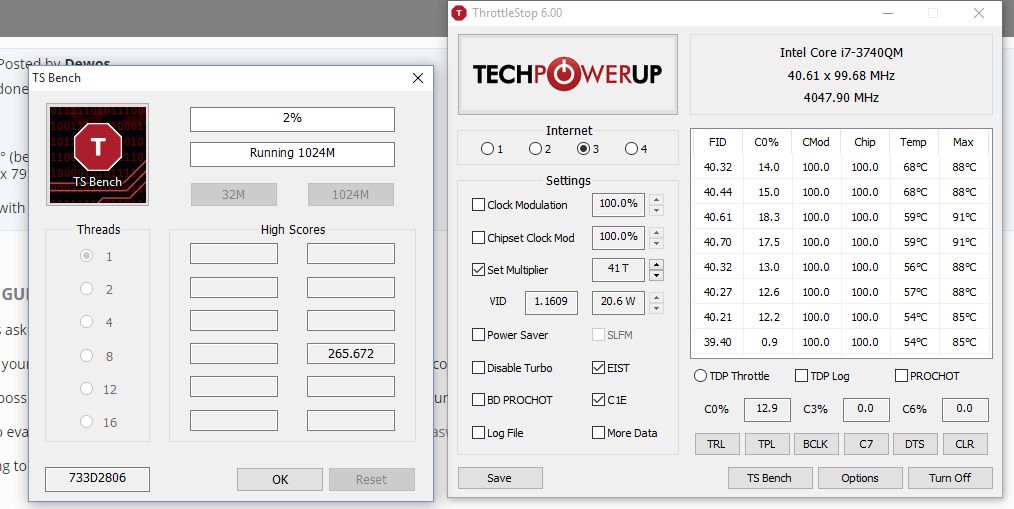
How much is your maximum consumption [email protected] under full load (tbench 1024M)?
If it is under 56.25W it should probably work with your Dell Adapter for small windows of time (128 sec).
Oh, I WISH
")
My CPU is a mess, is like around 58,5W
-
On 5/1/2016 at 0:34 AM, Khenglish said:
Temperatures had no effect. When using an approved power brick, CPU TDP on an xm cpu would be limited to the long power limit of 55W at all times. When using an unapproved power brick, The short term power limit would then work, allowing up to 68W, and full x4 turbo multiplier.
Raising the power limits using IFR only worked when using an unapproved power brick. Using an approved brick would always clamp power draw to 55W.
Yes, I also can be able to overclock only with an unapproved psu adapter (not the Dell one).
-
Nice!!!
It shouldn't go up that fast though... Do you have the bottom lid closed?
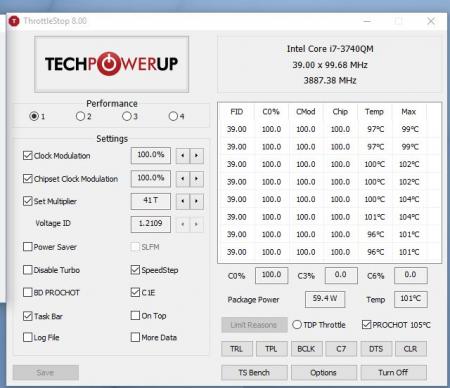
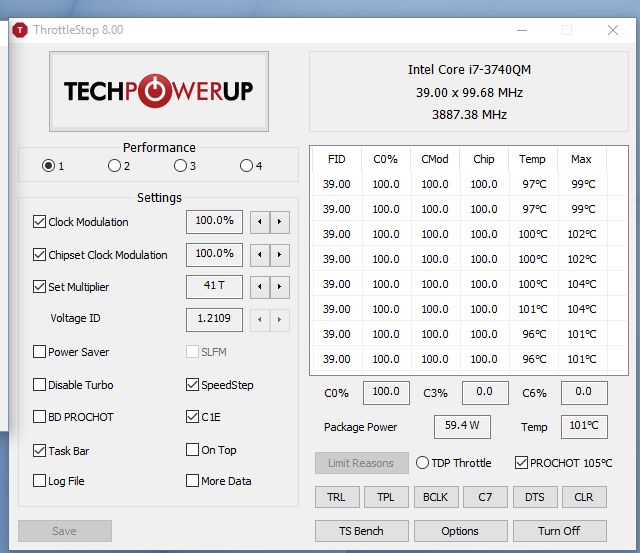
Cause mine @3.98GHz with Prime95 after 6 minutes of full load with open bottom lid temperature wouldn't cross 95°C...
UPDATE: If this is with TSBench seems like your chip is not very good thermally. You can see here that my 3720QM @ 3.8GHz is ~ 50W @1.2109V. 59.4W is almost 10W more at the same voltage!
Do you still have your dGPU disabled?
Yap, probably not the best CPU around, but if it keeps x39 is good enough.
In the future I will work on the heat building (additional heat sink). I'm not a big fan of the 'open bottom lid' route, it is not pratical and I'm more a 'daily' overclocker anyway.
Yes, the dGPU is disabled. Enabling it mess up with the drivers (because I need to cold-plug the eGPU before the boot), but it is worth a try for testing if you're interested
-
try to enable Intel Power Balance set CPU 31 and GPU 0.
Nothing
It won't go over 45W no matter what? Not even for a short time?Yes, max 45W, and I don't think is a faulty PSU.
UPDATE: It WAS a faulty PSU. Tried with another: it keeps 4c x39 rock solid for some seconds (until 105°). Yeah for us
And now this:
-
-
Quote
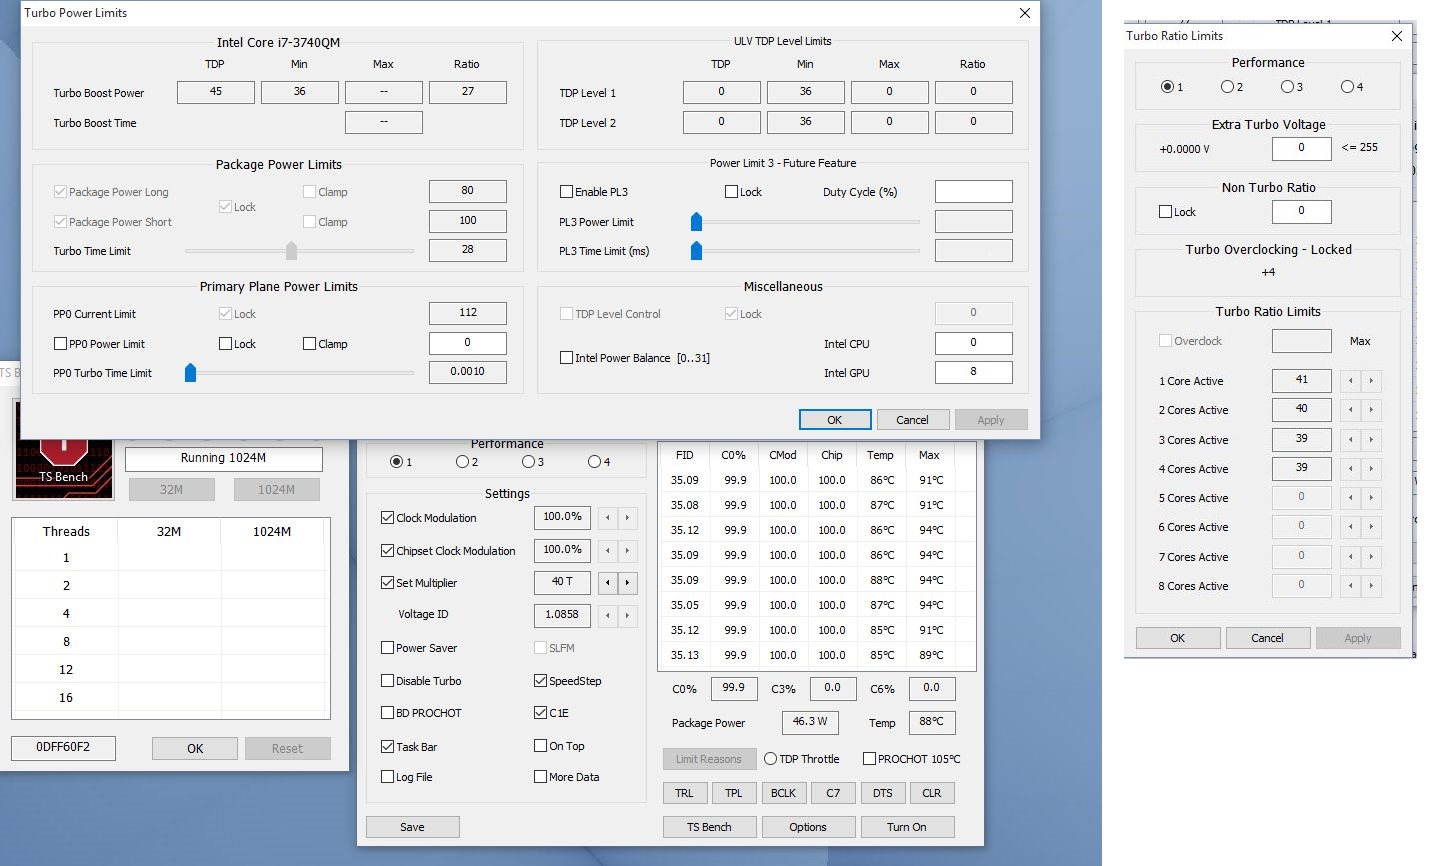
What do you mean safe? I have it like this for more than 3 months and it works great. I use mainly my 90W PSU and used my 130W for my Dock at work and when I OC my NVS5200M.Long Duration Power Limit 0xB40 [Power] To get the Optimal setting (no TDP Throttling), check with Throttlestop, (Example: 0x50 = 80W) Short Duration Power Limit 0xB41 [Power] Sets short duration TDP limit of CPU. Default value is +12,5% of the original (x64=100W)
Oh well, thanks @timohour for your help, but it doesn't work. 4c bench keeps always max 44W and the results are the same. Should I do something other than this? -
You are probably TDP throttled... Set your Long and Short Duration Limit @ 80W and 100W respectively (List of UEFI vars)
What value I should set?
But first.... Is it safe? I really don't want to fry my CPU
UPDATE: moreover my PSU is 90W
-
Nice!!!
it would be interesting to see where your 3740QM ranks.
Good with 1c (x40.x variable, almost x41). but pretty bad with 4c, (very variable, sometimes keeps x36, sometimes x.35.x or x34.x
 )
)
-
-
-
Interesting! Do you have any proof that disabling the NVS5200M helps with your temperatures? I remember when I applied the battery tweaks that when I disabled the dGPU completely I had bigger idle consumption than when enabled but not using it.... I thought that the same goes for heat emissions and that's why I have it enabled...
I don't know for the watt consumption, but temps are -2° usually (oh well, but it can be accidental).
-
Some faulty discoveries:
I completly disabled the NV5200 (I really don't need it, is only more heat to the CPU and the cooling heat pipes) but since then the docking station has dropped the DP and HDMI support.
Yeah, I know, as from the schematics they are wired to the dGpu directly, but for fun I tried:
Setting: Primary Display, Variable: 0x1D4
Option: Auto, Value: 0x3
Option: IGFX, Value: 0x0
Option: PEG, Value: 0x1
Option: PCI Bus, Value: 0x2
Setting: Internal Graphics, Variable: 0x1D8
Option: Auto, Value: 0x2
Option: Disabled, Value: 0x0
Option: Enabled, Value: 0x1
Setting: Port 3 PCIe Speed (Gen1/2) [Expresscard Slot] Variable: 0xB4
Option: 0x0 (Auto),
Option: 0x1 (Gen1),
Option: 0x2 (Gen 2)
Setting: iGPU Port Configuration, Variable: 0x1D7
Option: Disabled, Value: 0x0
Option: Enabled, Value: 0x1
Setting: iGPU Digital Port B Mode, Variable: 0x1DA
Option: Port is fully muxed with dGPU, Value: 0x0
Option: Port is not muxed with dGPU, Value: 0x1
Option: Port supports HPD only, Value: 0x2
Setting: iGPU Digital Port C Mode, Variable: 0x1DB
Option: Port is fully muxed with dGPU, Value: 0x0
Option: Port is not muxed with dGPU, Value: 0x1
Option: Port supports dHPD only, Value: 0x2
Setting: iGPU Digital Port D Mode, Variable: 0x1DC
Option: Port is fully muxed with dGPU, Value: 0x0
Option: Port is not muxed with dGPU, Value: 0x1
Option: Port supports HPD only, Value: 0x2
without any success (luckly the VGA is on the iGpu, at least).
By the way, the system is pretty much stable as now (not taking into account the Gen2 problem
 ). Next step: CPU overclock.


14" Dell Latitude E6430 - Performance Upgrades and System Mods
in Dell Latitude, Vostro, and Precision
Posted · Edited by Dewos
Hello! I have an interesting news. Starting from 368.22 Nvidia Driver (Note: but I'm not sure if it is the first driver doing so), my GTX 660 is automaticly detected on EC plug-in without the HDMI cable (win10).
- iGpu is still enabled
- External LCD link by EC
- eGpu is in Optimus mode
- All work is redirected to eGpu (if you say so in the panel)
- eGpu KEEPS 2.0 (before I was not able to keep this, and forced the 1.1x)