Leaderboard


Popular Content
Showing content with the highest reputation on 02/22/16 in all areas
-
So back when I got my P150EM, one of the deciding factors on getting it was that due to optimus/enduro, the battery life was respectable. I wanted the top hardware while still having some mobility. Over time though, the battery became more and more worn out, to the point where I hardly got over an hour of life out of it. New batteries are stupidly expensive, and Clevo used cheap cells for it in the first place. I wasn't paying $100 for a mediocre replacement battery. I decided to pay $50 for top end cells to boost capacity by 30% and get over 6h of battery life. I figured that this could get messy, and luckily a friend let me have his nearly dead P150HM battery for me to have some spare parts. So I swapped the cells, while destroying the plastic battery shell in the process, and got a battery that worked just like it still had the old cells. Figuring I needed to reprogram the EEPROM on the battery pack, I started removing the glue all over the EEPROM chip to get it in my programmer. I stupidly forgot that I was working on a BATTERY, which meant that it was ALWAYS ON, and poured MEK over it, blowing a fuse. After getting pissed off and giving up for a few months, today I gave it another go. I got the EEPROM chip out and started taking guesses at how to reprogram it. If I guessed wrong, good thing the fuse was blown so I don't melt anything. I figured out that battery EEPROM contains the capacity info in terms of mAh for a pair of battery cells. I searched for the default 5200 mAh (1450 in hex) and found it. I then raised this to 6800 mAh (1A90 in hex). It was a success! Nominal battery capacity was now 100640 mAh total. So now I knew I could probably program things right after enough tries. It was now time to get the battery operational again. I bridged the fuse, and the battery came back to life. Sort of. It would charge when off, but not on. It would run, but windows reported no battery drain (infinite energy!?!?!?!?). In short, the battery EEPROM was not being updated at all as the battery state changed. I was under the impression that if Ilet it charge, it would not stop until overvoltage protection kicked in, and if I let it discharge, it would not turn off until the system BIOS detected an undervoltage scenario, which is far below the safe discharge voltage of the battery. I figured for the time I'd just let it be and try to get the EEPROM right. Next was looking for the wear capacity. This is the capacity left in the battery as it ages. Using hwinfo64, I got the wear level, converted it to hex, and found it in the EEPROM. I then changed it to only 5% wear instead of 74%. I left some wear because I did let the cells sit for a few months, and I was directly soldering to the cells, which isn't really good for them due to the heat from the iron. This was a success. Current charge % correctly dropped as well. So now I needed to get the battery charging right. My only option was to rip apart my old, but fully functional P150EM battery. I found that the fuse was actually really weird with 3 prongs, and only 2 prongs were supposed to have 0 resistance. I had soldered all 3 together on the P150HM battery. I switched the EEPROM chips and boards, then hoped it would work and not require me to run and get the fire extinguisher. It worked! The battery is now charging properly as I type this. It also discharges right too. It looks like the laptop will try to overcharge it a bit since the current charge % was a little low vs reality, but that should just give it a little extra wear, with the charge % being calibrated properly at 100%. I'm not sure how I'm going to get that back in the shell...1 point
-
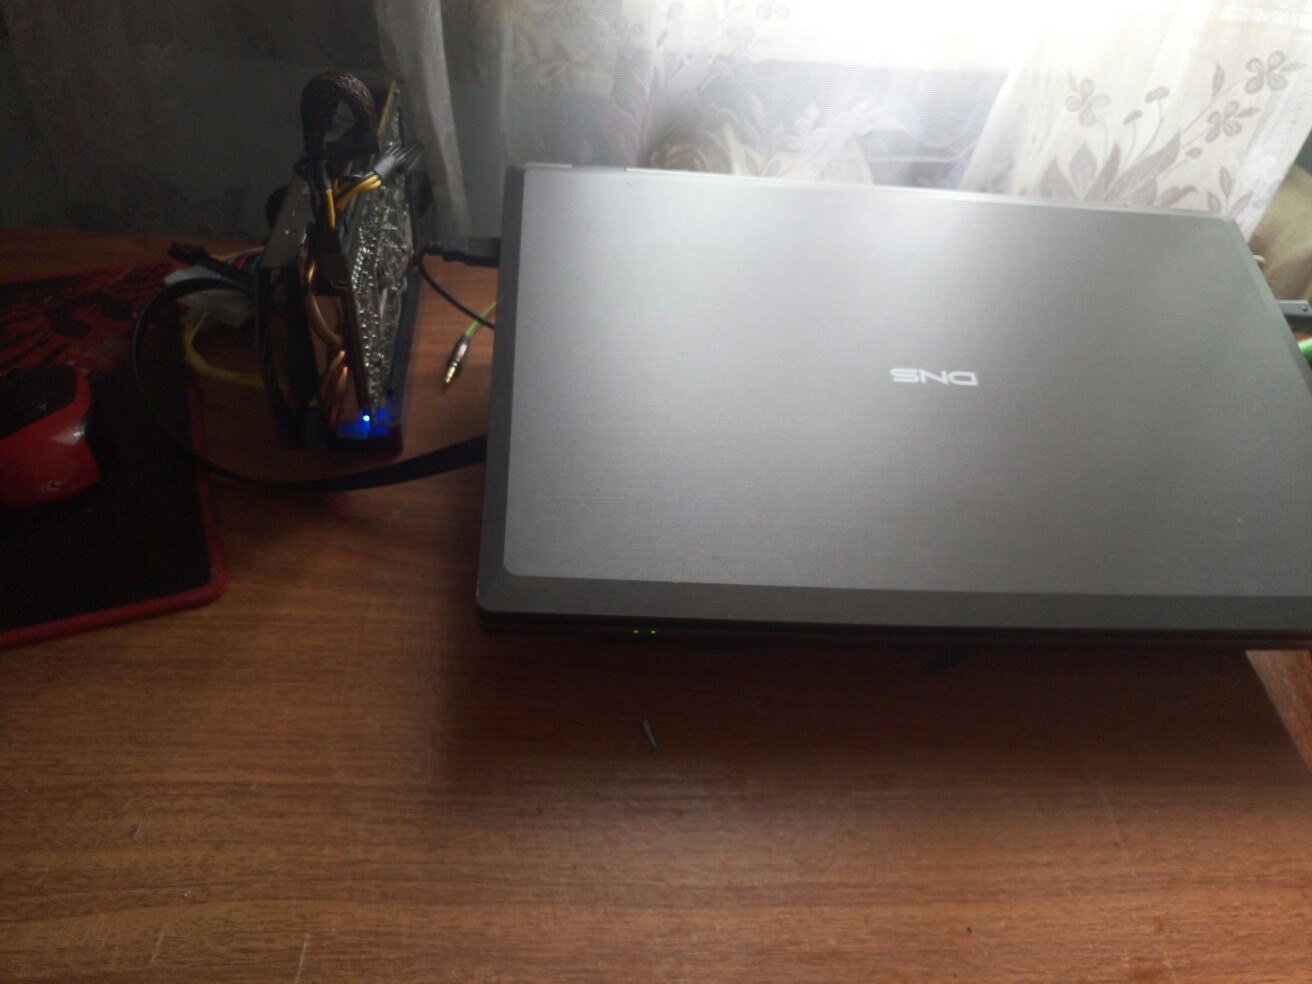
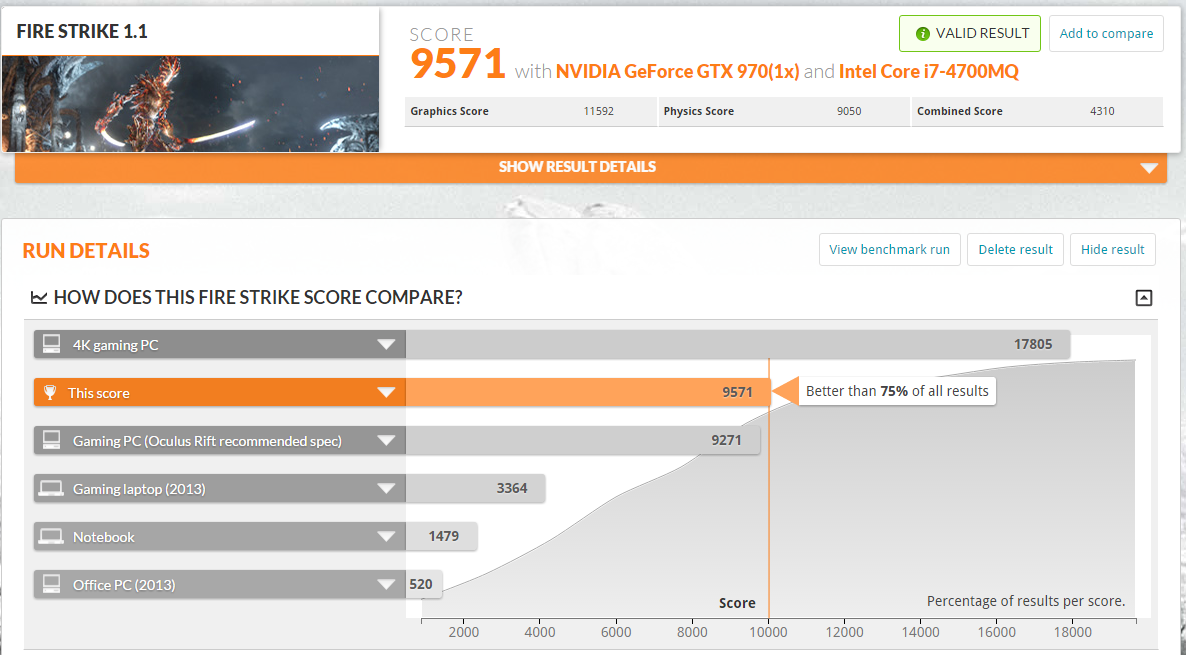
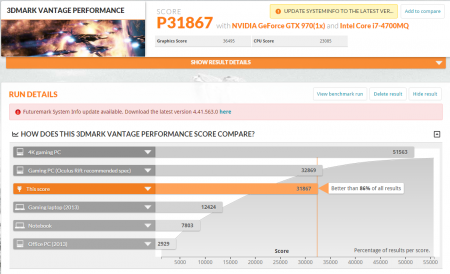
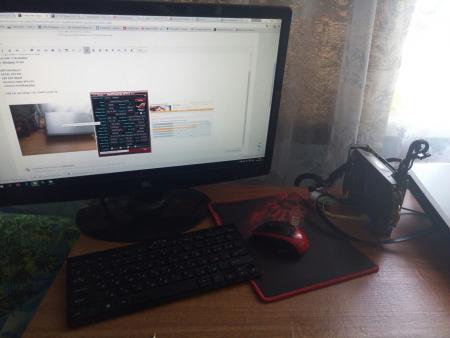
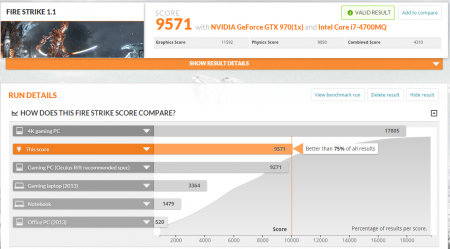
Laptop: Clevo W370SS BIOS: Prema Mod v1 CPU: i7 4700M RAM: 12.0 GB DDR3 (2133 Mhz - overclocked) iGPU: Intel HD 4600 dGPU: gtx 860m - disabled in bios Hard Disk: 2 TB (RAID0) OS: Windows 10 x64 eGPU Hardware: -ZOTAC GTX 970 -EXP GDC BEAST -AeroCool 600w ATX PSU -external fullhd monitor I did not use setup 1.30, i hadn't error 12. There is my result: http://www.3dmark.com/3dmv/5417774 http://www.3dmark.com/3dm/10917988

 1 point
 -
It's just probably still the bad USB port in general, all versions of EXP GDC had it. It's just not safe to stick anything out there as far as I've been reading about it. It's best not to use it. had no idea this issue is still the case in V8.1 point
-
Hi, I'm a new member here. I just built an EVGA TitanX + AKiTiO Thunder 2 + 1000W power supply system, and have it up and running on my 2013 Mac Book Pro & thunderbolt display. I spent a few hours figuring out power supply wiring and bending open the AKiTiO case. I used C clamps to helped flatten the bent section out, but it is still not very pretty. At least the external enclosure fits. As far as benchmarks, the octane benchmark gave me score of 127 for the Titan X alone , and a score of 139 for the GT 750M + GTX TITAN X. The basic guide was incredibly helpful, along with 2 other guides: The automate eGPU script https://github.com/goalque/automate-eGPU and How to compile tensorflow with CUDA support on OSX https://medium.com/@fabmilo/how-to-compile-tensorflow-with-cuda-support-on-osx-fd27108e27e1#.aggzip20a1 point
-
I really like it but the combat is very annoying and spammy. Every single monster is basically fought the same way even on the hardest difficulty. Another thing is that there's no level scaling. Basically in one location there's wolves on lvl 3 and in other on level 30. They both look exactly the same which makes no sense. That's very dumb as until you get close you're unable to see the level of these mobs, plus game keeps you away from some territories just because. One might argue they're not "level locked" but in my opinion they are. Say you're level 12 and want to head one direction only on the map discovering mysteries and treasures. Sooner or later you will encounter a location guarded by mobs with x2 x3 levels than yours and this content becomes almost inaccessible, however the monster looks exactly the same as lowest level monster of this type in the game. Same comes to quests, they're level-locked. It's very annoying and unimmersive. Especially when you meet a heavy armored bandit in real knight armor with some amazing weaponry but on level 10, and later on you meet a bandit in nothing but panties that pokes you and you die because he's level 18. Makes no sense, again. So sadly the combat and no level scaling make this game very dull in my experience. Writing and quests however are amazing and it's always intriguing to see what next is going to happen, and that's the only reason why I keep playing this game from time to time. Combat still becomes a repetitive chore. There is a mod for level scaling though. I fully recommend it. Still combat system is lackluster. It's just attack + dodge repeated hundreds of times and that's quite sad. Same comes to horse combat.1 point
-
[MENTION=5647]Lee James Wood[/MENTION] follow this. BIOS reset M17xR4 Optimus 1- Unplug power cord 2- Remove battery 3- Hold power button for 30 seconds 4- Remove CMOS coin battery (next to GPU fan) 5- Remove gtx 980M -> 2 screws only, there's no need to remove the heat sink. 6- Reinsert CMOS battery 7- Plug power cord 8- Power on -> Beeps -> hold power button until shutdown. 9- Power on -> F2 -> Boot menu -> "Boot list option" UEFI -> "Load Legacy Option ROM" Disabled -> "Secure boot" Disabled -> "Windows 8 Fast Boot" Disabled -> Exit menu 'Save Without Exit' -> Power off. 10- Reinsert gtx 980M 11- Power ON -> F2 -> shutdown. 12- Re-install Win10 13- Windows setup hold SHIFT+F10 Warning: All partitions & data will be permanently lost on the disk Already GPT, skip this. Select the proper disk diskpart DISKPART> List disk DISKPART>select disk X DISKPART>clean DISKPART>convert gpt DISKPART>exit Install windows 'F8' Boot options 'Safe Mode' & 'Disable driver Signing' cmd (Admin) bcdedit /set {default} bootmenupolicy legacy -> reboot -> F8 -> select 'Disable Driver Signature Enforcement' -> Display.Driver copy/overwrite nv_dispi.inf -> run setup.exe EDIT: BIOS reset: PEG/120Hz model will require 680M or 780M "backup card" to access BIOS settings, step 7, 8, >9 7- Install "backup card" -> Plug power cord 8- Power on -> Beeps -> hold power button until shutdown. 9- Power on -> F2 -> Boot menu -> "Boot list option" UEFI -> "Load Legacy Option ROM" Disabled -> "Secure boot" Disabled -> "Windows 8 Fast Boot" Disabled -> Exit menu 'Save Without Exit' -> Power off. 10- Reinsert gtx 980M 11- Power ON -> F2 -> shutdown. [url=http://www.3dmark.com/aot/11880]NVIDIA GeForce GTX 980M video card benchmark result - Intel Core i7-3940XM,Alienware M17xR4[/url]1 point