Search the Community
Showing results for tags 'thermal compound'.
-
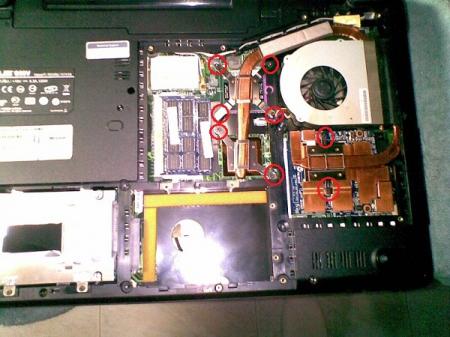
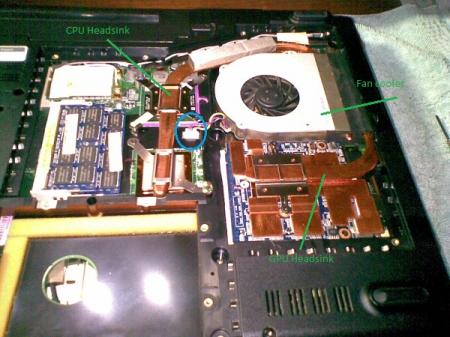
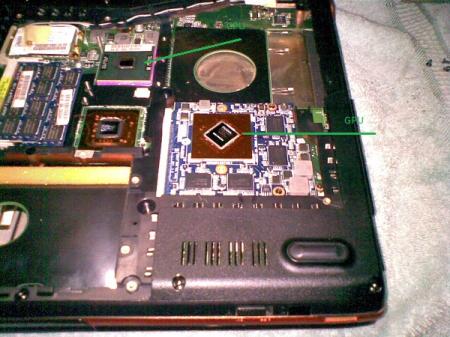
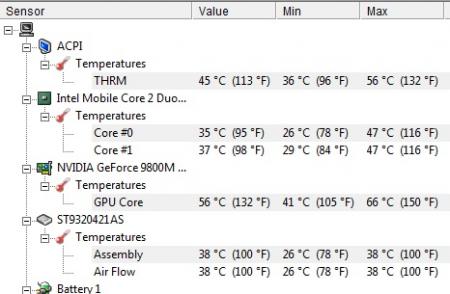
I wrote an article on my website and wanted to share here (you can read in spanish) EDIT: A complete guide to disassembly the Asus G50 can be found here: http://forum.techinferno.com/asus-gaming-notebook-forum/560-official-asus-g50-disassembly-guide.html#post6282 At this time we will see how clean and apply new thermal paste to an ASUS G Series (Republic of Gamers) more specifically the G50VT X1 model, however, this process may be the same that applies to all G50 and G60 series. This laptop began to raise their temps, mainly GPU. Before making the process of cleaning the fan / heatsink and applying new thermal paste, the temperatures were in: Normal use: CPU: Between 30 ° and 40 ° GPU: Between 60 ° and 75 ° Doing a "stress test" with FurMark 1.9 (only 3 minutes) CPU: Between 50 ° and 60 ° GPU: Between 90 ° and 97 ° reaching 106 °!! Note: Furmark stress tests performed in order to know the answer to take your 3D graphics card generation and whether it will be able to run the most demanding programs and games. As you can see, the temp of CPU (both cores) are not unusual, tem are quite acceptable, but the GPU is too FU***** high. After performing the cleaning process and application of new thermal paste temps are: Normal use: CPU: Between 26 ° and 38 ° GPU: Between 41 ° and 58 Doing a "stress test" with FurMark 1.9 per 15 minutes CPU: Between 40 ° and 47 ° max 57 ° GPU: Between 80 ° and 90 ° with a maximum of 92 ° Playing for a while Hydrophobia Prophecy the GPU max temp was 88° I started with the cleaning and application of new thermal paste. What we need is a tube / syringe of thermal paste, I used Artic Silver 5, a Phillips screwdriver. Antistatic cleaning cloth, a pair of coffee filters (yes coffe filters!) A lot of patience! so lets started! You must remove the top / main deck of the machine, so you'll see the following parts that you need to remove: As you can see in the image, the red circles are the screws that you need to remove in order to release the heatsink and fan. Also be sure to remove "gently" fan connector marked with the blue circle. After releasing the screws and the fan connector cable, "gently" pull up the CPU headsink, may be a little stuck but do it slowly and gently. Later will do the same with the fan cooler, the fan "box" is attached to the GPU headsink through a "duct tape" so you must be gentle to avoid any damage. Once released the Fan cooler you can put aside while you go to releasing the Headsink of the GPU. In my case, this Headsink was quite stuck, but after a few attempts you finally pull up once you've removed the headsink you now should start cleaning...the fan box has 3 screws that need to remove to be able to clean easily. Likewise, you should clean the sink grids that are filled with a lot of dust, preventing a good flow of air. This process can be slow, because in order to clean the grates you need something small to get inside and clean the stuck dusting. In my case I used a set of Screwdrivers that can also serve for other tasks. After cleaning the headsink you should proceed to clean the processor and GPU. Both have thermal paste residue that should be removed. You can find many online methods, but the one I used is quite practical. What you need is isopropyl alcohol, Widely used in cleaning of photographic lenses and electronic contacts, as it leaves no marks and is fast evaporating. It can be 99% pure or 70%. You can use 'Q tips "for this process, wet (very little) the Q tips on alcohol and rub it gently on the surface of the CPU / GPU to completely remove the thermal paste. Must be completely clean, you can use the "technique of the credit card" which as its name suggests you use an old piece of plastic card or similar to clean the remains of thermal paste. DO NOT use anything that could scratch the surface Once you've completed this process, the CPU / GPU will be like in the picture below (Note that I used a cloth underneath the laptop to prevent scratching) The next step will be to apply new thermal paste. In my case, as I said before I used Artic Silver 5 with very good results. For more information about this product you can see the official manual here. There are different methods for applying the thermal paste, you can find videos on youtube like this I applied the Artic Silver 5 method. Do not apply too much or little thermal. The recommendation is to cover the entire surface of the CPU / GPU evenly to avoid the so-called "air bubbles" Do NOT use your finger to apply the thermal paste, because the human skin contain grease and this will contaminate the electronics surface. For that we will use coffee filters in our finger, and gently apply it the thermal paste. The purpose is: the thermal paste is a driver which sends the heat from the CPU / GPU to the heatsink and through the fan, this hot air is taken out of the laptop. If exist "air bubbles" well...no good thermal conductivity, so: high temps, that's my explanation, let's see the Wikipedia: The thermal paste, also called thermal silicone, or thermal grease is a substance that increases the conduction of heat between the surfaces of two or more objects that may be irregular and do direct contact. In electronics and computing, is often used to help heat dissipation of components through a heat sink. A hair, piece of lint, and even dead skin cells can significantly affect the thermal interface's performance An important point to note is that any thermal paste need a break-in period can be a couple of days or a week depending on computer use. By this, temps will decrease gradually, so if you dont see a big difference in degrees after apply new thermal paste take it easy, you must give some time to adjust. Remember to monitor temps to confirm that you did a good job. To do this you can use programs such as HWMonitor Here is my temps on HWMonitor NOTE: I know, my english sucks...but I try ..take care and be safe!
- 38 replies
-
- 3
-

-
I did not know exactly where to put this thread but i think is a good idea to discuss and share something about the thermal paste. I have read enough of this topic, and the best known brands are: IC Diamond Arctic Cooling MX-2 / MX-4 Arctic Silver 5 Tuniq TX 2 / TX 4 Extreme COOLER MASTER IceFusion I found a new one (at least i did not know) that promises to be better than the others, called GC-Extreme Solutions GELID, here are the link to a review: GELID Solutions GC-Extreme Thermal Compound Review - Page 1/5 | techPowerUp. $13 on Newegg Also found several videos on YouTube explaining the methods of applying thermal paste, and i want to share with you a couple of them: Also found some pictures here that show (basically) how to apply the thermal paste on the AW M11x, i think internally is quite similar to M14x so, if any of you know a method or have any pictures/videos/reviews that you can share i'll be more than interested in seeing them and if they are of the M14x that would be better! greetings!
- 33 replies
-
- 6
-

-
- cpu cooling
- gpu cooling
-
(and 5 more)
Tagged with:


