


Nando
-
Posts
142 -
Joined
-
Last visited
-
Days Won
4
Content Type
Profiles
Forums
Downloads
Posts posted by Nando
-
-
I know what you mean...I'm looking for other options such ASUS G53 and MSI 680 but I have not decided yet...
-
3 times men! they did it again...3 orders canceled...dont know why...The worst thing is that they have give me no fucking reason...no answer...I feel like an idiot wondering why
-
I made another order for the M14x ... I hope they do not cancel again...
Final specs: (promo/pre config setup)
through this page $175 off
Coupon code HLSKSR06S9ZG0F free shiping
Coupon code GJ05XDSHB0MCCX $75 off
Total $1373.69 tax included
Intel Core i7 2630QM 2.0GHz (2.9GHz Turbo Mode, 6M cache)
6GB DDR3 at 1600MHz
14.0 High Def+ (900p/1600x900) with WLED backlight
1.5GB DDR3 NVIDIA GeForce GT 555M using NVIDIA Optimus technology $0.00
750GB 7200RPM SATA 3Gb/
Custom Nameplate
Internal High-Definition 5.1 Surround Sound Audio
Intel Advanced-N WiFi Link 6205 a/g/n 2x2 MIMO Technology
Internal Bluetooth 3.0
EDIT: ok is happens again: FUCK! they did it again! ORDER CANCELED! WTF?
-
still laughing with the guy's face hahahahahaha

-
the guy's face LMAO -
I'm still waiting for a response from Dell ... nothing yet..send them another email yesterday and did not even replied ...
sincerely, i wanted the M14 but I think I better go for the Asus G53SW or MSI GT683R with the new nVidia GeForce 560M GTX 1.5GB GDDR5
damn dell! ...1 order canceled, 3 days wasted and 2 days without feedback from them!
-
anytime dude!
-
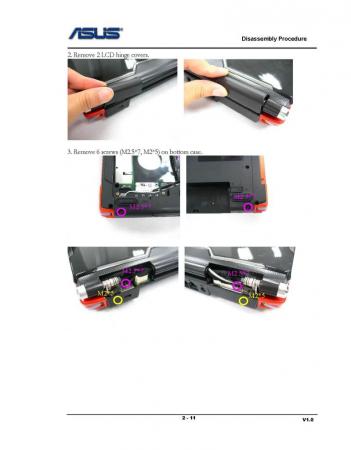
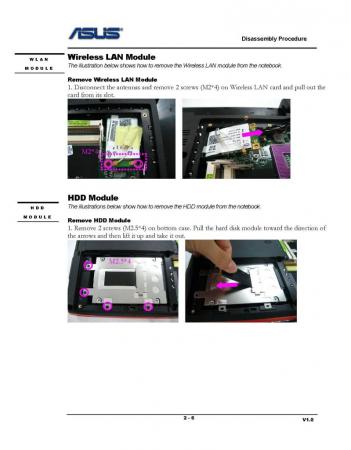
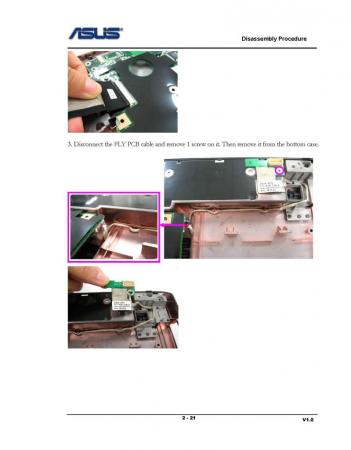
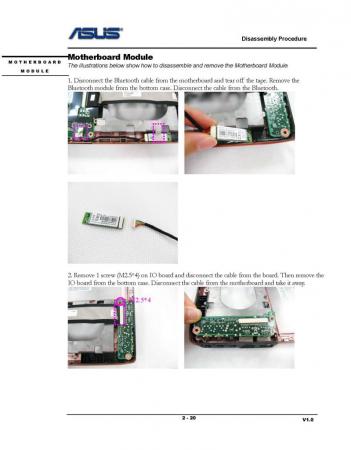
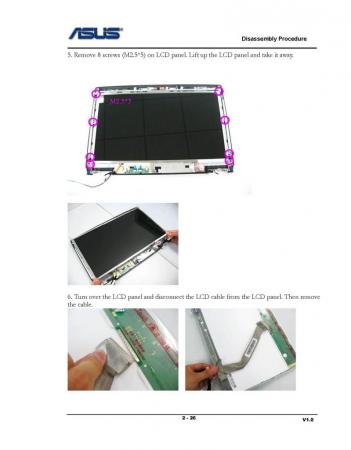
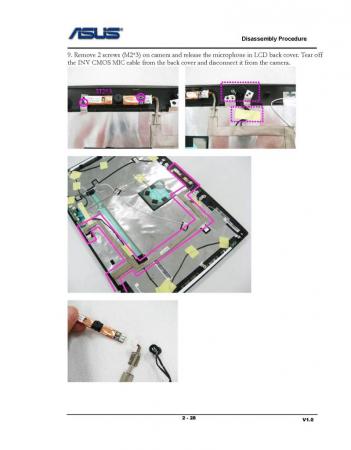
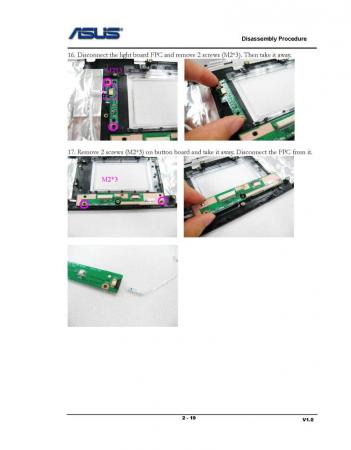
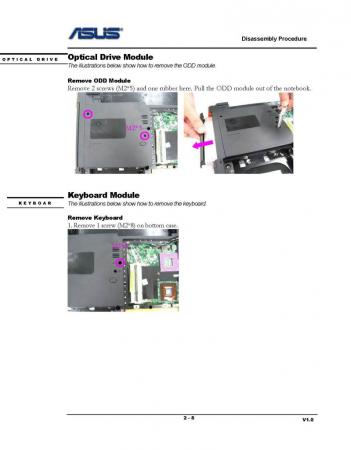
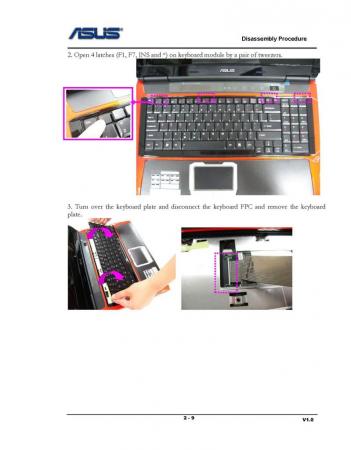
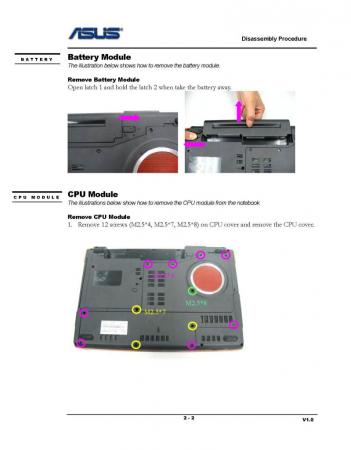
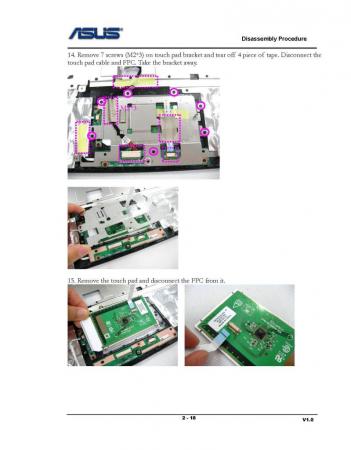
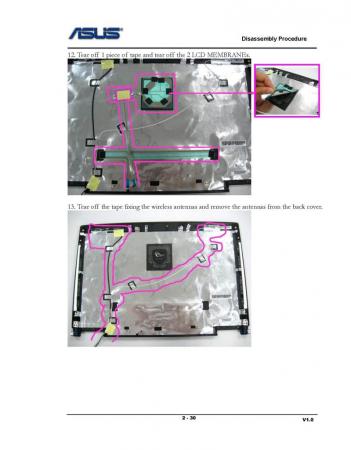
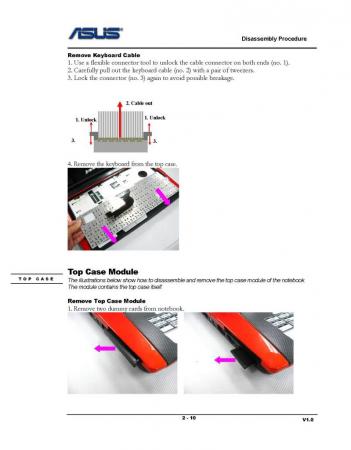
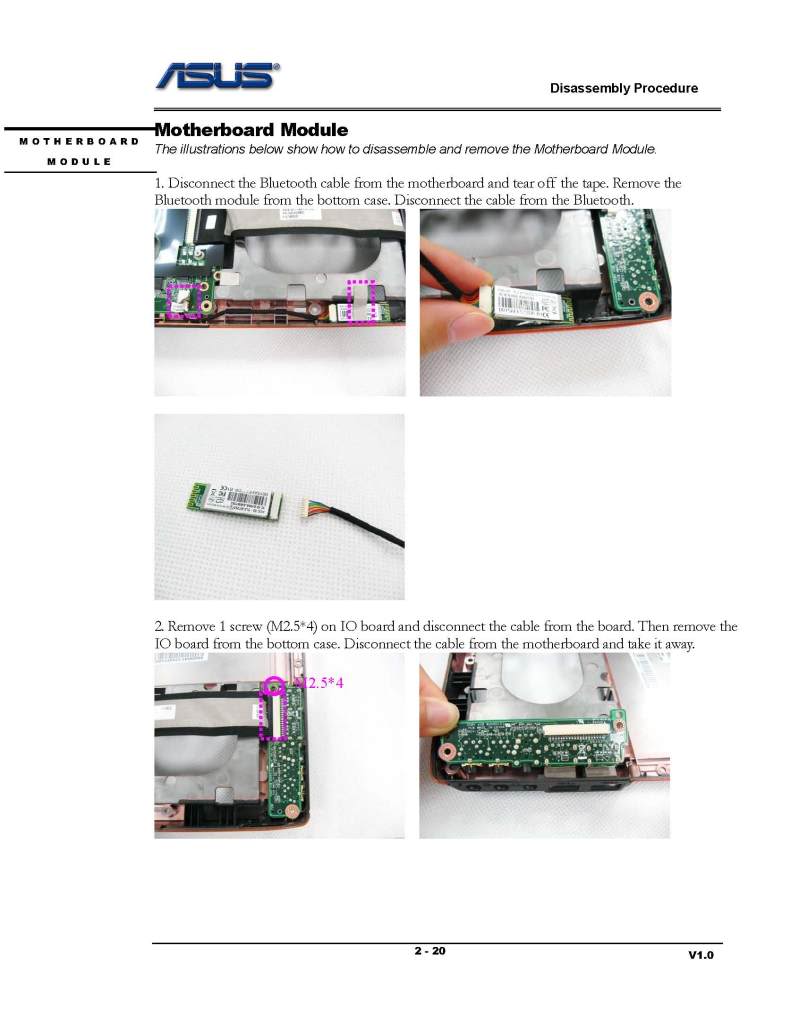
I found this, might help someone. Is a official guide to disassembly the notebook asus G50 series...


-
 2
2
-
-
i saw something like that
-
1
-
-
Have you tried any other compounds like shien etsu, OCZ freeze or MX-4 for comparison reasons?
Only AS5...i wanna try shien etsu I read that is very good
-
Thanks for sharing man! good job with the temps, what I do to apply the thermal paste is to have a drop at the size and shape of rise and let the pressure of the heatsink and the heat to take care of the rest, no spreading or anything, works best for me so far, after tests I found the proper amount too and I don't see any paste outside the die either.
that kind of methods are also effective...i know that...applied the method of spreading because it is one of the recommendations of AS5 for Core 2 Duo processors
-
my story...well...i make a order to buy a M14x ...a day later I notice that the order had been canceled by Dell...WTF??
I wrote to Dell... one day later I got an email apologizing for the error: I understand from your E-mail that that your order number xxxxxxxx was cancelled. I apologize for the inconvenience caused.
I have reviewed your account, and I see that the order was canceled due to processing issues. However, we have submitted a request to get the order re-entered without any further delay.
...still waiting...fuck!
-
I wrote an article on my website and wanted to share here (you can read in spanish)
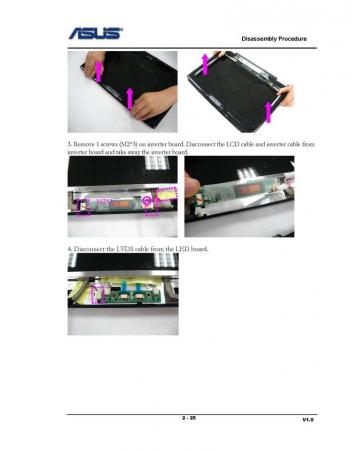
EDIT: A complete guide to disassembly the Asus G50 can be found here: http://forum.techinferno.com/asus-gaming-notebook-forum/560-official-asus-g50-disassembly-guide.html#post6282
At this time we will see how clean and apply new thermal paste to an ASUS G Series (Republic of Gamers) more specifically the G50VT X1 model, however, this process may be the same that applies to all G50 and G60 series. This laptop began to raise their temps, mainly GPU.
Before making the process of cleaning the fan / heatsink and applying new thermal paste, the temperatures were in:
Normal use:
CPU: Between 30 ° and 40 °
GPU: Between 60 ° and 75 °
Doing a "stress test" with FurMark 1.9 (only 3 minutes)
CPU: Between 50 ° and 60 °
GPU: Between 90 ° and 97 ° reaching 106 °!!
Note: Furmark stress tests performed in order to know the answer to take your 3D graphics card generation and whether it will be able to run the most demanding programs and games.
As you can see, the temp of CPU (both cores) are not unusual, tem are quite acceptable, but the GPU is too FU***** high.
After performing the cleaning process and application of new thermal paste temps are:
Normal use:
CPU: Between 26 ° and 38 °
GPU: Between 41 ° and 58
Doing a "stress test" with FurMark 1.9 per 15 minutes
CPU: Between 40 ° and 47 ° max 57 °
GPU: Between 80 ° and 90 ° with a maximum of 92 °
Playing for a while Hydrophobia Prophecy the GPU max temp was 88°
I started with the cleaning and application of new thermal paste. What we need is a tube / syringe of thermal paste, I used Artic Silver 5, a Phillips screwdriver. Antistatic cleaning cloth, a pair of coffee filters (yes coffe filters!) A lot of patience! so lets started!
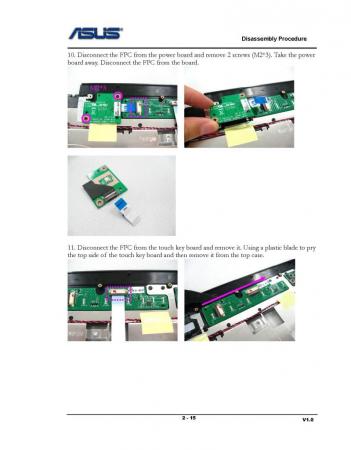
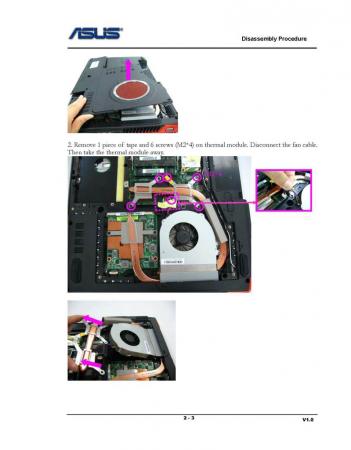
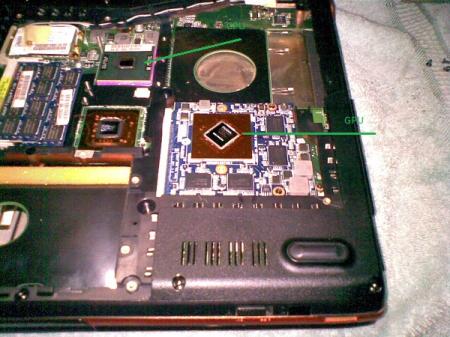
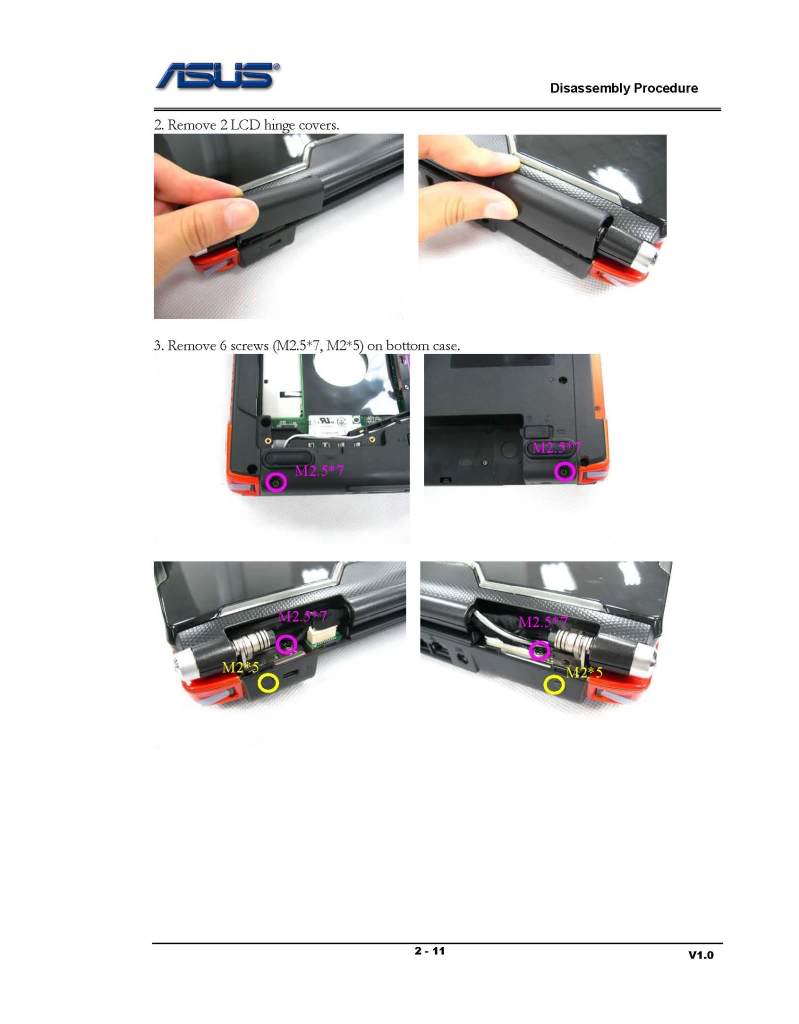
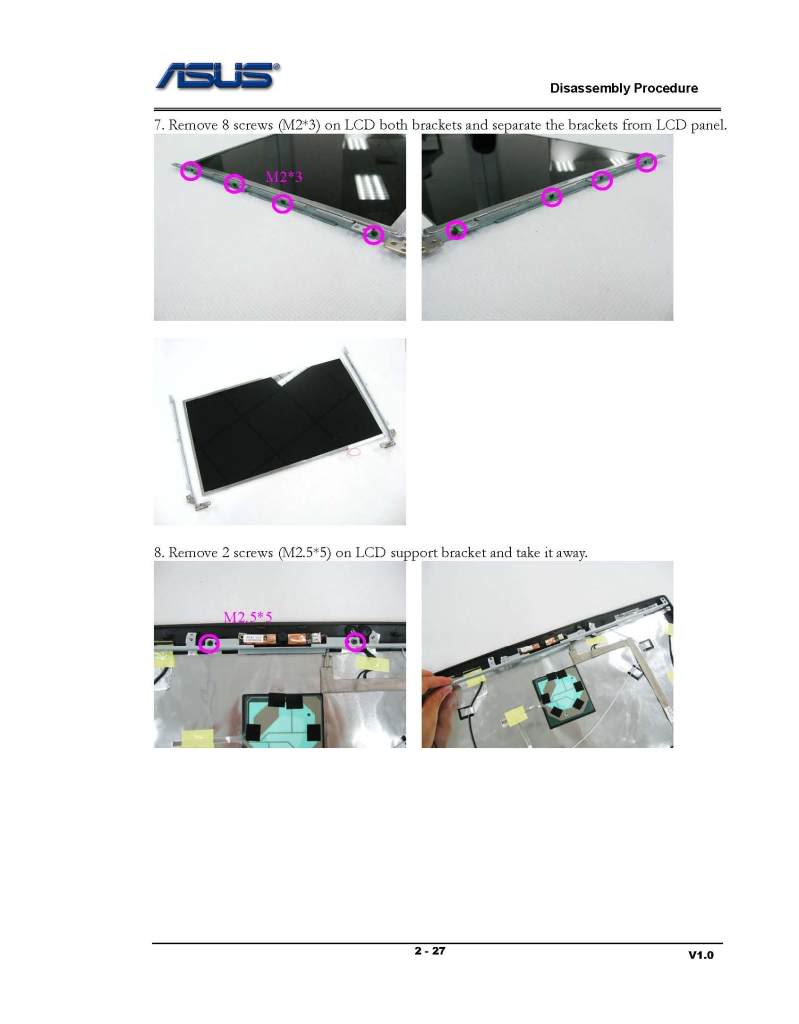
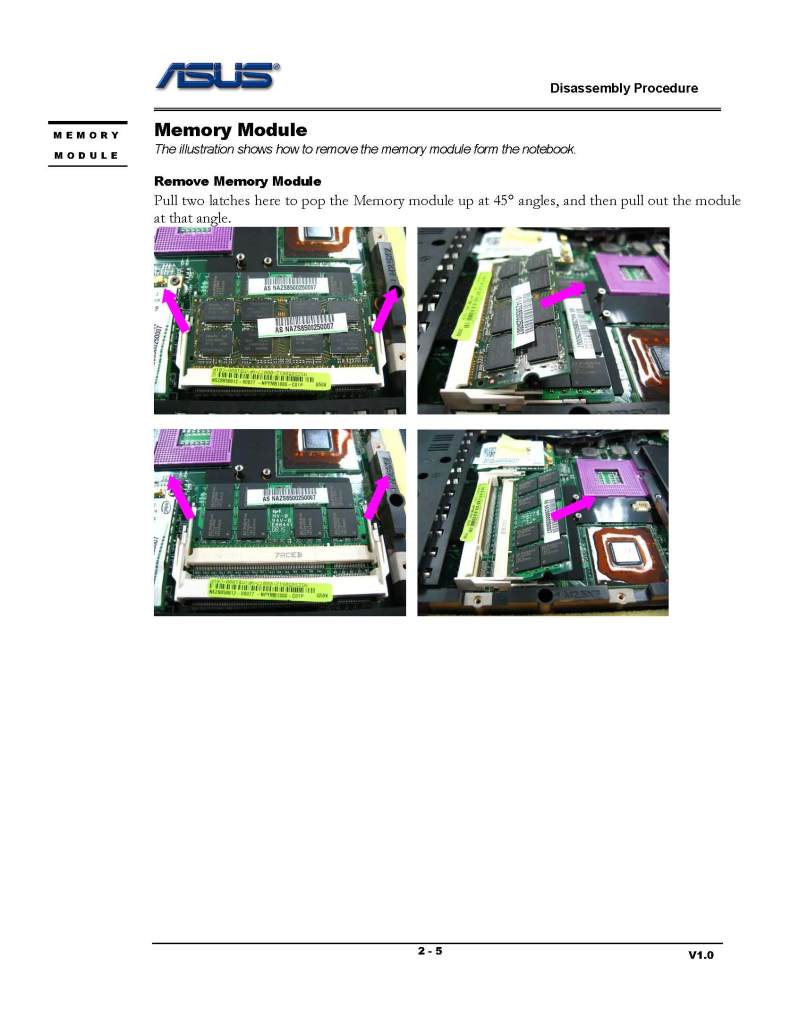
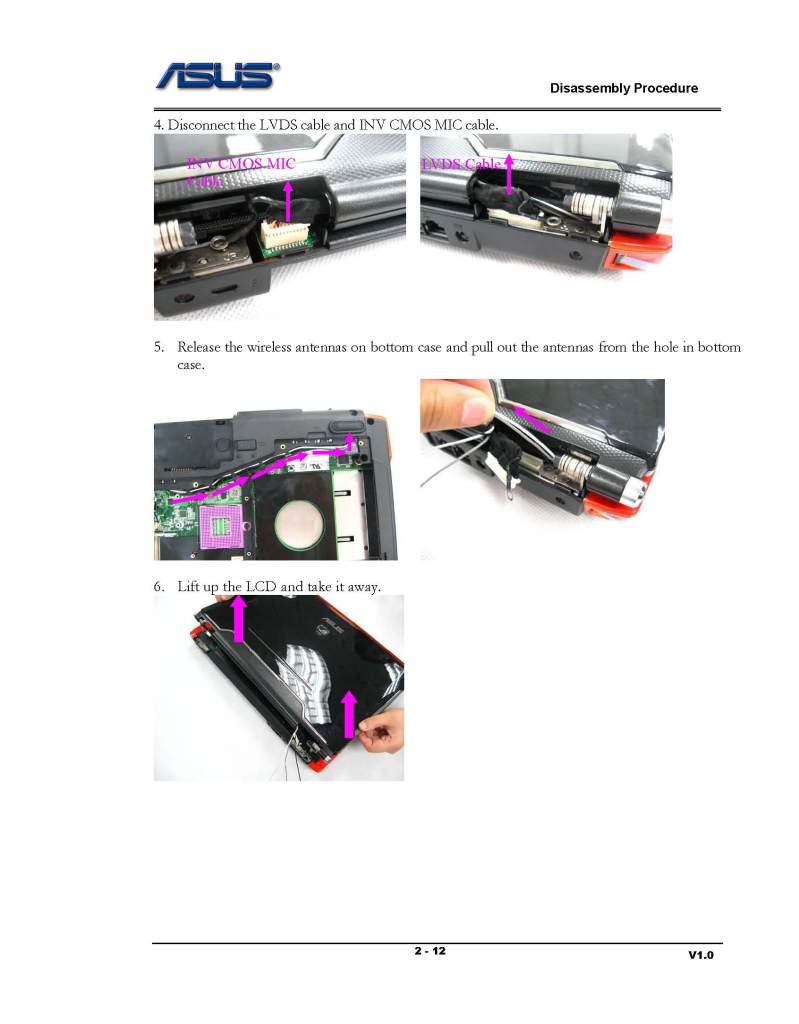
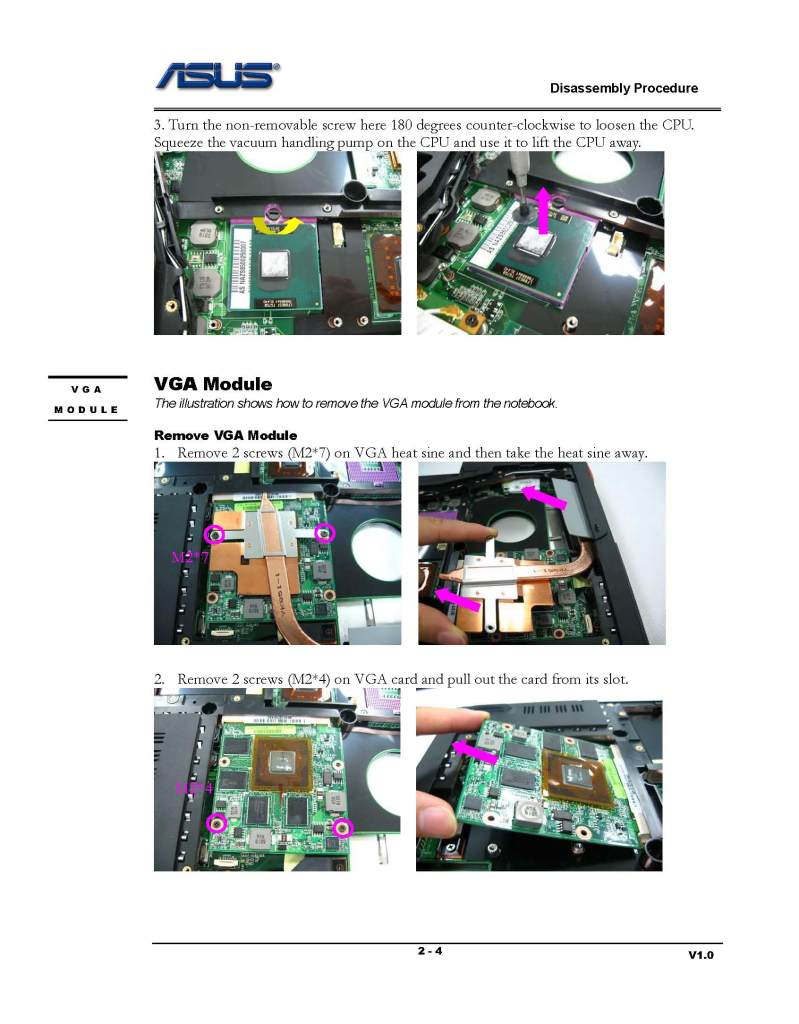
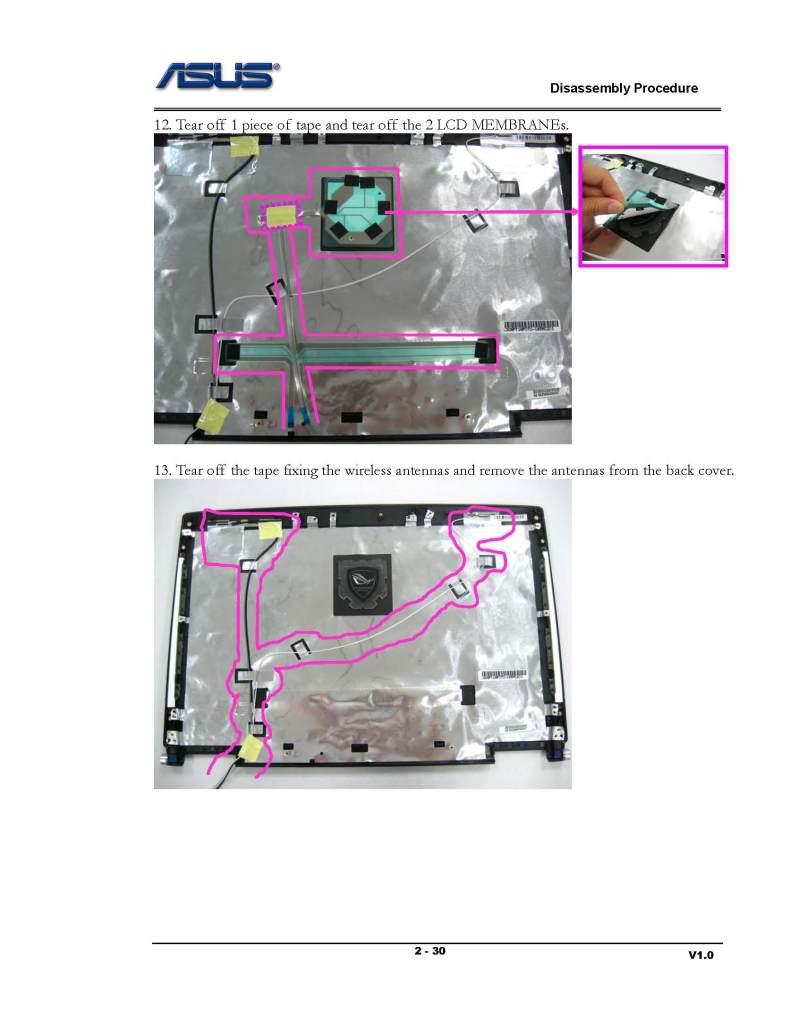
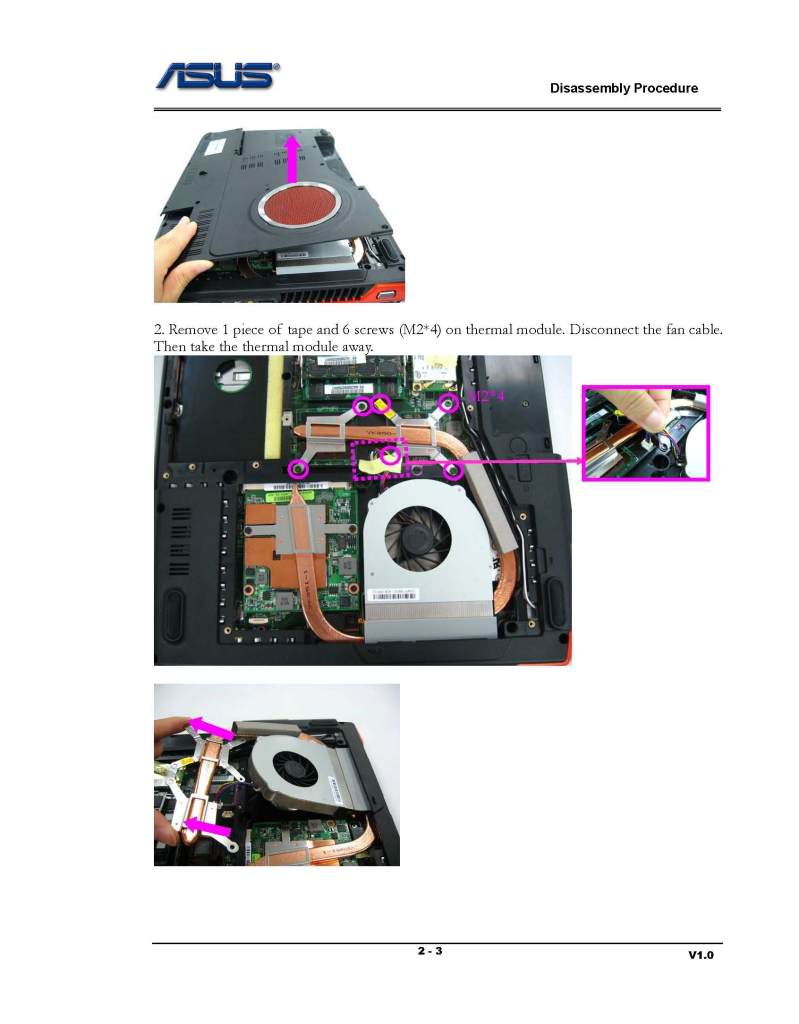
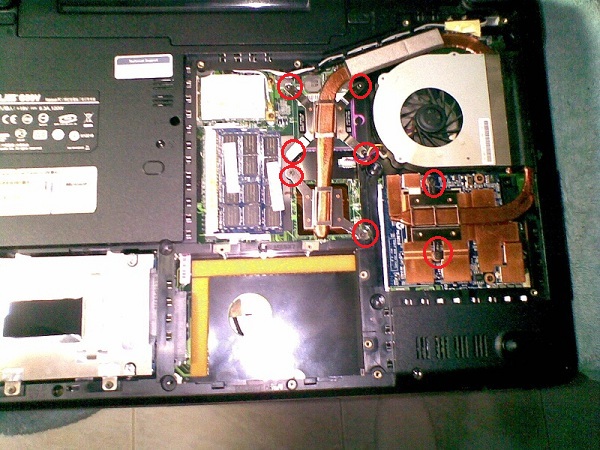
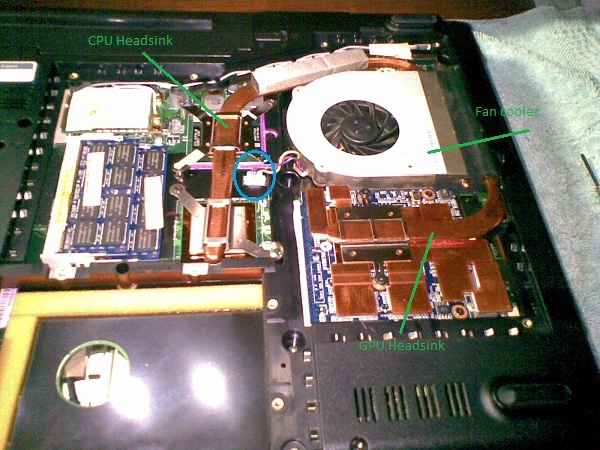
You must remove the top / main deck of the machine, so you'll see the following parts that you need to remove:

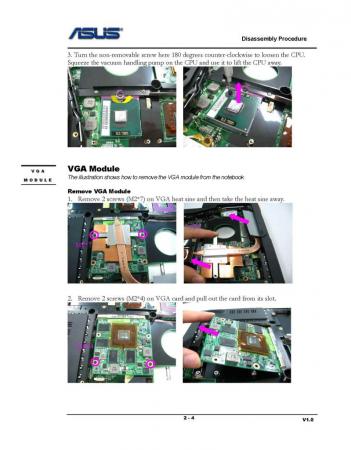
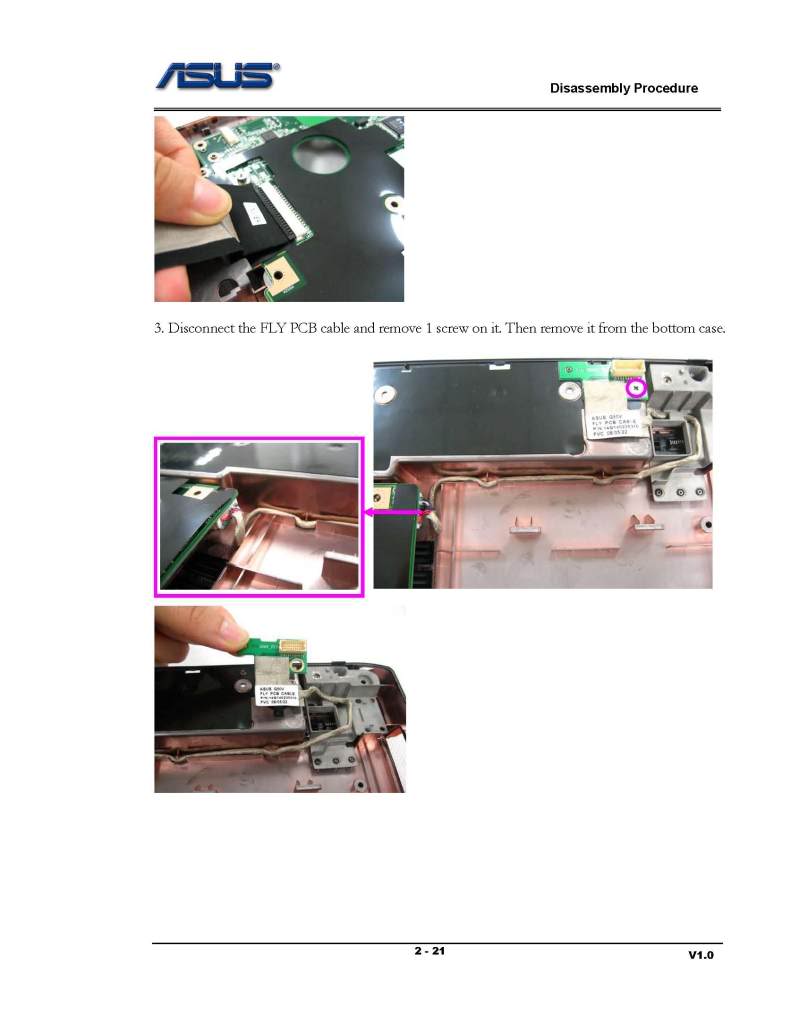
As you can see in the image, the red circles are the screws that you need to remove in order to release the heatsink and fan. Also be sure to remove "gently" fan connector marked with the blue circle.

After releasing the screws and the fan connector cable, "gently" pull up the CPU headsink, may be a little stuck but do it slowly and gently. Later will do the same with the fan cooler, the fan "box" is attached to the GPU headsink through a "duct tape" so you must be gentle to avoid any damage. Once released the Fan cooler you can put aside while you go to releasing the Headsink of the GPU. In my case, this Headsink was quite stuck, but after a few attempts you finally pull up
once you've removed the headsink you now should start cleaning...the fan box has 3 screws that need to remove to be able to clean easily. Likewise, you should clean the sink grids that are filled with a lot of dust, preventing a good flow of air. This process can be slow, because in order to clean the grates you need something small to get inside and clean the stuck dusting. In my case I used a set of Screwdrivers that can also serve for other tasks.
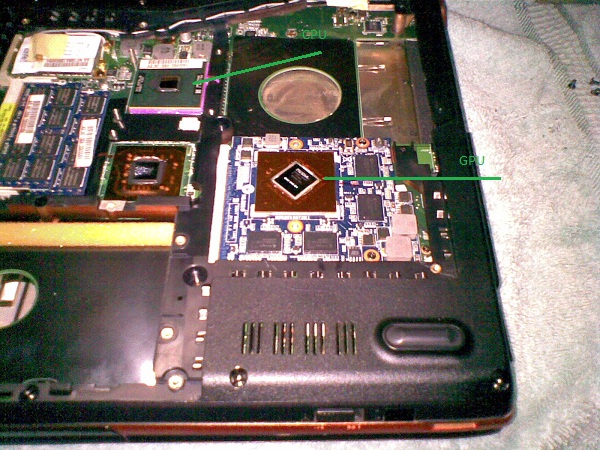
After cleaning the headsink you should proceed to clean the processor and GPU. Both have thermal paste residue that should be removed. You can find many online methods, but the one I used is quite practical. What you need is isopropyl alcohol, Widely used in cleaning of photographic lenses and electronic contacts, as it leaves no marks and is fast evaporating. It can be 99% pure or 70%. You can use 'Q tips "for this process, wet (very little) the Q tips on alcohol and rub it gently on the surface of the CPU / GPU to completely remove the thermal paste. Must be completely clean, you can use the "technique of the credit card" which as its name suggests you use an old piece of plastic card or similar to clean the remains of thermal paste. DO NOT use anything that could scratch the surface
Once you've completed this process, the CPU / GPU will be like in the picture below (Note that I used a cloth underneath the laptop to prevent scratching)
The next step will be to apply new thermal paste. In my case, as I said before I used Artic Silver 5 with very good results. For more information about this product you can see the official manual here.
There are different methods for applying the thermal paste, you can find videos on youtube like this
I applied the Artic Silver 5 method. Do not apply too much or little thermal. The recommendation is to cover the entire surface of the CPU / GPU evenly to avoid the so-called "air bubbles" Do NOT use your finger to apply the thermal paste, because the human skin contain grease and this will contaminate the electronics surface. For that we will use coffee filters in our finger, and gently apply it the thermal paste.
The purpose is: the thermal paste is a driver which sends the heat from the CPU / GPU to the heatsink and through the fan, this hot air is taken out of the laptop. If exist "air bubbles" well...no good thermal conductivity, so: high temps, that's my explanation, let's see the Wikipedia: The thermal paste, also called thermal silicone, or thermal grease is a substance that increases the conduction of heat between the surfaces of two or more objects that may be irregular and do direct contact. In electronics and computing, is often used to help heat dissipation of components through a heat sink.
A hair, piece of lint, and even dead skin cells can significantly affect the thermal interface's performance
An important point to note is that any thermal paste need a break-in period can be a couple of days or a week depending on computer use. By this, temps will decrease gradually, so if you dont see a big difference in degrees after apply new thermal paste take it easy, you must give some time to adjust.
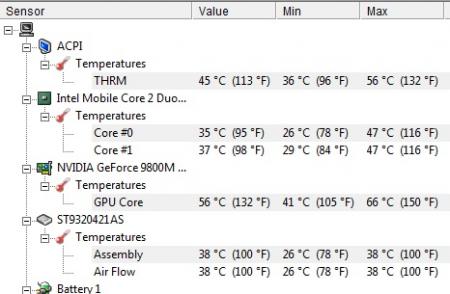
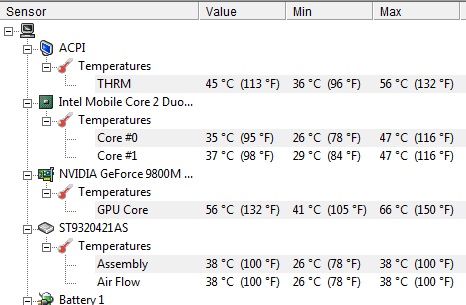
Remember to monitor temps to confirm that you did a good job. To do this you can use programs such as HWMonitor
Here is my temps on HWMonitor
NOTE: I know, my english sucks...but I try
 ..take care and be safe!
-
3
-
-
I read something about it, I do not remember where (maybe in the "other" forum?) but apparently if I remember well is a "common" problem on the M14 when there are 2nd HDD
EDIT: Speedy Gonzales is talking about it http://forum.techinferno.com/alienware-m14x/513-m14x-second-hdd-optical-drive-caddy-problem.html
-
i use Tweaks Logon to change the logon screen pic is really easy to use and no need to install
there is one like Ultimate Windows Tweaker: Tweak me
greetings!
-
1
-
-
wow that looks cool, but could be potential dangerous if used incorrectly since its metal and conductive.
yep...agree
-
-
nice! really cool!
-
found this:
Alienware Alienguise with Breed Theme: AlienGUIse™ Theme Manager dramatically transforms the appearance of your system into a truly unique display, and contains the exclusive Alienware-centered Breed skin.
couple pics
I personally not like, but maybe someone around here...
-
exactly, and we must understand that we're playing in bttery mode, so, dont expect miracles!
though, and without offending anyone, dont you think that is a lot of process just to play? I still think there must be a better way, or easy way, maybe a bios update or something...anyway meantime we have the "Steven way"

-
well, if the game has a story like Fallout definitely i give it a try
I was reading about the Brink's history, and is very similar to the story of another game that is coming out called Hydrophobia Prophecy, about the city on the water n other stuff like that...
-
still waiting for the repaste tuto
 btw thanks 4 sharing men!
 -
-
Timbuk2 D-Lux Laptop Messenger: Bondage - S $110 (really nice!)

-
2
-


An amusing story of Dell's incompetence and lack of organization
in Dell
Posted
well apparently they have not made any charges to credit card...what you say makes sense, seems to be automatic: i make an order and they automatically cancel it