


AleksR17x
-
Posts
27 -
Joined
-
Last visited
-
Days Won
1
Content Type
Profiles
Forums
Downloads
Posts posted by AleksR17x
-
-
-
Sorry no such thing for the 18 inchers. Even if you somehow found a matrix that fits there is no way to connect eDP (120hz 3D) on the motherboard.
External is the only way to go up from 60hz on 18s.
-
Sounds to me like the 680m you got has a problem with the output. If you buy another i would buy a 770m and get a 3D screen. The 120hz refreshrate is relaxing to look at compared to 60.
I wouldnt mess with stock bios to modified then go stock again. Leave it modified so you can upgrade from 680m and set Display to PEG for 3D display.
-
Nice effort, too bad it didnt work the first time.
-
Its pretty amazing that its sitting at 58 degrees under load, do you have a massive laptop cooler with dry ice under it ?
")
If the Fps is good then you can push it pretty far yep.
-
 1
1
-
-
I had a Asus VG278H with 3D vision 120hz 27"
Was plenty expensive but worth it for me, a cheap big monitor is not worth it at all.
Smaller high quality over big mediocre is a win.
-
Alright, looks good to me.
And then when gaming they stay around that same clock?
-
1
-
-
Download MSI afterburner, watch the clocks there.
Also powerlimit should be 100pct / +100 in Afterburner
Stock: 924mhz Gpu
Memory: 2500mhz
You can also check Power plan to see if its set to High Performance and that the AC adapter works as it should.
-
1
-
-
ES chips does not always work on every motherboard. Microcode differs from the Retail version, if the bios cant talk to it it beeps.
I hope you have a M18 R2 and not R1 ?
-
Had this exact thing without the AC adapter plugged in (880m), check power plan is it set to high performance ?
-
58 degrees ? my 880m idles at 54 with a squeaky clean fan 3 pipe and new paste.
Sounds like a major undervolt/underclock going on.
970m should be 70-80 under load, TDP is 100 watts.
-
1
-
-
Its all about finding a balance between speed and quality in nvidia control panel.
970 is running pretty hot, can't do alot about OC without temps going thru the roof.
Also modding the cooler could help, i take it you have the 3 pipe cooler for it ?
-
1
-
-
My M17x R4 is making a damn high noise from the Gpu fan.
The fan blades are very square in design, pushes lots of air but is not very aerodynamic.
Gonna rip it out and put an Msi fan in there to quiet it down
-
My money is on the 5 beeps aswell, most of the other errors does not let the system boot.
Codes for alienware Laptops:
1 Possible Motherboard (covers BIOS corruption or ROM error)
2 No RAM detected
3 Possible Motherboard Chipset
4 RAM failure (other)
5 CMOS Battery
6 Video card/chip
7 CPU
8 LCD -
Thank you
There will be more updates later, just have to finish a car then i will focus on the laptop.
-
Had the exact same problem before i found out i had the Win version.
Make sure you get nvflash 5.141 for Dos.
Two files: CWSDPMI.exe (nvflash runs in protected mode)
Nvflash.exe which should be 1.1mb
-
Most tweaked versions works, afaik the Asus does not share the same bios given the totally different Pcb.
What you are after is the latest version of generic / dell etc 780m
If a mod sees this pleace move topic to
- Desktop & General Hardware
- Desktop Hardware
- NVIDIA Video Cards
-
The nice things with many 765 chips is their OC potential compared to 880 and 780s wich run pretty hot to begin with.
-
I have a R17x R4 with that exact screen, and a Gtx 880m.
I never had 8 beeps from my machine after putting the 880 in.
I got 8 beeps when i tried the 3D screen for the first time (without the 880m installed)
Because the Intel onboard cant drive that screen.
I cleaned the contacts for the Lcd on the motherboard before plugging in (and screwing it tight), also the leads in the Display cable itself are very thin and fragile.
It sounds to me that there is a problem with the 1070 you have, is it seated 100% in the mxm socket ?
-
Updated inf specific for Alienware M17x R4 - 880 GTX
384.76 - W10 64bit
1198 - SUBSYS 057B1028
Modded/updated Vbios highly Recommended
Instructions (for Win 10 64bit):
DDU have to be disabled (Windows Test Mode in right bottom corner)
1.: Download NVIDIA Driver package
http://us.download.nvidia.com/Windows/384.76/384.76-notebook-win10-64bit-international-whql.exe
Let it unpack and cancel installation
2.: Go to C:\NVIDIA\DisplayDriver\384.76\Win10_64\International\Display.Driver
overwrite the supplied nvdmi.inf over the one in the folder.
3.: Run setup.exe and let it install the new driver.
-
1
-
-
Being an Audiophile i had to get all the functions up and running for my Almost new R4
How to get updated driver.. and Thx control panel to work under windows 10 64 bit (who has 32 installed on an R4 anyways)
I have DDU disabled always, Windows 10 in Test mode.
Do this after all the other drivers/apps are updated, NVIDIA, Visual C etc.
Fix:
1.:ownload the latest driver for the Recon 3Di chip itself. This specific driver package is for a later revision that has another firmware on the effect side so the Control Panel does not work.
But we are not after that here, we need the latest driver so it will work optimally in W10.
http://www.dell.com/support/home/no/no/nobsdt1/Drivers/DriversDetails?driverId=D6NF4
2.: Thx Control panel:
Download the standard Audio driver package M17x R4 / M18x R2
https://downloads.dell.com/FOLDER00384156M/2/Audio_Creative_W74_5NJ7K_A01-Setup_ZPE.exe
3.: Right click the exe file and extract the contects to a random folder.
Go to Program files\Creative\Sound Blaster Recon3Di\Sound Blaster Recon3Di Control Panel
Copy the contents of this folder over to Program Filesx86\Creative
Make a shortcut to the desktop. Run it, and you have control over all settings
(optional) Delete the Newer Recon 3Di control panel folder if you installed that with the newer package that does not recognise the older Chip.
-
After messing with my Toshiba Qosmio this is where the fun starts for me.
Hopefully someone else can also use some of this info for their own cooling mods.
So i got this M17x R4 with a broken screen.
I7 3610, 8 gigs ram, 7970M etc.
Colors were all 70s psycho (LCD panel was cracked)
Replaced almost the whole laptop with new parts, brand new 120hz screen, brand new 3920xm, almost new Gtx 880M Oem dell from an M18.
New SSD drive among other things.
The question presents itself, how to cool the thing down some more.
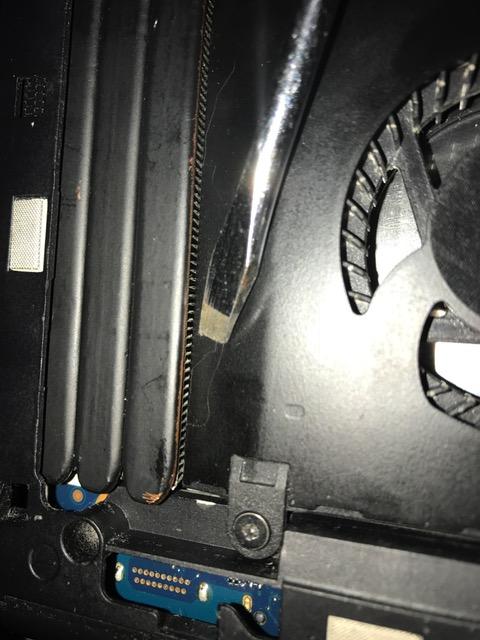
I took out the Cpu heatsink, added another Pipe. Turns out the ones i had was too short and fluid filled.
Had to use my biggest iron and solder it shut before using epoxy on it to be sure.
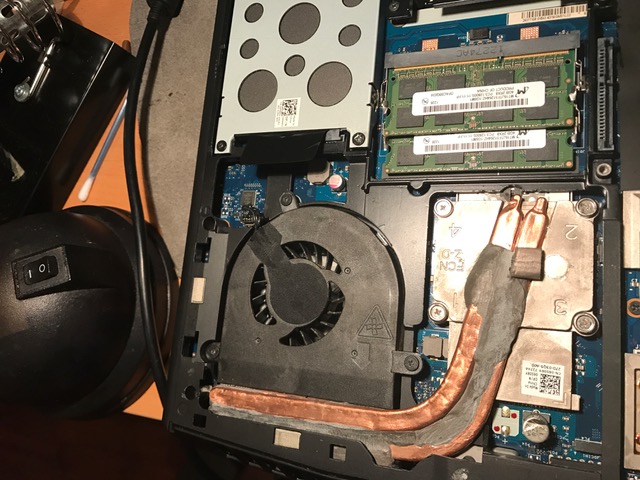
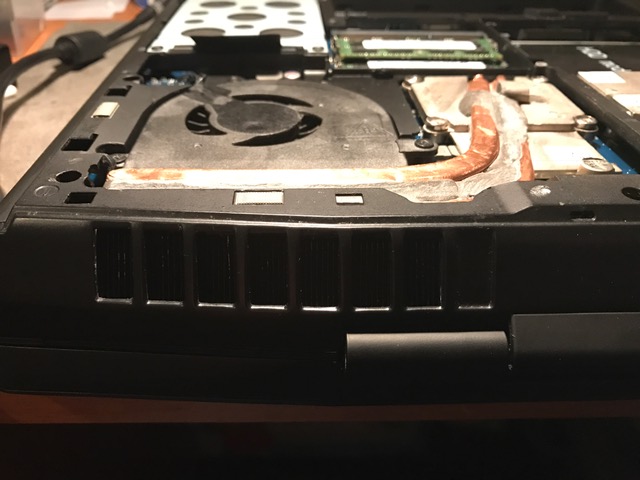
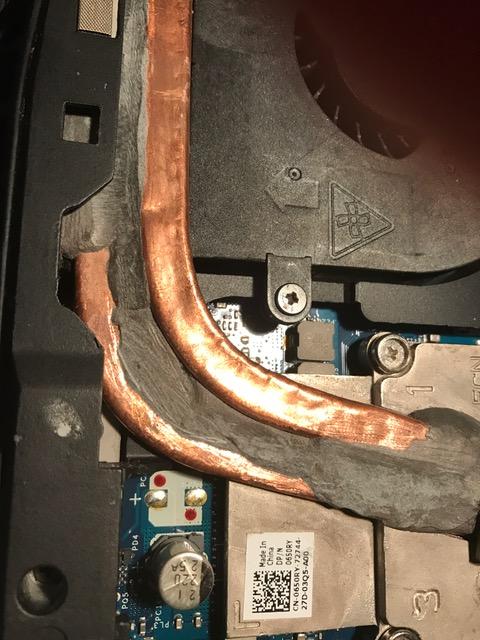
Grinded off some rough edges and smoothed out the transition where the fins are.
This Metal epoxy is doing an alright job transferring heat from the core pad to the fins aswell.
I thought about buying the M17x R5 4 pipe cpu heatsink on ebay and modify it to fit.
I wont dremel off the aluminum bracket (upper left in this image) to make the 4th pipe fit, because then the lower cover will be losing out on a clip.
I hate loose panels so will look into cutting the 4th pipe on the 4 pipe cooler just before it reaches the chassis.
As you can see in the picture i need to grind off a piece of the aluminum just over the inner bend to make the most out of the 4th pipe if i go that route later
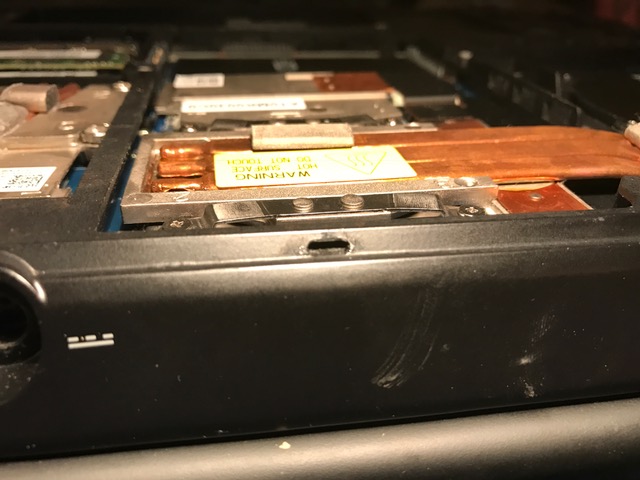
And so to the GPU, there is hardly enough room to fit a pipe over these three. I ordered 10 or so packets of heatsinks and coolers from some small gaming notebooks, i will get this next month.
Im thinking a wide pipe that i bring to a friend of mine for flat machine pressing, or a cnc machined flat piece of aluminum over here. I dont think The ebay R5 - 5 pipe will work with the stock bottom as is.
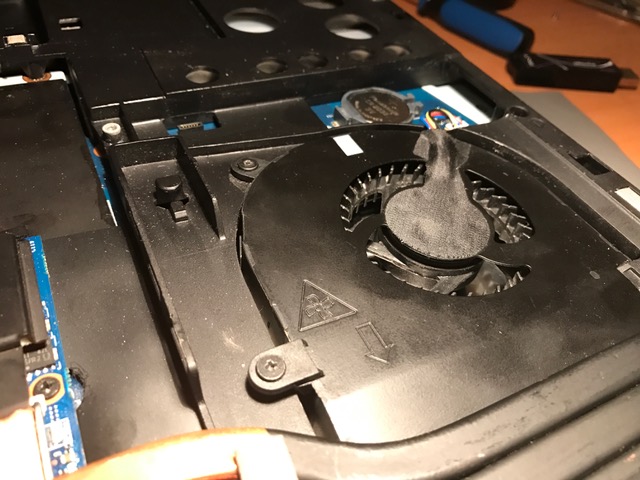
The GPU fan, i will buy a packet of small "P" gaskets and show you what i mean with forced cold air induction tomorrow.
Im not an engineer, but why add the hole under the keyboard. Hot air goes up not down.
On the Qosmio adding the gasket around the Fan and blocking the upper nonsense vent lowered the temps by quite a few degrees C
And finally the gaps around the fins, there will be some of the same gasket here.
No need to waste precious airflow from this (in my mechanical world) puny fan.
In this image you can see the bracket covering the inner Pipe, so a straight flat pipe will do it or the machined piece im thinking about.
Also around the edges of the fins around 5 pct of the airflow is returning back into the case. And what the heck were they thinking when they made the heatsink fins naked at the bottom leaking hot air everywhere.
Even Toshiba knew they hat to cover it to keep air flowing the right way.. outside of the case.
-------------------------
To be continued
------------------------
-
1
-
-
After being an owner of a x875 for over a year i have some issues with it compared to other gaming laptops.
(Alienware m17x R4 currently)
It looks ok from the outside, but the whole bottom is plastic.
1. There is only 1 Fan to cool both Gpu and Cpu. 1 pipe for each, Gpu is fine. Cpu gets too hot. (on the X75 they made the sink much smaller for the Gpu; less heat on the top cover. 2 pipes Gpu tho)
2. The top aluminium cover gets hot on the right hand side.
3. The fan exhaust is on the right side
4. Weak hinges, weak hinge mountings.
5. No easily available unlocked bios.
Pros:
1. Very good sounding speakers from Harman Kardon
2. Fairly fast
3. Looks good with the illuminated keyboard.
4. Not overly large
5. 3D vision able with full HD 120hz screen and (very important) only 1 motherboard can run it.
Im not surprised there is not a lof of content around for this Laptop, not exactly a tweakers dream.
-
Hello all
Aleksander here.
Car mechanic and Notebook tweaker, if it works dont fix it doesn't always apply
Currently happy owner of an Alienware M17x R4, there are definately room for improvement in the cooling department.
Compared to my earlier gaming laptop-Qosmio x875 its a big improvement.
I will post several build logs to show people how to squeeze every centigrade out of air cooling.
M17x R4 - 880M and SEC5044 (120hz 3D)
in Alienware M17x / AW 17
Posted
I have been trying every concievable setting and even different Windows versions to try and get 3D vision to work.
M17x R4 A11 Modded bios
Dell 880M 8gb Modded bios
Windows 8.1 Pro 64bit
Even forced EDID driver for the SEC5044 (Samsung 120hz 1080p 3D)
But no dice with 3D vision.
Does this have something to do with 3rd party driver install that makes 3D vision refuse to talk to the driver because its been modded to work ?
Any knowledgable input would be greatly appreciated.