matthieuv
-
Posts
2 -
Joined
-
Last visited
matthieuv's Achievements
Curious Beginner (1/7)
0
Reputation
-
Hi Viktor, don't worry, this issue is related to a Mac OS update : the "spoof OS version" doesn't work anymore, you now need a patched version of "apple_set_os.efi", available on my dropbox : https://www.dropbox.com/s/edeypug0b7rc895/apple_set_os.efi?dl=0 Just copy this file on your EFI partition, in the efi/EFI/custom folder. At Mac startup, you'll see another icon to activate it, you'll need to use it at each Windows startup in order to see the iris Pro graphics. I'll update my video with this information soon, let me know if it works for you
-
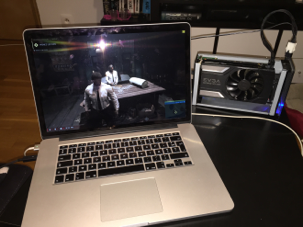
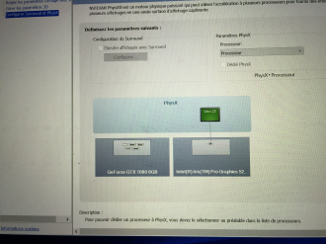
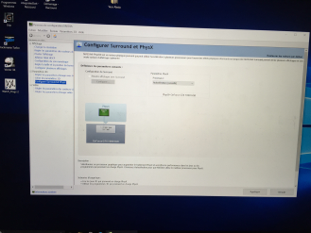
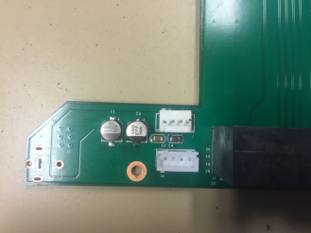
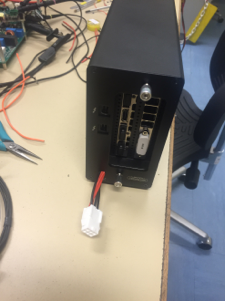
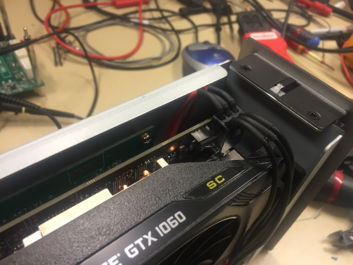
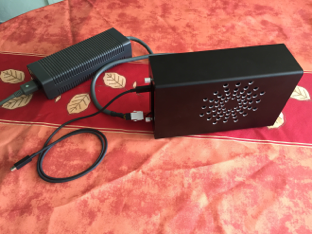
Hey guys, Let me introduce you my eGPU setup, realized on a 2013 15" retina Macbook Pro, model equipped with a dedicated GT 750M. I am using an Akitio Thunder2 PCIe enclosure and a EVGA Geforce GTX 1060 SC 6Gb. I wanted to use both internal and external display on my Mac. I was looking for information during weeks before buying it and wasn’t really sure if it would work as I wanted to. Many people are convinced that using the internal screen is impossible or way more complicated if the Mac has a dedicated GPU. I spend a whole week formatting and testing, using UEFI, BIOS, considering going back to Windows 7 (not for long)… I finally used Windows 10 UEFI, the programs rEFInd and GPU-switch and nothing else ! No need for an HDMI headless ghost or any program to spoof the number of screens. I made a video to show you the whole installation process, I hope that it will help: My GF did the voice acting as I wasn't convinced by my own If you prefer a text-based tutorial, here are the different steps: 1) Installation of Windows 10 in UEFI mode On the 2013 retina Macbook Pro, the SSD is a PCIe model. This seems related to the UEFI mode used by default when using the Boot camp assistant. If you don’t want to use it or are using another model of Macbook, you can follow this excellent tutorial to force the UEFI mode: http://fgimian.github.io/blog/2016/03/12/installing-windows-10-on-a-mac-without-bootcamp/ You just need to create a conventional partition and convert your table partition from “hybrid” to “protective”. By doing this, Windows will see a GPT disk instead of MBR. You just need to boot your USB drive on EFI mode. Once Windows is properly installed with the correct Macbook drivers (another reason to prefer the boot camp assistant), you need to go back to Mac OS. 2) Installing rEFInd rEFInd is a boot manager tool, like rEFIt or GRUB. Its first advantage is the ability to choose the OS without the need to press a key at startup. And the real reason why we are using it is to spoof the computer to allow Windows seeing the entire installed hardware. You can install refind from this link: http://www.rodsbooks.com/refind/ Then you need to activate this spoof ability by opening a terminal and typing these two commands: sudo mkdir /Volumes/efi sudo mount -t msdos /dev/disk0s1 /Volumes/efi Now, you can see your EFI partition in your Finder. Go to EFI/EFI/refind and open the file refind.conf with textedit. Search for the “spoof OS version” and remove the comment symbol # Reboot your computer and choose Windows on the rEFInd screen. Open your device manager, you’ll see your iGPU (intel iris pro graphics 5200) and dGPU (Geforce GT 750M) 3) gpu-switch GPU-switch can be downloaded from there: https://github.com/0xbb/gpu-switch Download the windows version, available in the description (direct link : https://github.com/0xbb/gpu-switch/releases/download/v0/gpu-switch-windows.zip ) Install Microsoft C++ redistributable (not sure which version do the trick, I’ve installed each version in x64 and x86 just to be sure) open the file integrated.bat with administrator rights, you should see the word “success” 4) GPU driver installation Not sure if this step is necessary but I’ve removed the dGPU driver before installing nVidia GeForce experience. The program DDU (Display Driver Uninstaller) is perfect for that. You can download it using this link: http://www.guru3d.com/files-details/display-driver-uninstaller-download.html Choose to uninstall and shutdown the computer, as you will install a new hardware indeed When your computer is off, plug the power supply to your eGPU, press the computer power button, wait for the chime and the rEFInd screen to appear, then plug your eGPU to the Macbook and launch Windows. If rEFInd is stucked, hold the power button until the computer is off. You should now see three graphics cards in the device manager, two of them not recognized at this point. Install nVidia GeForce experience and the latest nVidia driver. The GPU list will be updated at the end of the installation process. Re-launch GPU-switch and reboot. You don’t need to unplug the eGPU when rebooting. Now, your eGPU should have an error code 12, with unsufficient resources available. Just right clic on the dGPU (GT 750M) and disable it. Re-launch gpu-switch just to be sure (integrated.bat) and reboot. Just a last step and you’ll good to go Right click on the nVidia icon in your systray and open the configuration panel. Go to PhysX and set it to automatic instead of processor, like on this picture: That’s it, you can now launch your games on the internal screen or using an external monitor To switch between both, just plug the display on the eGPU and use the shortcut Win + P (Cmd + P on a Mac keyboard) to toggle between both screens. You can also duplicate them, it works, but don’t expect any kind of good performances doing this Now, the most important part, to avoid screwing your configuration: every time you go back to Mac OS, Windows will switch to the dedicated GPU (maybe also when turning off the computer, I’m not sure). For this reason, always re-enable the GT 750M before turning off the computer! Otherwise, you’ll get a black screen at Windows startup. Just follow this procedure when you want to use your eGPU: - Use gpu-switch to set the integrated GPU as primary - Disable the dGPU from the device manager - Turn off your computer or reboot - When you see the reEFInd screen, plug your eGPU and launch Windows - Play you favorite video game or launch your intensive GPU application (there are two schools) - Re-enable your dGPU from the device manager - Turn off your computer - Unplug your eGPU Now, some advices based on my little experience: If your end up with a black screen, you can restore Windows to a previous restauration point or remove the display driver. If you really can’t boot windows, using Parallels Desktop, you can boot your Windows partition from a virtual machine, then remove the display driver. At first, I was experiencing a game crash and the GPU fan running at max speed, when launching any sort of game. This issue was caused by the power supply connection, using an Xbox 360 S adapter with too thin wires These wires caused a voltage drop when consuming the 100W needed when playing a game (against 15W on Windows) About the electrical connections, here are a few pictures I’ve added a connector on the free PCB footprint to avoid soldering wires on the board. The cables are 0,75mm2 section and fits perfectly the original jack hole. About the PCIe power connector at the top of the graphic card, I had to cut it with a Dremel to fit the enclosure. You can find specific (and pretty expensive) cables on Ebay if you don’t want to modify one. For the ventilation, a colleague helped me cutting holes in front of the fan. I’m not sure to keep this solution, as some games make it very noisy. Let me know if this tutorial or the video did help you. Don't hesitate to ask for support if you want to do the same setup. Some websites are pretty discouraging about the concept of eGPU, the whole process is not pretty user-friendly but I'm happy to see that there is an active community growing each year !