


mcdudehouse
-
Posts
9 -
Joined
-
Last visited
Content Type
Profiles
Forums
Downloads
Posts posted by mcdudehouse
-
-
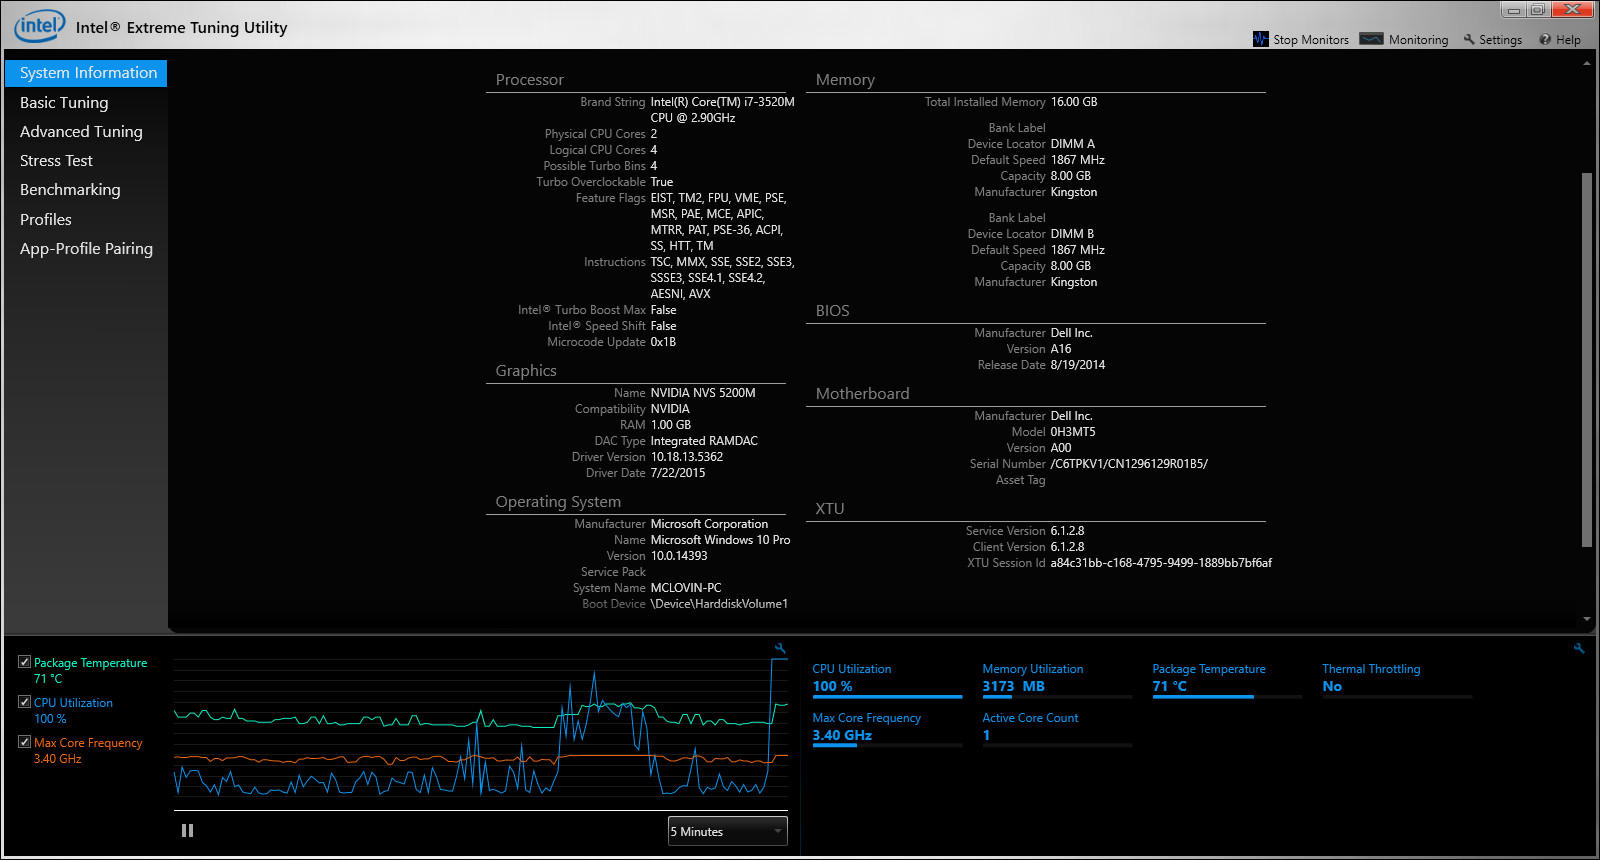
Okay folks. I'm back. I found an i7 3520m e6430 for $85!!! So I put my i5 on hold for now.
Specs:
E6430
i7 3520m 2core,
nvs5200 dgpu, Kingston hyperX 1866 16gb, Samsung 850 SSD, 130w Dell PSU (not recognized)
Here is my problem now... BCLK OC only works when speed step is disabled, but turbo boost does not work. Can I enable turbo boost with BCLK OC? How?
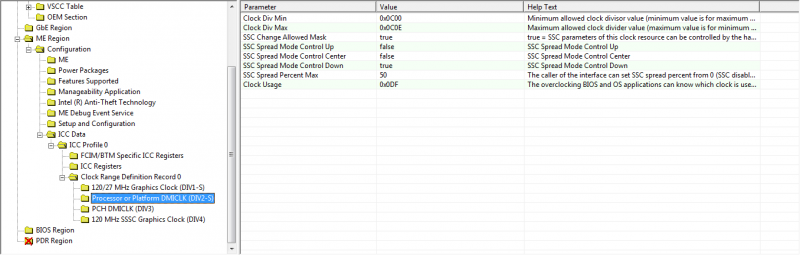
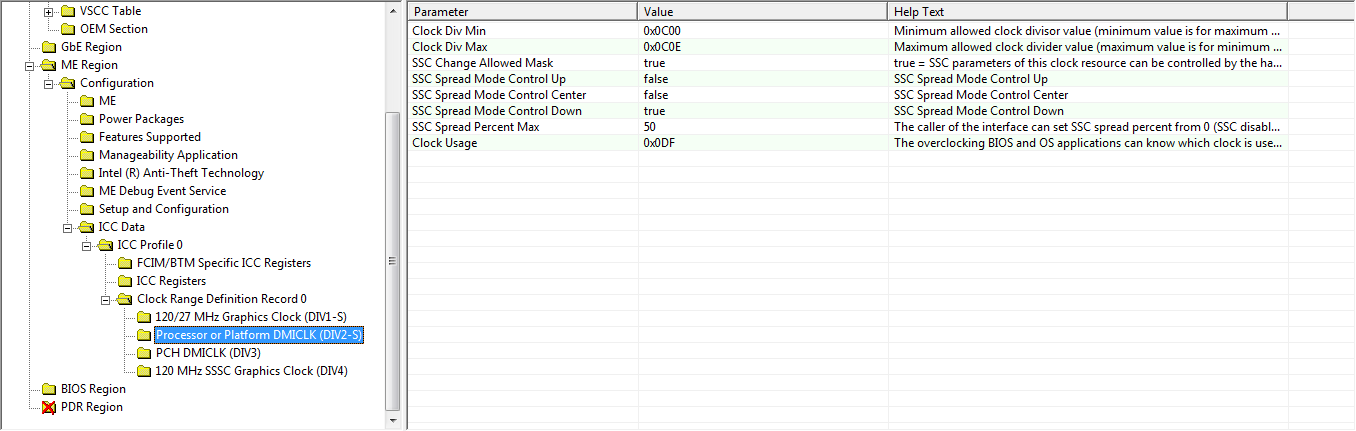
I have enabled lots of EFI variables but none have fixed this. In FITC div clock is at 0X0A00 clock usage at 0X007. Everything else is unchanged aside from the flash descriptor.
I don't know if I have the right FW Bringup Guide, does anyone have a link for the 8.1.10.1286 version?
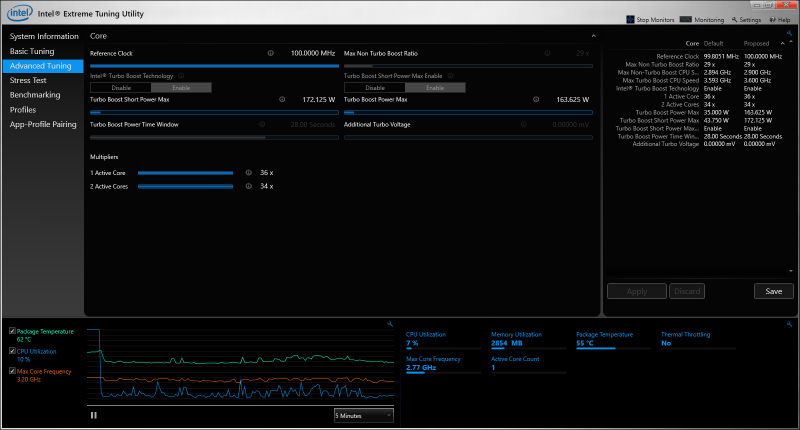
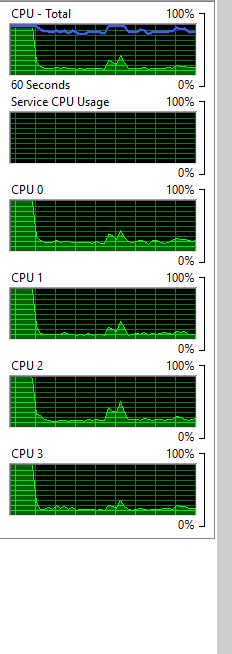
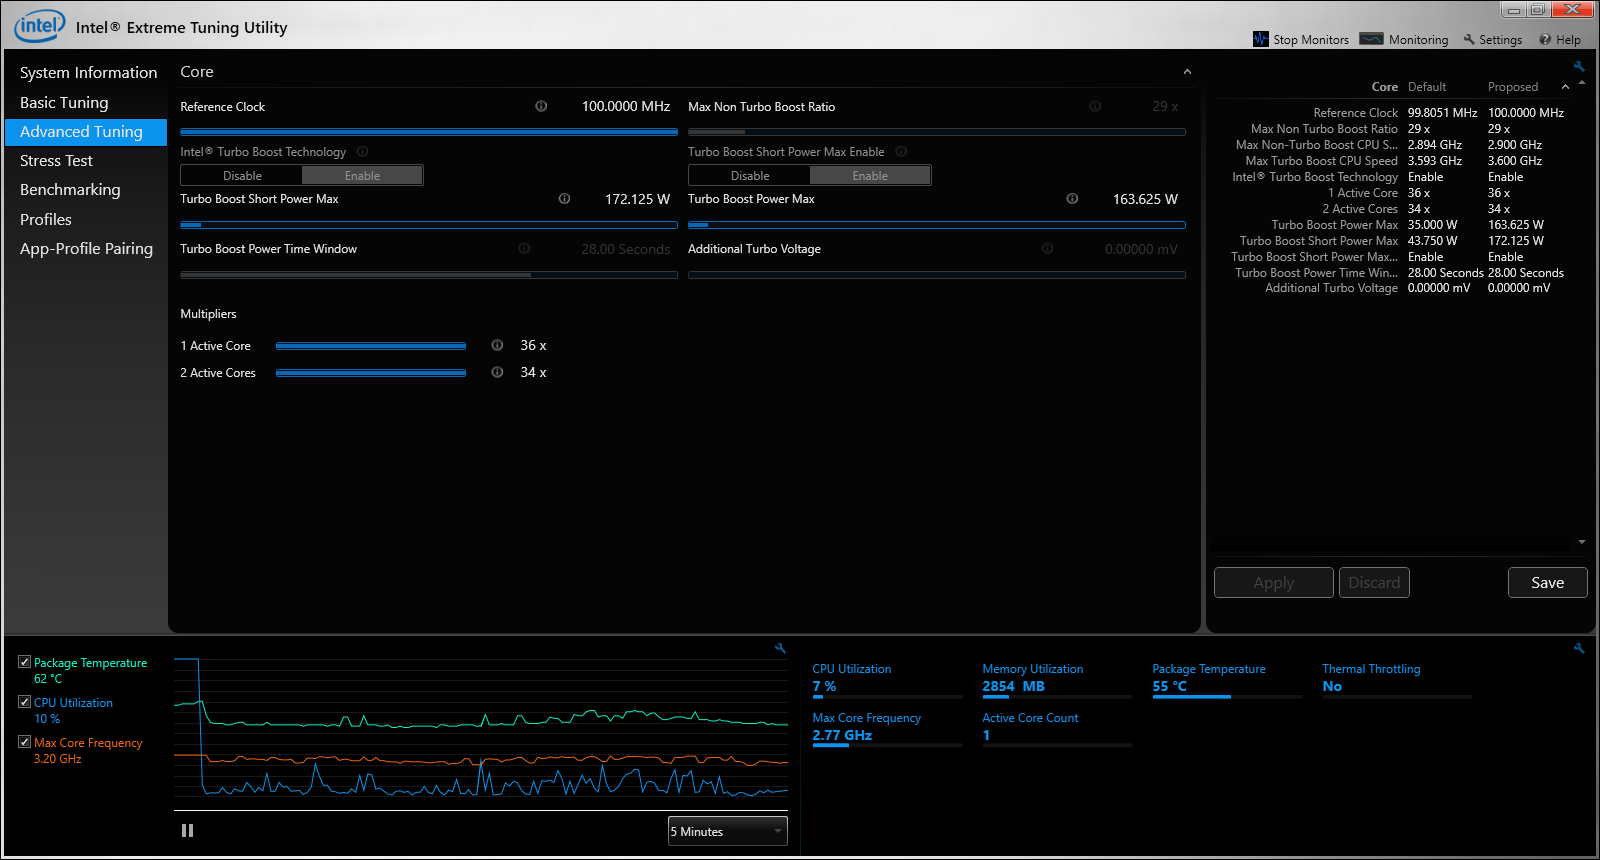
Also, XTU shows only one core is active during benchmarks of any sort... is this just a glitch with XTU? In the task manager it shows both cores working +HT.
It does run okay with speed step on, but it is really annoying when the cpu clocks down...
I have used MSI Afterburner, and Nvidia Inspector, and they will not overclock the dGPU. The settings just revert. Help please! In all tests it runs at 202mhz! Yuck!
My battery will not charge on the 130w PSU, it will not recognize the PSU. I have tried everything I can find online, no solution.
Am I going to need to buy a dell certified 90w PSU to make my battery charge? Is the PSU not allowing the dGPU to OC?? Is there an EFI Var that I can change?
The speakers are not detected, and the headphone jack is not detected. BluetoothBluetooth works though. I have tried resetting/reverting/deleting/reinstalling my battery drivers, wireless drivers and sound drivers.


-
You said the i3 turbo cannot be overclocked... I have an i5 3210m rated for 3.1 ghz. Or was that just a typo? In the FITC photo I attached it has a div clock adjustment. I cannot find the EFI Var to change it
I am actively looking for a cheap i7 at the local laptop recycle, but may have to wait a week or two or ten.
Thanks for the IFR link. I am updated to the A18 bios, so should I switch back to A07 or did Ram and BCLK OC vars stay the same? Or is there an IFR for A18?
Is there a straight forward resource on how to create my own IFR?
-
On 11/14/2015 at 9:48 AM, kondilac said:
Finally, i reached "adult" status on this board, and now i can post by myself

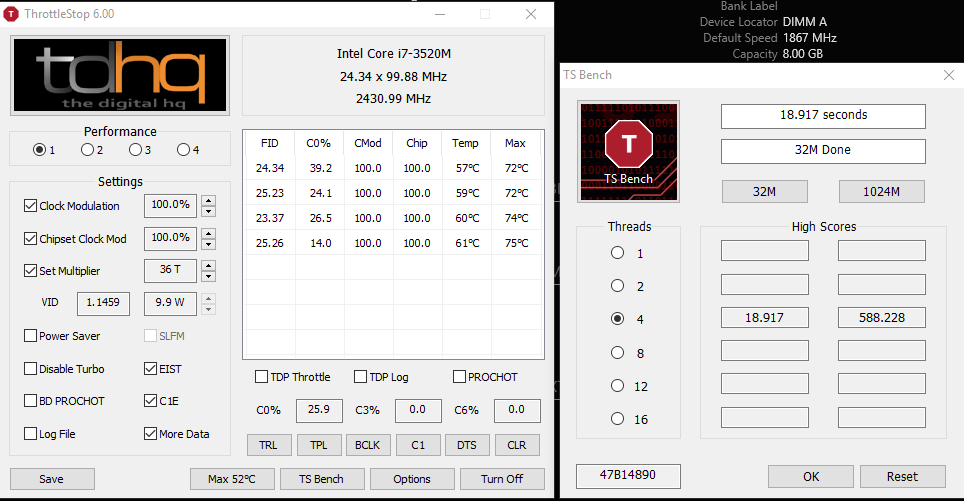
I successfully upgraded the SB i3, to an IB i5-3230M for 15$. Since my HyperX 2133Mhz kit is already migrated to the Dell, the first boot revealed that the memory controller of the i5 cant cope with the PnP (JEDEC) 2133Mhz @CL11. I locked the memory speed down to 1600Mhz CL11 , replacing one of the kingstons with a samsung module, just to be able to check the new CPU is working properly. Yes it does, and a little bit of TSBench revealed that it does outperform my Haswell-ULV on the same clock not only with lower power consumption (15.1W thanks to the Haswells IVR and integrated PCH VS 10.9W) but a 32M TSBench completes almost a second faster. The Haswell system has a very lean w8.1 x64 install, and the Ivy has a bloated w7 x64. (no throttling occurs, both cpus are running @2.4Ghz during the whole bench)
The other thing which makes me very happy that when C-states are disabled in the bios, i can still toggle C1E using Throttlestop for the Battery profile(I was able to do the same on 1st gen. Core i anno, but unable to do it with 4th.gen.), and although it does not enable C3, C6 and C7, but still has a substantial impact in idle power consumption (3.1W vs 7.1W). And the advantages of disabled C states in my usage scenario is huge, so the ~+1W power consumption when idling is a fair trade-off for me.(This i5 idles around 2.5W with all C states enabled, although i have not tinkered with the settings so far to see if this can be reduced)
The next thing on my list is finding the limit of the memory controller, but i'll have to dig into the topic deeper... My kit is a Kingston HX321LS11IB2K2/16, if anybody with the same kit would share their settings that would be great.
UPDATE: Using EFI variables (Thanks timohour for the extract of A16 BIOS), i was able to lock the memory freq. to 1866, so my kit is running in dual channel 1866Mhz 10-11-12-30 CR1. This could be useful for some other folks too, when the automatic freq. configuration makes the system unusable, but one can get into the one-time boot menu (F12 during Dell logo). Unfortunately my machine wont even get to POST when the auto memory frequency configures the sticks to run @ 2133. Also, changing boot mode from Legacy to UEFI when one wants to mangle with EFI vars is unnecessary, because even in Legacy mode there is option to boot into the EFI shell from the USB drive. I guess SecureBoot still has to be disabled, but i will check.
Setting: Memory Frequency, Variable: 0x1E6 {05 A6 12 04 13 04 D1 01 02 00 E6 01 10 10 00 00 00 00 00 00 00 00 00 00 00 00 00 00 00 00 00 00 00 00 00 00 00 00}
0x60BA3             Option: Auto, Value: 0x0 {09 0E BE 02 30 00 00 00 00 00 00 00 00 00}
0x60BB1             Option: 1067, Value: 0x1 {09 0E 14 04 00 00 01 00 00 00 00 00 00 00}
0x60BBF             Option: 1333, Value: 0x2 {09 0E 15 04 00 00 02 00 00 00 00 00 00 00}
0x60BCD             Option: 1600, Value: 0x3 {09 0E 16 04 00 00 03 00 00 00 00 00 00 00}
0x60BDB             Option: 1867, Value: 0x4 {09 0E 17 04 00 00 04 00 00 00 00 00 00 00}
0x60BE9             Option: 2133, Value: 0x5 {09 0E 18 04 00 00 05 00 00 00 00 00 00 00}
0x60BF7             Option: 2400, Value: 0x6 {09 0E 19 04 00 00 06 00 00 00 00 00 00 00}
0x60C05             Option: 2667, Value: 0x7 {09 0E 1A 04 00 00 07 00 00 00 00 00 00 00}
There is another EFI var that for DIMM2 (the top slot) but it does not need to be modified if running dual chanel, because the freq, and timings will be determined by the module with the worst capabilities. I've also noticed that there is something wrong with the values, because this should be only 8 bit, instead of 12 (?!)
Setting: Memory Frequency, Variable: 0x1E7 {05 A6 12 04 13 04 D2 01 02 00 E7 01 10 11 00 00 00 00 00 00 00 00 00 00 00 00 00 00 00 00 00 00 00 00 00 00 00 00}
0x60C3B             Option: 1067, Value: 0x42B {09 0E 14 04 00 01 2B 04 00 00 00 00 00 00}
0x60C49             Option: 1333, Value: 0x535 {09 0E 15 04 30 01 35 05 00 00 00 00 00 00}
0x60C57             Option: 1600, Value: 0x640 {09 0E 16 04 00 01 40 06 00 00 00 00 00 00}
0x60C65             Option: 1867, Value: 0x74B {09 0E 17 04 00 01 4B 07 00 00 00 00 00 00}
0x60C73             Option: 2133, Value: 0x855 {09 0E 18 04 00 01 55 08 00 00 00 00 00 00}
0x60C81             Option: 2400, Value: 0x960 {09 0E 19 04 00 01 60 09 00 00 00 00 00 00}
0x60C8F             Option: 2667, Value: 0xA75 {09 0E 1A 04 00 01 75 0A 00 00 00 00 00 00}
UPDATE2: I was also able to boot into windows @2133 CL11-12-13(factory) , when manually setting EFI var 0x1EF (Nmode) to 2N instead of auto. Using 2N mode improves stability, but 1N offers the maximum performance. Memory bandwith R/W/C was around 28k/30k/28k Mb/s. Before running a GFX bench to check for iGPU instability, i've restarted the system. Tried to restart, to be exact, because this functionality is lost, but there are some other settings available in the bios at the memory section, so maybe this could work out better than loosening the timings. I will continue to experiment tomorrow, until then i've reverted back to 1866, which is stable with the factory (tight) timings.
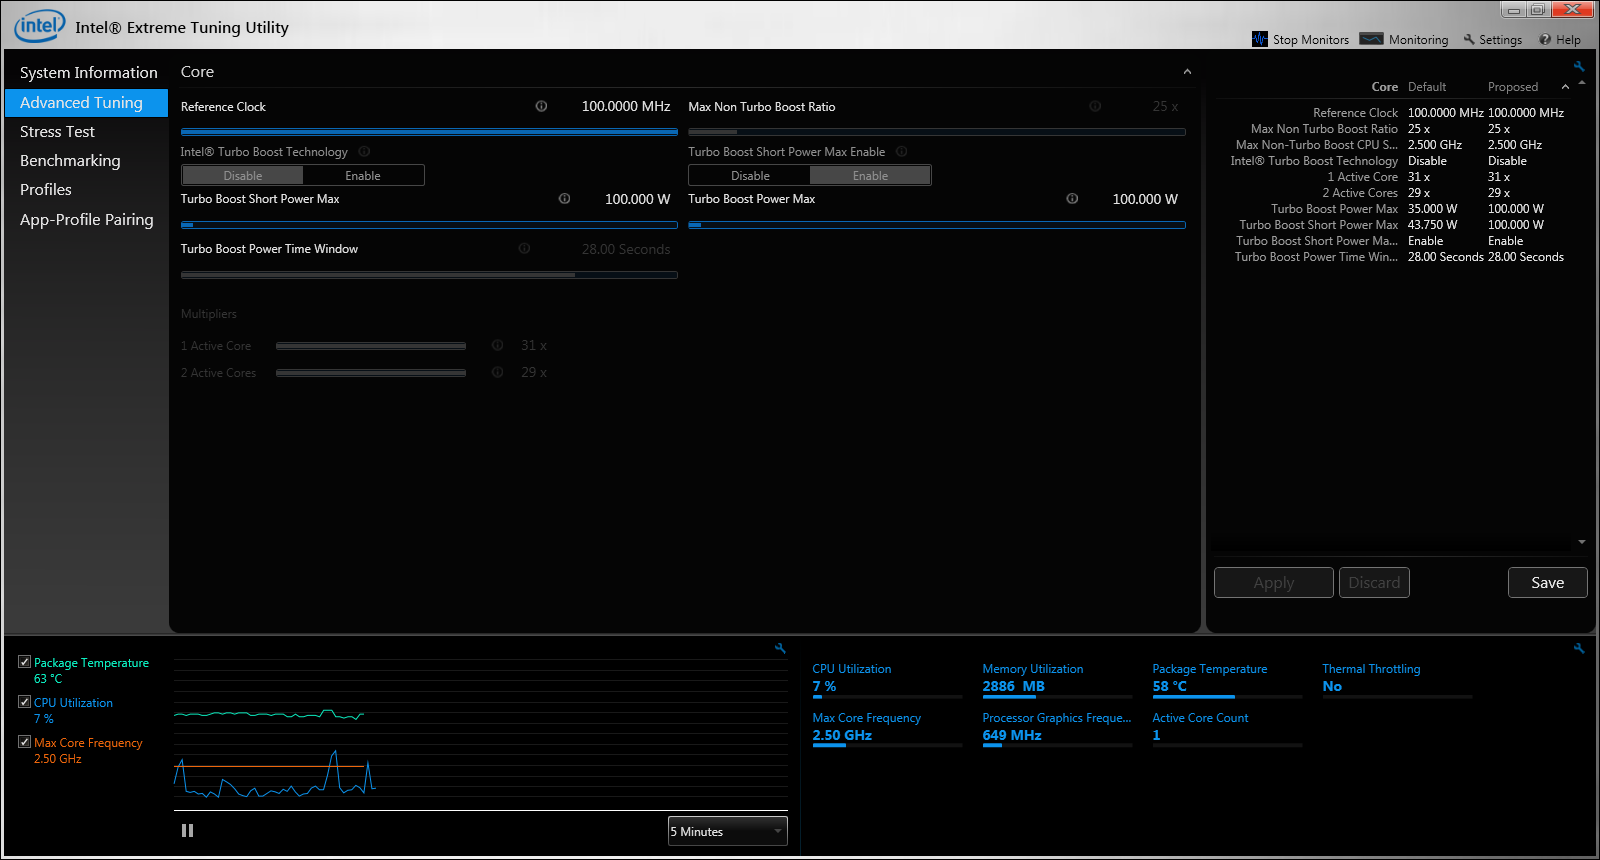
Where can I find a table with all of these EFI var commands regarding Ram OC and BCLK OC. Also, how are you guys finding them (as I am here to learn)? I just realized that I have an i5 3210m, I believe the max turbo boost is 3.1ghz, but the XTU slider is stopped at 2.5ghz... Should I disable turbo boost in the bios once I get the slider unlocked? Is is possible to unlock the turbo-boost enable/disable function in XTU?
As of now, I would like to squeeze 1866mhz out of my ram and max out the CPU. I have corsair vengeance CMSX8GX3M2B1600C9 8gb 1600mhz 1.35/1.5 dual voltage ram.
Is this ram even worth messing with? If its more work than it is worth, say the word! I will switch back to my Kingston 16gb HyperX 1.35v 1866mhz ram, but I have to pull it from another computer. I don't know much about ram OC but if I need, wouldn't I be able to adjust the Kingston module to run at a higher voltage?
Also, will I have to change the efi variables for the graphics clocks in FITC for dGPU overclocking? If so, which folder in fitc controls the dGPU?
Finally, if I copy the bios after setting Ox1EE to 0x2 will it show up in FITC?
Sorry for so many questions... I should probably be named McNoobHouse. Thanks for bearing with me.
Oh one last thing, I read it somewhere but it is hard to sift through 28 pages to find it. What is the safest way to flash the new FITC image to the bios? Which image do I use?

-
On 9/23/2015 at 11:22 AM, timohour said:
You are right... You are right, this is not at all helpful. I assume you already unlocked your Descriptor.
If you not, open your image.bin in a Hex Editor (I use HxD) and apply the change you describe above...
Save the file and flash your new descriptor using fpt.exe in a bootable DOS disk using the command
fpt -desc -f [I]editedimage.bin[/I]Using -desc is to verify that you are only flashing your descriptor region...
Now that your descriptor is unlocked keep your original BIOS in a safe place (in case you need to return it for warranty issues or sell it) and open your unlocked edited image in FITC.
In the album below you can see that the PCIe Port Configuration is in PCH Strap 9. Originally 00 is selected (4x1 ports 1-4 (x1)). To set your port 1 @ x2 you should select 01 (1x2, 2x1 Port 1 (x2), Port 2 (wifi disabled), Ports 3,4 (x1)).
After selecting press OK go to menu Build and select Build Image (or press F5). After the build completes go into the FITC folder and there is going to be an outimage.bin created. This will be the full bios with your new Descriptor settings. Flash it and you are good to go...
(Optional: If you want only the descriptor region because there is limited space on your DOS disc, you can reopen the new image using FITC and inside the FITC folder you will find a new folder with the name of your bios image. Inside the Decomp folder you will find a 4K Flash Descriptor.bin you can use to flash your descriptor using the command I gave you above)
On 9/23/2015 at 11:22 AM, timohour said:Your WiFi port will be disabled but you can connect your WiFi under the WWAN port 5 which will be enabled (tested and working)
I am having trouble loading my bios.bin file into FITC since it requires xml. Do I need to convert my bios.bin into an xml file? Or is my bios already loaded up when I open fitc? If I have to convert, what is the easiest way?
Can you be more specific about connecting WiFi under the WWAN port 5? Are you saying to plug the WLAN card into the WWAN port or the half mini pcie port? Or are you saying to make an adjustment in FITC.exe?
Also in your screenshot you have your PCIe configuration 1 set to 10: 2x2
In the write-up it says PCIe should be set to 01: 1x2
Wouldn't you be running the x2.2 with the 10: 2x2 setting?
Thanks!
-
So I got the flash descriptor permanently unlocked! I just had the flash drive set up like a dummy... Thanks aldimeola81!
For anyone else who stumbles across this: I screwed up by not moving the fpt application from the file ME FW FLASHTOOL\ME(1.5M_8.1.10.1286)\Tools\System Tools\Flash Programming Tool\DOS to the root of my usb drive. Dumb mistake, but leave it to me to make them.
Permanent EFI SHELL:
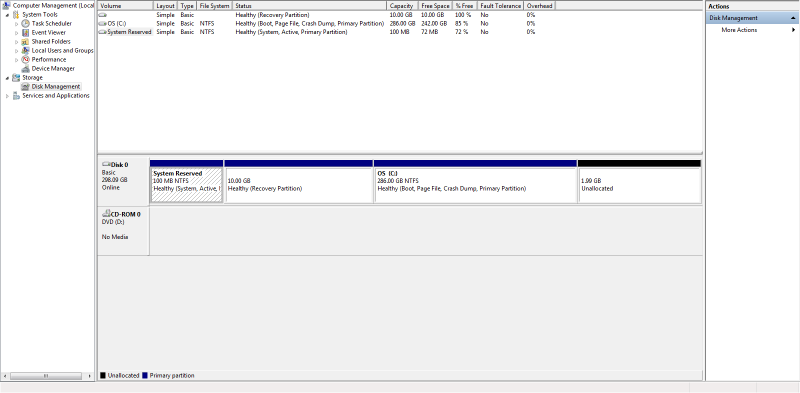
Now I have come to another snag. Attached is a screenshot of what my hard drive looks like. Any suggestions for me for making the permanent EFI shell work? This is how I got the hard drive... Two system partitions!? There is no EFI partition. I get the feeling that creating a new fat32 partition and setting up the EFI SHELL on it is gonna ruin my day. I read somewhere how to erase the old partitions with diskpart when your system crashes, but in this instance I think I may have to reformat. Suggestion? Will it work to simply ad another partition? On another note (this is probably too soon), I picked up some corsair vengeance 1.5v 2x4 1600mhz ram. (CMSX8GX3M2B1600C9) I was in a pinch, and have heard that you can still tweak it. Has anyone messed with this? I assume once I can change my uefi vars that I will be able to set the timing. If not, I don't mind swapping ram with my other computer for the hyperX 1866 1.35v...
-
Awesome, I'll give it a go when I get home. I would prefer not to buy a quad core, at least not yet... This is just my budget computer for school, but I would like to try getting a decent framerate on medium setting for games. I actually do more charting and things of that nature, but I believe the nv5200 can provide decent graphics as long as I can keep it cool.
Last week I put 1.35v kingston 1866mhz ram and it ran fine, but would not hold clock over 1600mhz. I had the sticks laying around so figured why not. Ill be back with an update after messing around with the flash descriptor some more.
Thank you!
-
On 9/24/2015 at 0:43 AM, timohour said:
OK this is almost perfect... I love it! Just needs some corrections
UPDATE: Check the corrected post above.
You don't need to unlock your Flash Descriptor to make UEFI variable modifications. Add here the ability to set port 1 or port3 to x2 mode. Ok, After booting with the paperclip "Boot to FreeDOS on startup using the USB (Press F12)". Use the command
fpt -d image.binto store a full image of your BIOS.
If you reboot the laptop you don't have to apply the pinmod again. If you shutdown and then startup you need to redo the pinmod again to enablel writing to the Descriptor region. This precedure is part of the Permanently Unlocking Descriptor... the image.bin you obtain after your first boot is the original BIOS. This is maybebe my mistake, the command isfpt -me -f yourimage.bin
At this moment you load your BIOS image (or your Descriptor region only)
You can change the UEFI vars without unlocking your Descriptor Hope you don't mind I will make the corrections in the table.Hey guys, just picked up my 6430 i5 3320 nv5200.
I am having an issue unlocking the flash descriptor. I apply the pinmod, boot to free dos, and when I type in any "fpt" commands, I get the bad command or filename response. Is there a particular way to set up the flash drive? I installed hex editor on the flash drive, but hxd commands don't work either. Is there a particular way to load fpt onto the flashdrive?
Also, after applying these bios mods, is there a way to control the fan speed? How much more can I get out of this 2-core i5? I would like to clock somewhere in the 3.2ghz realm. Is that feasible? And will the CL12 2133 Kingston pnp memory clock well with the i5?
-
I too cannot believe that there is no way to manually adjust the fan speed! I have tried all of the above, and have been searching for some time, but cannot find a way to make it work... Is it true that the e6430 is incapable of manual fan speed adjustments?

14" Dell Latitude E6430 - Performance Upgrades and System Mods
in Dell Latitude, Vostro, and Precision
Posted · Edited by mcdudehouse
Dang. So I am assuming changing ACPI variables havent changed a thing? If anyone has found the magic hack to bypass the dumb
I dont know what happened here, could a MOD delete this post? It erased a good chunk of it and I figured out what I need to know...