


angerthosenear
-
Posts
551 -
Joined
-
Last visited
-
Days Won
10
Content Type
Profiles
Forums
Downloads
Posts posted by angerthosenear
-
-
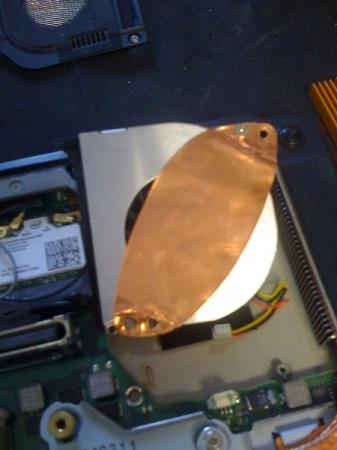
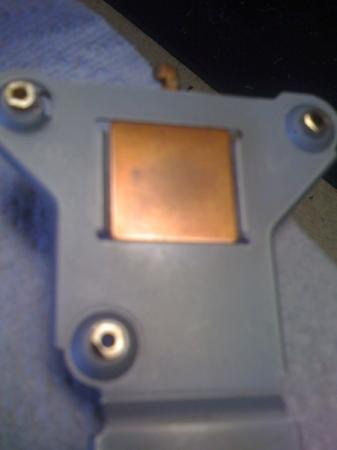
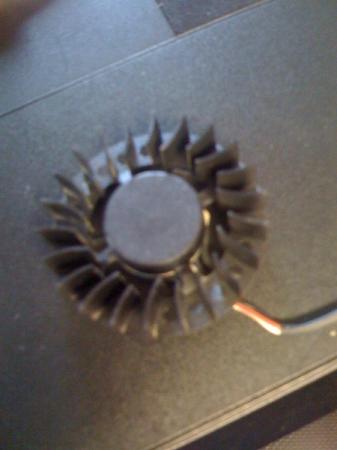
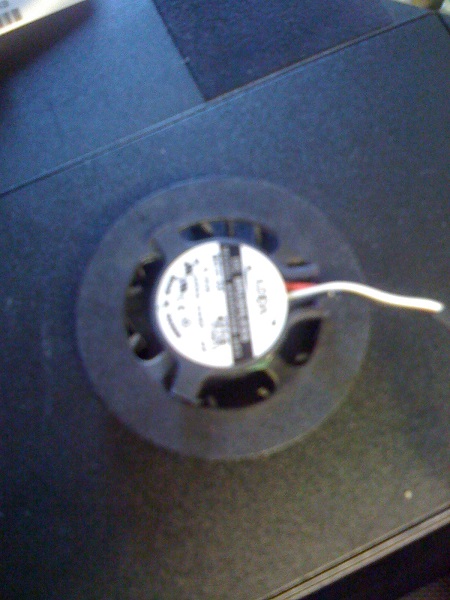
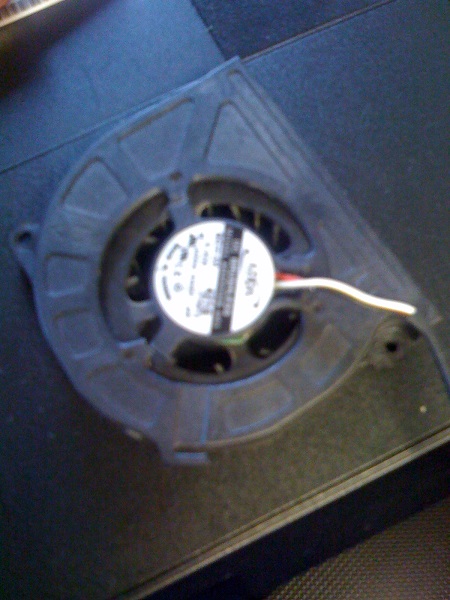
Here are pics of my offset plate mod:
After seeing this:
http://forum.techinferno.com/alienware-m17x/3479-m17x-cpu-fan-upgrade-mod-2cfm-10-4cfm.html
I hunted around for a similar style fan, and found one!
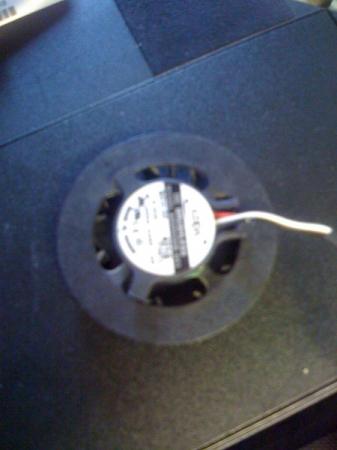
Now to make it fit (since the housing type is completely different I modified my old shell)
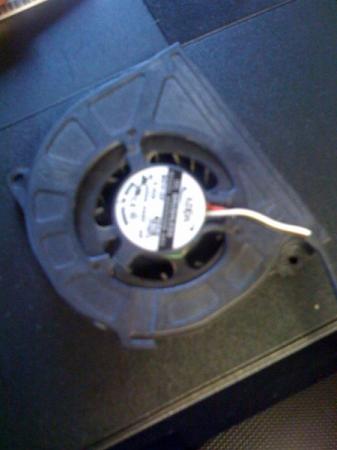
Used some index cards as spacers, glued it in, and it works great!
I also pulled the PWM pin out for full fan speed, and the temps were insane.....ly great!
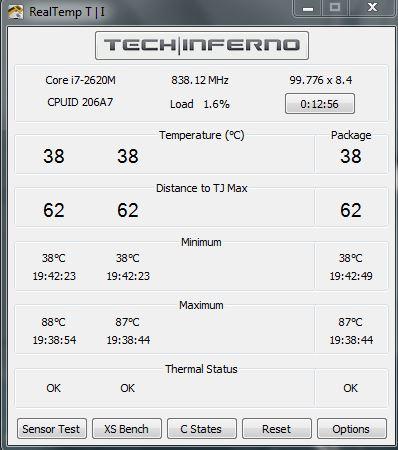
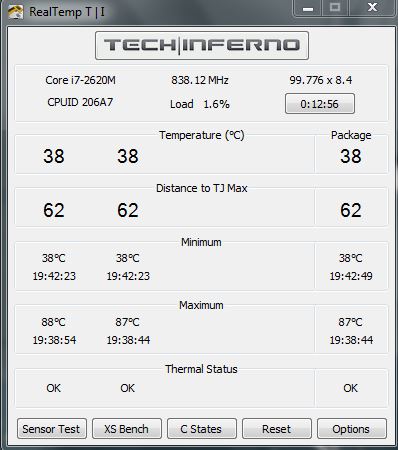
This a few moments after running a TS Bench 4 thread 1024M test.
After reattaching the PWM pin, it is just a smidge under it's previous temps, but more effective at the high end.
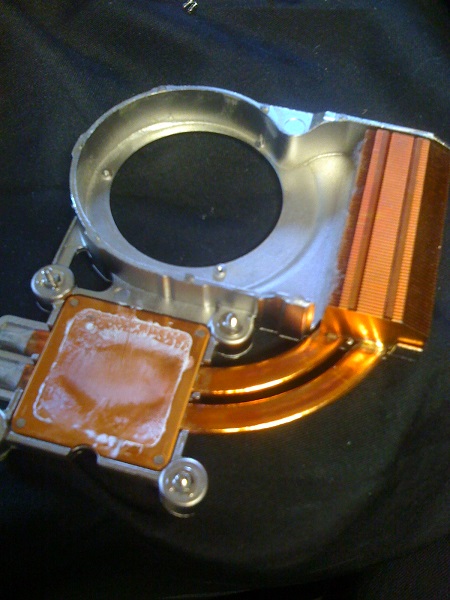
As for what I pulled the fan out of.... Let's just say I would love to cram it in my laptop. The CPU plate is on the wrong side, but the shape of the radiator is perfect, and the pipe shape is great. I just don't have experience doing this.

More concern now though:::
Where my heatsink makes contact to the CPU and dGPU looks like ... really bad.
I attempted to take some pics with my phone (potato quality camera):
CPU side:
dGPU side:
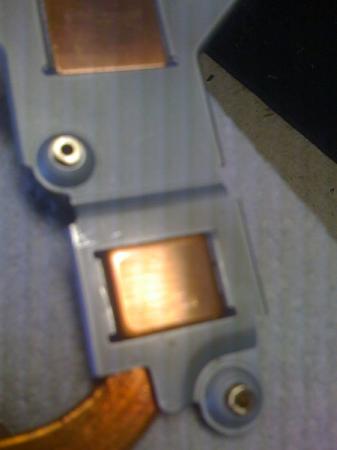
In case it isn't too clear. The pads are pitted and pretty scratch up. Even looks like some burn marks...
What should I do?

-
Please ask for support in the main DSDT Override or DIY eGPU Experiences Thread.
I have been out of the eGPU realm for too long to provide adequate support.
Here is a guide to performing a DSDT override with hopefully less misery, and setting up your computer to have your iGPU, dGPU, and eGPU working at the same time! Oh boy this is going to be fun.
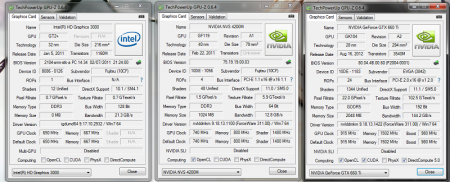
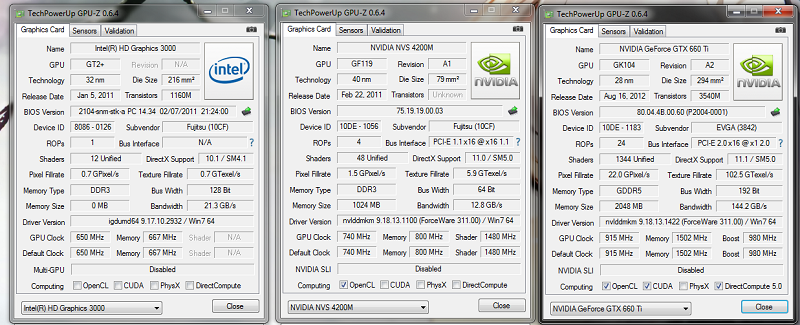
This is my system specs (Fujitsu T901):
i7-2620M
16GB RAM
NVS 4200M
GTX 660 Ti
Windows 7 Enterprise x64
Now it begins..
Disconnect your eGPU until I say so.
If you can, you should perform a DSDT override. The method shown in the official thread was really hard at
How to perform a DSDT override:
SpoilerGet the 'DSDTEditor-Linux-Mac-Win.7z' here:
(source: olarila.com • View topic - DSDT editor and patcher) I included the asl.exe file required as well to the zip in with the program's folder.
1. Run DSDT Editor.bat
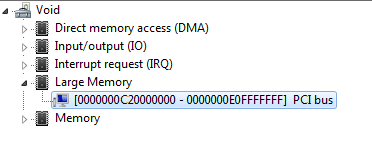
2. File -> Extract DSDT
3. Wait a bit, then click 'Device PCI0' - it should be just after your Processor.
4. Scroll down until you see your DWordMemory stuff, go to the bottom of this list.
5. At the bottom add:
0x0000000000000000, // Granularity
0x0000000C20000000, // Range Minimum
0x0000000E0FFFFFFF, // Range Maximum
0x0000000000000000, // Translation Offset
0x00000001F0000000, // Length
,, , AddressRangeMemory, TypeStatic)QWordMemory (ResourceProducer, PosDecode, MinFixed, MaxFixed, Cacheable, ReadWrite,6. I made it look nice and pretty after pasting that in (made it match).
(These next steps are optional I think, I have no idea if they are necessary, but I did them.)
o1. IASL -> Compile (or hit F5)
o2. Fix errors if you have any.
(Back to important stuff.)
7. File -> Save DSL as..
(I named mine dsdtoverride.dsl - I will use this name for future steps - I would put this file in the DSDT program directory with asl.exe and iasl.exe)
8. Close the DSDT editor.
9. Open up command prompt (maybe as admin? probably a good idea).
10. Go to where you saved your dsdtoverride.dsl (in command prompt).
11. In command prompt run:
iasl dsdtoverride.dsl
(Make sure the previous command made a .aml file. It may have made the name as dsdtoverride.aml, but mine was dsdt.aml)
12. Then run
asl /loadtable dsdt.aml
Reboot and check for a 'Large Memory' section in Device Manager -> Resources by Connection -> Memory
See the official DSDT override post for more info: http://forum.techinferno.com/diy-e-gpu-projects/7476-%5Bguide%5D-dsdt-override-fix-error-12-a.html#post102517
Now for the fun part........
- Disconnect your eGPU
- Uninstall ALL (ALL MEANS ALL) (dGPU included!!!) Nvidia drivers (keep the Intel graphics driver)
- Use Driver Sweeper and check all the Nvidia options, run, reboot, turn off computer -- don't install the driver for the dGPU yet
- Connect eGPU and go to Setup 1.x
- Set your eGPU port to G2 (assuming your have an adapter that supports G2, and your computer as well - if not, then skip setting the port to G2)
- dGPU off
- 32-bitA compaction for iGPU eGPU
- chainload to your OS
- Windows may yell at you to reboot due to hardware changes, don't quite yet
- Check device manager, you might (I did) have error 43
- Attempt to install the latest Nvidia drivers for you eGPU -- still don't install drivers for your dGPU
If your lucky, it will install, if not:
- shutdown/reboot
- Setup 1.x
- do the same as before (dGPU off and such)
- Attempt to install the Nvidia drivers again for your eGPU
- After a few hours of fiddling around, you should get them installed
- (keep your dGPU off this whole time)
- ONLY AFTER YOU GET YOUR eGPU DRIVERS INSTALLED!!
- (and as such, error 12 in device manager)
- Go to Setup 1.x
- Set port G2 on your eGPU port (again, if you support G2)
- 32-bitA compaction for iGPU dGPU eGPU (or choose 36-bit if you performed a DSDT override)
- chainload
You will probably get the reboot due to new devices again, but before you do, check device manager
Might have a generic VGA device or something instead of the NVS 4200M
Attempt to install the drivers for you dGPU now
If no luck, reboot and do the same Setup 1.x as before (with dGPU on)
Attempt to install dGPU drivers again
Reboot after you get your dGPU drivers installed
Keep the same Setup 1.x method
If your lucky you should have your iGPU dGPU and eGPU show up fine in device manager.
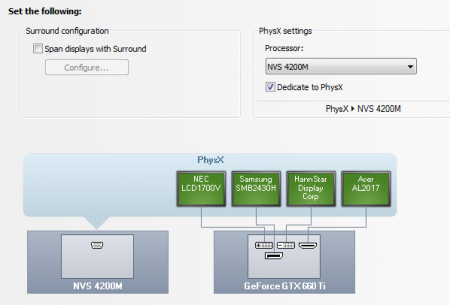
You can go to the Nvidia control panel and dedicate your dGPU as your PhysX processor, it works really well. (If you play stuff that supports PhysX and have an at least somewhat useful dGPU)
------------------------------------
I hope this helps.
^ over 20 hrs of fiddling around well spent ;-;
------------------------------------
HOW TO: Update drivers (probably):
Spoiler1. Open device manager
2. Right-click your eGPU and click uninstall.
3. Reboot as you would normally if you had your eGPU all working happy.
4. You hopefully will have your eGPU show up in device manager after reboot (probably with error 43 ?)
At this point you should have your iGPU and dGPU working fine (no errors or yellow warning flags), and you eGPU showing up but with the yellow error flag)
5. Right-click your dGPU and click uninstall, and check the box to delete the driver as well.
IMPORTANT: Your dGPU should now NOT be in the list in device manager (DO NOT CLICK "Scan for hardware changes"). And your eGPU should still be in the list with the yellow error flag.
6. Extract your driver update (default to C:\NVIDIA\* ), close the auto run installer thing.
7. Right click your eGPU in device manager and click "Update Driver Software..."
8. Select browse computer for driver.
9. Select the NVIDIA folder created in step 6 (or since you probably have old drivers, go inside that folder and click the version of the driver you are trying to install.
10. It should start installing at this point, just wait for a bit.
11. Hopefully it installs correctly / no issue. Should ask to reboot, go ahead.
12. Upon reboot your eGPU should be working, but time to fix the dGPU (should have some generic drivers installed on boot.
13. Similar to the eGPU, for the dGPU select the 'Update Driver Software..." option in device manager and pick the current notebook driver for your dGPU.
14. Should install successfully and ask to reboot, go ahead.
15. Done.
Note:
You can check your driver version for both your eGPU and dGPU in the System Information dialogue box under 'Help' in the NVIDIA Control Panel (you can even check your Bus here too (PCI Express x1 Gen2 as shown for my eGPU).
Results:::::
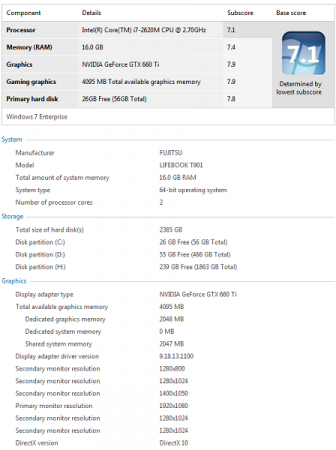
iGPU + dGPU + eGPU
dGPU PhysX dedicated:
WEI:
ALL THE MONITORS (and all different resolutions too
 ):
):

Weeee~~~~~~~~~~~~~~
Check out a video here:
-
 12
12
-
On a gen1 link you will notice a performance loss. On gen2 you probably won't unless you are playing something super intensive. You should be able to run something like Borderlands 2 on Ultra with little issue. It should run even with a high temp. Even before some of my cooling modifications, my CPU was in the 90s C and I still wouldn't see a significant performance hit.
-
If that is all you are doing, getting the Intensity Shuttle for USB 3.0 would probably be a better option. Certainly cheaper than a whole eGPU project, and it would be widely compatible.
-
I used to take off all the bottom covers and set the laptop on a box fan. It worked, but it isn't what you call portable.
I'm actually designing how to add a 2nd fan and some more heatsinks to cool this thing down. I should have some results up this weekend.
-
DSDT - If it is not required for your system then don't worry about it.
You really need to set the port to G2, it will help SIGNIFICANTLY overall. I suffer with high temps too. I normally don't have issues with it though. Try the x1.2 first and see if that helps.
-
'video streaming' -> will you be doing video editing or just video playback?
'HP laptop' -> what model laptop? does it have a dedicated GPU (dGPU) ?
Give a little bit more info and I can give you some suggestions.
-
I talked unsuccessfully with lenovo tech support today. I asked what type of connector the fan module has: "the ultrabay" I asked how it is powered "by the motherboard"
I did find the user manual for it though, it appears to just be a SATA connector. Can someone verify it is only SATA? If so, it might be possible to have both the fan module and a HDD side by side.
-
Oh my, I totally made this post wrong..... (I guess over 14hrs of writing English papers does this to ya).
I have the QM67 Chipset...
Which on the Intel page:
Compatible Processors
- Intel® Core™ i7-2720QM Processor (6M Cache, up to 3.30 GHz)
- Intel® Core™ i5-2540M Processor (3M Cache, up to 3.30 GHz)
- Intel® Core™ i7-2630QM Processor (6M Cache, up to 2.90 GHz)
- Intel® Core™ i3-2310M Processor (3M Cache, 2.10 GHz)
- Intel® Core™ i5-2410M Processor (3M Cache, up to 2.90 GHz)
- Intel® Core™ i7-2820QM Processor (8M Cache, up to 3.40 GHz)
- Intel® Core™ i5-2520M Processor (3M Cache, up to 3.20 GHz)
- Intel® Core™ i7-2620M Processor (4M Cache, up to 3.40 GHz)
- Intel® Core™ i7-2920XM Processor Extreme Edition (8M Cache, up to 3.50 GHz)
- Intel® Core™ i3-2330E Processor (3M Cache, 2.20 GHz)
- Intel® Core™ i3-2330M Processor (3M Cache, 2.20 GHz)
- Intel® Core™ i3-2350M Processor (3M Cache, 2.30 GHz)
- Intel® Core™ i5-2430M Processor (3M Cache, up to 3.00 GHz)
- Intel® Core™ i5-2510E Processor (3M Cache, up to 3.10 GHz)
- Intel® Core™ i7-2635QM Processor (6M Cache, up to 2.90 GHz)
- Intel® Core™ i7-2640M Processor (4M Cache, up to 3.50 GHz)
- Intel® Core™ i7-2670QM Processor (6M Cache, up to 3.10 GHz)
- Intel® Core™ i7-2710QE Processor (6M Cache, up to 3.00 GHz)
- Intel® Core™ i7-2760QM Processor (6M Cache, up to 3.50 GHz)
- Intel® Core™ i7-2860QM Processor (8M Cache, up to 3.60 GHz)
- Intel® Core™ i7-2960XM Processor Extreme Edition (8M Cache, up to 3.70 GHz)
- Intel® Core™ i7-2629M Processor (4M Cache, up to 3.00 GHz)
- Intel® Core™ i7-2649M Processor (4M Cache, up to 3.20 GHz)
- Intel® Core™ i7-2657M Processor (4M Cache, up to 2.70 GHz)
- Intel® Core™ i7-2617M Processor (4M Cache, up to 2.60 GHz)
- Intel® Core™ i7-2677M Processor (4M Cache, up to 2.90 GHz)
- Intel® Core™ i7-2637M Processor (4M Cache, up to 2.80 GHz)
- Intel® Core™ i5-2537M Processor (3M Cache, up to 2.30 GHz)
- Intel® Core™ i5-2557M Processor (3M Cache, up to 2.70 GHz)
- Intel® Core™ i3-2357M Processor (3M Cache, 1.30 GHz)
- Intel® Core™ i7-2655LE Processor (4M Cache, up to 2.90 GHz)
- Intel® Core™ i3-2310E Processor (3M Cache, 2.10 GHz)
- Intel® Core™ i7-2715QE Processor (6M Cache, up to 3.00 GHz)
- Intel® Core™ i7-2610UE Processor (4M Cache, up to 2.40 GHz)
- Intel® Core™ i3-2340UE Processor (3M Cache, 1.30 GHz)
- Intel® Core™ i5-2515E Processor (3M Cache, up to 3.10 GHz)
- Intel® Celeron® Processor B810 (2M Cache, 1.60 GHz)
- Intel® Celeron® Processor B810E (2M Cache, 1.60 GHz)
- Intel® Celeron® Processor 847E (2M Cache, 1.10 GHz)
- Intel® Celeron® Processor 847 (2M Cache, 1.10 GHz)
- Intel® Core™ i5-2467M Processor (3M Cache, up to 2.30 GHz)
- Intel® Celeron® Processor B800 (2M Cache, 1.50 GHz)
- Intel® Celeron® Processor 857 (2M Cache, 1.20 GHz)
- Intel® Celeron® Processor B840 (2M Cache, 1.90 GHz)
- Intel® Celeron® Processor 807UE (1M Cache, 1.0 GHz)
- Intel® Core™ i3-3217UE Processor (3M Cache, 1.60 GHz)
- Intel® Core™ i3-3120ME Processor (3M Cache, 2.40 GHz)
- Intel® Core™ i5-3610ME Processor (3M Cache, up to 3.30 GHz)
- Intel® Core™ i7-3615QE Processor (6M Cache, up to 3.30 GHz)
- Intel® Core™ i7-3612QE Processor (6M Cache, up to 3.10 GHz)
- Intel® Core™ i7-3610QE Processor (6M Cache, up to 3.30 GHz)
- Intel® Core™ i7-3555LE Processor (4M Cache, up to 3.20 GHz)
- Intel® Core™ i7-3517UE Processor (4M Cache, up to 2.80 GHz)
There are some IB CPUs are listed as compatible under this chipset...
Sorry for the confusion.
- Intel® Core™ i7-2720QM Processor (6M Cache, up to 3.30 GHz)
-
I noticed on the ark.intel.com site the HM67 chipset has support for some IB CPUs. I was wonder if it might support some of the higher-end IB CPUs such as the 3632QM. The socket is the same, so I guess it would just come down to a chipset issue. The 3632QM is not listed under the supported processors for the HM67 chipset, but like anything else, the supported list likes to lie.
So if anyone happens to have a SB laptop and some IB CPUs, could you see if it works and let me know the results?
Thanks.
-
I don't own the Y500, but I am interested in the ultrabay fan module it has. I've read around and found that it is pretty much useless since it moves air from the bottom of the laptop and straight out the side, doing nothing to cool the components.
However, depending on the connector, I would like to put it (modified) in my laptop. So if someone could share some pics of the Ultrabay fan that would be great.
Or if someone has one lying around, I would gladly take it off your hands.

-
I got my new Y500 with the dual GT750m last week. CPU temp (i7 3630QM) went really high when gaming, for example when playing Source game Dota 2 it was hovering at 90C. I did thermal repaste and tried to screw on the heatsink as tight as I could, and the temp dropped by about 5C on average.
Still the idle temp is kinda high at about 60C. On the other hand, the GPU that shares the same heatsink with the CPU only idles at 47C.
I am trying to do the BIOS mod, and hopefully there might be some way to undervolt it. Right now I am using ThrottleStop because when CPU and GPU are both under load, the CPU won't higher than 2.4GHz. Using TS, I can make it run at 3.2GHz.
- - - Updated - - -
Also, do you think that swapping the 45W 3630QM with a 35W 3632QM would help?
Don't so happen to have the UltraBay fan thing? I would love to get it (I know you can't use it with the SLI video cards since that is in the slot).
I'm sure using the 3632QM would help with temps if you don't mind the slight performance hit. I idle at 60C when I'm at home with my full setup (45-55C is when I'm on the go with more battery optimized settings). So your 60C with a quad isn't too terrible (I have a dual). The difference in temperature is kinda odd though. What is the order of the components?
GPU -> CPU -> radiator?
CPU -> GPU -> radiator?
-
Your idle temps are lower than my room temp...it's 45c in the shade outside...LOL
I know your pain.... cools down to be ~37C at midnight. Fun times (I moved).
-
I love the posts from the people helping. I myself found your little link to the laptop cooling mod very insightful. I can look no further then this thread with my problem. Thanks.
What kind of laptop do you have? I'll have some more pictures of the innards of mine after I get it working a little bit better. Hope it will help someone.
-
I know how PWM works, and since it is kinda screwy in some cases I was hoping a resister in line might work. (Similar to dimming an LED, you can have a lower frequency PWM or lower the voltage a little bit.
I'll give it a whirl tonight with a low ohm resister I can find lying around.
-
Yeah, obviously the voltage on the positive wire would go up since the fan is spinning faster, however the PWM is going up as well so that means a resistor would only lower that, causing the fan to spin less. Let's say if the PWM read the opposite we could put a resistor on it and lower the PWM, in essence, increasing the fan speed. Unfortunately that's not the case. But hey, at least your temps are somewhat controllable now which is more than ya started with

The PWM goes DOWN when the fan speed goes UP. The issue arises when the computer would want to turn the fan OFF, there would be a non-fan-speed-at-zero PWM voltage so it would be stuck trying to decrease the fan voltage to a sub-zero number. Unless this is fine, then a resistor in-line might work.
-
That is a pretty awesome cooling mod. Too bad I can't do something like that for mine.
-
I measured the voltages on the fan while at idle and while spinning (computer at load)
When the computer is idle with the fan off:
PWM: 3.225V
Pos: 0V
When the fan has a load and the fan is spinning:
PWM: 1.616V
Pos: 3.541V
By this I would guess the resister inline with the PWM wire would be a bust.
-
Holy damn that's a hot temp...not as bad as my friends who hit the tjmax 105 just from browsing lol :/
Are the fan and heatsink made of solidified dust?
-
Don't so happen to have a quad lying around I could get as an early Xmas gift do ya?
--
I guess the last thing on the list to try is the fan mod unless you have any other random ideas to try and cool this pocket volcano.
-
UPDATE! (and partial success story).
I got some washers to put between the screw head and the heatsink (there are springs on the heatsink posts themselves so this pretty much just compressed the springs more).
I made a offset plate for the fan. Now the fan sits directly on the heatsink with no gap.
Sitting at ~45 idle. I ran the ThrottleStop benchmark on 4-threads 1024M. I went from a completion time of over 800 seconds to ~650 seconds. CPU did not throttle at all (according to RealTemp). No longer having 100C temps under load. It still gets into the 90s, but that is only under a full load.
I haven't tried the fan mod yet.
Yay modding!
atn
-
(You didn't lose me with that woooo)
The fan does work when the computer decides to do something (like when it sits at 99C for a minute). It will audibly spin up, and a noticeable stream of air will pour out of the laptop.
I have used HWiNFO and there isn't even a mention of a fan speed or controller (even on my previous laptop). I'm not sure if it is hidden by the BIOS or something.
So I would guess it is either some moronic thing Fujitsu has done or the controller is shot. (I'm leaning toward the former since I have seen over 10 Fujitsu T901s with this issue.)
So should I put a thermistor (with leads) and put it on the heatpipe or something? Or just use a standard resistor inline with the fan speed wire, and let the built-in controller do its thing?
Thanks,
atn
-
The resister would be for the fan to report a lower fan speed than it actually is (would decrease the power on the signal wire). I'm guessing this is how the signal wire works. Not sure if it is PWM signal to fan to regulate, or the wire the fan reports its speed on for the fan controller to determine more voltage or not.
Maybe @iamtuck3r can elaborate.
-
Going to tag along and vote for a Lenovo. To stay closer to your price range, you can pick on of the Y400 models.
Lenovo has had some pretty awesome sales on the Y-series lately. My friend has the Y500 and loves it.
Both the Y400 and the Y500 have a GT750M which is quite adequate for the price.
$719 Y400:
i5-3230M
$749 Y400:
i7-3630QM
both have 8GB RAM
14" 1366x768 display
1TB 5400 RPM HDD
Not bad at all.


Thoughts on how to fix an insanely hot laptop (75C idle, 100+C load)
in General Notebook Discussions
Posted
There isn't much of a haze, it is visible scratching and other pits. Even after cleaning it off with paper towel + smidge of thermal paste as some rubbing compound and then a micro fiber cloth. It has a dark neigh-black rectangle where the die makes contact. When I first pulled the heatsink off, the thermal paste didn't even cover the whole die.....
I'll try to find another heatsink before attempting to swap the radiator.
I'll shoot ya a PM.