


Doink
-
Posts
66 -
Joined
-
Last visited
-
Days Won
3
Content Type
Profiles
Forums
Downloads
Posts posted by Doink
-
-
-
Yes you are right, something is wrong. Your score is around 1.3k points in firestrike on your dgpu and with your egpu setup you should score around 9k points with external monitor(minus 10-25% if using the internal screen). Make sure:
- your egpu runs Gen2 enabled
- using the desktop nvidia driver
and finally try it with an external monitor.
-
If you are playing with dsdt override don't forget to run "bcdedit.exe -set TESTSIGNING ON" as admin.
Your other problem looks similar to mine but I have an asus notebook with r9 390x [guide link] so its worth to mention that if your bios hangs while egpu is connected then try playing with the #clk/#perst delay switches on your adapter and if your bios hangs on all settings then try to isolate pin22 on the mpcie connector and set the #perst delay to max on your adapter. Just put a small electrical tape on the PIN and always do shutdown/reboot instead of restart and don't forget to wait the #perst delay(egpu fans will start and some LED action goes on your adapter) before entering to setup 1x. Hope it helps and good luck.
mpcie Pinout:
Spoiler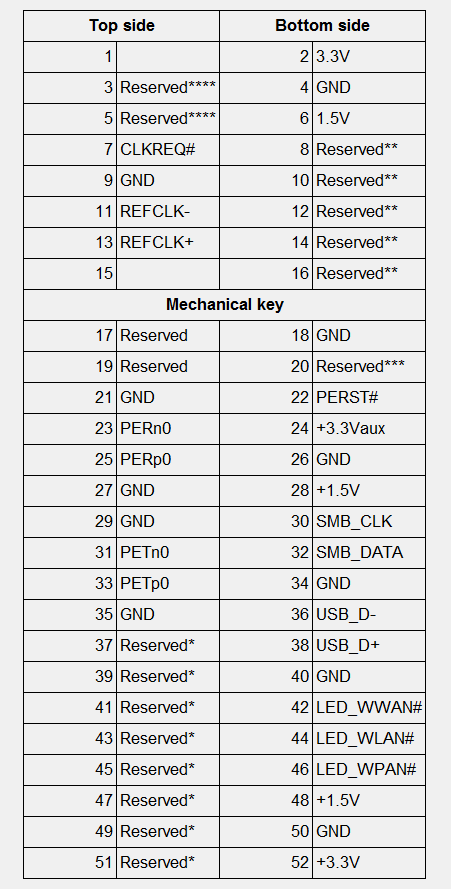
:
-
You don't need setup1x for fixing error 43.
Its just means the driver have some weird issues to fire up your card. Reinstall your driver using DDU. If err43 happens after this, just sleep/wake your computer and if you are using CDT/PTD switches then scan for devices in the device manager after those delays done. Sometimes you need to do this 8-10x in a row to actually bypass the error(if it works after a few sleep/wakes then check your PSUs, they can cause similar things). -
Putting the tab to User is not working, chipset tab visibility is hard coded in.
-
If the delay switches does nothing and bios hangs on all settings then try to isolate PIN22 on the mpci connector and set the PERST delay switch to max. Hope this solves your issue. Btw if you are using this pin22 method never restart you computer, always do shutdown/power on.
For more info:
-
Original Author: doink
Notebook
CPU: Intel Core i7-2630QM
RAM: 4x2GB 1333MHz
iGPU: Intel® HD Graphics 3000
dGPU: Nvidia Geforce GT550m
eGPU: ASUS STRIX-R9390X-DC3OC-8GD5-GAMING
OS: Windows 10 Pro 64bit
EXP GDC Beast
Preparation
Prepare the pcie memory (you have 2 options):
-
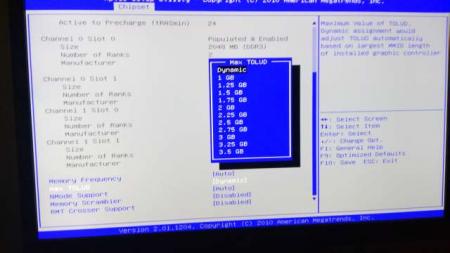
Mod your bios and then you can disable the dGPU, set your TOLUD to 2.25GB and change the pcie port2 speed to gen1. ( guide )
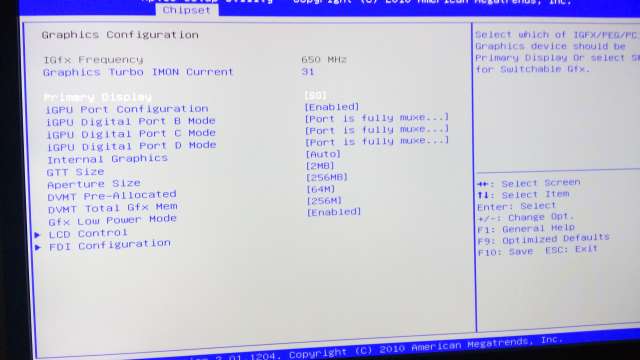
- You can disable the dGPU in the unlocked Chipset tab -> System Agent (SA) Config -> Graphics Config -> iGPU Port configuration = Disabled, and set the Primary display to IGFX
- Chipset tab -> Memory Config -> Max TOLUD = 2.25GB
- Chipset tab -> CougarPoint (PCH) Config -> PCI Express Config -> PCI Express Root Port 2 -> PCIe speed = Gen1 - Do DSDT override and you will disable the dGPU from Setup 1.30
- You can change the pcie port speed back to gen2 after everything works.
- Remove your old AMD driver with DDU
- Install Setup 1.30
Disassembly
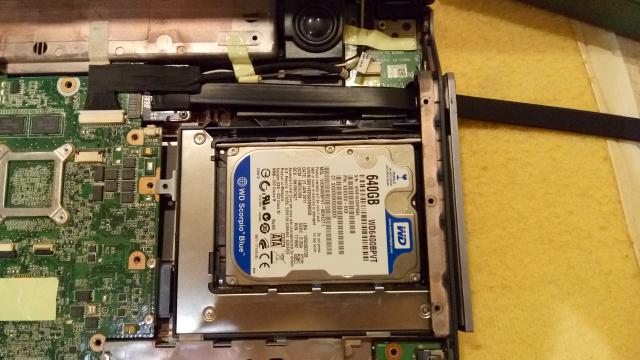
The wifi mPCIe port is located under the caps lock LED so you have to get rid off the top cover of the case.
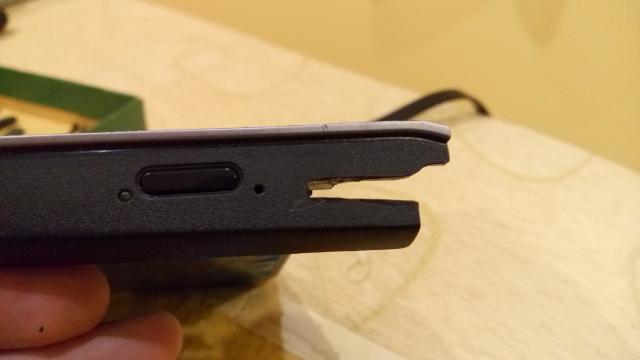
Optibay users can cut off the slim part of the bay to get enough space for the hdmi cable.

If you have any problems with the disassembly just follow this video:
Asus done some wierd mPCIe implementation on this notebook so you have to isolate PIN 22 on the GDC Beast mPCIe connector. (more info from sNullp)
You can find the mPCIe pinout here: PCI Express Mini Card (Mini PCIe) pinout diagram @ pinoutsguide.com
I just used electrical tape to solve this problem, luckily the neighbour pins are unused so you have enough space for the *magic*.
If you don't do it your timing on the GDC Beast won't work (no long green light near the switches) and you can't bypass the POST screen hang with egpu connected -> setup 1.3 never detects your eGPU. (windows will after sleep-plug-wake but with error 12 so its a dead end)
Set the switches on the EXP GDC to CTD 6s and PTD 14s.
Plug all the cables in and fire up the system.
Wait at the os selection page until the green light goes off and the egpu fans starts to work.
Enter Setup 1.3 and
- if you used the bios mod you can simply PCI Compact -> igp+egpu
- if you done the DSDT override you simply Video Cards -> dGPU off, PCI Compact -> 56.25GB -> igpu + egpu -> force igpu to 32bit
Chainload to your os and start windows.
Install the Radeon driver, don't reboot with egpu connected (POST hangs with amd gfx), always do shutdown-restart instead.
If everything goes, no freezes, no random disconencts then try setting the mPCIe port speed to Gen2.
Numbers
3dmark
FIRE STRIKE 1.1: 7719@Gen1 | 8438@Gen2
Graphics Score 10412@Gen1 | 11578@Gen2
Physics Score 5903@Gen1 | 6178@Gen2
Combined Score 3116@Gen1 | 3396@Gen2
With my dGPU, i get 830 (820/6200/314) points.
SKY DIVER 1.0: 18923@Gen1 | 19766@Gen2
Graphics Score: 35536@Gen1 | 38899@Gen2
Physics Score: 6130@Gen1 | 6219@Gen2
Combined Score: 13757@Gen1 |13910 @Gen2
CLOUD GATE 1.1: 13164@Gen1 | 15158@Gen2
Graphics Score: 48568@Gen1 | 60916@Gen2
Physics Score: 3707@Gen1 | 4177@Gen2
3dmark11: 10123@Gen1 | 11209@Gen2
Graphics Score: 13492@Gen1 | 16003@Gen2
Physics Score: 5969@Gen1 | 6092@Gen2
Combined Score: 5537@Gen1 | 5643@Gen2
Graphics Test 1: 48.35 fps@Gen1 | 61.62 fps@Gen2
Graphics Test 2: 75.07 fps@Gen1 | 82.35 fps@Gen2
Graphics Test 3: 91.53 fps@Gen1 | 104.7 fps@Gen2
Graphics Test 4: 43.0 fps@Gen1 | 51.1 fps@Gen2
Physics Test: 18.95 fps@Gen1 | 19.34 fps@Gen2
Combined Test: 25.76 fps@Gen1 | 26.25 fps@Gen2
Dota2
With the default renderer i get ~25-28fps in every video setting, using the -DX11 arg 60-90fps on highest settings.
Not Stable!
I currently have random connection issues even on Gen1 speed, the screen hangs for 2-3sec and then usually amd driver restores the egpu.
This happens usually after 1-2 hour if im in one game but in 3dmark i can't run all the tests at once at gen2.
So no random fps drops only random gpu drops

Update:
Same issue with PE4C-PM060A V3.0.
Thanks for @Tech Inferno Fan helping out with the PIN22 idea and ofc for the awesome Setup1.3 program.

-
Mod your bios and then you can disable the dGPU, set your TOLUD to 2.25GB and change the pcie port2 speed to gen1. ( guide )
-
I was able to get the DSDT override, but still getting code 12
 any help?
I have tried reinstalling the Nvidia drivers, as well as hotplugging in the eGPU upon windows start up, yet I am still getting Code 12 error. In device manager, I am able to view the section for Large Memory.
Just try to force your eGPU to the Large memory space from Setup1.3.
Video cards -> dgpu off
PCI compaction: endpoint: 56.25GB, ignore dgpu, run compact->igp+egpu-> force igp to 32bit
chainload
Skip the dgpu parts if you disabled it or don't have any.
-
Notebook
CPU: Intel Core i7-2630QM
RAM: 4x2GB 1333MHz
iGPU: Intel® HD Graphics 3000
dGPU: Nvidia Geforce GT550m
eGPU: ASUS STRIX-R9390X-DC3OC-8GD5-GAMING
OS: Windows 10 Pro 64bit
EXP GDC Beast
Preparation
Prepare the pcie memory (you have 2 options):
-
Mod your bios and then you can disable the dGPU, set your TOLUD to 2.25GB and change the pcie port2 speed to gen1. ( guide )
- You can disable the dGPU in the unlocked Chipset tab -> System Agent (SA) Config -> Graphics Config -> iGPU Port configuration = Disabled, and set the Primary display to IGFX
- Chipset tab -> Memory Config -> Max TOLUD = 2.25GB
- Chipset tab -> CougarPoint (PCH) Config -> PCI Express Config -> PCI Express Root Port 2 -> PCIe speed = Gen1 - Do DSDT override and you will disable the dGPU from Setup 1.30
- You can change the pcie port speed back to gen2 after everything works.
- Remove your old AMD driver with DDU
- Install Setup 1.30
Disassembly
The wifi mPCIe port is located under the caps lock LED so you have to get rid off the top cover of the case.
Optibay users can cut off the slim part of the bay to get enough space for the hdmi cable.


If you have any problems with the disassembly just follow this video:
Asus done some wierd mPCIe implementation on this notebook so you have to isolate PIN 22 on the GDC Beast mPCIe connector. (more info from sNullp)
You can find the mPCIe pinout here: PCI Express Mini Card (Mini PCIe) pinout diagram @ pinoutsguide.com
I just used electrical tape to solve this problem, luckily the neighbour pins are unused so you have enough space for the *magic*.
If you don't do it your timing on the GDC Beast won't work (no long green light near the switches) and you can't bypass the POST screen hang with egpu connected -> setup 1.3 never detects your eGPU. (windows will after sleep-plug-wake but with error 12 so its a dead end)
Set the switches on the EXP GDC to CTD 6s and PTD 14s.
Plug all the cables in and fire up the system.
Wait at the os selection page until the green light goes off and the egpu fans starts to work.
Enter Setup 1.3 and
- if you used the bios mod you can simply PCI Compact -> igp+egpu
- if you done the DSDT override you simply Video Cards -> dGPU off, PCI Compact -> 56.25GB -> igpu + egpu -> force igpu to 32bit
Chainload to your os and start windows.
Install the Radeon driver, don't reboot with egpu connected (POST hangs with amd gfx), always do shutdown-restart instead.
If everything goes, no freezes, no random disconencts then try setting the mPCIe port speed to Gen2.
Numbers
3dmark
FIRE STRIKE 1.1: 7719@Gen1 | 8438@Gen2
SpoilerGraphics Score 10412@Gen1 | 11578@Gen2
Physics Score 5903@Gen1 | 6178@Gen2
Combined Score 3116@Gen1 | 3396@Gen2
With my dGPU, i get 830 (820/6200/314) points.
SKY DIVER 1.0: 18923@Gen1 | 19766@Gen2
SpoilerGraphics Score: 35536@Gen1 | 38899@Gen2
Physics Score: 6130@Gen1 | 6219@Gen2
Combined Score: 13757@Gen1 |13910 @Gen2
CLOUD GATE 1.1: 13164@Gen1 | 15158@Gen2
SpoilerGraphics Score: 48568@Gen1 | 60916@Gen2
Physics Score: 3707@Gen1 | 4177@Gen2
3dmark11: 10123@Gen1 | 11209@Gen2
SpoilerGraphics Score: 13492@Gen1 | 16003@Gen2
Physics Score: 5969@Gen1 | 6092@Gen2
Combined Score: 5537@Gen1 | 5643@Gen2
Graphics Test 1: 48.35 fps@Gen1 | 61.62 fps@Gen2
Graphics Test 2: 75.07 fps@Gen1 | 82.35 fps@Gen2
Graphics Test 3: 91.53 fps@Gen1 | 104.7 fps@Gen2
Graphics Test 4: 43.0 fps@Gen1 | 51.1 fps@Gen2
Physics Test: 18.95 fps@Gen1 | 19.34 fps@Gen2
Combined Test: 25.76 fps@Gen1 | 26.25 fps@Gen2
Dota2
With the default renderer i get ~25-28fps in every video setting, using the -DX11 arg 70-120fps on highest settings.
Stable!
PSU was the source of the stability issues. After RMAd all working stable with both EXP GDC and PE4C-PM060A V3.0 adapters.
Thanks for @Tech Inferno Fan helping out with the PIN22 idea and ofc for the awesome Setup1.3 program.
-
 3
3
-
Mod your bios and then you can disable the dGPU, set your TOLUD to 2.25GB and change the pcie port2 speed to gen1. ( guide )
-
I managed to successfully unlock my iron's hidden bios features so i just show you guys the steps i made.
I do not recommend to do this, its just a part of my eGPU project.
I made this tutorial with the newest 209 bios already flashed, so maybe you want it too.
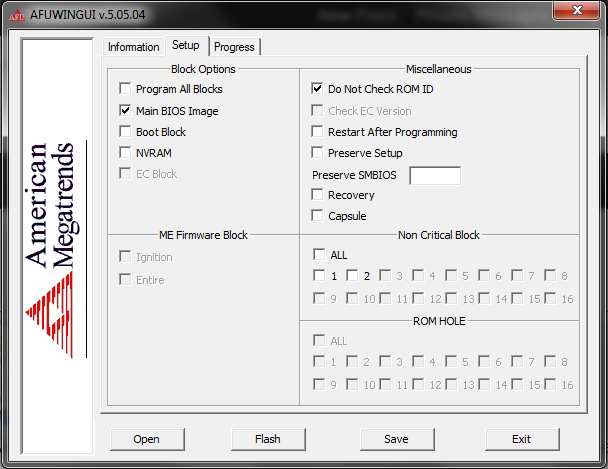
- Save your current rom file with AFUWINGUI v5.05.04., backup a lot of copies of this somewhere safe.
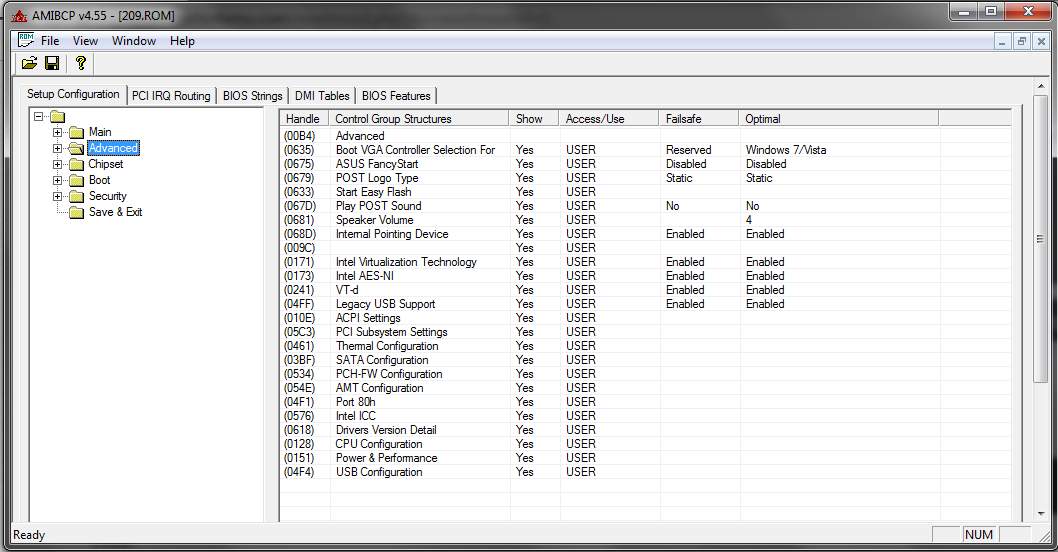
- Run AMIBCP4.55.0070 and open .rom file
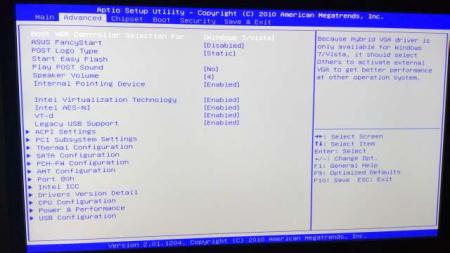
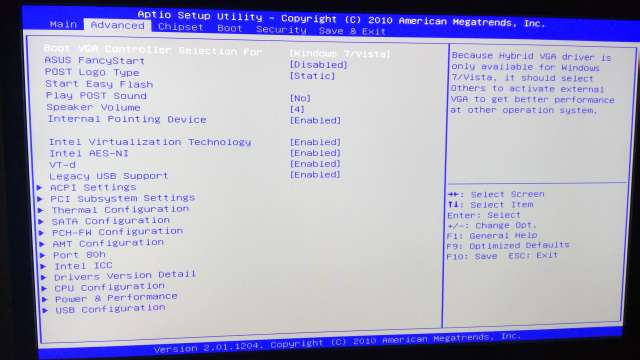
- Go to Advanced in the left tree and you will see your advanced menupoints in your bios something like this, except you will see Default instead of USER in the Access/Use column.

- You can force these menupoints to show up by changing the access to USER like on the picture
- The chipset tab is where the really deep things happen (Memory frequency, PCI-E configurations, IGP configurations, LCD setting, TOLUD config (default is dynamic) etc.). You don't have to set all these menus to USER here so just leave everything untoched here.
- Click File->Save
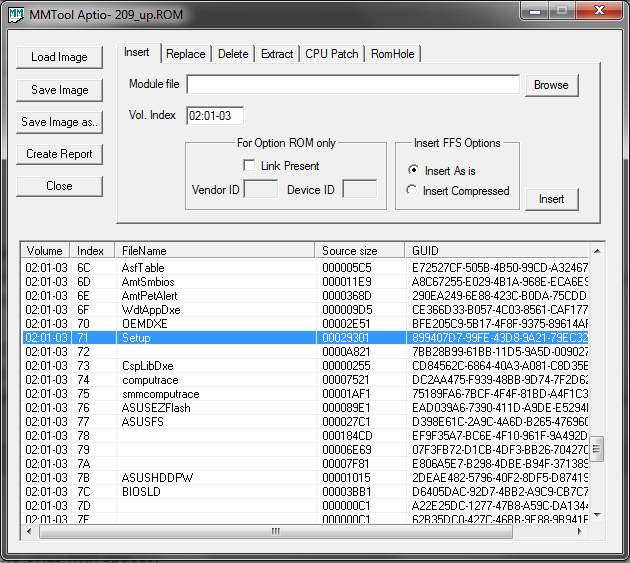
- Now we have to use MMTool (mmtool_aptio_4.50.0.23) to gather some information. Load the image and find the FileName: Setup row:

- I coudn't manage to replace this module with MMTool so we just need the GUID for the Setup module (899407D7-99FE-43D8-9A21-79EC328CAC21 for me)
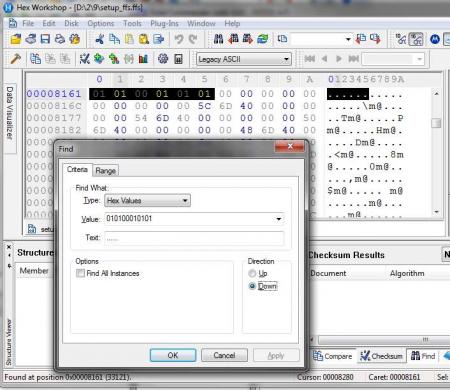
- Open UEFITool (0.21.4_win) and open your rom file.
- Click File->Search->GUID and type in your GUID (899407D7-99.....), select header only then click search. On the messages block double click on the found entry and right click on it => extract as is and save the fss file, don't close UEFI Tool.
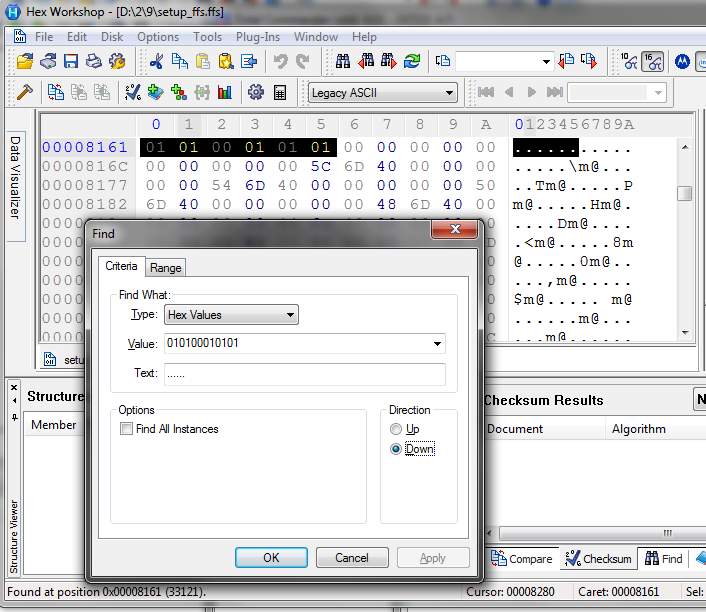
- Open the FFS file with a HEX Editor.
They store in an boolean array the hidden/showable tabs in our case it is: 01 01 00 01 01 01
The reason is because default if you go to your bios you see these tabs: (Main: enabled, Advanced: enabled, Chipset: disabled, Boot: enabled, Security: enabled, Save & Exit: enabled).
- Search for 01 01 00 01 01 01 and make sure you have only one matches (you should have only one) and change the red value to 01 and save the file.
- Double check the saved file size an continue only if its exactly 2 621 440 bytes
- Back to UEFITool right click on your GUID and press replace as is. Browse your edited fss file and click ok then File->Save image file. This creates your unlocked .rom file.- And now you can flash this bios file with AFUWIN. Open->your rom file. Go back to Information screen, in my case Current Firmware ID: 0ABUC0007, ROM file ID: 0ABUC000 so on the setup tab i had to check "Do not Check ROM ID" then click Flash ONLY if you take the risk like me.

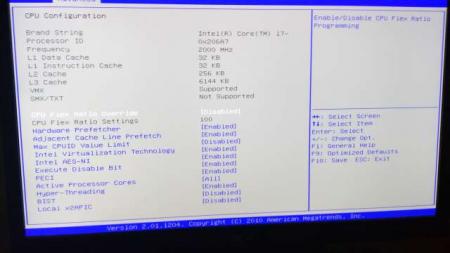
- After reboot go to the BIOS and you will see the new Chipset tab:

Reference: http://micheleprimavera.eu/?p=10
-
2
-
-
Hey guys,
GTX 550TI project abandoned! It was not my card.
Intel Core i7-2630qm @ 2ghz
HM65: gen=2, p=8 [email protected]
DSDT:no using_devcon_txt:yes
PCIw: no all_alloc: yes* [512MB]

iGPU=8086:0116 (Intel)

[email protected]
[email protected]
[email protected] 1b73:[email protected] (Fresco)
[email protected] 10ec:[email protected] (RealTeK)
My spec: i7-2630qm, Intel HD3000 + GT550m + R9 390X, hm65 chipset, 8GB ram, tolud (2.25GB), Exp GDC Beast, win10x64.
PCI dump: pcidmp.txt
Update with an R9 390X:
With unlocked bios things are getting interesting.
I set my tolud to 2.25GB, enabled hotplug on port2 and disabled my dGPU i can now see the eGPU with the sleep-plug-wake trick.
With this card bios hangs on POST screen so i start the system without the eGPU connected.
DSDT override done and working, with Setup 1.3 i moved the iGPU to the Larg Memory Space and it works fine.
The main issue now is windows doesn't care about the 32bit and 36bit free memory spaces and i can't manually assign it becase Setup1.3 doesn't detect the eGPU.
I tried the compact 36bit igp -> chainload -> dos mode -> iport bridge 2 ~CBBFF... 2020 -> chainload but it just creates a dummy memory allocation under PCI Express Root Complex, os never associates it with the eGPU.
I think Setup1.3 doesn't recognize the eGPU because when i hotplug it the fans stand still, maybe the radeon card needs something else to start but i have no idea how can i emulate better the sleep-plug-wake method in the Setup 1.3 screen. I've tried all the port related stuff in setup.
BTW, the AMD High Definition Audio Bus works flawlessly, i can imagine its a self conflict.
Update:
Paperclip PSU, sleep-wake egpu in windows to get detected, reboot and disconnect hdmi cable to get past the POST screen. Boot into Setup 1.3 and it still not get detected so my previous idea was wrong because the egpu fans are in normal state using this method.


DELL E6430 + GT 730 + EXP GDC - stability issue
in DIY e-GPU Projects
Posted
I have a system with the same misery and tried with exp gdc and pe4c adapters and both failed time-time when plugged in another charger in the same room, so its probably not the adapter. Same thing, in 2d so much more driver crashes, in 3d just sometimes. I think thats some misery where 1 system plugged in with 2 wires to the electricity network because all the parts working fine in the same room with a traditional desktop system(psu+gpu). So my next step is to power the notebook with the same psu (12-20volt dcdc converter), its worth 3 bucks for sience.