ithildin
-
Posts
48 -
Joined
-
Last visited
-
Days Won
2
Content Type
Profiles
Forums
Downloads
Everything posted by ithildin
-
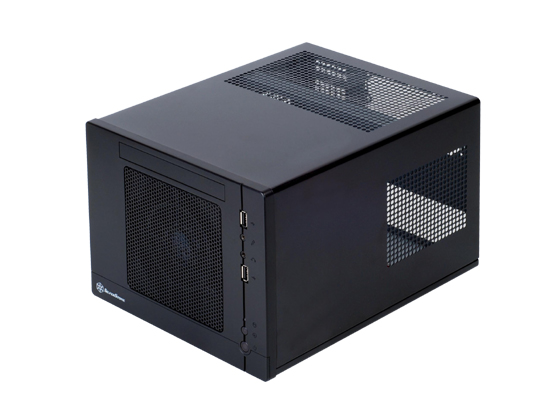
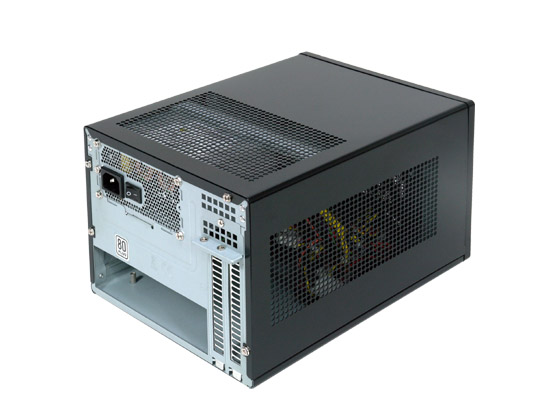
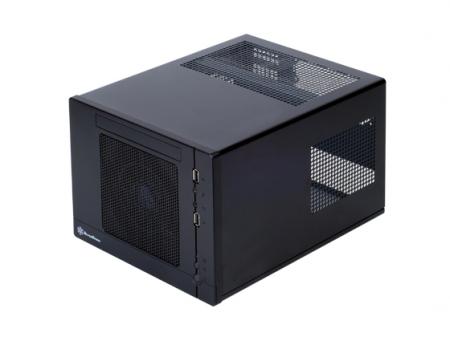
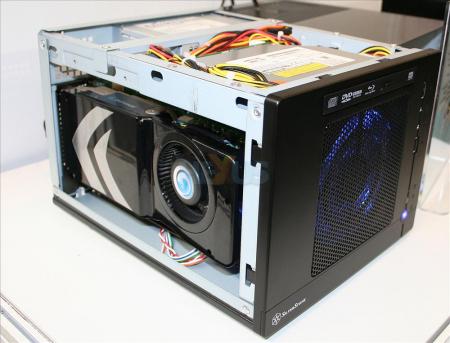
I'm using the Silverstone Sugo SG05. It looks bigger in the pictures that it actually is. The footprint is about that of a shoe box, 10.8L volume-wise, can take a 10 inch long GPU (maybe even 10.5 inch one) and is fairly inexpensive (I got mine for less than $30). Unfortunately full length 11-inch cards won't fit but the Sugo SG05 can modded to be accommodate one by cutting the inner metal panel. The new Sugo SG13 is supposed to have an extra .5 inch of clearance and may be a better option at this point. There isn't enough clearance at the bottom of the case to connect a standard powered PCIe x16 ribbon cable to the GPU so I'm also using a Supermicro RSC-R1UG-E16R-X9 right angle PCIe adapter. For PSU, I'm using the Silverstone ST45SF-G 450W SFX 80+ Gold v2.0. It's got a nice max 37A on the 12V rail (which should be enough for any GPU) and is fairly quiet - just make sure not to get the v1.0 which suffered from a noisy fan. V2.0 has a new fan and smoother speed ramping. That A4 looks gorgeous. I might get one myself to try out as an eGPU case.
-
You're right that the riser cable adds to impedance mismatch/signal reflection problems. I've tried hooking the GTX 670 directly to the AKiTiO PCIe slot and feeding power through a DC barrel adapter - it's better but still not stable. With a riser cable/adapter, running the full 3DMark test suite crashes the system (usually halfway through Firestrike). When I connect the GPU directly to the Thunder2 PCIe slot, the first round of 3DMark tests finishes successfully but the system eventually crashes if I repeat the 3DMark tests, usually during the second round.
-
Sure! I wanted to be able to use the computer case's front button panel to turn the eGPU on or off. The issue is that all modern ATX/ITX computer cases come with momentary push switches to trigger power and reset but ATX/SFX power supplies require a toggle switch to connect the PS_ON pin to a ground pin in the 24-pin motherboard connector, which you can accomplish with a SWEX or using the paperclip trick. Modern motherboards accomplish this by maintaining an active circuit, even with the computer is off, and respond to a momentary press of the ON button to trigger the PSU on. Since we're not using motherboards, I needed to figure out a basic electronic circuit that would accomplish this same function so I decided that this was a good opportunity to play with an Arduino and use it to build a basic power control device for my eGPU. Since the Arduino microcontroller can be programmed to perform to a wide variety of different functions, I thought about going beyond power control and also use it to monitor temperature inside the case and control the case fan. So far, I've put together a simple circuit with an Arduino to toggle an LED upon pressing a button (see here) and to measure ambient temperature (a barebones version of the "Lover Meter" starter kit example ). I then made a custom ATX 24 pin adapter following these instructions. I then hooked up the Arduino to the stand-by +5V supply from the SFX PSU, replaced the push button on the breadboard with a connection to the SG-05 case power switch and then I connected a line to the PS_ON pin instead of the LED. The same code that controlled the LED now switches the PSU on or off. You can't use the the Arduino's USB while it's hooked up to a separate 5V supply so I had to wire up an LCD module to display the temperature readings and the PSU state while everything is running off the SFX PSU but I'll probably remove the LCD once I'm happy with the design.For now, here's a short video to show how the current version is working:
-
Updated with more details of the implementation: more benchmark results stability issues with the EVGA GTX 670 FTW card solved issue with GTX 460 not booting details on the enclosure and hardware tinkering
-
US$189 AKiTiO Thunder2 PCIe Box (16Gbps-TB2)
ithildin replied to Tech Inferno Fan's topic in Enclosures and Adapters
The A4 looks like an excellent option for a small yet versatile eGPU case. Having the motherboard and GPU in parallel configuration (like a blade server) and with a SFX PSU on the opposite end of the case is a great way to save space. I think the AKiTiO Thunder2 could fitted in this case very easily - one would just need a custom motherboard tray and an additional powered riser. We would end up with an eGPU case that is much smaller than the Silverstone Sugo SG-05 I'm using (6.8L vs 10.8L!), which is pretty awesome. The starting price is a bit steep ($150-250) but it seems the 3M riser adapter is a major factor driving up cost. Since we still need to use a powered riser cable, we may be able to purchase the case without the 3M PCIe riser at a significantly lower price. -
US$189 AKiTiO Thunder2 PCIe Box (16Gbps-TB2)
ithildin replied to Tech Inferno Fan's topic in Enclosures and Adapters
Quick update on my situation: I've just finished testing my set up with a GTX 460 and I'm happy to report that the system is definitely more stable than with the GTX 670. I managed to run 3dMark Firestrike, Skidiver and Unigine Heaven Extreme continuously for several hours without a hitch. Naturally, performance is much worse than with the GTX 670 but everything else is comparable (even power draw since the TDPs are similar) which seems to confirm the hypothesis that my problem was in the GPU and not the rest of the set up. I'll keep running tests to verify these initial results - I have an AMD R9 290X that I may end up testing as well. -
US$189 AKiTiO Thunder2 PCIe Box (16Gbps-TB2)
ithildin replied to Tech Inferno Fan's topic in Enclosures and Adapters
That's very interesting, thanks guys! I'll definitely try the GTX 460 - I'll let you know how it goes. -
US$189 AKiTiO Thunder2 PCIe Box (16Gbps-TB2)
ithildin replied to Tech Inferno Fan's topic in Enclosures and Adapters
I've tried two different cables, same result. Once I fly back from the holidays next week, I'll be able to test my gear hooked up to an Intel NUC with a TB1 port. I also have an extra GPU (GTX 460) that I can try, in case the problem is in the GTX 670. -
US$189 AKiTiO Thunder2 PCIe Box (16Gbps-TB2)
ithildin replied to Tech Inferno Fan's topic in Enclosures and Adapters
Hi Tech Inferno Fan, sorry for my incomplete posting. I selected this particular riser adapter since the specs clearly mentioned it was compatible with gen2 and 3 signals. Still, I tried removing it, as well as the riser cable by connecting the GPU directly to the AKiTiO's X16 slot - it's still unstable. -
US$189 AKiTiO Thunder2 PCIe Box (16Gbps-TB2)
ithildin replied to Tech Inferno Fan's topic in Enclosures and Adapters
Hey guys, My AKiTiO setup has been plagued with stability issues and perhaps you have some idea what the cause might be. My setup is as follows: Laptop: Macbook Air 13" mid-2013 with TB1 running Windows 8.1 with UEFI GPU: EVGA GTX 670 FTW 2GB (170W TDP) PSU: Silverstone ST45SF-G SFX PSU 450W 80+ Gold, max 37A@12V Case: Silverstone Sugo SG-05 Adapters: Supermicro RSC-R1UG-E16R-X9 Riser Card Powered PCIe x16 riser cable Modded molex-DC barrel plug adapter Everything works OK initially but it eventually crashes while running high demand applications, such as during Firestrike benchmark with 3DMark or Civilization V. The crashes start as a sudden drop in framerate, loss of picture and full system freeze or occasionally the driver recovers with a "Display driver nvlddmkm stopped responding and has successfully recovered." message. The crashes don't come immediately - e.g. I can boot up and run Firestrike and it will complete it successfully but if I run the full 3DMark suite it won't finish. I can have it running for hours with some game and it will still happen if I do something that will suddenly tax the GPU harder. I've tried the following: Updating Geforce drivers to 347.09 Powering through riser cable, DC-molex adapter or both Two different TB cables (AKiTiO's and a 2m Apple TB cable) Two different PSUs (Corsair 400CX 400W 30A@12V) Two different PCIe riser cables Connecting without the Supermicro right angle PCIe riser card Connecting without any PCIe adapter (hooking up AKiTiO daugthterboard directly to the GPU, powering through the molex-DC adapter) Stabilizing the x4 PCIe connection between the AKiTiO TB board and PCIe daughter board with an insulated bulldog clip Some of these things helped but the stability problem remains. I haven't tried with a different GPU but this one had been working fine in my desktop machine for a while now. I'm at my wits' end. Any ideas? -
US$189 AKiTiO Thunder2 PCIe Box (16Gbps-TB2)
ithildin replied to Tech Inferno Fan's topic in Enclosures and Adapters
True but then it's not really enclosed - I'd rather not leave the GPU or inner wiring exposed. The AKiTiO inner case already does a good job at supporting the GPU and TB card so it shouldn't be too difficult or expensive to come up with a new outer shell that fits similarly to AKiTiO's but with extra room to fully enclose a longer GPU with extra wiring. I'll try to draw up something in CAD in the next few weeks. Then I'll start with trying to source a simple box from enclosure makers like Protocase. There's a laser cutter I could use at work to make some custom acrylic end plates. -
US$189 AKiTiO Thunder2 PCIe Box (16Gbps-TB2)
ithildin replied to Tech Inferno Fan's topic in Enclosures and Adapters
Will do! I'm thinking in the same lines of re-using the AKiTiO Thunder2 enclosure but there are a few issues with this approach: Very limited room to fit extra cables/molex adapters Not tall enough to accomodate PCIe 6/8pin connections to the GPU (1-2 mm above the inner metal bracket) Inadequate ventilation - the outer case has to be drilled to provide ventilation otherwise air flow is constrained by the small stock fan and the circular cutout on the inner case (it could still be fine for Maxwell cards but other GPUs may overheat) Mid-size GPUs can fit on the inner case provided that the fan is removed/mounted outside or by bending/cutting the front bracket like (but then the outer case will be too short to enclose the GPU) All of these problems can be solved by replacing the outer case/cover with one both longer (2+ cm) and taller (1-2 cm), with a vent on the GPU side. The original end plates could be replaced by custom ones to close the gaps and maybe provide extra functionality (i.e. separate barrel connector for a Dell DA-2/other PSU, power switch, fan and LED mounts). -
US$189 AKiTiO Thunder2 PCIe Box (16Gbps-TB2)
ithildin replied to Tech Inferno Fan's topic in Enclosures and Adapters
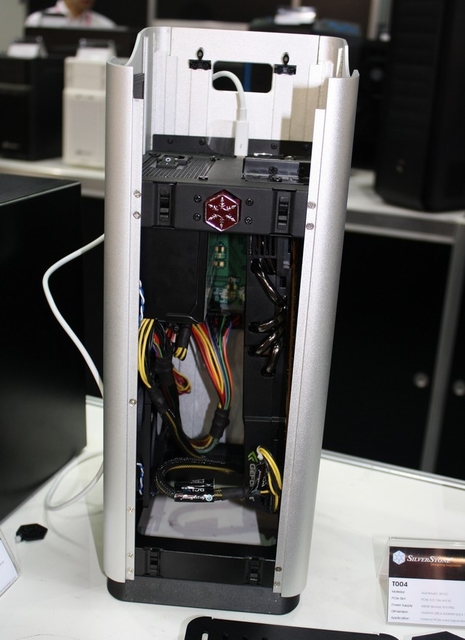
I'm also interested in a coming up with a decent enclosure for my eGPU. I would also prefer a relatively small solution that I can pack with my luggage (preferably with carry-on) when I fly home for holidays, visiting friends, etc.. This way I can take my gaming computer with me - finding a spare monitor that I could use is usually not a problem. I like the FT03-mini but it's considerably larger that the Silverstone's T004 concept eGPU case, which I think makes better use of internal space for the GPU and PSU: The top compartment is redundant so the case could be shorter while keeping a similar footprint. Whenever I get the bandwidth, I would like to design something similar to the T004 that I could to whip together in a hacker space - perhaps a laser cut acrylic case or a generic extruded aluminum enclosure with some mods (drilled holes for ventilation, custom machined end plates to support GPU, PSU and a fan).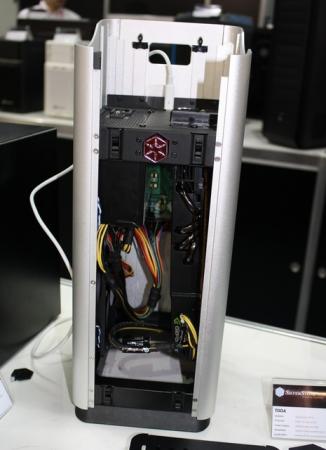
-
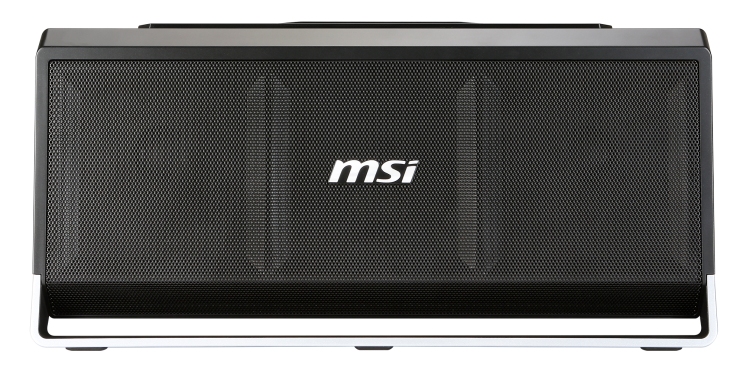
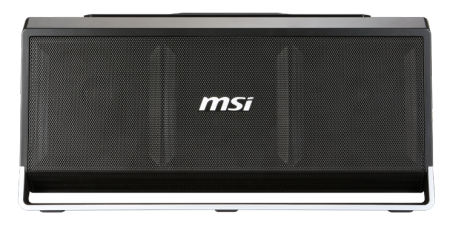
MSI eGPU dock in the works for GS30?
ithildin replied to ha1o2surfer's topic in Enclosures and Adapters
Until MSI releases more details, we can only speculate on their choice of interface for this product. Light Peak was indeed Intel's codename for eventually became Sony Vaio Z's implementation and Apple/Intel's Thunderbolt. The underlying technology is the same, even if the connector and demultiplexing isn't. I haven't found any info confirming that the GS30 is indeed using Light Peak and the laptop doesn't appear to have a Thunderbolt port either (2x USB, 1x HDMI, 1x Ethernet, SD card reader, DC power, Kensington lock slot). My guess is that this eGPU case is more of a conventional laptop dock, connecting to the laptop through a slot on the underside of the laptop - notice how the laptop is placed on top of the eGPU case and the two levers next to it, just above the power button: One (or both) of those could be a latch or release lever. Also, on the photo where you see the front of the case: Look at the very top of the case - it looks like there is a footprint for the laptop, which also suggests it's a docking interface. Docking connectors often hook up directly to the PCIe bus directly and there have been many examples of docks carrying not just additional storage and extended connectivity options but also GPUs (e.g. the old Thinkpad docks) so it's not out of the realm of possibility that this was the route MSI took for the GS30. It's a well established technology that would side step the licensing issues with Light Peak/Thunderbolt. The bad news is that this dock will probably only fit with this particular laptop model series and thus won't be a universal eGPU solution. Still, it's a step closer to a mainstream solution for a problem everyone here cares about.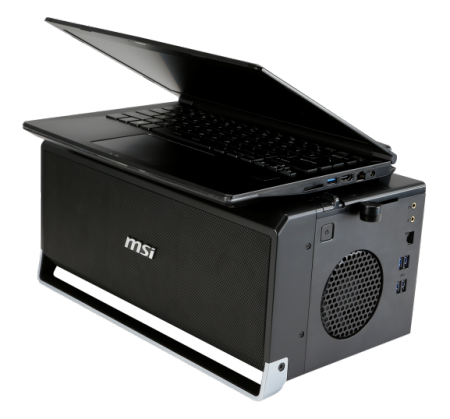
-
US$189 AKiTiO Thunder2 PCIe Box (16Gbps-TB2)
ithildin replied to Tech Inferno Fan's topic in Enclosures and Adapters
The capacitor is not strictly necessary but it can help filter the current and improve stability of the set up. I would keep it, especially if you are hooking power up directly to a Dell DC adapter. -
US$189 AKiTiO Thunder2 PCIe Box (16Gbps-TB2)
ithildin replied to Tech Inferno Fan's topic in Enclosures and Adapters
This mod is pretty exciting since it bypasses the PCB tracks and any concerns with them not being design to supply 75W. I took a closer look at the right angle PCIe connector on the board to try to determine if it can carry that much power safely. The part is a Meritec 98317A-164-2MMF 100 ohm right angle connector. Here's the relevant datasheet from the manufacturer's website and some key info: Meets PCIe 2.2, 100 ohm, specifications (...) Contact resistance: 40 milliohms nominal Dielectric withstanding voltage: 300VDC Current rating: 1.1 AMP per contact Insulation resistance: 100 Mohms (minimum) The PCIe interface has 5x +12V lines and 4x +3.3V lines. With 1.1A per contact, this connector tops out at ~80W (5.5A at 12V + 4.4A at 3.3V = 80.52W) and thus can supply PCIe spec 75W safely. Knowing this, I'm more inclined to try out this mod myself. Btw, the capacitor on my powered riser is a 6.3mm x 8mm solid aluminum one labelled "FP 99HE 101 16" (Fujitsu 99HE series 100uF 16V). -
Sure, I'll test the set up on a few of those games. Like jacobsson mentioned, the powered riser feeds the AKiTiO Thunder2 so the DC adapter is redundant. I still need to test how the GTX 670 behaves without a powered riser (using the AKiTiO 25W PCIe slot power instead). Not for now, unfortunately. The internal Intel GPU is still detected by Windows but the Macbook screen is turned off automatically on boot. I still need to play with it some more - there might be a hidden setting somewhere in the Intel drivers that can re-enable the internal screen. Also, I haven't implemented the eGPU on OS X but it should be possible.
-
US$189 AKiTiO Thunder2 PCIe Box (16Gbps-TB2)
ithildin replied to Tech Inferno Fan's topic in Enclosures and Adapters
I've posted the first set of results of my http://forum.techinferno.com/diy-e-gpu-projects/7604-%5Bguide%5D-2013-11-macbook-air-gtx670%4010gbps-tb1-akitio-thunder2-win8-1-a.html#post104264 implementation. -
Here are my current results from testing the AKiTio Thunder2 with a 13" Macbook Air (mid-2013). Specs: Laptop: Macbook Air 13" Core I5-4250u 1.3 GHz dual core (up to 2.6 GHz), 4GB RAM, Intel HD 5000 iGPU, Thunderbolt v1 port Windows 8.1 Pro N 64-bit UEFI boot as default option GPU1: EVGA GTX 670 FTW 2GB GPU2: Gainward GTX 460 GS 1GB Set up: Silverstone ST45SF-G 450W 80+ Gold SFX PSU Powered x16 PCIe riser cable Right angle x16 PCIe adapter (Supermicro RSC-R1UG-E16R-X9) AKiTio Thunder2 Observations: The Macbook Air disables the internal screen automatically when it detects an eGPU so Optimus is not engaged. I've tried Evo*'s guide to enabling the iGPU on Macbook Pros but this implementation is bugged for the Macbook Air (clocks CPU down to max 1.3 GHz, disables laptop keyboard and trackpad). All three Nvidia cards (GTX 460, 670 and 970) boot up and are recognized correctly. I had problems with the GTX 460 at first but updating its VBIOS allowed it to work with the Thunder2 adapter under UEFI boot conditions. The only AMD card I've tested with this setup (Sapphire R9 290X 4GB) failed to boot. The same configuration successfully booted when connected to an Intel NUC instead of the Macbook Air. The EVGA GTX 670 FTW 2GB is unstable as an AKiTiO Thunder2 eGPU. After substantial testing with multiple power configurations and different cables, I came to the conclusion that any high demand application (benchmark software, games) would eventually cause Windows to crash with the GTX 670. This problem is not apparent with the GTX 460/970 and the GTX 670 works fine in a regular desktop machine so this issue may be due to GPU-to-Thunder2 impedance mismatch, as suggested by Tech Inferno Fan and juniordiscart. The EVGA GTX 970 SC ACX 2.0 is fully stable with the AKiTiO Thunder2. I managed to run a substantial suite of tests continuously for several hours without a single problem. Results: GTX 970: 3DMark06: 15233 3DMark Vantage (graphics): P14587 (22361) 3DMark 11 (graphics): P7280 (13144) 3DMark Firestrike: 6803 (10274) Unigine Heaven: Extreme 58.6 fps, Score 1476 Unigine Valley: Extreme HD 46.5, Score 1944 CUDA-Z: Memory Copy Pinned Pageable Host to Device 792.262 MiB/s 677.892 MiB/s Device to Host 893.463 MiB/s 746.893 MiB/s Device to Device 64.2137 GiB/s GPU Core Performance Single-precision Float 4054.58 Gflop/s Double-precision Float 142.48 Gflop/s 32-bit Integer 1476.71 Giop/s 24-bit Integer 945.449 Giop/s GTX 460: 3DMark Vantage (graphics): P10687 (11869) 3DMark 11 (graphics): P2980 (2984) 3DMark Firestrike: 1994 (2132) Unigine Heaven: Unigine Valley: Extreme HD 17.9, Score 748 GTX 670 (sold): 3DMark06: 15386 3DMark Vantage (graphics): P17258 (26282) 3DMark 11 (graphics): P5777 (7994) 3DMark Firestrike: 4693 (6253) Unigine Heaven: Extreme HD 34.8 FPS, Score 876; Normal FPS 61.9 Score 1560 Unigine Valley: crashes CUDA-Z: Memory Copy Pinned Pageable Host to Device 796.536 MiB/s 678.324 MiB/s Device to Host 903.53 MiB/s 801.042 MiB/s Device to Device 69.6637 GiB/s GPU Core Performance Single-precision Float 1874.95 Gflop/s Double-precision Float 135.806 Gflop/s 32-bit Integer 540.554 Giop/s 24-bit Integer 539.788 Giop/s Coming next: Enclosure - Instead of a fully custom enclosure, I've decided to go for the Silverstone Sugo SG-05. This case has a small footprint yet enough room for a 450W SFX PSU and a 10-10.5" long GPU. Mini-ITX tray for AKiTiO Thunder2 and other electronics. I'm using a laser cutter to make this out of an acrylic sheet and mount the AKiTiO's PCBs with standoffs and screws - I will post the design here once it's finalized. Power and case fan speed control with Arduino. This is meant to enable power control and monitoring from the front panel buttons and LEDs. In addition to power LED and toggle switch, the Arduino will monitor temperature inside the case and adjust case fan speed accordingly. Power from the Arduino comes from the +5V PSU stand-by line. GPU upgrade. I've sold the GTX 670 and replaced it with a brand new EVGA GTX 970 SC ACX 2.0. Unlinke its predecessor, the GTX 970 performs beautifully with the AKiTiO, except for some moderate coil whine. Work in progress pictures: Updates: 2015-01-12: Over the holidays, I tested my set up more extensively and found that it is inherently unstable. This is most likely a GPU issue, potentially due to impedance mismatch, that prevents it from performing stably with the AKiTiO Thunder2 as an eGPU. I will be collecting more data with alternative GPUs. I will also post an update soon with details on my enclosure (Silverstone SG-05) and some of the custom parts I am putting together (plastic tray to hold the AKiTiO circuit boards and an Arduino controller for the front LEDs and power button). 2015-01-18: I've hooked up an Arduino Uno board to the SFX PSU using a modded 24-pin ATX connector. With some simple code, the Arduino can toggle the PSU on or off upon pressing the front power button on the SG-05 case. The Arduino is also measuring ambient temperature with a TMP36 sensor - next step is implementing the 12V circuit to drive the fan! 2015-02-24: After many fruitless attempts at stabilizing my setup with the GTX 670, I upgraded the GPU to an EVGA GTX 970 SC ACX 2.0 (04G-P4-2977-KR). Preliminary stress tests running Firestrike on a loop showed no stability problems. I will continue running a full set of benchmarks with the new GTX 970 and post the results here soon. 2015-03-01: First set of benchmark results with the GTX 970 show much improved stability and performance. I was able to run a comprehensive suite of tests over several hours without a single hiccup. My unit has considerable coil whine so I'll be returning it to upgrade it to a GTX 970 FTW+. Next steps are to run some in-game benchmarks and record some sample videos. I will also continue working on the Arduino fan/power control and will post the final design and code through Fritzing.

-
US$189 AKiTiO Thunder2 PCIe Box (16Gbps-TB2)
ithildin replied to Tech Inferno Fan's topic in Enclosures and Adapters
I guess it will ultimately depend on the wire gauge (see if you can spot the writing on the wire). Your adapter seems to have capacitors built in so some level of power filtering should already be in place. -
US$189 AKiTiO Thunder2 PCIe Box (16Gbps-TB2)
ithildin replied to Tech Inferno Fan's topic in Enclosures and Adapters
It will depend on how the powered riser cable was built. The connector itself can withstand about 11A (122W) but a single wire can top out at 5A (60W) which is not sufficient to meet the 75W PCIe spec + power the TB card and may crash or burn out under load. Some powered risers use two 12V wires so in theory they can carry up to 10A (120W) which should be enough for everything. Does your powered riser cable have a solid capacitor soldered on (like this one)? According to bitcoin mining forums, more recent versions of powered risers have capacitors built in to stabilize power supply and prevent system crashes under sustained load. -
US$189 AKiTiO Thunder2 PCIe Box (16Gbps-TB2)
ithildin replied to Tech Inferno Fan's topic in Enclosures and Adapters
Excellent news on the x4 connector. I would be really great if we could replace the PCIe adapter board entirely, both for warranty concerns and also for powering hungrier GPUs without issues. The concern I have with hooking up a molex to feed more power to the board next to the TB connection is that the tracks might not be spec'd for carrying that much current. My experience with a fried PE4H v1 because of a GTX 470 trying drawing more than 75W makes me a bit wary of trying this. Someone here will probably have a more informed opinion on whether the tracks on this board will be up to spec. With a standard x4 connector very likely in place, the molex connector between boards is the final puzzle to work out a complete PCIe riser replacement. Besides just supplying power it could also be transmitting data, similarly to the "special" header on the ThunderboltEX II card. Can we tell the difference with a multimeter or do we need a different instrument (e.g. oscilloscope)? That's a nice idea, although it would be great if at least one of the female connectors was x4 so it wouldn't protude out of the top of the enclosure when connected to the TB board. I'm considering soldering a female half on a x4 to x4 riser cable but it's going to be tedious work. -
US$189 AKiTiO Thunder2 PCIe Box (16Gbps-TB2)
ithildin replied to Tech Inferno Fan's topic in Enclosures and Adapters
My Akitio Thunder2 arrived on the mail yesterday. I'm looking forward to testing it with my Macbook Air and a couple of GPUs in the next few weeks once my PCIe x16 riser cable arrives. First impressions on the unit is that it's sturdy and well built but relatively accessible for modding. It's larger than I expected but the inner chassis/outer shell design wastes some of that extra room. The outer shell is a thick aluminium case so drilling vent holes will probably require a CNC mill. However, it seems to be a standard extruded aluminium project box painted black (plus a set of feet) so I should be able to replace it with a common project case with similar dimensions.This gives us the option to replace the outer shell with a wider case so long as new front+back plates are designed with matching cutouts for Thunderbolt ports/vent,etc. Length is limited by the inner chassis and fan placement but we could gain some extra room by moving the fan to the space between the outer grill and inner case. It seems like the front grill can be removed and should have enough room there to fit a slimmer fan. On first analysis, the main PCB seems to just act as a x4 to x16 adapter plus routing power for the TB card, front LED and case fan. Like Tech Inferno Fan noted, it looks like power to the TB daughter card is provided by a molex adapter and it might not be possible to feed directly by the PCIe slot (I'll test this first). Even so, one could potentially replace the main board entirely with a x4 female to female adapter (if such a thing exists) + a x4-x16 powered PCIe riser cable and a picoPSU. We would just need to devise a PSU setup with three 4-pin molex (PCIe riser, TB card and LED/fan) + one 6-pin power for the GPU. Removing the main PCB should leave more room to fit a small GPU with cabling and picoPSU plus some outer case modifications to improve air flow. My powered riser cable should arrive tonight so I expect to run a few quick tests with an ATX PSU in the next few days. I'll post some detailed case measurements as well.