nak1017
-
Posts
30 -
Joined
-
Last visited
Content Type
Profiles
Forums
Downloads
Everything posted by nak1017
-
That is the installation guide I used and I can get into windows, but I keep running into an "black screen" error having to do with the video drivers when I try to install the support software. From everything I've read, it's got something to do with the igdkmd64.sys driver for the HD4000, and only happens when I either install the bootcamp driver package (not individually) or the nVidia drivers. If I remove igdkmd64.sys and nvlddmkm.sys from the drivers folder, the system will boot, but it leaves me with little graphics support... I haven;t read anything which describes the nVidia drivers causing a problem so is this something new, or am I just not properly eliminating the HD4000 drivers? I did, and I got win8 to boot, but now I'm just trying to be able to get the drivers straight... What did you do on your computer? Did you have problems installing nVidia drivers?
-
Awesome setup! Looks clean too Sent from my Nexus 5 using Tapatalk
-
Oripash, any changes to your install guide? Can the installation be done without rEFIt/rEFInd? Thanks for making it so complete, how do the new bootcamp drivers work?
-
Does anyone here have a link to an updated guide on how to reinstall win8 with EFI? The only ones I've found have been using rEFIt (Opirash's) or swapping hard drives... Is there a way to do it with just bootcamp?
-
eGPU Case and Controller Project Update (WIP)
nak1017 replied to nak1017's topic in DIY e-GPU Projects
No, that PCIe-PCIe part is the secret sauce in Sonnet's setup and unfortunately quite necessary The second riser hasn't seemed to be a problem so far, though i am having issues with my GTX770 and this new TB2 card so I'll try taking it out and seeing if it works better. -
So I'm seeing people being able to load windows 8.1 with EFI on macbooks now (Yay!), and that it will allow native thunderbolt support in windows... but I'm not seeing any updated guides on how to do reinstall win8.1 to get EFI, and what problems arise... Has anyone done this recently, and can they recommend a tutorial/guide?
-
So I could really use some help here... First, my setup: OS: Window 8.1 in MBR System: 2012 MacBook Pro Retina 15" RAM: 16GB GPU: EVGA GTX770 PSU: Corsair AX860i (that should be plenty huge) Setup: Sonnet Echo SE II I had the setup working with the original thunderbolt card which came with the Sonnet, and then I upgraded to a thunderbolt 2 card during Sonnet's switchover program.Then, no luck... I've tried an old R4550 AMD card and it works, but the nVidia GTX770 doesn't. I don't change the pci.bat or startup.bat between the 2 TB cards. Here's my pci.bat for reference: REM r:/core/compact.exe pciend f8000000 import devcon.txt makebatch R:\config\pci.bat REM created Sun Jan 26 21:59:26 2014 echo off echo Performing PCI allocation for 2012 13" MBPr based off Tech Inferno Fan's findings . . . :: The X16 root port @echo -s 0:1.1 1c.w=6030 20.l=AE90A090 24.l=CDF1AEA1 > setpci.arg :: Underlying Bridges in order from high to low @echo -s 4:0.0 1c.w=5131 20.l=AB00A090 24.l=C9F1B801 >> setpci.arg @echo -s 5:3.0 1c.w=4131 20.l=A700A200 24.l=C5F1B801 >> setpci.arg @echo -s 7:0.0 04.w=7 1c.w=3131 20.l=A300A200 24.l=C1F1B801 28.l=0 30.w=0 3c.b=10 >> setpci.arg @echo -s 8:3.0 04.w=7 1c.w=3131 20.l=A300A200 24.l=C1F1B801 28.l=0 30.w=0 3c.b=10 >> setpci.arg :: The NVidia eGPU @echo -s 9:0.0 04.w=400 0C.b=20 24.w=3F81 10.l=A2000000 14.l=B8000000 1C.l=C0000000 3C.b=10 50.b=1 88.w=140 >> setpci.arg setpci @setpci.arg set pci_written=yes Since the AMD card works, I've effectively troubleshot everything from the card to the computer, and I tested the GTX770 in a desktop and it works, so it's just down to the pci.bat/startup.bat. On nando's advice, I tried changing the root port (see below), but that didn't work either... :: The X16 root port @echo -s 0:1.0 1c.w=6030 20.l=AE90A090 24.l=CDF1AEA1 > setpci.arg Anyone else having issues with nVidia/Sonnet SE II combos? Is there something about nVidia cards I'm missing? What else can I try? Thanks to anyone who can help...
-
I just tested a small fanless r4550 card without a modified riser and it didn't work. I'm thinking it's a pin 8 problem, and that would mean having to add a reset into the circuit. But this might be because I'm running in MBR, and not EFI. Can anyone corroborate this? Would this work with a win8.1 EFI installation?
-
I used an Arduino for my delay; an adafruit Trinket and a 2N3904 transistor on a cheap little breadboard should do nicely... I used an Uno in my project because I had one available, but the Trinket's are cheaper. Here's a link to my setup, enjoy
-
More or less bumping this... Knowing that the AMD card popped up in the eGPU setup, and that the GTX 770 works perfectly fine on another computer, I figure it has to be something with the startup sequence. I'm wondering if it's a pin 8 problem since that was not added to my delay circuit. I'm sortof just stabbing in the dark right now... I'm taking the setup over to a friend's place tomorrow since he has a handful of video cards to try out
-
So I've been poking at this for a few days and now I'm more confused than ever... I got an old AMD 4550 series card to work immediately with my setup and got the GTX770 card which was in the eGPU to work in an old desktop PC, but I can't get the GTX770 to work in eGPU. I didn't change any settings in the startup routine since I got the new thunderbolt 2 card from Sonnet, and the GTX770 card worked fine with the old the thunderbolt 1 card. I've taken my timer setup out of the loop, but no change. Any ideas? What should I be looking for? Sent from my Nexus 5 using Tapatalk
-
Just tried it no avail. Do you think changing the original pci.bat file from 0:1.0 might work? Also is there any diagnostic stuff I can run that might help?
-
I had the chance to upgrade from a TB1 to a TB2 with Sonnet's big swapover program, and since I'll probably be upgrading to a laptop with a TB2 port on it next, it seemed prudent... I'm still using a TB1 cable. Do you think that could be the cause? I know the TB2 setup can atleast see the TB1 port on the laptop as the LEDs light up when I turn the laptop on. Here is the pci.bat I've been using: REM r:/core/compact.exe pciend f8000000 import devcon.txt makebatch R:\config\pci.batREM created Sun Jan 26 21:59:26 2014 echo off echo Performing PCI allocation for 2012 13" MBPr based off Tech Inferno Fan's findings . . . :: The X16 root port @echo -s 0:1.1 1c.w=6030 20.l=AE90A090 24.l=CDF1AEA1 > setpci.arg :: Underlying Bridges in order from high to low @echo -s 4:0.0 1c.w=5131 20.l=AB00A090 24.l=C9F1B801 >> setpci.arg @echo -s 5:3.0 1c.w=4131 20.l=A700A200 24.l=C5F1B801 >> setpci.arg @echo -s 7:0.0 04.w=7 1c.w=3131 20.l=A300A200 24.l=C1F1B801 28.l=0 30.w=0 3c.b=10 >> setpci.arg @echo -s 8:3.0 04.w=7 1c.w=3131 20.l=A300A200 24.l=C1F1B801 28.l=0 30.w=0 3c.b=10 >> setpci.arg :: The NVidia eGPU @echo -s 9:0.0 04.w=400 0C.b=20 24.w=3F81 10.l=A2000000 14.l=B8000000 1C.l=C0000000 3C.b=10 50.b=1 88.w=140 >> setpci.arg setpci @setpci.arg set pci_written=yes It's right out of Strandmatte's guide and worked when I had the original TB1 card. I've run PCI compaction as this is the resulting pci.bat file: REM r:/core/compact.exe pciend f8000000 preserve 0:1a.0 0:1a.1 0:1a.2 0:1a.3 0:1b.0 0:1b.1 0:1d.0 0:1d.1 0:1d.2 0:1d.3 0:1f.1 0:1f.2 0:1f. import devcon.txt makebatch R:\config\pci.batREM created Sat Apr 5 01:17:50 2014 echo Performing PCI write (compact@Sat Apr 5 01:17:50 2014) @echo -s 1:0.0 COMMAND=0 COMMAND=0 COMMAND=0 > setpci.arg @echo -s 1:0.1 COMMAND=0 >> setpci.arg @echo -s 7:0.0 COMMAND=0 COMMAND=0 >> setpci.arg @echo -s 3:0.1 COMMAND=0 >> setpci.arg @echo -s 3:0.0 COMMAND=0 COMMAND=0 >> setpci.arg @echo -s a:0.0 COMMAND=0 >> setpci.arg @echo -s 0:14.0 COMMAND=0 >> setpci.arg @echo -s 0:1b.0 COMMAND=0 >> setpci.arg @echo -s 0:1f.2 COMMAND=0 >> setpci.arg @echo -s 0:1d.0 COMMAND=0 >> setpci.arg @echo -s 0:1a.0 COMMAND=0 >> setpci.arg @echo -s 0:1f.3 COMMAND=0 >> setpci.arg @echo -s 0:16.0 COMMAND=0 >> setpci.arg @echo -s 4:0.0 COMMAND=0 >> setpci.arg @echo -s b:2.0 COMMAND=0 >> setpci.arg @echo -s b:1.0 COMMAND=0 >> setpci.arg @echo -s a:0.0 COMMAND=0 >> setpci.arg @echo -s 9:5.0 COMMAND=0 >> setpci.arg @echo -s 9:4.0 COMMAND=0 >> setpci.arg @echo -s 9:3.0 COMMAND=0 >> setpci.arg @echo -s 8:0.0 COMMAND=0 >> setpci.arg @echo -s 6:5.0 COMMAND=0 >> setpci.arg @echo -s 6:6.0 COMMAND=0 >> setpci.arg @echo -s 6:4.0 COMMAND=0 >> setpci.arg @echo -s 6:3.0 COMMAND=0 >> setpci.arg @echo -s 6:0.0 COMMAND=0 >> setpci.arg @echo -s 5:0.0 COMMAND=0 >> setpci.arg @echo -s 0:1.0 COMMAND=0 >> setpci.arg @echo -s 0:1c.1 COMMAND=0 >> setpci.arg @echo -s 0:1c.0 COMMAND=0 >> setpci.arg @echo -s 0:1.2 COMMAND=0 >> setpci.arg @echo -s 0:1.1 COMMAND=0 >> setpci.arg @echo -s 1:0.0 BASE_ADDRESS_1=d000000c BASE_ADDRESS_2=0 BASE_ADDRESS_3=ce00000c BASE_ADDRESS_4=0 BASE_ADDRESS_0=f7000000 >> setpci.arg @echo -s 1:0.1 BASE_ADDRESS_0=f6ffc000 >> setpci.arg @echo -s 7:0.0 BASE_ADDRESS_0=f6ec0000 BASE_ADDRESS_1=f6ebf000 >> setpci.arg @echo -s 3:0.1 BASE_ADDRESS_0=f6df000c BASE_ADDRESS_1=0 >> setpci.arg @echo -s 3:0.0 BASE_ADDRESS_2=f6de000c BASE_ADDRESS_3=0 BASE_ADDRESS_0=f6dd000c BASE_ADDRESS_1=0 >> setpci.arg @echo -s a:0.0 BASE_ADDRESS_0=f6ce0000 >> setpci.arg @echo -s 0:14.0 BASE_ADDRESS_0=f6fe0004 BASE_ADDRESS_1=0 >> setpci.arg @echo -s 0:1b.0 BASE_ADDRESS_0=f6ff8004 BASE_ADDRESS_1=0 >> setpci.arg @echo -s 0:1f.2 BASE_ADDRESS_5=f6ff7800 >> setpci.arg @echo -s 0:1d.0 BASE_ADDRESS_0=f6ff7400 >> setpci.arg @echo -s 0:1a.0 BASE_ADDRESS_0=f6ff7000 >> setpci.arg @echo -s 0:1f.3 BASE_ADDRESS_0=f6ff6f04 BASE_ADDRESS_1=0 >> setpci.arg @echo -s 0:16.0 BASE_ADDRESS_0=f6ff6ef4 BASE_ADDRESS_1=0 >> setpci.arg @echo -s 4:0.0 BASE_ADDRESS_0=f6bfc004 BASE_ADDRESS_1=0 >> setpci.arg @echo -s 9:3.0 MEMORY_BASE=f6c0 MEMORY_LIMIT=f6c0 >> setpci.arg @echo -s 8:0.0 MEMORY_BASE=f6c0 MEMORY_LIMIT=f6c0 >> setpci.arg @echo -s 6:3.0 MEMORY_BASE=f6c0 MEMORY_LIMIT=f6c0 >> setpci.arg @echo -s 6:0.0 MEMORY_BASE=f6e0 MEMORY_LIMIT=f6e0 >> setpci.arg @echo -s 5:0.0 MEMORY_BASE=f6c0 MEMORY_LIMIT=f6e0 >> setpci.arg @echo -s 0:1.0 MEMORY_BASE=f6f0 MEMORY_LIMIT=f7f0 PREF_MEMORY_BASE=ce01 PREF_BASE_UPPER32=0 PREF_MEMORY_LIMIT=dff1 PREF_LIMIT_UPPER32=0 >> setpci.arg @echo -s 0:1c.1 MEMORY_BASE=f6b0 MEMORY_LIMIT=f6b0 >> setpci.arg @echo -s 0:1c.0 PREF_MEMORY_BASE=f6d1 PREF_BASE_UPPER32=0 PREF_MEMORY_LIMIT=f6d1 PREF_LIMIT_UPPER32=0 >> setpci.arg @echo -s 0:1.1 MEMORY_BASE=f6c0 MEMORY_LIMIT=f6e0 >> setpci.arg @echo -s b:2.0 COMMAND=0 >> setpci.arg @echo -s b:1.0 COMMAND=0 >> setpci.arg @echo -s a:0.0 COMMAND=7 >> setpci.arg @echo -s 9:5.0 COMMAND=0 >> setpci.arg @echo -s 9:4.0 COMMAND=0 >> setpci.arg @echo -s 9:3.0 COMMAND=7 >> setpci.arg @echo -s 8:0.0 COMMAND=7 >> setpci.arg @echo -s 6:5.0 COMMAND=0 >> setpci.arg @echo -s 6:6.0 COMMAND=0 >> setpci.arg @echo -s 6:4.0 COMMAND=0 >> setpci.arg @echo -s 6:3.0 COMMAND=7 >> setpci.arg @echo -s 6:0.0 COMMAND=7 >> setpci.arg @echo -s 5:0.0 COMMAND=7 >> setpci.arg @echo -s 0:1.0 COMMAND=7 >> setpci.arg @echo -s 0:1c.1 COMMAND=7 >> setpci.arg @echo -s 0:1c.0 COMMAND=7 >> setpci.arg @echo -s 0:1.2 COMMAND=0 >> setpci.arg @echo -s 0:1.1 COMMAND=7 >> setpci.arg @echo -s 1:0.0 COMMAND=7 COMMAND=7 COMMAND=7 >> setpci.arg @echo -s 1:0.1 COMMAND=6 >> setpci.arg @echo -s 7:0.0 COMMAND=7 COMMAND=7 >> setpci.arg @echo -s 3:0.1 COMMAND=6 >> setpci.arg @echo -s 3:0.0 COMMAND=6 COMMAND=6 >> setpci.arg @echo -s a:0.0 COMMAND=7 >> setpci.arg @echo -s 0:14.0 COMMAND=6 >> setpci.arg @echo -s 0:1b.0 COMMAND=6 >> setpci.arg @echo -s 0:1f.2 COMMAND=7 >> setpci.arg @echo -s 0:1d.0 COMMAND=6 >> setpci.arg @echo -s 0:1a.0 COMMAND=6 >> setpci.arg @echo -s 0:1f.3 COMMAND=3 >> setpci.arg @echo -s 0:16.0 COMMAND=6 >> setpci.arg @echo -s 4:0.0 COMMAND=6 >> setpci.arg setpci @setpci.arg set pci_written=yes Anything helpful in there? I'm sortof in the dark of the coding part of this (I like the hardware stuff)
-
I thought TB2 was supposed to be backwards compatible? But TB2 devices should be able to be used with an Ivy Bridge laptop... ?
-
Looks like you're using a laptop equipped with TB2 though... maybe that's the problem... How did you do your setup if you don't mind me asking? Did you follow one of Strandmatte's or Shelltoe's (or someone elses) guides?
-
Ok, it's re-broken... I upgraded the internal TB card (TB1->TB2) in the Sonnet Echo SE II and now I don't think my laptop is seeing the Sonnet Card at all. My first thought is that this is a driver issue, and that TB2 doesn't work in Win8.1 yet on a '12 15" rMBP. Does anyone have any experience with something like that? So far I've tried a PCI compaction, but it seems to make my keyboard non-operational so I haven't made it farther than that... I'll post more tomorrow, I need sleep... If anyone can help me with this it would be greatly appreciated
-
eGPU Case and Controller Project Update (WIP)
nak1017 replied to nak1017's topic in DIY e-GPU Projects
I've got a mid'12 rMBP which only has the TB1, but I'm probably going to upgrade this summer to whatever the new Retina (or it's equivalent). I haven't done any true benchmarks, but from a 'butt-dyno' perspective, I definitely sees an improvement when playing Skyrim. It's also nice not having the fans go full blast when gaming on the macbook either... -
eGPU Case and Controller Project Update (WIP)
nak1017 replied to nak1017's topic in DIY e-GPU Projects
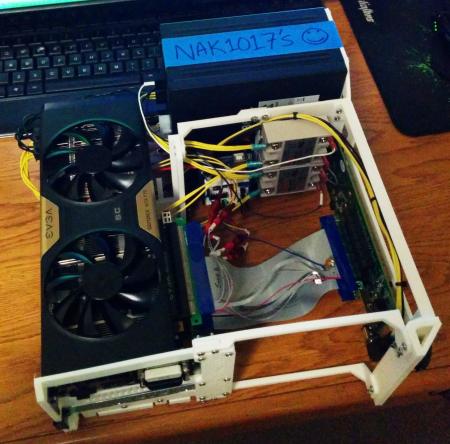
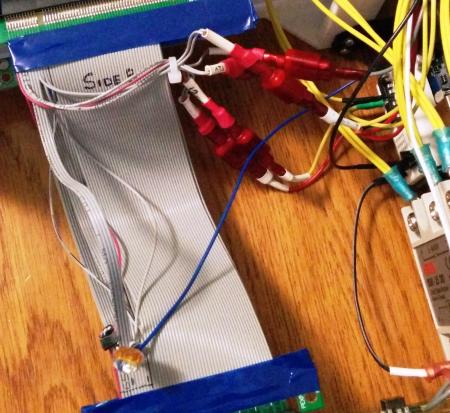
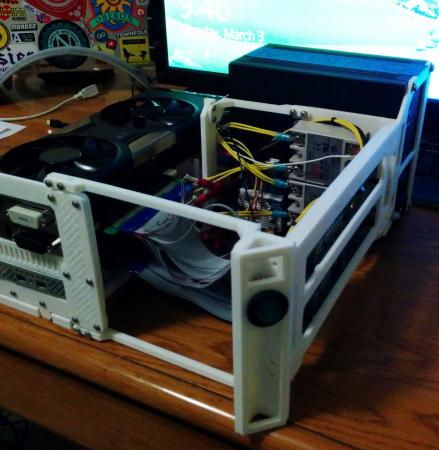
Thanks for the support! Sonnet's Echo Express SE 2 is a 2 piece setup; one card a PCIe to PCIe board, and the other is a good ol' fashion PCIe to TB2 card. I just added a 4x riser between the 2 to keep it a little more neat and orderly in the rig. I'm thinking about taking the whole setup apart next time I make any changes to the case, and making a step-by-step picture guide to the setup. That should should the cards in more detail. -
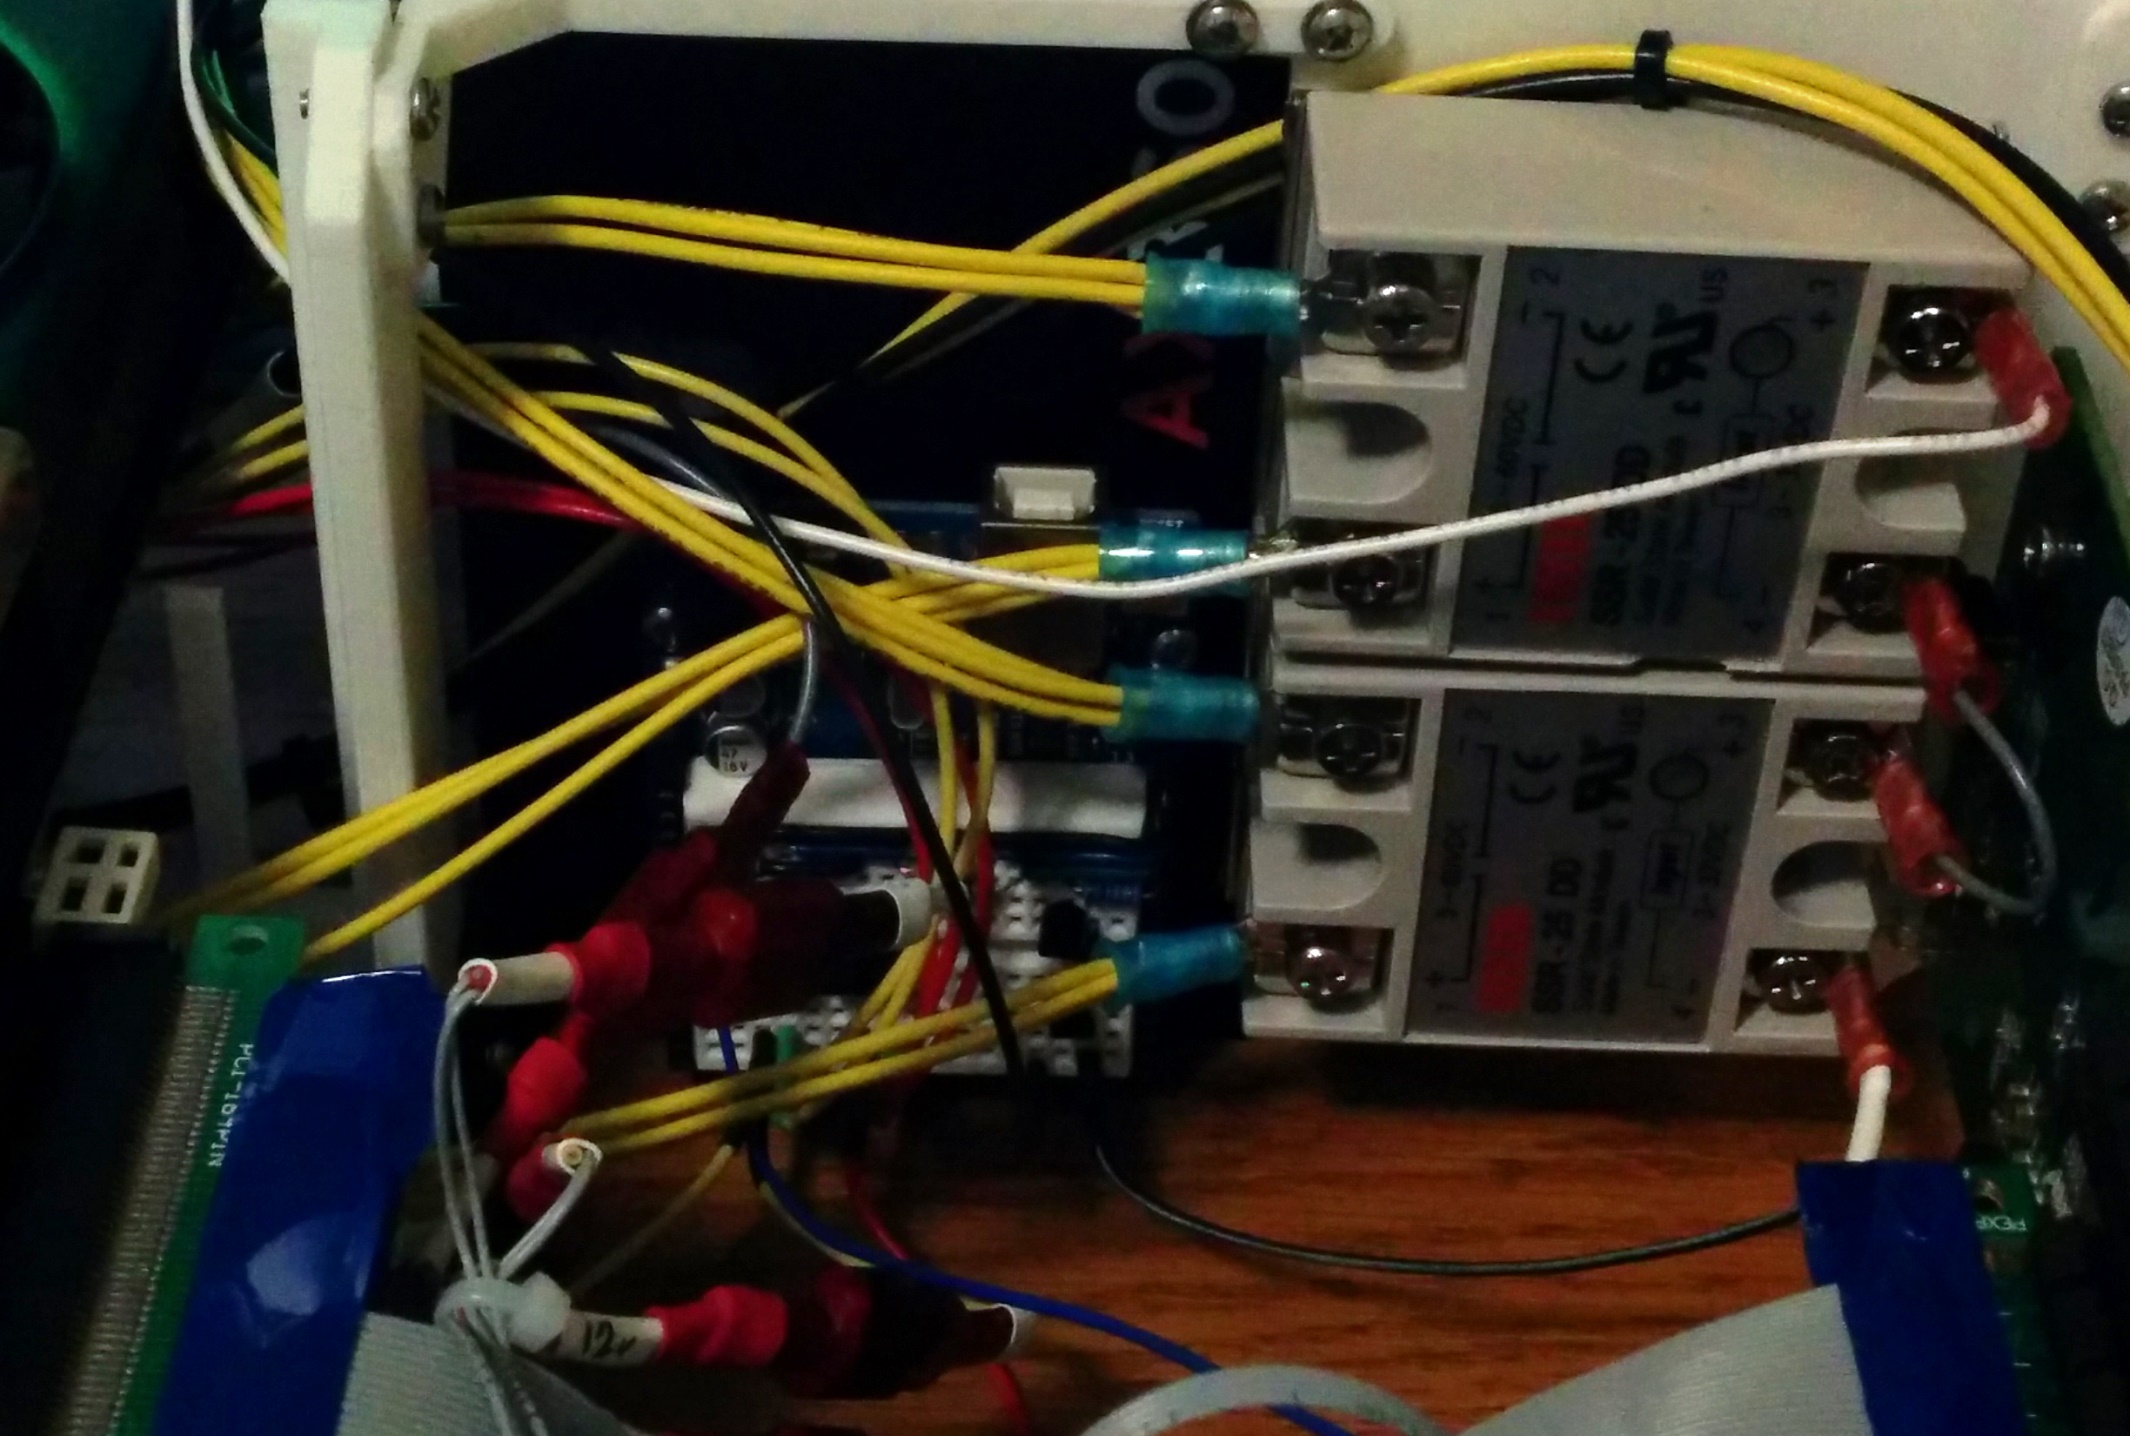
It's been a little while since I posted about this so I thought I'd give some progress, and while I'm still working to finalize everything, I have a pretty decent case built, a rough BOM, and working code. I haven't had time to put the wiring schematic on the computer (it's a mess of sketches in a notebook), but I'll add it as soon as I can.The purpose of this setup was to get everything on one power supply, and eliminate the need to count down to start the power supply once I started my computer. It's probably overkill, but so is an external GPU for that matter...Anyway, here's some pictures: [ATTACH]11135[/ATTACH] [ATTACH]11136[/ATTACH] [ATTACH]11137[/ATTACH] [ATTACH]11138[/ATTACH]I'm using 2 big solid-state relays and 2 small board-mounted solid-state relays to control the power going to the video card. The whole thing is powered by an Arduino Uno which is reading one of the 3.3V lines from the PCIe line to tell it when the computer turns on.The code for the Arduino Uno is as follows: //Last Change - 3/1/14 const int relay1Pin = 10; const int relay2Pin = 11; const int relay3Pin = 12; const int relay4Pin = 2; int onPin = 0; int counter = 0; unsigned long offTimer; void setup(){ pinMode(relay1Pin, OUTPUT); pinMode(relay2Pin, OUTPUT); pinMode(relay3Pin, OUTPUT); pinMode(relay4Pin, OUTPUT); digitalWrite(relay1Pin, LOW); digitalWrite(relay2Pin, LOW); digitalWrite(relay3Pin, LOW); digitalWrite(relay4Pin, LOW);} void loop(){ onPin = analogRead(A0); if (onPin > 410.0){ //Voltage threshold is above 2 volts delay(18000); //Used for ON delay digitalWrite(relay1Pin, HIGH); digitalWrite(relay2Pin, HIGH); digitalWrite(relay3Pin, HIGH); digitalWrite(relay4Pin, HIGH); } //Voltage threshold is below 1 volt if ((onPin < 100.0) && (counter == 0)){ offTimer = millis(); counter = 1; delay (1000); if (onPin > 100.0){ counter = 0; } } //Used for OFF delay if (((millis() - offTimer) > 5000) && (onPin < 100.0)){ digitalWrite(relay1Pin, LOW); digitalWrite(relay2Pin, LOW); digitalWrite(relay3Pin, LOW); digitalWrite(relay4Pin, LOW); } } There's an ON delay of 18 seconds in this code which works for me, but might not work for you. I have the spot in the code where marked where you can change it. If you haven't worked with Arduinos before, the time is in milliseconds so a time of 18000 will equal 18 seconds. I've also got the threshold voltage on the analog pin set to 2 volts, but you shouldn't have to mess with that if you use one of the 3.3V lines coming out of the PCIe slot. There's also an OFF delay which will turn everything off after the thunderbolt link powers down. I've got a 5 second delay in there with a threshold of slightly below 1V, but I have it set to start a count down to turn off which still allows input from the analog pin. This is in case there is any fluctuation in the 3.3V on the PCIe. It might be unnecessary, but I'm playing it safe on that...The Bill of Materials (BOM) is as follows: (I'm sure I forgot something too...) Video Card = Corsair AX860, but basically anything 400+ watts should work fine Thunderbolt Setup = I used a Link; I bought 2 in case I screwed up cutting in the first one :) PCIe 4x to 4x Riser = SMD version allows you stick a small breadboard between the headers and save space Big solid-state relays x2 = These AQV252Gs are DIP mounted and handle the PCIe 12V and 3.3V power 2N3904 Transistors x2 = Link; these little guys fit between the headers of the SMD UNOs 2.5mm Right Angle Plug = Link; for connecting the 18ga 12V cables to the Big SSRs 18-22ga Ring Terminals x4 = Link; used on PCIe cable to connect cut wires; I didn't use them but I should have D-sub Male Crimp Pins = Link; Use with the pins since they're not insulated 4-40 Machine Screws of Various Length = I used these on the case 6-32x0.25" Machine Screws x4 = Used to hold the Power Supply I'm working on converting the case over to 6-32 screws since those are readily available at Home Depot and Lowes, but I've been too busy to make much progress and my 3D printer is in need of an upgrade... I'm also using a modified version of 123D Design by Autodesk so anyone could modify these; the downloadable version seems to work better for me. I've include the gcode files so you can test print some of the parts are decide what changes you need to make for your setup. Currently, the power supply is just attached on one side, and needs to be picked up separately if the case is moved. I'm going to fix that, and some flex in the video card cradle when I next print the case... stay tuned :)Anyway, if anyone has any questions, feel free to ask me.Also, special thanks to MystPhysX and

-
Looks like the Express III might do a little better than 4x PCIe... Here's the SE II for comparison...
-
So just a progress update for anyone reading this... It's still sortof in proof-of-concept phase, but I got the guy working and have a rough case printed out to make the thing look all nice and pretty. Next step is to get some relays or solid-state switches and an arduino, and figure out how to automate the startup procedure. I'll start a new thread once I get a little farther, and include all the code, STL files (for printing) and a nice BOM.

-
So I did get it working, but it's a little inconsistent. There seems to be a sweet spot between hitting the power button on my laptop and switching on the eGPU where it will work. Is that something a reset delay on pin 8 will fix?
-
Ok, I finally got my Echo Express after Sonnet made me wait for the SE II to come out (it still doesn't have TB2 yet too), but after a few days of futzing with it, I'm not getting anything so any help would be appreciated. Here's what I've got so far: OS: Window 8.1 System: 2012 MacBook Pro Retina 15" RAM: 16GB GPU: EVGA GTX770 PSU: Corsair AX860i (that should be plenty huge) Setup: Only using eGPU on external monitor I've gone through Strandmatte's setup guide and Shelltoe's setup guide and followed Strandmatte's instructions since those seemed to be the closer to my setup. I've also used the drivers from LaptopVideo2go.com, par MystPhysx's recommendation since those are supposed to handle the 2 nvidia GPUs. I did not do anything with the INF files that were available on that website however as it did not sound like they were necessary for this. I've followed Strandmatte's startup routine, but the laptop won't boot (stays on gray screen) if the eGPU is pulled in and turned on. I've tried starting the computer, waiting 3 seconds and switching on the eGPU, but everything seems to boot as if the eGPU wasn't attached. I have not changed any setting in the DIY eGPU Setup program itself and installed the two .bat files (startup.bat and pci.bat) par Strandmatte's instructions. The instructions were copy and pasted into the files so as long as that code is OK, there shouldn't be a problem there... I'm not sure I properly dismounted the V: disk image after installing the .bat files, to save the image. Not being much of a software guy, I really didn't know the best way to do that... The only way I could figure on how to do that is to force dismount, which gives me a warning message about unsaved changes being lost. I'm also not getting the V: disk image to mount immediately each time, and had to schedule a task to make sure it loads each time. So here are some basic noob questions I have: 1) What is the best way to dismount the V: disk image? Could that be causing any of these problems? 2) Do I need the V: disk image to mount each time I use the eGPU, or was that just a setup thing? Would have the task scheduler mount the image cause problems? 3) Are the INF files distributed by LaptopVideo2go.com necessary? I used their drivers, but not the INFs... 4) I'm completely in the dark about startup sequence... Do I turn on the eGPU after a few seconds, or wait till Windows is completely up, or something in-between? (how does the reset delay in the BPlus units work, and how is that different?) 5) Is there anything I should do or change inside DIY eGPU Setup? I've run the "2. automated startup via startup.bat" boot-menu during install, and that's it. Would any of the options in there help diagnose or solve this problem? Since I'm basically just a hardware/electronics guy, any help would be appreciated. This software stuff confuses and scares me...
-
What about the 2012 15" model? Sent from my SGH-M919 using Tapatalk
-
Since there is already an nVidia GPU in the rMBPs, are they a better choice for people who will use their laptops with and without the eGPU, since they will share drivers? Sent from my SGH-M919 using Tapatalk