


TitanGod
-
Posts
35 -
Joined
-
Last visited
-
Days Won
1
Content Type
Profiles
Forums
Downloads
Posts posted by TitanGod
-
-
Since you can choose the frequency in the BIOS for the memory, would the laptop be able to support these?
They are not XMP, but they are PnP @ 1866 already.
Would like some feedback

-
 1
1
-
-
Since it is limited to SATA I, putting an SSD in there would be a waste....
SATA I is decent for gaming, it's like using a standard non SSD hard drive. You prob won't even notice the difference.
If you were to game from the SSD with the SSD in the original port, then you would notice the speed increase. You can prob get like 250 MB/s read/write.
-
Ive been thinking of doing the mod, but i am scared of breaking that little white connector that holds the ribbon cable from the optical D: Ive been in there once and added an SSD but for some reason ive developed a phobia lol. has anyone else used that Macbook caddy? if so what are the opinions?
thx in advance
It says Macbook cause majority of 9.5mm caddys are used by macbooks. They just are trying to market the macbook people so they can get it.
The only thing you need to know is that it's slot-load and it;s 9.5mm
It runs good, only concern is that it runs at SATA I speed, which isn't a big deal for me since i'm using a standard 500GB HDD in it . the SSD is in the main SATA slot.
-

Pretty funny if you ask me...
-
2
-
-
It seems that "just maybe" the optical caddy isn't the issue. The M14x was advertised as SATA III capable and I have heard that other M14x owners who have obtained SATA III SSD's cannot even get the M14x to run it at SATA III regardless of the drivers. I know the HM67m is SATA III capable so it's something faulty on Dell end.
Could be a faulty MOBO or some kind of restriction Dell has on the laptop that they haven't enabled for some odd reason.
-
Ok, after running some benchmarks on the secondary hard drive with the optical
Caddy, it seems as it may not be running at it's advertised SATA II speeds. I have the WD black 500 GB 7200 rpm in the caddy and with ATTO it peaked at around 93Mb read/write. I don't know what avg speeds are for a mechanical drive but it doesn't seem normal to me.
I'm gonna try the optical caddy with my SSD and see if gets atleast 200 Mb read/write. If not then the caddy is faulty or is only SATA I capable

-
The Wiz's mod was nice... but it takes a lot to develop a modified bios from a locked one and there hasn't even been word of a second revision.. so it may be awhile before you see anything at all if there even will be.
Thank you for finding out for us! Guess we just gotta keep our hopes up for the best.
-
Going to stick with A01 or now. No need for the bios to control my "battery" settings. I am doing fine on my own.
I'm doing the same. Unless there is a way to modify the bios to give us the other fixes sans the GPU Lock.
-
Mine was just dropped in my mailbox... They didn't require SOD
-
I disabled the laptop from charging in the Bios since i'm going to have it connected for a long period of time...
and it seems to still be charging, but around the rate of 1%-2% a day....
O_O
Nothing major since I do a full charge cycle about once a week to keep the battery in good shape but it's still odd
-
Should I bother with the Beta Nvidia Drivers (275.27) for The Witcher 2?
Is there a noticeable difference from the latest stable drivers they have out now. (270.61)
-
Well .. so much for trying to get this done tonight myself. Thanks to CRAPPY USPS SERVICE that says the item was delivered when it certainly wasn't delivered to my house.. .q234!@#$!@#$!@#$@#$%@#$%#$^
You have got to be kidding me.... They actually delivered it to the wrong house?!?!
-_______________-
-
I just noticed, I started this thread and didn't provide my Steam ID... ><
Steam ID: Stevakis
Don't have many games at the moment, but next week i'm getting everything possible lol
-
I read somewhere that in A03 they completely removed the ability to set the GPU to maximum performance while on battery.
I guess they figured it would be cheaper than providing better batteries or doing some kind of recall.
Regardless I'm happy with the laptop and the way it performs. I honestly only do my gaming anyways while connected to the A/C adapter. Whats the point of gaming on battery if you are just killing the lifespan of the battery and it only lasts less than 1 hour of heavy gaming.
-
I'm gonna try to hit 2K later today

-
1
-
-
New Gameplay Video for Witcher 2 .. It's a gameplay sample only.. but it looks pretty darn good!
This video has convinced me to get the game. Awesome!
-
I don't even think there is an A02...
I have A01 O_O
-
Yea I have been using it for about a week now and have not run into any problems. Just transfered about 200 GB worth of shows and movies I have and everything went through smoothly.
@arklight
After looking online, buying an external enclosure for the 9.5mm drive would cost just as much as buying an external DVD drive.
I have not been able to find any cheap enclosures unfortunately
-
I posted this in NBR but I wanted to share the love here as well. It benefited me a lot since I don't have a need for an optical drive and my SSD is only 80 GB.
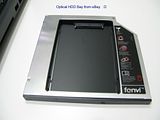
This is the optical bay I bought... SATA Hard Drive Caddy Bay Macbook PRO 13" Unibody A1278 - eBay (item 260760330830 end time May-28-11 02:09:19 PDT)
You do not have to buy the same optical HDD caddy but it does have to be 9.5mm in height. Anything bigger will not fit.
Do this at your own risk. I take no responsibility for any mishaps you encounter along the way.
Before you do this, install your SSD as you would normally, and install windows from the DVD with the optical disc drive still in the M14x. IF NOT THEN YOUR COMPUTER WILL BOOT FROM THE HARD DRIVE YOU HAVE WINDOWS OS ON REGARDLESS WHICH SATA SLOT IT IS IN.
Step 1. Optical Bay I Purchase from eBay
Step 2. Opening the bottom panel
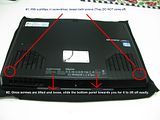
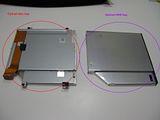
Step 3. This is the DVD optical disc bay that comes in the M14x
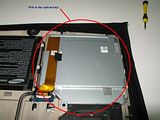
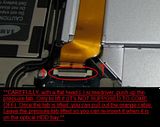
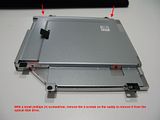
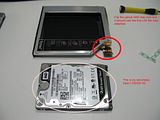
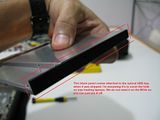
Step 4. Removal of screws. (GO TO STEP 5 BEFORE REMOVING STRIP)
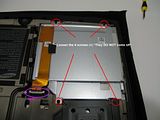
Step 5. Careful removal of the SATA strip
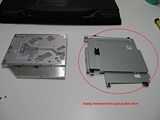
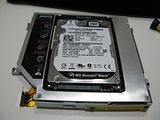
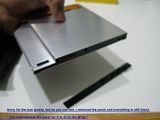
Step 6. Optical disc bay vs Optical HDD bay
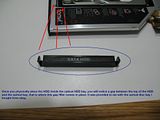
Step 7. How to remove the SATA strip from optical disc bay
Step 8. The SATA strip
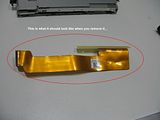
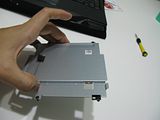
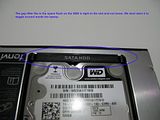
Step 9. Removing the caddy from the optical disc drive
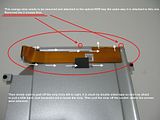
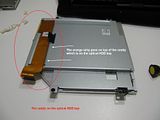
Step 10. Attaching the strip on the optical HDD bay exaclty as it was on the optical disc bay.
Step 11. The optical HDD bay with strip attached.
Step 12. The gap filler provided with the optical bay. It's to fill the space between the HDD and the optical HDD bay.
Step 13. What the gap filler looks like with the HDD in the optical HDD bay
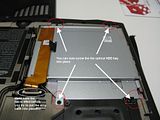
Step 14. Removal of black panel form optical HDD bay. * must be removed for it to fit inside the M14x *
Step 15. Optical HDD bay with black panel removed.
Step 16. Placement of optical HDD bay inside M14x
Step 17. Drivers automatically installed.
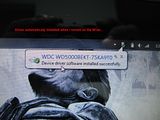
Step 18. Computer detecting secondary hard drive
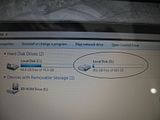
Step 19. HWinfo with the both the SSD the HDD in the info (Sata II 3Gb/s)

I will fix it up and add any additional pictures if needed as time goes on. If you don't like the guide, please don't criticize. This is for the visual people out there who need help and want to enjoy the additional hard drive.
If you have any questions, please feel free to ask
-
18
-
-
If it is indeed the vbios is part of the system bios, we can probably have some luck over at the bios-mods.com forums...
Look what they were able to do for the folks who had the M17x R2
Alienware M17x-R2 A10 BIOS Unlocked OC Options
@svl7 I see you've been there already lol
-
2
-
-
NewmodeUS, Hard Drive Caddys for Notebooks
I will be receiving this in a day or 2. Will let you know how it goes. It worked well with Macbooks.. soo0o00o0o0 we'll see..

Please let us know how it goes, i'm hoping that since I bought the $20 one that it doesn't suck....
If not then I'll just return it and get the $40 dollar one ><
-
I'm supposed to receive my optical caddy this coming Thursday. I'm going to put my WD black 500GB in its place since I have the Intel G2 80 GB in the primary hard drive slot.
I'll keep everyone here posted to see if my M14x produces the same slow results. Hopefully not.
-
This is not just to alienware gamers but also everyone else here!
It would be nice if we can get a list of those willing to share their Steam ID's so we can have days where we can possible game together.
Maybe some BF2, BC2, MW2, Brink, etc etc etc lol
Obviously it would be within in the T|I community. Maybe a mumble channel would be nice too!
If it sounds to cheesy, just forget it lol
Maybe it'll entice more people to want to join in with T|I

-
I just bought mine... this is the one I bought... I will let you guys know how it goes when I receive it and install it.
O_O Why did a smiley face come out in the link lol


**GUIDE** Installing secondary hard drive on your M14x w/pics !!
in Alienware M14x / AW 14
Posted
the max a 9.5mm caddy can support is the 500GB, for a 750 GB or a 1TB you would need the 12.5 mm caddy , which is already to big for the M14x